GrowSpan 113577 User manual

1
Revision date: 12.17.14
©2014 GrowSpan™
All Rights Reserved. Reproduction
is prohibited without permission.
*Actual building may differ from what is shown.
Rainwater Catch Drain
for Film-Covered Greenhouses
and High Tunnels
113577 36' Rainwater Catch Drain for 36' Long Frame
113578 48' Rainwater Catch Drain for 48' Long Frame
113579 60' Rainwater Catch Drain for 60' Long Frame
113580 72' Rainwater Catch Drain for 72' Long Frame
113581 96' Rainwater Catch Drain for 96' Long Frame
NEW CONSTRUCTION
IMPORTANT! READ THESE INSTRUCTIONS BEFORE
YOU BEGIN CONSTRUCTION OF YOUR HIGH
TUNNEL OR GREENHOUSE.
EXISTING GREENHOUSE OR HIGH TUNNEL
FOLLOW THE INSTRUCTIONS IN THIS MANUAL TO
ATTACH THIS RAINWATER CATCH DRAIN SYSTEM
TO YOUR EXISTING BUILDING.

2Revision date: 12.17.14
READ THIS DOCUMENT BEFORE YOU BEGIN
Thank you for purchasing this rainwater catch drain system. When properly assembled and maintained, this system will provide years of reliable service. This
guide includes information needed to safely assemble and maintain the system. Read these instructions before you begin.
Important Information
REQUIRED TOOLS
The following list identifies the main tools needed
to assemble the system. Additional tools and
supports may be needed.
• Tape measure and marker
• Variable speed drill to drive Tek screws
• Transit, string line, or chalk line
• Tool to cut film material
CUSTOMER-SUPPLIED MATERIALS REQUIRED
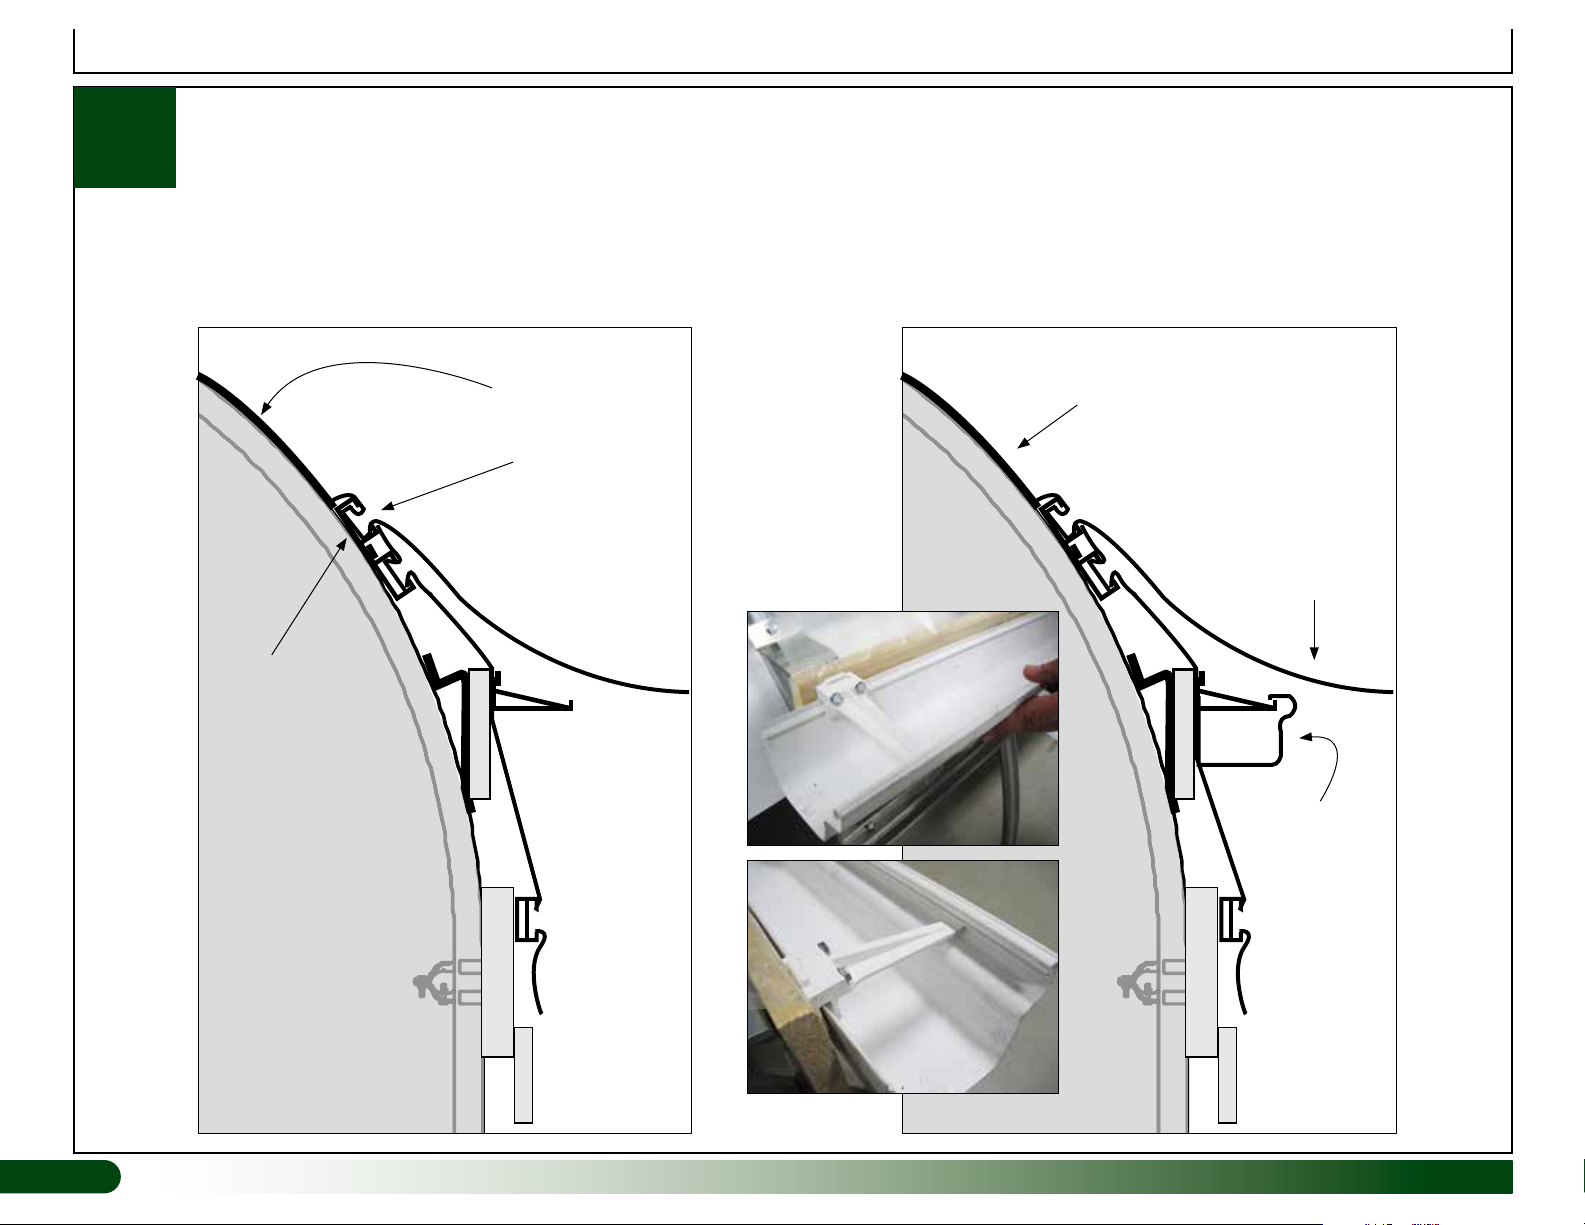
To properly attach the gutters of this rainwater
catch drain system to the frame, a 1" x 4" ribbon
board must first be installed. This board runs the
length of the building.
For systems that use a reservoir to collect water
at the end of the gutter, extend the ribbon board
beyond the building frame to provide a surface
to mount the gutters. See pages 4 & 11 for an
example.
Customer is responsible for supplying the
materials for the ribbon board.
Recommended lumber: Treated 1" x 4" boards
purchased locally.
ASSEMBLY PROCEDURE
This manual describes how to install the
rainwater catch drain system. The steps outlining
the process are as follows:
1. Unpack the contents of the shipment and
place where you can easily inventory the
parts. Refer to the Bill of Materials/Spec
Sheets.
2. Verify that all parts listed on the Bill of
Materials/Spec Sheets are present. If
anything is missing or you have questions,
consult the Pictorial Parts Guide and
all diagrams for clarification, or contact
Customer Service.
3. Read and understand these instructions and
all additional documentation included with
the shipment before you begin.
4. Gather the required tools.
5. For best results, assemble the components
in the order they are presented in these
instructions.
SAFETY PRECAUTIONS
• Wear eye protection.
• Wear gloves when handling system parts.
• Use a portable GFCI (Ground Fault Circuit
Interrupter) when working with electric power
tools and cords.
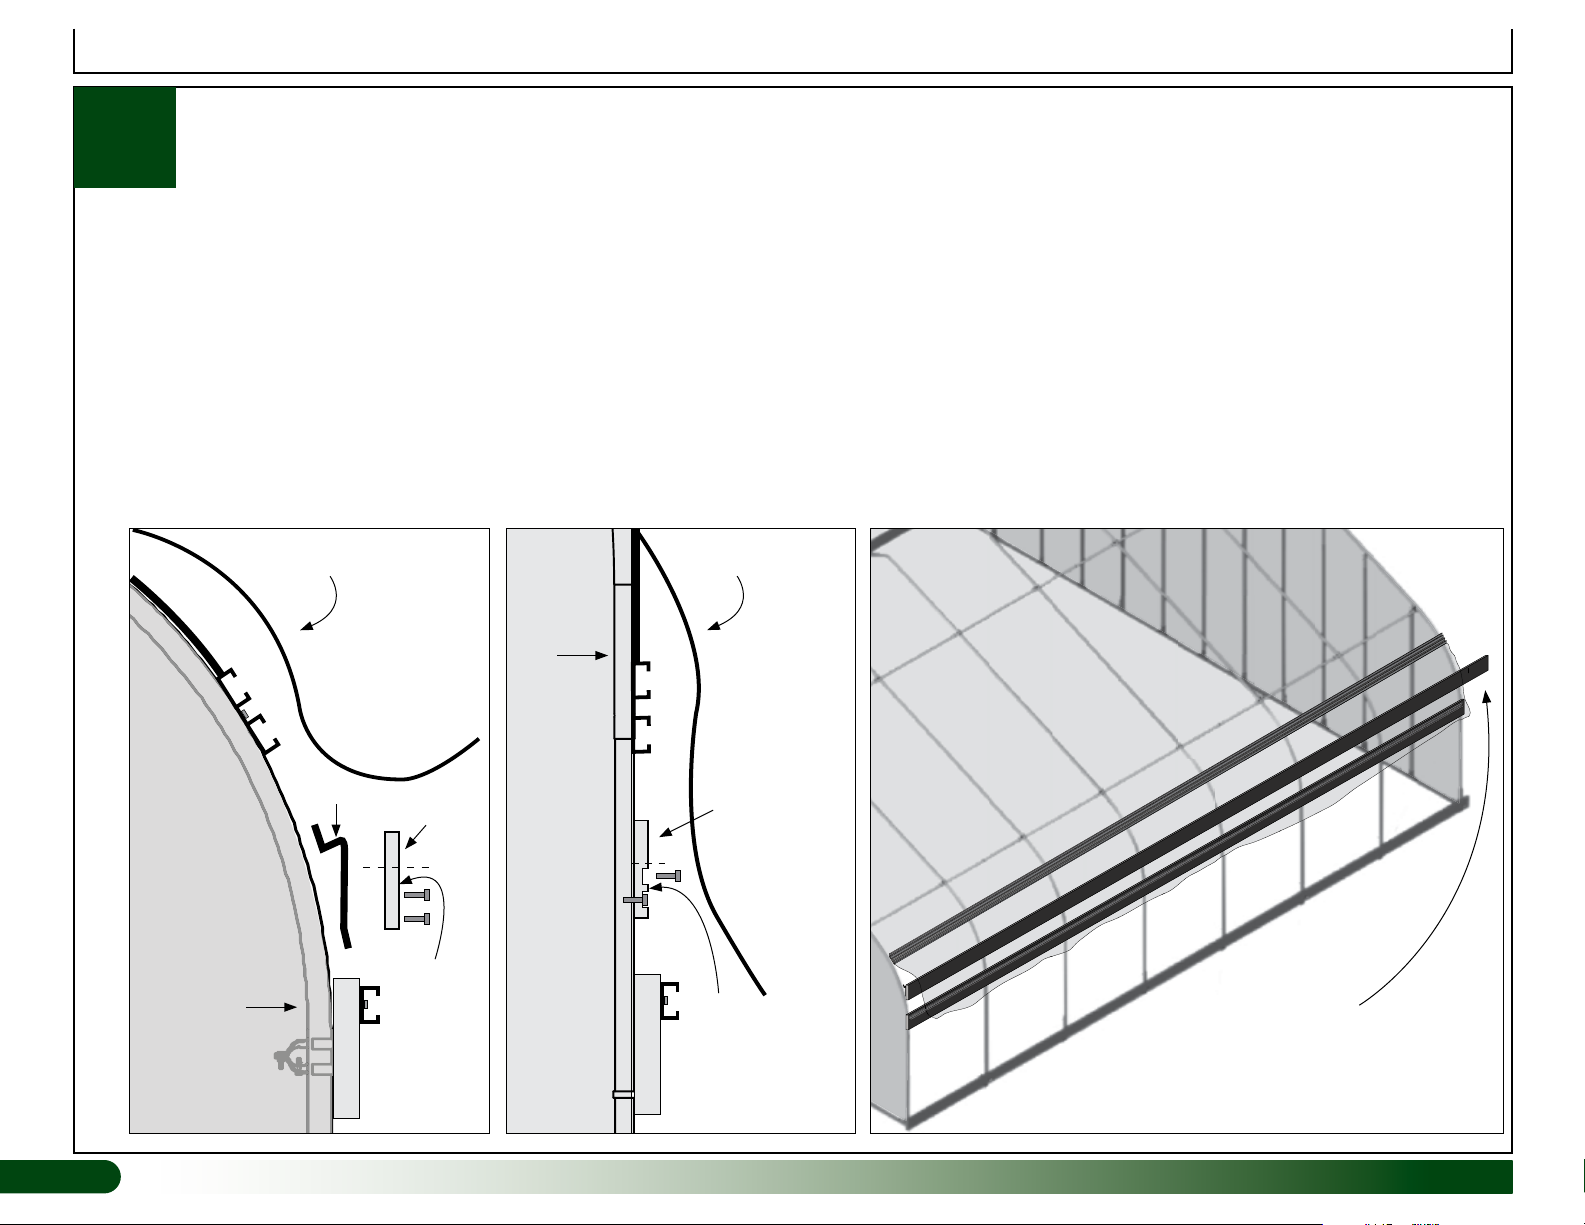
ABOUT THIS RAINWATER CATCH DRAIN KIT
This kit includes the parts needed to attach the system to high tunnels and greenhouses with roll-up or drop-down sides and covered with film or 5.2 oz
material. It is not designed for use on any building with polycarbonate sides or roof coverings. Consult with your sales representative if the cladding for your
building is something other than film or 5.2 oz material.
New Building: If you have purchased this kit to install on a building that has not been constructed, read this guide and the instructions included with the
building to determine the best way to proceed. In most cases, it is best to first assemble the building frame and then to install this kit before you install the roof
covering. Additionally, install any roll-up or drop-down side components after installing the components in this rainwater catch drain kit.
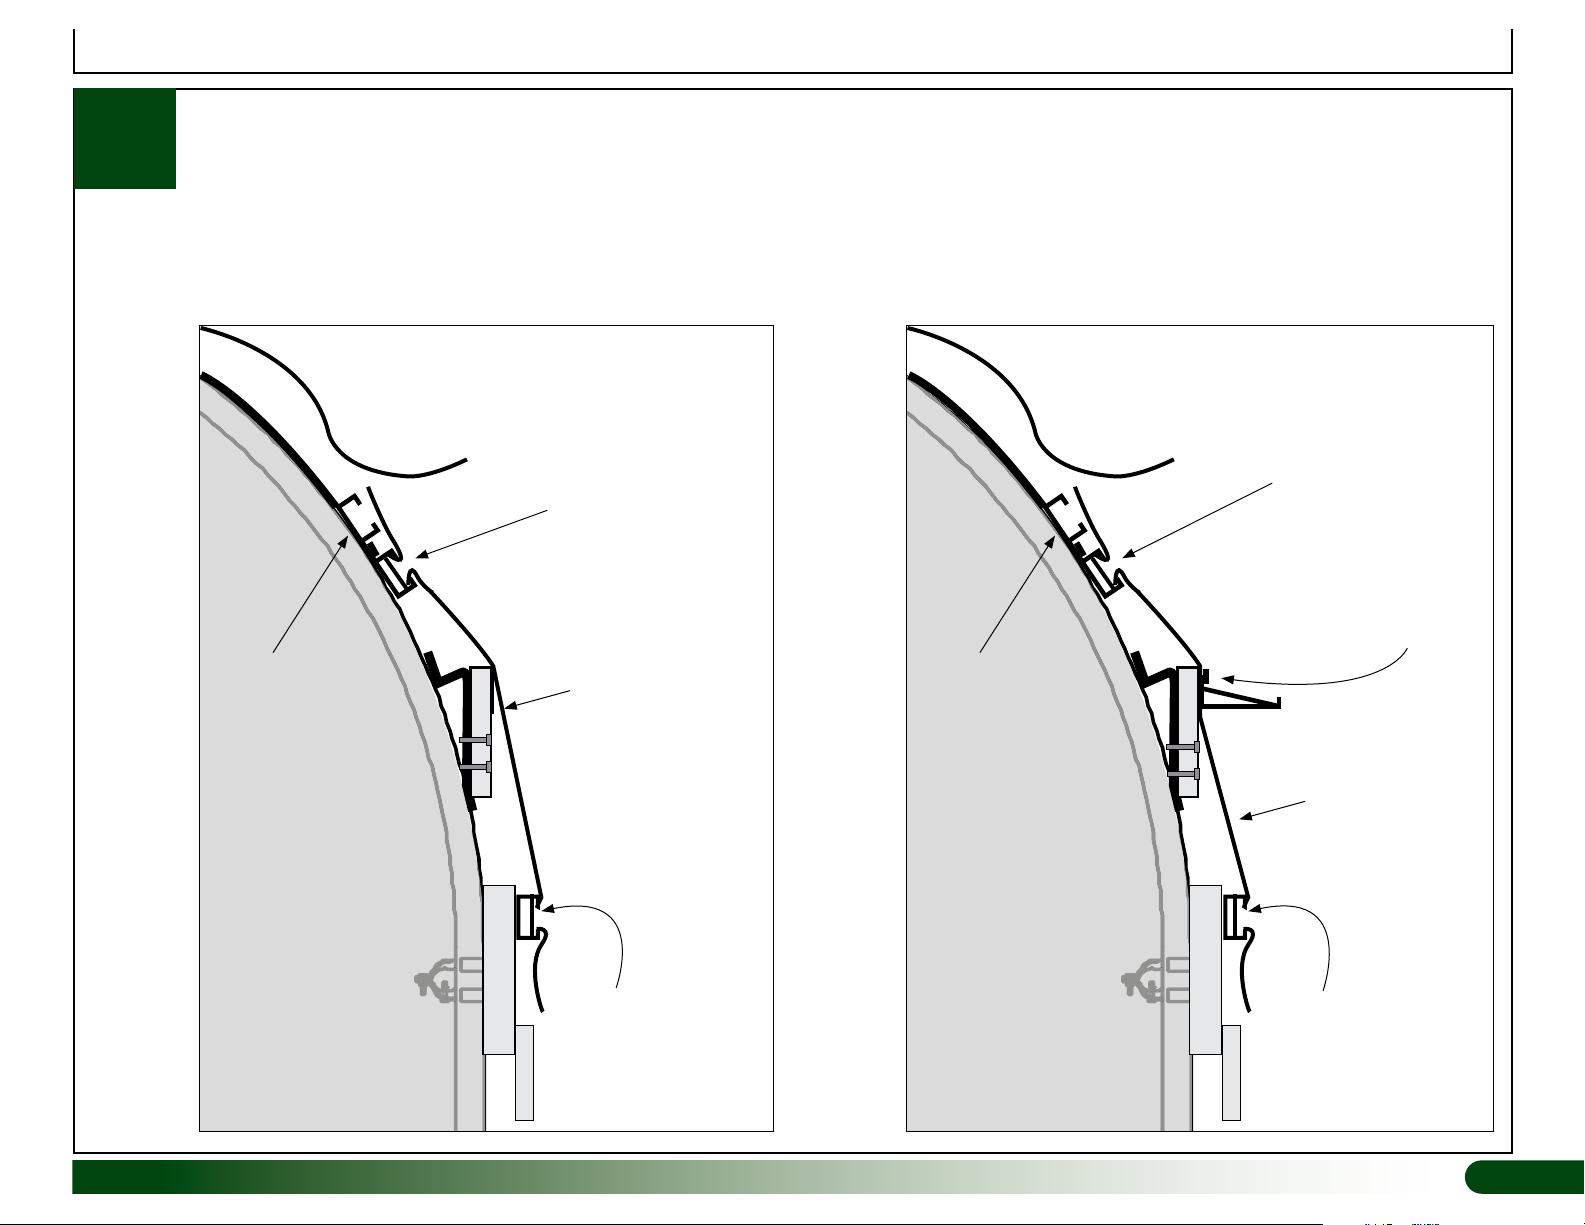
Existing Building: To install this system on an existing building with a film or 5.2 oz cover, it will be necessary to partially loosen the lower edge of the roof
covering. Do not attempt to install this system on windy days or when such conditions are expected. Doing so may cause extensive damage to the
roof film, building, and building contents and may cause personal injury.

3
Revision date: 12.17.14
PICTORIAL GUIDE
The following graphics and photos will help identify the different parts of the
system. (Some parts are not shown.)
FA4652
Wood Screw
FA4482B
1" Tek Screw
FA4484B
1-1/2" Tek Screw
100441 & 100443
Driver
Important Information
*WF1576
*112711
113622 113625 113626
113627
111613Z144 102198
*Items are used with the supplied 2" and 3" pvc to direct water from the gutters to
a holding tank or other storage container. These components are used for water
storage and gutter downspout. Contact your sales representative for additional
information and to purchase a tank for your rainwater catch drain system.
BASIC INSTALLATION STEPS
Sample buildings are shown in the diagrams. Actual building may differ.
ATTENTION: Field adjustments to these steps may be required during
installation. If you are not familiar with the assembly and installation of
greenhouse and high tunnel buildings that include a film or fabric roof cover,
consult with a knowledgeable contract before you begin.
These are the basic installation steps:
1. Attach the 111613Z144 to the building above the ribbon boards for the
building drop-down or roll-up sides.
2. Determine the required slope of the gutter system and mark the bracket
and/or customer-supplied ribbon board position on the building frame.
NOTE: Install the 113074 brackets when the curve of the rafter is too
great to allow for the installation of customer-supplied 1" x 4" boards.
Brackets help to plumb the boards and gutter brackets when installed.
3. Attach 113074 brackets to the rafters and customer-supplied 1" x 4"
boards to the 113074 brackets. If brackets are not needed, attach the
customer-supplied boards directly to the rafters.
4. Secure the 2' wide section of film to the 111613Z144 and to the
u-channel attached to the building using the 102198 spring wire.
5. Attach the 113623 gutter brackets to the 1" x 4" boards (Step 2).
6. Secure main cover film in u-channel using the 102198 spring wire.
7. Snap the 10' gutter sections onto the 113623 gutter brackets. Secure
each gutter splice using 113624 gutter connector and 113628 sealant.
8. Install the 113627 drop outlet and the left (113625) and right (113626)
gutter end caps. Seal using the 113628 sealant.
9. If a reservoir was purchased, use the 2" and 3" pvc components
included with this kit to direct water to the reservoir. Additional parts
may be needed for custom water collection systems. Contact your sales
representative to purchase additional pvc components.
10. Place the free end of the cover film inside the gutter. Cut as needed to
allow film to fit around the vinyl gutter brackets and into the gutter.
11. Make 1" vertical cuts in cover and thread the fiberglass rods through
these to secure the cover material in the gutter.

4Revision date: 12.17.14
Rainwater Catch Drain System
When installed, the rainwater catch drain system runs along each side of the building from end-to-end. A reservoir (additional purchase required) is typically
installed at the drain end of the gutter to store water. Gutter slopes throughout its length to ensure proper drainage.
111613Z144
Reservoir
(additional purchase)
Gutter with 3"
PVC Downspout
*Actual building may differ. Side panel is not shown.
Ribbon board installed with the
building for the roll-up or drop-down
side panel options.

5
Revision date: 12.17.14
Not to
exceed
16".
Building
Cover
*2' Wide Film
*Included with rainwater
catch drain kit.
**Supplied by customer.
*113074 Bracket
Secure to rafter using
*FA4482B Tek Screws.
*111613Z144
Secure to rafter using *FA4482B
Tek screws.
*113623
Gutter Bracket
**1" x 4" Ribbon Board
Secure board to 113074
bracket using *FA4484B
Tek screws. Countersink
screws for best results.
Ribbon board and u-channel for
drop-down or roll-up side panel.
See main building instructions if
applicable.
Free end of
cover film
anchored inside
installed gutter.
113622
Gutter
Single u-channel attached to each
end rafter. Included with building.
Exploded end view showing a sample building and the rainwater catch drain kit components. Installed rainwater catch drain kit with gutter attached.
Rainwater Catch Drain System

6
6Revision date: 12.17.14
Complete these steps:
1. If main cover film is installed, remove the spring wire that secures
the cover in the u-channel until the lower edge of the cover is
loose. Also, remove the cover from the end rafter u-channel to
allow for the installation of the 111613Z144.
NOTE: Dashed line identifies the u-channel that must be
removed to allow for the installation of the rainwater catch drain
components. For a new construction, first install the ribbon board
as instructed in the building instruction manual and then install
the 111613Z144 as noted in these diagrams.
1RAINWATER CATCH DRAIN INSTALLATION
Assembly Instructions
Diagram shows
the 111613Z144
installed.
111613Z144
Not to
exceed
16".
Not to
exceed
16".
Building Cover
*Included with rainwater
catch drain kit.
**Supplied by customer.
*111613Z144
Secure to rafter using
*FA4482B Tek screws.
**Ribbon board and
u-channel for drop-down
or roll-up side panel. See
main building instructions
to install.
Single u-channel is
shown. Depending on
building design, double
u-channel may also be in
this position to secure roof
material and roll-up side.
U-channel attached
to end rafters. Cut
to allow for the
installation of the kit
components.
2. Using the diagram,
determine where
to install the
111613Z144 that
runs the length of
the building frame
along the side.
3. Mark height at both
ends ensuring that
the 111613Z144 will
be level along the
side. Use a string
line or chalk line to
mark each rafter.
4. Attach the
111613Z144 to
building rafters
using FA4482B Tek
screws included
with the kit. Install
one screw every
48" on-center to
secure.
ATTENTION: Building design must include a roll-up or drop-down side. If your
building does not include either of these, contact customer service to purchase
additional u-channel and spring wire. Do not continue with the installation of this
kit without consulting with customer service.

7
Revision date: 12.17.14
Assembly Instructions
1CALCULATING GUTTER SLOPE
A slope of 1/4" (.25") per 10' run of gutter is recommended to ensure proper
drainage. To calculate the slope of the gutter for your building, take the building
length and multiply it by .025. Example below shows calculating the gutter slope for
a 20' building.
Building Length: 20'
Required Slope: .25" per 10'
20' (length) x .025 (multiplier) = .5" (Recommended slope is 1/2".)
5. Determine the gutter slope using the example to the right.
6. On the first end rafter, mark the height of gutter to indicate the high end.
Gutter position is between the ribbon board for the drop-down or roll-up
side of the building and the 111613Z144. (See diagrams on previous
page.) For best results, mount the gutter 3"-4" above the ribbon board
for the drop-down and roll-up sides.
7. Move to the low end and mark end rafter to set the required slope. Snap
a chalk line, or mark each rafter using a string line stretched end-to-end.
Use these to install the 113074 gutter brackets (if used) or the customer-
supplied 1" x 4" ribbon boards if the 113074 brackets are not used.
111613Z114
Ribbon board installed
with the main building.
Used for roll-up and
drop-down sides.
Step 6: Mark
gutter position
(high end).
Step 7: Mark gutter
position (low end). Mark
is X number of inches
lower than high end
as determined by the
required slope for the
length of the building.
Dashed line identifies slope
of gutter marked on each
rafter. Use marks to install
113074 brackets (if used) or
gutter ribbon board.
Slope
20'
RAINWATER CATCH DRAIN INSTALLATION (continued)

8
8Revision date: 12.17.14
1
8. If using the 113074 brackets to plumb the gutter on frame, align brackets with slope lines on each rafter (previous page). Attach brackets every 48" using
two (2) FA4482B Tek screws for each. Next, attach customer-supplied 1" x 4" ribbon board to each 113074 bracket using two (2) FA4484B Tek screws.
Countersink Tek screws in ribbon board for best results. To prevent conflicts with gutter bracket installation, install screws so they are 1-1/2" below the top
of ribbon board. Ribbon board runs along building end-to-end. Extend ribbon board past end rafter at drain end to allow for gutter install beyond frame.
Sample Frame with 113074 Bracket:
Attach ribbon board to the bracket.
Sample Frame without 113074 Bracket:
Attach ribbon board directly to rafter.
If rafters are straight where the gutter will be installed, 113074 brackets are typically not used. Attach customer-supplied 1" x 4" ribbon board to rafters
using FA4484B Tek screws. Countersink heads of screws below board surface for best results. Install screws so they are 1-1/2" below top of ribbon board
to prevent interfering with the vinyl gutter bracket installation.
Align ribbon board with slope lines to set required gutter slope from end-to-end.
Assembly Instructions
Rafter
113074
Customer-
Supplied
Ribbon
Board
No
screws
here.
Building Cover
30'-0"
CONCRETE PIER
GROUND LEVEL
CONCRETE PIER
12"12"
No
screws
here.
Building Cover
Rafter
Customer-
Supplied
Ribbon
Board
Customer-supplied ribbon board for gutter
extends past frame to allow for installation
of drop outlet and downspout.
Attach brackets and gutter to ribbon board.
RAINWATER CATCH DRAIN INSTALLATION (continued)

9
Revision date: 12.17.14
1
Assembly Instructions
9. After attaching the ribbon board, secure the 2' section of film (sent with the kit) between the 111613Z144 and the u-channel attach to the side of the
building used for the main cover and/or roll-up sides. Use the 102198 spring wire sent with the kit for both connections. Install the 2' film and spring wire
over the roll-up side panel if panel is installed. U-channel supplied with the building may be single or double. Single is shown below.
10. With the film installed, attach the vinyl gutter brackets (113623) over the film and to the ribbon board using the FA4652 wood screws.
Building Cover
*Secure 2'
film in channel
using *102198
spring wire.
*Secure 2' wide film
in building u-channel
using 102198 spring
wire from kit.
*2' wide film
Secure
building cover
in this channel
using 102198
spring wire.
*Secure 2' wide film
in building u-channel
using 102198 spring
wire from kit.
Building Cover
*Secure 2'
film in channel
using *102198
spring wire.
*2' Wide
Film
*113623 bracket to
board using *FA4652
wood screws. Remove
washers from screws if
needed.
Secure
building cover
in this channel
using 102198
spring wire.
*Included with
rainwater catch
drain kit.
RAINWATER CATCH DRAIN INSTALLATION (continued)
*Included with
rainwater catch
drain kit.

10
10 Revision date: 12.17.14
1
Assembly Instructions
11. Next, secure the main roof cover material to the upper channel of the installed 111613Z144. Do not trim the excess roof material. The free edge of the
cover will be anchored inside the gutter in Procedure 2.
12. Beginning at the high end of the gutter, slide or snap the 113622 gutter sections onto the gutter brackets. Position high end flush with the outer edge of the
building rafter. Use the 113624 connectors to join each 10' section and glue each connection using the 113628 cement.
Secure
building cover
in this channel
using 102198
spring wire.
Secure cover
in u-channel
using 102198
spring wire.
Free end of cover
is placed inside
the gutter once
gutter is fully
installed.
113622
Gutter
Single u-channel attached to each end
rafter. Included with the building.
RAINWATER CATCH DRAIN INSTALLATION (continued)

11
Revision date: 12.17.14
1
Assembly Instructions
13. At the drain end of the gutter, determine how you want to end the gutter run and where you want to install the 113627 drop outlet. Consider the amount of
gutter that remains and where you want the reservoir (additional purchase required) to sit. Install the drop outlet in the desired position and seal with the
113628 cement. Install the end cap and glue in place using the 113628 cement.
14. Return to the high end of the gutter and install that end cap. Glue in place.
15. Continue by securing the roof material in the gutter.
*Actual building frame may differ from the
example shown.
Extend ribbon board past
frame to allow room for tank.
Additional purchase required.
Use the 3" pvc (not shown)
included with the kit as a
downspout if needed.
Additional purchase required for reservoir.
RAINWATER CATCH DRAIN INSTALLATION (continued)

12
12 Revision date: 12.17.14
2
Assembly Instructions
SECURE END OF MAIN COVER IN GUTTER
After attaching the gutter components to the building, place the free edge of the building roof cover material inside the gutter and complete the steps that follow.
4
3
1. Pull lower edge of building cover down
and press into the gutter.
4. Remove excess material so cover can
press easily into the gutter and around
gutter bracket.
2. Use a utility knife or similar tool to make
a cut at the first gutter bracket. Cut to the
edge of the cover.
5. Repeat the steps to cut the cover at each
gutter bracket. When complete, press
cover down and into the gutter.
3. Next, cut cover to allow the material to
form around and under gutter bracket.
6. Beginning at 2" in from one end of the
cover, mark a 1" vertical line on the cover
material. Continue marking the cover
throughout its length in 12" intervals. Cut
on each side of each gutter bracket. See
circle in photo above.
6
1
Main Cover
2
Gutter bracket
under cover.
5

13
Revision date: 12.17.14
7. Make a 1" cut through cover at each mark
using a utility knife or similar cutting tool.
10. Verify that the stake passes under each
gutter bracket. When installed correctly,
the stake will anchor cover in the gutter.
8. Take one 109108 fiberglass stake and,
beginning at one end, thread the stake
through the slits in the cover.
11. Make additional cuts as needed when
adding stakes or custom-fitting the stakes
in the channel.
12. Verify that all edges around the gutter
brackets are secured with the stake.
9. Continue threading the stake through each
cut as shown.
7
11
2
Assembly Instructions
SECURE END OF MAIN COVER IN GUTTER (continued)
8 9
10
This manual suits for next models
4
Table of contents
Other GrowSpan Lawn And Garden Equipment manuals

GrowSpan
GrowSpan 105158F User manual

GrowSpan
GrowSpan Gothic Premium H Series User manual

GrowSpan
GrowSpan Gothic Pro Series User manual

GrowSpan
GrowSpan 106202 User manual

GrowSpan
GrowSpan 115021 User manual

GrowSpan
GrowSpan 105163F User manual

GrowSpan
GrowSpan 105169F User manual

GrowSpan
GrowSpan 108207 User manual

GrowSpan
GrowSpan Gothic Pro 106314R User manual

GrowSpan
GrowSpan Estate Elite 104609 User manual