manuals.online logo
Brands
  1. Home
  2. •
  3. Brands
  4. •
  5. GSMK
  6. •
  7. Cell Phone
  8. •
  9. GSMK Cryptophone 450 User manual

GSMK Cryptophone 450 User manual

A passphrase of at least 16 characters is
recommended, consisting of a mix of
letters, numbers and special characters.
For instance, use the initial letters from
the words of a poem or song text you
remember well and replace some of the
letters by numbers.
Switching between CryptoPhone
Screen and Home Screen / Windows
You can always quickly toggle between
the main CryptoPhone Screen and the
phone's Home Screen by pressing the
button on the left side of the device,
below the microUSB port.
To display the Windows Mobile Start
menu for configuration etc., tap the
Windows icon in the lower left corner of
the Home Screen.
Check your CryptoPhone Number
Your personal
CryptoPhone number
can be found at
Settings
About.
Write it down, so you can give it to your
contacts. This number does not change,
no matter what SIM card you put into
the phone, even if you use a WLAN.
Enable Data Connection
Please note that the CryptoPhone 450
will establish a data connection to stay
online (so that you can be contacted)
and will transmit more data when you
make or receive a call.
Normal data usage is 2-5 Megabyte per
24 hours in standby mode to keep the
CryptoPhone connected.
Using the CP450 over the mobile phone
network (3G, EDGE or GPRS) without an
affordable data plan can result in high
charges. When you are roaming on a
foreign network, even higher charges
may occur. To avoid those costs it is
strongly recommend to use contracts
with data flat rates. When abroad,
please obtain a local prepaid contract
with a reasonable data plan from the
country you are traveling to.
To enable / disable the data connection,
go to Windows Settings Wireless
Manager Menu to Connect /
Disconnect Cellular Data connection.
If your network provider configuration
(APN settings) is not selected
automatically, you need to configure it
manually. Go to Windows Settings
Connection Folder Connections
Add new modem. Choose "Cellular
Line (GPRS)" as the line type and then
enter the network parameters (APN,
username, password) as required.
Please consult with your network
operator what the correct values for
these parameters are. In case of
difficulties, set the phone to 'No Added
Security' or 'Medium Security' mode
(see and ) and work with your
operator until you can use the web
browser to access the internet. When
you can access the internet from your
web browser, CryptoPhone IP will also
be able to establish connections. If there
is no working internet connection,
CryptoPhone IP calls will not work.
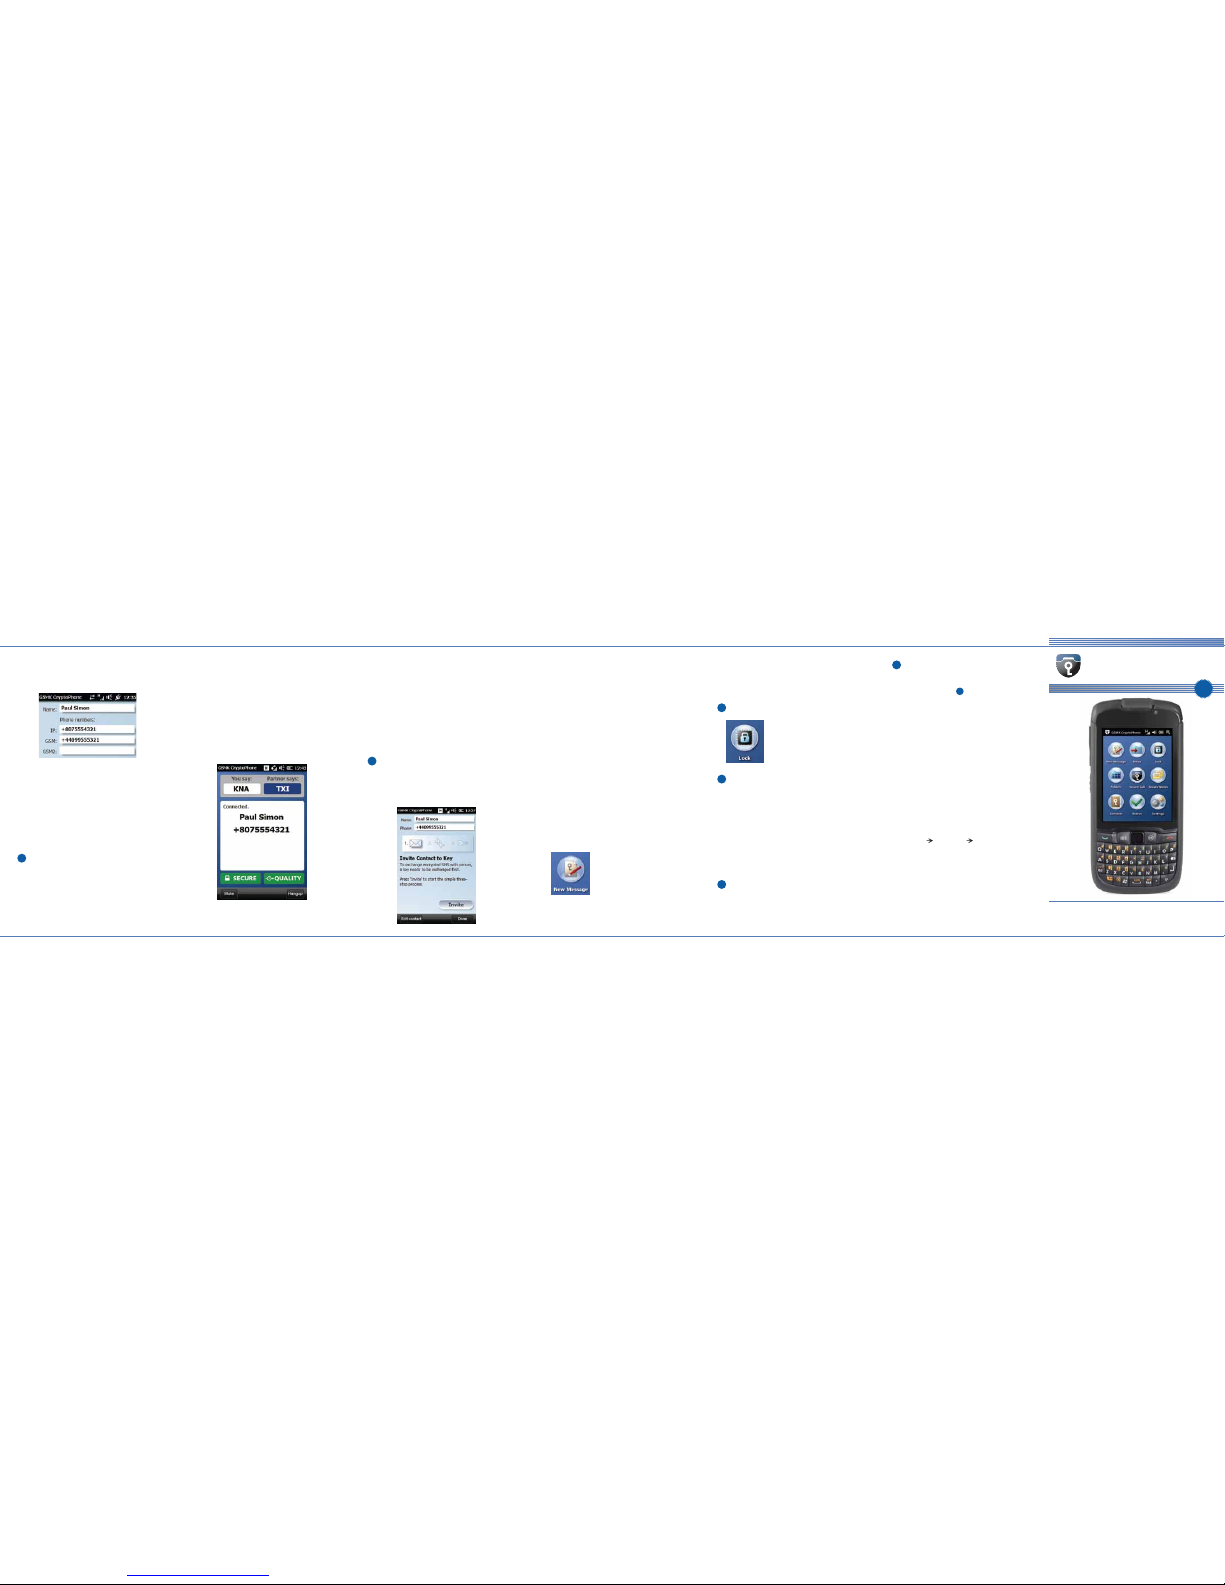
Connect to Secure Network
To connect your
CryptoPhone to
the secure network,
tap the 'Status' icon
on the main screen.
The 'Status' icon will show an animation
while the phone tries to connect.
If your CryptoPhone is connected to the
secure network, the icon will show a
green checkmark.
Note: Sometimes when switching
between mobile network and WLAN,
the CryptoPhone application may not
notice the change immediately.
It may be required to switch the phone
off and back on again after a network
change.
Storing Contacts
Each contact stored in the Secure
Storage area consists of one
CryptoPhone number and up to two
GSM numbers.
The first entry is the CryptoPhone IP
Number, which always starts with +807.
This number can be used to initiate
secure voice calls. It always stays the
same, even if your partner uses a
different SIM Card or is online via WLAN.
CryptoPhone Numbers can not be used
to send secure SMS messages. The GSM
numbers are used for sending secure
SMS. They are the normal mobile phone
numbers of your contact.
Use the secondary GSM number to keep
track of your contact's local prepaid
number while he is traveling abroad, etc.
To add a new contact,
tap the 'Contacts'
button, then select
'New Contact' from
the menu. ...
7
The system's Security Level controls the
balance between convenience and
security. Read the descriptions of each
level and then choose the level most
appropriate for you. The recommended
Security Level is High.
While you can always select another
Security Level by cold booting later
(see ), doing so will erase all data
stored on the phone.
Set Passphrase for Secure Storage
The Secure Storage contains your
encrypted SMS messages and your
secure contacts. After booting up, the
phone will ask you to set the passphrase
for the Secure Storage.
The strength of protection of the Secure
Storage depends entirely on how
difficult to guess your passphrase is.
Select Security Level
The first step to configure your
CryptoPhone after startup is to use the
'Security Profile Selector' tool to select
the operating system's Security Level.
The operating system of your
CryptoPhone has been hardened against
a number of known attacks.
To further reduce the likelihood of new
and unknown attacks, the higher
Security Levels disable more applications
and services.
1
2
3
4
5
6
13
113
Quick Start Guide
www.cryptophone.de
IP
GSMK CryptoPhone 450
To initiate the key exchange go to
'Contacts', highlight the name of your
contact and select "Manage Keys" from
the menu.
You can now initiate the key exchange
by pressing the Invite button.
For each key exchange, five SMS
messages will be sent and received,
containing the public key material.
After key exchange is completed, you
will be asked to verify the new SMS key
by either a phone call or other means.
The six letters of the cryptographic
fingerprint of your key are shown on
the display. Read out the three letters
that are shown under "You say" and
verify that the letters your partner reads
out are the same as shown under
"Partner says".
You can now
exchange encrypted
SMS messages with your
partner using the
'New Message' icon.
The SMS key is kept in the Secure
Storage and is used to generate session
keys for your future encrypted SMS
exchanges with this partner.
It can be renewed from the "Manage
Keys" menu.
Lock the Secure Storage
To lock the Secure
Storage, tap the
'Lock' icon.
Emergency Erase
In case a capture of your phone by
unfriendly elements is imminent, you
can use the 'emergency erase' function.
It overwrites all key material and
subsequently the rest of the flash
memory of the phone.
You can access this function from the
'Lock' screen. Note that an emergency
erase will take several minutes.
Reset
To reset your CryptoPhone, remove the
battery, re-insert it and switch the
phone on again.
Cold Boot
If you want to switch to a different
Security Level (see ) or reset your
phone to factory state, so that a new
empty Secure Storage is created, you
need to cold boot your phone.
Please note that all data stored on the
phone will no longer be available.
The data is not securely overwritten in
memory, as it would be in case of using
the Emergency Erase function, and can
possibly be reconstructed by forensic
methods.
Data stored encrypted in the Secure
Storage area continues to remain as
secure as your passphrase.
To cold boot your phone, go to
Windows Settings System and tap
'Master Reset'.
The 'quality' indicator icon changes its
color depending on the delay and
overall quality of the connection.
If it stays orange or red, try to change to
a location with better network
coverage. If it stays red and your call has
dropouts or otherwise bad audio, try
calling again and try to find better
network coverage. Call quality can be
sub-optimal in fast moving vehicles.
Send a Secure SMS Message
Before you can exchange secure SMS
messages with a contact, you need to
complete a key exchange.
the cryptographic key exchange is in
progress. "Key Exchange" is shown on
the display. After key exchange is
completed, six letters are shown. This is
a cryptographic fingerprint of the
unique session key used during your
secure call. When in call, read out the
three letters that are shown under "You
say" and verify that the letters your
partner reads out are the same as shown
under "Partner says".
If they do not match, you should not
consider the line secure.
Optionally, enter up to two GSM phone
numbers of your contact if you want to
exchange secure SMS messages.
Tap 'Save' to store the contact. You can
edit the contacts later. Enter the name
and the corresponding CryptoPhone
number for the contact you want to call
securely.
You will recognize valid CryptoPhone
numbers by the prefix +807. Note that
they can not be contacted from the
normal telephone network.
Make A Secure Call
Tap the 'Contacts' button, select the
contact and either use the 'Dial' button
or choose "Call Secure" from the menu.
If your partner is available, you will hear
a ring tone. When he picks up, you will
hear a special tone sequence, indicating
9
10
8
...
11
12
13
1

Other GSMK Cell Phone manuals

GSMK CRYPTOPHONE G10i User manual

GSMK

GSMK CRYPTOPHONE G10i User manual

GSMK CryptoPhone G10 User manual

GSMK

GSMK CryptoPhone G10 User manual

GSMK CryptoPhone 500 User manual

GSMK

GSMK CryptoPhone 500 User manual

Popular Cell Phone manuals by other brands

Haier HC-C2100 user guide

Haier

Haier HC-C2100 user guide

Kyocera 3225 user guide

Kyocera

Kyocera 3225 user guide

NewPlan CP10 user manual

NewPlan

NewPlan CP10 user manual

Samsung Anycall S8300H user manual

Samsung

Samsung Anycall S8300H user manual

Gigabyte GSmart i120 quick guide

Gigabyte

Gigabyte GSmart i120 quick guide

Plum TWEEK B100 user manual

Plum

Plum TWEEK B100 user manual

INNOSTREAM INNO 90 user manual

INNOSTREAM

INNOSTREAM INNO 90 user manual

LG LGA225GO user guide

LG

LG LGA225GO user guide

Nokia 8860 - Cell Phone - AMPS owner's manual

Nokia

Nokia 8860 - Cell Phone - AMPS owner's manual

LG G5200 Service manual

LG

LG G5200 Service manual

LG VS840 owner's manual

LG

LG VS840 owner's manual

Zte Grand X Max+ user guide

Zte

Zte Grand X Max+ user guide

Nokia 110 manual

Nokia

Nokia 110 manual

LG LG-P715 user guide

LG

LG LG-P715 user guide

LG IQ quick start guide

LG

LG IQ quick start guide

Alcatel OT-806 manual

Alcatel

Alcatel OT-806 manual

Motorola RBR MotoTalk user guide

Motorola

Motorola RBR MotoTalk user guide

LG LM-Q610NM user guide

LG

LG LM-Q610NM user guide

manuals.online logo
manuals.online logoBrands
  • About & Mission
  • Contact us
  • Privacy Policy
  • Terms and Conditions

Copyright 2025 Manuals.Online. All Rights Reserved.