Gude Expert PDU Energy 8310 Series User manual

© 2014 Gude Analog- und Digitalsysteme GmbH
Manual Ver. 1.1.0
valid from Firmware Ver. 1.1.1
Expert PDU Energy 8310 Series

Have your Gude devices always in view - and in control.
With the free Gude Control App you can retrieve all relevant information
from your GUDE products regardless of their current whereabouts. Check
with your smartphone the important operating figures of your server and
rack environment like sensor values (max/min), energy consumption as
well as state of inputs and outputs with watchdog functions. In particular,
connected consumers can be switched remotely with Gude Control.
"Gude Control" is available for Expert PDU Energy 8310 and can be
free downloaded from the Google Play Store and iTunes Store.

3
Expert PDU energy 8310
Table of contents
Table of contents
Chapter 1 Safety Advice 4
Chapter 2 Description 4
Chapter 3 Hardware 4
4
3.1 Content of delivery
4
3.2 Installation
5
3.3 Usage and Display
Chapter 4 Configuration 6
6
4.1 DHCP
6
4.2 Network settings with GBL_Conf
7
4.3 Configuration via webinterface
4.3.1 Configuration - IP Address 7
4.3.2 Configuration - IP ACL 8
4.3.3 Configuration - HTTP 9
4.3.4 Configuration - Sensors 10
4.3.5 Configuration - SNMP 11
4.3.6 Configuration - Syslog 12
4.3.7 Configuration - E-Mail 13
Chapter 5 Features 14
14
5.1 Bootloader mode
14
5.2 Firmware update
14
5.3 Technical information
15
5.4 Factory settings
Chapter 6 Support 15
Chapter 7 Contact 15
Chapter 8 Declarations of conformity 16

4
Expert PDU energy 8310 Safety Advice
Safety Advice
1
The device must be installed only by qualified personnel according to the following installation and operating instructions.
The manufacturer does not accept responsibility in case of improper use of the device and particularly any use of equip-
ment that may cause personal injury or material damage.
The device contains no user-maintainable parts. All maintenance has to be performed by factory trained service personnel.
Check if the power cord, the plug and the socket are in proper condition.
The device can be connected only to 230V AC (50 or 60 Hz) sockets.
Always connect the device to properly grounded power sockets.
The device is intended for indoor use only. Do NOT install them in an area where excessive moisture or heat is present.
Because of safety and approval issues it is not allowed to modify the device without our permission.
Please note the safety advises and manuals of connected devices, too.
The device is NOT a toy. It has to be used or stored out or range of children.
Packaging material is NOT a toy. Plastics has to be stored out of range of children. Please recycle the packaging materi-
als.
In case of further questions, about installation, operation or usage of the device, which are not clear after reading the ma-
nual, please do not hesitate to ask our support team.
Description
2
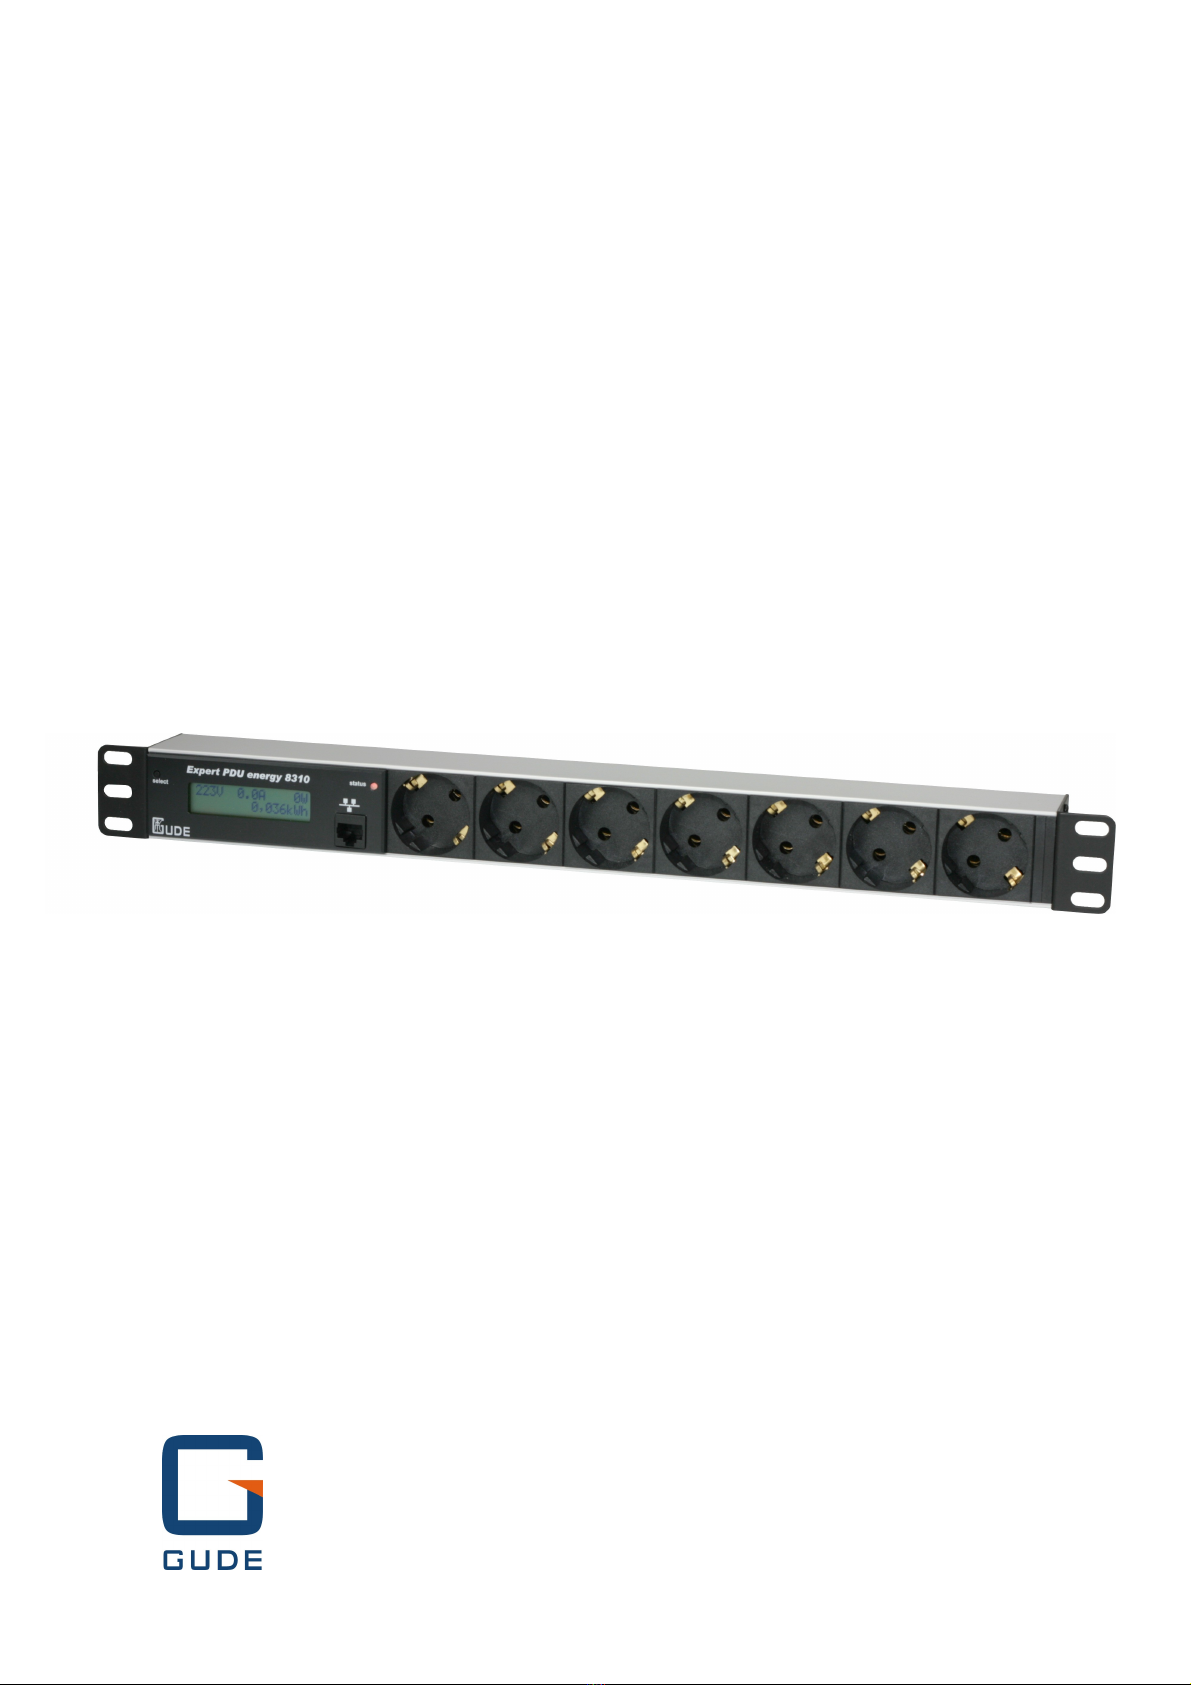
The Expert PDU energy 8310 is a multiple socket outlet with CEE 7/4 sockets (model 8310) or IEC C13 sockets (model
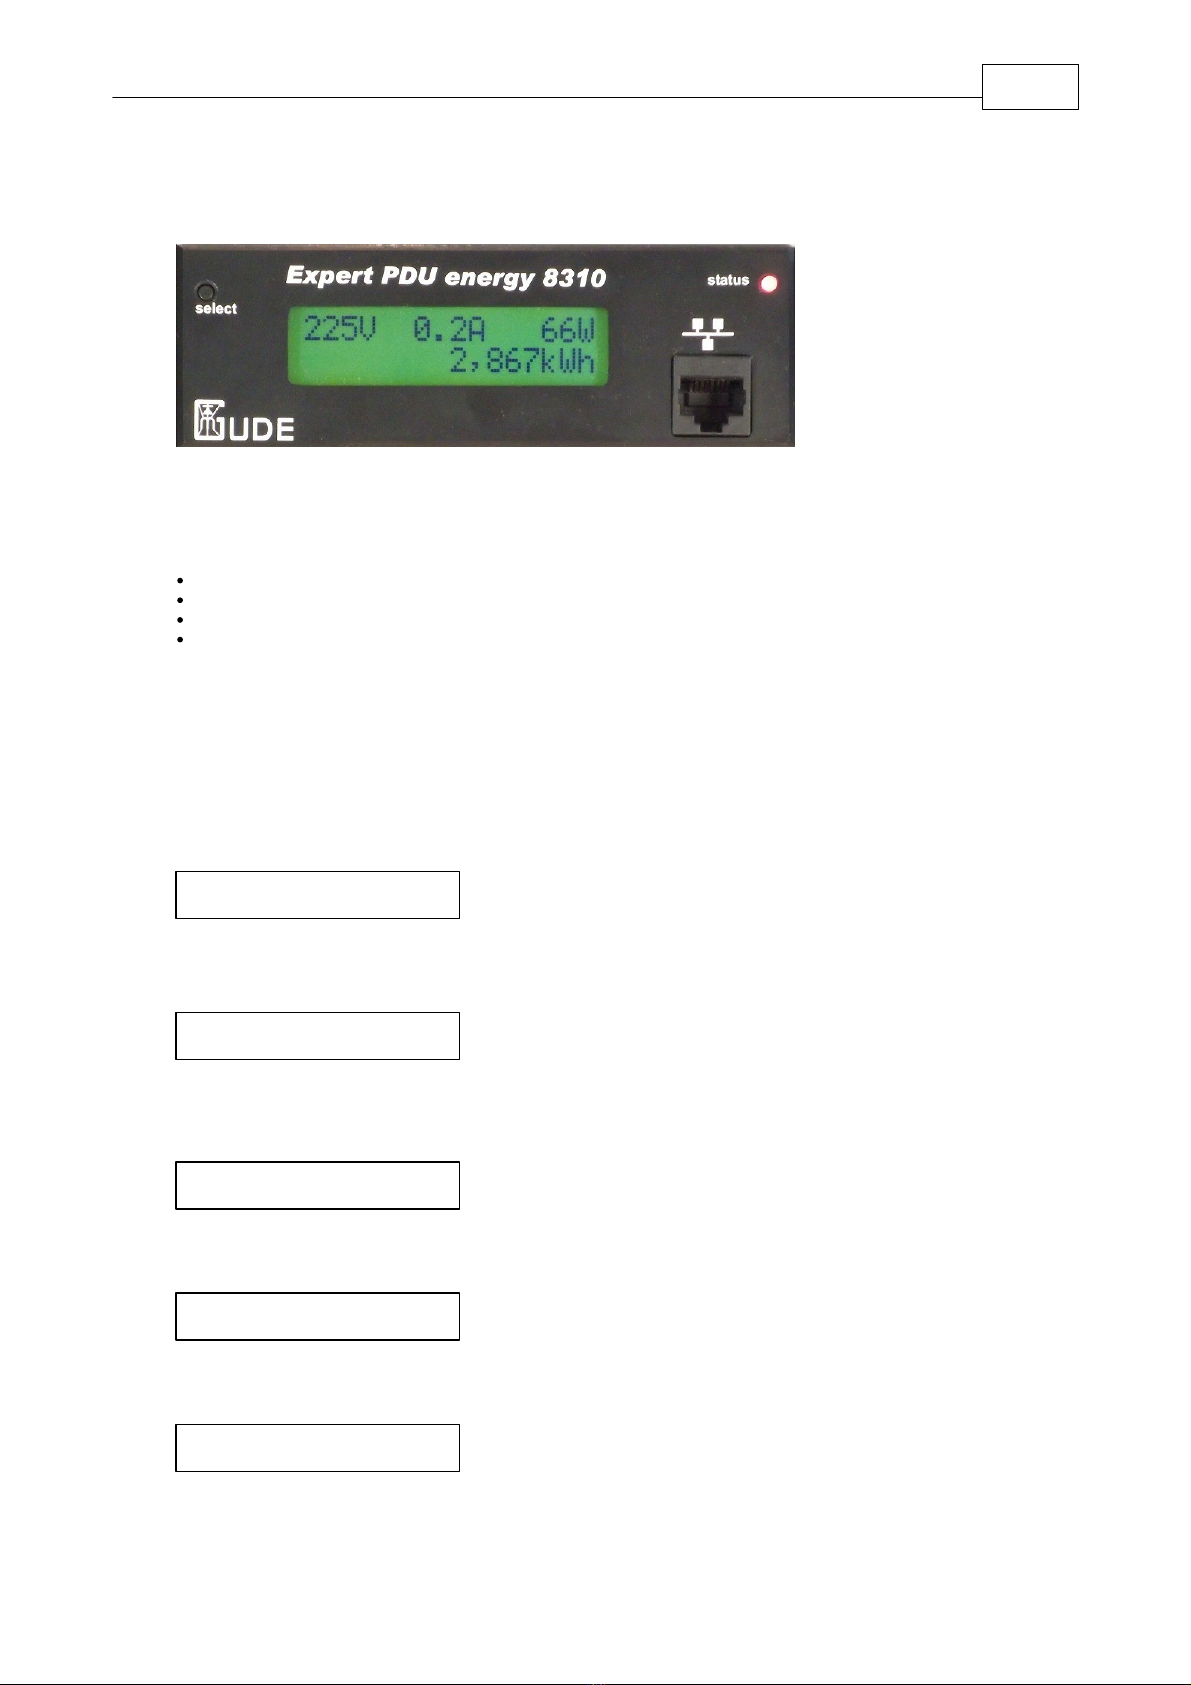
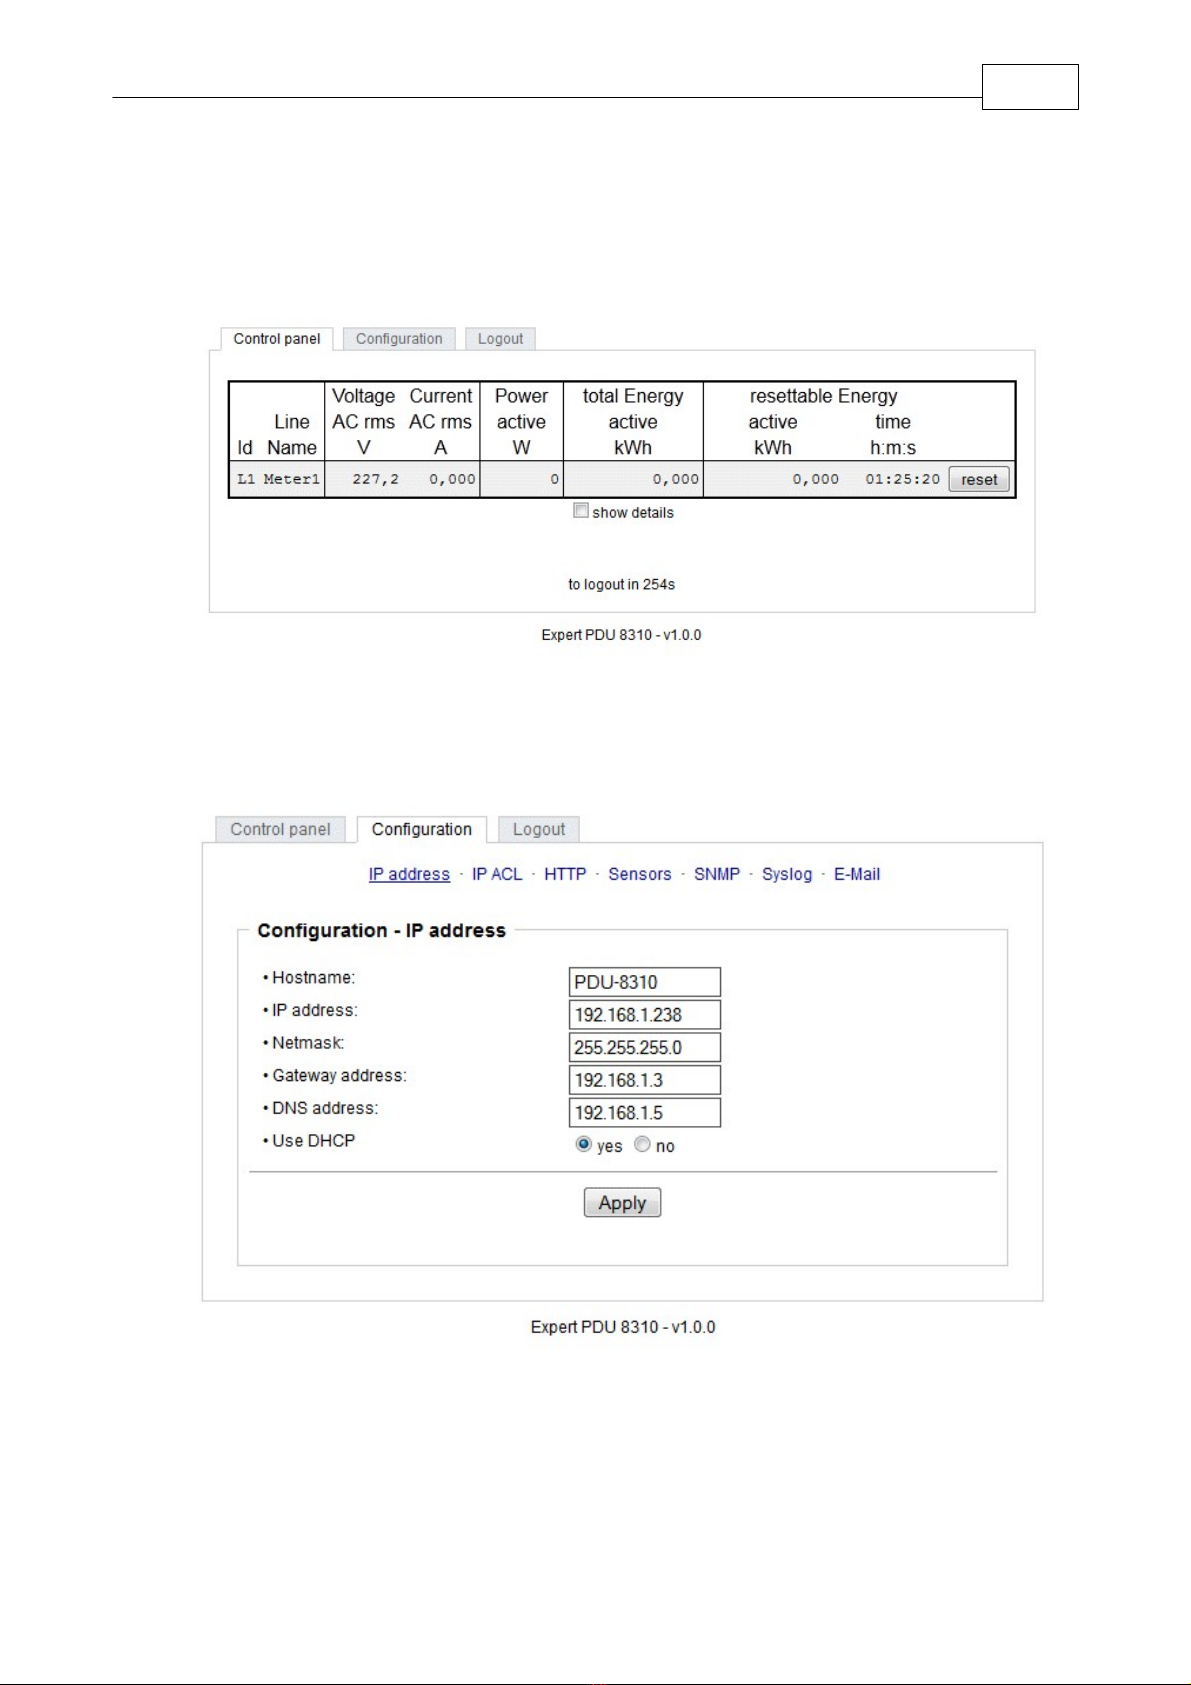
8310-1). It has a LCD display and can be connected to an Ethernet network. Integrated in the device is a Web server and an
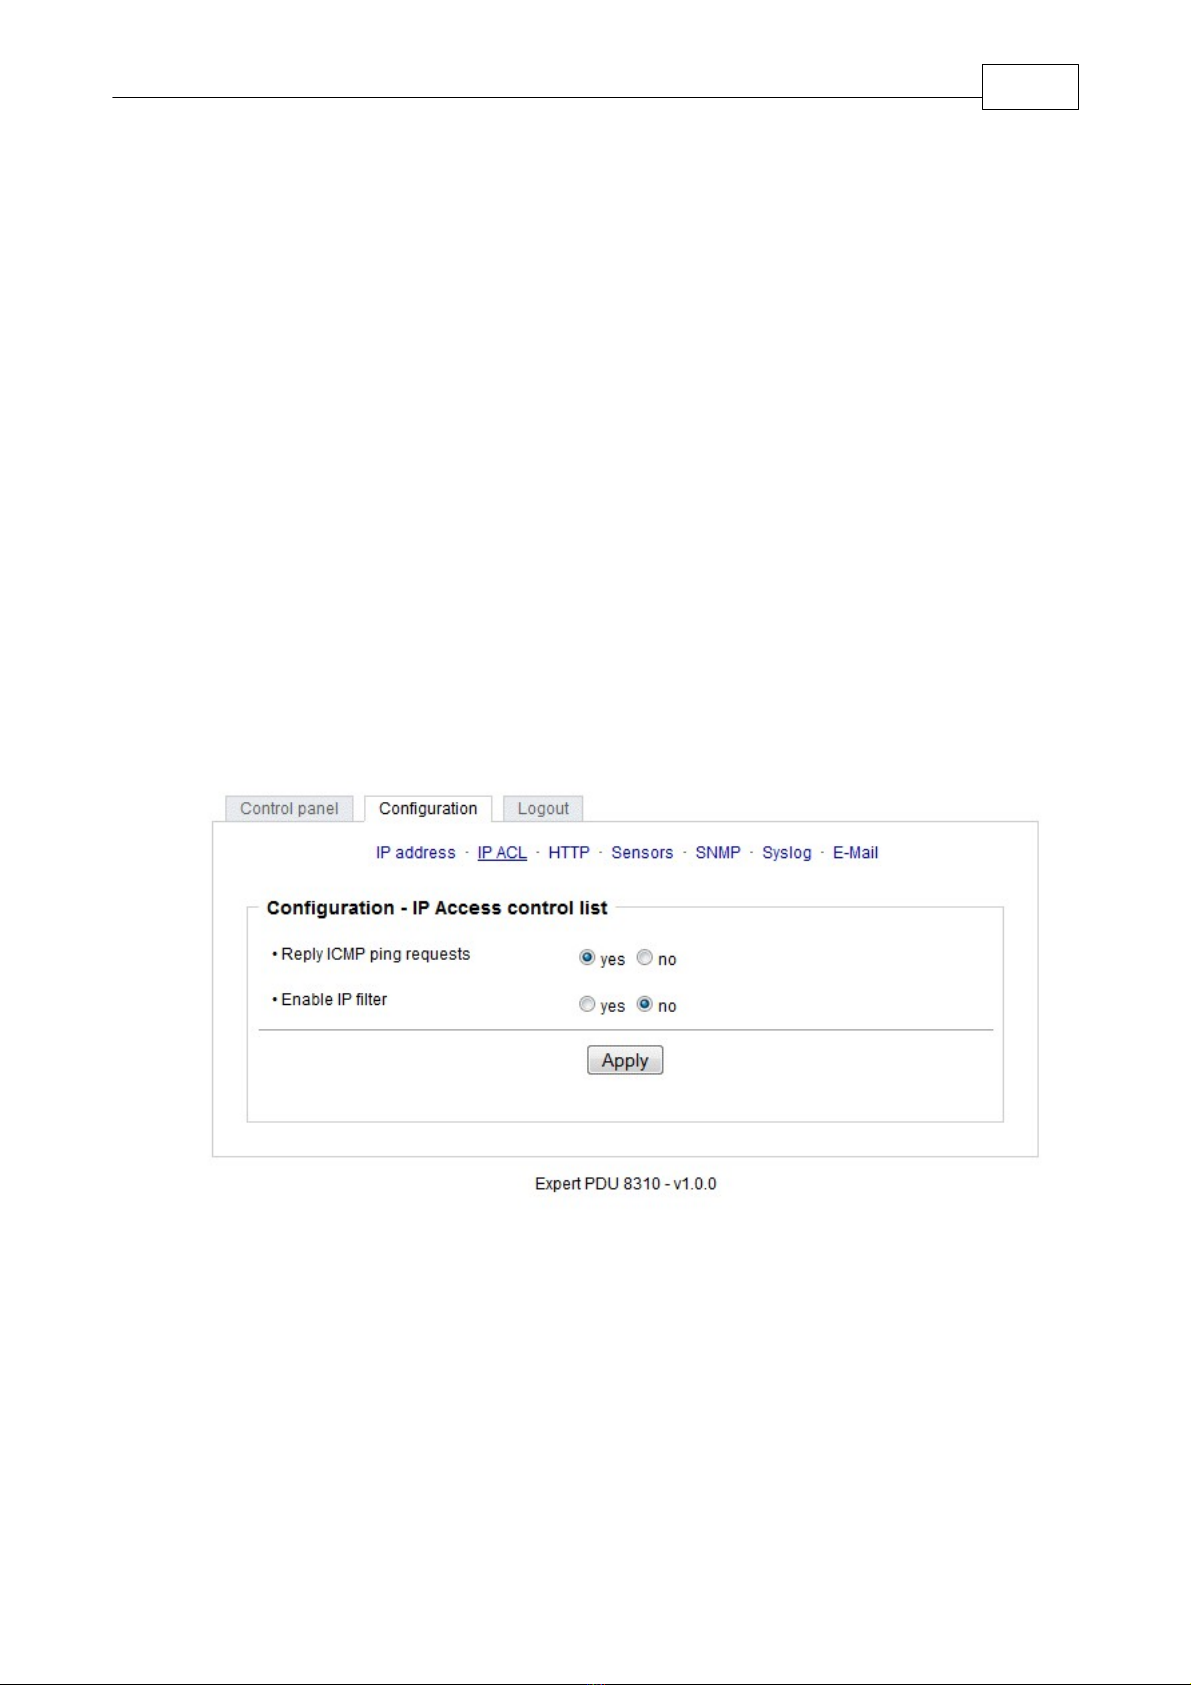
SNMP server to enable remote retrieval of measurement data. In response to an adjustable threshold syslog messages,
emails and SNMP traps can be sent.
Features
Measurement of current, voltage, phase angle, power factor, frequency, active power, apparent power and reactive power
2 power meter, a counter counts continuously, the other counter is resettable
Backlit LCD Display
Quick and easy Plug & Play installation
Simple and flexible configuration via Web browser or Windows program
Platform independent operation via web browser
Syslog support
SNMP support (SNMPv1, SNMPv2c)
E-mail support (SMTP)
Firmware update via Ethernet during operation
Developed and manufactured in Germany
Hardware
3
Content of delivery
3.1
The delivery includes:
Expert PDU energy 8310
CD-ROM and manual
Installation
3.2
1. Insert the plug of the AC power cord into an outlet. The device reboots and is ready after a few moments. The display and
the status LED should be lit.
2. Connect your network to the Ethernet port of the Expert PDU energy 8310.
3. Attach up to seven loads to the CEE 7/4 sockets (or IEC sockets for 8310-1) of the Expert PDU energy 8310.

5
Expert PDU energy 8310 Hardware
Usage and Display
3.3
Status LED
The status LED shows directly the state of the device:
Red: The device is not connected to the Ethernet.
Orange: The device is connected to the Ethernet, TCP/IP settings are not defined.
Green: Your device is connected to the Ethernet, TCP/IP settings are assigned.
regularly flashing: The device is in bootloader mode.
Display views
Durch Drücken des "select" Tasters können verschiedene Informationen und Messwerte auf dem Display abgerufen werden.
Bei jedem Druck auf den Taster wird eine neue Seite auf dem LCD Display angezeigt:
By pressing the "select" button various informations and statistics are available on the display. Each time you press the but-
ton a new page is shown on the LCD display:
227V
0.0A 0W
0.000kWh
This is the usual energy view. On the top line is printed voltage, current and power. The bottom line shows the consumed
energy (unit kWh). After 10 seconds of waiting time every other page will resume to this view.
7:48:59 h:m:s
0.000kWh
This page shows in the bottom line the power meter and on the top line the period of time over the power was measured. The
values ??are stored in an EEPROM every 5 minutes and therefore preserved during a power outage.
VRMS
225.3V
IRMS
0.000A
Here, voltage and current are shown.
Active
0W
Reactive
0VAR
Active power and reactive power are shown.
Apparent
0VA
Phase
-83.5deg
The measured values ??of apparent power and the phase angle of the power.

6
Expert PDU energy 8310 Hardware
Freq
50.02Hz
Powerfact
-0.3
The power frequency (50Hz in the German electricity grid) and the power factor.
Gude PDU 8310
192.168.1.123
This page provides information on the product name and the assigned IP address.
Firmware 1.0.0
MAC:001932003f09
The firmware version number and used the MAC ethernet address.
Configuration
4
DHCP
4.1
After turning on, the unit looks for a DHCP server on the Ethernet and requests an available IP address. Check in the settings
of the DHCP server which IP address was assigned, and if necessary set, that the same IP address will be used each time.
To disable DHCP, you can use the software GBL_Conf.exe or adjust the configuration via the web interface.
Network settings with GBL_Conf
4.2
For changing the network properties manually, the program GBL_Conf.exe is required. This tool is available for free on our
website www.gude.info.
Furthermore GBL_Conf.exe enables you to install firmware updates and to reset to factory settings.
Activate bootloader mode and run GBL_Conf.exe. The program will look automatically for connected devices and will display
their network configuration.
If the displayed IP address accords with the factory settings (192.168.0.2), there is either no DHCP server available in the
network or no free IP address could be allocated.
Enter a free IP address and the according netmask in the entry mask, then save these changes by clicking on Program Devi-
ce -> SaveConfig.
Restart the firmware, so that the changes will take effect. Now click on Search in order to have the new network configuration
displayed.

7
Expert PDU energy 8310 Configuration
Configuration via webinterface
4.3
Enter the IP address of the device into the address line of your internet browser:
http://”IP address of unit”/
and press LOGIN.
To enter the configuration menu, click on „Configuration“ Tab.
Configuration - IP Address
4.3.1
Hostname4.3.1.1
Enter the hostname of the device. The hostname is used to connect with the DHCP server.
Illegal symbols in the hostname may prevent network access.
For the changes to get valid a restart of the firmware is required.

8
Expert PDU energy 8310 Configuration
IP Address4.3.1.2
Here you can change the IP address.
For the changes to get valid a restart of the firmware is required.
Netmask4.3.1.3
Here you can change the netmask.
For the changes to get valid a restart of the firmware is required.
Gateway4.3.1.4
Here you can change the standard gateway.
For the changes to get valid a restart of the firmware is required.
Use DHCP4.3.1.5
Here you can set, if the unit shall get its TCP/IP settings directly from your DHCP server. Then the device requests an IP-
Adress, Netmask and a standard Gateway from this server. If there is no DHCP server inside of your network, we recom-
mend to deactivate this function.
For the changes to get valid a restart of the firmware is required.
Configuration - IP ACL
4.3.2
IP Access Control List (IP ACL) acts as an IP filter. Wether it is active hosts and subnets only can contact the unit, if their IP
addresses are stated in this IP ACL.
e.g.: „http://192.168.0.1“ or „http://192.168.0.1/24“
If you locked yourself out by mistake, please activate the bootloader mode, start Gbl_Conf.exe and deactivate IP ACL.
You can find more information about configuration of IP ACL or have a look at http://www.gude.info/wiki.
Reply ICMP-Ping requests4.3.2.1
Here you can set, if the device shall react on pings.

9
Expert PDU energy 8310 Configuration
Enable IP Filter4.3.2.2
Here you can activate the IP Access Control List (IP ACL).
If IP ACL is active, DHCP and SNMP only work, if all necessary servers and clients are registered in this list.
Configuration - HTTP
4.3.3
HTTP Port4.3.3.1
Here you can enter the HTTP port number, if necessary. Possible numbers are 1 ... 65534 (standard: 80). To get access, you
have to enter the port number after the IP address of the device, e.g.: http://192.168.0.2:1720
For the changes to get valid a restart of the firmware is required.
Require HTTP Password4.3.3.2
Password protected access can be activated here. In this case, a user and an admin password have to be defined. Pass-
words have a maximum lengths of 15 characters.
Administrators are authorized to modify the settings. The username of the admin is “admin”.
Users are authorized to login, but are not allowed to modify the settings. The username of the user is “user”.
If you have forgotten your password, activate the bootloader mode, start GBL-Conf.exe and deactivate the password request.
For the changes to get valid a restart of the firmware is required.
Check Password on start page4.3.3.3
If activated, the user has to enter his password, before logging in to the webinterface.

10
Expert PDU energy 8310 Configuration
Configuration - Sensors
4.3.4
Generate Messages4.3.4.1
Here you can configure if and at which Min-/Max-values the device shall send alerts via SNMP-Traps, Syslog or Email.
Peak measurement period4.3.4.2
Here, you can enter the time over which the peak values of the sensors shall be displayed: 30 minutes up to 24 hours.
Hysteresis4.3.4.3
Here you can specify a threshold that is reached after crossing a threshold in order to signal that falls below the threshold.
example:
Limit 10 ° C
Action: Output alarm
threshold 1
If the value of 11 ° C is reached, the alarm is reset. Without the threshold would be for small fluctuations of 0.1 ° C respective-
ly, a new alarm is issued, or initiate a command.
Limit 10 °
Action: trigger alarm
threshold 0
Temperature 10 ° C.
Alarm is triggered.
Temperature 10.1 ° C
Alarm is reset
9.9 ° C temperature alarm is triggered
etc.

11
Expert PDU energy 8310 Configuration
Configuration - SNMP
4.3.5
SNMP4.3.5.1
To get detailed status information of the device SNMP can be used. SNMP communicates via UDP (port 161):
Supported SNMP commands:
- SNMPGET: request status information
- SNMPGETNEXT: request the next status information
- SNMPSET: request change of status
You will need a Network Management System, e.g. HP-Open View, OpenNMS, Nagios etc., or the command line tools of
NET-SNMP to request information via SNMP.
4.3.5.1.1 SNMP-communities
SNMP authentifies requests by so called communities.
The public community has to be added to SNMP-read-requests and the private community to SNMP write requests. You can
see the SNMP communites like read/write passwords. SNMP v1 and v2 transmit the communities without encryption. There-
fore it is simple to spy out these communities. We recommend to use a DMZ or IP ACL.
4.3.5.1.2 MIB
All information, that can be requested or changed, the so called „Managed Objects“, are described in „Management Informati-
on Bases“ (MIBs).
There are three MIBs, which can be requested from the unit:
„system“, „interface“
„system“ and „interface“ are standardized MIBs (MIB-II).
At least, there are so called Object Identifiers (OID) subordinated to those three structures. An OID describes the location of
an information inside a MIB.
4.3.5.1.3 SNMP-traps
SNMP-Traps are system messages, sent via SNMP-protocol to different clients. On following events a SNMP-Trap will be
dispatched:
Min/Max-Alerts from the sensors
You can find more information about configuration of SNMP at http://www.gude.info/wiki.

12
Expert PDU energy 8310 Configuration
Enable SNMP-get4.3.5.2
Here you can activate SNMP-get protocol.
Community public4.3.5.3
Here you can enter the SNMP public community.
Enable SNMP-set4.3.5.4
Here you can activate SNMP-set protocol of <%PRODUCT NAME%>.
Use SNMP only if your network is fitted for.
Community private4.3.5.5
Here you can enter the SNMP private community.
Download SNMP MIB4.3.5.6
Here you can download the MIB.
Configuration - Syslog
4.3.6
Syslog messages are simple text messages transmitted to a syslog server using UDP.
Linux OS regularly have a syslog daemon installed, e.g. syslog-ng. For Windows there are some freeware tools available.
On following events a syslog message will be send:
- Booting up
- Activation/deactivation of syslog
- sensor alarm
You can find more information about configuration of Syslog in chapter Configuration - Syslog or have a look at http://
www.gude.info/wiki.
Enable Syslog4.3.6.1
Here you can activate Syslog.

13
Expert PDU energy 8310 Configuration
Syslog Server IP4.3.6.2
If syslog is active enter here the IP address of you Syslog server.
Syslog Port4.3.6.3
If syslog is active enter here the port number, that your Syslog server uses to receive syslog information.
More information about Syslog you can find in chapter Syslog, on http://www.gude.info/wiki or ask our support team.
Configuration - E-Mail
4.3.7
Enable E-Mail4.3.7.1
Here you can activate the e-mail function of the device.
E-Mail server4.3.7.2
Enter the e-mail server, e.g. m[email protected]
Sender address4.3.7.3
Enter the address, the device should use, when sending e-mails.
Recipient address4.3.7.4
Enter the e-mail address of the recipient.
Enable Authentifiaction4.3.7.5
If your e-mail server needs an authentification, you can enter it here.
Username4.3.7.6
Enter the username, the device should use to log on your e-mail server.
Set new password4.3.7.7
If your server needs a password for sending e-mails, you can enter it here.
Repeat password4.3.7.8
Repeat the password, to enable it.

14
Expert PDU energy 8310 Configuration
Email4.3.7.9
Email messages are generated when the current exceeds or falls below a given limit. Refer to chapter "Configuration - Sen-
sors".
Currently, only SMTP servers are supported, that are offering no authentication (open-relay) or unencrypted authentication
(PLAIN). An encrypted authentication to the SMTP server is not possible.
One way to learn whether the desired SMTP server understands the PLAIN authentication, is to enter the string "EHLO local-
host" in telnet. Here's an example:
$ telnet smtp.1und1.com 25
Trying 212.227.15.129...
Connected to smtp.1und1.com.
Escape character is '^]'.
220 smtp.1und1.com (mreu3) Welcome to Nemesis ESMTP server
EHLO localhost <---- *TYPE* *THIS*
250-smtp.1und1.com
250-STARTTLS
250-AUTH LOGIN PLAIN <---- *PLAIN* *SUPPORTED!*
250-AUTH=LOGIN PLAIN
250-SIZE 120000000
250 HELP
Features
5
Bootloader mode
5.1
To activate the boot loader mode, hold the "select" button down and plug the unit into a power grid.
To ensure that the device is in bootloader mode, you can see in the GBL_Conf.exe program window the word "BOOT LDR"
after the device's name, and the device status LED is slow the blinking.
In bootloader mode you can disable the password and IP ACL, it is possible to use the program GBL_Conf.exe to perform a
firmware update and factory settings can be restored. To exit the boot loader mode again, restart the device without pressing
the button.
Alternatively, you can leave the boot loader mode by selecting the GBL_Conf menu Device -> Enter firmware.
Firmware update
5.2
In order to update the firmware the program GBL_Conf.exe and the latest firmware are needed.
Start the device in bootloader mode and run the program GBL_Conf.exe. On the left side of the program window all Gude de-
vices that are in the network are listed. Select the device, that should be updated, click on Program DeviceFirmware Update
and determine the location of the new firmware.
Please note: The up-to-date firmware and GBL_Conf.exe can be found at www.gude.info, free to download.
Technical information
5.3
Connections:
1 x CEE 7/4 Plug, 230 VAC, max. 16A
1 x Ethernet jack (RJ45)
Power outlets
7x CEE 7/4, max. 16A (8310)
8x IEC C13, max. 10A (8310-1)
Network:
10/100 MBit/s 10baseT Ethernet
Protocols:
TCP/IP, HTTP, SNMP v1 and v2c, SNMP traps, Syslog
Operating temperature:
0°C-50°C (non-condensing)
Dimensions:
19’’ / 1 rack unit
482,6mm x 44,5mm x 44,5mm (L x H x W)
Total weight:
~1.5 kg

15
Expert PDU energy 8310 Features
Factory settings
5.4
In order to restore the default settings the device must be started in bootloader mode. Besides that the program
GBL_Conf.exe is required.
Run GBL_Conf.exe and select the device whose settings should be restored. Then click on Program Device -> Reset to Fab
default.
Please notice that all current settings will be deleted. The default settings will be loaded when the firmware of the device is re-
started the next time.
Support
6
In case of further questions, about installation or operation of the device, please have look at www.gude.info/wiki or do not
hesitate to contact our support (m[email protected]).
Contact
7
Gude Analog- und Digitalsysteme GmbH
Eintrachtstraße 113
50668 Cologne
Germany
fon: +49-221-912 90 97
fax: +49-221-912 90 98
E-Mail: [email protected]
Internet: www.gude.info
President: Dr.-Ing. Michael Gude
Registration Court: Cologne
Registration number: HRB-Nr. 17 7 84
WEEE-number: DE 58173350
Sales Tax Identfication Number: DE 122778228

16
Expert PDU energy 8310 Contact
Declarations of conformity
8
EG Konformitätserklärung
EC Declaration of Conformity
Der Hersteller
The manufacturer
Gude Analog- und Digitalsysteme GmbH
Eintrachtstr. 113
50668 Köln (Deutschland)
erklärt hiermit, dass die folgenden Produkte / hereby declares that the following products
Produktbezeichnung
Product name
Expert PDU energy 8310
Expert PDU energy 8310-1
Beschreibung
Description
Stromverteilung mit IP basierter Energiemessung
power distribution unit with IP based energy monitoring
mit den Bestimmungen der nachstehenden EU-Richtlinien übereinstimmen / are in accor-
dance with the following European directives
2006/95/EG
2006/95/EC
Niederspannungsrichtlinie
Low Voltage Directive (LVD)
2004/108/EG
2004/108/EC
Elektromagnetische Verträglichkeit (EMV)
Electromagnetic Compatibility (EMC)
2011/65/EU
zur Beschränkung der Verwendung bestimmter gefährlicher Stoffe in Elek-
tro- und Elektronikgeräten (RoHS)
on the restriction of the use of certain hazardous substances in electrical and electronic
equipment (RoHS)
und dass die nachstehenden harmonisierten Europäischen Normen zur Anwendung gelangt
sind. / and comply with the following harmonised European standards.
EN 60950-1:2006 /
AC:2011
Einrichtungen der Informationstechnik - Sicherheit / Information technology equipment - Safe-
ty
EN 55022:2010
Einrichtungen der Informationstechnik - Funkstöreigenschaften / Information technology
equipment - Radio disturbance characteristics
EN 55024:2010
Einrichtungen der Informationstechnik - Störfestigkeitseigenschaften / Information technology
equipment - Immunity characteristics
EN 50581:2012
Technische Dokumentation zur Beurteilung von Elektro- und Elektronikgeräten hinsichtlich
der Beschränkung gefährlicher Stoffe / Technical documentation for the assessment of elec-
trical and electronic products with respect to the restriction of hazardous substances
Köln, 09.07.2013
Dr. Michael Gude, Geschäftsführer / General manager, CEO

Expert PDU energy 8310
© 2014 Gude Analog- und Digitalsysteme GmbH
25.02.2014
This manual suits for next models
1
Table of contents
Other Gude Power Distribution Unit manuals