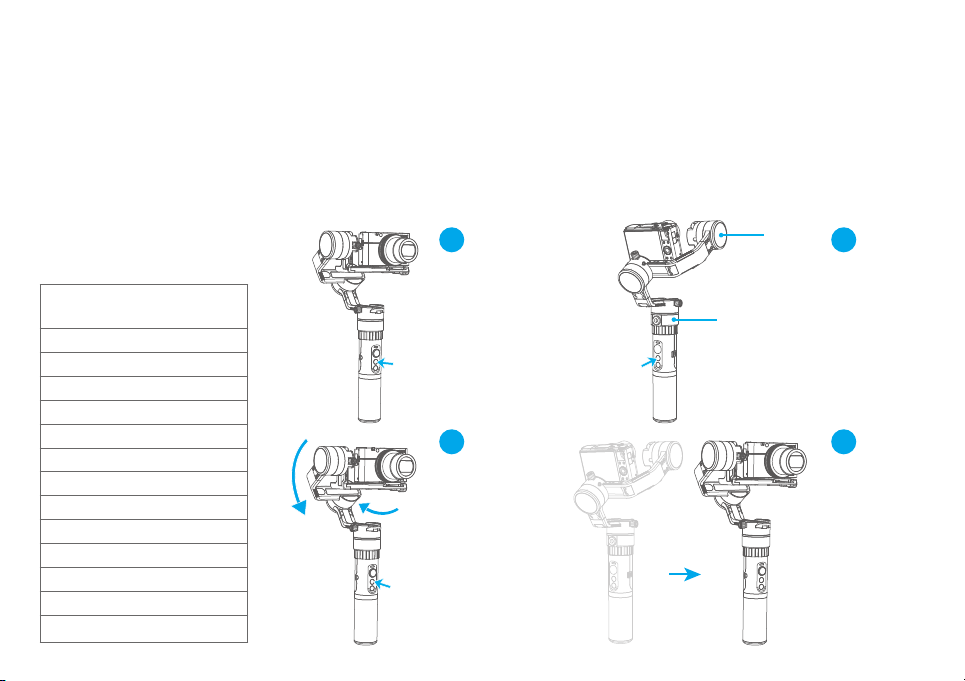
Guilin Feiyu Technology a1000 User manual

3-Axis Gimbal for Mirrorless Camera
Guilin Feiyu Technology Incorporated Company
V 2.3ENUser Manual

1. Product Overview
1
[2] Tilting lock screw
[21] USB interface
[4] Thumb screw
[12] Shutter cable socket
[3] Sliding arm
[20] Trigger button
[13] Cross arm
[15] Rolling axis
[14] Rolling lock screw
[19] Vertical arm
[23] Charging indicator
[11] Socket connector
[9] Function button
Status indicator
Joystick
[22] Retaining ring
[24] Handle
[5]
[16] Quick-release clamp
[17]
[18] Clamp block thumb screw
Adapter(Clamping plate)
[6]
[7]
[8]
Panning axis
Panning lock screw
[1] Tilting axis
[10] Shutter button
[1]
[4]
[6]
[20]
[23]
[8]
[9]
[2]
[17]
[18]
[15]
[19]
[5]
[3]
[21]
[24]
[13]
[12]
[14]
[7]
[10]
[22]
[16]
[11]

Included Accessories
After installation, please
tighten the retaining ring
!
USB cable
4 Batteries
(Type: 18650)
Shutter release
cable for Sony cameras
(3.5 mm to multi port)
Shutter release cable
for Panasonic cameras
(3.5 mm to multi port)
Shutter release cable
for Canon cameras Smart charger Cold shoe mount
Double-hand foldable set (Optional)
Retaining ring
Retaining ring
1/4-20
inch screw
Single Handle
Install the handle
Tripod
2
Thumb screw
Double-hand Accessories
(RS-80N3)

Attach camera or smartphone
Place the camera correctly on the quick-release clamp
and tighten the camera with the thum bscrew,finally,
place quick-release clamp into the clamping plate, tighten
the clamp block thumb screw.
18650
18650
21
2. User Guide
Attention: please read the following instructions before powering on the gimbal.
Insert the batteries
Remove the handle, insert 2 pcs 18650
batteries and tighten the handle.
Prior to use, please be sure to fully charge the
batteries.
Take the Panasonic DMC-GH4 camera for example
3

First use the smartphone adapter (optional) to install the
phone, and place them correctly on the clamping plate,
use the thumb screw to secure the phone through the
middle chute at the bottom of clamping plate.
Place the camera correctly on the clamping plate and
use the thumb screw to secure the camera through
the middle chute at the bottom of clamping plate.
3
Take the Sony camera for example Take the smartphone for example
Balance Adjustment
!
Turn on the gimbal after adjusting the center of gravity balance of the three axis.(refer to chapter
"9. Balance Adjustment"for more details)
Note: center of gravity imbalance can lead to poor performance or even failure
of the gimbal to operate at all.
4

Power on/Power off
Power on:long press the function button and release it when the green light is on and you hear a tone.
Power off:
long press the function button and release it when the red light changes from quick flashing
to constant and you hear a tone.
4
3. Functions Modes
Function button
Single tap
Function Explanation
Instructions of Button
Trigger button
Lock
Double tap
Double tap
Triple tap
Reset
Long press
Return to panning mode, tilting and rolling to return to initial level
Function Explanation
Panning and Tilting mode Under panning and tilting mode, control the rolling axis by moving the
joystick to the left or right, and the control angle is - 30 °~+ 30°
Rotate 180°in horizontal Make the camera lens rotate 180 °
In the panning mode or panning and tilting mode, press and hold the
button to enter the lock mode, release it to return previous mode
Quadruple tap Enter autorotation mode
Autorotation Mode
Five tap Initialization Enter initialization
5
Panning Mode / Lock Mode Single tap to switch between panning
mode and lock mode

In case of low power, the indicator will light red and flash 3 times
every 5 seconds. Please charge gimbal or replace the battery.
The current mode of the gimbal can be identified
by the indicator status.
Explanation of indicator status
Indicator status Mode / Status
Blue light flashes once
Blue light flashes twice
Panning mode
Panning and Tilting mode
Lock mode / Initialize the gimbalBlue light constant on
Blue light keeps flashing Initialization failure / Malfunction
Low powerRed light flashes three times
Red light keeps flashing Entering power off
!
Explanation of joystick control
Function
Button
Shutter
button
Up
Status
indicator
Left
Right
Down
Panning Mode (Default mode )
Panning and Tilting Mode
Lock Mode
Reset
The orientation of the camera is fixed.
Return to panning mode, tilting and rolling to return to initial level.
Tilting and rolling direction are fixed, and the camera lens moves according to the hand movement of the user.
Modes
The rolling direction is fixed, and the camera lens moves according to the hand movement of the user.
6

1
3 4
2
Autorotation Mode
Gimbal speed setting reference table
Annexed parameter table:
8 hours / turn
4 hours / turn
1 hour / turn (default)
30 minutes / turn
15 minutes / turn
2 minutes / turn
4 minutes / turn
8 minutes / turn
30 seconds / turn
24 seconds / turn
18 seconds / turn
12 seconds / turn
1 minute / turn
a1000 Rotate Speed
Other operations:click the function button to exit the autorotation mode during automatic rotation. The speed setting is made by
Feiyu ON App.
Note: both the panning and tilting directions can be rotated.
1.Quadruple tap on function
button, gimbal will access the
autorotation mode setting.
Tilting
Tilting
Panning
Panning
2. Turn the panning axis or tilting
axis to the start position and hold
for half a second.Click on function
button, record the start position .
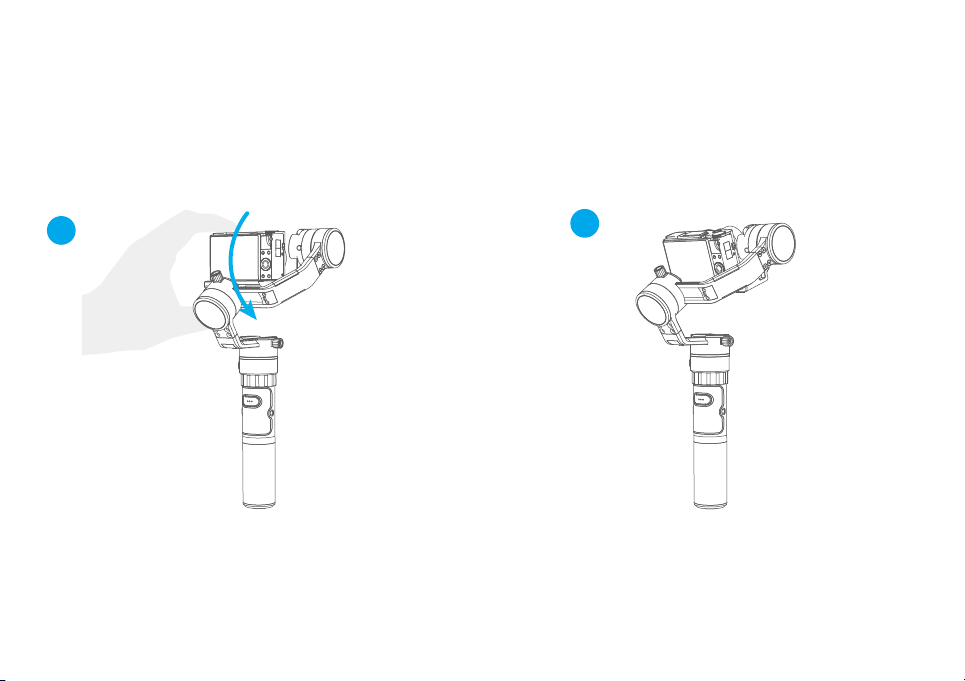
3 .Turn the panning axis or
tilting axis to the end position
and hold for half a second.
Click on the function button
again,record the end position .
4.Gimbal will recover to
start position automatically.
Tilting axis and panning
axis turn to end position
at constant speed.The
gimbal is automatically
reset after the end.
1.Quadruple tap on function button, gimbal will access the autorotation mode .
2. Set the gimbal start rotation position: pull the tilting axis or panning axis to the start position by hand,click the function button to record.
3. Pull the gimbal (which can be rotated more than one turn) according to the rotation path you want to set, and then click the function
button to record the end position .The gimbal will go to the start position and start the automatic rotation.Using the gimbal autorotation
function with a camera, timelapse photography functioning can be used to achieve special movement timelapse photograpy.
7

2
1
Manual Lock
Hold the camera and change its angle in
tilting axis direction.
Keep this position for half a second, the
current angle will be locked manually.
Adjust the camera by hand to the desired angle and hold in place for half a second to lock in that angle.(The tilting axis
and panning axis in the lock mode can be manual lock and the tilting axis can be manual lock in the panning mode.)
Take the tilting axis as an example :
8

4. Charging
Photograph
The shutter button can take pictures via the shutter release cable.
Automatic continuous shooting: Shutter button long press 3s or more, gimbal "drop"sound and enter the automatic
continuous shooting mode, the default 5s shot once.One tap the shutter button to exit the automatic continuous shooting
mode.(you can enter the Feiyu On App to setting the photographic interval time)
Manual photograph: click the shutter button to focus, click again within 3s to take pictures.If there is no operation within 3s,
the focus state is cleared.
Status indicator
Charging indicator
Micro USB
Input:5V/1A
(Equipped by user)
Explanation of Charging indicator status
Indicator status Mode / Status
Blue light,red light is off
The blue and red light
are flashing
Stop charging
The voltage of two batteries balance ajustment
The blue and red light Charging
(If the two batteries voltage difference between
the larger, the process takes a long time)
9
Table of contents


