CYGOLITE
1307-AEASTSAINTGERTRUDEPL.,SANTAANA,CA92705 USA
PHONE:(714)437-7752 FAX:(714)437-7962
www.cygolite.com
• Industry leading Cree LED Technology
• USB Rechargeable
• 7LightingModes(Med-Hi-Boost-Low-Daylight Flash-Walking-SOS)
• Quick Release Rechargeable Li-Ion Battery Stick
• Regulated Power Circuitry for steady brightness
• Smallest size in its class (only 130 g)
OPERATION MANUAL
CONTENTS
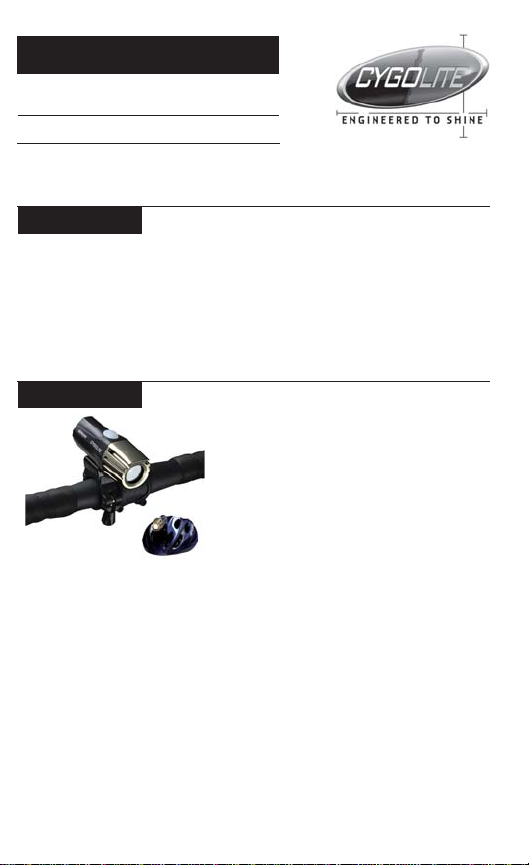
• Super Bright LED Headlight
• Quick Release Rechargeable
Li-Ion Battery Stick
• Wall Charger
• USB Charging Cable
• Handlebar Bracket
• Helmet Mount Kit (ExpiliOn500 only)
•OperationManual
The ExpiliOn Series comes with a one year limited warranty, against any
defective part or craftsmanship. The battery is warranted up to 90 days
after the original date of purchase. If the unit is under warranty, Cygolite
will repair or replace defective components at no charge provided the
product has not been subject to misuse, abuse, or non-Cygolite authorized
alteration, modification or repair. Warranted products requiring service
must receive a Return Merchandise Authorization number (RMA#) from
customer service. The original receipt (INCLUDING DATE) is required on
all warranty repairs. Shipping costs inccurred from shipping warranty or
repair items from the customer to Cygolite are covered by the customer.
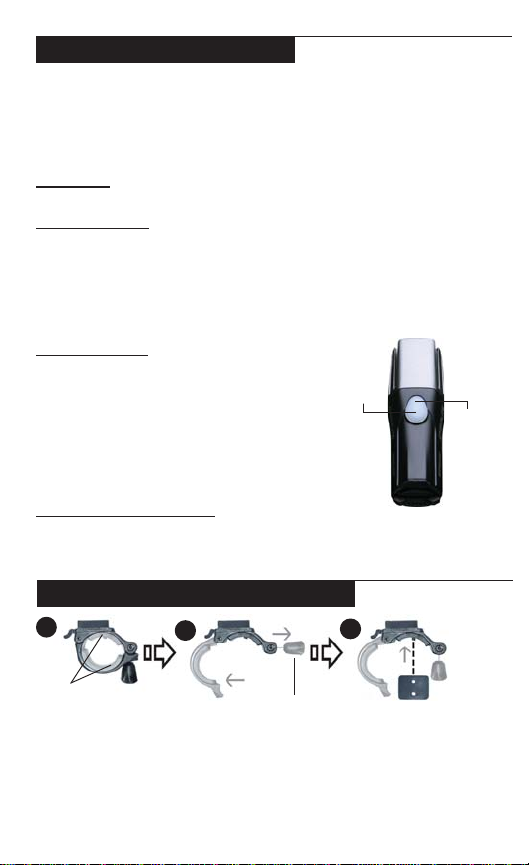
The headlight will not turn on.
· Make sure the power button was firmly pressed.
· Make sure battery is securely installed in the headlight and in the closed
position.
· Make sure the battery is fully charged.
All Cygolite products are backed by Cygolite’s warranty, providing quality,
craftsmanship and the assistance of our knowledgeable staff. If any
support is needed, we will assist with 48 hour turnarounds on parts and
service. For questions, problems, and/or authorized CYGOLITE parts
contact us.
Congratulations on your purchase of the ExpiliOn High-Brightness LED
headlight system. Please refer to this guide to operate your ExpiliOn
safely and properly.
The ExpiliOn series is designed to be used on bikes in some of the most
extreme outdoor conditions. Over time, dust and dirt may hinder the
connections on your headlight. To prevent this from happening, ensure that
the headlight is clean after every ride.
Wipe the headlight with a damp cloth. Do not submerge the battery or
headlight in water. Remove all dirt around or on the plugs or jacks on the
headlight.
The High-Brightness LED has extensive life so bulb replacement is not
required.
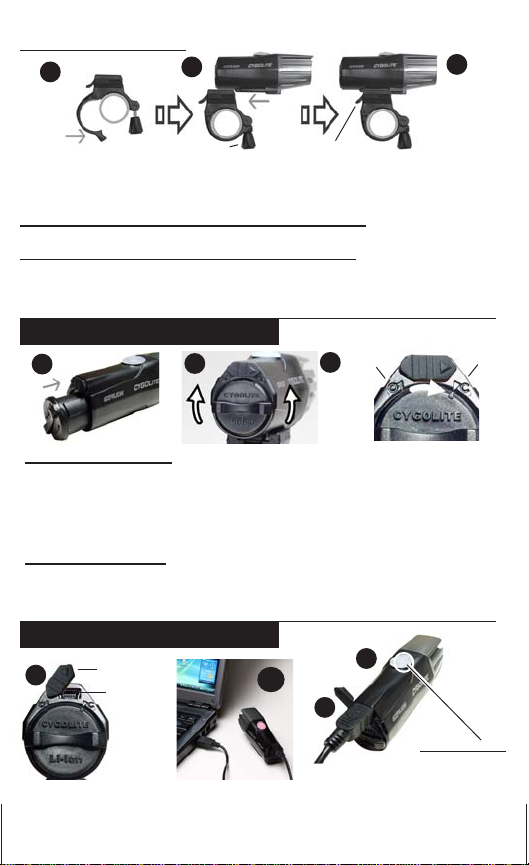
Q: When should I replace the bulb?
· The LED bulb has extensive life so bulb replacement is not
necessary.
Q: When should I charge my battery?
· The battery can be charged any time, but we recommend fully
charging the battery every time you charge it.
Q: Can I use non-Cygolite parts for this unit?
· No, Cygolite parts are manufactured to specific quality
specifications. To ensure the quality of your lighting system,
only use Cygolite parts. Use of non-Cygolite parts will void the
warranty and may cause damage to the light.
Q: Can I leave my light charging for extended periods of time?
· Yes, the light is smart charging & will prevent from overcharging but
like all electrical appliances we recommend disconnecting the
headlight and charger when the light is fully charged.
Q: Can I use my other Cygolite batteries with the ExpiliOn?
· No, the ExpiliOn is only compatible with Cygolite’s Li-Ion
batteries used on the ExpiliOn systems.
Q: Will my charger for my other Cygolite systems recharge the
ExpiliOn battery?
· No, the ExpiliOn battery only works with the supplied charger.
Attempting to charge the battery with any other charger will
result in damage.
Q: Where can I purchase the compatible Li-Ion batteries for my
ExpiliOn?
· Compatible Li-Ion batteries can be purchased from the spare
parts section of our website or by contacting Cygolite
customer service.
Q: Can I use this light for activities other than cycling ?
· No, this light is specifically intended for bicycle use only.
Q: What should I do if moisture or water gets into my light?
· Immediately remove the battery from the light. Put the
battery aside and allow the light to dry completely before
continued usage.
Super Bright LED Lighting System
withUSBRechargeableLi-IonBatteryforCycling
If you have more questions that are not listed here,
visit the support page at: www.cygolite.com
CAUTION:
· Headlight may get hot during use. Use caution when handling.
· Unplug the headlight from charger when not in use.
· Unplug connectors by the plug, never by the cable.
· Do not modify or substitute any parts with Non-Cygolite parts.
· Do not open headlight case.
· Provide adequate airflow to the headlight to cool during use.
· If the light is on & stationary longer than 10 minutes, turn it off.
· Do not look directly at light.
· Do not operate or submerge under water.
· Do not operate the light unattended.
· Keep headlight away from combustible materials.
· Do not package headunit when hot or immediately after use.
· Carrying a flash light is recommended.
· This light is for bicycle use only.
·
Statelawsregardingflashingbicyclelightsmayvaryamongstates.Usetheflashingmodes
in accordancetoyourlocal state laws as well as federal law.
ExpiliOn 500/410
TM
FEATURES
CONTENTS
WARRANTY
COMMITMENT
CARE
TROUBLESHOOTING
F.A.Q.s