GYS GYSFLASH 100.12 HF User manual

73502-V3-14/03/2016
EN 10-17 / 50-52 GYSFLASH 100-12 HF

10
GYSFLASH 100-12 HF
This manual contains safety and operating instructions. Read it carefully before using the device for the rst time and keep it in a
safe place for future reference.
GENERAL DESCRIPTION
The GYSFLASH 100-12 HF provides a high powered stabilised power supply incorporating SMPS (Switch Mode Power Supply) tech-
nology. Designed to sustain 12V battery (liquid/AGM/gel) for vehicles during diagnostic work. This device will also ensure an ideal
charging cycle for battery maintenance for the most modern vehicles and battery types. It can be tted with cables up to 2x5m in
16mm².
Changing charging cables
requires recalibration (see page 14). It is considered a xed device not a mobile product.
These devices have 5 modes including 2 that are hidden:
• Charge Mode: to charge liquid or gel electrolyte batteries (lead, lead Calcium, lead Calcium-silver, AGM...) from 20 Ah to 1200
Ah in 12V.
•
Supply mode « Diag + »:
GYSFLASH supply up to 100A to ensure compensation of current used by high-energy consumers
(engine fan, window regulator, electronic suspension, etc). In this mode the voltage can be precisely adjusted.
•
Supply mode « Showroom »:
ensure current compensation when using electrical features of a demonstration vehicle (window
regulator, heating, morrors, etc) enabling permanent display of the vehicle. In this mode the voltage can be precisely adjusted.
•
« Change battery » mode:
ensures a stabilised power supply to the vehicle during battery replacement to preserve memory
settings. By default this mode is inactive and doesn’t appear in the mode list.
•
« Power Supply » mode:
This mode is intented for experimented user only. By default this mode is inactive and doesn't appear
in the mode list. This mode enables to use the charger as a powerful stabilised power supply with regulated voltage and adjustable
maximum current.
This device has an automatic restart feature enabling in Charge, Showroom and Power Supply modes to automatically restart the device
in case of power cut.
The function «Lock Showroom», if activated, restricts the device to Showroom Mode only, to facilitate its use
for vehicles demonstrators.
START UP
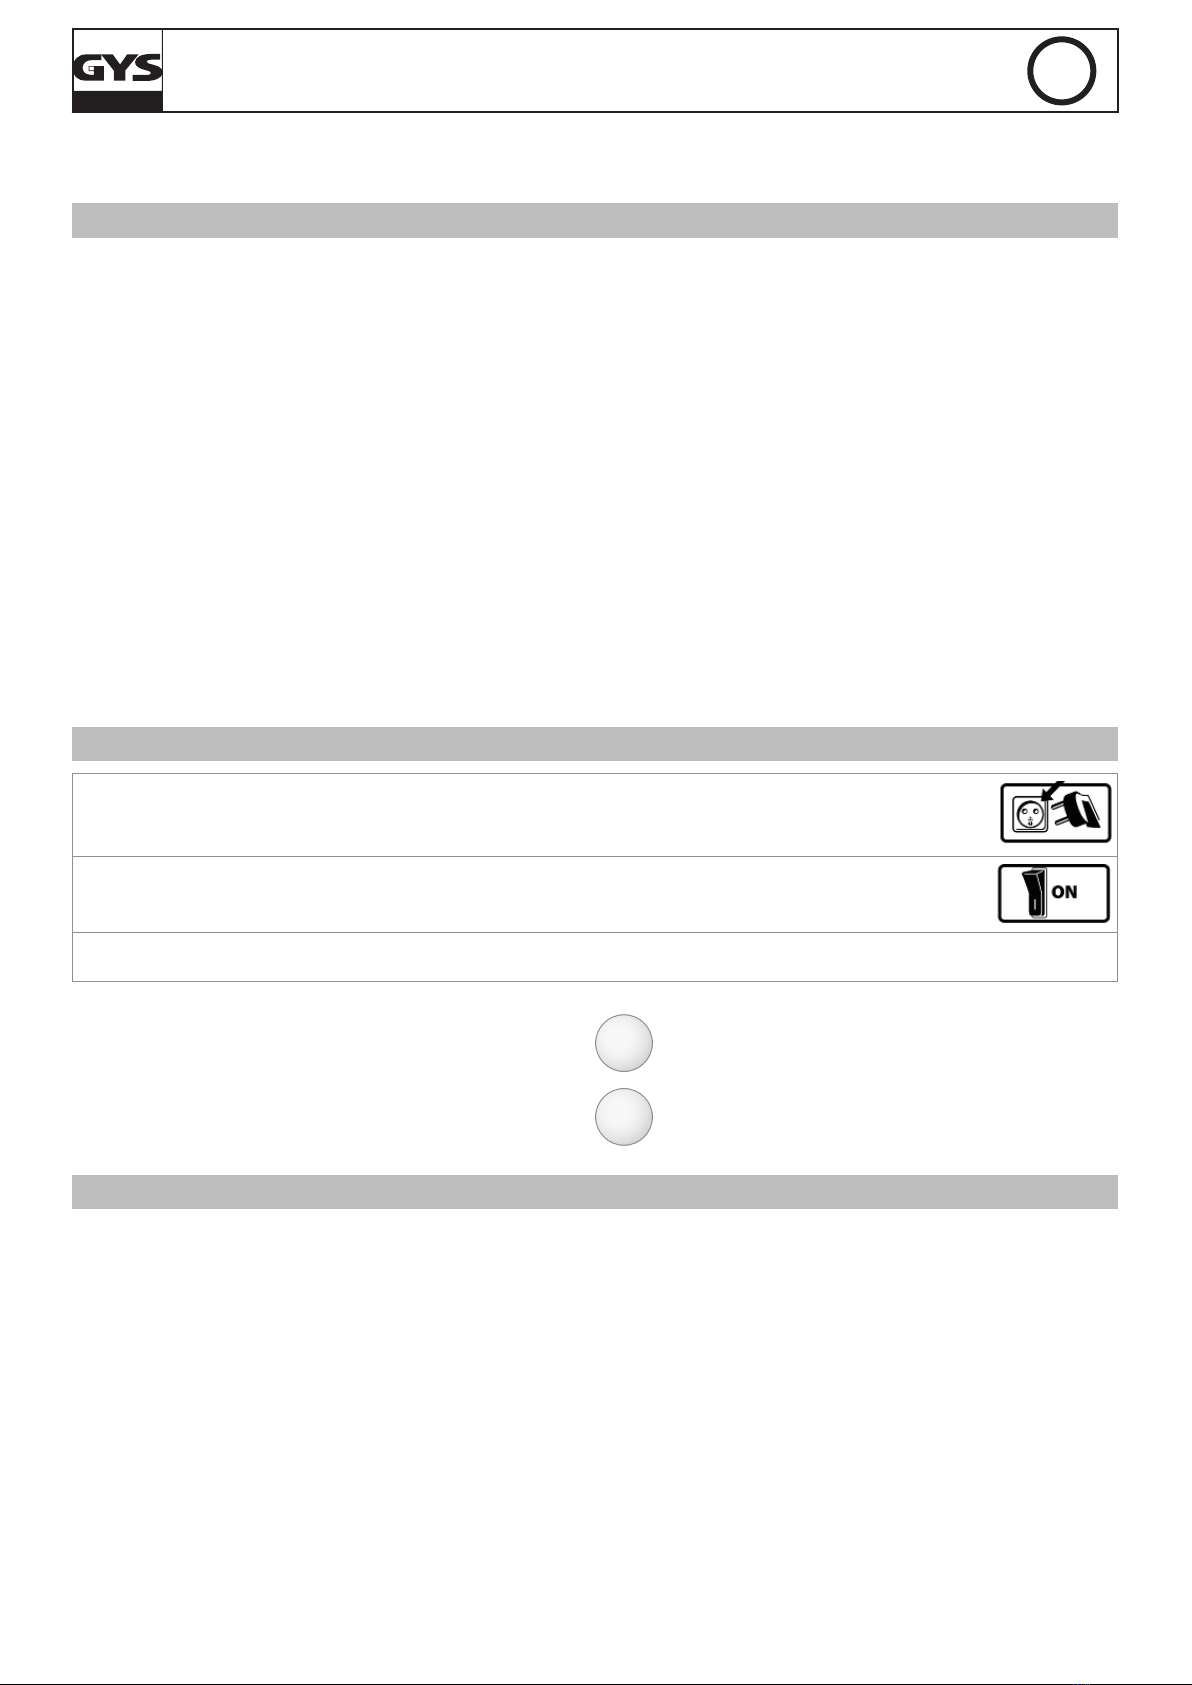
1Connect the charger to the mains. Single phase mains voltage 230V ± 15% (50/60Hz).
2"Turn the switch to "ON".
For 3s the display will show "GYSFLASH 100-12 HF Vx.x"
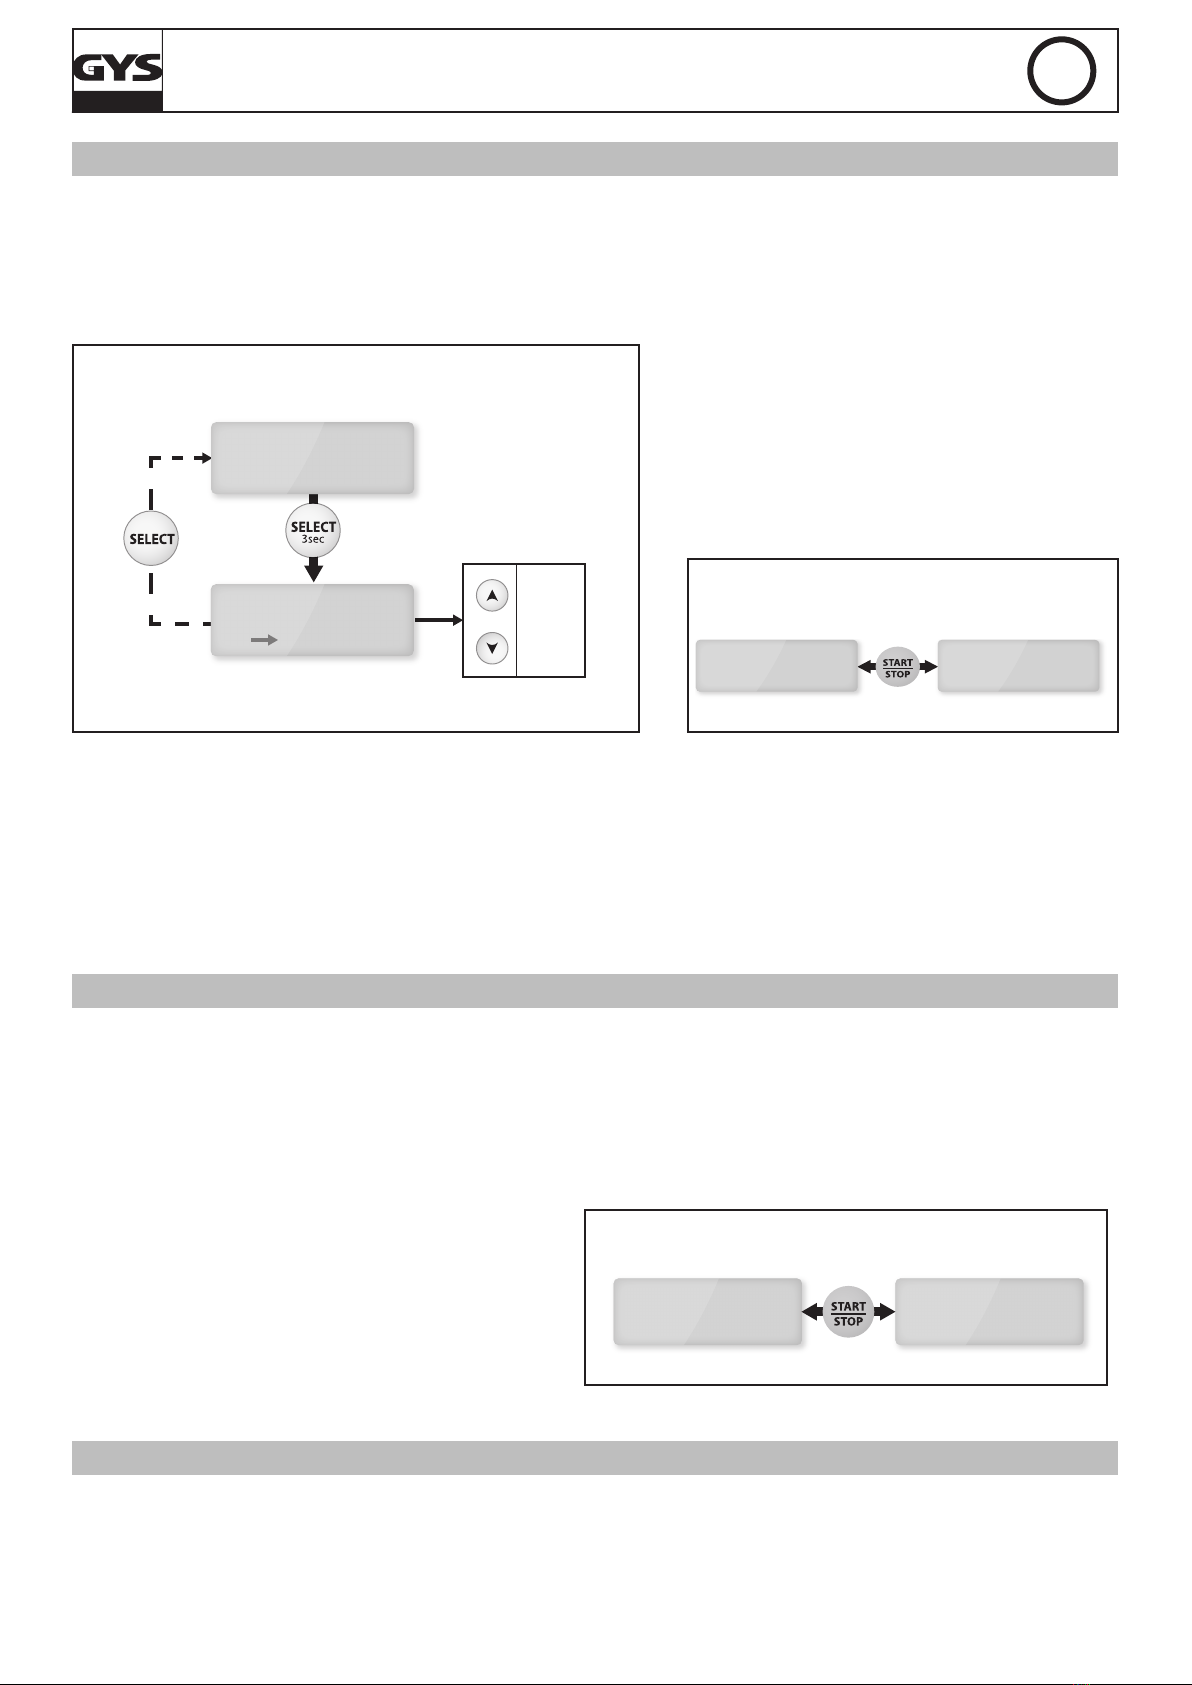
3Select the required mode. By default the charger will automatically select the last setting.
• The "Mode" key enables access to several menus :
MODE Charge > Diag+ > Showroom (>Change Battery*)
(> Power Supply*)
*hidden by default.
• To access the "conguration" menu press the "mode" key
for 3s : MODE 3 sec - Conguration
CHARGE MODE
This product will charge the battery safely even if the battery is still in the vehicle.
Ensure that the correct sequences are followed.
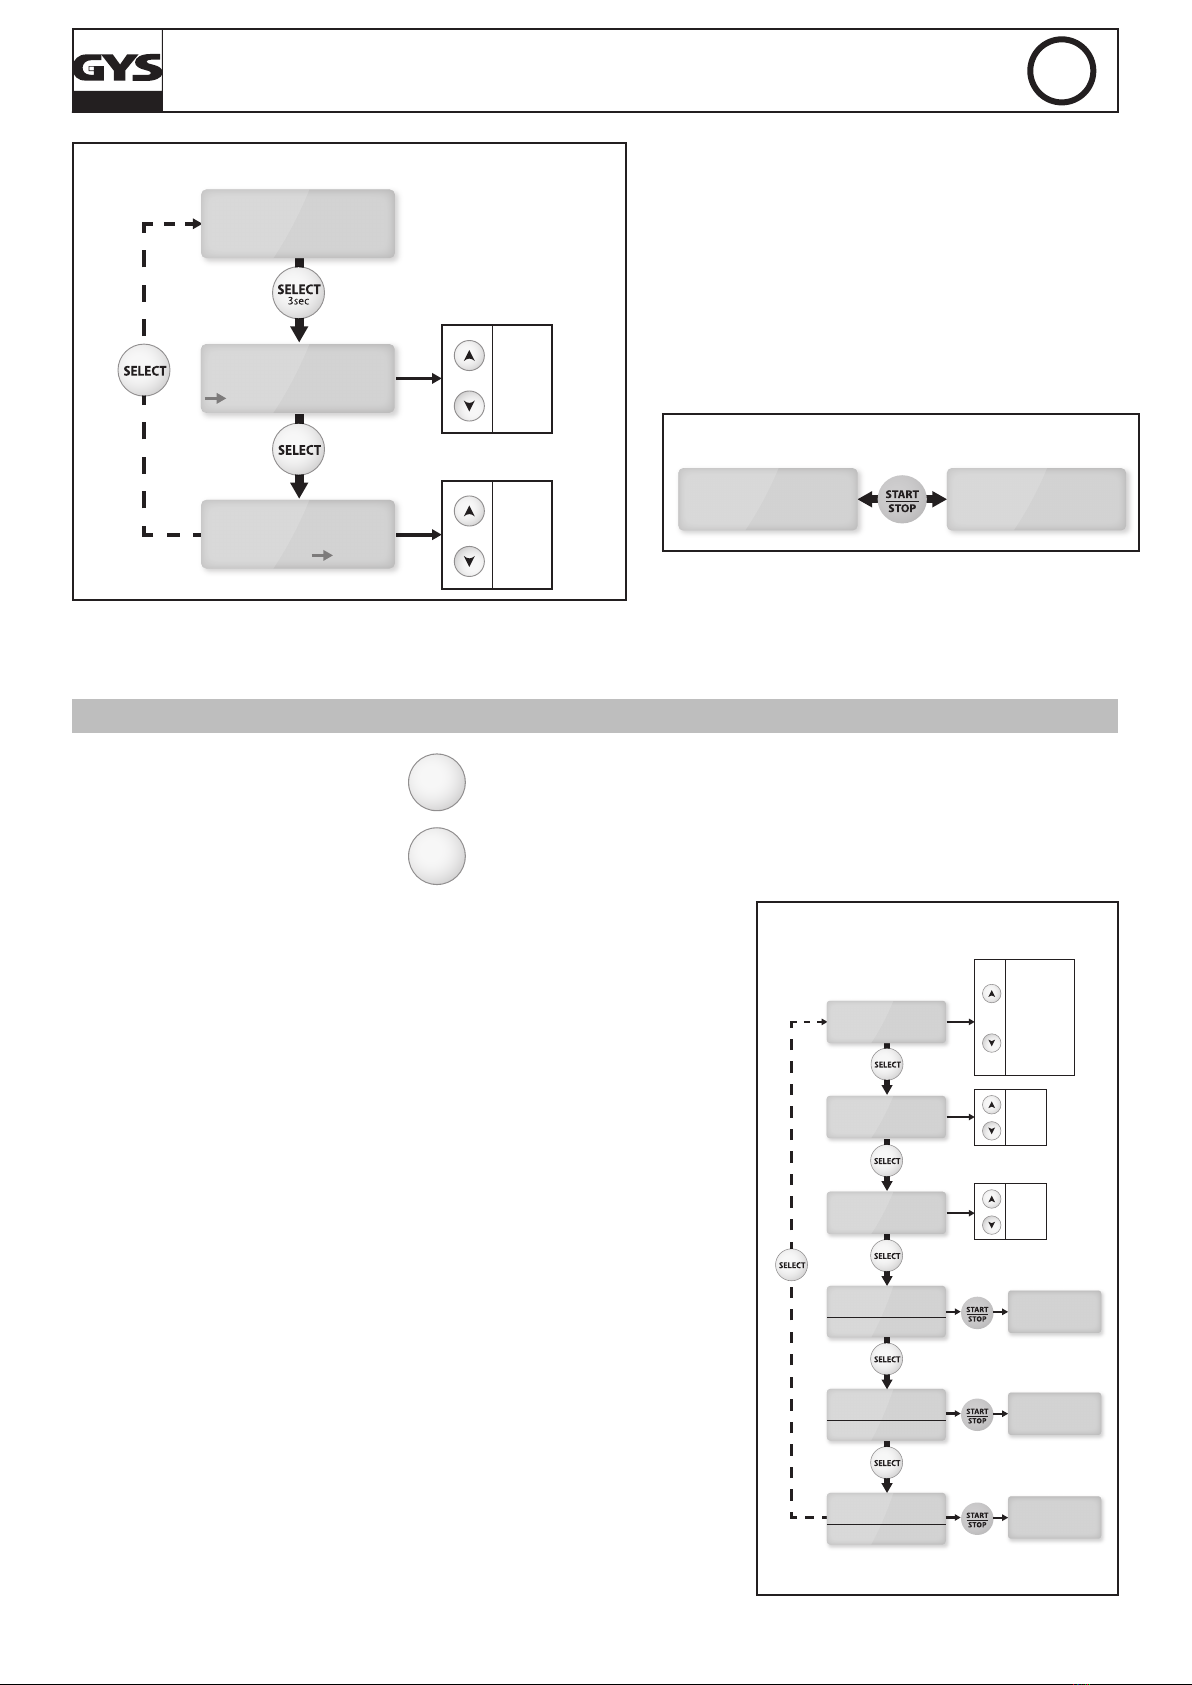
Charge conguration :
Before starting to charge the battery, ensure that the charger has been correctly set (battery voltage, charging curve and battery
capacity).
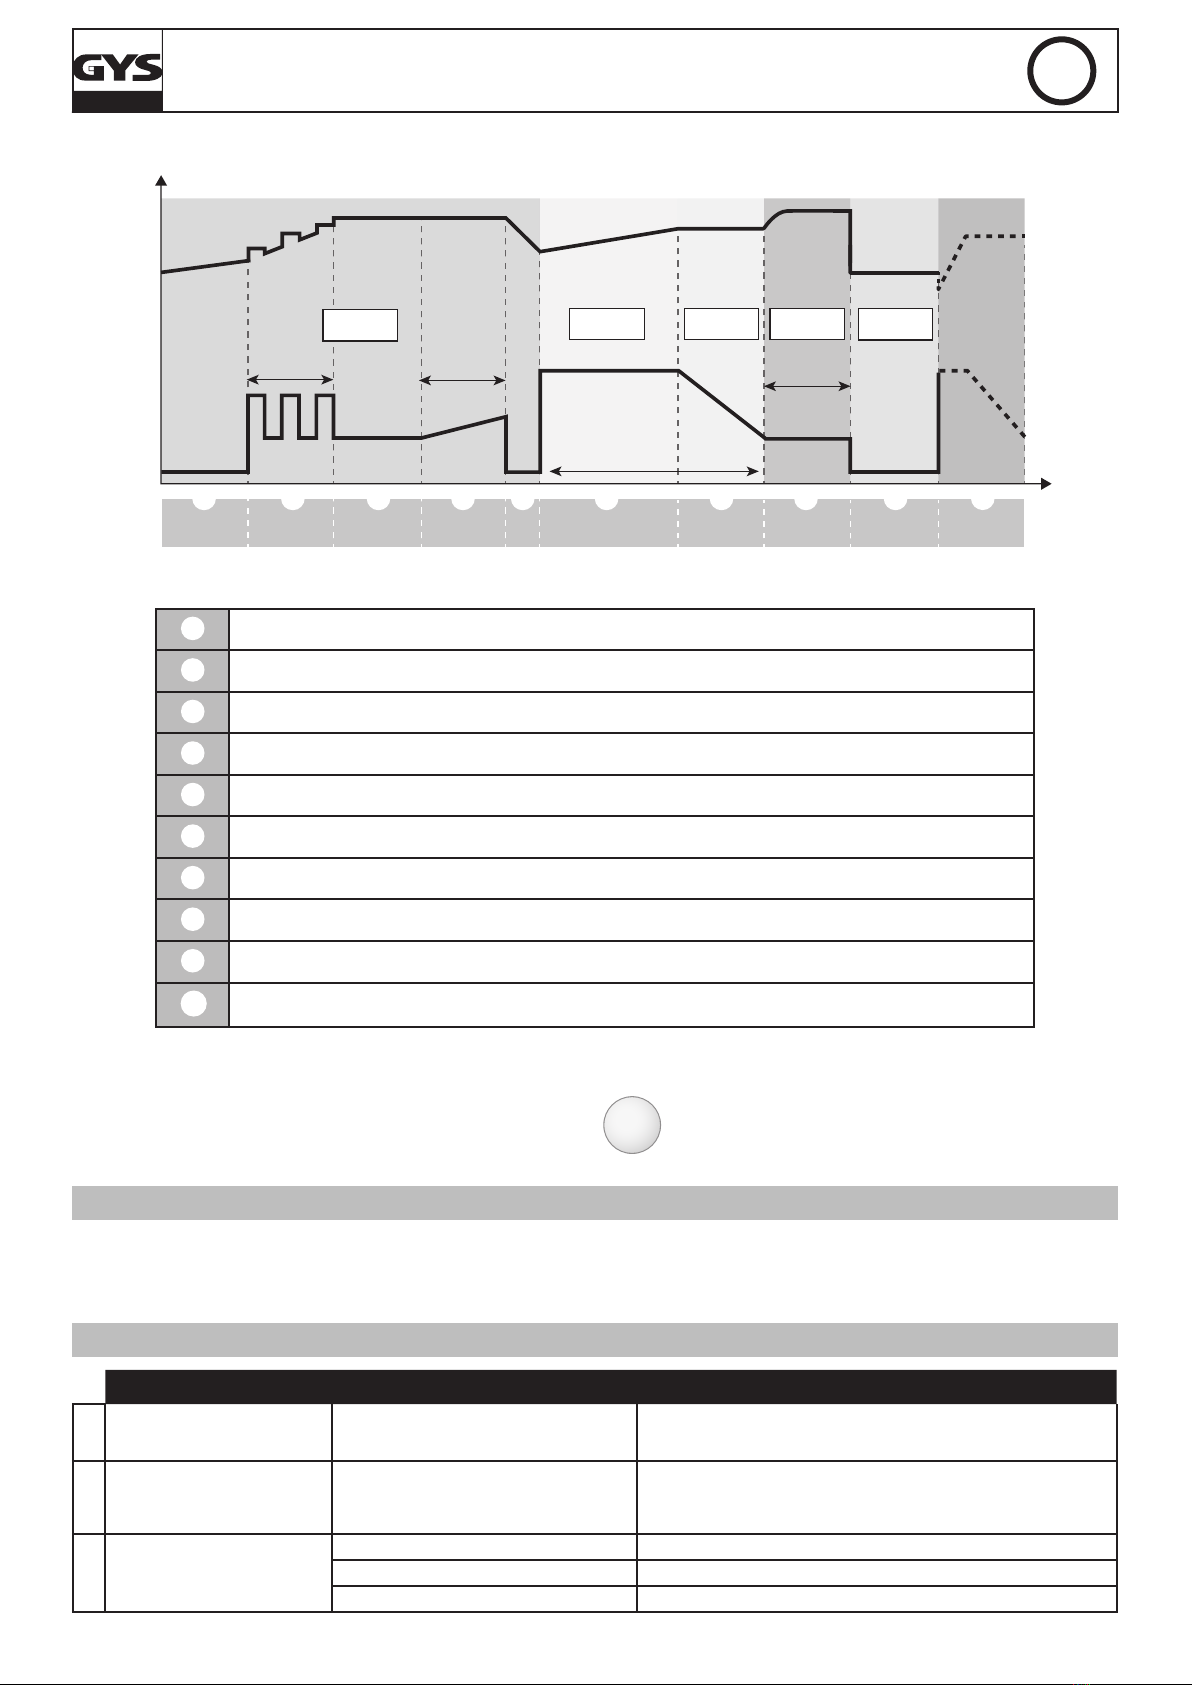
Several charging curves are available :
• Easy: simplied curve, suitable for every lead battery and which for it is not required to know the battery capacity. However for an
optimized charge, it is recommended when possible to use the liquid or gel/AGM batteries charging curves.
• Liquid: charging curve for vented battery (lead, lead calcium, lead calcium-silver, etc). For this charging curve the battery capacity
in Ah must be selected.
• Gel/AGM: charging curve for sealed battery (gel, maintenance free, AGM…). For this charging curve the battery capacity in Ah must
be selected.
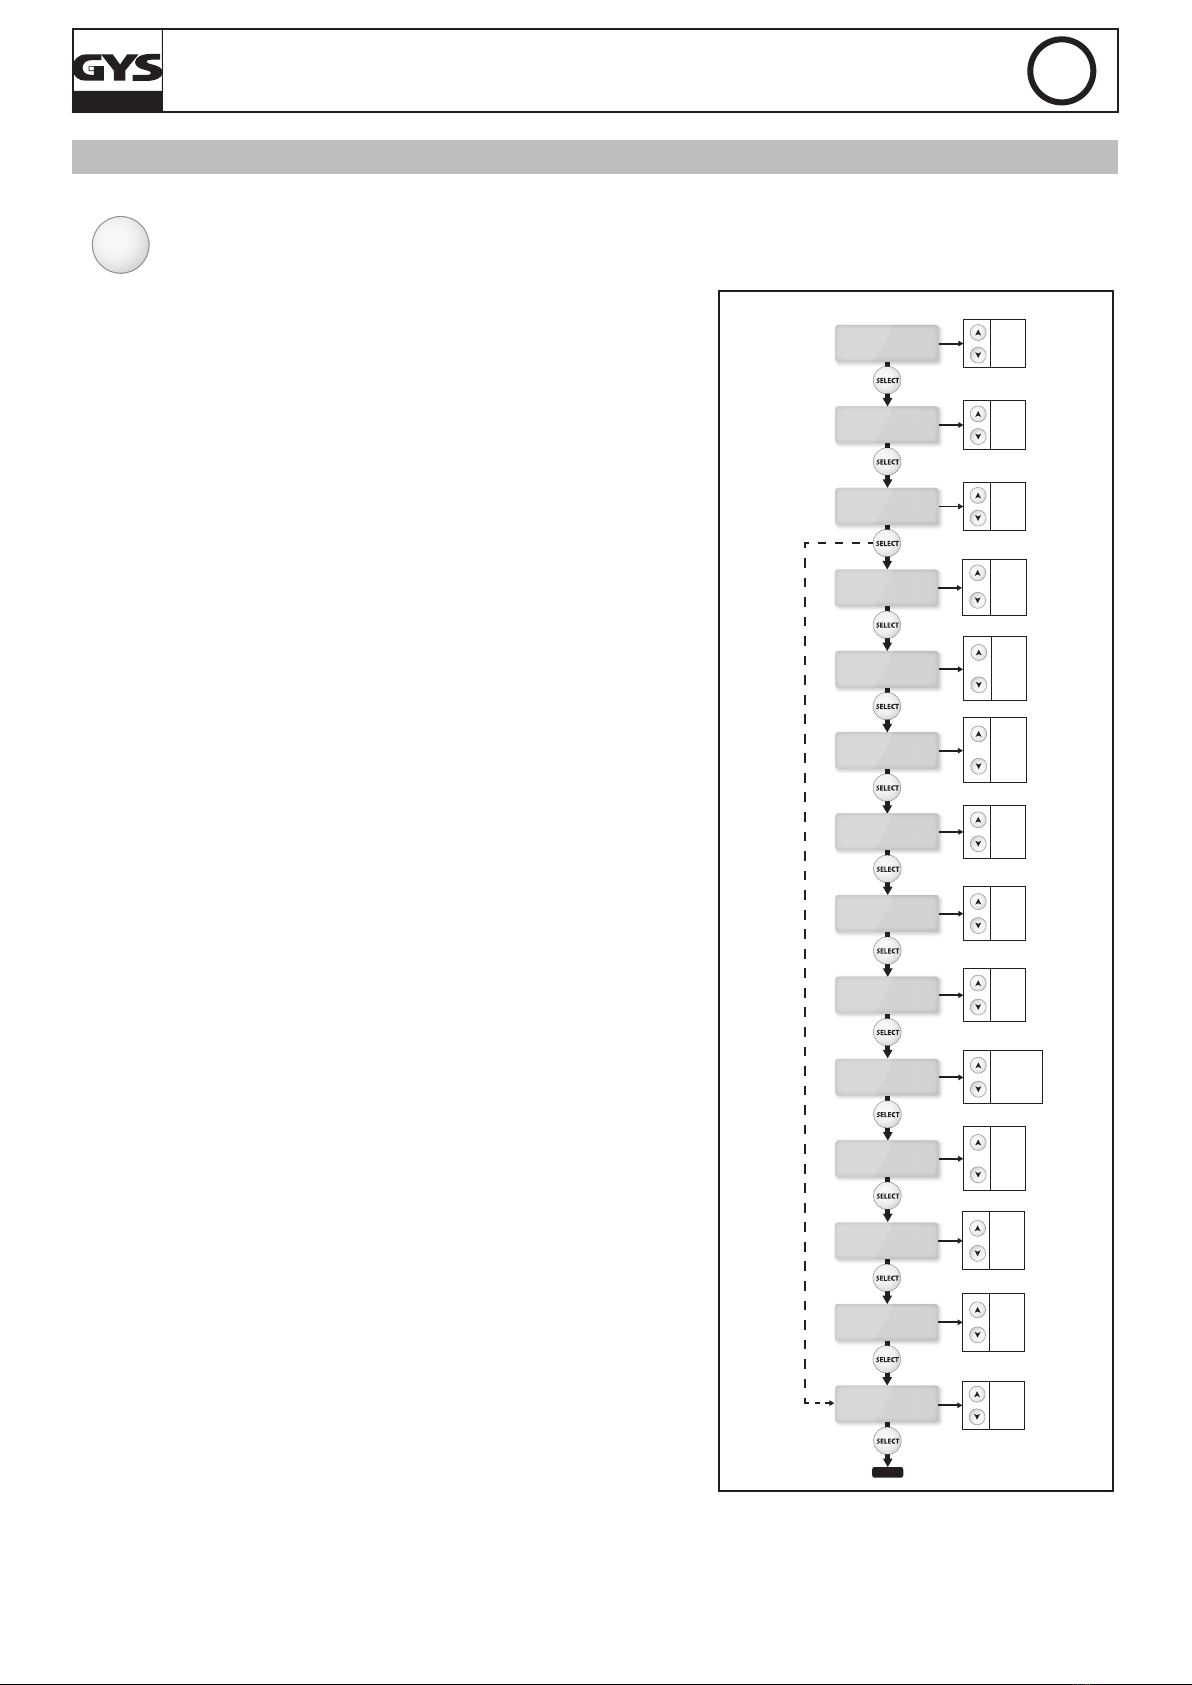
• Expert: charging curve type IUOIOU adjustable via the menu Expert conguration and intented for experimented user (see page 15).
By default this curve is inactive and doesn't appear in the curve list of the CHARGE mode.
WARNING: According to the conguration of the expert curve (see page 15), it can be necessary to disconnect vehicle’s battery
before starting the charge in order to protect the electronic of the vehicle.
EN

11
GYSFLASH 100-12 HF EN
CHARGE MODE CONFIGURATION DEPENDING
ON THE BATTERY TYPE
Easy
Liquid
Gel/AGM
Expert
20Ah
11Ah
...
1200Ah
CHARGE 12V
Gel/AGM
80Ah
12V
80Ah
12V
80Ah
CHARGE
Gel/AGM
CHARGE
Gel/AGM
Charging curves available if activated in
«Advanced Menu».
Only for liquid, gel/AGM and expert
charging curves.
Start up :
• Connect the clamps : red to the (+) and black
to the (-) of the battery.
• Push the START/STOP key to start the charge.
• During the charge, the product alternates
between displaying the progressing percentage
of the charge, voltage, current, injected ampere
hours and elapsed time.
• Push the START/STOP key again to stop the
charge.
CHARGE MODE START UP
10%
12V
80Ah
CHARGE
CHARGE
Gel/AGM U=12.5V
Q=2.5Ah I=10A
00h22
NB: When the charge ends (100%), if the battery remains connected the charger maintains the charge level of the battery by
applying a oating voltage.
Precaution: Check the electrolyte level and ll if necessary before charging.
When charging on vehicle, it is recommended to reduce the electrical consumption of the vehicle to a minimum (switch off the lights,
close the doors...) in order to do not disturb the charging process.
DIAG+ MODE
On a stationary vehicle the GYSFLASH supplies up to 100A to test high-energy consumers: engine fan, window regulator, electronic
suspension, etc... By supplying a steady voltage:
- 12V to 14.8V
Voltage adjustment
It is possible to adjust the voltage in steps of 0.1V according to manufacturer’s specications.
DIAG + MODE CONFIGURATION
12.0V
12.1V
...
14.8V
DIAG+
U=13.5V
12V
DIAG+
U=13.2V
12V
Start up :
• Connect the clamps : red to the (+) and black to the
(-) of the battery.
• Push the START/STOP key to start the mode.
• During use the current consumed and the instanta-
neous voltage are displayed.
DIAG+ MODE START UP
I=12A
U=13.5V
DIAG+
U=13.5V
12V DIAG+ 12V
Precaution : Before using the Diag+ Mode. If the screen displays a current greater than 10A, it indicates the battery is discharged.
The device will start charging automatically. Check all electrical consumers are switched off on the vehicle. Wait until the current falls
below 10A and then re-launch the diagnostic.

12
GYSFLASH 100-12 HF EN
SHOWROOM MODE
On a stationary vehicle, the GYSFLASH supplies up to 100A to test high-energy consumers (engine fan, window regulator, electronic
suspension, etc…) by supplying a steady voltage adjustable:
- 12V to 14.8V
Volatage adjustment:
It is possible to adjust the voltage in steps of 0.1V according to manufacturer’s specications.
SHOWROOM MODE CONFIGURATION
12.0V
12.1V
...
14.8V
SHOWROOM
U=13.5V
12V
SHOWROOM
U=13.7V
12V
Start up with battery :
• Connect the clamps : red to the (+) and
black to the (-) of the battery.
• Push the START/STOP key to start the
mode.
• During use the current consumed and the
instantaneous voltage are displayed.
SHOWROOM MODE START UP
SHOWROOM
U=13.5V I=12A
U=13.5V
12V
SHOWROOM
12V
Start without battery (not recommended)
It is possible to supply power to the vehicle without a battery by pushing the START/STOP key for 3 secondes. The screen will
display "no battery" for 1 second before starting to supply the vehicle.
Warning: polarity reversal can damage vehicle electronics.
Precaution :
Before using the Showroom Mode. If the screen displays a current higher than 10A, it indicates the battery is discharged. The device
will start charging automatically. Check all electrical consumers are switched off on the vehicle. Wait until the current falls below 10A
before using any electical functions of the car.
CHANGE BATTERY MODE (OPTIONAL)
The GYSFLASH will maintain a stabilised power supply to the vehicle during battery replacement to preserve memory settings. By
default this mode is inactive and doesn’t appear in the mode list. It can be activated via the Advanced menu (see page 15).
Start up :
• Connect :
1 : Red clamp to the (+) of the battery / battery terminal, in such a way that the battery can be changed without disconnecting
the clamp.
2 : Black clamp to the vehicle chassis or earth.
• Press the START/STOP key to start the mode.
• During use, the current consumed and the instanta-
neous voltage are displayed.
• When changing the battery ensure the polarity is
correct.While exchanging the batteries, be careful
not to disconnect the charger clamps to avoid loss of
electronic data.
CHANGE BATTERY START UP
CHANGE BATTERY CHANGE BATTERY
U=12.9V I=26A12V
aWarning: polarity reversal can damage the vehicle electronics.
POWER SUPPLY MODE (OPTIONAL)
This mode is intended for expert users only. This mode enables the charger to be used as a stabilised power supply, with regulated
voltage and adjustable maximum current. By default this mode is inactive and doesn't appear in the mode list. It can be activated
via the Advanced menu (see page 15).
Adjustment of the voltage regulation and current limitation :
The voltage regulation can be adjusted from 2V to 16V and the maximum current from 2A to 100A:

13
GYSFLASH 100-12 HF EN
POWER SUPPLY MODE CONFIGURATION
POWER SUPPLY
U=19.6V I<30A
POWER SUPPLY
U=19.6V I<10A
2.0V
2.1V
...
16.0V
2A
3A
...
100A
POWER SUPPLY
U=13.5V I<30A
Start up :
• Push the START/STOP key to start the mode.
• During use, the current consumed and the instan-
taneous voltage are displayed.
POWER SUPPLY START UP
POWER SUPPLY
U=19.6V I<50A
POWER SUPPLY
U=19.6V I=10A
NOTE: Unlike other modes, Power Supply mode, the charger does not compensate cables voltage drop. In this case, the voltage
displayed on the screen corresponds to the output voltage of the charger (not the voltage on the clamps).
CONFIGURATION MENU
Access to conguration menu : MODE 3 sec - Mode
To browse in the sub menu press the
«Select» key :
SELECT
languages > restart > lock showroom > cable check > ADVANCED
MENU > Reset Memory
Sub menu :
• Languages :
This menu enables to select the language (use the arrows to change the
language).
• Automatic restart :
Automatic restart only works with «Showroom», «Charge» and «Power
Supply» mode. This feature enables charger to restart automatically and to
restart charging after a cut in power. This feature is inactived as default =>
Display «Conguration | Restart : OFF».
• Lock Showroom :
To lock the device in Showroom Mode (to avoid misuse).
CONFIGURATION MODE
SETTINGS
English
SETTINGS
restart: OFF
Y (yes)
N (no)
ON
OFF
English
Francais
Deutsch
Nederlands
Espanol
Portugues
Italiano
Russian
...
SETTINGS
Cables Testing:
Press START
SETTINGS
lock showroom: N
SETTINGS
Advanced Menu:
Press START
SETTINGS
Reset Memory:
Press START
Cables testing
Advanced menu
Reset Memory

14
GYSFLASH 100-12 HF EN
Shortcut to Lock Showroom :
The «Lock Showroom» feature can be activated without accessing the conguration menu.
• Turn OFF the device (main switch in the OFF position)
• Press MODE key
MODE
• Turn ON the switch, while the MODE key is still pressed. The screen displays «GYSFLASH
1000-12 HF Vx.x» for 3 seconds.
• Hold the MODE key until the creen displays «lock showroom: Y»
• Cables calibration :
This mode must be used each time the cables are changed. The GYSFLASH can be tted with cables up to
2x5m in 16mm².
OK : The calibration was successful.
FAIL : A problem occurred during the calibration. In this case, the calibration is reset to the factory setting.
Check that the cables are in good condition and properly put in short-circuit and repeat the procedure.
• ADVANCED MENU (code 1-9-6-4) :
This menu is intented for experimented user only.
To access this menu, enter in the code above («Select» key to change the digit selection and «Start/Stop» key to
conrm the code).
For more details, see page 15.
• Reset Memory (code 1-9-6-4) :
This menu is intented to factory reset the charger
settings by entering the code above. Any personal
parameters are deleted.
RESET MEMORY
RESET MEMORY
Code OK
Yes
No
RESET MEMORY
Reset all ?
RESET MEMORY
Code: 0000
Code OK
(1964)
RESET MEMORY
Error Code Code NOK
Display 1s
0
1
...
9
Change the
code number

15
GYSFLASH 100-12 HF EN
ADVANCED MENU
This menu controls the advanced parameters of the charger. To move from one parameter to another push the Select key :
SELECT
Activation «Change battery» > Activation «Power Supply» > Activation «Expert Curve» (> Adjusment of the
«Expert Curve» parameters)
• CHANGE BATTERY mode activation:
To activate the CHANGE BATTERY mode, select «ADVANCED MENU |
Change bat: ON». Now this mode will be accessible from the mode list.
• POWER SUPPLY mode activation:
To activate the POWER SUPPLY mode, select «ADVANCED MENU | Power
Supply: ON». Now this mode will be accessible from the mode list.
• «EXPERT» curve activation:
To activate the «RECOV» curve, select «ADVANCED MENU | Expert curve:
ON». Now this curve will be available in the charging curves list from the
CHARGE mode.
• Parameters adjustment of the «Expert» curve:
If the charging curve is activated, the charging curve parameters can be
adjusted (type IU0I0U):
- Ucharge: Charge voltage adjustable from 12.0 to 16.0V (Step 7).
- Urecovery: Recovery voltage adjustable up to 30.0V.
If the value «OFF» is selected the recovery function is inactive (Step 2
and 4).
- Uoating: Floating voltage adjustment.
If the value «OFF» is selected the oating function is inactive (Step 9).
- Trecovery: Maximum time for shorted cells recovery, adjustable from
1h to 12h (Step 2).
- Trefresh: Time for the refreshing phase adjustable from 1h to 12h. If
the value «OFF» is selected, the refresh function is not activated (Step 8).
- T desulfat: Maximum time adjustable from 1h to 12h of the desulfation
phase (Step 4).
- T ch_max: Maximum charging time (Step 7 and 8).
- T ch_min: Minimum charging time (Step 7 and 8).
- Urefresh: Maximum voltage during the cooling phase (Step 8).
- OCP (Over Charge Protection): Maximum percentage of the nominal
capacity which can be injected before the protection begins.
aWarning:
When charging in-situ, a «Urecovery» or «Urefresh» too high
might damage the electronics of the vehicle. We advise NOT to
adjust these settings above 15V.
To save and validate the new settings, select «ADVANCED MENU» | save? Yes»
Push the «MODE» key to exit the «Conguration» menu.
ADVANCED MENU
ON
OFF
ADVANCED MENU
Power Supply: OFF
EXPERT CURVE
Uoating: OFF
EXPERT CURVE
Ucharge: 14.3V
EXPERT CURVE
Urecovery: OFF
ON
OFF
ON
OFF
ADVANCED MENU
expert curve: OFF
EXPERT CURVE
T recovery*: 5h
1h
2h
...
12h
EXPERT CURVE
T desulfat: 12h
1h
2h
...
12h
EXPERT CURVE
Tch_max: 16h
1h
2h
...
36h
EXPERT CURVE
Tch_min: 0h
0h
1h
...
Tch_max
EXPERT CURVE
T refresh: 5h
OFF
1h
2h
...
12h
EXPERT CURVE
U refresh: 17.0V
Uch
...
30.9V
31.0V
EXPERT CURVE
OCP: 200%
100%
...
245%
250%
ADVANCED MENU
Save? No
Yes
No
RETURN
OFF
Uch
...
29.9V
30.0V
12.0V
12.1V
...
16.0V
OFF
12.0V
12.1V
...
Uch
ON
OFF
ADVANCED MENU
Change bat.: OFF

16
GYSFLASH 100-12 HF EN
Charging curve description (IU0I0U)
Test Test Charge Absorption Floating New charge
cycle
Shorted cell
Recovery
Sulphation
Test Desulphation
I
U
1 2 3 4 5 6 7 8 9 10
Refresh
Recovery Phase I Phase U0Phase I0Phase U
U=Ucharge
U=Uoating
U=Urecovery
max.
Trecovery I=Icharge
I=Irefresh
Trefresh
max.
T
desulfat
Tch
U=Urefresh
1Battery analysis
2Recovering damaged elements from an extended deep discharge
3Sulphated battery test
4Sulphated battery recovery
5Checking the battery recovery
6Battery charged to 80%
7Battery charged to 100%
8Battery cells refresh
9Maintenance charge
10
Starts a charge cycle for maintaining performance = maintenance
To save and conrm the new settings, select “ADVANCED MENU” | save? Yes”
Push the «MODE» key to exit the «Conguration» menu. MODE
PROTECTIONS
This device is protected against short-circuits and polarity inversions. It has an anti-spark feature which prevents sparks whilst
connecting the Gysash to the battery. The Gysash will not deliver current if there is no battery detected (no voltage in the clamps).
The charger is tted with an internal 125A fuse (ref. 054585), to protect against misuse.
TROUBLESHOOTING
TROUBLESHOOTING CAUSES REMEDIES
1Screen ashing :
« #error (+)<-->(-) »
+ alarm beep The polarity has been reversed on the clamps Connect the red clamp to the (+) and the black clamp to the (-) of the battery.
2Screen ashing :
« #erreur U>Umax »
+ alarm beep Battery voltage too high Charger not suitable (ex: 24V battery instead of 12V battery).
3Screen ashing :
« #battery error »
+ alarm beep
Battery short-circuited or damaged Change the battery.
Battery not connected or clamps in short-circuit Check clamps connection.
6V Battery connected Charger not suitable.

17
GYSFLASH 100-12 HF EN
4Screen ashing :
« >100A »
+ alarm beep Consumption exceeds the output of the charger Turn off electrical consumers to reduce power demand
5The GYSFLASH delivers a high cur-
rent (greater than 10A) before the
diagnostic tool has been activated.
Several consumers are active on the vehicle GYSFLASH works to specication. Turn off consumers to check the battery is not
too discharged (see cause n°2).
Battery discharged Battery deeply discharged, the GYSFLASH delivers current to charge it. Wait
until the output current is below 10A to start the diagnostic.
6Displays for 1s :
« no battery »
+ alarm beep
Showroom mode is working on
« no battery »
Showroom without battery : GYSFLASH operating normally.
To deactivate the "no battery" function, press the "START/STOP" key, and then
press the "START/STOP" key again to start the Showroom mode with battery.
7The device is locked in Showroom
mode Lock Showroom active Normal operation of GYSFLASH.
Refer to conguration menu to deactivate this function.
8Screen displays :
« #error temp(°C) »
+ alarm beep
Faulty fan Contact your distributor.
Extended exposure to sunlight Do not leave the device exposed to sunlight.
Leave the device ON until the fault disappears. (The alarm beep can be stoppe-
dPossibility to stop the alarm beep by pressing the START/STOP key).
9Screen displays :
« #error IHM »
+ alarm beep Electronic fault Contact your distributor.
10 Screen displays :
« #error fuse »
+ alarm beep Mishandling Internal fuse must be changed by a qualied person
(ref. 054585 : 125A).
11 The device doesn't display anything Input fuse HS Input fuse must be changed by a qualied person
(temporised fuse 10A 5x20).
Faulty electrical network
Check the voltage of the electrical network is between 180V and 260V.
SAFETY
▪ Explosive gas, avoid ame and sparks. During the charge, the battery must be placed in a well ventilated area.
▪ Acid projection hazard.
▪ Protect against rain and moisture.
▪ The charger must be connected to an EARTHED power supply.
▪ If the electricity supply cable is damaged, or if the internal fuse has blown (ref 054585), it must be replaced by the manufacturer,
its after sales service, or a qualied person.
▪ Do not use to charge small batteries (i.e those with a capacity less than the minimum stated on the Gysash), or non rechar-
geable batteries.
▪ Always ensure the Red clamp is connected to the "+" battery terminal rst.
▪ If it is necessary to connect the black clamp to the vehicle chassis, make sure it is a safe distance from the battery and the fuel/
exhaust pipe.
▪ After charging, disconnect the charger from the outlet, then disconnect the clamp from the earth and the battery in the indicated
order.
▪ The charger must be positioned so that the socket is always accessible.
▪ This charger is not a toy.
▪ This product should be disposed of at an appropriate recycling facility - do not dispose of in domestic waste.
▪ Do not short-circuit the clamps during use.

50
GYSFLASH 100-12 HF
ATTESTATION DE CONFORMITÉ
La société GYS atteste que le chargeur décris dans ce manuel : GYSFLASH 100-12 HF est fabriqué conformément aux exigences
des directives européennes suivantes :
- Directive Basse Tension : 2006/95/CE du 12/12/06.
- Directive CEM : 2004/108/CE du 15/12/2004- 03/05/1989.
Il est pour cela conformes aux normes harmonisées :
- EN 60335-2-29 & EN 55014-1 / EN 55014-2 – EN61000-3-2 - EN61000-3-3 – EN62233
Date de marquage CE : 2015.
DECLARATION OF COMPLIANCE
The GYS Company testies that the charger described in this manual : GYSFLASH 100-12 HF is manufactured in compliance with
the requirements of the following European directives :
- Low Voltage Directive : 2006/95/CE du 12/12/06.
- EMC Directive : 2004/108/CE du 15/12/2004- 03/05/1989.
Therefore it comply with the following harmonized standards :
- EN 60335-2-29 & EN 55014-1 / EN 55014-2 – EN61000-3-2 - EN61000-3-3 – EN62233
Making dates CE : 2015.
KONFORMITÄTSERKLÄRUNG
GYS erklärt, dass das Hochfrequenz- Batterieladegerät : GYSFLASH 100-12 HF Richtlinienkonform mit folgenden europäischen
Bestimmungen hergestellt wurde:
- Niederspannungsrichtlinie : 2006/95/CE du 12/12/06.
- EMV-Richtlinie : 2004/108/CE du 15/12/2004- 03/05/1989.
Dieses Gerät stimmt daher mit den erweiterten Normen überein :
- EN 60335-2-29 & EN 55014-1 / EN 55014-2 – EN61000-3-2 - EN61000-3-3 – EN62233
CE/GS Kennzeichnung : 2015.
ATTESTACION DE CONFORMIDAD
La empresa GYS declara que el cargador descrito en este manual, GYSFLASH 100-12 HF, está fabricado en conformidad a las exi-
gencias de las directivas europeas siguientes:
- Directiva Baja Tensión : 2006/95/CE del 12/12/06.
- Directiva CEM : 2004/108/CE del 15/12/2004- 03/05/1989.
Para estas razones, son en conformidad con las normas armonizadas :
- EN 60335-2-29 & EN 55014-1 / EN 55014-2 – EN61000-3-2 - EN61000-3-3 – EN62233
Fecha de marca CE : 2015.
ДЕКЛАРАЦИЯ СООТВЕТСТВИЯ
Компания GYS удостоверяет, что зарядное устройство, описанное в данной инструкции: GYSFLASH 100-12 HF
произведено в соответствии с требованиями следующих европейских директив:
- Директива о Низком Напряжении: 2006/95/CE от 12/12/06.
- Директива CEM : 2004/108/CE от 15/12/2004- 03/05/1989.
Для этого они соответствуют гармонизированным нормам :
- EN 60335-2-29 & EN 55014-1 / EN 55014-2 – EN61000-3-2 - EN61000-3-3 – EN62233
Дата нанесения маркировки CE: 2015.
VERKLARING VAN OVEREENSTEMMING
GYS verklaart dat de in deze handleiding beschreven lader ; GYSFLASH 100-12 is vervaardigd in overeenstemming met de eisen van de volgende
Europese richtlijnen:
- Lage Spanningsnorm : 2006/95/CE - 12/12/06. /Richtlijn CEM : 2004/108/CE - 15/12/2004 - 03/05/1989.
Het apparaat is daardoor in overeenstemming met de geharmoniseerde normen:
- EN 60335-2-29 & EN 55014-1 / EN 55014-2 – EN61000-3-2 - EN61000-3-3 – EN62233
Datum CE markering : 2015.
01/09/2015
Société GYS
134 BD des Loges
53941 Saint-Berthevin
France
Nicolas BOUYGUES
Président Directeur Général

51
GYSFLASH 100-12 HF
COMBINAISON BATTERIES / BATTERIES COMBINATION / BATTERIEKOMBINATIONEN / COMBINACION
BATERIAS / КОМБИНАЦИЯ АККУМУЛЯТОРОВ / BATTERIJ COMBINATIE
PICTOGRAMMES / SYMBOLS / ZEICHENERKLÄRUNG / ICONOS / СИМВОЛЫ / PICTOGRAMMEN
T 10A
FUSE 125A
Appareil conforme aux directives européennes.
The device complies with European Directive.
Gerät entspricht europäischen Richtlinien.
Aparato en conformidad a las directivas europeas.
Аппарат соответствует европейским директивам.
Het apparaat is in overeenstemming met met de Europese richtlij-
nen.
T 10A
FUSE 125A
Pour usage intérieur, ne pas exposer à la pluie.
For interior use, do not expose to the rain.
Nur für den Gebrauch in geschlosssnen Räumen geeignet. Gegen
Nässe schützen.
Para uso interior. No poner bajo la lluvia.
Для использования в помещении, не ставить под дождь.
Uitsluitend voor gebruik binnen, niet blootstellen aan de regen.
Marque de conformité EAC (Communauté économique Eurasienne).
Conformity mark EAC (Eurasian Economic Commission) .
EAC-Konformitätszeichen (Eurasische Wirtschaftsgemeinschaft).
Marca de conformidad EAC (Comunidad económica euroasiática).
Маркировка соответствия EAC (Евразийское экономическое
сообщество).
EAC overeenstemming mark (Euraziatische Economische Gemeen-
schap).
T 10A
FUSE 125A
Attention gaz explosifs, éviter la formation de ammes et
d’étincelles.
Warning contains explosive gas, keep away from ames or source
of sparks.
Nicht in der Nähe von Flammen oder Funkenquellen arbeiten!
Cuidado! Gases explosivos, evitar llamas y chispas.
Внимание: взрывчатые газы, избегайте образования пламени
и искр!
Let op : explosief gas, vermijd vuur en vonken.
T 10A
FUSE 125A
Attention! Lire le manuel d’instruction avant utilisation.
Caution! Read the user manual.
Achtung! Lesen Sie die Betriebsanleitung.
Cuidado! Leer el manual de instrucción antes del uso.
Внимание ! Прочтите инструкцию перед использованием.
Let op! Lees aandachtig de handleiding voor gebruik.
T 10A
FUSE 125A
Assurer une aération sufsante pendant la charge.
Ensure an adequate ventilation when charging.
Stellen Sie eine ausreichende Belüftung während des
Ladevorgangs sicher.
Asegurarse de una ventilación susiente durante la carga.
Обеспечить достаточную вентиляцию во время зарядки.
Zorg voor voldoende ventilatie tijdens het laden.
T 10A
FUSE 125A
T 10A
FUSE 125A
Produit faisant l’objet d’une collecte sélective - Ne pas jeter dans une
poubelle domestique.
Separate collection required – Do not throw in a domestic dustbin.
Für die Entsorgung Ihres Gerätes gelten besondere Bestimmungen
(Sondermüll). Es darf nicht mit dem Hausmüll entsorgt werden.
Este producto es objeto de una recogida selectiva. No echa en el
contendor doméstico.
Товар подлежит специальной переработке – не выбрасывать в
общий мусоросборник.
Afzonderlijke inzameling vereist. Gooi het niet in het huishoudelijk
afval.
IP21
Protégé contre l’accès aux parties dangereuses avec un doigt, et
contre la pluie verticale.
Protected against vertical rain and against nger access to
dangerous parts.
Geschützt vor Regen und Fingerabdrücke an empndlichen
elektronischen Teilen.
Proteger contra el acceso a partes peligrosas con la mano o el
dedo y contra la lluvia vertical.
Защищен против доступа пальцев в опасные места и против
прямого попадания капель воды.
Beveiligd tegen het aanraken van gevaarlijke onderdelen met de
vingers, en tegen verticaal vallende regendruppels.
T 10A
FUSE 125A
Fusible temporisé 10A.
Temporized Fuse 10A.
Träge Sicherung 10A.
Fusible de retardo 10A.
Предохранитель с замедлителем 10A.
Vertraagde zekering 10A.
T 10A
FUSE 125A
Fusible automobile 125A.
Automobile Fuse 125A.
Sicherungsautomat 125A.
Fusible automóviles 125A.
Автомобильные предохранители 125A.
Auto zekering 80A.

52
GYSFLASH 100-12 HF
SPÉCIFICATIONS TECHNIQUES / TECHNICAL FEATURES / TECHNISCHE EIGENSCHAFTEN / ESPECIFICACIONES
TECNICAS / TECHNISCHE SPECIFICATIES
GYSFLASH 100-12 HF
Tension d’alimentation / Power supply/ Netzanschluss/ Tensión de alimentación / Напряжение питания / Netspanning ~230 V AC ±15%
50 / 60 Hz
Puissance nominale max / Max nominal power / Max. Leistung / Potencia nominal máxima / Макс. номинальная мощность
/ Maximaal nominaal vermogen 1500W
Rendement max / Max efciency / Max. Wirkungsgrad / Rendimiento máxima / Масимальная производительность /
Maximale rendement 93%
Fusible d’entrée / Input fuse / Eingangssicherung / Fusible de entrada / Входной предохранитель / Zekering T 10A (5x20)
Tension de sortie nominale / Nominal output voltage / Nominale Ausgangsspannung / Tensión de salida nominal /
Номинальное выходное напряжение / Nominale uitgaande spanning 12 V DC
Plage de tension de sortie / Output voltage range / Ausgangsspannungsbereich / Margen de tensión de salida / Диапазон
выходного напряжения / Spanningsbereik uitgang 2 - 16V
Courant de sortie max / Max output current / Max. Ausgangsstrom / Corriente de salida max. / Максимальный ток на
выходе / Maximale uitgaande stroom 100A
Fusible de sortie / Output Fuse / Ausgangsicherung / Fusible de salida / Выходной предохранитель / Zekering 125A
Type de batteries / Battery types / Batteriearten / Tipo de baterías / Тип аккумулятора / Accu soort
Batterie au plomb /
Leadacid batteries
/ Bleibatterie /
Batería al plomo /
Свинцово-кислотая АКБ
/ Loodaccu
Capacité nominale de charge / Nominal charge capacity / Batteriekapazität / Capacidad nominal de carga / Номинальная
емкость зарядки / Nominale laad capaciteit 20 – 1200 Ah
Nombre de cellules / Number of cells / Anzahl der Zellen / Cantidad de células / Кол-во ячеек / Aantal cellen 6 (12V)
Consommation Batteries au repos / Back Current Drain / Rückstrom / Consumo baterías al descanso/ Расход АКБ в
состоянии покоя / Accu verbruik in de ruststand < 1 mA
Courbe de charge / Charge curve / Ladekennlinie / Curva de carga / График зарядки / Laadcurve IU0I0U
Température de fonctionnement / Operating temperature / Betriebstemperatur / Temperatura de funcionamiento /
Рабочая температура / Werktemperatuur 0°C – 40°C
Température de stockage / Stocking temperature / Lagertemperatur / Temperatura de almacenaje / Температура
хранения / Opslagtemperatuur -20°C – +80°C
Classe de protection / Protection index / Schutzklasse / Clase de protección / Степень защиты / Beschermingsklasse IP21
Poids, cables secteur et de charge compris / Weight, input cables and charge cables included / Gewicht, inkl. Netz-/ und
Ladekabel / Peso, cables sector y de carga incluidos / Вес с учетом сетевого шнура и кабелей зарядки / Gewicht, kabels 6,0 Kg
Dimension (l x H x P) / Abmessungen (B x H x T) / Medida / Размеры (Д x В x Г) / Afmetingen (L x H x B) 320 x 105 x 292
FACE AVANT / FRONTAL SIDE / FRONTSEITE / DELANTERA / ПЕРЕДНЯЯ ПАНЕЛЬ / VOORKANT
SELECT
MODE START
STOP
MADE IN FRANCE
134
5
2
1FR : Bouton Mode
EN : Mode button
DE : Mode Knopf
ES : Botón Modo
RU : Выбор Режима
NL : Modus knop
4FR : Bouton Start/Stop
EN : Start/Stop button
DE : Start/Stop Knopf
ES : Botón Start/Stop
RU : Кнопка Вкл/Выкл
NL : Start/Stop knop
2FR : Boutons + ou -
EN : + or - button
DE : + oder - Knöpfe
ES : Botones + o -
RU : Кнопки + или -
NL : Knop + of -
5FR : Afcheur
EN : Display
DE : Display
ES : Pantalla
RU : Экран
NL : Weergavescherm
3FR : Bouton Select
EN : Select button
DE : Select Knopf
ES : Botón Select
RU : Кнопка
подтверждения выбора
NL : Select knop
Other manuals for GYSFLASH 100.12 HF
2
Table of contents
Other GYS Power Supply manuals

GYS
GYS Gysflash 70-24 HF Maintenance and service guide

GYS
GYS GYSFLASH 102.12 HF User manual

GYS
GYS GYSFLASH 50-12 HF User manual

GYS
GYS GYSFLASH 30.12 HF User manual

GYS
GYS GYSFLASH 40-12 FV User manual

GYS
GYS GYSFLASH 30.12 HF User manual

GYS
GYS NOMAD POWER PRO TRUCK 027527 User manual

GYS
GYS GYSFLASH 50-12 HF User manual

GYS
GYS Gysflash 75-12 HF User manual
Popular Power Supply manuals by other brands

Pulsar
Pulsar AWO 205PU Assembly instructions

Venitem
Venitem TUL373 installation manual

Rockwell Automation
Rockwell Automation Allen-Bradley 1606 Series Reference manual

Simplex
Simplex 4008-9801 installation instructions

Teknic
Teknic Amazon IPC-3 user manual

Pulsar
Pulsar Black Power PSBEN 2024C/LCD instructions