hadewe Azuras PLUS User manual

Art. 0983
FB 04-301 Rev. 1
Date: 30.01.2019
Manual
Azuras PLUS

2
Directory
Foreword 3
Safety Instructions 4
Cleaning & Disinfection 10
Discover Device 11
Before Use 12
Area of Application 12
Operation 12
Usage 14
Operating Steps 14
Work Positioning 15
Infilling the Spray Speed 17
Spray 17
Insert Bur 18
Adjusting the Speed 18
Memory Keys 19
Foot Switch 19
Select Menu 20
Help Menu 20
Settings Menu 21
Confirm Washer Change 21
Turn Light ON/OFF 21
Pictures & Videos 22
Messages 25
Maintenance & Care 26
Washer 26
Water Filter 26
Cleaning Function 27
Cleaning the Chuck 27
Maintenance Overview 28
Upload Firmware 29
Handling Instructions 30
Troubleshooting 31
Technical Details 33

3
Foreword
The Azuras Plus foot care unit was produced according to strict quality criteria
and uses the latest technology in its design. The images in this manual may
vary slightly from the product you have bought as we are constantly
developing our products.
This user manual includes a detailed description and explanation of how to
use the Azuras Plus unit. If you have any questions or suggestions, you can
contact us by telephone or email.
This user manual belongs with the Azuras Plus unit. Keep it somewhere safe.
If you give this product to someone else, please include this document as it
includes important information on how to correctly use the product.
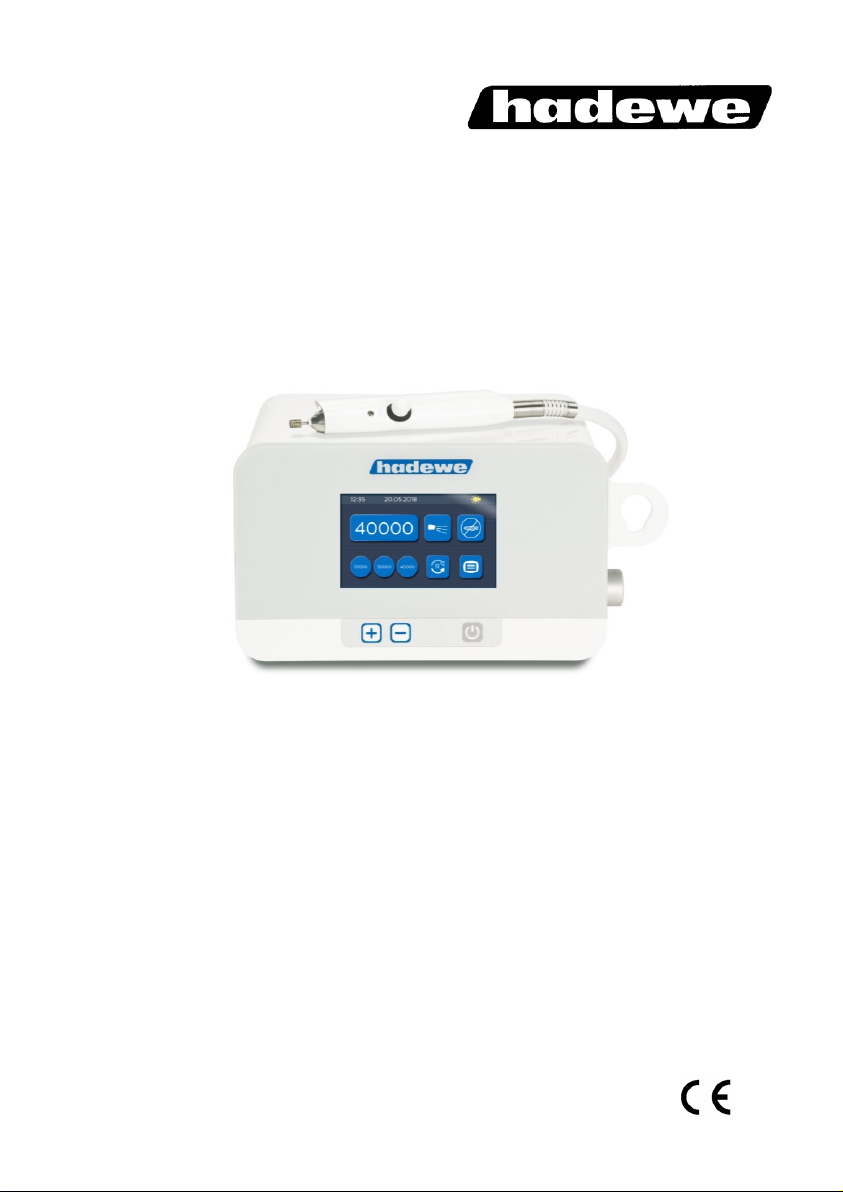
Short description of functions
The Azuras Plus is a device for the treatment of callus and nails. The
handpiece is compatible with rotating tools such as diamond polishers, steel
cutters and ceramic cutters. These can be worked with up to a speed of
40,000 rpm thus providing an efficient way of removing tissue. The direction of
rotation can be changed by pressing a button. The integrated spray function
emerges reliably bundles emerging dusts. The rotation speed can be adjusted
using the keyboard. The amount of spray liquid is adjusted via knob. All other
functions can be accessed with the touch display. The device display will notify
you when the washer needs to be changed and when the device is due for
inspection. Functions and maintenance steps will be described with pictures
and videos shown in the display. You can further use an USB stick featuring
your own pictures. For example, you may want to show your customers the
separate successful steps from treatment to treatment.

4
Safety Instructions
The installation of the working area has to
correspond to the relevant regulations. Set up
the unit in such a way, that the air slits are not
blocked and the extracted air can escape well.
This device shall only be used by persons who
are familiar with feature and function of the
unit.
This appliance can be used by children aged
from 8 years and above and persons with
reduced physical, sensory or mental
capabilities or lack of experience and
knowledge if they have been given supervision
or instruction concerning use of the appliance
in a safe way and understand the hazards
involved. Children should be supervised not to
play with the appliance. Cleaning and user
maintenance shall not be made by children
without supervision.
To avoid the risk of electrocution only connect
the device to the main power supply. If you pull
the power plug, it will stop the connection to the
main power supply. Set up the unit so that the
power plug is always accessible. The power
switch should also always be easily accessible.

5
Safety Instructions
Only switch on the unit if the handpiece rests
secured in the handpiece holder, or if you hold
it safely in your hand.
Prevent any liquids from entering into the
control unit, since this could damage the
electronic elements. Clean the outside of the
box only with a damped cloth. Make sure, that
you have unplugged the unit before.
Only when pulling the mains cable, you can
ensure that the device will be completely
disconnected from mains. Check the mains
cable regularly for damages and in case of
such, have it changed or repaired by an
authorized service center.
Prevent your hair from wrapping itself around
moving parts. If applicable, wear a hair net.
When working with materials, which might
create dust or moisture, use a drilling unit with
suction or spray technique. Wear a nose and
mouth protection. Always follow the safety
instructions, provided by the manufacturer of
the materials being formed and used.

6
Safety Instructions
For safety reasons, you must always wear
disposable gloves and protective glasses when
operating this unit. In addition, a face mask
conforming to EN 14683 type IIR or EN 149
FFP 2 must also be worn.
Ensure that the patient’s foot and the
handpiece are held firmly in place during the
operation. To prevent injury, work with extreme
caution on the foot of the patient and use only
light pressure.
If water leaks from the unit, then a disturbance
is present. The unit has to be separated from
the socket and cannot be used any longer.
Only use distilled water plus a sterilizing
additive, e.g. hadewe AquaHy (art. no. 8555). If
you use other brands pay attention to their
manuals if you can use them for this purpose.
Never use tap water or alcoholic fluid, or other
burnable liquids. In case, you are working with
an alcoholic fluid, or other burnable liquids,
there is always the danger of fire or explosion
hazards. Never refill the tank directly over the
unit to avoid in case you accidently spill water,
this will flow into the unit.

7
Safety Instructions
Change the spray liquid every day. Always add
disinfection additive to the distilled water.
Rinse the tank daily and fill it with fresh water
every day.
Empty the unit if it is not in use for a longer
period of time, e.g. before vacations. Clean out
the tank. Set the spray function on maximum.
Now start the spray function, and the water will
spray for approx. 3 min. The fluid will be blown
out of the complete spray system and
handpiece.
To ensure that the bur/tool sits firmly in the
chuck, do not work with tools which
•have an oily shaft.
•are worn.
•are bent.
Before using the equipment, assure that
•the tool can be pushed far enough into the
chuck (test this with a dipstick and clean if
necessary),
•the inserted tool sits properly in the chuck
and will not cant/jam while clamping it,
•the tool is approved for using it at the max

8
Safety Instructions
speed (see manufacturer’s instructions), or
•only use the speed required by the
instrument,
•the tool is absolutely dry.
For safety reasons, do not change the tool
while the motor is running.
Switch off the unit immediately if
•the bur comes off during the treatment itself,
•the motor blocks during the treatment.
The light on the handpiece is for lighting the
area being treated. Do not look directly into the
light.
Always follow the operating instructions. Do not
carry out any repairs, modifications or
maintenance work yourself. This is only to be
accomplished by an authorized specialist. The
mains cable may also only be changed by the
manufacturer, or an authorized specialist.
Maintenance records may be supplied to repair
workshops and trained technicians upon
request. Never remove the housing, especially
not while the equipment is plugged into the
socket, since some components are under
electric voltage. Any unauthorized or improper

9
Safety Instructions
handling (e.g. trying to repair the unit) of the
equipment will immediately nullify the
guarantee/warranty and any other liabilities of
the manufacturer.
Using the memory buttons: Only use burs/tools
which are permitted for speed level saved
under (15) to (17)!
When the device is brought out of standby
mode, it will run with the rotation speed used
last. Take care to not start the mill at an overly
high rotation speed. Select the required
rotation speed before changing the milling tool.
In case the touch display shows a damage or
does not work properly the device may not be
used any longer. Please send it to a qualified
service workshop for repair.

10
Cleaning and Disinfection
The device is designed to be compatible with rotating
instruments which do not penetrate the skin or mucosal or
inadvertently may still cause injuries. For this application please
adhere to the cleaning and disinfection instructions provided
below. After every treatment please carry out the following steps:
•Remove the rotating tool (e.g. bur, capper etc.) first. Then
handle the tool according to the instructions of its
manufacturer.
•Remove tissue remains by wiping off the unit with a mildly
moistened paper cloth. Afterwards clean all surfaces with
disinfection cloth (e.g. Mikrozid AF Tücher of Schülke and
Mayr). There is no limit to the number of times this device can
be cleaned and disinfected during its recommended lifespan.

11
Discover Device
1 main power switch
2 USB port
3 increase speed
4 reduce speed
5 press briefly: switch unit on
press again briefly: turn on the
handpiece
press long (keep pressed):
switch unit off (standby)
6 spray regulator knob
7 time
8 date
9 speed display
10 turn OFF / ON spray
11 maintenance required
12 USB stick plugged in (green
light)
13 light (yellow when switched on)
14 turn off handpiece & spray / turn
on airflow
15-17 memory keys for speed
18 changing the direction of rotation
(left/right switch)
19 bringing up menu with additional
functions
1 2 3 4 5 6
7 8 9 10 11 12 13 14
15 16 17 18 19

12
Before Use
Please read through the instructions
carefully before using the unit and
carefully note the safety advice.
Always keep this manual accessible
to any users of the drill.
Area of Application
This device should only be used by
people who have completed a foot
care qualification. Before use the
operator should familiarize with the
device by reading this manual or
being instructed by another.
The device must only be used in
closed spaces. It may be used in
hospitals, in a commercial
environment or in patient’s homes.
The device is not intended for use
in operating rooms.
The control unit can be set up in a
cabinet or can be used as a
portable unit, e.g. in a carry case. It
is suitable for the following scopes:
•foot care (milling, trimming and
polishing),
•manicure (grinding, milling and
polishing works).
The devise is determined of
operating rotating
instruments, which will not
penetrate the skin or murcous
membrane if used
appropriate, but could evoke
damages accidently.
Caution: In the area of
pedicure you have to work
with spray techniques.
Operation
The working area must conform to
the conditions described. Set up the
unit in such a way, that the air slits
are not blocked and the extracted
air can escape well. To guarantee
unhindered air flow there must a
gap of at least 12 cm to the back-
side of the device.
Position the device so that the
operating buttons are easy to reach
and the outlet of the hose is a
maximum distance of 60 cm from
the patient’s foot. The unit should
be placed 30 –90 cm above the
floor.
Image: Example of positioning of foot care unit
in treatment room

13
Before Use
Image: Bird's-eye view of work area
If you have a foot switch, insert its
plug into the port on the right of the
device which displays this symbol
.
Make sure, that the tank is filled
with spray liquid. Ensure that the
tool is fixed.
On the left side of the device you
will find the main power switch.
Press the main power switch (1) to
turn the unit on.
The display prompts you to set the
device language:
This is followed by 5 other pages
with important clues. With you
proceed to the next page. On the
last page press to start the
device. The counter for calculating
the maintenance proposal will
automatically be set to zero.
To use the handpiece and spray
function press the button (5) on the
front of the unit.

14
Usage
In the following section the order in
which you should use the device is
described. Additionally, the
individual steps will be explained in
detail. Read the complete manual
before use.
Operating Steps
Once you have clamped in the
instrument, press the standby
button (5) to turn on the screen.
Select with the buttons (3) and (4)
for the desired speed. The
instrument manufacturers often give
out recommendations for the
optimum speed. In any case, it must
be ensured that the maximum
permissible speed is not exceeded.
Now press the standby button (5)
again to rotate the handpiece.
By means of the icon (18) you can
choose the direction of rotation. As
a rule, it works clockwise. Also,
most rotational instruments (steel
instruments with cross cutting) are
optimized for the clockwise rotation.
In diamond cutters or grinders, the
direction of rotation does not affect
the removal rate. Working in
reverse may be useful if the
resulting milling dust is swirled in a
clockwise direction in the field of
view.
Now, you can turn on the spray by
pushing button (10). By using the
spray regulator knob (6), you can
set the amount of the spray liquid.
After setting the speed and the
spray amount, you can start with
working.
Frequently used speed can be
saved. First set the desired speed
Save this by pressing one of the
three memory keys (15), (16) or
(17) for 4 seconds. To recall the
stored speed quickly, briefly press
the corresponding memory key.
If you want to interrupt or finish the
job, press the standby button (5).
Handpiece and spray switch off
then. You can put the handpiece on
the handpiece holder present at the
right side of the device.
Alternatively, by holding down the
switch on the handpiece or by
pressing the button on the foot
switch ether can be turned off.
By long pressing the standby button
(5) the device turns off and is in
standby mode.
We recommend you to disconnect
the device from the mains power
supply if it’s not going to be used for
a while. This will save electricity.
The mains plug must also be
removed when it comes to retiring
the device.

15
Usage
Work Positioning
The following images are examples
of how to work on various parts of
the foot. Always make sure that the
foot is firmly gripped and that you
can work freely and without strain.

16
Usage

17
Usage
Infilling the Spray Liquid
Switch off the device. Pull out the
spray tank on its handle. Hold the
cover of the tank in hand and
unscrew the tank. Now fill it with
distilled water and anti-germ liquid,
e.g. AquaHy (art. no. 8555).
Do not exceed the maximum
level when filling the tank.
Now turn the tank cover back on the
tank. While screwing back the cover
on the tank, make sure that is
closed correct. Otherwise there will
no pressure be built up. Put the
tank back in the housing. Switch on
the power switch in the rear of the
unit.
Attention: Never use tap
water (danger of calcification).
Also, do not use explosive or
combustible liquids, e.g.
alcohol.
Note: Never refill the tank
directly over the unit to avoid
in case you accidently spill
water, this will flow into the
unit.
The water filter (art. no. 3479)
has to be fully under water,
otherwise no water will be
sucked in.
Please only use distilled
water together with
disinfectant AquaHy (art. no.
8555). Other admixtures
could be unsuitable and
cause damages at your
device. Particularly alcohol-
based spray fluids often
attack hoses and make them
porous.
Spray
Turn on the spray function while
pushing switch (10). Now the spray
system will be filled automatically
and a strong spray stream will be
blowed out of the handpiece for the
first 7 sec. Then you can adjust the
requested spray stream while
turning knob (6).
When turning off the unit or the
spray function, the spray liquid is
pumped back completely into the
tank from the hoses. With this
process, a bubbling can be heard in
the tank.

18
Usage
Insert Bur
The handpiece is equipped with a
chuck, which can hold all burs with
a diameter of 2.35 mm (this is the
diameter usually used for tools in
podiatry). To open the chuck, push
the knob forward with your thumb
and leave it there.
Now insert the tool as far as
possible. Pull back the knob and the
tool will be firmly clamped.
For security reasons, only
change the tool if the
handpiece is turned off.
Adjusting the Speed
Put the handpiece back in the
handpiece holder or keep it in your
hand. Switch ON the unit with
switch (5). Now you can adjust the
requested speed with the switch (3)
and (4). Choose the direction with
icon (18).

19
Usage
Memory Keys
Frequently used speed can be
saved. There are 3 memory spaces
available. First set the desired
speed. Save this by pressing one of
the three memory keys (15), (16) or
(17) for 4 seconds. The saved
speed is now directly available on
pressing the memory key. To recall
the stored speed quickly, briefly
press the corresponding memory
key (15), (16) or (17).
Only use burs/tools which are
permitted for speed level
saved under (16) to (17).
When the device is brought
out of standby mode, it will
run with the rotation speed
and suction power used last.
Take care to not start the mill
at an overly high rotation
speed. Select the required
rotation speed before
changing the milling tool.
Foot Switch
Operation of the foot switch
Only use the original hadewe foot
switch (art. no. 0970) to avoid any
damages. Insert the plug of the foot
switch into the socket with the
symbol .
Function of foot switch
By holding down the foot switch, the
power can be switched ON/OFF.
While the spray is on, and you push
the switch once, the spray stream
will stop. If you push it a second
time, the handpiece will stop.
Pushing the switch, a third time,
both functions will start to work
again.
By briefly pressing the foot switch,
the handpiece and spray are
stopped (e.g. to change the tool/
bur). By pressing again briefly, the
handpiece and spray can be
reactivated.
When the display is
switched off, you can turn it
on by keeping the foot
switch pressed (keep
pressed long).

20
Usage
Select Menu
In the select menu, you can use the
following functions:
Pictures/Videos: viewing pictures or
videos from your USB stick
Help: instructions, help tutorials,
troubleshooting
Clean: starts the cleaning program
Maintenance: shows the last main-
tenance and error messages
Change washer: enter date of
change of the washer and display
the date of last change
Settings: for setting the time, date
and language
With this button you can return
to the previous menu.
Help Menu
Manual: Here is a short form of the
manual. This does not replace the
original manual in paper form, as
the latter contains more detailed
instructions and safety instructions.
Insert bur: this clip demonstrates
the clamping of rotary tools
Change washer: video clip that
shows how to change the filter bag
Clean chuck: video clip that
demonstrates the cleaning of the
chuck
Change filter: video clip that shows
how to change the water filter
Troubleshooting: solutions to known
problems
Fill water tank: video clip that shows
how fill the water tank
With this button you can return
to the previous menu.
Table of contents
Other hadewe Pedicure Spa manuals

hadewe
hadewe HELIUS-40 User manual

hadewe
hadewe Medeas User manual

hadewe
hadewe Veloria Chrome User manual

hadewe
hadewe Argos 2 User manual

hadewe
hadewe Argos2 User manual

hadewe
hadewe Auroria User manual

hadewe
hadewe SB2 Series User manual

hadewe
hadewe Veloria MD User manual

hadewe
hadewe Helius 22 User manual

hadewe
hadewe Veloria User manual
Popular Pedicure Spa manuals by other brands

Relaxor
Relaxor FM14B Happy Feet Owner's manual & operating instructions

European Touch
European Touch Pedicure Spa owner's manual

Pure-Fit Spa
Pure-Fit Spa VM721 Usage and maintenance instructions

Continuum Footspas
Continuum Footspas MAESTRO owner's manual

Conair
Conair Massaging Spa Foot Bath FB33R Instruction booklet

Terraillon
Terraillon TONIC 3 manual