Haier HPR10XC6 User manual

PORTABLE AIR CONDITIONER
CLIMATISEUR PORTATIF
ACONDICIONADOR DE AIRE PORTATIL
Before operating this oven, please read these instructions completely.
Quality nInnovation nStyle
User Manual
Model # HPR10XC6
Guide de l’Utilisateur
Modéle # HPR10XC6
Manual del Usuario
Para Modelo de # HPR10XC6

TABLE
RECEPTACLE AND FUSE TYPES
RATED VOLTS 125/60 250/60
AMPS 15 20 15 20 30
WALL OUTLET
FUSE SIZE 15 20 * 15
TIME DELAY FUSE Plug Plug Plug
(or circuit braker)
1
English
A Word From Haier
Thank You for buying a dependable, energy saving and easy to operate HAIER air conditioner. This
manual contains useful information for you to maintain, operate, install and safely use your air condi-
tioner. Your air conditioner cleans, cools and dehumidifies the air in your room to provide you with
the ultimate level of comfort.
Please read instructions carefully before using the product. Also, do not forget to fill out and mail the
Product Registration Card.
Product Registration
Record Your Model and Serial Number.
Attach the sales receipt to this guide and keep for future reference. Model and serial number can be
obtained from the serial label, which is on your air conditioner. For all your service calls during the
warranty period the following information will be needed:
Model Number:....................................................................................................................
Serial Number: ....................................................................................................................
Date of Purchase: ................................................................................................................
Dealer’s Name:....................................................................................................................
Dealer’s Address: ................................................................................................................
Dealer’s Phone Number: ......................................................................................................
20 30

SAFETY PRECAUTIONS
WARNING: Following these basic precautions will reduce the risk of fire, electrical
shock, injury or death when using your air conditioner.
1) Air conditioner must be connected to proper electrical outlet with the correct electrical
supply. (see table previous page)
2) Proper grounding must be ensured to reduce the risk of shock and fire. DO NOT CUT
OR REMOVE THE GROUNDING PRONG. If you do not have a three-prong electric
receptacle outlet in the wall, have a certified electrician install the proper receptacle.
The wall receptacle MUST be properly grounded.
3) Do not operate air conditioner if power cord is frayed or otherwise damaged. Also
avoid using it if there are cracks or abrasion damage along the length, plug connector
or if the unit malfunctions or is damaged in any manner. Contact an authorized service
for examination, repairs or
adjustments.
4) DO NOT USE AN ADAPTER OR AN EXTENSION CORD.
5) Do not block airflow around the air conditioner. Also the exhaust hose should be free of
any obstructions.
6) Always unplug the air conditioner before servicing it or moving it.
7) Do not install or use the air conditioner in any area where the atmosphere contains
combustible gases or where the atmosphere is oily or sulphurous. Avoid any chemicals
coming in contact with your air conditioner.
8) Do not place any object on the top of the unit.
9) Never operate the air conditioner without the filters in place.
10) Do not use the air conditioners near a bathtub, shower or wash basin.
SAVE THESE INSTRUCTIONS
2
English

3
English
Table Of Contents
PAGE
A Word From Haier ....................................................................................................................1
Product Registration ....................................................................................................................1
Safety Precautions ......................................................................................................................2
Advantages ................................................................................................................................4
Parts and Features ......................................................................................................................5
Assembly and Installation............................................................................................................7
Operation ..................................................................................................................................8
Product Specification ..................................................................................................................9
Care and Cleaning ....................................................................................................................9
Storage ......................................................................................................................................9
Trouble Shooting ......................................................................................................................10
Warranty Information................................................................................................................11

Advantages of this Model
1. This model is easy to operate. The electronic control panel has a timer, thermostat, three cooling
speeds, three fan speeds and one speed dehumidification function (dry).
2. The unit has a unique design which evaporates the water. Therefore no condensation tank is
necessary, thus avoiding you to have to wake up in the middle of the night to empty the bucket and
turn on the unit.
3. Easy to install window kit is included, which consists of the exhaust hose, 2 hose adapters, the
window panel kit and window panel adapter.
4. Full directional casters are included to help the unit to be moved in almost any area.
5. The filter screen is designed for easy accessibility of the filter.
6. Portable air conditioners are easy to store when not in use.
4
English

English
Parts and Features
5
CONTROL PANEL
FRONT
HANDLE AIR OUTLET
CASTERS
FILTER SCREEN
REAR
AIR INTAKE
EXHAUST DUCT
AIR INTAKE FOR
CONDENSOR
POWER CORD
WATER DRAIN PIPE

English
6

English
7
Assembly and Installation
1. Push the round Window Panel Adapter through the rear of the Plastic Panel.
Line up the holes and tighten the Adapter with 4 screws that are included in
the kit. (Tighten screws from the front).
2. Adjust the Plastic Panel to the width or height of your window and tighten
the 2 screws that are attached to the panel.
3. Install the Window Plastic Panel into the window. If necessary use duct tape
to better secure the panel.
4. Connect exhaust hose to the unit by inserting the hose connector that is
attached to the hose into the exhaust. (See Illustration A)
5. Move the unit to the window, extend the hose and attach the other end of
the hose to the window. Align the tabs on the hose and window panel
adapters and fasten them together.
6. Plug into wall outlet to get ready for operation.
* NOTE: Use on Single Outlet Circuit Only.
Accessories Include
1. Plastic panel - 2 pieces
2. Window Panel adapter - 1 piece
3. Screws - 4 pieces
4. Heat Exhaust hose connector-2
pieces
5. Heat Exhaust hose-1 piece
12
Exhaust Hose
Hose Connector Hose Connector
3
A
B

8
English
NOTE: Wait for 24 hours to turn on air conditioner if the unit has been tilted for any
reason. This is for the oils and the coolants to settle and level off.
1. Wait for 3 minutes before restarting the unit after a normal shut down so as to complete the
compressor cycle.
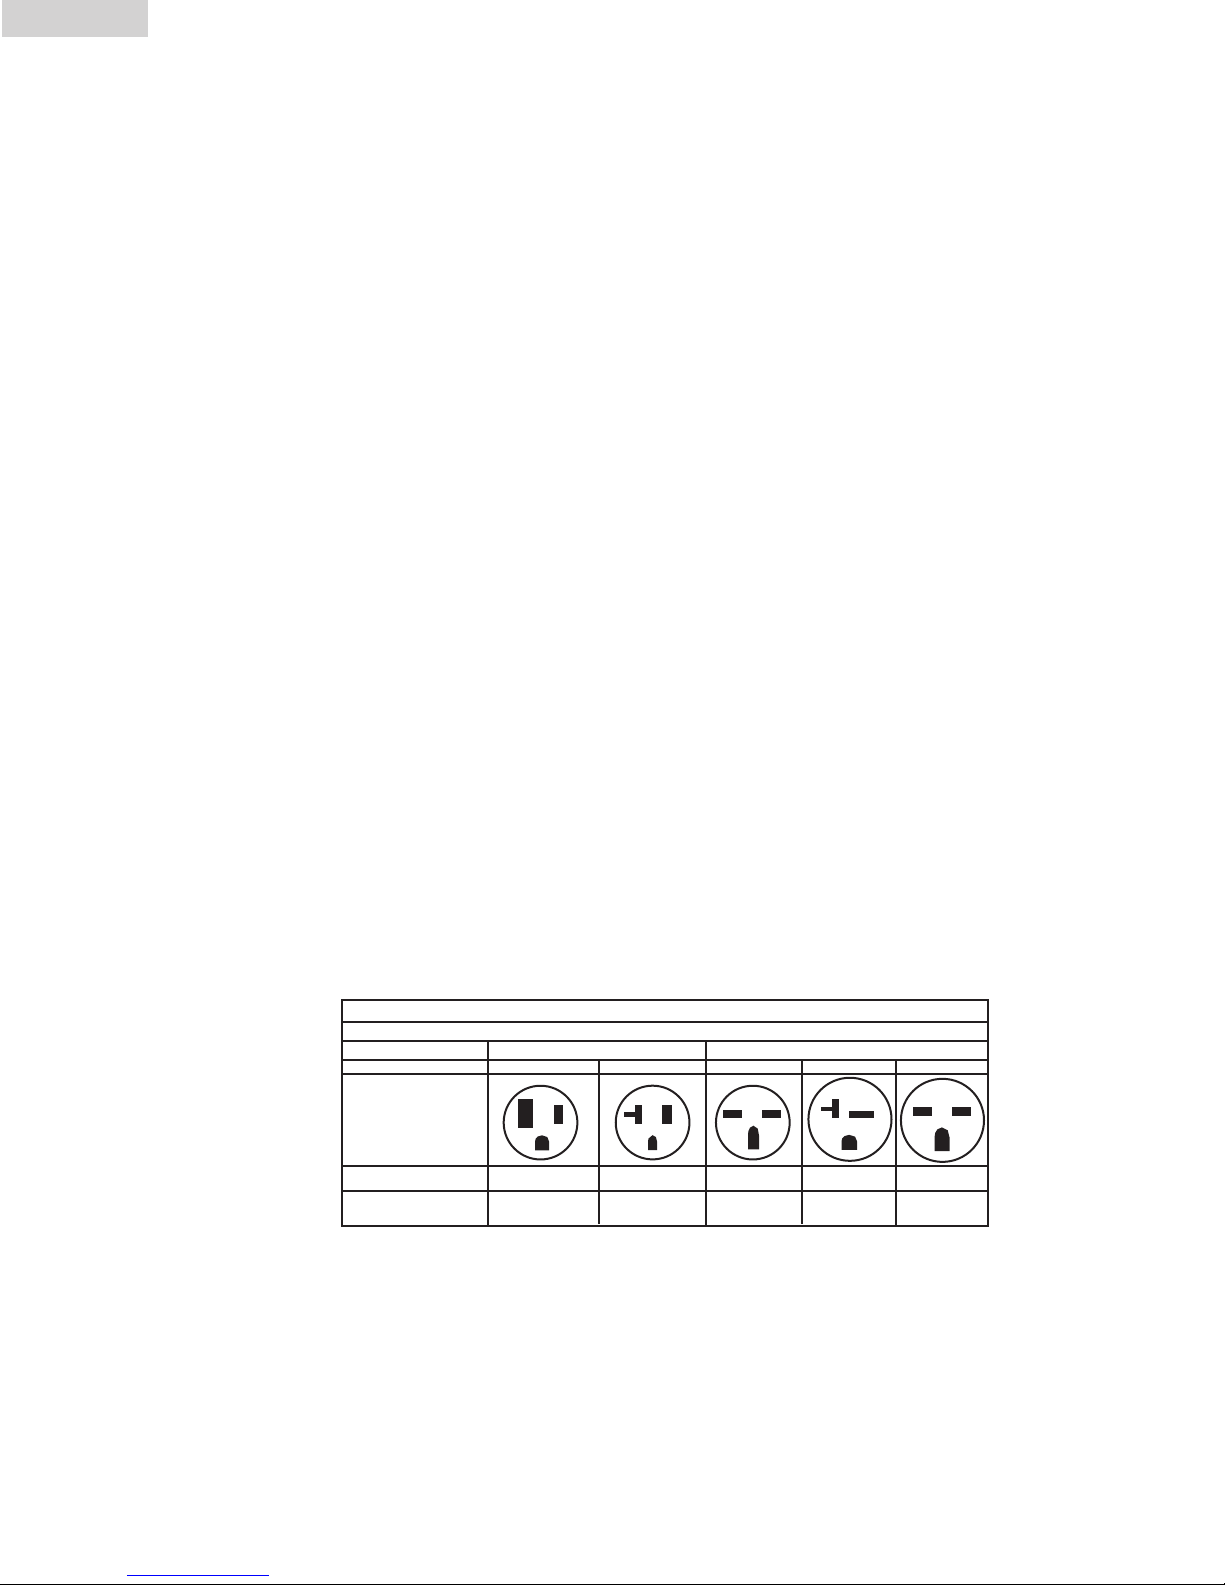
2. Use an 115v 15 amp outlet for the air conditioner. Do not use any other electrical appliances
on this line or you may trip the fuse. Use a dedicated line for this air conditioner.
3. Do not place the air conditioner in direct sunlight or close to any heating appliances.
ex. baseboard heaters, stoves, etc.
4. Operate on a flat surface only.
5. Keep the unit free of any obstructures such as drapes, curtains, blinds, etc.
6. Keep unit at least 1 foot away from the wall.
7. Check and clean the filter once every week to get the highest efficiency.
NOTE: Do not use unit without filter.
8. If the unit is not being used for a long period of time remove the plug from the water drain
pipe and drain out any condensed water.
When turning on the unit first time after plugging it into an electrical outlet the unit will start in a
low fan cool mode. The temperature read out on the LED will be the room temperature. When
turning on the unit in regular usage it will remember the last shut off setting. If you want to
operate the air conditioner as a dehumidifier then adjust to dry mode.
Setting The Temperature
To set the temperature press the + or the - key to raise or lower the temperature. The temperature
can be raised or lowered in the cool or dry mode. The temperature cannot be adjusted in the fan
mode.
Fan Speeds
There are 3 adjustable speeds in the cool and fan mode: Low, Medium & High. In the dry or
dehumidification mode the fan will only operate at low speed.
On/Off Time Set
The air conditioner has a 1-12 hour on/off built-in timer. To delay start the unit from 1-12 hours
at a 1 hour interval, simply press the time/set key and then press the + or - key to adjust the start
time. Note that the unit has to be plugged in to an electrical outlet for the timer to operate.
To auto shut-off the unit press the time/set key while the unit is running and then press the + or -
key to adjust the off time. The auto shut-off switch operates in all 3 modes: Cool, Dry & Fan.
NOTE: The temperature can be set between 60˚F to 89˚F.
Operation

9
English
Product Specification
Care and Cleaning Guide
• Always unplug your air conditioner before cleaning.
• Air filter needs to be cleaned at least once a week for your unit to operate at optimum
efficiency. Slide out the filter from the back by pulling on the tab. The filter may be washed
or vacuumed. Remove the excess water from the filter by gently shaking the filter. This will
remove dust and particles trapped in the filter. After cleaning, reinstall the filter. DO NOT
use your air conditioner without the air filter in place.
• To clean the cabinet, DO NOT use harsh chemicals, abrasives, ammonia, chlorine, bleach,
concentrated detergents, solvents or metal scouring pads. Some of these chemicals may
dissolve, damage and/or discolor your air conditioner.
• Always use a soft cloth dampened with water or a mild soap and water solution to wipe the
front of the cabinet. Wipe dry with a soft cloth.
Storage
• To store your air conditioner when not being used for a long period of time, drain con-
densed water using the drain pipe. Remove exhaust hose, clean the filters, cover with plastic
bag and store away.
Voltage and Frequency 115V / 60Hz
Input Power 950 W
Cooling Capacity 10000 BTU
Moisture Removal (pints/day) 81
Coolant R-22
Timer 12 Hours
Operating Temperature Range 64˚F - 100˚F
Unit Dimensions (WxDxH) (inches) 18 9/16 x 14 1/16 x 34 3/16
471 mm x 357 mm x 868 mm
Net Weight lbs. approximate 79.3 lbs.
Exhaust Hose 5 Feet

10
English
Trouble-Shooting
If air conditioner does not operate:
• Check if unit is plugged in. The plug may have come loose.
• Check if the electrical wall receptacle is of proper voltage.
• Check if the circuit breaker needs to be reset or if the fuse needs to be replaced.
• Check if the unit is in “Off” mode.
• If the warning light is on, drain the water drain pipe by removing the plug.
Air conditioner working but room not cooling:
• Room may have appliances that produce heat. Use an exhaust fan to remove excess heat.
• Check exhaust hose for proper installation.
• Redirect the airflow. Remove any obstacles.
• All doors and windows need to be closed so that cool air does not escape the room.
• Air filter may be blocked or may need cleaning.
• Unit BTU may be too low for the required cooling area.
• On extremely hot & humid days, air conditioners may take a little longer to cool.
• Drain the water drain pipe by removing the plug.
• Unit may be in fan or dry mode. Put air conditioner in cool mode.

11
English
This warranty covers all defects in
workmanship or materials for:
1. The mechanical and electrical parts (including
labor costs) contained in this Haier product,
for a period of 12 months, from the date of
purchase, (commercial or rental application,
the warranty is 90 days).
2. The sealed system and compressor contained
in this Haier product is for a period of 5 years,
from the date of purchase (excluding labor
costs after the initial 12 month period). In
commercial or rental use, the additional limit-
ed compressor warranty is for 1 year and 9
months, (excluding labor costs after the initial
90 days period).
You must keep and be able to provide
your original sales receipt as proof of the
date of purchase.
Who is covered?
The original retail purchaser of this Haier prod-
uct.
What will be done?
Haier will repair or replace, in your home, any
mechanical, electrical part or the compressor,
which proves defective in normal household, use
for a period of 12 months. Haier will repair or
replace (excluding labor costs) the sealed system
and compressor (parts only) for an additional 4
year period.
How can you get service?
1. Contact your nearest Haier
authorized Service Depot. For the name of the
Service Depot nearest you, contact Haier at
(877) 337-3639.
2. All service must be performed, by an
authorized Haier Service Depot.
THIS WARRANTY COVERS UNITS WITHIN
THE CONTINENTAL
UNITED STATES, CANADA
AND PUERTO RICO AND
DOES NOT COVER:
• Damages from improper installation.
• Damages in shipping.
• Damages from misuse, abuse, accident, alter-
ation, lack of proper care and maintenance.
• Damages from service, by other than an
authorized dealer or service center.
• Labor, service, transportation and shipping
charges for the removal of defective parts and
installation of a replacement part, beyond the
initial 12 month period.
THIS LIMITED WARRANTY IS GIVEN
IN LIEU OF ALL OTHER WARRANTIES, EXPRESS
OR IMPLIED, INCLUDING THE WARRANTIES OF
MERCHANTABILITY AND FITNESS FOR A
PARTICULAR PURPOSE.
The remedy provided in this warranty is exclusive
and is granted in lieu of all other remedies. This
warranty does not cover incidental or consequen-
tial damages. Some states do not allow the exclu-
sion of incidental or consequential damages, so
this limitation may not apply to you. Some states
do not allow limitations on how long an implied
warranty lasts, so this limitation may not apply to
you. This warranty gives you specific legal rights,
and you may also have other rights, which vary
from state to state.
Limited Warranty

1
Un mot de Haier
Merci d’avoir achete un climatiseur “Haier”qui est dependable, facile a operer et economise de l’en-
ergie. Ce manuel contient l’information necessaire pour maintenir, operer,installer et utiliser propre-
ment votre climatiseur. Votre climatiseur nettoie, refroidit et dehumidifie l’air dans votre salle pour
vous fournir avec le niveau ultime de confort.
S’il vous plait lisez soigneusement les instructions avant d’installer ce produit. N’oubliez pas de rem-
plir et poster la carte d’enregistrement du produit.
Registration du Produit
Registrez le model et numero de serie.
Pour tous vos appels de service pendant la periode de votre garantie, les informations suivantes vous
seront necessaries. Attachez le recu de ventes a ce guide et garder pour la reference d’avenir. Cette
information peut etre obtenue de la plaque en serie, qui est sur votre climatiseur.
Numero du model: ..............................................................................................................
Numero de serie: ................................................................................................................
Date d’achats:......................................................................................................................
Nom du negociant: ..............................................................................................................
Addressed u negociant: ........................................................................................................
Numeros de telephone du negociant:....................................................................................
TABLEAU
TYPES DE PRISES ET FUSIBLES
TENSION
AMPÈRES
PRISE DE COURANT
MURALE
TAILLE DU FUSIBLE
FUSIBLE À FUSION
TEMPORISÉE (disjoncteur)
125/60 250/60
15 20 15 20 30
15 20* 15 20* 30
Fiche Fiche
Fiche
Français

Français
2
CONSIGNES DE SÉCURITÉ
AVERTISSEMENT: Veuillez suivre ces précautions de base lorsque vous utilisez l'ap-
pareil afin de réduire tout risque d'incendie, d'électrocution, de
blessure, voire de mort.
1) Le climatiseur doit être branché au niveau d'une prise électrique d'une tension adéquate.
(voir tableau)
2) L'appareil doit être mis à la terre (masse) afin de réduire tout risque d'électrocution et d'in-
cendie. NE PAS COUPER NI RETIRER LA BROCHE DE MASSE. Si votre prise murale ne peut
accueillir une fiche à trois broches, veuillez faire en sorte qu'un électricien qualifié en installe
une. La prise murale DOIT être mise à la masse.
3) Ne pas utiliser l'appareil si le cordon d'alimentation est effiloché ou fissuré, si la fiche et le con-
necteur sont endommagés, ou si l’appareil présente une panne ou est endommagé d’une
façon quelconque.
4) NE PAS UTILISER UN ADAPTATEUR OU UNE RALLONGE.
5) Ne pas gêner ni bloquer le flux d'air autour de l'appareil et que rien ne bouche le tuyau de
sortie.
6) Débrancher toujours le climatiseur avant de le déplacer ou d'effectuer opération de
maintenance.
7) Ne pas installer le climatiseur dans un endroit où l’atmoshpère est huileuse ou présente des
gaz combustibles ou du soufre. Éviter que les produits chimiques entrent en contact avec le cli-
matiseur.
8) Ne placer aucun objet sur le climatiseur.
9) Ne jamais utiliser le climatiseur sans les filtres.
10) Ne pas utiliser le climatiseur à proximité d’une baignoire, d’une douche ou d’un lavabo ou
évier.
ÉCONOMISER CES INSTRUCTIONS

Français
3
Table de matieres
PAGE
Un mot de Haier ....................................................................................................................1
Registration du Produit ..........................................................................................................1
Precautions de Surete ............................................................................................................2
Avantages................................................................................................................................4
Parties et caracteristiques......................................................................................................5
Assemblee et Installations ....................................................................................................7
Exéction ....................................................................................................................................8
Specification du Produit..........................................................................................................9
Soins et nettoyage ..................................................................................................................9
Emmagasinage........................................................................................................................9
Detections d’un probleme....................................................................................................10
Imformations de la garantie ..............................................................................................11

Français
4
Avantages de ce Model
1. Ce model est facile a operer. L’electronique a un minuteur, thermostat, trois vitesses pour refroidir,
trois ventilateurs et une vitesse de dehumidification (seche).
2. Ce produit a une conception unique qui evapore l’eau. Donc une tank de condensation n’est pas
necessaire. Ceci vous evitera de vous lever au milieu de la nuit pour vider le seau et virez le
produit.
3. Une trousse de fenetre facile a installer est incluse et est constituee d’un tuyau d’echappement, de
2 jets de tuyau, d’une trousse de panneaux de fenetre, d’un connecteur du tuyau d’echappement.
4. Roulettes directionelles sont inclus pour aider a deplacer le produit d’une maniere commode pour
etre utiliser dans presque n’importe quel domaine.
5. L’ecran du filtre est concu pour l’acces facilement.
6. Les climatiseurs portatifs sont faciles a emmagasiner quand pas utilizes.

Français
5
Parties et Caracteristiques
PANNEAU DE CONTROL
DEVANT
POIGNEE SORTIE D’AIR
4 FACONS DE ROULETTE MOBILES
ECRAN DE FILTRE
DERRIERE
ENTREE D’AIR
CANAL D’ESCHAPPEMENT
ENTREE D’AIR POUR
CONDENSEMENT
CORDE ELECTRIQUE
TUYAU D’EGOUT
D’EAU

Français
6

Français
7
Montage et Installation
ASSEMBLEMENT ET INSTALLATION
ACCESSOIRES INCLUS
1. Panneaux en matiere plastique - 2 pieces
2. Adapteur du panneau de la fenetre - 1 piece
3. Vis – 4 pieces
4. Connecteurs du tuyau d’echappement de la
chaleur -2pieces
5. Tuyau d’echappement de la chaleur – 1piece
1. Pousser l’adapteur du panneau de la fenetre circualaire a travers le
panneau en plastique . Alignez les trous et resserrez l’adapteur avec les
4 vis qui sont inclus dans la trousse. ( Resserrez les vis du devant )
2. Ajustez le panneau en plastique a la largeur et hauteur de votre fenetre et
resserrez les 2 vis qui sont attaches au panneau.
3. Installez le panneau en plastique sur la fenetre . Si necessaire, utilisez la
bande adhesive pour assurer le panneau en place.
4. Connectez le tuyau d’echappement a l’unite en inserrant le cote plus etroit
de l’adapteur de l’unite qui est attaché au tuyau dans l’echappement. .
Tournez l’adapteur dans le sens des aiguilles d’une montre jusqu’a ce que
ce dernier se verouille. ( Voir l’illustration A )
5. Transferez l’unite a la fenetre, etendez le tuyau et attachez l’autre fin du
tuyau a la fenetre . Alignez les etiquettes du tuyau et de l’adapteur du
panneau de la fenetre et attachez les ensemble.
6. Branchez à la prise murale pour être prêt pour l'opération.
NOTE : Utilisation sur le circuit simple de sortie seulement.
12
Tuyau d’echappement
Adapteur de la fenetre Adapteur de l’unite
3
B
A

Français
8
NOTE: Attendez 24 heures pour tourner le climatiseur si le produit a ete penche pour
n’importe quelle raison. Ceci est pour regler et niveler les petrols
1. Attendez 3 minutes avant de remettre en marche le produit après une panne normale pour
completer le cycle de compresseur.
2. Utilisez un 115v 15sortie de amp pour le climatiseur. Ne pas utiliser autre appareils electriques
sur cette ligne ou vous pouverz trebucher le fusible. Utilisez une ligne dediee pour ce
climatiseur.
3. Ne pas placer le climatiseur dand la lumiere du soleil directe ou pres des chauffages.
Exemples.. les appareils de chauffage, de plinth, des fours etc…
4. Operez sur une surface plate seulement.
5. Gardez le produit libre d’obstructures tels que les rideaux,tentures , persiennes etc.
6. Gardez le produit au moins 1 foot eloigne du mur.
7. Verifiez et nettoyez le filtre une fois chaque semaine pour recevoir la plus haute efficacite.
NOTE: Ne pas utiliser le prodruit sans le filtre.
8. Si le prodruit n’est pas utilise pur une longue periode de temps, enlevez le bouchon du tyau
d’egout d’eau et drainez l’eau condensee.
Quand vous mettez en marche le climatiseur pour la premiere fois, après l’avoir branche, le
ventilateur commencera a froid bas. La temperature lue sur le LED sera la temperature de la
salle. En tournant le produit regulierement , il se souviendra du reglace du dernier eteint. Si vous
voulez operer le climatiseur comme un dehumidifier, ajustez alors pour la mode seche.
Montage de la Temperature
Pour regler la temperature appuyez sur le + ou – bouton pour elever ou abaisser la temperature.
La temperature peut etre eleverr ou abaissee dans le frais ou sec mode. La temperature ne peut
pas etre ajustee dans le mode de ventilateur.
Vitesse du Ventilateur
Il ya 3 vitesses ajustables pour le ventilateur . Bas, Moyen ou haut.. Dans la mode seche ou
dehumidificateur, le ventilateur fonctionne a une vitesse basse.
Declenchement de la minuterie
Le climatiseur a 1-12 heures ON/OFF minuteur incorpere. Pour retarder le commencement du
produit de 1-12 heures a un intervalle d’une heure, simplement appuyez sur le declenchement
puis pressez sur la clef + ou – pour ajuster le temps du commencement. Notez que le produit doit
etre branche dans une sortie electrique pour que le minuteur fonctionne.
Pour fermer le produit automatiquement simplement appuyez sur le declenchement puis presses
sur la clef + ou – pour ajuster le temps d’eteint. L’auto eteint commutateur opera dans tous les 3
modes. Refroidit, sec et ventilateur.
NOTE: La temperature peut etre reglee entre 60˚F a 89˚F.
Operacion
Table of contents
Languages:
Other Haier Air Conditioner manuals

Haier
Haier 1U71S2SR2FA User manual

Haier
Haier HW-18L2H User manual

Haier
Haier AS072AIAHA User manual

Haier
Haier HSU-09HA103 User manual

Haier
Haier AP242ACAAA User manual

Haier
Haier HSU24VHJ(DB) User manual

Haier
Haier H2SM-14HB03/R2 User manual

Haier
Haier QHC08 User manual

Haier
Haier HSM24HEK03 User manual

Haier
Haier H2SM-18HA03 User manual

Haier
Haier ESA3155 - annexe 4 User manual

Haier
Haier QHC18 User manual

Haier
Haier QHEE06AC Safety guide

Haier
Haier HW-07LN03 User manual

Haier
Haier HW-18CH2N User manual

Haier
Haier HPN10XCM User manual

Haier
Haier AB182ACBHA User manual

Haier
Haier HSU-09RR03 User manual

Haier
Haier AB162MCERA User manual

Haier
Haier HSU-12C03/K - annexe 1 User manual