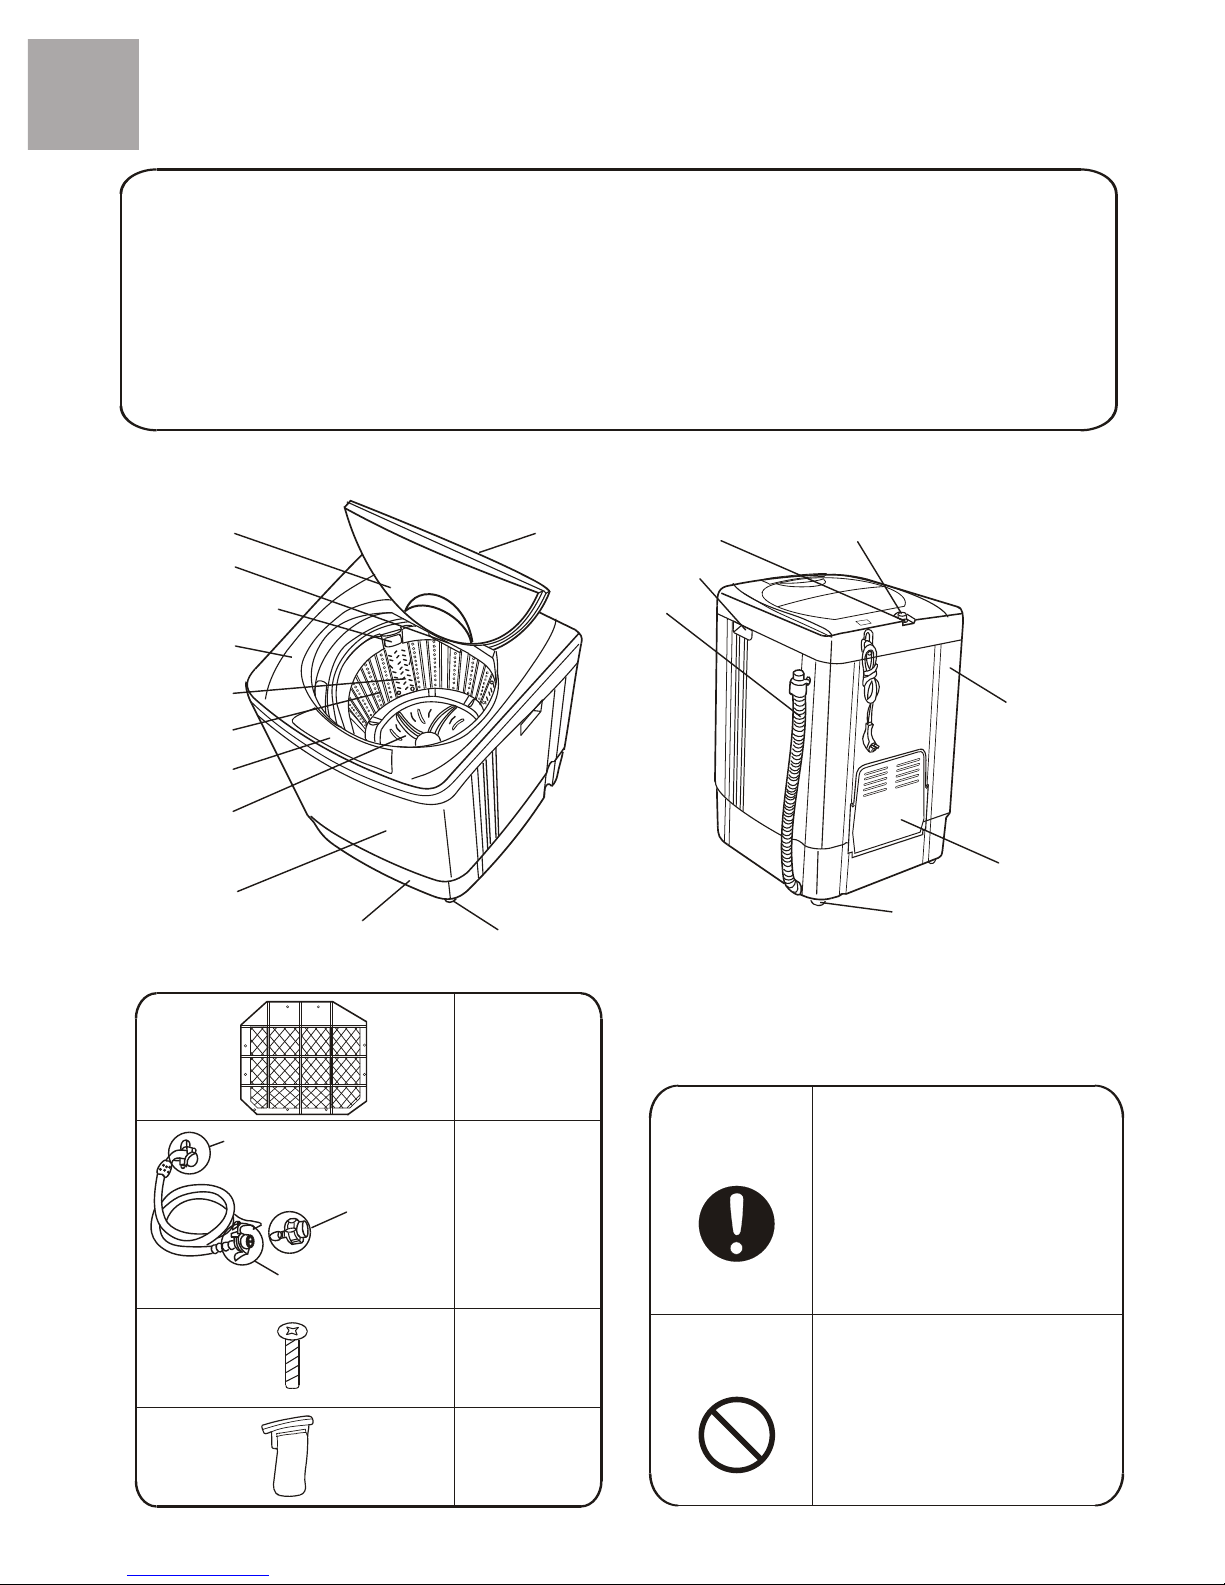
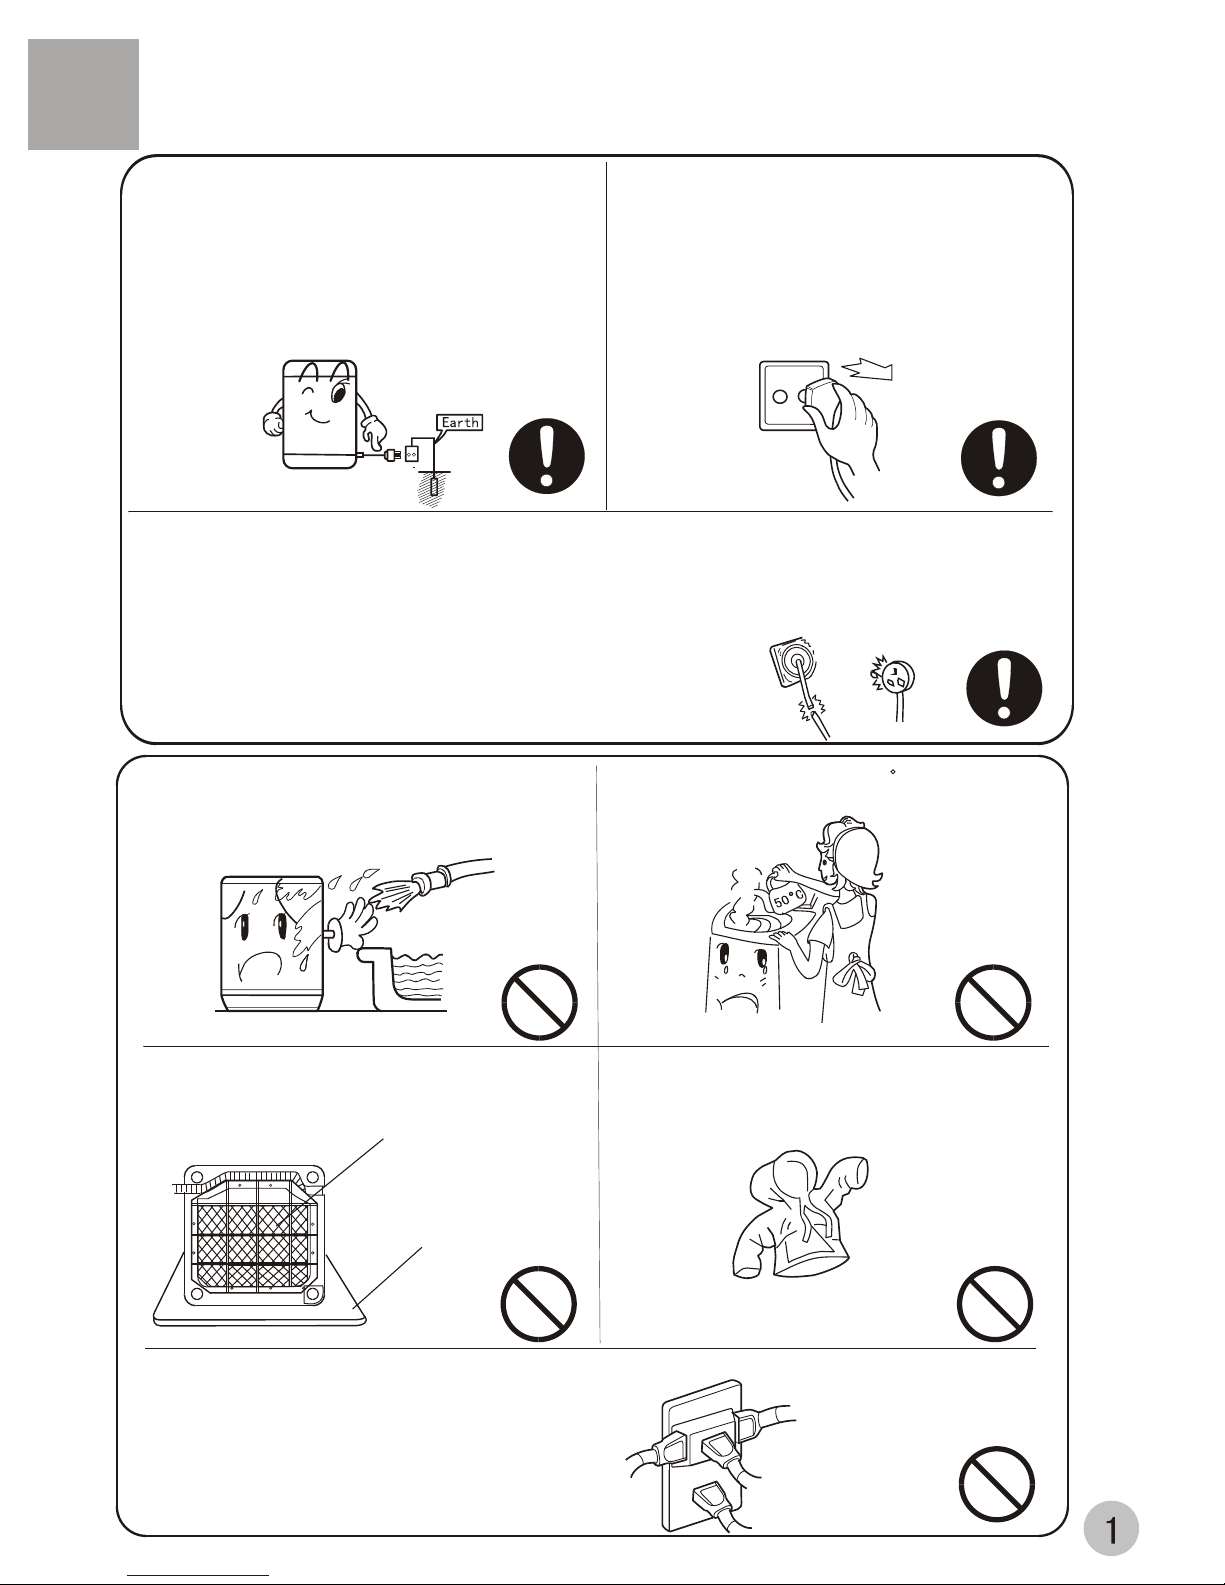
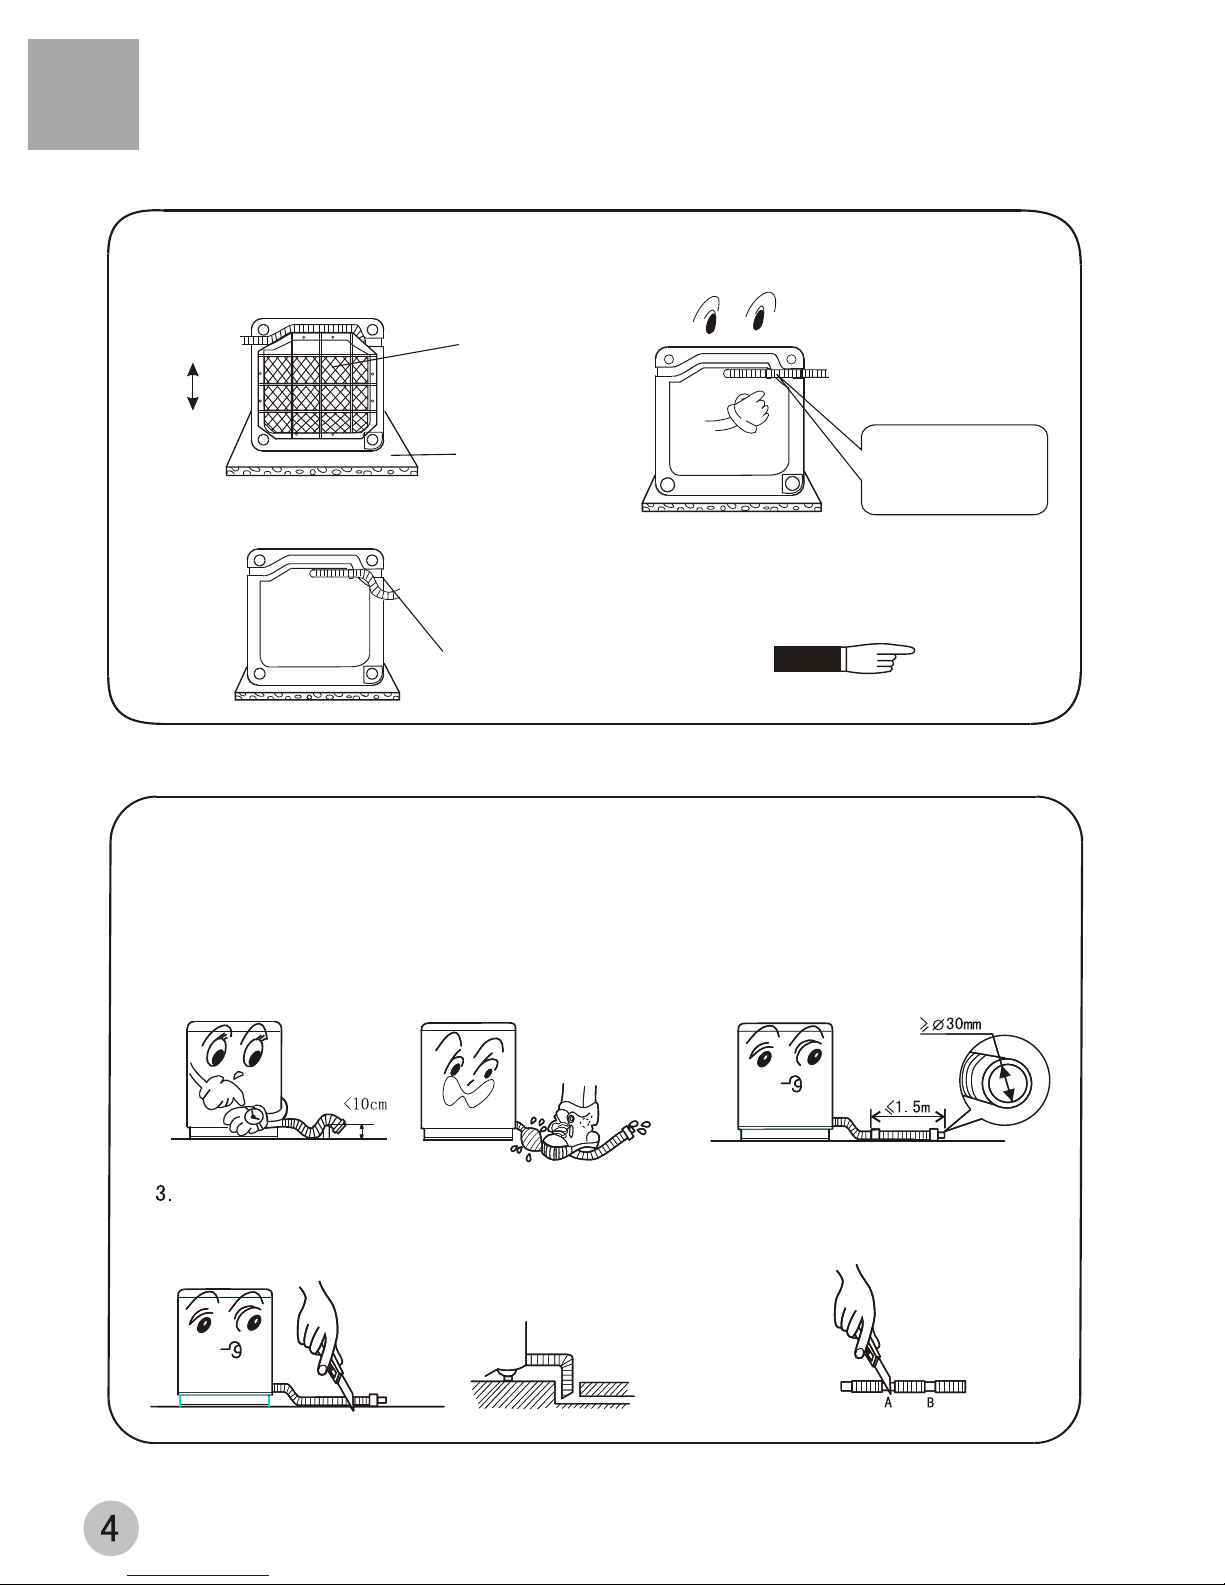
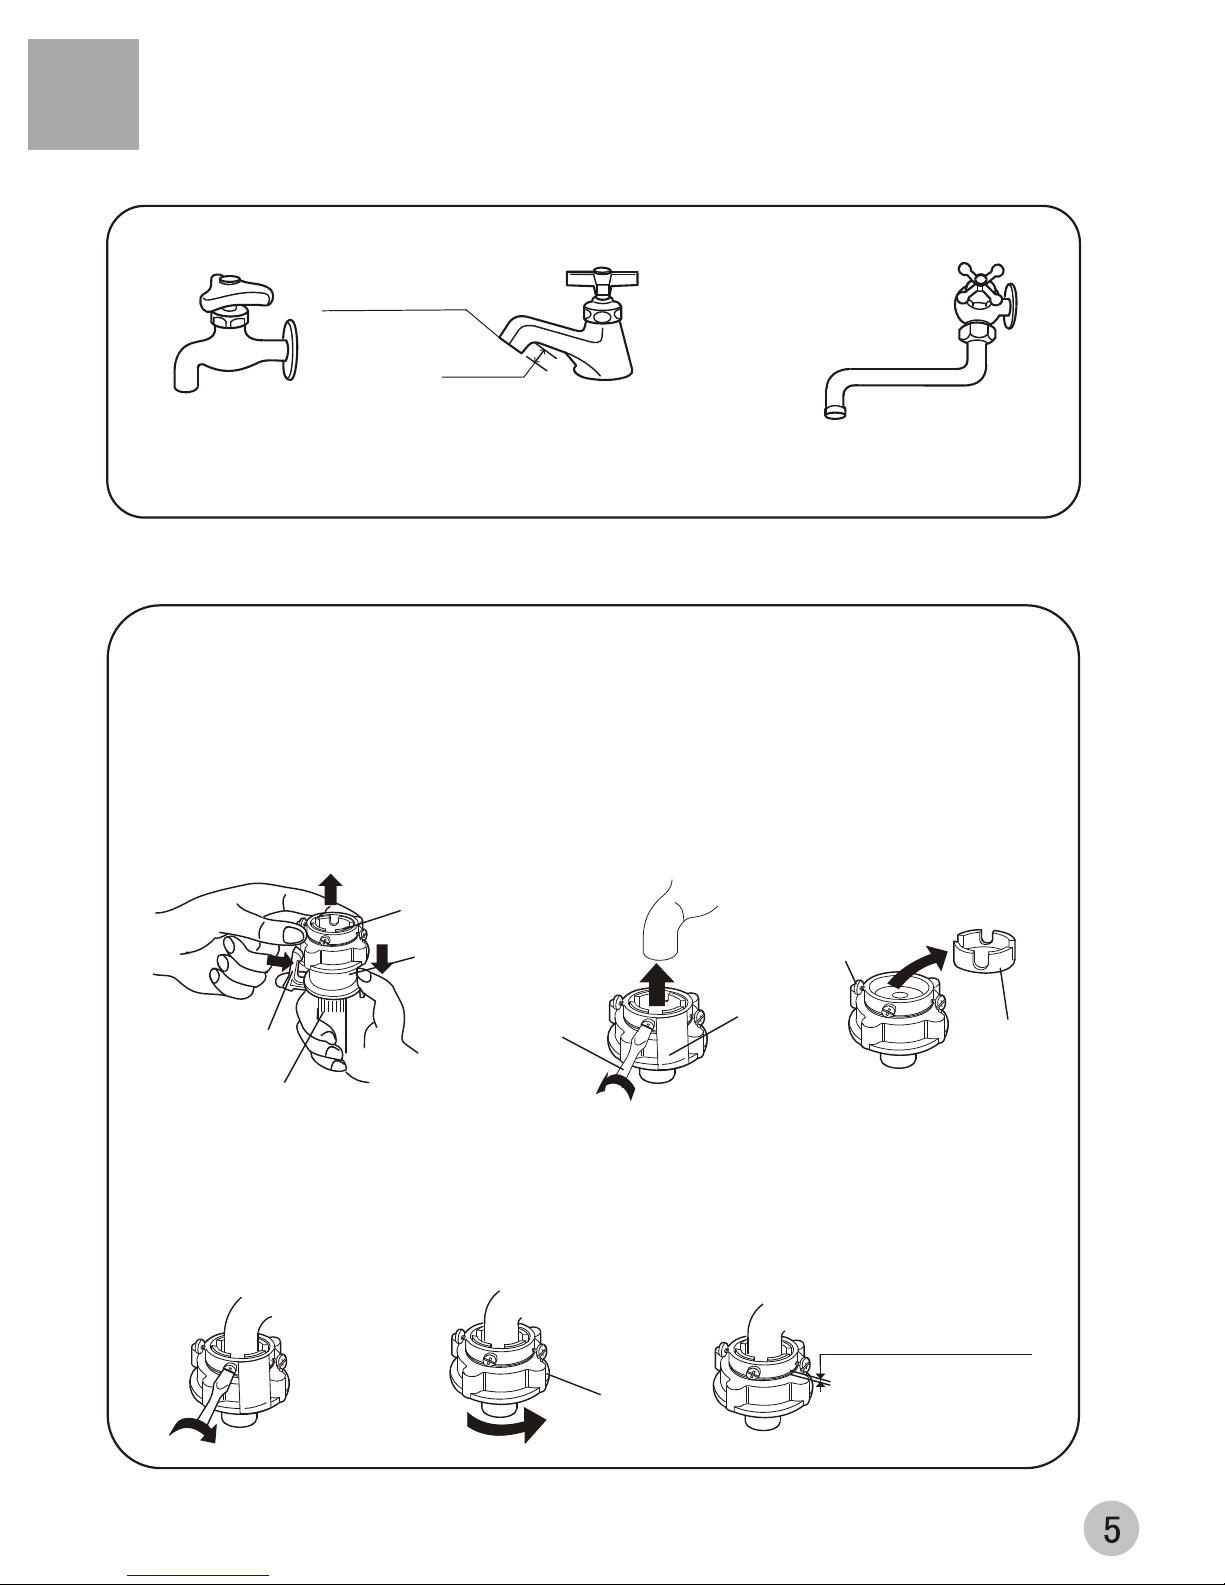
Haier XQB50-10 User manual

Names of the parts.............the 2nd cover
Safety precautions .......................1
Introduction of the special functions.........3
Installation and adjustment ..................3
Install the water inlet hose............5
Preparation before washing .............7
Put in the laundries .........................8
Usage of the detergent .......................9
Use the operation buttons ................10
Close the top lid ........................14
Finish washing ............................14
Disposal after washing ....................15
Trouble shooting Answer to questions.....16
Packing list ...................................17
Specifications.........................the back cover
Contents
Before using
Using process
Please read this manual carefully before using.
Please retain it attentively for future reference.
User's manual
Full Automatic Washing Machine
XQB50-10
Please check if the power receptacle is earthed
reliably before usage to guarantee your safety.
The manufacturer is not responsible for any
risks occurred owing to disobey these
stipulations.

Meaning and description of the symbols
Honourable users,
Thank you for choosing our products.
Our products integrate high-tech, precision,frontier science.To facilitate
using it, please read this manual carefully and operate this machine
according to it.
Before Using
Before Using
Names of the parts
the end connecting to
the water inlet hose jointer
the end connecting to
the washing machine
jointer connecting the
water inlet hose and
the water faucet
Warning sign
Forbidden sign
Contents marked with that symbol
are related to the safety of the
product and the personal safety
of the users. Please operate in
strict conformity to the contents,
otherwise it may cause damage
of the machine or injure the
personal safety of the user.
Contents marked with that symbol
are actions forbidden to perform.
Performing of those actions may
result in damage of the machine
or injure the personal safety of
the user.
Accessories
bottom plate
(one)
water inlet hose
(one)
Water inlet
hose jointer
(one)
ST4X16
tapping screws
(eight)
Adjustable foot
fixed foot (3)
back cover
Cabinet
base frame
Drain hose
Control panel
film
Control panel
Filter cover
Power line
Pulsator
Inner tub
Detergent box
Lint filter
Top lid B
Cabinet handle
water valve
Top lid A Sop mat
Lint filter
(one)
(Installed by user)

Before Using
Before Using
Safety precautions
Do not damage the power cord,bend ,extend,twist,bind or alter it by force.Do not press or
nip it with weight.If the power cord or the power plug is bad, or the power plug becomes
flexible,to avoid risk it is required to have it replaced by the technicians of our special
shop or the after-sale service department. Keep the pin of the power plug clean,if the
power plug is polluted with dust,please wipe with dry cloth carefully.
The power cord plug should be convenient
to be pluged in or pluged out with hand
while the washing machine runs normally.
Be sure to pull the plug out and close the
water tap when the machine is idle,when
moving the machine,or when cleaning
the machine.Do not use wet hand to ins-
ert or pull out the power plug.
In case the washing machine is installed on ground with
carpet, do not block the ventilation hole with carpet.
Do not let the machine share one receptacle with other electric appliances. If the power plug is damaged, or the
plugging into the receptacle is loose, do not use the plug any more.
Do not wash water-proof laundries like the raincoat,
bike covers etc. to avoid abnormal vibrations in spinning.
Do not use water hotter above 50 C .
Do not put the machine at damp place like
the bathroom. Never wash it with water.
Not put wet laundries on the control panel.
soft items
The ventilation holes
at the bottom
Please plug the plug on special 220V AC
receptacle.Be sure to use single-phase
tow pins receptacle.Ensurethe earthing
prong of the power receptacle is earthed
reliably.Use leakage protector if possible.

Do not decompose, repair or alter the
machine by yourself.
Do not put any hot or heavy items (such
as the kettle with hot water ) on the
washing machine.
Do not wash laundries with volatile
materials (such as thinner, petrol etc.)
The handicapped or children without
care shall not use the machine.
Keep the machine away from direct
sunlight and heat source like the heater.
Before Using
Before Using
Do not stretch hands into the working
machine. It is dangerous even if the
rotation is slow. Take special care of
the children.Do not let the children
climb the washing machine.
Petrol
Thinner
.
To prevent your laundries and washing
machine from damage,be sure to take
out all of the foreign materials from your
pocket,such as coins,buttons,sand or
hairpins etc.
Before washing,please check if the water
tap is open ,and if the water inlet pipe is
connected properly.
It is suggested to use low-foaming was-
hing powder
Please keep the lint filter in good condition,
and install it to proper position. If the lint
filter is lost or damaged, please contact
the local after-sales service department of
our company.

The largest allowed slope of the
shank base of the machine is 2 .
The slanting or rough ground will
result in unstable running or
stoppage of the machine. Please
adjust it with following methods:
Adjust the adjustable foot:
Install the bottom plate
After you open the package,
please lean the washing
machine gently down on soft
items ( like the towel cloth,
blanket, etc. ). Install the
bottom plate to the bottom of
the machine with the eight
screws by a cross screwdriver,
then lift the machine up gently.
See to the figure:
Adjust the installation position
Before Using
Before Using
Installation and adjustment
Please install and adjust the machine according to the requirement of the manual. It is
very important to your security and correct operating the machine.
1.Press downward to
assmble.
2.Pull upward to detach.
1.To twist the adjustable foot, please
first lift up the side of the foot slightly,
loosen the adjustable nut, and twist
the foot.
2.Fasten the nut after adjustment.
Loosen Fasten
High Low
adjustable nut
adjustable foot
"Hand scrub" wash:
The drum and pulsator rotate in opposite directions to form a washing
water flow similar to hand scrubbing movement, and meanwhile the
drum inner wall also take a share in washing, which obviously increase
the washing intensity.
Open-cover alarm function
During washing cycle except the processes of water filling and draining,
the washing machine will stop operation and automatically alarm if the
top cover is opened.
Special functions
Back
Front
Bottom plate
Screw
Soft items
Pull down Put up
Install the lint filter

1.The height of the drain hose shall be
less than 10cm, or the drainage will not
be smooth, and cost such long time that
the machine may stop at mid way.
2.Do not trample or press the drain hose.
If the drain hose is too long, cut it at mid
point. To make smooth drainage, cut the
front end of the hose slantingly.
4.If extra drain hose is needed, please
make separate purchase. The inner
diameter of the extra hose shall not
less than 30mm, and the length shall
not exceed 1.5m.
If the extra hose is too long, cut it
either at Aor at B point.
1.Lean the machine down gently with the front
surface facing the ground. Loosen the eight
screws by a cross screwdriver.
3.Extend the drain hose from the left side. Push the
drain hose into the groove with hands.
4.Install the bottom plate (as per indicated before),
then lift the machine up gently.
2.Pull out the drain hose from the groove at the
right side.
Back
Front
Bottom plate
Soft item
Use groove at
this side after
direction changing
Page 3
Push the drain hose
into the groove with
hands at this point
Before Using
Before Using
How to change the direction of the drain hose
Usage of the drain hose
The drain hose shall drain smoothly

Water tap,suitable Water tap,not suitable
It is required that the front end shall be longer than 10mm.
The outlet end surface of the tap shall be flat and smooth. If not please file it to
avoid leakage.
3.Loosen the screw till the water tap can be accessed. Put the jointer of the water
inlet hose on the tap. See to Figure 2. (If the tap diameter is too large and the jointer
can not be set on the water tap, please loosen the four screws and take out the
bushing in the jointer. See to the figure3.)
2.Press the lower end of the lock lever and push down the slider. Take off the water
inlet hose jointer from the water inlet hose component. See to Figure 1.
Remarks: Before twisting the fastening nut, the thread is 4mm above the
upper surface of the nut. After twisting the fastening nut, the thread is 2mm
above the upper surface of the nut. See to Figure 6.
5.Take off the nameplate. Twist the fastening nut as per the indication of the figure.
See to Figure 5.
4.Fasten the four screws evenly. See to Figure 4.
>10mm
Outlet end surface
Nut
About 4mm before twisting
About below 2mm after twisting
Screw
Screwdriver Mark label
bushing
Figure 2
Figure 5
Figure 1
Figure 4
Figure 3
Figure 6
Slider
Water inlet pipe jointer
Water inlet pipe
Locking lever
Before Using
Before Using
Install the water inlet hose
Confirm the water tap
Connection between the water inlet hose jointer and
the water tap
1.Use the new water inlet hose provided with the machine to connect to the water
faucet.Old hose sets should not be reused.

1.Do not take off the water absorption
cushion. Please check if the cushion
is dropped or damaged before each
usage. If it happens please contact
our after-sale department immediately.
2.Put the nut of the water inlet hose on
the valve jointer.
3.Fasten the nut. Swaying it gently to
confirm if it's suitable.
1.Close the water tap.
2.Press the locking lever. Push down the slider. Then
pull off the water inlet hose. If the machine is used
more than once every week, the jointer of the water
inlet hose can be kept on the tap to prevent
damaging the fixing screw.
1.Push down the slider. Insert the
water inlet hose into the jointer.
2.Hang the lock lever to the jointer.
Release the slider till a click
sound is heard.
Locking lever
Slider
Water absorption cushion
Nut of the water inlet hose
Jointer of the water inlet valve
Slider
Jointer of the
water inlet hose
Locking lever
Before Using
Before Using
Connection between the water inlet hose and the
washing machine
Connection between the jointer of the water inlet
hose and the water inlet hose
Check the connection between the jointer of the
water inlet hose and the water tap
Take down the water inlet hose
1.Swaying the hose gently to confirm if it is fastened
stable.
2.After installation, open the tap to check if it leaks.
3.Do not bend the hose with overstrain.
4.Before each usage please check if
the connection between the jointer
of the water inlet hose and the water
tap, and the installation of the
water inlet hose are firm, so as to
prevent dropping from improper

Confirm if
there's special
requirment for
the laundries.
Clear the pocket.
Take out the
coins , sand,
hairpins etc.
Fasten the
buttons and
zippers.
When the pulsator
is running , the
buttons of the
laundries may
cause noise. For
the sake of
discretion,please
put the laundries
with buttons into
other laundries.
Preparation before washing
1.Connect the water inlet hose and open
the water tap .
2.Confirm that the washing machine is
earthed reliably . Then insert the power
plug into the receptacle. Do not connect
the earth terminal to the gas pipe and
tap water pipe.
3.Put down the drain hose.
The quantity of
the laundries
shall not exceed
the rated value.
The big laundries
like the jeans
shall be put in
loosely.
Using process
Using process
1 Preparation before washing
Pay attention to followings before washing the laundries
a.Please check if the laundries are applicable for washing.
b.Separate those not colorfast from other laundries.
c.For laundries not waterabsorbing,please put them into water with hands.
d.For laundries with much soil,please remove the soil first.You can add detergent on the
part with serious soil directly.It is much easier to remove the soil by that mean.
e.For laundries likely to get lint ball or with long fiber,please first turn the inside out before
putting them into the water.
f.Do not put the laundries polluted with chemicals directly into the washing machine.
g.For those small laundries ,laundries likely to be twisted or worn,and woolen laundries,
please put them into mesh bag before wasing.

Reference weight of the laundries:
working suit up,down
jeans about 800g
The capacity of washing and spinning of the
machine refer to the largest weight of the standard
laundries under dry condition that can be washed
or spinned in one time. One time washing quantity
shall be lower than the rated capacity. The largest
capacity of this machine is 5.0kg.
The thickness, size, type of the cloth will influence
the actual washing capacity. It is suitable for one
time washing to put in reasonable amount of
laundries and the laundries can be turned round in
washing.
Do not select "High" water level for laundries less
than 1.0kg, so as to avoid splashing of water.
To wash thin laundries like the stocking, silk etc.,
please first put them into washing mesh bag (which
can be purchased separately) before wash.
shirt jacket
single bed sheet
Socks
underpants
undershirt
pajamas
blanket
cotton,about 900g
cotton,about
300g
cotton,about
800g
cotton,about 600g
blending,about 50g
cotton,about 70g
cotton,about 180g
Using process
Using process
2 Put in the laundries
cotton,about 1120g
blending coat
(about 800g)

How touse the whitener
Fill water to decided level. Dilute
the whitener with container. Pour
it slowly into the washing tub.
Avoid using whitener on
laundries with color or pattern as
they are prone to lose color.
The whitener shall not touch the
laundries directly.
Refer to the user's manual for
the usage and quantity of the
whitener.
For powder whitener, please
dissolve it before use.
Standard usage quantity of the detergent and water
quantity
Using process
Using process
3 Put in the detergent
Inlet box of the detergent
2.5~3.5
Above 3.5
1.5~2.5
0.5~1.5
Below 0.5
9
8
7
6
5
4
3
2
1
About 35L About 46.5g About 29g
About 42L About 56g About 35g
About 33L About 44g About 27g
About 38L About 50.5g About 31.5g
About 28L About 37g About 23g
About 31L About 41g About 26g
About 23L About 30.5g About 19g
About 26L About 34.5g About 22g
About 15L About 20g About 12.5g
About 18L About 24g About 15
10
Laundries
quantity(kg)
Water level Water quantity Common powder
(Add 40g in each
30L water)
Concentrated
powder
(Add 25g in each
30L water)
How to use the washing
powder
Direct dissolved in the machine
1.Fill water to "Low" water level.
2.Add the power. Run for 30 seconds
to dissolve it completely.
3.Put in the laundries. Select
suitable water level.
The instant dissolving of the washing
powder:
1.Prepare warm water of 30 and a
container.
2.Add the powder while stirring to
fully dissolve it.
Put in the prorer quantities detergent
according to the water level and the
laundries quantities .
It is suggested not to use high
sudsing detergent.
Washing powder with poor quality or
long time storage maybe caked.
Please pay attention to cleaning the
detergent box in time

The user selects a suitable water level depending
on the load.
If "Quick" wash is selected, water level will
indicate "2". After water level reaches "2", it will
wash while water filling, and wash normally upon
the water level reaching "4".
After washing for 1 min, pressing "Water level"
button will enable supplemental water filling, which
will stop automatically upon the water reaching
overflow level.
" WATER LEVEL"button
a.
Using process
Using process
4 Use the operation buttons
Description of the function of the buttons
STANDARD
JEANS
GENTLE
QUICK WASH
Normal wash
Large, thick or heavily soiled laundry
Woolen textiles or underwear
10 min quick wash for load below 2 Kg
"PROGRAM " button
You can select from the following four programs.
Program
Gentle
Quick
Standard
.
10
8
6
4
2
9
7
5
3
1
WATER
LEVEL
SELECTION
PROGRAM
SELECTION
SOAK
WASH
RINSE
SPIN
PROCEDURE
SELECTION
Mode and meaning of the indicator light
Flashing: indicate the running program
Flashing rapidly: indicate abnormal condition
On: indicate the program about to run, or
indicate the selected mode
"PROCEDURE"button

Remarks: After pressing "POWER ON/OFF" to connect power supply, if the washing machine
lasts idle more than 10 min, it would automatically shut off the supply.
XQB50-10
To indicate -- during sensing.
To indicate remaining min. During
program running.
To indicate remaining reserved
time (hrs) during reservation period.
To indicate fault symbols for abnormal
conditions (see page 16)
SURPLUS(MIN)
Page 16
After the power is switched on, press it to
start the machine
During working, push it to pause working.
During pause, push this button to restart
and continue operation.
"START/PAUSE"button
Press "Power On/Off" button to connect
power supply.
After power is connected, pressing this
button will cut off the supply.
"POWER ON/OFF"button
Using process
Using process
POWER
START ON / OFF
PAUSE
"RESERVATION" button
The N tube displays the cycle
remaining min, during running.
tube display time left (minutes).
Pressing the button, the N tube
displays the reserved hrs to the wash
cycle end. The indicator flashes to
indicate in-reservation.
ixie
ixie
RESERV
RESERVE
HOURS LATER
SURPLUS MIN
ATION

WATER
LEVEL
SELECTION RESERV
ATION
PROCEDURE
SELECTION
POWER
START ON/OFF
PROGRAM
SELECTION
STANDARD
JEANS
GENTLE
QUICK WASH
After the power is switched on, the washing machine will automatically set a normal program
comprising of processes of "Wash, Rinse and Spin" . If other program is desired, press the button
of "Process" to select one or several process of soak, wash, rinse and spin. Refer to the
paragraph "Processes selecting".
After switching on, the "Standard" program will be the default. If other full-automatic program is
desired, you can press the button "Program" to get the corresponding indicator on. Refer to the
"Button of 'program'"paragraph on page 10.
Example: Use the "Quick" program for slightly soiled articles.
When "standard" or "Jeans" program is selected, the
washing machine will perform full-automatically
controlled fuzzy program to set water level, water flow and
wash duration according to the cloth nature and weight
PROCEDURE
SELECTION
PROGRAM
SELECTION
POWER
ON/OFF
Page 13
Page 10
Using process
Using process
b. Operating procedure and explanations for the
buttons
1 Press the "POWER ON/OFF" button to switch on
the power supply
2 Press the button of "Program Selection" to
select a suitable full-automatic program
3 Press the button of "PROCEDURE SELECTION" to
select suitable processes.
SOAK
WASH
RINSE
SPIN
PAUSE
10
8
6
4
2
9
7
5
3
1
XQB50-10

Even there's no water in the tub, the
spinning will start after a certain period.
Do not use soak process for woolen laundries.
Wash the laundries that are prone to lose
colors separately from other laundries.
The pulsator will not rotate unless the
water is filled to selected water level.
Selection method of the procedure programs
Attention
Using process
Using process
If you push the "PROCEDURE SELECTION" button for 6 times, it will resume the
original mode, and it will circulate like that.
If you select the"QUICK WASH" program, you have to set the full procedure of
wash, rinse and spin. The procedure can not be selected.
Times of pushing
the"select"button
0
1
2
3
4
5
Applicable procedure Contents(the lighted indicators
indicate the programs about to run)
Spin(spin after drain)
Wash(the washing
liquid remains in the
tub)
When the common laundries
need washing, rinsing and
spinning.
Soak Wash Rinse Spin
Repeat using the washing
liquid
When the laundries need
rinsing and spinning after
manual washing
When the laundries need only
spinning after manual
washing (first drain then spin)
If the laundries are very dirty,
or the sleeve and collar are
dirty, first soak then wash
Wash,rinse,spin
Rinse,spin
Wash,rinse(the
rinsing liquid remains
in the tub)
Soak,wash,rinse,spin
The laundry needn't spin to
avoid wrinkles
Selected procedure
program
After switching on the power, press the button "WATER LEVEL" to select a water level according
to the load. Please refer to the paragraphs.Detergent standard dosages and water levels
and "Button of Water level" on page 10.
WATER
LEVEL
Page 9
Page 10
4 Press the "WATER LEVEL" button to select suitable
water level

After switching on, the washing machine reserved wash program will be automatically set
inactive. If you desire a wash cycle to end at a reserved time, you can press the "Reservation"
button to set a reserved wash program. Refer to "The button of Reservation"on page 11.
When "Reservation"becomes active, the nixie tube
displays the time to the end of the reserved wash cycle, and
the indicator turns on.
To change the running program or cancel the reservation,
you should cut off the supply and reselect.
the washing will finish
about 18 hours later
Time list of each program (minute)
Total time: including the normal water inlet time, drain time, excluding the power off time. The
total washing time may be influenced by the water inlet pressure and water level.
Spin time: the time from intermittent running to finishing.
The Standard or Jeans program could combine the process of soak during which the washing
machine firstly soak for about 15~45 min after water filling and then begins to wash.
When "Quick wash" program is chosen, the washing machine would automatically set water
level and full processes of wash, rinse and spin.
Confirm the reserve program
RESERVE
ATION
START
PAUSE
Standard
Program
Gentle
Jeans
Quick
Water
level
Wash
(min)
About 6 About 35~47
About 5.5~6.5
About 35~48
About 10
About 24
1~10
1~10
About 3
About 4
About 3
About 2
About 2
Rinse
(min)
Spin
(min) Total time(min)
Rinse once, about 4
Rinse twice, about 4
Rinse twice, each abut 4
Rinse twice,each about 4
Using process
Using process
6 Press the "start/pause" button
5 Push the "RESERVATION" button to select
suitable reserve program
1~10
5 Close the top lid
6 Finish washing
Except water filling and draining, if the
top cover is opened, the washing
machine will stop running and alarm.
After Finishing wash
alarm automatically
The washing machine cuts off the power supply
automatically when wash cycle ends.

Clean
Using process
Using process
Disposal after washing
After using, please clean the lint and foreign materials of the lint filter etc. in time. Otherwise it may influence
your using the machine.
When washing, lint filter must be used
After using, please clean it in time.
Lint filter:
1.Pull upward to detach
2.Clean the lint
Put it in water and clean while it is still wet.
(See to Figure 1).
3.Press downward to assemble.
1.After washing, close the water faucet. ( If needed, you can dismantle the water inlet hose).
Please first pull off the power plug from the receptacle before cleaning.
5.Wipe off the water drops on the surface of the machine and inside the tub. Open the top lid for some time (about 1 hour),
then close the top lid.
4.Hang up the power cord and drain hose.
3.Be sure to pull off the power plug before maintenance.
2.Do not store water in the washing machine for a long period. Drain the water completely after each using.
Figure 1
Figure 2
Pull down Put up
The filter screen of the water inlet
valve is likely to be blocked by
foreign materials and influence the
water inlet. Please clean it with
brush every two months.
If the cabinet is dirty, wipe it with wet cloth
Do not flush it directly with water.
Wipe it with neutral detergent.
Do not wipe it with thinner, petrol, alcohol
etc.
Thinner
Alcohol
Petrol

(If there's breakdown, please pull off the power plug before checking) The following
phenomena are not breakdowns sometimes. Please confirm again before sending it to
repair. If there are real breakdowns, please come to the special maintenance department or
after-sale service department of our company. Do not repair it by yourself.
Phenomena The reason How to settle
The top lid is not closed
Is the drain hose put down?
Is the drain hose blocked by
foreign material?
Are the laundriesput slantingly?
Are the laundries slanting in
spinning?
Is the machine slanting?
The water tap is not open
The water inlet valve is blocked
The water pressure is too low
and the current istoo small
Is there power failure?
Is the power plug loose?
Is the jointer screw of the water
inlet hose is loose or twisted
awry?
The water faucetleaks
There's abnormal sound inside the
machine
The machine does
not act
Close the top lid
Put down thedrain hose. Open
and close thetop lid once.
Clean the foreignmaterial.
Open and closethe top lid once.
Re-order the laundries.Close
the top lid.
Level the machine in right
position. Open and close the
top lid once.
Open the water tap. Push the
"Start/Pause" button.
Clean the water inlet valve.
Push the "Start/Pause" button.
Wait for the normal water
pressure before use.
Use it when the power is on.
Insert the power plug tightly.
Level the machine properly.
Re-order the laundries.
Fasten the jointer screw
properly.
Trouble shooting Answer to question
Does the water level arrive at the
set water level?
Affusion to the set water level.
Is the power plug loose? Insert the power plug tightly.
Is the top lid closed? Close the top lid
Are the laundriesput orderly? Put the laundriesorderly.
Not spin
Not wash
Buzzing upon reservation starts,
Nixie tube indicates "E0"
Safety switch actuates, not
spin, (after self-correction
twice), nixie tube displays
"E3", buzzing
No or slow water filling (not
reaching the level in 15 min),
nixie tube indicates "E4",
buzzing
No or slow drain, nixie tube
indicates "E1" , buzzing.
If the nozzle is choked with
foreign bodies
Remove the foreign bodies
Poor or no waterfall flow
The top cover leaves open Close the top lid
Running pauses during spin,
nixie tube indicates "E2",
buzzing

User's manual
Name
Components of the water
inlet hose
Bottom plate
Tapping screws ST4x16
One
One
One
Eight
One
Quantity
Inside the document bag
Storage position
Automatic washing machine
Inside the accessory bag
Between the upper cushion of the washing machine
package and the upper seal of the package carton
Packing list
It is the water remained in the factory inspection of
performance.
Common phenomena
Phenomena Explanation
Balance the laundries to avoid slanting.
The program is setting the drain time. Some time is
needed before it starts spinning.
To prevent splash during water filling.
The spinning is intermittent when it starts.
While water filling in wash and rinse, the
pulsator pauses rotation
There may be some water flowing out of
the drain hose in the first use of the machine.
Push the "Procedure selection" button to
select "Spin", but it doesn't work.
Supplementary water filling 48 s after
sensor tests cloth material.
Wash pauses
Lint filter One Inside the accessory bag

Rated voltage frequency
Rated washing / spinning capacity
Water level/Water quantity (about)
Max water consumption
pressure
Rated washing power
Rated spinning power
Weight
Dimension
5.0kg
About 126L (High water level; Standard program)
0.03MPa-0.78MPa
350W
255W
About 26kg
L 537mm W 520mm H 890mm
220V~ 50Hz
Model XQB50-10
Specification
Specification
Other manuals for XQB50-10
2
Table of contents
Other Haier Washer manuals

Haier
Haier HA655TME User manual

Haier
Haier HG1000TXVE User manual

Haier
Haier XPB88-LS User manual

Haier
Haier HWF90BW1 User manual

Haier
Haier HWM120-B1678S8 User manual

Haier
Haier HW-B1060 User manual

Haier
Haier HLC1700AXS User manual

Haier
Haier XPB50-23BS User manual

Haier
Haier HW70-14F2B User manual

Haier
Haier HWM95-113S User manual

Haier
Haier hW80-1401B-u User manual

Haier
Haier HWM110-9188 User manual

Haier
Haier HNS1260TVE User manual

Haier
Haier HWM85-728 User manual

Haier
Haier JW-K42B User manual

Haier
Haier HWM100-113S User manual

Haier
Haier HWM55-23BS User manual

Haier
Haier HWM8000 User manual

Haier
Haier XPB56-23S User manual

Haier
Haier HWM95-113S User manual