Hama 00124153 MoveData User manual

00124153
00124154
MoveDataCard Reader
microSD
E
F
D
GB
Operating Instructions
Bedienungsanleitung
Mode d‘emploi
Instrucciones de uso

4
Thank you for choosing a Hama product.
Take your time and read the following instructions and information completely. Please keep these
instructions in a safe place for future reference. If you sell the device, please pass these operating
instructions on to the new owner.
1. Explanation of Warning Symbols and Notes
Warning
This symbol is used to indicate safety instructions or to draw your attention to specic hazards
and risks.
Note
This symbol is used to indicate additional information or important notes.
2. Package Contents
•„MoveData” Lightning-USB Card Reader
•These operating instructions
3. Safety Notes
•The product is intended for private, non-commercial use only.
•Protect the product from dirt, moisture and overheating and use it in dry rooms only.
•Do not use the product in the immediate vicinity of heaters or other heat sources or in direct sunlight.
•Do not drop the product and do not expose it to any major shocks.
•Do not attempt to service or repair the product yourself. Leave any and all service work to qualied
experts.
•Do not open the device or continue to operate it if it becomes damaged.
•Dispose of packaging material immediately according to locally applicable regulations.
•Do not modify the product in any way. Doing so voids the warranty.
•Keep this product, as all electrical products, out of the reach of children!
GOperating Instructions

5
4. Technical Data
Warning
Never usetheUSB type AandtheLightningplug at thesame time.
„MoveData“ Lightning-USB Card Reader
Power Supply 5V max. 500 mA
Memory Card microSD/ microSDHC/ microSDXC
Connections USB2.0type A
Lightning(8-pin connector)
Operating Systems
•Windows 10/8/7/Vista/XP
•Mac OS 9.x or higher
•iOS 5.1 or higher
•Requirement: Installation of the Hama MoveData App
5. Using via USB Connector
•Plug your memory card into the appropriate slot of the card reader.
•Press the unlocking device and push it into the direction of the desired connector (USB).
•Connect the card reader to a free USB port on your computer.
•You can now transfer data between your computer and the memory card.
Warning – Data Loss
•Ensure that thedatatransferis done beforeyou remove amemorycard from yourcard reader.
•Always usethe ejectfunction of youroperatingsystembeforeyou remove amemorycard from
yourcard readeror disconnectyourcard reader (withinserted memorycard)from your end
device.
•Data loss can´tbe excludedat disregard!

6
6. Using via Lightning Connector
Note – microSD/ microSDHC/
microSDXC memory cards
•The inserted memory card has to be
formatted into FAT32 for an easy use.
•To transfer your data/les optimally the use of
memory cards from class 10 is recommended.
•Download the Hama MoveData App from the
Apple App Store.
•Plug your memory card into the appropriate slot
of the card reader.
•Press the unlocking device and push it into the
direction of the desired connector (Lightning).
•Connect the card reader with your terminal
device (iPhone/iPad/iPod) via the lightning
connector.
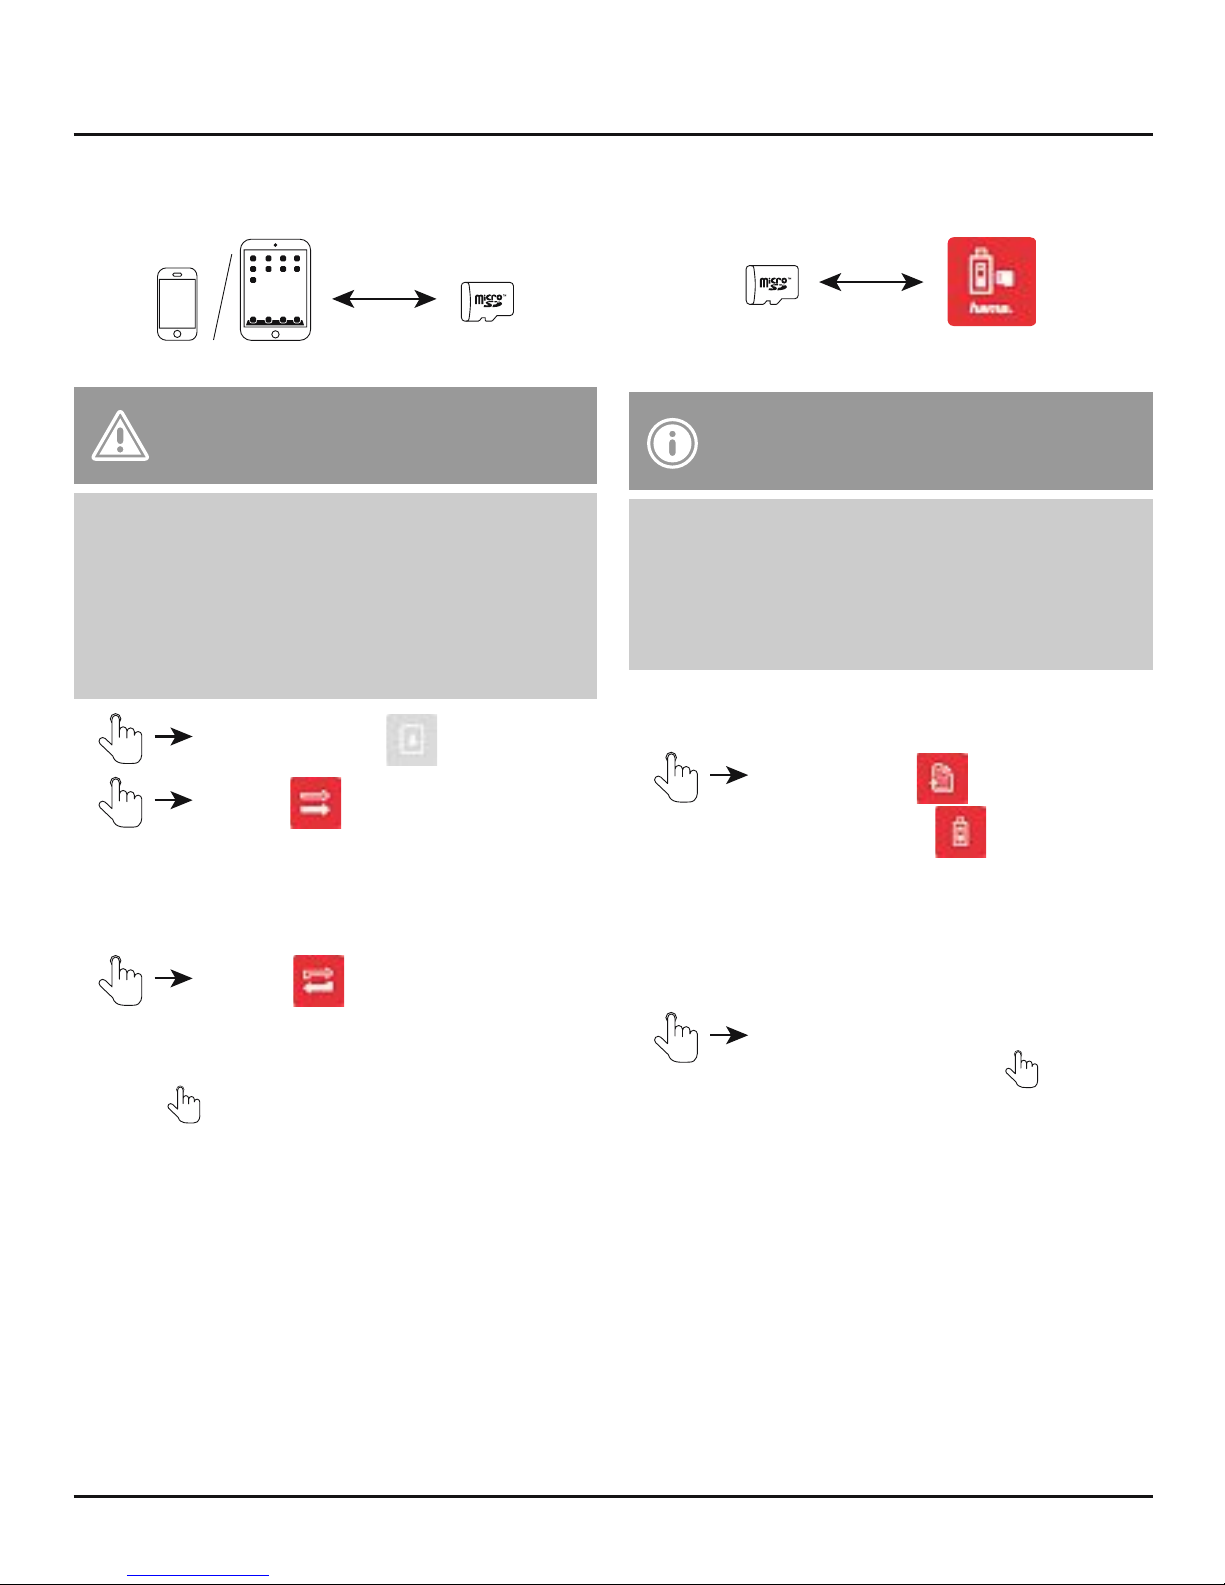
•Open the MoveData App.
There are several options for using the card reader
in the main menu.
Contact Backup
•Backup of the contact information from the
terminal device to the memory card
•Recovery of the contact information from the
memory card to a terminal device
Local Storage
•Memory capacity for les directly in the Hama
MoveData App
•Advantage: direct access to the stored data,
even without card reader
External Storage
•Direct access to the les stored on the memory
card (only when using the card reader)
Photo Album
•Direct access to the les (images and videos) on
the terminal device
Settings
•Access to the settings section of the Hama
MoveData App
Note – App Authorization
•For some functions, the Hama MoveData
App needs the permission for access to your
terminal device (e.g. contact information
backup / recovery, back up images, etc.)
•If the app should have no permission,
you get an appropriate notication while
performing such a function.
•To permit the access, select the Hama
MoveData App in the settings menu of the
terminal device and push the appropriate
switch to green.
Note – Icon
This icon is used when you have to
touch the display on a certain spot to
perform an action or open a menu.

7
6.1 Backup / Recovery of Contact
Information
Warning – Data Loss when
Restoring the Contact Information
If you restore contact information of the
memory card on the terminal device, the
contact information stored on the terminal
device will be deleted. After restoring only
the contact information of the backup le are
available.
•Contact Backup
•Backup
All contact information of the terminal
device will be backed up on the memory
card of the card reader (in .vcf format).
•Restore
Access to all contact information that are
stored on the memory card. Select the le
( ) that contains the desired contact
information to restore them on the terminal
device.
6.2 Data Transfer Between Local and
External Storage
Note – Transferring Within the
Same Memory Location
With this transfer method, les and folders can
also be transferred within the same memory
location (e.g. move an image from the external
storage into a subfolder of the external
storage).
6.2.1 Individual or Several Files/Folders
•Local Storage
or External Storage
Listing of all les and folders that are
stored in the local (app) or the external
storage (memory card).
•Edit
Select the le(s) or folder(s) ( ) that you
want to transfer to the other storage.
Three options are appearing on the lower
display:
Delete: Deletes the selected le(s) or
folder(s) from the local or external storage
Move: Moves the selected le(s) or
folder(s) (deleting of the le(s) or folder(s)
from the initial storage at the same time)
Copy: Copies the selected le(s) or folder(s)
(preservation of the le(s) or folder(s) on
the initial storage at the same time)

8
•Copy or Move
•Local Storage
or External Storage
Selected le(s) or folder(s) will be saved on
the local (app) or external storage (memory
card).
•You have several opportunities for saving the
selected le(s) or folder(s):
New Folder
A new folder will be created. Enter a folder
name and conrm OK( ).
Select the newly created or an already
existing folder ( ).
•Paste Here or Move to Here
Selected le(s) or folder(s) will be saved
into the selected folder or directly on the
local/external storage.
The progress of the copy or move process
is shown on the display.
•Done
The process will be completed.
•Home
Direct access to the main menu.
6.2.2 Individual Files
Note
With this transfer method, only individual les
can be selected and transferred.
•Local Storage
or External Storage
Listing of all les and folders that are
stored in the local (app) or the external
storage (memory card).
•Edit
Select the le ( ) that you want to
transfer to the other storage.
•
•Copy or Move
•Local Storage
or External Storage
The Selected le will be saved in the local
(app) or external storage (memory card).

9
•You have several opportunities for saving the
selected le:
New Folder
A new folder will be created. Enter a folder
name and conrm with OK( ).
Select the newly created or an already
existing folder ( ).
•Paste Here or
Move to Here
Selected le will be saved into the selected
folder or directly on the local/external
storage.
The progress of the copy or move process is
shown on the display.
•Done
The process will be completed.
•Home
Direct access to the main menu.
6.3 Data transfer from Local Storage to
terminal device
Note
•You can transfer data from the local storage
(app) to your terminal device or open/use it
with other apps.
•With this transfer method, only individual
images or videos can be transferred to your
terminal device.
•Local Storage
Listing of all les and folders that are
stored in the local storage (app).
•Edit
Select the le ( ) that you want to
transfer to the terminal device.
•
•Open In
•Save Image respectively
Save Video
The selected image or video will be saved
on the terminal device.
•Done
The process will be completed.
•Home
Direct access to the main menu.

10
6.4 Data transfer from the local/external
storage to the terminal device
Note
With this transfer method, only individual image
les can be transferred to the terminal device.
•Local Storage
or External Storage
Listing of all les and folders that are
stored in the local (app) or the external
storage (memory card).
•Select the image ( ) that you want to transfer
to your terminal device.
•The image will be displayed.
•Save
The selected image will be saved on the
terminal device.
•Cancel
•Home
Direct access to the main menu.
6.5 Data transfer from the terminal device
to the local/external storage
6.5.1 Via Photo Album
Note
With this transfer method, only image and
video les can be transferred from the terminal
device.
•Photo Album
Listing of all media folders (albums) or les
that are stored on the terminal device.
•If necessary choose the folder ( ) that
contains the desired le(s).
•Select the le(s) ( ) that you want to transfer.
•Done
A target folder for saving the selected le(s)
can be chosen.
•Local Storage
or External Storage
Selected le(s) will be saved in the local
(app) or external storage (memory card)

11
•You have several opportunities for saving the
selected le(s) or folder(s):
New Folder
A new folder will be created. Enter a folder
name and conrm with OK ( ).
Select the newly created or an already
existing folder ( ).
•Paste To Here
Selected le(s) will be saved into the
selected folder or directly on the local/
external storage.
Youreach the main menu automatically
after nishing the copy process.
6.5.2 Via import from library
•Local Storage
or External Storage
Listing of all les and folders that are
stored in the local (app) or the external
storage (memory card).
•+
•From Library
Listing of all media folders/les that are
stored on the terminal device.
•If necessary choose the folder ( ) that
contains the desired le(s).
•Select the le(s) ( ) that you want to transfer.
•Done
The selected le(s) will directly be saved on
the local/external storage. You are still in
the listing of all les and folders that are
stored on the local (app)/external storage
(memory card).
•Home
Direct access to the main menu.
6.5.3 Via Clipboard
Note
With this transfer method, only individual image
les can be transferred from the terminal device
•Select in the gallery (Photos) of the terminal
device the image ( ) that has to be
transferred to the local/external storage.
The image will be displayed.
•
•Copy
The selected image will be copied into the
clipboard of the terminal device.
•Open the Hama MoveData App
•Local Storage
or External Storage
Listing of all les and folders that are
stored in the local (app) or the external
storage (memory card).

12
•+
•From Clipboard
The selected image will directly be saved
on the local/external storage. You are still
in the listing of all les and folders that are
stored on the local (app)/external storage
(memory card).
•Home
Direct access to the main menu.
6.6 Delete files/folders from the local/
external storage
6.6.1 Several files/folders
•Local Storage
or External Storage
Listing of all les and folders that are
stored in the local (app) or the external
storage (memory card).
•Edit
Select the le(s)/ folder(s) ( ) that you
want to delete.
•Delete
Conrm the deletion process ( ). The
selected le(s)/ folder(s) will be deleted
from the local/external storage.
•Done
You are still in the listing of all les and
folders that are stored on the local (app)/
external storage (memory card).
•Home
Direct access to the main menu.
6.6.2 Individual files
•Local Storage
or External Storage
Listing of all les and folders that are
stored in the local (app) or the external
storage (memory card).
•Edit
Select the le/folder ( ) that you want to
delete.
•
•Delete
Conrm the deletion process ( ).
The selected le/folder will be deleted from
the local/external storage.
•Done
You are still in the listing of all les and
folders that are stored on the local (app)/
external storage (memory card).
•Home
Direct access to the main menu.

13
6.7 Rename files in the local/external
storage
•Local Storage
or External Storage
Listing of all les and folders that are
stored in the local (app) or the external
storage (memory card).
•Edit
Select the le ( ) that you want to
rename.
•
•Rename
You can now rename the le. Enter a new
name and conrm with OK ( ).
•Done
You are still in the listing of all les and
folders that are stored on the local (app)/
external storage (memory card).
•Home
Direct access to the main menu.
6.8 Create a new folder on the local/
external storage
•Local Storage
or External Storage
Listing of all les and folders that are
stored in the local (app) or the external
storage (memory card).
•+
•New Folder
A new folder will be created. Enter a folder
name and conrm with OK ( ).
•Home
Direct access to the main menu.
6.9 Create text documents on the local/
external storage
•Local Storage
or External Storage
Listing of all les and folders that are
stored in the local (app) or the external
storage (memory card).
•+
•New Text Document
A new text document will be created. Enter
the desired text.

14
•Save
Enter a le name for the text document and
conrm with OK ( ). The text document
is saved.
•Cancel
You are still in the listing of all les and
folders that are stored on the local (app)/
external storage (memory card).
•Home
Direct access to the main menu.
6.10 Information about the local and
external storage
•at Local Storage
or External Storage
The maximum and still available storage
capacity of the respective storage is
displayed.
6.11 App Settings
•Settings
Access to the settings of the Hama
MoveData App.
•About
Further information about the software
(Version, publisher of the App, etc.)
•Show hidden les
By activation of this option, hidden les will
be displayed in the app.
•Modify le extension
By activation of this option, le extensions
will be visible and can be changed (with
help of the function rename, see 6.7.
Rename les in the local/external storage).
Warning – Modify le extension
Modifyingleextensions mayleadto the
le beinguseless.
7. Warranty Disclaimer
Hama GmbH & Co. KG assumes no liability and
provides no warranty for damage resulting from
improper installation/mounting, improper use of
the product or from failure to observe the operating
instructions and/or safety notes.
8. Service and Support
Please contact Hama Product Consulting if you
have any questions about this product.
Hotline: +49 9091 502-115 (German/English)
Further support information can be found here:
www.hama.com

16
Vielen Dank, dass Sie sich für ein Hama Produkt entschieden haben!
Nehmen Sie sich Zeit und lesen Sie die folgenden Anweisungen und Hinweise zunächst ganz durch.
Bewahren Sie diese Bedienungsanleitung anschließend an einem sicheren Ort auf, um bei Bedarf darin
nachschlagen zu können. Sollten Sie das Gerät veräußern, geben Sie diese Bedienungsanleitung an den
neuen Eigentümer weiter.
1. Erklärung von Warnsymbolen und Hinweisen
Warnung
Wird verwendet, um Sicherheitshinweise zu kennzeichnen oder um Aufmerksamkeit auf
besondereGefahrenundRisiken zu lenken.
Hinweis
Wird verwendet, um zusätzlich Informationen oder wichtige Hinweise zu kennzeichnen.
2. Packungsinhalt
•Lightning-USB-Kartenleser „MoveData“
•Diese Bedienungsanleitung
3. Sicherheitshinweise
•Das Produkt ist für den privaten, nicht-gewerblichen Haushaltsgebrauch vorgesehen.
•Schützen Sie das Produkt vor Schmutz, Feuchtigkeit und Überhitzung und verwenden Sie es nur in
trockenen Räumen.
•Betreiben Sie das Produkt nicht in unmittelbarer Nähe der Heizung, anderer Hitzequellen oder in
direkter Sonneneinstrahlung.
•Lassen Sie das Produkt nicht fallen und setzen Sie es keinen heftigen Erschütterungen aus.
•Versuchen Sie nicht, das Produkt selbst zu warten oder zu reparieren. Überlassen Sie jegliche
Wartungsarbeit dem zuständigen Fachpersonal.
•Öffnen Sie das Produkt nicht und betreiben Sie es bei Beschädigungen nicht weiter.
•Entsorgen Sie das Verpackungsmaterial sofort gemäß den örtlich gültigen Entsorgungsvorschriften.
•Nehmen Sie keine Veränderungen am Produkt vor. Dadurch verlieren sie jegliche
Gewährleistungsansprüche.
•Dieses Produkt gehört, wie alle elektrischen Produkte, nicht in Kinderhände!
DBedienungsanleitung

17
4. Technische Daten
Warnung
Verwenden Sie keinesfallsden USB TypAundden LightningSteckergleichzeitig.
Lightning-USB-Kartenleser „MoveData“
Stromversorgung 5V max. 500 mA
Speicherkarte microSD/ microSDHC/ microSDXC
Anschlüsse USB2.0Typ A
Lightning(8 Pin-Anschluss)
Betriebssysteme
•Windows 10/8/7/Vista/XP
•Mac OS 9.x oder neuere Versionen
•iOS 5.1 oder neuere Versionen
•Voraussetzung: Installation der Hama App MoveData
5. Verwendung via USB-Anschluss
•Stecken Sie Ihre Speicherkarte in den entsprechenden Slot des Kartenlesers.
•Drücken Sie die Entriegelung und schieben Sie diese in die Richtung des gewünschten Anschlusses
(USB).
•Schließen Sie den Kartenleser an einer freien USB Buchse Ihres Computers an.
•Sie können nun den Datentransfer zwischen Ihrem Computer und der Speicherkarte vornehmen.
Warnung – Datenverlust
•Bevor Sieeine Speicherkarte ausdem Kartenleser entnehmen,vergewissernSiesich,dass der
Datentransferbeendetist.
•Entfernen SiedenWechseldatenträger immer über dieAuswurffunktion Ihres Betriebssystems,
bevor SiedasSpeichermediumausdem Kartenleser entnehmen oder den Kartenleser(mit
eingestecktem Speichermedium)vonIhremEndgerättrennen.
•BeiNichtbeachtung kann Datenverlustnicht ausgeschlossenwerden!

18
6. Verwendung via Lightning Anschluss
Hinweis – microSD-/ microSDHC-/
microSDXC-Speicherkarten
•Um die eingesetzte Speicherkarte problemlos
verwenden zu können, ist eine Formatierung
in dem Dateiformat FAT32 notwendig.
•Für eine optimale Übertragung Ihrer
Daten/ Dateien wird eine Verwendung von
Speicherkarten ab Class10 empfohlen.
•Laden Sie die Hama App MoveData aus dem
Apple App Store herunter.
•Stecken Sie Ihre Speicherkarte in den
entsprechenden Slot des Kartenlesers.
•Drücken Sie die Entriegelung und schieben
Sie diese in die Richtung des gewünschten
Anschlusses (Lightning).
•Schließen Sie den Kartenleser mit Hilfe des
Lightning-Anschlusses an Ihr Endgerät (iPhone/
iPad/iPod) an.
•Öffnen Sie die App MoveData.
Es stehen Ihnen im Hauptmenü verschiedene
Menüs zur Nutzung des Kartenlesers zur
Verfügung.
Kontakte Sichern
•Sicherung von Kontaktdaten des Endgerätes auf
die Speicherkarte
•Wiederherstellung von Kontaktdaten der
Speicherkarte auf einem Endgerät
Lokaler Speicher
•Speicherkapazität für Dateien direkt in der Hama
App MoveData
•Vorteil: Direkter Zugriff auf hier gespeicherte
Dateien, auch ohne Kartenleser
Externer Speicher
•Direkter Zugriff auf die Dateien der Speicherkarte
(nur bei Verwendung des Kartenlesers)
Fotoalbum
•Direkter Zugriff auf die Dateien (Bilder, Videos)
des Endgerätes
Einstellungen
•Zugriff auf die Einstellungen der Hama App
MoveData
Hinweis – App Berechtigung
•Die Hama App MoveData benötigt für
einige Funktionen die Berechtigung zum
Zugriff auf Ihr Endgerät (z.B. Kontaktdaten
sichern/ wiederherstellen, Bilder sichern, etc.)
•Sollte die App keine Berechtigung haben,
erhalten Sie bei Ausführung einer solchen
Funktion eine entsprechende Meldung.
•Um den Zugriff zu erlauben, wählen Sie die
Hama App MoveData in den Einstellungen
Ihres Endgerätes aus und schieben den
entsprechenden Regler auf grün
Hinweis – Symbol
Dieses Symbol wird verwendet, wenn
Sie den Bildschirm an einer bestimmten
Stelle berühren müssen, um eine
Aktion durchzuführen oder ein Menü
zu öffnen.

19
6.1 Sichern / Wiederherstellen von
Kontaktdaten
Warnung – Datenverlust
bei Wiederherstellung der
Kontaktdaten
Wenn Sie Kontaktdaten von der Speicherkarte
auf dem Endgerät wiederherstellen, werden
die bereits auf dem Endgerät gespeicherten
Kontaktdaten gelöscht. Nach Wiederherstellung
stehen nur noch die Kontaktdaten aus der
Sicherungsdatei zur Verfügung.
•Kontakte Sichern
•Sicherung
Alle Kontaktdaten des Endgerätes werden
auf der Speicherkarte des Kartenlesers
(im .vcf-Format) gesichert.
•Wiederherstellung
Zugriff auf alle Kontaktdaten, die auf der
Speicherkarte gespeichert sind.
Wählen Sie die Datei ( ), die die
gewünschten Kontaktdaten enthält, aus,
um diese auf dem Endgerät
wiederherzustellen.
6.2 Datenübertragung zwischen lokalem
und externen Speicher
Hinweis – Übertragung innerhalb
desselben Speicherortes
Bei dieser Übertragungsvariante können auch
Dateien und Ordner innerhalb desselben
Speicherortes übertragen werden (z.B. ein Bild
vom externen Speicher in einen Unterordner des
externen Speichers verschieben).
6.2.1 Einzelne oder mehrere Dateien/
Ordner
•Lokaler Speicher
oder Externer Speicher
Auistung aller auf dem lokalen (App) oder
externen Speicher (Speicherkarte)
gespeicherten Dateien und Ordner.

20
•Bearbeiten
Wählen Sie die Datei(en) oder Ordner aus
( ), die Sie auf den anderen Speicher
übertragen möchten.
Am unteren Bildschirmrand erscheinen drei
Auswahlmöglichkeiten:
Löschen: Löscht ausgewählte Datei(en)
oder Ordner vom lokalen oder externen
Speicher
Verschieben:Verschiebt ausgewählte
Datei(en) oder Ordner (Gleichzeitiges
Entfernen der Datei(en) oder Ordner vom
ursprünglichen Speicher)
Kopieren: Kopiert ausgewählte Datei(en)
oder Ordner (Gleichzeitiges Erhalten der
Datei(en) oder Ordner auf ursprünglichen
Speicher)
•Kopieren oder Verschieben
•Lokaler Speicher
oder Externer Speicher
Ausgewählte Datei(en) oder Ordner werden
im lokalen (App) oder externen Speicher
(Speicherkarte) gespeichert.
•Sie haben verschiedene Möglichkeiten,
ausgewählte Datei(en) oder Ordner
abzuspeichern:
Neuer Ordner
Es wird ein neuer Ordner erstellt. Geben Sie
einen Ordnernamen ein und bestätigen mit
OK( ).
Wählen Sie den neu erstellten oder einen
bereits bestehenden Ordner aus ( ).
•Hier einfügen oder
Verschieben einfügen
Ausgewählte Datei(en) oder Ordner werden
in dem ausgewählten Ordner oder direkt
auf dem lokalen/ externen Speicher
abgespeichert.
Der Fortschritt des Kopier-/
Verschiebevorgangs wird auf dem Display
angezeigt.
•Fertig
Der Vorgang wird abgeschlossen.
•Home
Direktzugang zum Hauptmenü.
6.2.2 Einzelne Dateien
Hinweis
Bei dieser Übertragungsvariante kann immer
nur eine einzelne Datei ausgewählt und
übertragen werden.
•Lokaler Speicher
oder Externer Speicher
Auistung aller auf dem lokalen (App) oder
externen Speicher (Speicherkarte)
gespeicherten Dateien und Ordner.
•Bearbeiten
Wählen Sie die Datei aus ( ), die Sie auf
den anderen Speicher übertragen möchten.

21
•
•Kopieren oder Verschieben
•Lokaler Speicher
oder Externer Speicher
Die ausgewählte Datei wird im lokalen
(App) oder externen Speicher
(Speicherkarte) gespeichert.
•Sie haben verschiedene Möglichkeiten, die
ausgewählte Datei abzuspeichern:
Neuer Ordner
Es wird ein neuer Ordner erstellt. Geben Sie
einen Ordnernamen ein und bestätigen mit
OK( ).
Wählen Sie den neu erstellten oder einen
bereits bestehenden Ordner aus ( ).
•Hier einfügen oder
Verschieben einfügen
Die ausgewählte Datei wird in dem
ausgewählten Ordner oder direkt auf dem
lokalen/ externen Speicher abgespeichert.
Der Fortschritt des Kopier-/
Verschiebevorgangs wird auf dem Display
angezeigt.
•Fertig
Der Vorgang wird abgeschlossen.
•Home
Direktzugang zum Hauptmenü.
6.3 Dateiübertragung vom lokalen
Speicher zum Endgerät
Hinweis
•Vom lokalen Speicher (App) aus können
die Dateien auf das Endgerät übertragen
oder mit anderen Apps geöffnet/ verwendet
werden.
•Bei dieser Dateiübertragung können
ausschließlich Bild- und Video-Dateien
(einzeln) auf das Endgerät übertragen
werden.
•Lokaler Speicher
Auistung aller auf dem lokalen Speicher
(App) gespeicherten Dateien und Ordner
•Bearbeiten
Wählen Sie die Datei aus ( ), die Sie auf
das Endgerät übertragen möchten.
•
•Öffnen
•Bild sichern bzw.
Video sichern
Das ausgewählte Bild bzw. Video wird auf
dem Endgerät gespeichert.

22
•Fertig
Der Vorgang wird abgeschlossen.
•Home
Direktzugang zum Hauptmenü.
6.4 Dateiübertragung vom lokalen/
externen Speicher zum Endgerät
Hinweis
Bei dieser Dateiübertragung können
ausschließlich Bild-Dateien (einzeln) auf das
Endgerät übertragen werden.
•Lokaler Speicher
oder Externer Speicher
Auistung aller auf dem lokalen (App) oder
externen Speicher (Speicherkarte)
gespeicherten Dateien und Ordner.
•Wählen Sie das Bild aus ( ), das Sie auf das
Endgerät übertragen möchten.
•Das Bild wird angezeigt.
•Sichern
Das ausgewählte Bild wird auf dem
Endgerät gespeichert.
•Abbrechen
•Home
Direktzugang zum Hauptmenü.
6.5 Dateiübertragung vom Endgerät zum
lokalen/ externen Speicher
6.5.1 Via Fotoalbum
Hinweis
Bei dieser Dateiübertragung können
ausschließlich Bild- und Video-Dateien vom
Endgerät übertragen werden.
•Fotoalbum
Auistung aller auf dem Endgerät
gespeicherten Medien-Ordner(Alben) oder
Dateien.
•Ggfs. wählen Sie den Ordner aus ( ), in dem
sich die gewünschte(n) Datei(en) benden.
•Wählen Sie die Datei(en) aus ( ), die Sie
übertragen möchten.
•Fertig
Es kann ein Zielordner zum Abspeichern
der ausgewählten Datei(en) bestimmt
werden.

23
•Lokaler Speicher
oder Externer Speicher
Ausgewählte Datei(en) werden im lokalen
(App) oder externen Speicher
(Speicherkarte) gespeichert.
•Sie haben verschiedene Möglichkeiten,
ausgewählte Datei(en) oder Ordner
abzuspeichern:
Neuer Ordner
Es wird ein neuer Ordner erstellt. Geben Sie
einen Ordnernamen ein und bestätigen mit
OK( ).
Wählen Sie den neu erstellten oder einen
bereits bestehenden Ordner aus ( ).
•Hier einfügen
Ausgewählte Datei(en) werden in dem
ausgewählten Ordner oder direkt auf dem
lokalen oder externen Speicher
abgespeichert.
Nach Abschluss des Kopiervorgangs
gelangen Sie automatisch in das
Hauptmenü.
6.5.2 Via Importieren aus Galerie
•Lokaler Speicher
oder Externer Speicher
Auistung aller auf dem lokalen (App) oder
externen Speicher (Speicherkarte)
gespeicherten Dateien und Ordner.
•+
•Importieren aus Galerie
Auistung aller auf dem Endgerät
gespeicherten Medien-Ordner/ Dateien.
•Ggfs. wählen Sie den Ordner aus ( ), in dem
sich die gewünschte(n) Datei(en) benden.
•Wählen Sie die Datei(en) aus ( ), die Sie
übertragen möchten.
•Fertig
Die ausgewählte(n) Datei(en) werden direkt
auf dem lokalen/ externen Speicher
abgespeichert. Sie benden sich weiterhin
in der Auistung aller auf dem lokalen
(App)/ externen Speicher (Speicherkarte)
gespeicherten Dateien und Ordner.
•Home
Direktzugang zum Hauptmenü.
6.5.3 Via Zwischenablage
Hinweis
Bei dieser Dateiübertragung können
ausschließlich Bild-Dateien (einzeln) vom
Endgerät übertragen werden
•Wählen Sie in der Galerie (Fotos) des Endgerätes
das Bild aus ( ), das Sie auf den lokalen/
externen Speicher übertragen möchten. Das Bild
wird angezeigt.
•
This manual suits for next models
1
Table of contents
Languages:
Other Hama Card Reader manuals