Hama 00178602 User manual

Hama GmbH &CoKG
86652 Monheim/Germany
Alllistedbrands are trademarks of the correspondingcompanies. Errors andomissionsexcepted,
andsubjecttotechnical changes. Ourgeneralterms of deliveryand paymentare applied.
www.hama.com/nep
Service &Support
www.hama.com
+49 9091 502-0
DG
00178602/04.20

F
D
GB
Operating Instructions
Bedienungsanleitung
Mode d‘emploi
with Heart Rate MonitorFitness Tracker
Fitness-Tracker mit Pulsmesser
00178602
Fr
SCHRITTE
BPM
KM
11.29
767
0
0


Fr
SCHRITTE
BPM
KM
11.29
767
0
0
Fit Track 5900
Fit Track 5900
2
3
1
4

GOperating instruction
Controls and displays
1. Sensor button
2. Removable strap
3. Closure
4. Charging contact
Display symbols:
Step counter
Calories burned
Distance covered
Heart rate activity
Speed
Duration of activity
Heart rate measurement
Notications
Selection of sport types
Walking
Running
Cycling
Hiking
Football
Basketball

Volleyball
Strength training
Badminton
Tennis
Table tennis
Bowling
Baseball
Badminton
Treadmill
Aerobics
Yoga
Spinning
Skiing
Skating
Push-ups
Skipping
Climbing
Dancing

Stopwatch
Cameraremote trigger
Selection of dial
GPS
ON
OFF
GPS settings
Telephone search
Brightness settings
Alarm
Drink reminder
Movement reminder
Thank you for choosing aHama product.
Take your time and read the following instructions and information completely.Please keep these instructions in a
safe place for futurereference.
Your new tness tracker is the ideal companion for ahealthy lifestyle and will motivate you to be active throughout
the day.Aswell as displaying the time and date, it also collects data about the number of steps you have taken,
your heart rate and the calories you have burned. Wireless connection via
Bluetooth
®to your smartphone enables
you to document the data on the associated app and thereforeconstantly keep track of your success. Check here
when you have reached your personal tness goal!

1. Explanation of warning symbols and notes
Warning
This symbol is used to indicate safety instructions or to draw your attention to specichazards and risks.
Note
This symbol is used to indicate additional information or important notes.
2. Package contents
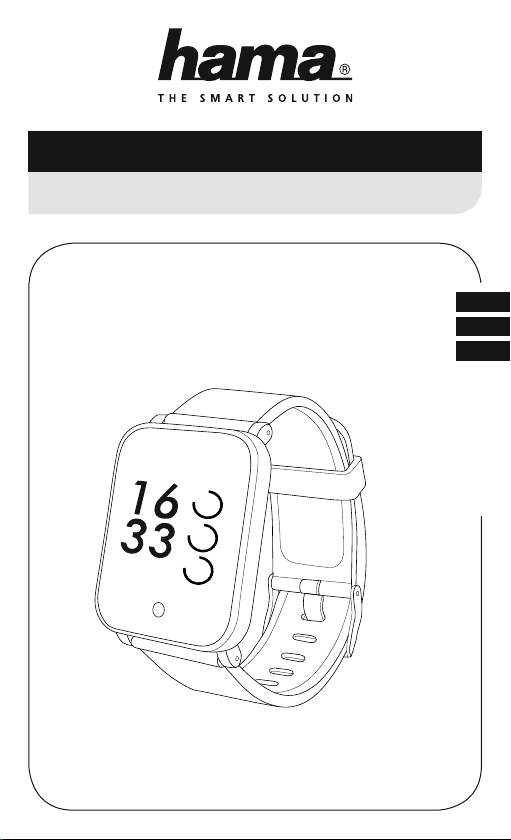
•"Fit Track 5900" tness tracker
•1USB charging cable
•Operating Instructions
3. Safety instructions
•This product is intended for private, non-commercial use only.
•Use the product only for the intended purpose.
•Protect the product from dirt, moistureand overheating and use it in dry environments only.
•Do not use the product in the immediate vicinity of heaters, other heat sources or in direct sunlight.
•Do not operate the product outside the power limits specied in the technical data.
•Do not use the product in areas in which electronic products arenot permitted.
•The battery is integrated and cannot be removed.
•Do not open the device or continue to operate it if it becomes damaged.
•Do not attempt to service or repair the product yourself.Leave any and all service work to qualied experts.
•Do not drop the product and do not expose it to any major shocks.
•Do not modify the product in any way.Doing so voids the warranty.
•Dispose of packaging material immediately in accordance with the locally applicable regulations.
•Do not incinerate the battery or the product.
•Do not tamper with or damage/heat/disassemble the batteries/rechargeable batteries.
•While driving acar or using sports equipment, do not allow yourself to be distracted by your product and keep
an eye on the tracsituation and your surroundings.
•Consult your doctor beforestarting an exercise programme.
•Always be awareofyour body’sresponsewhen you exercise, and speak to your doctor in an emergency.
•Consult your doctor if you have amedical condition and wish to use the product.
•This is aconsumer product, not amedical device. Hence, it is not intended for the diagnosis, therapy,cureor
prevention of illnesses.
•Prolonged contact with the skin can lead to skin irritations and allergies. Consult adoctor if symptoms persist.
•This product is not atoy.Itcontains swallowable smallparts that pose asuffocation hazard.
Warning -cardiac pacemakers
This product generates magnetic elds. Persons with acardiac pacemaker should consult adoctor beforeusing
this product, as the pacemaker's proper function could be affected.
Information -Flying
•This product is aconstant transmitter of radio signals. Please be awarethat carrying and using radio
transmitters during certain phases of the ight (e.g. take-off /landing) is not permitted for safety reasons.
•Check with your airline beforeyou ywhether your tness tracker can be taken on board. If in doubt, leave
the product at home.

Warning –rechargeablebattery
•Only use suitable charging devices or USB connections to charge the product.
•Donot use defective chargers or USB ports and do not attempt to repair them.
•Donot overcharge the product or allow the battery to completely discharge.
•Avoid storing, charging and using in extreme temperatures and at extremely low atmospheric pressures (such
as at high altitudes).
4. First steps with the "Fit Track 5900" fitness tracker
4.1 Charging
•Charge your tness tracker fully beforeusing it for the rst time.
•Connect the charging cable to afreeUSB port on your computer or USB charger and the tness tracker's
charging contact [4].
•To do this, consult the operating instructions for the USB charger you areusing.
Note
•The charging time for afull battery charge is around 120 minutes. As soon as the battery shown in the
display is fully charged, the charging process is complete and you can disconnect the tness tracker from
the charging cable.
4.2 Putting and switching on
•Place the tness tracker around your wrist and fasten it using the closure.
•Hold the sensor button [1]down for 3seconds to start the tness tracker.
Note
•The position on your wrist does not matter for the tness tracker's function.
•The tness tracker can be worn on either wrist. It is also possible to attach it both above and below the wrist.
4.3 Power Off
•To switch the tness tracker off,switch to menu item [Function]and then in the sub-menu go to the item
[Power Off]. Then press the sensor button [1]for 3seconds.
4.4 Operation -Menu structure
•Press the sensor button [1]toactivate the start screen and to switch between the displays in the sequence
shown.
•The sub-menus areaccessed by pressing and holding the sensor button [1]for 3seconds (see illustration
below).
Note
•This graphic is asummary of all of the menu items that can be displayed on the tness tracker and the
sequence of displays when shipped.

Loremipsum
Loremipsum
Start screen
Step counter Weather
display Notifications Heart rate
(pulse) Stopwatch Alarm settings
Main menu
Detailed display
(Steps, calories,
distance)
Detailed display
of received
messages
Main menu Main menu
Activation of
heart rate
measurement
Detailed
display of
sport types
Detailed
display of
stopwatch
Selection of
sport types
Start
Activity
Selection
Detailed
display
End of
activity /
Main menu
Activate
stopwatch /
end stopwatch
Selection of
sub-menus
Sub-menu
Settings
Confirmation
of selection
Selection of
sport types
1sec. 1sec. 1sec. 1sec. 1sec. 1sec. 1sec.
3sec.3sec. 3sec. 3sec. 3sec. 3sec.
3sec. 3sec.
3sec.
3sec.
Main menu
1sec.
3sec. 3sec.
1sec.
1sec.
1sec. 1sec.

5. Setting up the fitness tracker
5.1 Downloading the Hama FIT app
Note
The following operating systems aresupported:
•iOS 8.1 or higher
•Android 5.0 or higher
•Open the iTunes AppStoreorGoogle Play Storeonyour smartphone.
•Youcan nd the app using the search Settings.
•Download the app as normal and install it on your smartphone. To do this, follow the instructions on your
smartphone.
5.2 Pairing the fitness tracker with your smartphone
Note
In order for your tness tracker to display calls, text messages and WhatsApp messages, activate push mode for
messages in your smartphone settings.
Android /Apple mobile devices
•Ensurethat the
Bluetooth
®Settings is switched on on your smartphone and your tness tracker.
•Start the app on your smartphone and search for the "Fit Track5900" tness tracker by pressing on the
Bluetooth symbol.
•Now select your "Fit5900" tness tracker to pair it with the app.
•Then make your personal settings.
•The tness tracker is now linked with the app and synchronisation begins.
Note
To start synchronisation of the tness tracker with the app, either press the circular arrow in the [Home]menu
item at the top right or drag the screen downwards.

6. Using the app
6.1 Setting personal data
•When setting the tness tracker up for the rst time, choose whether your values aretobedisplayed in metric
(metres, kilograms) or imperial (feet, pounds) units.
•In the [Settings]menu item under [User Prole], enter your personal data such as your gender,height,
weight, date of birth and step length.
•Add your name and aprole pictureifyou wish.
•Choose the menu item you wish to edit by tapping it. Asub-menu will then open in which you can enter the
relevant settings.
Note
•Please be awarethat your terminal device must support some functions if they aretobeused.
•Formoreinformation, please refer to the operating instructions of your terminal device.
•While setting up the app, you will be asked whether the app has permission to access the functions of your
terminal device.
iOS/Android:

6.2 Displays in the main menu
6.2.1 Activity mode
The main menu shows you the following information:
Under menu item [Home]inthe Activity tab, you will see the steps taken [ ], the distance covered [ ], the
last heart rate measured [ ]and the calories burned for the day in question. [ ].
iOS/Android:
Steps taken Calories burned Distance covered
The achieved proportion of your daily goal will be displayed in the relevant menu item. Youcan dene this in the
Activity goal (Android) /Goals (iOS) settings. (See Section 6.3.2)

6.2.2 Recording aheart rate measurement
Note
Please be awarethat heart rate recording in the history is only possible if an active
Bluetooth
®connection is in
place between the tness tracker and the app.
•Under the menu item [Home]and the Activity tab, select the Heart rate button [ ].
•To start recording your heart rate, tap [Start].
The tness tracker starts to recordyour heart rate.
iOS/Android:
•To stop the recording, tap [Stop].
•Under the menu item [Settings]and the Device settings option, you can activate automatic heart rate
measurement (See Section 6.3.4.2). When this Settings is activated, the tness tracker measures your heart rate
continuously at 15-minute intervals.

6.2.3 Sleep mode
•Under the menu item Home in the Sleep tab, you will see your sleep rhythm for the day in question.
•Hereiswhereyou will nd agraphical analysis of your sleep quality.
iOS/Android:

6.2.4 Sport mode
•Under the menu item [Sport], you will see asummary of your previous activities and you can also start anew
activity.
•First select the type of sport for which you want to recordanactivity by pressing [Change sport type]. Youwill
then be shown the sport type Running, Walking, Hiking and Cycling.
•To start anew activity,press [Start].
•The display above shows the previous activities and the entiredistance covered. Select previous activities to
obtain asummary of other activities you have completed.
•To obtain moredetailed information about an activity,select the activity in question.
•The detailed view shows you information on the distance covered, the time spent, your speed, your heart rate
and the number of steps taken and calories burned.
Your heart rate is also evaluated, and its progress shown as agraph and divided into zones.

6.2.5 Summary of daily /weekly /monthly /annual successes
•Under the menu item Data, you will see your recorded training successes shown as achart.
•In the Day /Week /Month /Year tabs shown at the top, you can switch between the individual views.
•If you tap on the date display at the top, acalendar opens and you can select aspecicdate to show the
training successes for that day.
iOS/Android:

6.3 Settings
Under the menu item [Settings], you can adapt the tness tracker to your individual needs.
iOS/Android:
6.3.1 Profile
Select the sub-item [User Prole]toadapt your personal data.
6.3.2 Activity goal /Goals
Select the sub-item [Goal Settings](Android) /[Target Settings](iOS) to adapt your personal daily goals.
6.3.3 Bluetooth devices
Select the sub-item [Bluetooth Device]toestablish anew pairing with the tness tracker.

6.3.4 Device settings
Select the sub-item [Device Settings]toactivate various tness tracker Settings and to adjust the selected sport
types.
iOS/Android:
6.3.4.1 Switch on display with raise
•Activate this function to enable the tness tracker's display to be activated when you move your arm upwards.
6.3.4.2 Automatic heart rate measurement
•Activate this function for the tness tracker to measureyour heart rate continuously at 15-minute intervals.
6.3.4.3 Camera control
•Activate this function to be able to control the cameraonyour smartphone using the tness tracker.
6.3.4.4 Sport types
•Select the item [Add Sports]todene the various types of sport that aretobestored on your tness tracker.
•Out of the 22 sport types displayed, you can select four that areadded in addition to the sport types Walking
and Running on your tness tracker.
•Conrm your selection by pressing [Save (Android) /Synchronise (iOS)].
6.3.4.5 Alarm
•Select the item [Alarm]toset different alarm times.
•Youcan add an alarm by tapping [+].
•To do this, select the required alarm time in the sub-menu and the day of the week.
•Conrm your selection by pressing [Save (Android) /Synchronise (iOS)].
6.3.4.6 Drink reminder
•Select the sub-item [Water Drinking Reminder]and activate this Settings in the sub-menu.
•In the sub-menu, you can set the start time for the drink reminder,the interval, the number of repetitions and
the day of the week.
•Conrm your selection by pressing [Save (Android) /Synchronise (iOS)].
6.3.4.7 Movement reminder
•Select the sub-item [Sedentary Reminder]and activate this Settings in the sub-menu.
•In the sub-menu, you can set the interval of the movement reminder,the start and end time, and the day of the week.
•Conrm your selection by pressing [Save (Android) /Synchronise (iOS)].

6.3.4.8 Do not disturb
•Select the sub-item [Do not disturb]and activate this Settings in the sub-menu.
•In the sub-menu, you can set the start and end time for Do not disturb mode.
•Conrm your selection by pressing [Save (Android) /Conrm (iOS)].
6.3.4.9 Restore factory settings
•In this sub-item, select [Reset]toreset the Hama FIT App to the factory settings.
•Conrm the subsequent prompt with [OK]inorder to reset the Hama FIT app to the factory settings, or press
[Cancel]toclose the selection.
6.3.5 Push notifications
•Select the item [Notication Alerts]toactivate the notication function for various apps and services.
6.3.6 Google Fit /Apple Health
•Activate the connection to Google Fit by pressing the button on the right and connecting, when prompted, to
your Google account.
•Select the Apple Health item to obtain instructions for pairing with Apple Health.
6.3.7 Instructions &information
•Select the item [Instructions &information]tocall up alink to asupport page containing further information.
6.3.8 Contact
•Select the item [Feedback]ifyou have any questions about this app or your tness tracker,orwish to submit
feedback about the product.
6.3.9 Firmware
•Select the item [Firmware]tosearch for anewer version of this app and to update it if necessary.
7. Care and Maintenance
•Only clean this product with aslightly damp, lint-free cloth and do not use aggressive cleaning agents.
•Ensurethat no water is able to enter the product.
8. Warranty Disclaimer
Hama GmbH &CoKGassumes no liability and provides no warranty for damage resulting from improper
installation/mounting, improper use of the product or from failuretoobserve the operating instructions and/or
safety notes.
9. Technical data
Bluetooth
®version 4.0
Display
1.3" LCD
Dimensions 260 x35x10 mm
Weight 39g
Protection class IP68
Battery type Lithium polymer
Battery capacity 220mAh /3.8V
Table of contents
Languages:
Other Hama Fitness Tracker manuals
Popular Fitness Tracker manuals by other brands

iSunshine
iSunshine Smart Bracelet Wristband Watch user manual

Withings
Withings Move Quick installation guide

Sensewear
Sensewear Bodymedia Quick start guide and user manual

Withings
Withings Go Quick installation guide

Epson
Epson Pulsense PS-100 quick start guide

Goji
Goji GO Activity Tracker GATRBK15 instruction manual