Hama BTH-5 User manual

00040491-08.04
Hama GmbH & Co KG
Dresdner Str. 9
86653 Monheim/Bayern GERMANY
Tel. +49 (0)90 91/502-0
Fax +49 (0)90 91/502-274
www.hama.de
www.hama.de

00040491
Bluetooth-Headset BTH-5

Das Headset „BTH-5“ ist ein drahtloses Headset für Mobiltelefone, ausgestattet mit der Bluetooth
Technologie.
Bei der Bluetooth Technologie handelt es sich um einen Standard für die drahtlose Datenkommunikation auf
kurze Distanz. Headsets und BlueTooth™-fähige Mobiltelefone können ohne Kabel bis zu einem Abstand von
10 Metern miteinander Verbindung aufnehmen.
Das „BTH-5“ ist ein geeignetes Bluetooth Headset, dass die Bedingungen nach den Richtlinien des
Bluetooth 1.1 Protokolls erfüllt. Es werden zwei Profile unterstützt: Headset Profile und Geräte mit
Hands-Free Profile.
Funktion mit allen geeigneten Bluetooth® Geräten, die Headset-Profile und Geräte mit Hands-Free-Profile
unterstützen.
Beschreibung
1. An/Aus (S1) 4. LED
2. Lautstärke + (S2) 5. Netzteil-Anschluss
3. Lautstärke - (S3)
Laden des Headsets
Bevor Sie das Headset zum ersten Mal benutzen, laden Sie es mit dem mitgelieferten Netzteil für ca. 12
Stunden auf. Wenn das Headset voll geladen ist, wird dies durch permanentes Leuchten der grünen LED
signalisiert (Headset abgeschaltet). Ist das Headset eingeschaltet, wird ein voller Ladezustand durch Blinken
der grünen LED signalisiert.
Blinkt die LED rot (Headset eingeschaltet), wird Akkuladung signalisiert. Bei ausgeschaltetem Headset
leuchtet bei Akkuladung die LED permanent rot.
lKopfhörer und Mikrofon
6. Lautsprecher 8. Ohrbügel
7. Mikrofon 9. Ohrbügel-Arretierung
2

Niedriger Batteriestatus
Wenn die LED des Headsets während des Betriebs beginnt rot zu blinken, wird ein niedriger Batteriestatus
signalisiert. Weiterhin wird dies in regelmäßigen Abständen (alle paar Minuten) auch akkustisch signalisiert.
Nach einer gewissen Zeit schaltet sich dann das Headset ab. Das Headset muss dann wie oben beschrieben
geladen werden.
Headset einschalten
Drücken und halten Sie die Taste S1 am Headset für ca. 2 Sekunden. Ein tiefer gefolgt von einem hohen Ton
ist zu hören, die LED leuchtet grün und blinkt dann regelmäßig alle 3 Sekunden – das Headset ist
eingeschaltet.
Headset ausschalten
Drücken und Halten Sie die Taste S1 für ca. 5 Sekunden. Ein hoher Ton gefolgt von einem tiefen Ton ist zu
hören – die LED leuchtet rot bis Sie die Taste loslassen – das Headset ist ausgeschaltet.
Tragen des Headsets
Der Ohrbügel lässt sich leicht vom Gelenk ziehen und in der gewünschten Richtung anbringen. Entscheiden
Sie, ob Sie das Headset rechts oder links tragen möchten und bringen Sie den Ohrbügel entsprechend an.
1. Setzen Sie das Headset mit dem Ohrbügel hinter
Ihrem Ohr auf.
2. Der Ohrbügel lässt sich individuell anpassen und
sorgt somit für besten Halt.
3. Stellen Sie sicher, dass das Mikrofon in Richtung
Mund zeigt.
3
linkes Ohr rechtes Ohr

Anpassung des Headsets an Ihr Mobiltelefon (Pairing)
Damit das Headset mit Ihrem Telefon kommunizieren kann, ist es erforderlich die beiden Komponenten
miteinander „bekannt“ zu machen. Dieser Prozess wid als Pairing bzw. Kopplung bezeichnet und stellt die
Gundlage der Benutzung des Bluetooth-Headsets dar. Das Pairing muss nur einmal durchgeführt werden!
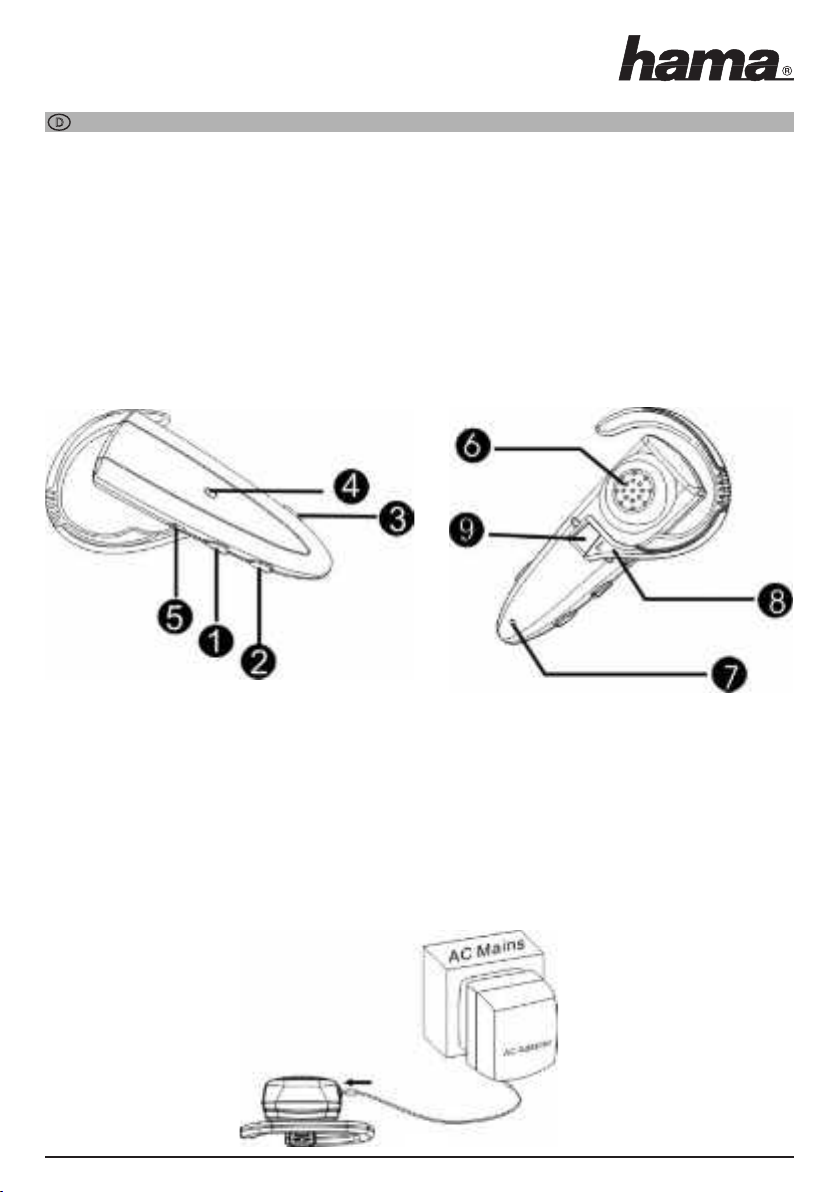
Stellen Sie sicher, dass das Headset voll geladen ist und das Netzteil nicht am Headset angesteckt ist.
Stellen Sie weiterhin sicher dass das Headset ausgeschaltet ist bevor Sie mit dem Pairing (Kopplung)
beginnen.
Bereiten Sie Ihr Telefon für die Pairing-Prozedur vor. Folgen Sie gemäß der Bedienungsanleitung Ihres
Mobiltelefons den Anweisungen wie Sie Ihr Telefon in den Bluetooth-Modus schalten und die
Kopplungsprozedur durchzuführen ist.
- Drücken und halten Sie die Taste S1 bis die LED abwechselnd rot/grün blinkt.
- Das Headset ist nun im Pairing-Modus, Ihr Telefon sucht nun in der Bluetooth-Umgebung nach
entsprechenden Geräten.
- Hat Ihr Telefon das Headset gefunden, wird dies im Display angezeigt „BTH-5“
- Folgen Sie weiterhin den Anweisungen im Telefon bzw. in der Bedienungsanleitung des Telefons.
- Wenn Sie nach dem Passkey oder PIN gefragt werden, bestätigen Sie diesen mit „0000“
- Das Headset ist nun erfolgreich mit dem Telefon gepairt (gekoppelt), die LED blinkt regelmäßig
alle 3 Sekunden und das Headset kann verwendet werden.
Sollte die Kopplungsprozedur nicht zum gewünschten Erfolg führen, schalten Sie das Headset sowie Ihr
Telefon aus und starten Sie den Vorgang neu!
Herstellen einer Bluetooth-Verbindung zum Telefon
Nachdem das Headset mit dem Telefon gepairt wurde, muss eine Bluetooth-Verbindung zum Telefon
hergestellt werden. Folgen Sie hierzu auch den Anweisungen der Bedienungsanleitung Ihres Mobiltelefons.
Um die Bluetooth-Verbindung zum Telefon herzustellen, drücken Sie kurz die Taste „S1“. Das Telefon erkennt
die Verbindungsanforderung und frägt diese an. Bestätigen Sie diese mit der entsprechenden Funktion im
Telefon. Sie können nun Anrufe über das Headset tätigen!
Anrufe beantworten
Eingehende Anrufe können Sie über das Headset entgegennehmen. Drücken Sie hierzu die Taste „S1“.
Die LED blinkt schnell grün (jede Sekunde) und signalisiert somit den Sprechbetrieb.
Anrufe beenden
Anrufe können durch drücken der Taste „S1“ am Headset beendet werden. Nach beenden des Anrufs blinkt
die LED und signalisiert Normalbetrieb (StandBy).
Anrufe abweisen (wird nicht von allen Telefonen unterstützt)
Um einen eingehenden Anruf abzuweisen, drücken Sie die Taste „S1“ bis ein langes akkustisches Signal zu
hören ist. Der Anruf wird abgewiesen.
Gespräche umleiten
Während eines Telefonats besteht die Möglichkeit, Gespräche vom Telefon zum Headset bzw. vom Headset
zum Telefon zu transferieren.
Telefon > Headset:
Drücken Sie die Taste „S1“ am Headset. Das Gespräch wird auf das Headset transferiert.
Headset > Telefon:
Folgen Sie bitte der Anweisung in der Bedienungsanleitung Ihres Mobiltelefons.
4

5
Anrufe tätigen per Sprachwahl (Voice-Dialing)
Um Anrufe per Sprachwahl tätigen zu können, müssen die entsprechenden Sprachprofile im Telefon
hinterlegt/abgespeichert sein. Beachten Sie hierzu die Bedienungsanleitung Ihres Mobiltelefons. Die
Sprachwahl über das Headset funktioniert in der gleichen Art und Weise als würde der Anruf über das
Telefon geführt werden. Lediglich wird die Sprachwahl nicht am Telefon sonder über das Headset aktiviert!
- Drücken Sie kurz die Taste „S1“
- Ein kurzer Ton signalisiert, dass die Sprachwahl aktiviert wurde
- Sprechen Sie nun den entsprechenden Namen des gewünschten Gesprächspartners
- Der Anruf wird aufgebaut
Wahlwiederholung der zuletzt gewählten Nummer (wird nicht von allen Telefonen unterstützt)
Um die Wahl der zuletzt gewählten Rufnummer zu wiederholen, drücken Sie die Taste „S3“ für 2 Sekunden.
Ein kurzer Ton signalisiert den Wahlversuch und der Anruf wird aufgebaut.
Stummschalten des Mikrofons
Um während eines Gesprächs das Mikrofon stummzuschalten, drücken Sie für ca. 1 Sekunde gleichzeitig die
Tasten „S2“ und „S3“. Ein periodisches, akkustisches Signal wird signalisiert solange die Mikrofonstumm-
schaltung aktiviert ist.
Um die Mikrofonstummschaltung aufzuheben, drücken Sie wiederum die Tasten „S2“ und „S3“ gleichzeitig.
Das akkustische Signal wird beendet und die Stummschaltung aufgehoben.
Lautstärkeregelung
Während eines Gesprächs kann die Lautstärke des Headsets reguliert werden. Mit der Taste „S2“ lässt sich
die Lautstärke nach oben, mit der Taste „S3“ nach unten regulieren. Wird der obere bzw. untere Anschlag
der Lautstärkeregulierung erreicht, wird dies über einen akkustischen Ton signalisiert.
Zulassungs- und Sicherheitsbescheinigungen/Allgemeine Informationen
Dieses Gerät trägt die CE-Kennzeichnung entsprechend den bestimmungen der Directive R&TTE (99/5/EG).
Hama GmbH & Co. KG erklärt hiermit, dass sich dieses Gerät in Übereinstimmung mit den grundlegenden
Anforderungen und den weiteren relevanten Regelungen und Vorschriften der Richtlinie 1999/5/EG befindet.
Die Konformitätserklärung finden Sie im Internet unter http://www.hama.de
The “BTH-5” headset is a wireless headset for mobile phones equipped with Bluetooth technology.
Bluetooth technology is a standard for wireless data communication over a short distance. Headset and
BlueTooth™ compatible mobile phones can be wirelessly connected up to a distance of 10 meters.
The “BTH-5” is a suitable Bluetooth Headset that fulfils the conditions according to the Bluetooth 1.1
protocol. Two profiles are supported: Headset profile and devices equipped with hand-free profile.
The headset functions with all suitable Bluetooth devices that support the headset and hands-free profile.
L Cordless Connection upto 10 m

Description:
1. On/Off (S1) 4. LED
2. Volume control + (S2) 5. Power supply unit
3. Volume control - (S3)
Charging the headset
Before using the headset for the first time, charge the headset with the supplied power supply unit for
approximately 12 hours. If the headset is completely charged, the green LED remains continuously
illuminated (headset switched off). If the headset is switched on, the flashing green LED indicates the full
charging status.
If the LED flashes red (headset switched on), the battery charging is indicated. The LED is permanently
illuminated red when the battery is charging while the headset is switched off.
Low battery status
If the LED of the headset begins to flash red while in operation, a low battery status is indicated. An acoustic
signal also indicates the low batter status at regular intervals (every couple minutes). After a certain time the
headset switches off. The headset must then be charged as described above.
6. Speaker 8. Ear loop
7. Microphone 9. Ear loop locking mechanism
6

Switching on the headset
Press and hold the S1 button on the headset for approximately 2 seconds. You can hear a low sound
followed by a higher sound, the LED turns green and flashes every 3 seconds – the headset is switched on.
Switching off the headset
Press and hold the S1 button for approximately 5 seconds. You can hear a high sound followed by a lower
sound – the LED turns red until you release the button – the headset is switched off.
Wearing the headset
The ear loop is easily pulled by the hinge and placed into the desired position. Decide whether you
wish to wear the headset on the right or left side and put on the headset accordingly.
1. Put on the headset with the ear loop behind your ear.
2. The ear loop can be individually adjusted and
provides a secure fit.
3. Ensure that the microphone is facing your mouth.
7
left ear right ear

Adjusting the headset to your mobile phone (pairing)
To ensure the headset can communicate with your telephone, it is necessary to “introduce” both
components. This process is known as pairing or coupling and is the basis for using the Bluetooth headset.
The pairing must only be performed once!
Ensure that the headset is fully charged and the power supply is not plugged into the headset. Also ensure
that the headset is switched off before you begin the pairing (coupling) process.
Prepare your telephone for the pairing process. Follow the operating manual instructions of your mobile
phone to switch your telephone into Bluetooth mode and perform the coupling procedure.
- Press and hold the S1 button until the LED alternatively flashes red/green.
- The headset is now in pairing mode. Your telephone searches for the corresponding devices in the
Blue tooth environment.
- If the headset finds your mobile phone, it will be indicated by “BTH-5”on the phone's display.
- Also follow the instructions in the phone or in the operating instructions of the phone.
- If you are asked for the passkey or PIN, confirm this with “0000”
- The headset has now been successfully paired (coupled) with the telephone, the LED flashes regularly
every 3 seconds and the headset can be used.
If the coupling procedure was not successful, switch off the headset and your telephone and restart the
procedure!
Establishing a Bluetooth connection to the phone
Once the headset is paired with the telephone, a Bluetooth connection must be established to the telephone.
Follow the operating manual instructions of your mobile phone.
To establishing a Bluetooth connection to the phone, briefly press the “S1” button. The telephone recognizes
the connection requirements and requests these requirements. Confirm these requirements using the corre-
sponding function in the telephone. You can now make calls using the headset!
Answering calls
You can answer incoming calls using the headset. Press the “S1” button. The LED flashes quickly
(every second) and indicates the talking mode.
Ending calls
Calls can be ended by pressing the “S1” button on the headset. After ending the call, the LED flashes and
indicates normal operation (standby).
Rejecting calls (not supported by all telephones)
To reject a call, press the “S1” button until you hear a long acoustic signal. The call is rejected.
Transferring calls
During a telephone call you can transfer the call from the telephone to the headset or from the headset to
the telephone.
Telephone > Headset:
Press the “S1” button on the headset. The call is transferred to the headset.
Headset > Telephone:
Please follow the operating manual instructions of your mobile phone.
8

Making calls using voice dialling
To make calls using voice dialling, the corresponding voice profile# must be set up/stored in your phone. For
more information, please refer to the operating instructions of your mobile phone. Voice dialling using the
headset operates in the same manner as if you were making a call using the phone. The voice dialling is not
activated on the phone, rather using the headset!
- Briefly press the “S1” button
- A brief sound indicates that the voice dialling has been activated
- Say the correct name of the person you wish to call out load
- The call will be made
Redialling the number last dialled (not supported by all telephones)
To redial the last number dialled, press the “S3” button for 2 seconds. A brief sound indicates the call
attempt and the call is made.
Switching off the sound of the microphone
To switch off the sound of the microphone during a call, press the “S2” and “S3” buttons at the same time
for approximately 1 second. You hear a periodic acoustic signal as long as the sound of the microphone is
switched off.
To switch the sound of the microphone back on, press the “S2” and “S3” buttons at the same time. The
acoustic signal ends and the sound is switched back on.
Volume control
You can adjust the volume of the headset during a call. The “S2” button increases the volume; the “S3”
button lowers the volume. If the upper or lower limit of the volume control is reached, the limit is indicated by
an acoustic signal.
Registration and Safety Certification/General Information
This device bears the CE symbol as specified by the provisions of Directive R & TTE (99/5/EC).
Hama GmbH & Co. KG hereby declares that this device is in compliance with the basic requirements and
other relevant guideline and regulations of the 1999/5/EC guideline. You will find the declaration of conformity
in the Internet at http://www.hama.de.
Le «BTH-5» est un micro-casque sans fil pour téléphones mobiles utilisant la technologie Bluetooth.
La technologie Bluetooth est une norme pour la transmission de données sans fil à courte distance. La
connexion sans fil entre le micro-casque et un téléphone compatible BlueTooth™ peut être établie dans un
périmètre de 10 mètres.
Le «BTH-5» est un micro-casque compatible Bluetooth ® conforme aux directives du protocole Bluetooth
1.1. Deux profils sont supportés: HSP (Headset-Profile) et les appareils HFP (Hands-Free Profile).
Fonctionne avec tous les appareils compatibles Bluetooth® qui supportent les systèmes Headset-Profile et
Hands-Free-Profile.
¬ Connexion sans Fil jusqu’à 10 Mètres
9

Description
1. Marche/Arrêt (S1) 4. DEL
2. Volume + (S2) 5. Prise de connexion pour
bloc d'alimentation
3. Volume - (S3)
Chargement du micro-casque
Avant d'utiliser le micro-casque une première fois, chargez-le avec le bloc d'alimentation fourni
(env. 12 heures). Une fois que le chargement est terminé, le voyant est vert en continu (micro-casque
désactivé). Lorsque le micro-casque est en marche, l'état de charge complète est signalé par le voyant
clignotant en vert. Si le voyant clignote en rouge (micro-casque en marche), le chargement est en cours.
Lorsque le micro-casque est désactivé, le chargement est signalé par le voyant rouge en continu.
6. Haut-parleur 8. Tour d'oreille
7. Microphone 9. Blocage tour d'oreille
10

Faible niveau de charge des piles
Si le voyant du micro-casque commence à clignoter en rouge pendant l'utilisation, le niveau de charge des
piles est faible. Le faible niveau de charge est également indiqué par un signal acoustique intermittent (en
intervalles de quelques minutes). Après un certain temps, le micro-casque se met automatiquement à l'arrêt.
Le micro-casque doit alors être chargé selon le processus décrit ci-dessus.
Mise en marche du micro-casque
Maintenez la touche «S1» de votre micro-casque enfoncée pendant env. 2 secondes. Le micro-casque émet
un son grave suivi d'un son aigu, le voyant s'allume en vert et se met à clignoter régulièrement (toutes les 3
secondes). Le micro-casque est en marche.
Mise à l'arrêt du micro-casque
Maintenez la touche «S1» enfoncée pendant env. 5 secondes. Le micro-casque émet un son aigu suivi d'un
son grave, le voyant s'allume en rouge aussi longtemps que vous relâchez la touche. Le micro-casque est à
l'arrêt.
Comment porter le micro-casque
Le tour d'oreille peut facilement être retiré de l'articulation pour être fixé à la position désirée. Choisissez
l'oreille sur laquelle vous souhaitez porter votre micro-casque (droite ou gauche), et fixez-le sur le côté
correspondant.
oreille gauche oreille droite
11

1. Faites glisser le tour d'oreille avec le micro-casque
derrière votre oreille.
2. Le tour d'oreille peut être ajusté individuellement.
3. Le microphone doit être orienté vers la bouche.
Configuration du micro-casque pour votre téléphone mobile (pairing)
Avant la première utilisation du micro-casque avec votre téléphone, il est nécessaire de mettre en liaison les
deux composants (pairing). Ce processus appelé pairing ou couplage est fondamental pour l'utilisation du
micro-casque Bluetooth. Le couplage ne doit être effectué qu'une seule fois!
Assurez-vous que le micro-casque est complètement chargé et que le bloc d'alimentation n'est pas
branché. Assurez-vous également que le micro-casque est à l'arrêt avant de commencer le pairing
(couplage).
Préparez votre téléphone pour le pairing. Veuillez également consulter les consignes du fabricant de votre
portable et suivre les instructions pour passer en mode Bluetooth et effectuer la mise en liaison.
- Maintenez la touche «S1» aussi longtemps que le voyant clignote en alternance (rouge/vert).
- Le micro-casque passe en mode pairing, et votre téléphone commence à rechercher des appareils
Bluetooth.
- L'affichage de votre téléphone portable signale la détection du micro-casque, dès qu'il a été trouvé.
- Continuez à suivre les instructions affichées sur votre téléphone ou dans le mode d'emploi de votre
téléphone.
- Lorsque votre téléphone exige un mot de passe ou un PIN, entrez «0000».
- La liaison entre le micro-casque et le téléphone est alors établie, le voyant clignote régulièrement (toutes
les 3 secondes), et vous pouvez utiliser votre micro-casque.
Si la mise en liaison n'a pas fonctionné, mettez votre micro-casque et le téléphone à l'arrêt, et recommencez
le processus.
Établir une connexion Bluetooth avec le téléphone
Après la mise en liaison du micro-casque et du téléphone, il est nécessaire d'établir une connexion
Bluetooth avec le téléphone. Veuillez également consulter les consignes du fabricant de votre portable.
Pour établir une connexion Bluetooth avec le téléphone, appuyez brièvement sur la touche «S1». Le
téléphone reconnaît la requête de connexion et demande une confirmation. Confirmer la requête avec la
fonction correspondante du téléphone. Vous pouvez maintenant téléphoner avec votre micro-casque !
12

Recevoir un appel
Vous pouvez recevoir des appels avec votre micro-casque. Appuyez sur la touche «S1». Le voyant clignote
rapidement en vert (toutes les secondes) pour indiquer le mode communication.
Mettre fin à un appel
Pour mettre fin à un appel, appuyez sur la touche «S1» du micro-casque. A la fin de l'appel, le voyant
clignote pour indiquer le mode normal (StandBy).
Refuser un appel (doit être supporté par le téléphone)
Pour refuser un appel entrant, maintenez la touche «S1» enfoncée aussi longtemps que vous entendez un
long signal acoustique. L'appel est refusé.
Renvoyer un appel
Vous pouvez transférer des appels du téléphone vers le micro-casque et vice versa lors d'un appel.
Transfert du téléphone mobile vers le micro-casque
Appuyez sur la touche «S1» du micro-casque. L'appel est transféré vers le micro-casque.
Transfert du micro-casque vers le téléphone mobile
Veuillez consulter les consignes du fabricant de votre portable.
Appel par reconnaissance vocale (Voice-Dialing)
Pour pouvoir effectuer des appels avec la fonction reconnaissance vocale, des profils vocaux doivent être
enregistrés sur le téléphone. Veuillez également consulter les consignes du fabricant de votre portable. Le
mode reconnaissance vocale du micro-casque fonctionne de la même manière que lors d'un appel avec un
téléphone. La reconnaissance vocale est simplement activé sur le micro-casque et non pas sur le téléphone !
- Appuyez brièvement sur la touche «S1».
- Un son bref indique que la reconnaissance vocale est activée.
- Prononcez alors le nom de votre correspondant .
- La communication est établie.
Composer à nouveau le dernier numéro d'appel sortant (doit être supporté par le téléphone)
Pour composer à nouveau le dernier numéro d'appel sortant, appuyez sur la touche «S3» pendant 2
secondes. Un son bref indique la composition du numéro. La communication est établie.
Désactiver le microphone
Pour désactiver le microphone lors d'un appel, appuyez simultanément sur les touches «S2» et «S3» pendant
1 seconde. Un son intermittent est émis aussi longtemps que le mode secret est activé.
Pour activer le microphone, appuyez de nouveau simultanément sur les touches «S2» et «S3». Le signal
s'arrête et le microphone est activé.
Réglage du volume
Vous pouvez régler le volume du micro-casque lors d'un appel. Appuyer sur la touche «S2» augmente le
volume, appuyer sur la touche «S3» le diminue. Lorsque le volume maximum ou le volume minimum est
atteint, le micro-casque émet un son.
Certificat d'autorisation et de sécurité / Informations générales
Le symbole CE est apposé sur cet appareil, conformément aux dispositions de la directive R&TTE (99/5/EG).
Hama GmbH & Co. KG certifie que cet appareil est conforme aux exigences et aux dispositions concernées
de la directive 1999/5/EG. La déclaration de conformité à la directive R&TTE 99/5/CE se trouve sur
http://www.hama.de/www.hama.de. 13

De „BTH-5” is een draadloze headset voor mobiele telefoons en is uitgerust met de Bluetooth technologie.
De Bluetooth technologie zorgt voor de draadloze datacommunicatie op korte afstanden. Zo kan er een
draadloze verbinding tot stand worden gebracht tussen een headset en een mobiele telefoon die met
BlueTooth™ technologie is uitgerust.
De „BTH-5” is een Bluetooth headset die functioneert volgens de richtlijnen van het Bluetooth 1.1
protocol. Er worden twee profielen ondersteund: headset-profielen en apparaten met handsfree-profielen.
De "BTH-5" kan gebruikt worden met alle Bluetooth® apparaten die headset-profielen en
handsfree-profielen ondersteunen.
Beschrijving
1. Aan/Uit (S1) 4. LED
2. Volume + (S2) 5. Aansluiting voedingsadapter
3. Volume - (S3)
Headset opladen
Laad de headset voor het eerste gebruik met de meegeleverde voedingsadapter gedurende ca. 12 uur op.
Als de headset volledig opgeladen is, brandt de LED (groen) permanent (headset uitgeschakeld). Als de
headset ingeschakeld en volledig opgeladen is, knippert de LED (groen).
Als de LED rood (headset ingeschakeld) knippert, wordt de accu opgeladen. Als de headset uitgeschakeld is
en de accu wordt opgeladen, dan is de LED permanent rood.
14
6. Luidspreker 8. Oorbeugel
7. Microfoon 9. Oorbeugel-scharnier
:Draadloze Verbinding tot 10 Meter

Lage accustatus
Als de LED van de headset tijdens gebruik rood begint te knipperen, is de accustatus laag. Deze lage
accustatus wordt bovendien aangegeven door een akoestisch signaal dat om de paar minuten klinkt.
Na verloop van tijd wordt de headset uitgeschakeld. De headset moet vervolgens, zoals hiervoor
beschreven, opgeladen worden.
Headset inschakelen
Houd de knop S1 van de headset gedurende ca. 2 seconden ingedrukt. U hoort een lage en vervolgens een
hoge toon, de LED is groen en knippert om de 3 seconden. De headset is ingeschakeld.
Headset uitschakelen
Houd de knop S1 van de headset gedurende ca. 5 seconden ingedrukt. U hoort een hoge en vervolgens een
lage toon, de LED is rood tot u de knop loslaat. De headset is uitgeschakeld.
Dragen van de headset
De oorbeugel kan van het scharnier worden losgetrokken en in de gewenste stand worden aangebracht.
Bedenk of u de oorbeugel rechts of links wilt dragen en breng de oorbeugel overeenkomstig aan.
1. Plaats de headset met de oorbeugel achter uw oor.
2. De oorbeugel kan aan de vorm van uw oor worden
aangepast waardoor hij goed blijft zitten.
3. Controleer of de microfoon in de richting van uw
mond staat.
15
linker oor rechter oor

De headset aan uw mobiele telefoon koppelen (pairing)
De headset kan pas met uw telefoon communiceren nadat de beide componenten aan elkaar zijn
"voorgesteld". Dit proces wordt pairing of koppeling genoemd en vormt de basis voor het gebruik van de
Bluetooth-headset. Pairing hoeft maar een keer te gebeuren!
Controleer of de headset volledig opgeladen is. De voedingsadapter mag niet op de headset aangesloten
zijn. Schakel de headset uit voordat u met de pairing (koppeling) begint.
Bereid uw telefoon voor de pairing voor. Lees hierover in de gebruiksaanwijzing van uw mobiele telefoon na
hoe u uw telefoon in de Bluetooth-modus zet en de koppelingsprocedure uitvoert.
- Houd de knop S1 ingedrukt tot de LED afwisselend rood/groen knippert.
- De headset bevindt zich nu in de pairing-modus, uw telefoon zoekt vervolgens in de Bluetooth-omgeving
naar compatibele apparaten.
- Zodra uw telefoon de headset heeft gevonden, wordt in het display "BTH-5" weergegeven.
- Volg de aanwijzingen van uw telefoon resp. van de gebruiksaanwijzing van uw telefoon op.
- Als er naar de Passkey of PIN wordt gevraagd, drukt u „0000” in.
- De headset is nu met de telefoon "gepaird" (gekoppeld), de LED knippert om de 3 seconden en de headset
kan gebruikt worden.
Als de koppeling niet gelukt is, schakel dan de headset en uw telefoon uit en start de procedure opnieuw!
Tot stand brengen van verbinding tussen Bluetooth en telefoon
Na het pairen van de headset met de telefoon, moet er een Bluetooth-verbinding met de telefoon tot stand
worden gebracht. Volg hiervoor de aanwijzingen in de gebruiksaanwijzing van uw mobiele telefoon.
Druk om de verbinding tussen Bluetooth en telefoon tot stand te brengen kort op de knop "S1". De telefoon
herkent het verbindingsverzoek en vraagt dit aan. Bevestig de vraag met de betreffende functie van uw
telefoon. U kunt nu telefoneren via de headset!
Gesprekken aannemen
Inkomende gesprekken kunt u via de headset beantwoorden. Druk hiervoor op de knop "S1". De LED knippert
snel groen (elke seconde) en geeft zo aan dat u zich in de gespreks-modus bevindt.
Gesprekken beëindigen
Gesprekken kunnen door het indrukken van de knop "S1" op de headset beëindigd worden. Na het
beëindigen van het gesprek knippert de LED en geeft aan dat u zich in de normale modus bevindt (stand-by).
Gesprekken afwijzen (wordt niet door elke telefoon ondersteund)
Druk om een inkomend gesprek af te wijzen op de knop "S1" tot u een lang akoestisch signaal hoort. Het
gesprek wordt afgewezen.
Gesprekken omleiden
U kunt tijdens een telefoongesprek gesprekken van de telefoon naar de headset, resp. van de headset naar
de telefoon omleiden.
Telefoon > headset:
Druk de knop "S1" op de headset in. Het gesprek wordt naar de headset omgeleid.
Headset > telefoon:
Volg de aanwijzingen in de gebruiksaanwijzing van uw mobiele telefoon op.
16

Gesprekken tot stand brengen per spraaksturing (voice-dialing)
Voor het tot stand brengen van gesprekken met de spraaksturing, dienen er overeenkomstige
spraakprofielen in de telefoon opgeslagen te zijn. Lees hiervoor de aanwijzingen in de gebruiksaanwijzing
van uw mobiele telefoon. De spraaksturing via de headset werkt op dezelfde manier als wanneer het
gesprek via de telefoon zou worden gevoerd. De spraaksturing wordt namelijk niet via de telefoon maar via
de headset geactiveerd!
- Druk de "S1"-knop kort in
- Een kort akoestisch signaal geeft aan dat de spraaksturing geactiveerd is
- Spreek vervolgens de betreffende naam van de gewenste gesprekspartner in
- Het gesprek wordt tot stand gebracht
Herhaling van het laatst gekozen nummer (wordt niet door elke telefoon ondersteund)
Druk om het laatst gekozen nummer te herhalen gedurende 2 seconden op de „S3”-knop. Een kort
akoestisch signaal geeft aan dat het nummer wordt herhaald en dat het gesprek tot stand wordt gebracht.
Mute-functie van de microfoon
Druk om tijdens een gesprek de microfoon op mute te schakelen gedurende ca. 1 seconde tegelijkertijd de
knoppen "S2" en "S3" in. U hoort een periodiek, akoestisch signaal zolang de mute-functie actief is.
Druk voor het beëindigen van de mute-functie nogmaals tegelijkertijd de knoppen „S2” en „S3” in. Het
akoestische signaal wordt beëindigd en de mute-functie wordt uitgeschakeld.
Volumeregeling
U kunt tijdens een gesprek het volume van de headset regelen. Met de knop "S2" gaat het volume omhoog,
met de knop "S3" gaat het volume omlaag. Als het hoogste of laagste volumeniveau bereikt wordt hoort u een
akoestisch signaal.
Registratiebewijzen en veiligheidskeuringen/algemene informatie
Dit apparaat draagt de CE-markering volgens de bepalingen van de richtlijn R&TTE (99/5/EG).
Hama GmbH & Co. KG verklaart hierbij dat dit apparaat voldoet aan de vereisten en de overige relevante
voorschriften van de richtlijn 1999/5/EG. De verklaring van overeenstemming conform de R&TTE-richtlijn
99/5/EG vindt u op internet onder HYPERLINK "http://www.hama.de"
http://www.hama.de/http://www.hama.de
17
This manual suits for next models
1
Table of contents
Languages:
Other Hama Headset manuals