Hama 00039703 User manual

0 0039703/09.07
All listed brands are trademarks of the corresponding companies. Errors and omissions excepted,
and subject to technical changes. Our general terms of delivery and payment are applied.
Hama GmbH & Co KG
D-86651 Monheim/Germany
www.hama.com

USB - Serial
Konverter
Converter
Convertisseur
COMPUTER
00039703

2
Packungsinhalt:
1x USB zu seriell Konverter Kabel
1x Treiber CD-Rom
1x gedruckte Kurzanleitung
1x Entsorgungshinweis
Sicherheitshinweise:
- Benutzen Sie den Konverter nicht in extrem feuchter
oder staubiger Umgebung
- Betreiben Sie dieses Gerät nicht auf Heizkörpern oder
in der Nähe von Wärmequellen
- Dieses Gerät ist nur für den Inneneinsatz bestimmt.
Software Installation:
Installation unter Windows Vista 32Bit und 64bit
Versionen:
Hinweis: Bitte installieren Sie den Treiber bevor Sie den
USB zu Seriell Konverter an Ihren Rechner anstecken!
Legen Sie bitte die beliegende Treiber CD-ROM in Ihr
Laufwerk ein. Sollte das CD-Menü nicht von selbst starten,
öffnen Sie bitten den Arbeitsplatz, wählen Ihr CD-Laufwerk
aus und klicken doppelt auf die Datei Autorun.exe.
Sobald das CD-Menü auf Ihren Bildschirm erscheint,
wählen Sie bitte Ihre jeweilige Sprache und wählen Sie
die Option „Treiber Windows Vista 32 und 64bit“ aus.
Damit wird die Treiberinstallation gestartet, bitte folgen
Sie den Anweisungen des Programms. Unter Umständen
erscheint die Benutzerkontensteuerung und fragt Sie, ob
das Programm zugriff auf Ihr System haben darf, klicken Sie
daher auf die Schaltfläche -> Zulassen. Stecken Sie nun
den USB zu Seriell Konverter an eine freie USB Buchse an,
daraufhin wird das Gerät von Vista automatisch erkannt
und installiert. Nach erfolgreicher Installation will Windows
das System neu starten, klicken Sie auf die Schaltfläche ->
„Jetzt neu Starten“. Nach dem Neustart von Vista ist der
USB zu Seriell Konverter einsatzbereit.
Ob der Konverter ordnungsgemäß installiert wurde, können
Sie unter Start (Windows Logo) -> Systemsteuerung ->
System und Wartung -> Geräte Manager nachsehen. Unter
Umständen werden Sie von der Benutzerkontensteuerung
aufgefordert, dieser Aktion zuzustimmen. Klicken Sie des-
halb auf die Schaltfläche -> Fortsetzen. Folgender Eintrag
muss ohne gelbe Ausrufezeichen vorhanden sein.
Anschlüsse (COM und LPT):
• Prolific USB-to-Serial Comm Port (COMx)
Hinweis: Um die Anschlusseinstellungen des COM Ports zu
ändern, klicken Sie bitte doppelt auf dem oben genannten
Eintrag in Ihrem Geräte-Manager und wählen den Reiter
Anschlusseinstellungen.
Installation unter Windows 98SE/ME und 2000:
Hinweis: Bitte installieren Sie den Treiber bevor Sie den
USB zu Seriell Konverter an Ihren Rechner anstecken!
Legen Sie bitte die beliegende Treiber CD-ROM in Ihr
Laufwerk ein. Sollte das CD-Menü nicht von selbst starten,
öffnen Sie bitten den Arbeitsplatz, wählen Ihr CD-Laufwerk
aus und klicken doppelt auf die Datei Autorun.exe.
Sobald das CD-Menü auf Ihren Bildschirm erscheint,
wählen Sie bitte Ihre jeweilige Sprache und wählen Sie
die Option „Treiber Windows 98SE/ME/2000“ aus. Damit
wird die Treiberinstallation gestartet, bitte folgen Sie den
Anweisungen des Programms. Stecken Sie nun den USB zu
Seriell Konverter an eine freie USB Buchse an, daraufhin
wird das Gerät von Windows automatisch erkannt und
installiert. Nach erfolgreicher Installation sollte Windows
neu gestartet werden. Nach dem Neustart von Windows ist
der USB zu Seriell Konverter einsatzbereit.
Wichtige Hinweise für Windows 98/ME/2000:
Ob der Konverter ordnungsgemäß installiert wurde, können
Sie unter Start -> Einstellungen -> Systemsteuerung ->
System -> Hardware -> Geräte Manager nachsehen.
Dort muss folgender Eintrag ohne gelbes Ausrufezeichen
vorhanden sein.
Anschlüsse (COM und LPT):
• Prolific USB-to-Serial Comm Port (COMX)
Hinweis: Um die Anschlusseinstellungen des COM Ports zu
ändern, klicken Sie bitte doppelt auf dem oben genannten
Eintrag in Ihrem Geräte-Manager und wählen den Reiter
Anschlusseinstellungen.
Installation unter Windows XP:
Hinweis: Bitte installieren Sie den Treiber bevor Sie den
USB zu Seriell Konverter an Ihren Rechner anstecken!
Legen Sie bitte die beliegende Treiber CD-ROM in Ihr
Laufwerk ein. Sollte das CD-Menü nicht von selbst starten,
öffnen Sie bitten den Arbeitsplatz, wählen Ihr CD-Laufwerk
aus und klicken doppelt auf die Datei Autorun.exe.
Sobald das CD-Menü auf Ihren Bildschirm erscheint,
wählen Sie bitte Ihre jeweilige Sprache und wählen Sie die
Option „Treiber Windows XP“ aus. Damit wird die Treiberin-
stallation gestartet, bitte folgen Sie den Anweisungen des
Programms. Stecken Sie nun den USB zu Seriell Konverter
an eine freie USB Buchse an, daraufhin wird das Gerät von
XP automatisch erkannt und installiert. Nach erfolgreicher
Installation sollte Windows neu gestartet werden. Nach
dem Neustart von Windows ist der USB zu Seriell Konverter
einsatzbereit.
dBedienungsanleitung

3
Wichtige Hinweise für Windows XP:
Ob der Konverter ordnungsgemäß installiert wurde, können
Sie unter Start -> Systemsteuerung -> Leistung und
Wartung -> System -> Hardware -> Geräte Manager
nachsehen. Dort muss folgender Eintrag ohne gelbes
Ausrufezeichen vorhanden sein.
Anschlüsse (COM und LPT):
• Prolific USB-to-Serial Comm Port (COMX)
Hinweis: Um die Anschlusseinstellungen des COM Ports zu
ändern, klicken Sie bitte doppelt auf dem oben genannten
Eintrag in Ihrem Geräte-Manager und wählen den Reiter
Anschlusseinstellungen.
Installation unter Windows XP x64bit Edition:
Legen Sie bitte die beliegende Treiber CD-ROM in Ihr Lauf-
werk ein. Wenn das Hama Installationsmenü gestartet
wird,
beenden Sie dieses, indem Sie auf „Exit/Beenden/Terminer“
klicken. Stecken Sie nun den USB zu Seriell Konverter an
eine freie USB Buchse an Ihren Rechner ein. Jetzt startet
der Windows Hardwareupdate Assistent und fragt Sie ob
Windows „Eine Verbindung mit Windows Update herge-
stellt werden, um nach Software zu suchen?“, wählen Sie
„Nein, diesmal nicht“ aus und klicken auf die Schaltfläche
-> Weiter. Der Hardwareupdate Assistent erkennt den
Konverter als USB-Serial Controller und fragt Sie „Wie
möchten Sie vorgehen?“ Wählen Sie die Option „Software
von einer Liste oder bestimmten Quelle installieren (für
fortgeschrittene Benutzer)“ aus -> Weiter. Im nächsten
Menüfenster wählen Sie folgende Optionen „Diese Quellen
nach dem zutreffendsten Treiber durchsuchen“ und im
Fenster weiter unten den Punkt „Folgende Quelle ebenfalls
durchsuchen“ und geben Sie D:\Driver\Windows x64bit
ein. (Wobei unter Umständen das D durch den Laufwerks-
buchstaben Ihres CD-Laufwerks ersetzt werden muss)
oder klicken Sie auf durchsuchen und wählen das vorher
bezeichnete Verzeichnis aus. -> Weiter.
Falls nun die Meldung erscheint „Die Software, die für diese
Hardware installiert wird Prolific USB-to-Serial Bridge ...
hat den Windows-Logo-Test nicht bestanden, der die Kom-
patibilität mit Windows XP überprüft. ... „
Klicken Sie auf
die Schaltfläche -> Installation fortsetzen. Nun werden die
entsprechenden Daten von der CD kopiert -> Fertig stellen.
Nach dem Ende der Installation wird empfohlen das System
neu zu starten, bevor der USB zu seriell Konverter benutzt
wird.
Wichtige Hinweise für Windows XP x64bit Edition:
Ob der Konverter ordnungsgemäß installiert wurde, können
Sie unter Start -> Systemsteuerung -> Leistung und
Wartung -> System -> Hardware -> Geräte Manager
nachsehen. Dort muss folgender Eintrag ohne gelbes
Ausrufezeichen vorhanden sein.
Ports (COM & LPT):
Prolific USB-to-Serial Bridge (COMX)
Hinweis: Um die Anschlusseinstellungen des COM Ports zu
ändern, klicken Sie bitte doppelt auf dem oben genannten
Eintrag in Ihrem Geräte-Manager und wählen den Reiter
Anschlusseinstellungen.
Installation unter Mac OS X 10.4.x oder höher:
Legen Sie bitte die beiliegende Treiber CD-ROM in Ihr
Laufwerk ein. Kurz danach taucht auf ihrem Desktop ein
CD-Icon mit der Bezeichnung 39703 auf. Klicken Sie doppelt
auf dieses Icon und öffnen nacheinander die Verzeichnisse
Driver und anschließend Mac_OS_X. In diesem Verzeich-
nis befindet sich eine Datei namens PL2303_1.2.1r2.dmg.
Klicken Sie nun doppelt auf die DMG Datei, um die Datei zu
entpacken. Daraufhin öffnet Ihr MAC System ein gemoun-
tetes Laufwerk mit dem Namen PL2303. In diesem Laufwerk
befindet sich eine Datei namens: PL2303_1.2.1, klicken Sie
doppelt auf diese Datei und das Installationsprogramm wird
automatisch gestartet. Folgen Sie nun den Anweisungen
des Programms, bis Sie aufgefordert werden Ihren MAC
Neuzustarten. Starten Sie nun Ihr System neu und schlie-
ßen nach dem Neustart den USB zu seriell Konverter an
eine freie USB Buches Ihres MAC´s an.
Hinweis: Um sicherzustellen, dass der Treiber ordnungs-
gemäß auf Ihren Mac installiert wurde, rufen Sie bitte
das Programm Apple System Profiler auf und wählen den
Reiter Hardware aus. In diesem Reiter finden Sie die Option
USB dort muss dann im rechten Fenster folgender Eintrag
vorhanden sein.
USB-BUS -> USB-Serial Controller.
Supportinformationen:
Bei defekten Produkten wenden Sie sich bitte an Ihren
Händler oder der Hama Produktberatung:
Support Hotline – Hama Produktberatung:
Tel. +49 (0) 90 91 / 502 – 115
Fax. +49 (0) 90 91 / 502 – 272
e-mail: mailto:[email protected]
Produktinformationen oder neue Treiber finden Sie im
Internet unter www.hama.com

4
Package contents:
1 x USB-to-serial converter cable
1 x Driver CD-ROM
1 x Printed quick guide
1 x Disposal instructions
Safety notes:
- Do not use the converter in extremely damp or dusty
environments.
- Do not operate this device on radiators or near heat
sources.
- This device is designed for indoor use only.
Software Installation:
Installation on Windows Vista 32 bit and 64 bit versions:
Note: Install the driver before connecting the USB-to-serial
converter to your computer.
Insert the enclosed driver CD-ROM into your drive. If the CD
menu does not start automatically, open Computer, open
your CD drive and double-click the Autorun.exe. file.
As soon as the CD menu appears on your screen, select
your language and the option “Driver Windows Vista 32
and 64 bit”. This starts the driver installation; please follow
the program’s instructions. In some cases, User Account
Control may appear and ask you whether the program is
allowed to have access to your system. Click -> “Allow”.
If you now insert the USB-to-serial converter into a free
USB port, Vista will automatically recognise and install it.
After installation is complete, Windows wants to restart the
system. Click the button -> “Finish”. After Vista has been
restarted, the USB-to-serial converter is ready for use.
You can verify whether the converter has been successfully
installed by checking under Start (Windows logo) ->
Control Panel -> System and Maintenance -> Device
Manager. In some circumstances, you may be asked by
User Access Control to allow this action. Click -> Continue.
The following entry must appear without a yellow
exclamation mark.
Ports (COM and LPT):
• Prolific USB-to-Serial Comm Port (COMx)
Note: To change the COM port settings, double click the
aforementioned entry in the Device Manager and select the
Port Settings tab.
Installation on Windows 98SE/ME and 2000:
Note: Install the driver before connecting the USB-to-serial
converter to your computer.
Insert the enclosed driver CD-ROM into your drive. If the CD
menu does not start automatically, open My Computer, open
your CD drive and double-click the Autorun.exe. file.
As soon as the CD menu appears on your screen, select
your language and the option “Driver Windows 98SE/
ME/2000”. This starts the driver installation; please follow
the program’s instructions. If you now insert the USB-to-
serial converter into a free USB port, Windows will automa-
tically recognise and install it. After installation is complete,
Windows should be restarted. After Windows has been
restarted, the USB-to-serial converter is ready for use.
Important instructions for Windows 98/ME/2000:
You can check whether the converter has been installed
successfully by selecting Start -> Settings -> Control Panel
-> System -> Hardware -> Device Manager. The following
entry should appear without a yellow exclamation mark.
Ports (COM and LPT):
• Prolific USB-to-Serial Comm Port (COMX)
Note: To change the COM port settings, double click the
aforementioned entry in the Device Manager and select the
Port Settings tab.
Installation on Windows XP:
Note: Install the driver before connecting the USB-to-serial
converter to your computer.
Insert the enclosed driver CD-ROM into your drive. If the CD
menu does not start automatically, open My Computer, open
your CD drive and double-click the Autorun.exe. file.
As soon as the CD menu appears on your screen, select
your language and the option “Driver Windows XP”.
This starts the driver installation; please follow the
program’s instructions. If you now insert the USB-to-serial
converter into a free USB port, XP will automatically
recognise and install it. After installation is complete,
Windows should be restarted. After Windows has been
restarted, the USB-to-serial converter is ready for use.
Important instructions for Windows XP:
You can check whether the converter was installed
successfully under Start -> Control Panel -> Performance
and Maintenance -> System -> Hardware -> Device
Manager. The following entry should appear without a
yellow exclamation mark.
Ports (COM and LPT):
• Prolific USB-to-Serial Comm Port (COMX)
Note: To change the COM port settings, double click the
aforementioned entry in the Device Manager and select the
Port Settings tab.
gOperating Instruction

5
Installation on Windows XP x64 Edition:
Insert the enclosed driver CD-ROM into your drive. If the
Hama installation menu is started, exit it by clicking “Exit/
Beenden/Terminer”. Now insert the USB-to-serial conver-
ter into a free USB port on your computer. The Hardware
Update Wizard appears and asks “Can Windows connect
to Windows Update to search for software?”. Select “No,
not this time” and click the button -> Next. The Hardware
Update Wizard recognises the converter as USB-Serial
Controller and asks “What do you want the wizzard to do?”.
Select the option “Install from a list or specific location
(Advanced)” and then -> Next. In the next menu window,
select the option “Search for the best driver in these
locations” and then further down, the option “Include this
location in the search” and enter D:\Driver\Windows x64bit
(you may need to replace D with the drive letter of your CD
drive), or click Browse and choose the aforementioned
directory. -> Next.
If the message “The software you are installing for this
hardware: Prolific USB-to-Serial Bridge has not passed
Windows Logo testing to verify its compatibility with
Windows XP.”, click the button -> Continue Anyway. The
necessary files are now copied from the CD. -> Finish.
We recommend that you restart your system after the
installation has completed before you use the USB-to-serial
converter.
Important Instructions for Windows XP x64 Edition:
You can check whether the converter was installed
successfully under Start -> Control Panel -> Performance
and Maintenance -> System -> Hardware -> Device
Manager. The following entry should appear without a
yellow exclamation mark.
Ports (COM & LPT):
• Prolific USB-to-Serial Bridge (COMX)
Note: To change the COM port settings, double click the
aforementioned entry in the Device Manager and select the
Port Settings tab.
Installation on Mac OS X 10.4.x or higher:
Insert the enclosed driver CD into your CD-ROM drive.
Shortly thereafter, a CD icon with the name 39703 appears
on your desktop. Double click this icon and open the direc-
tory Driver and then Mac_OS_X. In this directory, there is
a file named PL2303_1.2.1r2.dmg. Double click the DMG file
to extract the file. Your Mac will then open a mounted drive
with the name PL2303. In this drive, there is a file named
PL2303_1.2.1. Double click this file to start the installation
program. Now follow the instructions of the installation pro-
gram until you are requested to restart your Mac. Restart
your system and connect the USB-to-serial converted to a
free USB port on your Mac after restarting.
Note: To ensure that the driver was installed on your Mac
properly, open the Apple System Profiler program and
choose the Hardware tab. On this tab you will find the
option USB. The entry “USB-BUS -> USB-Serial Controller”
must be present there in the right window.
Support information:
Contact your dealer or Hama Product Consulting if you have
a faulty product:
Support hotline – Hama product consulting:
Tel. +49 (0) 90 91 / 502 – 115
Fax. +49 (0) 90 91 / 502 – 272
E-mail: mailto:[email protected]
Product information and new drivers are available on the
Internet at www.hama.com.

6
Contenu de l‘emballage :
1 câble convertisseur USB vers série
1 pilote sur CD-ROM
1 notice d’utilisation imprimée
Consignes de recyclage
Consignes de sécurité :
- N‘utilisez pas le convertisseur dans des environnements
exagérément humides ou poussiéreux.
- N‘utilisez pas cet appareil à proximité de sources de
chaleur et ne le placez pas sur un radiateur.
- L’appareil est conçu exclusivement pour une utilisation
àl’intérieur.
Installation du logiciel :
Installation sous Windows Vista 32 bit et versions 64 bit :
Remarque : veuillez installer le pilote avant de connecter le
convertisseur USB vers série à votre ordinateur.
Insérez le CD-ROM pilote fourni dans votre lecteur. Dans le
cas où le menu du CD ne démarre pas automatiquement,
veuillez ouvrir votre poste de travail, sélectionner votre
lecteur de CD et double-cliquer sur le fichier autorun.exe.
Sélectionnez la langue désirée, puis l’option « Driver
Windows Vista 32 et 64 bit » dès que le menu apparaît à
l’écran. L‘installation du pilote démarre automatiquement,
suivez les consignes du programme. Il est possible que le
contrôle du compte utilisateur apparaisse et vous demande
si le programme peut avoir accès à votre système, cliquez
sur le bouton -> Autoriser. Insérez le convertisseur USB
vers série dans un port USB libre de votre ordinateur,
l’appareil est automatiquement reconnu et installé par Vista.
Une fois l’installation terminée, Windows va vouloir redé-
marrer votre système, cliquez sur le bouton
-> Redémarrer
mon ordinateur maintenant
. Votre convertisseur USB vers
série est prêt à fonctionner après le redémarrage de Vista.
Vous pouvez vérifier si le convertisseur a été correctement
installé en consultant Démarrer (Windows Logo) ->
Panneau de configuration -> Système et maintenance ->
Gestionnaire de périphérique. Il est possible que le
contrôle du compte utilisateur vous demande l’autorisation
de continuer la procédure. Cliquez sur le bouton ->
Continuer. L’entrée suivante doit y être affichée sans point
d’exclamation jaune :
Ports (COM et LPT) :
• Prolific USB-to-Serial Comm Port (COMx)
Remarque : veuillez double-cliquer sur l’entrée mention-
née ci-dessus dans votre gestionnaire de périphériques
et sélectionner l’onglet paramètres de connexion afin de
modifier les paramètres de connexion du port COM.
Installation sous Windows 98SE/ME et 2000 :
Remarque : veuillez installer le pilote avant de connecter le
convertisseur USB vers série à votre ordinateur.
Insérez le CD-ROM pilote fourni dans votre lecteur. Dans le
cas où le menu du CD ne démarre pas automatiquement,
veuillez ouvrir votre poste de travail, sélectionner votre
lecteur de CD et double-cliquer sur le fichier autorun.exe.
Sélectionnez la langue désirée, puis l’option « Driver
Windows 98SE/ME/2000 » dès que le menu apparaît à
l’écran. L‘installation du pilote démarre automatiquement,
suivez les consignes du programme. Insérez le
convertisseur USB vers série dans un port USB libre de
votre ordinateur, l’appareil est automatiquement reconnu
et installé par Windows. Une fois l‘installation terminée,
Windows devrait redémarrer votre ordinateur. Votre
convertisseur USB vers série est prêt à fonctionner après le
redémarrage de Windows.
Consignes importantes pour Windows 98/ME/2000 :
Vous pouvez vérifier si le convertisseur a été correctement
installé en consultant Démarrer -> Paramètres -> Panneau
de configuration -> Système -> Matériel -> Gestionnaire
de périphérique. L’entrée suivante doit y être affichée sans
point d’exclamation jaune :
Connexions (COM et LPT) :
• Prolific USB-to-Serial Comm Port (COMX)
Remarque : veuillez double-cliquer sur l’entrée mention-
née ci-dessus dans votre gestionnaire de périphériques
et sélectionner l’onglet paramètres de connexion afin de
modifier les paramètres de connexion du port COM.
Installation sous Windows XP :
Remarque : veuillez installer le pilote avant de connecter le
convertisseur USB vers série à votre ordinateur.
Insérez le CD-ROM pilote fourni dans votre lecteur. Dans le
cas où le menu du CD ne démarre pas automatiquement,
veuillez ouvrir votre poste de travail, sélectionner votre
lecteur de CD et double-cliquer sur le fichier autorun.exe.
Sélectionnez la langue désirée, puis l’option « Driver
Windows XP » dès que le menu apparaît à l’écran.
L‘installation du pilote démarre automatiquement, suivez
les consignes du programme. Insérez le convertisseur
USB vers série dans un port USB libre de votre ordinateur,
l’appareil est automatiquement reconnu et installé par XP.
Une fois l‘installation terminée, Windows devrait redémar-
rer votre ordinateur. Votre convertisseur USB vers série est
prêt à fonctionner après le redémarrage de Windows.
fMode d‘emploi

7
Consignes importantes pour Windows XP :
Vous pouvez vérifier si le convertisseur a été
correctement installé en consultant Démarrer -> Panneau
de configuration -> Performances et entretien -> Matériel
-> Gestionnaire de périphérique. L’entrée suivante doit y
être affichée sans point d’exclamation jaune :
Ports (COM et LPT) :
• Prolific USB-to-Serial Comm Port (COMX)
Remarque : veuillez double-cliquer sur l’entrée mention-
née ci-dessus dans votre gestionnaire de périphériques
et sélectionner l’onglet paramètres de connexion afin de
modifier les paramètres de connexion du port COM.
Installation sous Windows XP x 64 bit Edition :
Insérez le CD-ROM pilote fourni dans votre lecteur. Quittez
le menu d’installation de Hama en cliquant sur « Exit/
Beenden/Terminer » dès que ce menu démarre. Insérez le
convertisseur USB vers série dans un port USB libre de
votre ordinateur. Sélectionnez « Non » et cliquez sur
-> Suivant l
orsque l’assistant de mise à jour du matériel
apparaît et vous demande si Windows doit « établir une
connexion aux mises à jour de Windows ». L’assistant de
mise à jour du matériel reconnaît le convertisseur comme
USB-Serial Controller et vous demande « Quelle tâche vou-
lez-vous que I´Assistant exécute ? » ; sélectionnez l’option
« Installer à partir d’une liste ou d’un emplacement spécifié
(utilisateurs expérimentés) », puis cliquez sur -> Suivant.
Sélectionnez « Recherche le meilleur pilote dans ces
emplacements » dans la fenêtre qui apparaît, puis l’option
« Inclure cet emplacement dans la recherche: » et
saisissez D:\Driver\Windows x64bit (la lettre D doit être
éventuellement remplacée par la lettre correspondant à
votre lecteur de CD-ROM) ou cliquez sur Parcourir… et
sélectionnez le fichier indiqué plus haut. -> Suivant
Dans le cas où le message « Le logiciel installé pour ce
matériel Prolific USB-to-Serial Bridge ... n’a pas satisfait
aux tests Windows Logo visant à assurer la compatibilité
avec Windows XP » apparaît, cliquez sur le bouton ->
Continuer l’installation. Les fichiers nécessaires sont alors
copiés à partir du CD-ROM -> Terminer.
Nous vous recommandons, une fois l’installation terminée,
de redémarrer votre système avant de commencer à utiliser
le convertisseur USB vers série.
Consignes importantes pour Windows XP x64bit Edition :
Vous pouvez vérifier si le convertisseur a été
correctement installé en consultant Démarrer -> Panneau
de configuration -> Systéme et maintenance -> Matériel ->
Gestionnaire de périphérique. L’entrée suivante doit y être
affichée sans point d’exclamation jaune :
Ports (COM & LPT) :
Prolific USB-to-Serial Bridge (COMX)
Remarque : veuillez double-cliquer sur l’entrée mention-
née ci-dessus dans votre gestionnaire de périphériques
et sélectionner l’onglet paramètres de connexion afin de
modifier les paramètres de connexion du port COM.
Installation sous Mac OS X 10.4.x ou version ultérieure :
Insérez le CD-ROM pilote fourni dans votre lecteur. Un icône
de CD portant l’inscription 39703 apparaît peu après sur
votre écran. Double-cliquez sur cet icône et ouvrez succes-
sivement les répertoires pilote, puis Mac_OS_X. Un fichier
nommé PL2303_1.2.1r2.dmg se trouve dans ce répertoire.
Double-cliquez sur le fichier DMG afin de le décomprimer.
Votre système MAC OS ouvre un lecteur nommé PL2303.
Un fichier nommé PL2303_1.2.1 se trouve dans ce lecteur,
double-cliquez sur ce fichier ; le programme d’installation
démarre automatiquement. Suivez les consignes du
programme jusqu’à la fin de l’installation ; vous serez invité
à redémarrer votre ordinateur. Redémarrez votre système,
puis connectez votre convertisseur USB vers série à un port
USB libre de votre ordinateur.
Remarque : vous pouvez vérifier si le contrôleur a été cor-
rectement installé en consultant vos Préférences système,
puis en sélectionnant l’onglet matériel. Vous trouverez
l’option USB dans cet onglet ; l’entrée suivante doit y être
affichée dans la fenêtre droite : USB-BUS -> USB-Serial
Controller.
Informations du support technique :
En cas de produit défectueux, veuillez vous adresser à votre
revendeur ou au département de conseil produits de Hama :
Ligne téléphonique directe d’assistance –
Conseil produits Hama :
Tél. +49 (0) 90 91 / 502 – 115
Fax +49 (0) 90 91 / 502 – 272
Les informations produits et les nouveaux pilotes sont
disponibles sous : www.hama.com

8
Contenido del paquete:
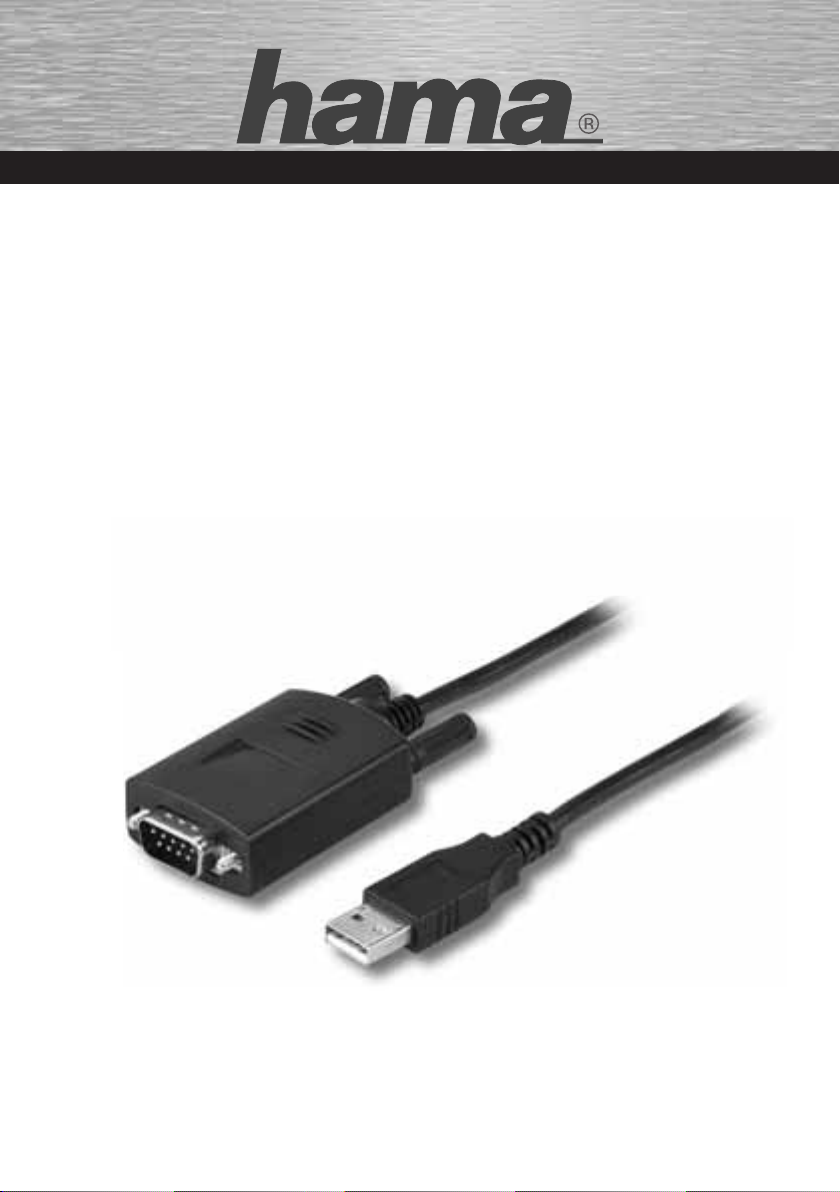
1 cable para convertidor USB a serie
1 CD-Rom con controladores
1 ejemplar instrucciones breves
1 instrucciones para desecho y reciclaje
Indicaciones de seguridad:
- No use el convertidor en un entorno con una gran
humedad o con mucho polvo
- No coloque el dispositivo encima de radiadores de cale
facción o cerca de fuentes de calor
- Este dispositivo ha sido concebido para su uso exclusi
vo en interiores, no al aire libre.
Instalación del software:
Instalación con WindowsVista, versiones de 32Bit y 64bit:
Nota: Instale los controladores antes de conectar a su
ordenador el convertidor USB a serie.
Coloque en la unidad de CD-ROM el CD de controladores
suministrado. Si el menú del CD no arranca automática-
mente, haga clic en “Mi PC”, seleccione la unidad de CD-
ROM y haga clic dos veces sobre el fichero “Autorun.exe”.
Cuando aparezca el menú del CD en su pantalla, elija un
idioma y seleccione la opción „Controlador Windows Vista
32 y 64bit“ .
Con ello arranca la instalación de controladores
.
Siga las instrucciones del programa. En algunos casos
puede ocurrir que aparezca el Gestor de usuarios y le
pregunte si el programa puede tener acceso a su sistema.
En ese caso, haga clic en el botón -> permitir. Enchufe
ahora el convertidor USB a serie en un puerto USB libre de
su ordenador. A continuación, Vista reconocerá automá-
ticamente el dispositivo y lo instalará. Una vez concluida
con éxito la instalación Windows le pedirá que reinicie el
sistema. Haga clic en el botón -> “Reiniciar ahora“. Una ver
reinicializado el sistema operativo Vista, el convertidor USB
a serie está listo para ser usado.
Puede comprobar si el convertidor se ha instalado correc-
tamente en Inicio (símbolo de Windows) -> Control del
sistema -> Sistema y mantenimiento -> Administrador de
dispositivos. En algunos casos puede ocurrir que el Gestor
de usuarios le pida que confirme su conformidad con esta
acción. Para ello haga clic en la superficie -> Continuar.
Las siguiente entrada no debe llevar el signo de admiración
amarillo:
Conexiones (COM y LPT):
• Prolific USB-to-Serial Comm Port (COMx)
Nota: Para cambiar los ajustes de conexión del puerto
COM, haga doble clic en la entrada anteriormente citada de
su administrador de dispositivos y elija la pestaña Ajustes
de conexión.
Instalación bajo Windows 98SE/ME y 2000:
Nota: Instale los controladores antes de conectar a su
ordenador el convertidor USB a serie.
Coloque en la unidad de CD-ROM el CD de controladores
suministrado. Si el menú del CD no arranca automática-
mente, haga clic en “Mi PC”, seleccione la unidad de CD-
ROM y haga clic dos veces sobre el fichero “Autorun.exe”.
Cuando aparezca el menú del CD en su pantalla, elija un
idioma y seleccione la opción “Controlador Windows
98SE/ME/2000“. Con ello arranca la instalación de con-
troladores. Siga las instrucciones del programa. Enchufe
ahora el convertidor USB a serie en un puerto USB libre
de su ordenador. A continuación, Windows reconocerá
automáticamente el dispositivo y lo instalará. Una vez
concluida con éxito la instalación, debería reinicializar
el sistema operativo Windows.. Una ver reinicializado el
sistema operativo Windows, el convertidor USB a serie está
listo para ser usado.
Notas importantes para Windows 98/ME/2000:
Puede comprobar si el convertidor se ha instalado
correctamente en Inicio -> Configuración ->
Control del sistema -> Sistema -> Hardware ->
Administrador de dispositivos. La siguiente entrada no
deben llevar el signo de admiración amarillo.
Conexiones (COM y LPT):
• Prolific USB-to-Serial Comm Port (COMX)
Nota: Para cambiar los ajustes de conexión del puerto
COM, haga doble clic en la entrada anteriormente citada de
su administrador de dispositivos y elija la pestaña Ajustes
de conexión.
Instalación bajo Windows XP:
Nota: Instale los controladores antes de conectar a su
ordenador el convertidor USB a serie.
Coloque en la unidad de CD-ROM el CD de controladores
suministrado. Si el menú del CD no arranca
automáticamente, haga clic en “Mi PC”, seleccione la
unidad de CD-ROM y haga clic dos veces sobre el fichero
“Autorun.exe”.
Cuando aparezca el menú del CD en su pantalla, elija un
idioma y seleccione la opción “Controlador Windows XP“ .
Con ello arranca la instalación de controladores. Siga las
instrucciones del programa. Enchufe ahora el convertidor
USB a serie en un puerto USB libre de su ordenador. A
continuación, Windows XP reconocerá automáticamente
el dispositivo y lo instalará. Una vez concluida con éxito la
instalación, debería reinicializar el sistema operativo Win-
dows.. Una ver reinicializado el sistema operativo Windows,
el convertidor USB a serie está listo para ser usado.
eInstrucciones de uso

9
Notas importantes para Windows XP:
Puede comprobar si el convertidor se ha instalado correc-
tamente en Inicio -> Control del sistema -> Rendimiento y
mantenimiento -> Sistema -> Hardware -> Administrador
de dispositivos. La siguiente entrada no deben llevar el
signo de admiración amarillo.
Conexiones (COM y LPT):
• Prolific USB-to-Serial Comm Port (COMX)
Nota: Para cambiar los ajustes de conexión del puerto
COM, haga doble clic en la entrada anteriormente citada de
su administrador de dispositivos y elija la pestaña Ajustes
de conexión.
Instalación bajo Windows XP Edición x64bit:
Coloque en la unidad de CD-ROM el CD de controladores
suministrado. Cuando arranque el menú de instalación de
Hama, termínelo haciendo clic en
”Exit/Beenden/Terminer“
.
Enchufe ahora el convertidor USB a serie en un puerto
USB libre de su ordenador. A continuación arranca el
asistente de actualización de hardware de Windows y le
preguntará si desea que Windows establezca una conexión
con Windows Update para buscar software. Elija “No, esta
vez no” y haga clic en el botón Seguir. El asistente para
la actualización de Hardware reconoce el convertidor
como Controlador USB-Serie y le pregunta ”¿Cómo desea
continuar?”. Seleccione la opción “Instalar software de
una lista o de una fuente determinada (para usuarios
avanzados)” y haga clic seguidamente en -> Seguir. En la
siguiente ventana del menú, elija las siguientes opciones
“Buscar el mejor controlador en esta fuente” y en la
ventana de más abajo “Buscar también en la siguiente
fuente” e introduzca D:\Driver\Windows XP x64bit.
(eventualmente, deberá cambiar la letra D por la letra de
su unidad de CD) o haga clic en Explorar y seleccione el
directorio antes nombrado. -> Seguir.
Si apareciese el mensaje “El software que se va a instalar
para el Hardware Prolific USB-to-Serial Bridge ... no ha
superado el test del Logo Windows que comprueba la
compatibilidad con Windows XP. ...”, haga clic en el botón
-> Continuar la instalación. A continuación se copian los
datos correspondientes desde el CD. -> Terminar
Una vez finalizada la instalación, se recomienda reiniciar
el sistema operativo antes de utilizar el convertidor de USB
a serie.
Notas importantes para Windows XP Edición x64bit:
Puede comprobar si el convertidor se ha instalado correc-
tamente en Inicio -> Control del sistema -> Rendimiento y
mantenimiento -> Sistema -> Hardware -> Administrador
de dispositivos. La siguiente entrada no deben llevar el
signo de admiración amarillo.
Ports (COM & LPT):
Prolific USB-to-Serial Bridge (COMX)
Nota: Para cambiar los ajustes de conexión del puerto
COM, haga doble clic en la entrada anteriormente citada de
su administrador de dispositivos y elija la pestaña Ajustes
de conexión.
Instalación bajo Mac OS X 10.4.x o superior:
Coloque el CD de controladores suministrado en la unidad
de CD-ROM. Poco después aparecerá en su escritorio un
icono de CD con el nombre 39703. Haga doble clic sobre
este icono y abra sucesivamente los directorios Driver y
seguidamente Mac_OS_X. En este directorio se encuentra
un archivo con el nombre PL2303_1.2.1r2.dmg. Haga doble
clic en el archivo DMG para descomprimirlo. Su sistema
MAC abrirá entonces una unidad montada con el nombre
PL2303. En este directorio se encuentra un archivo con el
nombre: PL2303_1.2.1, haga doble clic sobre este fichero
y el programa de instalación arrancará automáticamente.
Siga las instrucciones del programa hasta que se le pida
reiniciar su MAC. Reinicie entonces su sistema y, una
vez hecho esto, enchufe el convertidor USB a serie en un
puerto USB libre de su MAC.
Nota: Para asegurarse de si el controlador se ha instalado
correctamente en su Mac, llame el programa Apple
System Profiler y abra la solapa Hardware. En esta solapa
se encuentra la opción USB, en cuya ventana derecha
debe verse la siguiente entrada. USB-BUS -> USB-Serial
Controller.
Información de ayuda:
Si tiene que hacer alguna reclamación sobre un producto
defectuoso, diríjase a su proveedor o a su distribuidor de
productos Hama:
Línea directa de soporte – Asesoramiento sobre productos
Hama:
Tfno. +49 (0) 90 91 / 502 – 115
Fax. +49 (0) 90 91 / 502 – 272
e-mail: [email protected]
Encontrará información para sus productos o nuevos
controladores en www.hama.com

10
Περιεχόμενο συσκευασίας:
1x καλώδιο μετατροπέα USB σε σειριακό
1x δίσκος CD-Rom με πρόγραμμα οδήγησης
1x τυπωμένες σύντομες οδηγίες
1x οδηγία απόσυρσης
Οδηγίες ασφαλείας:
- Μη χρησιμοποιείτε τον μετατροπέα σε πολύ υγρό ή
σκονισμένο περιβάλλον.
- Μη λειτουργείτε αυτήν τη συσκευή πάνω από θερμαντικά
σώματα ή κοντά σε πηγές θερμότητας.
- Αυτή η συσκευή προορίζεται μόνο για εσωτερική χρήση.
Εγκατάσταση λογισμικού:
Εγκατάσταση με τα Windows Vista εκδόσεις
32Bit και 64bit:
Υπόδειξη: Προτού συνδέσετε το μετατροπέα „USB σε
σειριακό“ στον υπολογιστή, εγκαταστήστε πρώτα το
πρόγραμμα οδήγησης !
Εισάγετε το παρεχόμενο CD-ROM με το πρόγραμμα οδήγησης
στη μονάδα CD-ROM του υπολογιστή. Αν το μενού CD δεν
ξεκινήσει από μόνο του, ανοίξτε το εικονίδιο «υπολογιστής»,
επιλέξτε τη μονάδα CD και κάντε διπλό κλι στο αρχείο Autorun.
exe.
Μόλις το μενού CD εμφανιστεί στην οθόνη, επιλέξτε τη
γλώσσα σας καθώς και την επιλογή „Πρόγραμμα οδήγησης
Windows Vista 32 και 64bit“. Με τον τρόπο αυτό ξεκινά η
εγκατάσταση του προγράμματος οδήγησης. Ακολουθήστε τις
οδηγίες του προγράμματος. Κατά περίπτωση εμφανίζεται το
Σύστημα ελέγχου λογαριασμών χρηστών και σας ρωτά, αν το
πρόγραμμα επιτρέπεται να έχει πρόσβαση στο σύστημά σας.
Κάντε κλικ στο κουμπί -> Επιτρέπεται. Στη συνέχεια συνδέστε
το μετατροπέα „USB σε σειριακό“ σε μία ελεύθερη θύρα USB.
Η συσκευή αναγνωρίζεται και εγκαθίσταται αυτόματα από το
Vista. Μετά απο την επιτυχή εγκατάσταση τα Windows θέλουν
να κάνουν νέα εκκίνηση του συστήματος, Κάντε κλικ στο κουμπί
-> „Νέα εκκίνηση τώρα“. Μετά από την νέα εκκίνηση από το
Vista, ο μετατροπέας „USB σε σειριακό“ είναι πλέον έτοιμος
για λειτουργία.
Με τις εντολές Έναρξη (λογότυπο Windows) -> Πίνακας
ελέγχου -> Σύστημα και συντήρηση -> Διαχείριση
συσκευών, μπορείτε να εξετάσετε αν ο μετατροπέας
εγκαταστάθηκε σωστά. Υπάρχει περίπτωση το Σύστημα
ελέγχου λογαριασμών χρηστών να σας ζητήσει να εγκρίνεται
αυτήν την ενέργεια. Κάντε κλικ στο κουμπί -> Επόμενο. Η
ακόλουθη καταχώρηση θα πρέπει να εμφανίζεται χωρίς το
κίτρινο θαυμαστικό.
Συνδέσεις ( COM και LPT ):
• Prolific USB-to-Serial Comm Port (COMx)
Υπόδειξη: Για να αλλάξετε τις ρυθμίσεις σύνδεσης της θύρας
COM, κάντε διπλό κλικ στην παραπάνω καταχώρηση στο
πρόγραμμα διαχείρισης συσκευών και επιλέξτε την καρτέλα
Ρυθμίσεις συνδέσεων.
Εγκατάσταση με τα Windows 98SE/ME και 2000:
Υπόδειξη: Προτού συνδέσετε το μετατροπέα „USB σε
σειριακό“ στον υπολογιστή, εγκαταστήστε πρώτα το
πρόγραμμα οδήγησης !
Εισάγετε το παρεχόμενο CD-ROM με το πρόγραμμα οδήγησης
στη μονάδα CD-ROM του υπολογιστή. Αν το μενού CD δεν
ξεκινήσει από μόνο του, ανοίξτε το εικονίδιο «υπολογιστής»,
επιλέξτε τη μονάδα CD και κάντε διπλό κλι στο αρχείο Autorun.
exe.
Μόλις το μενού CD εμφανιστεί στην οθόνη, επιλέξτε τη
γλώσσα σας καθώς και την επιλογή „Πρόγραμμα οδήγησης
για Windows 98SE/ME/2000“. Με τον τρόπο αυτό ξεκινά
η εγκατάσταση του προγράμματος οδήγησης. Ακολουθήστε
τις οδηγίες του προγράμματος. Στη συνέχεια συνδέστε το
μετατροπέα „USB σε σειριακό“ σε μία ελεύθερη θύρα USB.
Η συσκευή αναγνωρίζεται και εγκαθίσταται αυτόματα από τα
Windows. Μετά από την επιτυχή εγκατάσταση, πρέπει να γίνει
επανεκκίνηση των Windows. Μετά από την νέα εκκίνηση από
τα Windows, ο μετατροπέας „USB σε σειριακό“ είναι πλέον
έτοιμος για λειτουργία.
Σημαντικές υποδείξεις για τα Windows 98/ME/2000:
Με τις εντολές
Έναρξη -> Ρυθμίσεις -> Πίνακας ελέγχου ->
Σύστημα -> Υλικός εξοπλισμός -> Διαχείριση συσκευών
,
μπορείτε να εξετάσετε αν ο μετατροπέας εγκαταστάθηκε
σωστά. Εκεί πρέπει να υπάρχει η ακόλουθη καταχώρηση χωρίς
κίτρινο θαυμαστικό.
Συνδέσεις ( COM και LPT ):
• Prolific USB-to-Serial Comm Port (COMX)
Υπόδειξη: Για να αλλάξετε τις ρυθμίσεις σύνδεσης της θύρας
COM, κάντε διπλό κλικ στην παραπάνω καταχώρηση στο
πρόγραμμα διαχείρισης συσκευών και επιλέξτε την καρτέλα
Ρυθμίσεις συνδέσεων.
Εγκατάσταση στα Windows XP:
Υπόδειξη: Προτού συνδέσετε το μετατροπέα „USB σε
σειριακό“ στον υπολογιστή, εγκαταστήστε πρώτα το
πρόγραμμα οδήγησης !
Εισάγετε το παρεχόμενο CD-ROM με το πρόγραμμα οδήγησης
στη μονάδα CD-ROM του υπολογιστή. Αν το μενού CD δεν
ξεκινήσει από μόνο του, ανοίξτε το εικονίδιο «υπολογιστής»,
επιλέξτε τη μονάδα CD και κάντε διπλό κλι στο αρχείο Autorun.
exe.
Μόλις το μενού CD εμφανιστεί στην οθόνη, επιλέξτε τη
γλώσσα σας καθώς και την επιλογή „Πρόγραμμα οδήγησης
για Windows XP“. Με τον τρόπο αυτό ξεκινά η εγκατάσταση
του προγράμματος οδήγησης. Ακολουθήστε τις οδηγίες
του προγράμματος. Στη συνέχεια συνδέστε το μετατροπέα
„USB σε σειριακό“ σε μία ελεύθερη θύρα USB. Η συσκευή
αναγνωρίζεται και εγκαθίσταται αυτόματα από τα XP. Μετά
από την επιτυχή εγκατάσταση, πρέπει να γίνει επανεκκίνηση
των Windows. Μετά από την νέα εκκίνηση από τα Windows,
ο μετατροπέας „USB σε σειριακό“ είναι πλέον έτοιμος για
λειτουργία.
k
Οδηγίες χρήσης

11
Σημαντικές υποδείξεις για τα Windows XP:
Με τις εντολές Έναρξη -> Πίνακας ελέγχου -> Απόδοση
και συντήρηση -> Σύστημα -> Υλικός εξοπλισμός
-> Διαχείριση συσκευών, μπορείτε να εξετάσετε αν ο
μετατροπέας εγκαταστάθηκε σωστά. Εκεί πρέπει να υπάρχει η
ακόλουθη καταχώρηση χωρίς κίτρινο θαυμαστικό.
Συνδέσεις ( COM και LPT ):
• Prolific USB-to-Serial Comm Port (COMX)
Υπόδειξη: Για να αλλάξετε τις ρυθμίσεις σύνδεσης της θύρας
COM, κάντε διπλό κλικ στην παραπάνω καταχώρηση στο
πρόγραμμα διαχείρισης συσκευών και επιλέξτε την καρτέλα
Ρυθμίσεις συνδέσεων.
Εγκατάσταση με τα Windows XP έκδοση x64bit:
Εισάγετε το παρεχόμενο CD-ROM με το πρόγραμμα
οδήγησης στη μονάδα CD-ROM του υπολογιστή. Αν
ενεργοποιηθεί το μενού εγκατάστασης της Hama, τερματίστε
το κάνοντας κλικ στην επιλογή „Exit/Beenden/Terminer“
.
Συνδέστε το μετατροπέα „USB σε σειριακό“ σε μία ελεύθερη
θύρα USB του υπολογιστή σας. Κατόπιν ξεκινάει ο βοηθός
Windows αναβάθμισης υλικού εξοπλισμού και σας ρωτά αν
τα Windows „Θα πρέπει να κάνουν μία σύνδεση με την
αναβάθμιση των Windows, ώστε να γίνει αναζήτηση
λογισμικού;“. Επιλέξτε „Όχι, αυτή τη φορά“ και κάντε κλικ
στο κουμπί -> Επόμενο. Ο βοηθός αναβάθμισης εξοπλισμού
αναγνωρίζει το μετατροπέα ως ελεγκτή USB-σειριακό και
σας ρωτά «Πως θέλετε να συνεχίσετε;». Επιλέξτε τη
δυνατότητα „Εγκατάσταση λογισμικού από μία λίστα ή
μια συγκεκριμένη πηγή (για προχωρημένους χρήστες)“
-> Επόμενο. Στο επόμενο παράθυρο επιλέξτε τις εξής
δυνατότητες «Επιλογή αυτών των πηγών για το κατάλληλο
πρόγραμμα οδήγησης» και στο παράθυρο παρακάτω το
σημείο «Επίσης αναζήτηση στις παρακάτω πηγές» και
καταχωρήστε D:\Driver\Windows XP x64bit. (Σε ορισμένες
περιπτώσεις πρέπει να αντικαταστήσετε το D με το γράμμα
της δικής σας μονάδας CD) ή κάντε κλικ στην αναζήτηση και
επιλέξτε το κατάλογο που αναφέρθηκε προηγούμενα. ->
Επόμενο.
Αν εμφανισθεί το μήνυμα
«Το λογισμικό που εγκαθίσταται
για αυτό τον υλικό εξοπλισμό Prolific USB-to-Serial
Bridge ... δεν πέρασε τον έλεγχο λογότυπου Windows,
που ελέγχει τη συμβατότητα με τα Windows XP. ... »
κάντε
κλικ στο κουμπί -> Συνέχεια εγκατάστασης. Τα απαραίτητα
δεδομένα αντιγράφονται από το CD -> Τέλος.
Μετά το πέρας της εγκατάστασης συνιστάται να ξεκινήσετε
πάλι το σύστημα προτού χρησιμοποιήσετε το μετατροπέα USB
σε σειριακό.
Σημαντικές υποδείξεις για τα Windows XP έκδοση x64bit:
Με τις εντολές Έναρξη -> Πίνακας ελέγχου -> Απόδοση
και συντήρηση -> Σύστημα -> Υλικός εξοπλισμός
-> Διαχείριση συσκευών, μπορείτε να εξετάσετε αν ο
μετατροπέας εγκαταστάθηκε σωστά. Εκεί πρέπει να υπάρχει η
ακόλουθη καταχώρηση χωρίς κίτρινο θαυμαστικό.
Θύρες ( COM & LPT ):
Prolific USB-to-Serial Bridge (COMX)
Υπόδειξη: Για να αλλάξετε τις ρυθμίσεις σύνδεσης της θύρας
COM, κάντε διπλό κλικ στην παραπάνω καταχώρηση στο
πρόγραμμα διαχείρισης συσκευών και επιλέξτε την καρτέλα
Ρυθμίσεις συνδέσεων.
Εγκατάσταση με Mac OS X 10.4.x ή νεώτερο:
Εισάγετε το παρεχόμενο CD-ROM με το πρόγραμμα
οδήγησης στη μονάδα CD-ROM του υπολογιστή. Μετά από
λίγο εμφανίζεται στον υπολογιστή σας ένα εικονίδιο CD με την
ονομασία 39703. Κάντε διπλό κλικ σε αυτό το εικονίδιο και
ανοίξτε διαδοχικά τους καταλόγους Driver και Mac_OS_X. Σε
αυτόν τον κατάλογο υπάρχει ένα αρχείο με το όνομα PL2303_
1.2.1r2.dmg Κάντε διπλό κλικ στο αρχείο DMG για να το
αποσυμπιέσετε. Στη συνέχεια το σύστημα MAC ανοίγει μία
μονάδα με το όνομα PL2303. Σε αυτη τη μονάδα υπάρχει ένα
αρχείο με το όνομα: PL2303_1.2.1. Κάντε διπλό κλικ σε αυτό
το αρχείο και το πρόγραμμα εγκατάστασης αρχίζει αυτόματα.
Ακολουθήστε στη συνέχεια τις οδηγίες του προγράμματος
μέχρι να σας ζητηθεί να ξεκινήσετε πάλι τον υπολογιστή MAC.
Ξεκινήστε εκ νέου το σύστημα και στη συνέχεια συνδέστε το
μετατροπέα „USB σε σειριακό“ σε μία ελεύθερη θύρα USB
του υπολογιστή MAC.
Υπόδειξη: Για να βεβαιωθείτε πως το πρόγραμμα οδήγησης
εγκαταστήθηκε σωστά στον υπολογιστή Mac ανοίξτε το
πρόγραμμα Apple System Profiler και επιλέξτε την καρτέλα
Υλικός εξοπλισμός. Σε αυτήν την καρτέλα θα βρείτε τη
δυνατότητα USB. Εκεί στο δεξιό παράθυρο πρέπει να υπάρχει
η εξής καταχώρηση.
USB-BUS -> USB-Serial Controller.
Πληροφορίες υποστήριξης:
Για χαλασμένα προϊόντα απευθυνθείτε στο κατάστημα αγοράς
ή στο τμήμα εξυπηρέτησης της Hama:
Ανοικτή γραμμή υποστήριξης – Παροχή συμβουλών για
τα προϊόντα Hama:
Τηλ. +49 (0) 90 91 / 502 – 115
Φαξ: +49 (0) 90 91 / 502 – 272
e-mail: mailto:produktber[email protected]
Πληροφορίες για τα προϊόντα ή νέα προγράμματα οδήγησης
θα βρείτε στη διεύθυνση www.hama.com
Table of contents
Languages:
Other Hama Media Converter manuals