manuals.online logo
Brands
  1. Home
  2. •
  3. Brands
  4. •
  5. Hama
  6. •
  7. Receiver
  8. •
  9. Hama 179557 User manual

Hama 179557 User manual

1. Sicherheitshinweise
•Schützen Sie das Produkt vor Feuchtigkeit.
•SAT-Finder nicht dauerhaft zwischen SAT-Spiegel und Receiver eingebaut lassen.
•Achten Sie bei Arbeiten im Dachbereich auf Ihre Sicherheit (Absturzgefahr). Im
Zweifel wenden Sie sich an dazu ausgebildete Fachkräfte und versuchen Sie es
nicht selbst!
2. Einstellen der SAT-Anlage auf bestmöglichen Empfang mit SAT-Finder
•SAT-Receiver vom Stromnetz trennen und SAT-Finder wie auf Abbildung mit kurzem
F-Steckerkabel (nicht im Lieferumfang enthalten) zwischen LNB und Receiver
anschließen.
•Receiver wieder ans Stromnetz anschließen, einen Programmplatz anwählen.
•SAT-Antenne (SAT-Spiegel) mit Winkelmesser und Kompass grob auf gewünschten
Satelliten einstellen. Richtigen Satelliten durch Drehen und Schwenken der SAT-
Antenne suchen.
•Bei LED-Vollausschlag (2) den Emndlichkeitsregler (1) gegen den
Uhrzeigersinn zurückdrehen bis nur noch 2–3 LEDs aueuchten.
•Nun die Antenne fein justieren bis möglichst viele rote LEDs (2) leuchten
•Die LED „22 kHz“ (3) leuchtet bei der Übertragung des 22 kHz-Signals.
•Befestigungen der Antenne festschrauben.
•ACHTUNG: Durch Anziehen der Schrauben kann sich der eingestellte Wert wieder
verändern!
•Kontrollieren Sie an Ihrem Receiver, ob der gewünschte Satellit nun empfangbar ist.
•Nun können Sie den SAT-Finder entfernen und LNB und Receiver wieder verbinden.
1. Consignes de sécurité
•Protégez le produit de l‘humidité.
•Ne laissez pas le Satnder installé entre la parabole satellite et le récepteur en
permanence.
•Veillez à votre sécurité (risque de chute) en cas de travaux sur votre toit. En cas de
doute, veuillez vous adresser à un spécialiste qualié et ne tentez par d‘installer ce
produit par vos propres moyens.
2. Réglage de l‘installation satellite pour une réception optimale à l‘aide du
Satfinder
•Mettez le récepteur satellite hors tension, puis connectez le Satnder entre le LNB
et le récepteur à l’aide d’un câble F court comme indiqué sur le croquis.
•Reconnectez le récepteur au secteur et sélectionnez un programme.
•Orientez l‘antenne satellite (parabole satellite) sur le satellite désiré à l‘aide d‘un
rapporteur et d‘une boussole. Recherchez le bon satellite en tournant et en faisant
pivoter l‘antenne satellite.
•Dès que toutes les LED (2) s’allument, tournez le régulateur de sensibilité (1) dans
le sens contraire des aiguilles d’une montre jusqu’à ce qu’uniquement 2-3 LED
soient allumées.
•Effectuez alors un réglage n de l’antenne jusqu’à ce que le maximum de LED
rouges (2) s’allument.
•La LED « 22 kHz » (3) s’allume lors du transfert du signal 22 kHz.
•Serrez à fond les vis de l‘antenne.
•ATTENTION : Le serrage des vis est susceptible de modier le réglage.
•Vériez, sur votre récepteur, si vous arrivez à capter le satellite souhaité.
•Vous pouvez retirer le Satnder et reconnecter le LNB et le récepteur.
1. Safety instructions
•Protect the product from moisture.
•Do not leave the SAT nder permanently installed between the SAT dish and the
receiver.
•Take proper safety precautions when working on the roof (risk of falling). If in
doubt, contact a qualied technician and do not attempt to mount the product
yourself!
2. Adjusting the SAT system for the best possible reception using the SAT
nder
•Disconnect the SAT receiver from the power supply and connect the SAT nder as
shown with the short F cable (not included) between the LNB and receiver.
•Reconnect the receiver to the power supply, select a channel.
•Using a protractor and compass, roughly adjust the SAT antenna (SAT dish) accord-
ing to the desired satellites. Search for the proper satellite by turning and panning
the SAT antenna.
•If the LEDs give a full reading (2), turn the sensitivity adjuster (1) in the anti-clock-
wise direction until only 2 to 3 LEDs light up.
•Now nely tune the antenna until as many red LEDs (2) light up as possible
•The “22 kHz” LED (3) lights up when the 22 kHz signal is transmitted.
•Tighten the antenna fasteners.
•WARNING: The set value can change again when the screws are tightened.
•On your receiver, check if the desired satellite can now be received.
•You can now remove the SAT nder and reconnect the LNB and the receiver.
1. Instrucciones de seguridad
•Proteja el producto de la humedad.
•No deje el detector SAT montado permanentemente entre la antena parabólica y
el receptor.
•Alrealizar trabajos en el área del tejado, tenga en cuenta su propia seguridad
(peligro de caída). En caso de duda, recurra a personal especializado con la
formación adecuada y no lo intente por cuenta propia.
2.
Ajuste de la instalación SAT para una recepción óptima con el detector SAT
•Desconecte el receptor SAT de la red de corriente y conecte el detector SAT, como se
muestra en la imagen, con un cable con conector F (no incluido en el suministro),
entre LNB y receptor.
•Vuelva a conectar el receptor a la red de corriente, seleccione una posición de
programa.
•Empleando transportador y brújula, ajuste la antena SAT (antena parabólica) a los
satélites que desee. Busque los satélites correctos girando e inclinando la antena
SAT.
•Si se iluminan todos los LEDs (2), gire el regulador de sensibilidad (1) en sentido no
horario hasta que sólo luzcan 2–3 LEDs.
•Ajuste ahora con precisión la antena hasta que se ilumine la mayoría de los LEDs
posible (2)
•El LED “22 kHz” (3) luce durante la transmisión de la señal de 22 kHz
•Atornille las jaciones de la antena.
•ATENCIÓN: ¡El valor ajustado puede volver a modicarse apretando los tornillos!
•Controle desde su receptor si el satélite deseado se puede recibir ahora.
•Ahora puede retirar el detector SAT y volver a conectar LNB y receptor.
Bedienungsanleitung
Operating Instructions
Mode d‘emploi
Istruzioni per l‘uso
Návod k použití
Návod na použitie
Gebruiksaanwijzing
Instrukcja obsługi
D
F
PL
GB
CZ
SK
I
NL
SAT Receiver
LNB
1
2
Power Pegel/Level (A)
22kHz (C)
- +
Rec. LNB
not included
3
EInstrucciones de usoFMode d‘emploi
DBedienungsanleitung GOperating instruction
SAT Finder
SAT-Finder
179557
00179557/04.17
1. Veiligheidsinstructies
•Bescherm het product tegen vocht.
•SAT-Finder niet blijvend tussen SAT-schotel en receiver ingebouwd laten.
•Let op uw veiligheid tijdens werkzaamheden op het dak (gevaar voor vallen). Laat
bij twijfel het werk aan een vakspecialist over en probeert u het niet zelf!
2. Instellen van de SAT-installatie op de best mogelijke ontvangst met SAT-
Finder
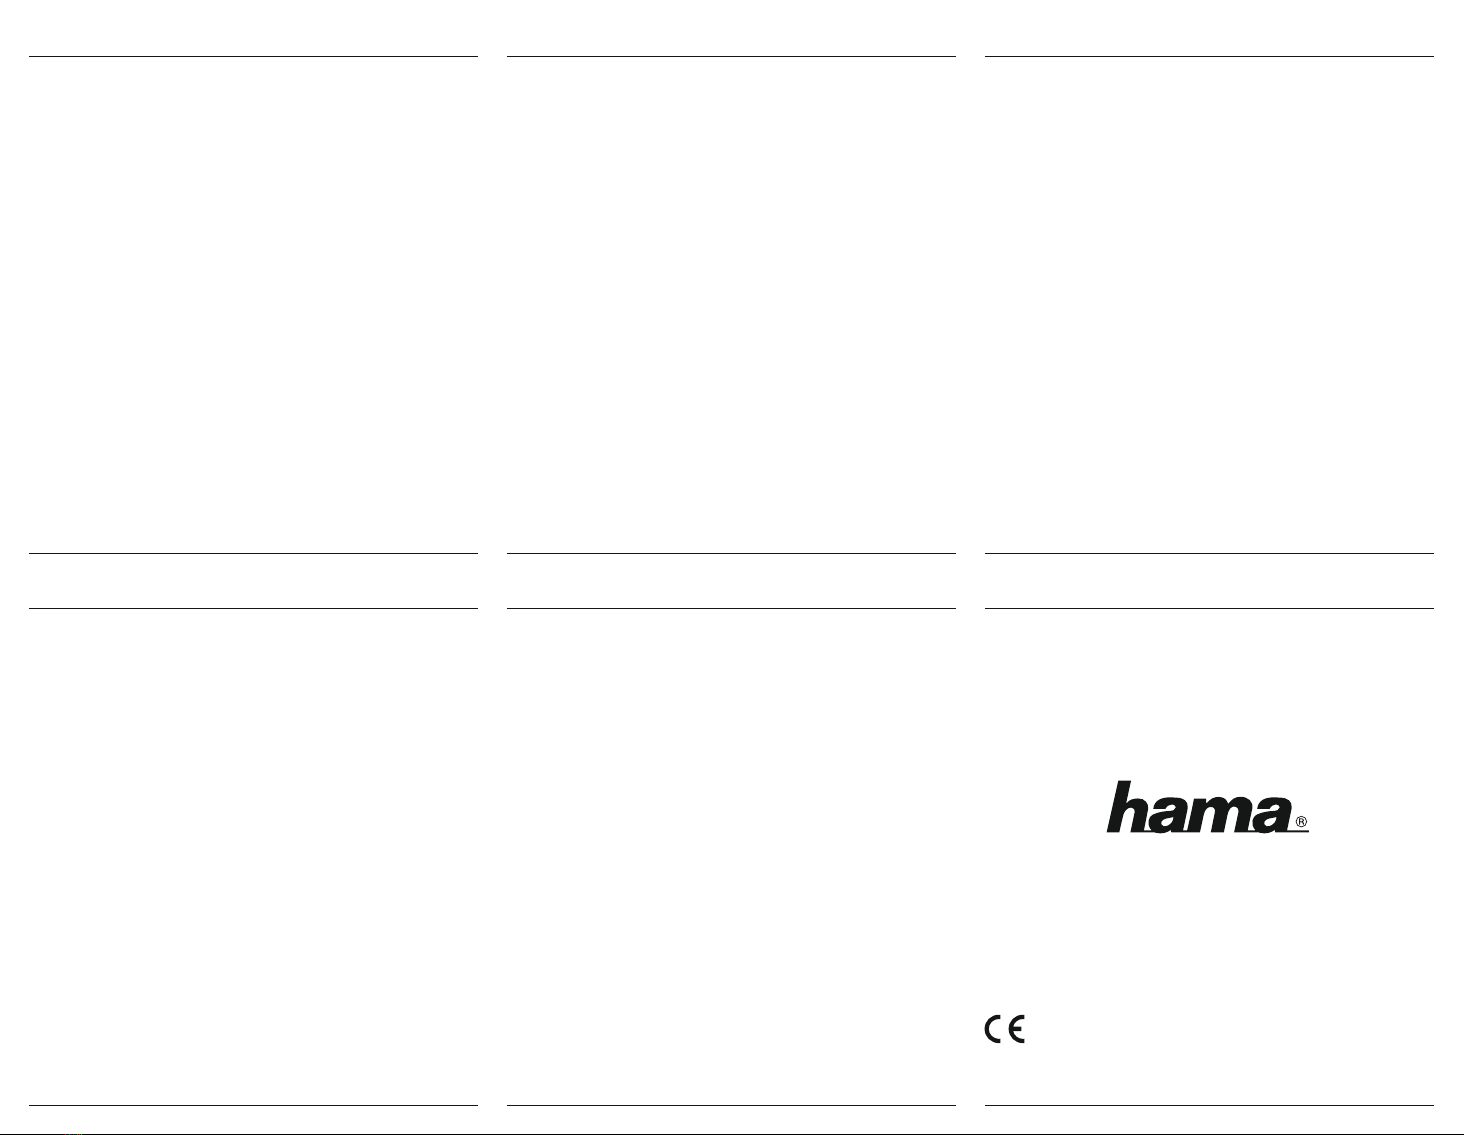
•Scheid de SAT-receiver van het stroomnet en sluit de SAT-Finder met een korte
F-stekkerkabel (niet inbegrepen) tussen LNB en receiver aan zoals in de afbeelding.
•Sluit de receiver weer op het stroomnet aan en selecteer een programmaplaats.
•Stel de SAT-antenne (SAT-schotel) met een hoek-/graadmeter en kompas globaal in
op de gewenste satelliet. Zoek de juiste satelliet door de SAT-antenne te draaien en
heen en weer te bewegen.
•Draai als alle LEDs (2) volledig branden de gevoeligheidsregelaar (1) tegen de
wijzers van de klok in (linksom) totdat er nog slechts 2-3 LEDs branden.
•Stel de antenne nu bij totdat er zoveel mogelijk rode LEDs (2) branden.
•De LED “22 kHz” (3) brandt bij de overdracht van het 22 kHz-signaal
•Schroef de bevestigingen van de antenne vast.
•ATTENTIE: Door het vastdraaien van de bouten kan de ingestelde waarde weer
wijzigen!
•Controleer op uw receiver of de gewenste satelliet nu is te ontvangen.
•Ukunt nu de SAT-Finder verwijderen en LNB en receiver weer met elkaar verbinden.
1. Avvertenze di sicurezza
•Proteggere il prodotto dall‘umidità.
•Non lasciare mai montato in modo permanente il dispositivo SAT-Finder tra la
parabola ed il ricevitore.
•Durante i lavori sul tetto fare attenzione alla propria sicurezza (pericolo di caduta).
In caso di dubbi rivolgersi ad un tecnico specializzato e non cercare di fare da soli!
2. Il dispositivo SAT-Finder permette di impostare l’impianto SAT per
garantire la miglior ricezione possibile.
•Disattivare l’alimentazione del ricevitore SAT e collegare il SAT-Finder come descritto
nella gura, inserendo la spina corta F (non inclusa nella fornitura) tra LNB e
ricevitore.
•Riattivare l’alimentazione del ricevitore e selezionare un canale.
•Regolare la parabola satellitare con un goniometro ed una bussola in direzione del
satellite desiderato. Cerare i satelliti desiderati ruotando e spostando la parabola.
•In caso di fondo scala dei LED (2), ruotare il regolatore di sensibilità (1) in senso
antiorario nché non restano accesi solo 2-3 LED
•Effettuare la regolazione di no della parabola nché non si accendono la maggior
parte di LED rossi (2)
•Il LED “22 kHz” (3) si accende durante la trasmissione del segnale 22kHz.
•Fissare bene il bloccaggio della parabola.
•ATTENZIONE: Quando si serrano i bulloni è possibile che il valore impostato venga
nuovamente modicato!
•Controllare dal ricevitore che i segnali dal satellite desiderato vengano ricevuti
correttamente.
•Adesso si può rimuovere il SAT-Finder e ricollegare insieme LNB e ricevitore.
1. Indicações de segurança
•Proteja o produto da humidade.
•Não deixe o localizador de satélite permanentemente instalado entre o prato de
satélite e o recetor.
•Durante os trabalhos na área do telhado, preste atenção à sua segurança (perigo
de queda). Em caso de dúvida, entre em contacto com técnicos especializados e
não tente montar o produto!
2. Congurar o sistema de satélite com o localizador de satélite para a
melhor receção possível
•Separe o recetor de satélite da rede elétrica e conecte o localizador de satélite
como ilustrado com o cabo de conexão F curto (não incluído no material fornecido)
entre o LNB e o recetor.
•Volte a ligar o recetor à rede elétrica e selecione um canal.
•Ajuste aproximadamente a antena de satélite (prato de satélite) com um gonióme-
tro e uma bússola para os satélites pretendidos. Procure os satélites pretendidos
rodando e basculando a antena de satélite.
•Em caso de uma deexão máxima do LED (2), ajuste o regulador de sensibilidade
(1) no sentido contrário ao dos ponteiros do relógio, até que apenas2–3 LEDs
acendam.
•Agora, ajuste a antena com precisão até que o número máximo de LEDs vermelhos
(2) acenda
•OLED „22 kHz“ (3) acende aquando da transmissão do sinal de 22 kHz.
•Aperte as xações da antena.
•ATENÇÃO: Ao apertar os parafusos, o valor ajustado pode alterar-se novamente!
•Controle no seu recetor se é possível captar o satélite pretendido.
•Agora pode remover o localizador de satélite e voltar a conectar o LNB e o recetor.
1. Biztonsági utasítások
•Óvja a terméket a nedvességgel szemben.
•Aműholdkeresőt nem lehet hosszan tartóan a műholdtükör és a jelfogó közé
beépítve hagyni.
•Ügyeljen a tetőmunkálatok során a biztonságra (csúszásveszély). Kétség esetén
forduljon szakemberhez és ne próbálkozzon saját maga!
2. Állítsa be az műholdberendezést a lehető legjobb vételre a műholdke-
resővel
•Válassza le a műhold jelfogót az áramról, és a műholdkeresőt kapcsolja össze az
ábra alapján egy rövid F-csatlakozókábellel (nincs mellékelve) a műholdvevő fej
(LNB) és a vevőeszköz között.
•Ajelfogót csatlakoztassa ismét az áramhálózathoz, majd válasszon ki egy csatornát.
•Állítsa a műholdas antennát (műholdtükröt) szögmérővel és iránytűvel nagyjából
a kívánt műholdra. Keresse meg a megfelelő műholdat a műholdas antennán
forgatással.
•Ha minden LED felvillan (2), az érzékenységszabályozót (1) forgassa az óramutató
járásával ellentétesen, amíg csak 2–3 LED világít.
•Ezután nomhangolja az antennát, míg lehetőleg sok vörös LED (2) világít
•ALED „22 kHz” (3) a 22 kHz-es jel továbbításánál világít.
•Erősen csavarozza le az antenna rögzítéseit.
•FIGYELEM: A csavarok meghúzásával a beállított értékek újra megváltozhatnak.
•Ellenőrizze a jelfogón, hogy a kívánt műhold elérhető-e.
•Ezután eltávolíthatja a műholdkeresőt, az LNB-t és a jelfogót pedig ismét összekap-
csolhatja.
1. Wskazówki bezpieczeństwa
•Chronić produkt przed wilgocią.
•Wykrywacza sygnału satelitarnego nie należy na stałe montować między anteną a
odbiornikiem.
•Podczas wykonywania prac na dachu przestrzegać zasad bezpieczeństwa (niebez-
pieczeństwo upadku). W razie wątpliwości poprosić o pomoc wykwalikowanych
specjalistów oraz nie próbować wykonywać tych prac samodzielnie!
2. Ustawianie instalacji satelitarnej pod kątem najlepszego zasięgu za
pomocą wykrywacza sygnału satelitarnego
•Odbiornik satelitarny odłączyć od źródła zasilania, a wykrywacz sygnału podłączyć
krótkim kablem z wtykiem F (nie należy do zakresu dostawy) między konwerterem
LNB a odbiornikiem, jak przedstawiono na ilustracji.
•Odbiornik ponownie podłączyć do sieci, wybrać miejsce odbioru programu.
•Za pomocą kątomierza i kompasu ustawić antenę satelitarną mniej więcej pod ką-
tem odbioru sygnału z wybranego satelity. Wyszukać wybranego satelitę obracając i
pochylając odpowiednio antenę.
•Wprzypadku zapalenia się wszystkich diod LED (2) przekręcić regulator czułości
(1) w kierunku przeciwnym do ruchu wskazówek zegara aż do momentu, w którym
świecić będą tylko 2–3 diody.
•Teraz dokładnie wyregulować antenę, aż zaświeci się możliwie największa liczba
czerwonych diod LED (2).
•Dioda LED „22 kHz” (3) świeci podczas transmisji sygnału 22 kHz.
•Dokręcić elementy mocujące anteny.
•UWAGA: W wyniku dokręcenia śrub ustawiona wartość może ulec zmianie!
•Sprawdzić na odbiorniku, czy sygnał z wybranego satelity jest dostępny.
•Teraz można usunąć wykrywacz sygnału satelitarnego i ponownie podłączyć LNB i
odbiornik.
Alllisted brands aretrademarksof thecorrespondingcompanies.Errors andomissionsexcepted,and
subjectto technical changes.Ourgeneral termsof deliveryandpaymentare applied.
Hama GmbH & Co KG
86652 Monheim/Germany
www.hama.com
OManual de instruçõesHHasználati útmutató
NGebruiksaanwijzingIIstruzioni per l‘uso PInstrukcja obsługi

Other Hama Receiver manuals

Hama 00 205321 User manual

Hama

Hama 00 205321 User manual

Hama Nano 00053330 User manual

Hama

Hama Nano 00053330 User manual

Hama 0014159 User manual

Hama

Hama 0014159 User manual

Hama 62759 User manual

Hama

Hama 62759 User manual

Hama 00184155 User manual

Hama

Hama 00184155 User manual

Hama RX 2 User manual

Hama

Hama RX 2 User manual

Hama 00136691 User manual

Hama

Hama 00136691 User manual

Hama 00053187 User manual

Hama

Hama 00053187 User manual

Hama 179507 User manual

Hama

Hama 179507 User manual

Hama Dekti 2000 T User manual

Hama

Hama Dekti 2000 T User manual

Hama 00178242 User manual

Hama

Hama 00178242 User manual

Hama Dekti 2000 T User manual

Hama

Hama Dekti 2000 T User manual

Hama GPS Receiver User manual

Hama

Hama GPS Receiver User manual

Hama 00053174 User manual

Hama

Hama 00053174 User manual

Hama 00040234 User manual

Hama

Hama 00040234 User manual

Hama 00014168 User manual

Hama

Hama 00014168 User manual

Popular Receiver manuals by other brands

WSI AV-300 installation manual

WSI

WSI AV-300 installation manual

JVC RX-D301S instructions

JVC

JVC RX-D301S instructions

EZCast CS2 manual

EZCast

EZCast CS2 manual

PCB Piezotronics 061A57 Installation and operating manual

PCB Piezotronics

PCB Piezotronics 061A57 Installation and operating manual

Monacor ATS-60R instruction manual

Monacor

Monacor ATS-60R instruction manual

BAPI Wireless 900 MHz Installation and operating instructions

BAPI

BAPI Wireless 900 MHz Installation and operating instructions

Marantz Slim-line NR1402 Specifications

Marantz

Marantz Slim-line NR1402 Specifications

Pioneer VSX-1016V-K Service manual

Pioneer

Pioneer VSX-1016V-K Service manual

Akai APW10 Operator's manual

Akai

Akai APW10 Operator's manual

Panasonic SAXR25 - DIGITAL A/V RECEIVER operating instructions

Panasonic

Panasonic SAXR25 - DIGITAL A/V RECEIVER operating instructions

OPW 1611 SERIES Installation and maintenance  instruction

OPW

OPW 1611 SERIES Installation and maintenance instruction

Belkin F8Z492 user manual

Belkin

Belkin F8Z492 user manual

Strong SRT 5434 user manual

Strong

Strong SRT 5434 user manual

Sony XAV-AX100 operating instructions

Sony

Sony XAV-AX100 operating instructions

Abtus HDBT-SCL21R/P User's operation guide

Abtus

Abtus HDBT-SCL21R/P User's operation guide

Binary B-900 Series Installation & setup guide

Binary

Binary B-900 Series Installation & setup guide

Kenwood 5.1 KRF-V7050D instruction manual

Kenwood

Kenwood 5.1 KRF-V7050D instruction manual

Sony STR-DA5800ES operating instructions

Sony

Sony STR-DA5800ES operating instructions

manuals.online logo
manuals.online logoBrands
  • About & Mission
  • Contact us
  • Privacy Policy
  • Terms and Conditions

Copyright 2025 Manuals.Online. All Rights Reserved.