Hama EWS-1400 User manual

C
14
.6
o
%
MAX
HUMIDITY
55
TENDENCY
18
o
C
.3
MAX
%
HUMIDITY
67
PM
Z
Z
51
30-10
TH
25
43
.5
1
%
REMOTE SENSOR
RF WIRELESS
°C
Ch
E
CZ
F
D
GB
I
P
NL
FIN
GR
RO
H
BG
PL
S
RUS
SK
Operating Instructions
Bedienungsanleitung
Mode d‘emploi
Instrucciones de uso
Руководство по эксплуатации
Istruzioni per l‘uso
Gebruiksaanwijzing
Οδηγίες χρήσης
Instrukcja obsługi
Használati útmutató
Návod kpoužití
Návod na použitie
Manual de instruções
Kullanma kılavuzu
Manual de utilizare
Bruksanvisning
Работна инструкция
00186306
00136259
Color EWS-1400Weather Station
Wetterstation


B
A
TENDENCY
PM
Z
Z
MAX
%
oo
%
MAX
HUMIDITY
HUMIDITY
CC
18
.3
14
.6
67 55
51
30-10
TH
MODE
5.0V
ALARM
SEARCH
+-
25
43
.5
1
%
REMOTE SENSOR
RF WIRELESS
°C
Ch
1 17 18 19 20 21
22
14 13 12 23 25
16
15
7
8
9
10
26
27
24
29
28
11
2 3 4 5 6

2
GOperating instruction
Controls and Displays
ABase station
1. Outdoor temperature
2. Measuring station radio symbol
3. Weather forecast symbol
4. Atmospheric pressuretrend
5. Room humidity
6. Room temperature
7. Room humidity trend
8. Wireless symbol
9. Weekday
10. Alarm symbol
11. Month
12. Day
13. Summer time
14. Time
15. Outdoor humidity trend
16. Outdoor humidity
17. MODE button
=settings /conrm the set value
18. +button
=increases the current set value/recalls the saved maximum/
minimum values
19. –button
=decreases the current setting /toggles between °C and °F /
activates/deactivates manual radio signal
20. ALARM button
=display /setting alarm modes
21. SEARCH button
=manual search for asignal from the measuring station
22. SNOOZE/LIGHT button
=temporarily interrupts the alarm /activates the backlight
23. socket
24. Recess for wall mounting
25. Battery compartment
BMeasuring station
26. Transmission indicator light
27. Display
28. Recess for wall mounting
29. Battery compartment
1. Explanation of Warning Symbols and Notes
Risk of electric shock
This symbol indicates product parts energized with adangerous
voltage of sucient magnitude to constitute arisk of electric shock.
Warning
This symbol is used to indicate safety instructions or to draw your
attention to specichazards and risks.
Note
This symbol is used to indicate additional information or important
notes.
2. Package Contents
•Color EWS-1400 Weather Station
(base station for indoors /outdoor measuring station)
•2AAA batteries
•2AA batteries
•Power supply unit
•These operating instructions
3. Safety Notes
•The product is intended for private, non-commercial use only.
•Donot operate the product outside the power limits given in the
specications.
•Donot use the product in moist environments and avoid splashes.
•Donot use the product in the immediate vicinity of heaters or other
heat sources or in direct sunlight.
•Donot use the product in areas wherethe use of electronic devices
is not permitted.
•Donot place the product near interference elds, metal frames,
computers, TVs, etc. Electronic devices and window frames can
negatively affect the product’sfunctionality.
•Donot drop the product and do not expose it to any major shocks.
•Keep the packaging material out of the reach of children due to the
risk of suffocation.
•Dispose of packaging material immediately according to locally
applicable regulations.
•Donot modify the product in any way.Doing so voids the warranty.
•Use the product for its intended purpose only.
•Keepthis product, as all electrical products, out of the reach of
children!
•Use the item only in moderate climatic conditions.
•The product is intended for indoor use only.
•Lay all cables so that they do not pose atripping hazard.
•Donot bend or crush the cable.
•Always pull directly on the plug when disconnecting the cable,
never on the cable itself.
W
arning –Batteries
•When inserting batteries, note the correct polarity (+ and -
markings) and insert the batteries accordingly.Failure to do so
could result in the batteries leaking or exploding.
•Only use batteries (or rechargeable batteries) that match the
specied type.
•Beforeyou insert the batteries, clean the battery contacts and
the polar contacts.
•Donot allow children to change batteries without supervision.
•Donot mix old and new batteries or batteries of adifferent
type or make.

3
W
arning –Batteries
•Remove the batteries from products that arenot being used
for an extended period (unless these arebeing kept ready for
an emergency).
•Donot short-circuit batteries.
•Donot charge batteries.
•Donot throw batteries in a re.
•Keep batteries out of the reach of children.
•Never open, damage or swallow batteries or allow them to
enter the environment. They can contain toxic, environmentally
harmful heavy metals.
•Immediately remove and dispose of dead batteries from the
product.
•Avoid storing, charging or using the device in extreme
temperatures and extremely low atmospheric pressure(for
example, at high altitudes).
Risk of electric shock
•Donot open the device or continue to operate it if it becomes
damaged.
•Donot use the product if the
AC adapter,the adapter cable or the mains cable aredamaged.
•Donot attempt to service or repair the product yourself.Leave
any and all service work to qualied experts.
4. Getting Started
Warning
•Only operate the product from an approved socket that is
connected to the public power supply.The socket must be
installed close to the product and must be easily accessible.
•Disconnect the product from the power supply using the On/
Off switch –ifthis is not available, unplug the power cordfrom
the socket.
•Ifusing amulti-socket power strip, make surethat the total
power consumption of all connected devices does not exceed the
power strip's maximum throughput rating.
•Ifyou will not be using the product for aprolonged period,
disconnect it from mains power.
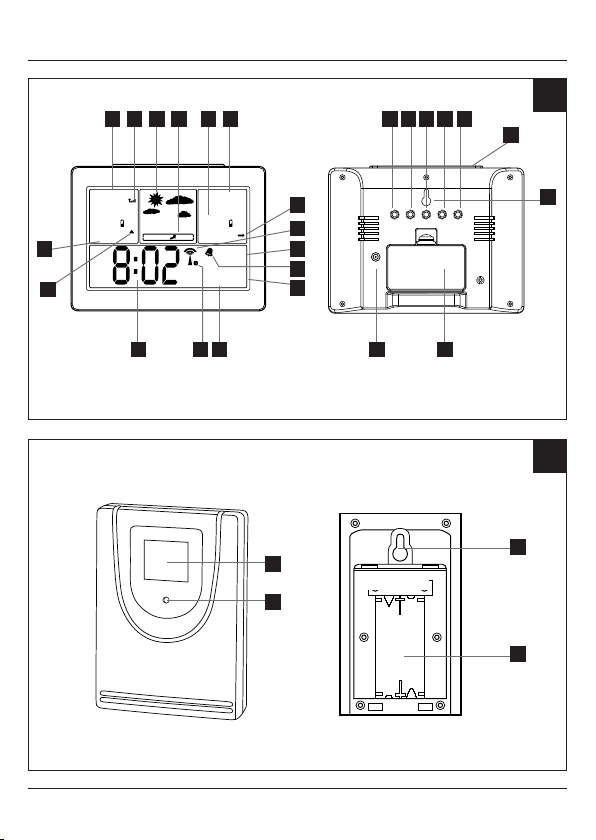
4.1. Insert batteries /connect power supply
Measuring station
•Remove the screen protector from the display.
•Open the battery compartment (29) and remove the contact breaker.
•Then close the battery compartment cover.
N
ote
Beforeuse, ensureyou insert the batteries in the measuring station
rst and then in the base station.
Base station
•Remove the screen protector from the display.
•Plug the power supply connection cable into the socket (23) on
the base station. Switch the base station on by plugging the power
supply unit into apower outlet approved for this purpose. The
socket must be close to the base station and easily accessible.
•Alternatively,open the battery compartment (25)and remove the
contact breaker.Close the battery compartment cover (25).
N
ote
If the batteries areinserted correctly and you connect the power
supply unit to the station, the base station will automatically switch
to the external power supply.
4.2. Replacing the batteries
N
ote –Replacing the batteries
•Note that the stations have to be resynchronised each time after
you change the batteries in the measuring or base station.
•Todothis, remove the batteries from the other station and then
reinsert them, or change them as required.
Measuring station
•When the symbol appears (next to the outdoor humidity (16),
replace the 2AAA batteries for the measuring station with 2
new ones.
•Open the battery compartment (29), remove and properly dispose of
the depleted batteries, and insert two new AAA batteries with the
correct polarity.Then close the battery compartment cover.
Base station
•When the symbol appears (next to the outdoor humidity (5),
replace the 2AAbatteries for the measuring station with 2new
ones.
•Open the battery compartment (25), remove and properly dispose of
the dead batteries and insert two new AA batteries with the correct
polarity.Then close the battery compartment cover (25).
5. Installation
N
ote –Installation
•Werecommend initially placing the base and measuring stations
in the intended locations without installing them and making all
the settings described in 6. Operation –todo.
•Only install the stations once the appropriate settings have been
made and astable wireless connection is established.
N
ote
•The wireless transmission range between the measuring and
base stations is up to 50 minopen spaces.
•Beforeinstallation, ensurethat wireless transmission will not
be disrupted by interference or obstacles like buildings, trees,
vehicles, high-voltage lines, etc.
•Beforethe nal installation, ensurethat thereissucient
reception between the intended installation locations.

4
N
ote
•When installing the measuring station, ensurethat it is protected
from direct sunlight and rain.
•The international standardheight for measuring air temperature
is 1.25 m(4ft) above ground.
W
arning
•Buy special or suitable installation material from aspecialised
dealer for wall-mounting.
•Ensurethat no faulty or damaged parts areinstalled.
•Never apply force during installation. This could damage the
product.
•Beforeinstallation, ensurethat the chosen wall is suitable for the
weight to be mounted, and make surethat thereare no electrical
wires, water,gas or other lines at the installation site on the wall.
•Donot mount the product above locations wherepersons
might linger.
5.1. Base station
•Use the base to position the base station on alevel surface.
•Alternatively,you can install the base station on awall using the
opening (24) on the back.
5.2. Measuring station
•You can also position the measuring station on alevel outdoor
surface.
•Werecommendinstalling the measuring station securely on an
outdoor wall (28).
•Install an anchor,screw,nail, etc. in the wall of your choice.
•Hang up the base/measuring station using the opening (24/28)
intended for this purpose.
6. Operation
N
ote
Hold down the +button (18) or the –button (19) to select the
values faster.
6.1. Connection to the measuring station
•After you insert the batteries, the base station automatically
searches for aconnection to the measuring station and performs
initial setup.
N
ote
•Initial setup takes approx. 3minutes.
•During connection, the wireless symbol on the measuring station
will ash (2).
•Donot press any buttons during setup. Otherwise, values may
not be transmitted correctly and thereisarisk of value errors
and inaccuracies.
•The setup process is completed when the indoor (5/6) and
outdoor (1/16) measurement data is displayed
•Ifthe base station still does not receive asignal from the measuring
station, press and hold the SEARCH button (21) for approx. 3
seconds to start the manual search for the signal.
6.2. Basic and manual settings
Automatic setting using the DCF signal
•After the rst time the base station is switched on and successful
transmission is established between the base station and the
measuring station, the clock will automatically search for aDCF
signal. During the search, the wireless symbol (8) will ash.
Display Searching for the DCF signal
Display ashing Active
Displayed continuously Successful –signal is being received
No display Inactive
•Ifthe station still does not receive asignal, press and hold the –
button (19) for approx. 3seconds to start the manual search for the
DCF signal. The wireless symbol (8) will start to ash.
N
ote –Time settings
•The search process takes about 7minutes. If the search fails, it
ends and is repeated at the next clock hour.
•Inthe meantime you can, however,set the time and the date
manually.
•The clock automatically continues to search for the DCF signal
on adaily basis (between 1:00 a.m. and 5:00 a.m.). If the
signal is received successfully,the manually set time and date
areoverwritten.
•Press and hold the –button (19) again for approx. 3seconds to
stop the manual search.
N
ote –Summer time
The clock automatically switches to summer time. appears on
the display as long as summer time is activated.
(Manual) settings
•Press and hold the –button (19) for approx. 3seconds to stop the
search for the DCF signal. The wireless symbol (8) goes out and you
can set the time manually.
•Press and hold the MODE button (17) for approx. 3seconds to
make the following settings one after the other:
•12/24 hour format
•Time zone
•Hours
•Minutes
•Year
•Month

5
•Day
•Weekday
•Toselect the individual values, press the +button (18) or the –
button (19) and conrm each selection by pressing the MODE
button (17).
•Press the MODE button (17) immediately to adopt the set value
displayed and to skip onwards.
•Ifyou do not make an entry for 15 seconds, you automatically exit
setup mode.
N
ote –Time zone
•The DCF signal can be received over long distances, but always
transmits the current Central European Time in Germany.Make
sureyou account for the time difference in countries with
another time zone.
•Ifyou areinMoscow,the time is 3hours later than in Germany.
This means that you should set +3 for the time zone. The clock
then automatically sets the time to 3hours after the DCF signal
received or relative to the manually set time.
N
ote –Weekday
Youcan choose from German (GE), English (EN), Danish (DA),
Dutch (DU), Italian (IT), Spanish (SP)and French (FR)for the
weekday display.
Celsius/Fahrenheit
•Press the –button (19) to switch between °C and °F for the
temperaturedisplay.
Alarm
•Press the ALARM button (20) to display the alarm time.
•Press and hold the ALARM button (20) for approx. 3seconds to set
the time of the alarm displayed. The hours display begins to ash.
•Press the +button (18) or the –button (19) to select the hour for
the alarm time and conrm your selection by pressing the ALARM
button (20). The minutes display begins to ash.
•Repeat the process to set the minutes for the alarm time.
•Ifnoentry is made for 15 seconds, setup mode automatically exits.
•Press the ALARM button (20) repeatedly to activate or deactivate
the daily alarm. The alarm symbol (10) will appear or disappear
accordingly.
•Ifthe alarm is triggered, the alarm symbol (10) will begin to ash
and an alarm will sound.
•Press any button except SNOOZE /LIGHT (22) to stop the alarm.
Otherwise, it will stop automatically after 2minutes.
N
ote –Snooze function
•While the alarm signal is sounding, press the SNOOZE/LIGHT
button (22) to activate the snooze function. Zz begins to ash on
the display.The alarm signal will be stopped for 5minutes, after
which it will sound again.
N
ote –Snooze function
•Press any button (except the SNOOZE/LIGHT button (22)) to stop
the snooze function and the alarm.
6.3. Weather forecast
•Based on changes in the atmospheric pressureand the data saved,
the base station is able to make weather forecasts for the next 12
to 24 hours.
N
ote –Weather forecast
The weather forecast function is not available during the rst few
hours of operation because it requires data that is collected during
operation.
The weather forecast and the current weather areindicated by ve
different symbols (3):
Symbol (3) Weather
Sunny
Slightly cloudy
Cloudy
Rainy
Stormy
•The weather station indicates atrend as to how the values for the
outdoor humidity (15), room humidity (7) and atmospheric pressure
(4) arelikely to develop over the next few hours.
Display Trend
Increasing
Constant
Decreasing

6
6.4. Maximum and minimum temperature and humidity values
•The base station automatically stores the maximum and minimum
outdoor/indoor temperatureand humidity values.
•Repeatedly press the +button (18) to switch between the current
temperatureand humidity,minimum temperatureand humidity
(MIN)and maximum temperatureand humidity (MAX).
•Press and hold the +button (18) for approx. 3seconds to reset the
stored maximum and minimum values.
6.5. Backlight
•Press the SNOOZE/LIGHT button (22) to light up the display for
approx. 5seconds.
•Press the SNOOZE/LIGHT button (22) again to light up the display
steadily.
Note –Permanent backlight mode
Permanent backlight mode is only possible when the base station is
plugged into mains power.
•Press the SNOOZE/LIGHT button (22) while the display is
permanently backlit to turn off the backlight
7. Care and Maintenance
Note
Disconnect the device from the power supply beforecleaning it or if
it is not going to be used for along period of time.
•Only clean this product with aslightly damp, lint-free cloth and do
not use aggressive cleaning agents.
•Make surethat water does not get into the product.
8. Warranty Disclaimer
Hama GmbH &CoKGassumes no liability and provides no warranty
for damage resulting from improper installation/mounting, improper
use of the product or from failuretoobserve the operating instructions
and/or safety notes.
9. Technical Data
Specications in accordance with Regulation (EU)
2019/1782
Manufacturer’sname or trade mark,
commercial registration number and
address
Hama, HRA12159,
Dresdner Str. 9,
86653 Monheim
Model identier HX075-0500600-
AG-001
Input voltage 100-240 V
Input AC frequency 50 /60Hz
Output voltage/
Output current/
Output power
5.0 VDC
0.6 A
3.0 W
Average active eciency 72.8 %
Eciency at low load (10 %) 59.1 %
No-load power consumption 0.06 W
Base station Measuring station
Power supply
3.0 V
2xAAbatteries
Power supply unit:
IN: 100-240 V~
50/60 Hz
OUT:5.0V 0,6A
3.0 V
2xAAA batteries
Measuring
range
Temperature
(°C)
Humidity
0°C –+50°C /32°F –
+122°F
20% –90%
-20°C –+60°C
20% –90%
Measurement
increments
Temperature
Humidity
0,1°C/ 0,2°F
1%
0,1°C
1%
Colour display YesNo
DCF radio-
controlled
clock
YesNo
Hygrometer YesYes
Thermometer YesYes
Barometer Yes(internal, not
displayed) No
Alarm function YesNo

7
Max. number
of measuring
stations
1
Range ≤50 m
10. Declaration of Conformity
Hereby,Hama GmbH &CoKG declares that the radio
equipment type [00186306, 00136259] is in compliance
with Directive 2014/53/EU.The full text of the EU
declaration of conformity is available at the following internet address:
www.hama.com->00186306, 00136259->Downloads.
Frequency band(s) 433 MHz
Maximum radio-frequency
power transmitted 0,123 mW
11. Recycling Information
Note on environmental protection:
After the implementation of the European Directive
2012/19/EU and 2006/66/EU in the national legal system,
the following applies:
Electric and electronic devices as well as batteries must
not be disposed of with household waste. Consumers
areobliged by law to return electrical and electronic
devices as well as batteries at the end of their service lives to the
public collecting points set up for this purpose or point of sale. Details
to this aredened by the national law of the respective country.This
symbol on the product, the instruction manual or the package indicates
that aproduct is subject to these regulations. By recycling, reusing
the materials or other forms of utilising old devices/Batteries, you are
making an important contribution to protecting our environment.

8
DBedienungsanleitung
Bedienungselemente und Anzeigen
ABasisstation
1. Außentemperatur
2. Funksymbol Messstation
3. Wettervorhersagesymbol
4. Luftdrucktendenz
5. Raumluftfeuchtigkeit
6. Raumtemperatur
7. Raumluftfeuchtigkeitstendenz
8. Funksymbol
9. Wochentag
10. Alarmsymbol
11. Monat
12. Tag
13. Sommerzeit
14. Uhrzeit
15. Außenluftfeuchtigkeitstendenz
16. Außenluftfeuchtigkeit
17. MODE-Taste =Einstellungen /Bestätigung des Einstellungswerts
18. +-Taste =Erhöhung desaktuellen Einstellungswertes/ Abruf der
gespeicherten Höchst-/ Tiefstwerte
19. –-Taste
=Verringerung desaktuellen Einstellungswertes /Wechsel
zwischen °C und °F /Aktivierung/ Deaktivierung manueller
Funksignal Empfang
20. ALARM-Taste =Anzeige/ Einstellung Alarm-Modus
21. SEARCH-Taste =Manuelle Suche nach Signal von der
Messstation
22. SNOOZE/LIGHT-Taste =Unterbrechung des Wecksignals /
Aktivierung Hintergrundbeleuchtung
23. Anschlussbuchse
24. Aussparung für Wandmontage
25. Batteriefach
BMessstation
26. Kontrollleuchte Übertragung
27. Display
28. Aussparung für Wandmontage
29. Batteriefach
1. Erklärung von Warnsymbolen und Hinweisen
Gefahr eines elektrischen Schlages
Dieses Symbol weist auf eine Berührungsgefahr mit nicht isolierten
Teilen des Produktes hin, die möglicherweise eine gefährliche
Spannung von solcher Höhe führen, dass die Gefahr eines
elektrischen Schlags besteht.
Warnung
Wirdverwendet, um Sicherheitshinweise zu kennzeichnen oder um
Aufmerksamkeit auf besondereGefahren und Risiken zu lenken.
Hinweis
Wirdverwendet, um zusätzlich Informationen oder wichtige
Hinweise zu kennzeichnen.
2. Packungsinhalt
•Wetterstation Color EWS-1400
(Basisstation für den Innenbereich /Messstation für den
Außenbereich)
•2AAA-Batterien
•2AA-Batterien
•Netzteil
•diese Bedienungsanleitung
3. Sicherheitshinweise
•Das Produkt ist für den privaten, nicht-gewerblichen
Haushaltsgebrauch vorgesehen.
•Betreiben Sie das Produkt nicht außerhalb seiner in den technischen
Daten angegebenen Leistungsgrenzen.
•Verwenden Sie das Produkt nicht in einer feuchten Umgebung und
vermeiden Sie Spritzwasser.
•Betreiben Sie das Produkt nicht in unmittelbarer Nähe der Heizung,
anderer Hitzequellen oder in direkter Sonneneinstrahlung.
•Benutzen Sie das Produkt nicht in Bereichen, in denen elektronische
Produkte nicht erlaubt sind.
•Positionieren Sie das Produkt nicht in der Nähe von Störfeldern,
Metallrahmen, Computern und Fernsehern etc. Elektronische
Geräte sowie Fensterrahmen beeinträchtigen die Funktion des
Produktes negativ.
•Lassen Sie das Produkt nicht fallen und setzen Sie es keinen heftigen
Erschütterungen aus.
•Halten Sie Kinder unbedingt von dem Verpackungsmaterial fern, es
besteht Erstickungsgefahr.
•Entsorgen Sie das Verpackungsmaterial sofort gemäß den örtlich
gültigen Entsorgungsvorschriften.
•Nehmen Sie keine Veränderungen am Produkt vor.Dadurch verlieren
Sie jegliche Gewährleistungsansprüche.
•VerwendenSie das Produkt ausschließlich für den dazu
vorgesehenen Zweck.
•Dieses Produkt gehört, wie alle elektrischen Produkte, nicht in
Kinderhände!
•VerwendenSie den Artikel nur unter moderaten klimatischen
Bedingungen.
•Das Produkt ist nur für den Gebrauch innerhalb von Gebäuden
vorgesehen.
•VerlegenSie alle Kabel so, dass sie keine Stolpergefahr darstellen.
•Knicken und quetschen Sie das Kabel nicht.
•Ziehen Sie zum Entfernen des Kabels direkt am Stecker und niemals
am Kabel.

9
W
arnung -Batterien
•Beachten Sie unbedingt die korrekte Polarität (Beschriftung +
und -) der Batterien und legen Sie diese entsprechend ein. Bei
Nichtbeachtung besteht die Gefahr des Auslaufens oder einer
Explosion der Batterien.
•Verwenden Sie ausschließlich Akkus (oder Batterien), die dem
angegebenen Typentsprechen.
•Reinigen Sie vor dem Einlegen der Batterien die Batteriekontakte
und die Gegenkontakte.
•Gestatten Sie Kindern nicht ohne Aufsicht das Wechseln von
Batterien.
•Mischen Sie alte und neue Batterien nicht, sowie Batterien
unterschiedlichen Typs oder Herstellers.
•Entfernen Sie Batterien aus Produkten, die längereZeit nicht
benutzt werden (außer diese werden für einen Notfall bereit
gehalten).
•Schließen Sie die Batterien nicht kurz.
•Laden Sie Batterien nicht.
•Werfen Sie Batterien nicht ins Feuer.
•Bewahren Sie Batterien außerhalb der Reichweite von Kindern
auf.
•Batterien nie öffnen, beschädigen, verschlucken oder
in die Umwelt gelangen lassen. Sie können giftige und
umweltschädliche Schwermetalle enthalten.
•Entfernen und entsorgen Sie verbrauchte Batterien unverzüglich
aus dem Produkt.
•Vermeiden Sie Lagerung, Laden und Benutzung bei extremen
Temperaturen und extrem niedrigem Luftdruck (wie z.B. in
großen Höhen).
Gefahr eines elektrischen Schlages
•Öffnen Sie das Produkt nicht und betreiben Sie es bei
Beschädigungen nicht weiter.
•Verwenden Sie das Produkt nicht, wenn der
AC-Adapter,das Adapterkabel oder die Netzleitung beschädigt
sind.
•Versuchen Sie nicht, das Produkt selbst zu warten oder zu
reparieren. Überlassen Sie jegliche Wartungsarbeit dem
zuständigen Fachpersonal.
4. Inbetriebnahme
Warnung
•Betreiben Sie das Produkt nur an einer dafür zugelassenen und
mit dem öffentlichen Stromnetz verbundenen Steckdose. Die
Steckdose muss in der Nähe des Produktes angebracht und leicht
zugänglich sein.
•Trennen Sie das Produkt mittels des Ein-/Ausschalters vom Netz
–wenn dieser nicht vorhanden ist, ziehen Sie die Netzleitung
aus der Steckdose.
Warnung
•Achten Sie bei Mehrfachsteckdosen darauf,dass
die angeschlossenen Verbraucher die zulässige
Gesamtleistungsaufnahme nicht überschreiten.
•Trennen Sie das Produkt vom Netz, wenn Sie es längereZeit
nicht benutzen.
4.1. Batterien einlegen/ Stromversorgung
Messstation
•Entfernen Sie die Schutzfolie auf dem Display.
•Öffnen Sie das Batteriefach (29) und entfernen Sie den
Kontaktunterbrecher.
•Schließen Sie die Batteriefachabdeckung anschließend.
H
inweis
Beachten Sie, dass Sie bei der Inbetriebnahme immer zuerst die
Batterien in die Messstation, und dann in die Basisstation einlegen.
Basisstation
•Entfernen Sie die Schutzfolie auf dem Display.
•Stecken Sie das Anschlusskabel des Netzteils in die Anschlussbuchse
(23) der Basisstation. Schalten Sie die Basisstation ein, in dem
Sie das Netzteil in eine dafür zugelassene Steckdose stecken. Die
Steckdose muss sich nahe der Basisstation benden und leicht
zugänglich sein.
•Alternativ öffnen Sie das Batteriefach (25) und entfernen Sie den
Kontaktunterbrecher.Schließen Sie die Batteriefachabdeckung (25)
anschließend.
H
inweis
•Wenn die Batterien korrekt eingelegt sind und Sie das Netzteil
mit der Station verbinden, wechselt die Basisstation automatisch
auf die externe Stromversorgung.
4.2. Batterien wechseln
H
inweis –Batteriewechsel
•Beachten Sie, dass Sie nach jedem Batteriewechsel an Mess-
oder Basisstation eine neue Synchronisation der Stationen
erfolgen muss.
•Nehmen Sie dazu die Batterien der anderen Station heraus
und setzen Sie erneut ein oder wechseln Sie diese bei Bedarf
ebenfalls aus.
Messstation
•Wenn das Symbol (neben der Außenluftfeuchtigkeit (16)
angezeigt wird, ersetzen Sie die 2AAA-Batterien der Messstation
durch 2neue Batterien.
•Öffnen Sie das Batteriefach (29), entnehmen und entsorgen
Sie die verbrauchten Batterien und legen Sie zwei neue AAA-
Batterien polrichtig ein. Schließen Sie die Batteriefachabdeckung
anschließend

10
Basisstation
•Wenn das Symbol (neben der Raumluftfeuchtigkeit (5) angezeigt
wird, ersetzen Sie die 2Batterien im Basisgerät durch neue Batterien
•Öffnen Sie das Batteriefach (25), entnehmen und entsorgen Sie
die verbrauchten Batterien und legen Sie zwei neue AA Batterien
polrichtig ein. Schließen Sie die Batteriefachabdeckung (25)
anschließend.
5. Montage
H
inweis –Montage
•Eswirdempfohlen, die Basis- und Messstation zunächst an den
gewünschten Aufstellorten ohne Montage zu platzieren und alle
Einstellungen -wie in 6. Betrieb beschrieben –vorzunehmen.
•Montieren Sie erst nach korrekter Einstellung und stabiler
Funkverbindung die Station/en.
H
inweis
•Die Reichweite der Funkübertragung zwischen der Mess- und
Basisstation beträgt im freien Gelände bis zu 50m.
•Achten Sie vor der Montage darauf,dass die Funkübertragung
nicht durch Störsignale oder Hindernisse wie Gebäude, Bäume,
Fahrzeuge, Hochspannungsleitungen, u.a. beeinusst wird.
•Stellen Sie vor der endgültigen Montage sicher,dass zwischen
den gewünschten Aufstellorten ausreichender Empfang besteht.
•Achten Sie bei der Montage der Messstation darauf,dass diese
vor direkter Sonne und Regen geschützt positioniert ist.
•Die internationale Standardhöhe für die Messung der
Lufttemperatur beträgt 1,25 m(4ft) über Grund.
W
arnung
•Besorgen Sie sich spezielles bzw.geeignetes Montagematerial im
Fachhandel für die Montage an der vorgesehenen Wand.
•Stellen Sie sicher,dass keine fehlerhaften oder beschädigten Teile
montiert werden.
•Wenden Sie bei der Montage niemals Gewalt oder hohe Kräfte
an. Diese können das Produkt beschädigen.
•Prüfen Sie vor Montage die Eignung der vorgesehenen Wand für
das anzubringende Gewicht und vergewissern Sie sich, dass sich
an der Montagestelle in der Wand keine elektrischen Leitungen,
Wasser-, Gas- oder sonstige Leitungen benden.
•Montieren Sie das Produkt nicht an Orten, unter denen sich
Personen aufhalten könnten.
5.1. Basisstation
•Stellen Sie die Basisstation mithilfe des Standfußes auf einer ebenen
Fläche auf.
•Alternativ können Sie die Basisstation mithilfe der Aussparung (24)
auf der Rückseite an einer Wand montieren.
5.2. Messstation
•Die Messstation können Sie ebenfalls auf einer ebenen Fläche im
Außenbereich aufstellen.
•Eswirdempfohlen, die Messstation sicher und fest an einer
Außenwand (28) zu montieren.
•Befestigen Sie Dübel, Schraube, Nagel, etc. in der dafür
vorgesehenen Wand.
•Hängen Sie die Basis-/ Messstation mit der dafür vorgesehenen
Aussparung (24/28) daran ein.
6. Betrieb
H
inweis
•Halten Sie die +-Taste (18) oder die –-Taste (19) gedrückt, um
die Werte schneller auswählen zu können.
6.1. Verbindung zur Messstation
•Nach dem Einlegen der Batterien sucht die Basisstation automatisch
nach einer Verbindung zur Messstation und führt die Ersteinrichtung
durch.
H
inweis
•Die Ersteinrichtung dauert ca. 3Minuten.
•Während dem Verbindungsversuch blinkt das Funksymbol
Messstation (2) auf.
•Vermeiden Sie in dieser Zeit jegliche Betätigung der Tasten!
Andernfalls können Fehler und Ungenauigkeiten bei den Werten
und deren Übertragung entstehen.
•Der Vorgang ist beendet, sobald die Messdaten für Innen- (5/6)
und Außenbereich (1/16) angezeigt werden.
•Wirdwiederholt kein Signal von der Messstation empfangen,
drücken und halten Sie die SEARCH-Taste (21) für ca. 3Sekunden,
um die manuelle Suche nach dem Signal zu starten.
6.2. Grundeinstellungen und manuelle Einstellungen
Automatische Einstellung nach DCF-Signal
•Nach dem ersten Einschalten der Basisstation und erfolgreicher
Übertragung zwischen Basis- und Messstation, beginnt die Uhr
automatisch die Suche nach dem DCF-Signal. Während des
Suchvorgangs blinkt das Funksymbol (8) auf.
Anzeige Suche nach DCF-Signal
Blinkende Anzeige Aktiv
Dauerhafte Anzeige Erfolgreich –Signal wirdempfangen
Keine Anzeige Inaktiv
•Wirdwiederholt kein Signal empfangen, drücken und halten Sie die
–-Taste (19) für ca. 3Sekunden, um die manuelle Suche nach dem
DCF-Signal zu starten. Das Funksymbol (8) beginnt zu blinken.

11
H
inweis –
U
hrzeiteinstellung
•Der Suchvorgang dauert etwa 7Minuten. Falls dieser fehlschlägt,
wirddie Suche beendet und zur nächsten vollen Stunde
wiederholt. Das Funksymbol (8) erlischt.
•Sie können währenddessen eine manuelle Einstellung von
Uhrzeit und Datum vornehmen.
•Die Uhr sucht automatisch weiterhin täglich (01:00 Uhr
und 05:00 Uhr) nach dem DCF-Signal. Bei erfolgreichem
Signalempfang werden die manuell eingestellte Uhrzeit und das
Datum überschrieben.
•Drücken und halten Sie die –-Taste (19) erneut für ca. 3Sekunden,
um den manuellen Suchvorgang zu beenden.
H
inweis –Sommerzeit
Die Uhrzeit stellt sich automatisch auf die Sommerzeit um. Solange
die Sommerzeit aktiv ist, wirdauf dem Display angezeigt.
(Manuelle) Einstellungen
•Drücken und halten Sie die –-Taste (19) für ca. 3Sekunden, um den
Suchvorgang nach dem DCF-Signal zu beenden. Das Funksymbol (8)
erlischt und Sie können die Uhrzeit manuell einstellen.
•Drücken und halten Sie die MODE-Taste (17) für ca. 3Sekunden,
um folgende Einstellungen nacheinander vorzunehmen:
•12/24-Stunden-Format
•Zeitzone
•Stunde
•Minute
•Jahr
•Monat
•Tag
•Wochentag
•Drücken Sie zum Auswählen der einzelnen Werte die +-Taste (18)
oder die –-Taste (19) und bestätigen Sie die jeweilige Auswahl
durch Drücken der MODE-Taste (17).
•Drücken Sie direkt die MODE-Taste (17), um den angezeigten
Einstellungswert zu übernehmen und zu überspringen.
•Erfolgt 15 Sekunden keine Eingabe, wirdder Einstellungsmodus
automatisch verlassen.
H
inweis –Zeitzone
•Das DCF-Signal kann weitläugempfangen werden, entspricht
jedoch immer der MEZ, die in Deutschland gilt. Beachten
Sie daher,dass Sie in Ländern mit anderer Zeitzone die
Zeitverschiebung beachten.
•Benden Sie sich in Moskau, ist es dort bereits 3Stunden später
als in Deutschland. Stellen Sie daher bei der Zeitzone +3 ein.
Die Uhr stellt sich dann immer nach Empfang des DCF-Signals
bzw.inBezug auf die manuell eingestellte Uhrzeit automatisch
3Stunden weiter.
H
inweis –Wochentag
Sie können für die Wochentaganzeige die Sprachen Deutsch (GE),
Englisch (EN), Dänisch (DA), Niederländisch (DU), Italienisch (IT),
Spanisch (SP)oder Französisch (FR)wählen.
Celsius /Fahrenheit
•Drücken Sie die –-Taste (19), um bei der Temperaturanzeige
zwischen °C und °F zu wechseln.
Wecker
•Drücken Sie die ALARM-Taste (20), um die Weckzeit anzuzeigen.
•Drücken und halten Sie die ALARM-Taste (20) für ca. 3Sekunden,
um die Weckzeit des angezeigten Alarms einzustellen. Die
Stundenanzeige beginnt zu blinken.
•Drücken Sie die +-Taste (18) oder die –-Taste (19), um die Stunden
der Weckzeit auszuwählen und bestätigen Sie die Auswahl durch
Drücken der ALARM-Taste (20). Die Minutenanzeige beginnt zu
blinken.
•Wiederholen Sie diesen Vorgang für die Minuten der Weckzeit.
•Erfolgt 15 Sekunden keine Eingabe, wirdder Einstellungsmodus
automatisch verlassen.
•Umden täglichen Alarm zu aktivieren bzw.zudeaktivieren, drücken
Sie wiederholt die ALARM-Taste (20). Das Alarmsymbol (10) wird
angezeigt/ nicht angezeigt.
•Wirdder Wecker entsprechend ausgelöst, beginnt das Alarmsymbol
(10) zu blinken und ein Wecksignal ertönt.
•Drücken Sie eine beliebige Taste (außer SNOOZE/LIGHT-Taste (22)),
um den Alarm zu beenden. Andernfalls endet dieser automatisch
nach 2Minuten.
H
inweis –Schlummerfunktion
•Drücken Sie während des Wecksignals die SNOOZE/LIGHT-Taste
(22), um die Schlummerfunktion zu aktivieren. Auf dem Display
beginnt Zz zu blinken. Das Wecksignal wirdfür 5Minuten
unterbrochen und dann erneut ausgelöst.
•Drücken Sie eine beliebige Taste (außer die SNOOZE/LIGHT-
Taste (22)), um die Schlummerfunktion und damit den Alarm
zu beenden.
6.3. Wettervorhersage
•Anhand von atmosphärischen Luftdruckveränderungen und
der gespeicherten Daten kann die Basisstation Angaben zu der
Wetteraussicht für die kommenden 12 bis 24 Stunden machen
H
inweis –Wettervorhersage
In den ersten Stunden des Betriebs ist die Wettervorhersage
aufgrund von fehlenden Daten, die erst im Laufe des Betriebs
gespeichert werden, nicht möglich.

12
Die Wettervorhersage und das aktuelle Wetter werden durch fünf
verschiedene Symbole (3) dargestellt:
Symbol (3) Wetter
Sonnig
Leicht bewölkt
Bewölkt
Regnerisch
Stürmisch
•Die Wetterstation gibt für Außenluftfeuchtigkeit (15),
Raumluftfeuchtigkeit (7) und Luftdruck (4) eine Tendenz an, wie sich
diese Werte wahrscheinlich für die nächsten Stunden entwickeln
werden.
Anzeige Tendenz
Steigend
Beständig
Fallend
6.4. Höchst- und Tiefstwerte der Temperatur und
Luftfeuchtigkeit
•Die Basisstation speichert die Höchst- und Tiefstwerte der
Temperatur sowie der Luftfeuchtigkeit im Außen- und Raumbereich
automatisch ab.
•Drücken Sie wiederholt die +-Taste (18),umzwischen der
Anzeige von aktueller Temperatur und Luftfeuchtigkeit, niedrigster
Temperatur und Luftfeuchtigkeit (MIN)und höchster Temperatur
und Luftfeuchtigkeit (MAX)zuwechseln.
•Drücken und halten Sie die +-Taste (18)für ca. 3Sekunden, um die
abgespeicherten Höchst- und Tiefstwerte zurückzusetzen.
6.5. Hintergrundbeleuchtung
•Drücken Sie die SNOOZE/LIGHT-Taste (22), wirddas Display für
ca. 5Sekunden beleuchtet.
•Drücken Sie die SNOOZE/ LIGHT-Taste (22) erneut, wirddas
Display dauerhaft beleuchtet.
H
inweis –kontinuierliche Hintergrundbeleuchtung
•Eine dauerhafte Beleuchtung des Displays ist nur bei Betrieb der
Basisstation über das Netzteil möglich.
•Drücken Sie die SNOOZE/ LIGHT-Taste (22) während der
dauerhaften Beleuchtung, wirddiese beendet.
7. Wartung und Pflege
Hinweis
Trennen Sie das Gerät vor der Reinigung und bei längerem
Nichtgebrauch vom Netz.
•Reinigen Sie dieses Produkt nur mit einem fusselfreien, leicht
feuchten Tuch und verwenden Sie keine aggressiven Reiniger.
•Achten Sie darauf,dass kein Wasser in das Produkt eindringt.
8. Haftungsausschluss
Die Hama GmbH &CoKGübernimmt keinerlei Haftung oder
Gewährleistung für Schäden, die aus unsachgemäßer Installation,
Montage und unsachgemäßem Gebrauch des Produktes oder
einer Nichtbeachtung der Bedienungsanleitung und/oder der
Sicherheitshinweise resultieren.
9. Technische Daten
Angaben nach Verordnung (EU) 2019/1782
Handelsmarke, Handelsregisternummer,
Anschrift
Hama, HRA12159,
Dresdner Str. 9,
86653 Monheim
Modellkennung HX075-0500600-
AG-001
Eingangsspannung 100-240 V
Eingangswechselstromfrequenz 50 /60Hz
Ausgangsspannung/
Ausgangsstrom/
Ausgangsleistung
5.0 VDC
0.6 A
3.0 W
Durchschnittliche Ezienz im Betrieb 72.8 %
Ezienz bei geringer Last (10 %) 59.1 %
Leistungsaufnahme bei Nulllast 0.06 W

13
Basisstation Messstation
Strom-
versorgung
3,0V
2x AA Batterie
Netzteil:
IN: 100-240 V~
50/60 Hz
OUT:5,0V 0,6A
3,0 V
2x AAA Batterie
Messbereich
Temperatur (°C)
Luftfeuchtigkeit
0°C –+50°C /32°F
–+122°F
20% –90%
-20°C –+60°C
20% –90%
Messschritte
Temperatur
Luftfeuchtigkeit
0,1°C/ 0,2°F
1%
0,1°C
1%
Farbdisplay Ja Nein
DCF-Funkuhr Ja Nein
Hygrometer Ja Ja
Thermometer Ja Ja
Barometer Ja (intern, keine
Anzeige) Nein
Weckfunktion Ja Nein
Max. Anzahl
Messstationen 1
Reichweite ≤50 m
10. Konformitätserklärung
Hiermit erklärt die Hama GmbH &CoKG,dass der
Funkanlagentyp [00186306, 00136259] der Richtlinie
2014/53/EU entspricht. Der vollständige Text der
EU-Konformitätserklärung ist unter der folgenden Internetadresse
verfügbar: www.hama.com -> 00186306, 00136259 -> Downloads.
Frequenzband/Frequenzbänder 433 MHz
Abgestrahlte maximale
Sendeleistung 0,123 mW
11. Entsorgungshinweise
Hinweis zum Umweltschutz:
Ab dem Zeitpunkt der Umsetzung der europäischen
Richtlinien 2012/19/EU und 2006/66/EG in nationales
Recht gilt folgendes:
Elektrische und elektronische Geräte sowie Batterien
dürfen nicht mit dem Hausmüll entsorgt werden. Der
Verbraucher ist gesetzlich verpichtet, elektrische und
elektronische Geräte sowie Batterien am Ende ihrer Lebensdauer an
den dafür eingerichteten, öffentlichen Sammelstellen oder an die
Verkaufsstelle zurückzugeben. Einzelheiten dazu regelt das jeweilige
Landesrecht. Das Symbol auf dem Produkt, der Gebrauchsanleitung
oder der Verpackung weist auf diese Bestimmungen hin. Mit der
Wiederverwertung, der stoichen Verwertung oder anderen Formen
der Verwertung von Altgeräten/Batterien leisten Sie einen wichtigen
Beitrag zum Schutz unserer Umwelt.

14
FMode d‘emploi
Éléments de commande et d'affichage
AStation de base
1. Températureextérieure
2. Icône radio (station de mesure)
3. Icône de prévisions météorologiques
4. Tendance de la pression atmosphérique
5. Humidité de l’air ambiant
6. Températureambiante
7. Tendance de l’humidité de l’air ambiant
8. Icône radio
9. Jour de la semaine
10. Icône alarme
11. Mois
12. Jour
13. Heured'été
14. Heure
15. Tendance de l’humidité de l’air extérieur
16. Humidité de l'air extérieur
17. Touche MODE =réglages /conrmation de la valeur sélectionnée
18. Touche +=augmentation de la valeur en cours de réglage /
consultation des valeurs maximales /minimales en mémoire
19. Touche –
=diminution de la valeur en cours de réglage /commutation
entre°Cet°F/activation/désactivation de la réception manuelle
du signal radio
20. Touche ALARM =achage /réglage du mode d’alarme
21. Touche SEARCH =recherche manuelle du signal provenant de
la station de mesure
22. Touche SNOOZE/LIGHT =interruption de la sonnerie de réveil /
allumage du rétroéclairage
23. Prise de raccordement
24. Fente pour installation murale
25. Compartiment àpiles
BStation de mesure
26. Témoin de contrôle transmission
27. Écran
28. Fente pour installation murale
29. Compartiment àpiles
1. Explication des symboles d‘avertissement et des remarques
Risque d’électrocution
Ce symbole indique un risque de contact avec des parties non
isolées du produit susceptibles de conduireuncourant électrique
capable de provoquer un risque d‘électrocution.
Avertissement
Ce symbole est utilisé pour indiquer des consignes de sécurité ou
pour attirer votreattention sur des dangers et risques particuliers.
Remarque
Ce symbole est utilisé pour indiquer des informations
supplémentaires ou des remarques importantes.
2. Contenu de l‘emballage
•Station météo Color EWS-1400
(station de base pour l'intérieur /station de mesurepour l'extérieur)
•2piles LR03/AAA
•2piles LR6/AA
•Bloc secteur
•Mode d'emploi
3. Consignes de sécurité
•Ceproduit est destiné àune installation domestique non
commerciale.
•N‘utilisez pas le produit en dehors des limites de puissance
indiquées dans les caractéristiques techniques.
•N‘utilisez pas le produit dans un environnement humide et évitez
toute projection d‘eau.
•Évitez d’utiliser le produit àproximité immédiate d‘un chauffage,
d’autres sources de chaleur ou exposé aux rayons directs du soleil.
•N‘utilisez pas le produit dans les zones dans lesquelles l‘utilisation
d‘appareils électroniques est interdite.
•Neplacez pas le produit àproximité de champs parasites, de
cadres métalliques, d’ordinateurs, de téléviseurs, etc. Les appareils
électroniques ainsi que les cadres de fenêtreont une inuence
négative sur le fonctionnement du produit.
•Protégez le produit des secousses violentes et évitez tout choc ou
toute chute.
•Tenez les emballages d‘appareils hors de portée des enfants, risque
d‘étouffement.
•Recyclez les matériaux d’emballage conformément aux prescriptions
locales en vigueur.
•N’apportez aucune modication àl’appareil. Des modications vous
feraient perdrevos droits de garantie.
•Utilisez le produit exclusivement conformément àsadestination.
•Cet appareil, comme tout appareil électrique, doit êtregardé hors
de portée des enfants !
•Utilisez l’article uniquement dans des conditions climatiques
modérées.
•Ceproduit est destiné àune utilisation exclusivement àl‘intérieur
d‘un bâtiment.
•Posez tous les câbles de telle sorte qu’ils ne présentent aucun
risque de chute.
•Faites attention ànepas plier ni coincer le câble.
•Pour retirer le câble, tirez directement au niveau de la che et
non du câble.
Avertissement –concernant les piles
•Respectez impérativement la polarité de la pile (marquage +
et -) lors de l‘insertion dans le boîtier ;risques d‘écoulement et
d‘explosion des piles si tel n‘est pas le cas.

15
Avertissement –concernant les piles
•Utilisez exclusivement des batteries (ou des piles) du type
indiqué.
•Avant d‘insérer les piles, nettoyez-en les contacts, ainsi que les
contacts d‘accouplement.
•N‘autorisez pas àdes enfants de remplacer les piles d‘un appareil
sans surveillance.
•N’utilisez pas simultanément des piles usagées et des piles
neuves ou des piles de différents types.
•Retirez les piles des produits que vous ne comptez pas utiliser
pendant un certain temps (à l‘exception des produits d‘alarme
en veille).
•Necourt-circuitez pas les piles.
•Netentez pas de recharger les piles.
•Nejetez pas de piles au feu.
•Conservez les piles hors de portée des enfants.
•Netentez pas d‘ouvrir les piles, faites attention ànepas les
endommager,les jeter dans l’environnement et àceque des
petits enfants ne les avalent pas. Les piles sont susceptibles
de contenir des métaux lourds toxiques et nocifs pour
l‘environnement.
•Retirez les piles usagées immédiatement du produit pour les
recycler.
•Évitez de stocker,charger et utiliser le produit àdes températures
extrêmes et àune pression atmosphérique extrêmement basse (à
haute altitude, par exemple).
Risque d’électrocution
•Netentez pas d’ouvrir le produit en cas de détérioration et
cessez de l’utiliser.
•N’utilisez pas l’appareil si
l’adaptateur secteur,lecâble de l’adaptateur ou le cordon
d’alimentation est endommagé.
•Netentez pas de réparer l’appareil vous-même ni d’effectuer
des travaux d’entretien. Déléguez les travaux d’entretien àdes
techniciens qualiés.
4. Mise en service
Avertissement
•Utilisez ce produit uniquement sur une prise électrique reliée
au réseau électrique public et homologuée. La prise de courant
doit êtresituée àproximité de l’appareil et doit êtrefacilement
accessible.
•Coupez l’appareil du secteur àl’aide de l’interrupteur -
débranchez la prise de courant en cas d’absence d’interrupteur.
•Encas de prises multiples, veillez àceque les appareils
consommateurs branchés ne dépassent pas la puissance
absorbée totale admissible.
•Débranchez l’appareil si vous ne l’utilisez pas sur une période
prolongée.
4.1. Insertion des piles /alimentation électrique
Station de mesure
•Retirez le lm protecteur situé sur l’écran.
•Ouvrez le compartiment àpiles (29) et retirez le lm de protection.
•Refermez le couvercle du compartiment àpiles.
R
emarque
Lors de la premièremise en service, insérez tout d'abordles piles
dans la station de mesure, puis dans la station de base.
Station de base
•Retirez le lm protecteur situé sur l’écran.
•Branchez le câble du bloc secteur dans la prise (23) de la station
de base. Mettez la station de base sous tension en branchant le
bloc secteur dans une prise de courant appropriée. La prise de
courant doit êtresituée àproximité de la station de base et doit être
facilement accessible.
•Alternativement, ouvrez le compartiment àpiles 25 et retirez le lm
de protection. Refermez le couvercle du compartiment àpiles (25).
R
emarque
•Lastation de base commute automatiquement sur alimentation
externe dès que vous insérez correctement les piles et branchez
le bloc secteur.
4.2. Remplacement des piles
R
emarque –
R
emplacement des piles
•Veuillez noter que vous devrez effectuer une nouvelle
synchronisation des deux stations après chaque remplacement
de piles de la station de base ou de la station de mesure.
•Lors de cette synchronisation, extrayez également les piles de
la station qui continuait àfonctionner,puis réinsérez-les ou
remplacez ces dernières.
Station de mesure
•Remplacez les deux piles LR03/AAA de la station de mesurepar
deux piles neuves lorsque le symbole apparaît àl’écran (à côté de
l’achage de la températureextérieure(16).
•Ouvrez le compartiment àpiles (29), retirez et éliminez les piles
usagées, puis insérez deux nouvelles piles LR03/AAA en respectant
les indications de polarité. Refermez le couvercle du compartiment
àpiles.
Station de base
•Remplacez les deux piles de la station de mesurebase par deux
piles neuves lorsque le symbole apparaît àl’écran (à côté de
l’achage de l’humidité de l'air ambiant (5).
•Ouvrez le compartiment àpiles (25), retirez et éliminez les piles
déchargées, puis insérez deux nouvelles piles LR6/AA en respectant
la polarité. Refermez le couvercle du compartiment àpiles (25).

16
5. Installation
R
emarque –
Installation
•Nous vous recommandons de positionner la station de base et
la station de mesuredans les endroits envisagés sans effectuer
le montage, puis d'effectuer les réglages tels que décrits au
chapitre 6. Fonctionnement.
•Procédez àl'installation de la/des station(s) uniquement après
avoir effectué les réglages et après réception d'une connexion
radio stable.
R
emarque
•Laportée de la transmission radio entrelastation de base et la
station de mesureest de 50 mdans un espace dégagé.
•Veuillez contrôler,avant l'installation, que la portée radio ne
soit pas altérée par des interférences ou des obstacles tels que
bâtiments, arbres, véhicules, lignes haute tension, etc.
•Veuillez contrôler,avant l'installation dénitive, la bonne qualité
de la transmission entreles deux stations.
•Veuillez également protéger la station de mesurede
l'ensoleillement direct et de la pluie lors de l'installation.
•Lahauteur standardinternationale de mesuredelatempérature
de l'air est de 1,25 m(4ft) au-dessus du sol.
A
vertissement
•Envue de l'installation, procurez-vous le matériel de montage
adéquat pour le mur concerné dans un commerce spécialisé.
•Veuillez contrôler que l'emballage ne contienne aucune pièce
erronée ou endommagée.
•N'appliquez en aucun cas une force excessive lors de
l'installation. Le produit pourrait en êtreendommagé.
•Avant l'installation, vériez que le mur prévu pour recevoir la
station dispose d'une force portante susante et qu'aucune
conduite d'électricité, d'eau, de gaz ni aucune autreconduite ne
passe dans cette partie de la cloison.
•N‘installez pas le produit àunendroit où des personnes sont
susceptibles de se tenir.
5.1. Station de base
•Placez la station de base sur une surface plane àl'aide de son pied.
•Vous pouvez également installer la station de base sur un mur à
l'aide de la fente (24) située sur sa face arrière.
5.2. Station de mesure
•Vous pouvez également placer la station de mesureàl'extérieur,sur
une surface plane.
•Nous vous recommandons d'installer solidement la station de
mesureàune paroi extérieure(28).
•Fixez cheville, vis, clou, etc. dans la paroi prévue pour recevoir
l'installation.
•Suspendez la station de base /demesureàl'aide de la fente
(24/28) prévue àcet effet.
6. Fonctionnement
R
emarque
•Maintenez la touche +(18) ou la touche –(19) enfoncée ande
fairedéler rapidement les chiffres.
6.1. Connexion vers la station de mesure
•Lastation de base recherche automatiquement une connexion àla
station de mesureeteffectue la premièreconguration après avoir
inséré les piles.
R
emarque
•Laconguration initiale dureenviron 3minutes.
•L'icône radio de la station de mesure(2) clignote pendant la
tentative de connexion.
•N'appuyez sur aucune touche pendant cette phase ;des erreurs,
des mesures inexactes ou une mauvaise transmission pourraient
en résulter.
•Laconguration est terminée dès que les valeurs mesurées
pour la zone intérieure(5/6) et pour la zone extérieure(1/16)
apparaissent àl'écran.
•Encas de plusieurs échecs de réception du signal par la station de
mesure, maintenez la touche SEARCH (21) enfoncée pendant env.3
secondes andelancer une recherche manuelle du signal.
6.2. Réglages de base et paramétrage manuel
Réglage automatique sur la base du signal horaire DCF
•L'horloge recherche automatiquement le signal DCF après la
premièremise sous tension de la station de base et en présence
d’une bonne transmission entrelastation de base et la station de
mesure. L'icône radio (8) clignote pendant la recherche du signal.
Achage Recherche du signal horaireDCF
Achage clignotant Recherche active
Achage permanent Recherche aboutie -signal en cours de
réception
Aucun achage Recherche inactive
•Encas de nouvel échec de réception du signal, maintenez la
touche –(19) enfoncée pendant env.3secondes andelancer
une recherche manuelle du signal DCF.L’icône radio (8) se met
àclignoter.
R
emarque –
R
églage de l'heure
•Larecherchedureenviron 7minutes. En cas d'échec de détection
du signal, la station recommence àrechercher le signal àl'heure
pleine suivante. L'icône radio (8) s'éteint.
•Vous pouvez également régler l'heureetladate manuellement.
•L’horloge continue de rechercher quotidiennement (à 01h00
et 05h00) le signal DCF.Les réglages manuels de l'heureetde
la date seront corrigés dès que la station reçoit correctement
le signal radio.

17
•Maintenez ànouveau la touche –(19) enfoncée pendant env.3
secondes andequitter la recherche manuelle du signal.
R
emarque –
H
eured'été
La station s'adapte automatiquement àl'heured'été.
apparaît àl’écran pendant la durée de l’heured’été.
Réglages (manuels)
•Maintenez la touche -(19) enfoncée pendant environ 3secondes
and’arrêter la recherche du signal DCF.L’icône radio (8) s’éteint et
vous pouvez régler l’heuremanuellement.
•Appuyez sur la touche MODE (17) pendant environ 3secondes an
d'effectuer successivement les réglages suivants:
•Format horaire12/24 heures
•Fuseau horaire
•Heure
•Minute
•Année
•Mois
•Jour
•Jour de la semaine
•Appuyez sur la touche +(18) ou sur la touche -(19) ande
sélectionner les différentes valeurs, puis conrmez votresélection en
appuyant sur la touche MODE (17).
•Appuyez directement sur la touche MODE (17) and’adopter la
valeur de réglage achée et passer au réglage suivant.
•Lemode de paramétrage s'interrompt automatiquement si vous
n'appuyez sur aucune touche pendant plus de 15 secondes.
R
emarque –
f
useau horaire
•Ilest possible de recevoir le signal DCF àgrande distance ;ce
signal correspond toutefois toujours àl'heureenvigueur en
Allemagne. Veuillez donc noter qu'un décalage horairedoit être
adopté dans les pays situés dans un autrefuseau horaire.
•Sivous vous trouvez, par exemple, àMoscou, le décalage
horaireentreMoscou et l'Allemagne est de 3heures (l'heurede
Moscou est en avance). Réglez donc le fuseau horairesur +3. La
station s'adapteraalors automatiquement àl'heurecaptée par
le signal horaireDCF (ou àl'heureréglée manuellement) et lui
ajoutera3heures.
R
emarque –
J
our de la semaine
Vous pouvez acher le jour de la semaine dans les langues
suivantes :allemand (GE), anglais (EN), danois (DA), néerlandais
(DU), italien (IT), espagnol (SP)oufrançais (FR).
Celsius /Fahrenheit
•Appuyez sur la touche -(19) andesélectionner l’achage en
degrés Celsius ou Fahrenheit.
Réveil
•Appuyez sur la touche ALARM (20) and’acher l’heured’alarme.
•Appuyez sur la touche ALARM (20) pendant environ 3secondes
anderégler l’heurederéveil de l’alarme sélectionnée. Les chiffres
de l'heuresemettent àclignoter.
•Appuyez sur la touche +(18) ou sur la touche -(19) ande
sélectionner l'heurederéveil, puis conrmez votresélection en
appuyant sur la touche ALARM (20). Les chiffres des minutes se
mettent àclignoter.
•Répétez cette procédurepour les minutes de l'heurederéveil.
•Lemode de paramétrage s'interrompt automatiquement si vous
n'appuyez sur aucune touche pendant plus de 15 secondes.
•Appuyez plusieurs fois sur la touche ALARM (20 pour activer/
désactiver l’alarme quotidienne. L'icône d'alarme (10) apparaît /
n'apparaît pas àl’écran.
•L'icône d'alarme (10) se met àclignoter et une alarme sonore
retentit lors du déclenchement de l’alarme.
•Appuyez sur n'importe quelle touche (à part la touche
SNOOZE /LIGHT (22)) and'arrêter l'alarme. L'alarme s'arrête
également automatiquement au bout de 2minutes.
R
emarque –
F
onction de répétition de l'alarme
•Appuyez sur la touche SNOOZE/LIGHT (22), pendant la
durée de la sonnerie, and'activer la fonction de répétition de
l’alarme. Zz se met àclignoter àl’écran. L’alarme s'interrompt
pendant 5minutes, puis retentit ànouveau.
•Appuyez sur n'importe quelle touche (à part la touche SNOOZE
/LIGHT (22)) and'arrêter la fonction de répétition de l’alarme,
et donc l'alarme.
6.3. Prévisions météorologiques
•Lastation de base peut acher des prévisions météo pour les
prochaines 12 à24heures sur la base des variations de la pression
atmosphérique et des données en mémoire.
R
emarque –
P
révisions météorologiques
Dans les premières heures suivant la mise en service, la station
n'est pas capable d'acher de prévisions météorologiques en
raison du manque de données qui seront enregistrées pendant le
fonctionnement ultérieur de la station.
Les prévisions météo ainsi que les conditions météo actuelles sont
achées àl'aide de cinq icônes différents (3) :
Symbole (3) Temps
Ensoleillé
Peunuageux

18
Nuageux
Pluvieux
Orageux
•Lastation météo indique une tendance d’évolution de l’humidité
de l'air extérieure(15), de l’humidité de l’air ambiante (7) et de la
pression atmosphérique (4) pour les prochaines heures.
Achage Tendance
Hausse
Stable
Baisse
6.4. Valeurs maximales et minimales de température et
d'humidité de l'air
•Lastation de base garde automatiquement en mémoireles valeurs
minimales et maximales de la températureetdel'humidité de l'air à
l'extérieur et àl'intérieur.
•Appuyez plusieurs fois sur la touche +(18) andepasser de
l’achage de la températureetdel’humidité de l’air actuelles à
l’achage de la températureetdel’humidité de l’air minimales
(MIN)oumaximales (MAX).
•Maintenez la touche +(18) enfoncée pendant environ 3secondes
anderéinitialiser les valeurs maximales et minimales en mémoire.
6.5. Rétroéclairage
•Appuyez sur la touche SNOOZE/LIGHT (22) and'allumer l'écran
pendant environ 5secondes.
•Appuyez ànouveau sur la touche SNOOZE/LIGHT (22) an
d'allumer l'écran en permanence.
R
emarque –
Rétroéclairage permanent
•L’éclairage permanent de l’écran est possible uniquement sur une
station de base branchée sur le secteur.
•Vous pouvez éteindrel’allumage permanent de l’écran en appuyant
sur la touche SNOOZE/LIGHT (22).
7. Soins et entretien
Remarque
Débranchez l‘appareil avant de procéder àson nettoyage et en cas
de non-utilisation prolongée.
•Nettoyez le produit uniquement àl’aide d’un chiffon non pelucheux
légèrement humide ;évitez tout détergent agressif.
•Veillez àcequ’aucun liquide ne pénètredans le produit.
8. Exclusion de garantie
La société Hama GmbH &CoKGdécline toute responsabilité en cas
de dommages provoqués par une installation, un montage ou une
utilisation non conformes du produit ou encoreprovoqués par un
non respect des consignes du mode d‘emploi et/ou des consignes
de sécurité.
9. Caractéristiques techniques
Indications prévues par le règlement (CE) 2019/1782
Raison sociale ou marque dé posée,
numérod’enregistrement au registredu
commerce et adresse du fabricant
Hama, HRA12159,
Dresdner Str. 9,
86653 Monheim
Référence du modèle HX075-0500600-
AG-001
Tension d’entrée 100-240 V
Fréquence du CA d’entrée 50 /60Hz
Tension de sortie/
Courant de sortie/
Puissance de sortie
5.0 VDC
0.6 A
3.0 W
Rendement moyen en mode actif 72.8 %
Rendement àfaible charge (10 %) 59.1 %
Consommation électrique hors charge 0.06 W
Other manuals for EWS-1400
2
This manual suits for next models
2
Table of contents
Languages:
Other Hama Weather Station manuals