manuals.online logo
Brands
  1. Home
  2. •
  3. Brands
  4. •
  5. HAMPTON BAY
  6. •
  7. Outdoor Light
  8. •
  9. HAMPTON BAY HD22936 User manual

HAMPTON BAY HD22936 User manual

READ AND SAVE THESE INSTRUCTIONS
VEUILLEZ LIRE ET CONSERVER CES INSTRUCTIONS
Low Voltage
Garden
Light Fixture
Lanterne de
Jardin
Basse tension
BULB TYPE: 20W HALOGEN MR11
TYPE D’AMPOULE:
20W HALOGÈNE MR11
DEAR CUSTOMER,
Congratulations on your purchase of a HAMPTON BAY™ lighting product. Our products will help to enhance the beauty of your home
and provide many years of enjoyment. HAMPTON BAY™ offers a wide selection of lighting products of the highest professional quality.
Ask your dealer about the many other HAMPTON BAY™ products that will help to create your own paradise.
To ensure the maximum performance of your garden light, please read and save these instructions.
Replacement parts may be ordered by using the fixture model number and the part’s name.
CHÈRE CLIENTE, CHER CLIENT,
Nous vous félicitons pour votre achat d’un luminaire HAMPTON BAY™. Nos produits vous aideront à embellir votre demeure et vous
procureront de nombreuses années de plaisir. HAMPTON BAY™ offre une grande variété de luminaires de la plus haute qualité
professionnelle. Votre dépositaire de produits HAMPTON BAY™ pourra vous conseiller sur nos nombreux autres produits et vous aider
à créer votre propre paradis.
Afin d’assurer la meilleure performance possible de votre éclairage de jardin, veuillez lire et conserver ces instructions.
Les pièces de rechange peuvent être commandées avec le numéro de modèle du luminaire et le nom de la pièce.
IMPORTANT SAFETY INFORMATION PERTAINING TO RISK OF
FIRE OR INJURY TO PERSONS.
• To reduce the risk of FIRE OR INJURY TO PERSONS turn off, unplug
transformer and allow lamp to cool before replacing it. Lamp gets HOT
quickly.
• Keep the lamp away from materials that may burn.
• Do not install within 10 feet (3m) of a pool, Spa or fountain.
• Install in accordance with all local codes and ordinances.
For halogen bulb only : T3 bulb (10W) Bi-Pin G4 base or
MR11 (20W) Bi-Pin G4 base.
• Do not touch the lamp bulb at any time. Use a soft cloth, as oil from the
skin may damage the lamp bulb.
• Do not operate the fixture with a missing or damaged bulb protector.
Only for use with low voltage power units with a maximum output rating
of 15V, 300W per secondary.
INFORMATIONS PERTINENTES CONCERNANT LES CAUSES DE
BRÛLURES OU DE BLESSURES.
• Afin de réduire les risques de BRÛLURES OU DE BLESSURES, fermer
“OFF” et débrancher le transformateur. Laisser la lampe se refroidir car
elle devient chaude rapidement.
• Garder la lampe éloignée des sources inflammables.
• Éviter l’installation à moins de 13 mètres (10pi) du bord d’une piscine,
d’un spa ou d’une fontaine d’eau.
• Faire l’installation de ce module en conformité avec les codes et les
règlements en vigueur dans votre région.
Pour ampoule halogène seulement: T3 (10W) à culot 2 broches (G4) ou
MR11 (20W) à culot 2 broches (G4).
• Ne pas toucher l’ampoule en aucun temps. Utiliser un chiffon doux car la
séborrhée de la peau peut endommager l’ampoule.
• Ne pas utiliser la fixture si le protecteur d’ampoule est endommagé ou
manquant.
Votre système d’éclairage à bas voltage doit être utilisé avec un bloc
d’alimentation contenant un amplificateur de 15V maximum et de 300W
par unité secondaire.
FOR LANDSCAPE LIGHTING SYSTEMS ONLY. OUTDOOR USE ONLY.
THE DEVICE IS ACCEPTED AS A COMPONENT OF A LANDSCAPE
LIGHTING SYSTEM WHERE THE SUITABILITY OF THE COMBINATION
SHALL BE DETERMINED BY CSA OR LOCAL INSPECTION
AUTHORITIES HAVING JURISDICTION.
POUR SYSTÈMES D’ÉCLAIRAGE PAYSAGER SEULEMENT. POUR
UTILISATION EXTÉRIEURE SEULEMENT.
CET APPAREIL EST ACCEPTÉ EN TANT QUE COMPOSANTE D’UN
SYSTÈME D’ÉCLAIRAGE D’EXTÉRIEUR OÙ LA FIABILITÉ DE LA
COMBINAISON DEVRAIT ÊTRE DÉTERMINÉE PAR LA CSA OU TOUT
ORGANISME LOCAL COMPÉTENT.
CUSTOMER SERVICE
SERVICE À LA CLIENTÈLE
5002-HD22936-BIL
1-888-867-6095 • cust[email protected] • servicealaclientele@niinorthern.com
MODEL # HD22936
1.1 Retirer soigneusement le luminaire de son emballage
protecteur.
1.2 Passer le câble dans la coche sur le dessus du piquet et assembler le
piquet au poteau en tournant dans le sens des
aiguilles d’une montre.
1.3 Dévisser la vis de pression et glisser l’embout de la fixture vers
l’extérieur.
1.4 Dévisser le support de lentille en tournant dans le sens contraire
des aiguilles d’une montre. Ne pas retirer la lentille du couvercle
de lentille
1.5 Insérer l’ampoule dans son réceptacle. Utiliser un chiffon doux, car
la séborrhée de la peau peut endommager l’ampoule.
1.6 Replacer la lentille et le support de lentille sur le corps en tournant
dans le sens des aiguilles d’une montre.
1.7 Régler l’angle du luminaire en desserrant la vis d’ajustement et en la
resserrant.
1.8 Replacer l’embout de la fixture sur le corps. Ajuster l’angle du
faisceau lumineux en glissant l’embout de la fixture vers l’avant ou
l’arrière (vers l’arrière = faisceau large, vers l’avant = faisceau petit)
et visser la vis de pression lorsque vous avez atteint l’angle approprié
du faisceau.
REMARQUE : La lentille doit être réglée vers le haut jamais vers le sol.
1.1 Carefully remove the fixture from its protective packaging.
1.2 Run the wire through the notch in the top of the spike and attach
the spike to the post by turning clockwise.
1.3 Loosen set screw and slide off light cap.
1.4 Remove the lens cover by turning counter-clockwise.
Do not remove the lens from the lens cover.
1.5 Insert the bulb into the bulb socket. Use a soft cloth, as oil
from skin may damage the lamp bulb.
1.6 Replace the lens cover on the body by turning clockwise.
1.7 Adjust the fixture’s angle by loosening the adjustment screw
and retightening it.
1.8 Replace the light cap over the body. Adjust the light’s beam
by sliding the cap back and forth (back = wide beam,
front = narrow beam) and screw the set screw in place once the
proper light beam is found.
NOTE: The lens should point up and never towards the ground.
1. Assembly of the Light Fixture
1. Assemblage du luminaire
Body
Corps
20W Halogen MR11 bulb
Ampoule 20W Halogène MR11
Lens Cover
Support de lentille
Light Cap
Embout de la xture
Wire
Câble
Set Screw
Vis de pression
Adjustment Screw
Vis d’ajustement
Post
Poteau
Connector
Connecteur
Spike
Piquet
2. Run the Landscape Wire (Not Included)
2. Installation du câble de jardin (non-inclus)
The landscape wire should run from the transformer
to each light without being cut. Do not run the
landscape wire within 10 feet (3m) of a pool, spa or
fountain. If the landscape wire is too long, cut it
with a cable cutter.
The landscape wire should be protected by routing it
close to proximity of the light fixture or next to a
building, deck or fence. Use cable suitable for low
voltage landscape lighting.
See chart below for recommended cable gauges.
*Suitable cable should be sized in accordance to the table, should be Type SPT-2W.
If you cannot find this cable at your local hardware or home improvement store then
please call customer service at 1-888-867-6095 or e-mail at
customerservice@niinorthern.com to order the cable needed.
Le câble pour jardin doit aller du transformateur à chaque
luminaire sans être coupé. Ne pas faire passer
le câble à moins de 3 mètres (10pi) d’une piscine, d’une
cuve thermale ou d’une fontaine. Si le câble pour jardin
est trop long, couper-le avec une pince coupe-câble.
Il faut protéger le câble pour jardin en le faisant passer
près du luminaire ou de l’édifice, de la terrasse ou de la
clôture.
Veuillez vous référer à la charte ci-dessous pour les
grosseurs de câble appropriées.
Le choix de la grosseur du câble doit être fait selon le tableau ci-joint et doit être
de type SPT-2W. Si vous ne trouvez pas ce câble à votre magasin ou quincaillerie de
quartier, alors contactez le service à la clientèle au 1-888-867-6095 ou par courriel au
customerservice@niinorthern.com
* llustration of xtures is for example only.
*
L’illustration des luminaires est à titre d’exemple seulement.
3. Choosing Lighting Fixture Location
3.
Choisir l’emplacement du luminaire
For uniform brightness and longer bulb life,
attach first fixture at least 10 feet from transformer.
Once you have decided where you will install your fixtures,
verify the type of soil.
• If the soil is of a loose, sandy or organic type, grasp the fixture
post, close to the spike, with both hands and firmly push into
the ground.
• If the soil is heavy or stony, dig a small hole, insert the fixture
spike, replace the soil and tap down.
Never push the fixture into the ground by the fixture head.
Pour un éclairage uniforme et pour allonger la vie de l’ampoule,
installer le premier luminaire à au moins 3 mètres du transformateur.
Une fois l’emplacement des luminaires déterminé, examiner la nature
du sol.
• Si le sol est meuble, sablonneux ou organique, prendre le pied
du luminaire près du piquet à deux mains et l’enfoncer fermement
dans la terre.
• Si le sol est lourd ou pierreux, creuser un petit trou, insérer le
piquet du luminaire, remplir le trou avec la terre et bien tasser.
Ne jamais enfoncer le luminaire dans la terre en le tenant par la tête.
Luminaires
Fixtures
Cable
Câble
Transformer
Transformateur
Combined wattage of all fixtures on line (in
Watts) Wire Gage (0-75')Wire Gage (75'-150')Wire Gage (150'-250')
0-60 16 16 12
60-120 16 12 12
120-180 12 12 12
180-240 12 12 Not recommended
240-300 12 Not recommended Not recommended
Calibre del cable
(75'-150')
Calibre del cable
(0-75')
Calibre del cable
(150'-250')
0-60 16 16 12
60-120 16 12 12
120-180 12 12 12
180-240 12 12
240-300 12
Voltaje combinado de todas las lámparas
(en vatios)
No recomendado No recomendado
No recomendado
Gauge du fil (0-75') Gauge du fil (75'-150') Gauge du fil (150'-250')
0-60 16 16 12
60-120 16 12 12
120-180 12 12 12
180-240 12 12
240-300 12
Wattage total de tous les luminaires sur la
ligne (en watts)
Pas recommandéPas recommandé
Pas recommandé
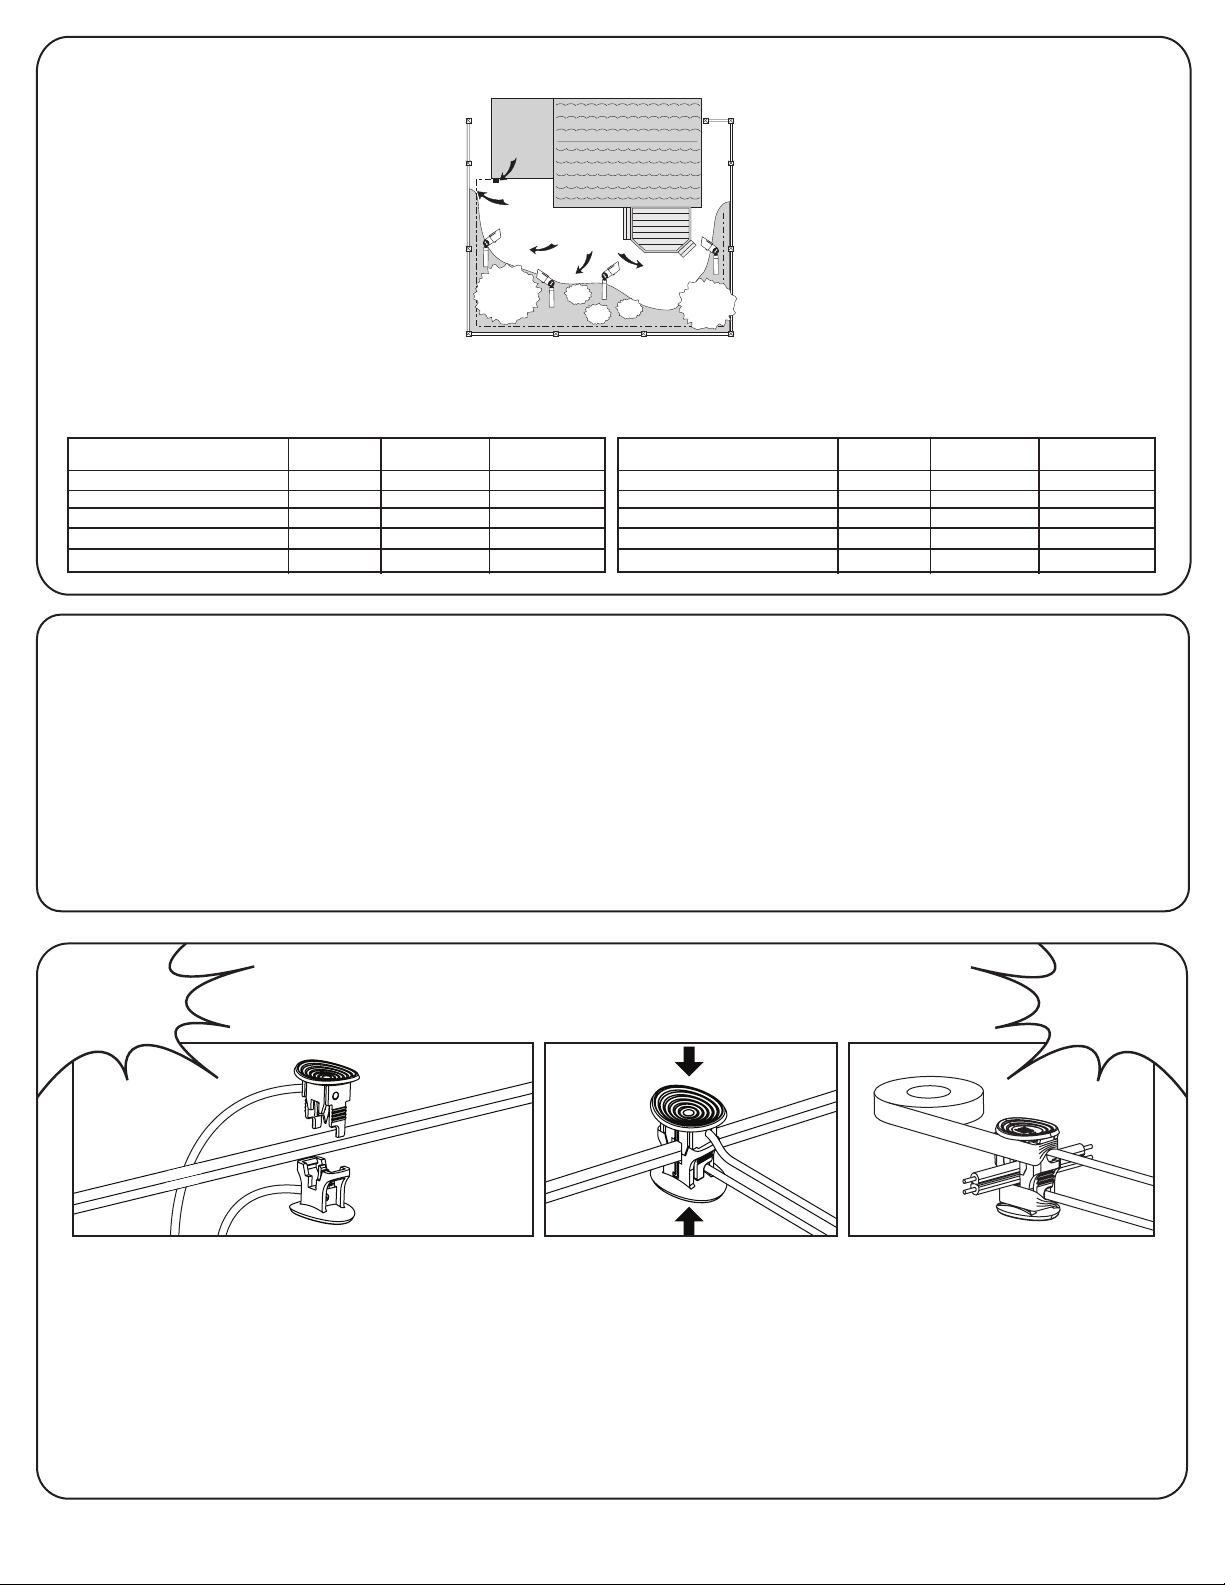
4.2 Align and fit the main low
voltage cable vertically to the
slot of wire connector as shown.
4.2 Aligner et installer le câble bas
voltage verticalement dans la fente
tel qu’illustré.
4.3 Press the wire connector together until fully
seated and locked around the cable. Pre-set
prongs will pierce the cable insulation and
establish contact. Turn on the power unit. If the
light fixture does not turn on, repeat operations
4.2 and 4.3.
4.3 Presser le connecteur de chaque côté
jusqu’à qu’il soit bien installé et sécurisé. Les
pointes du connecteur vont percer la gaine
du câble pour établir un contact. Mettre sous
tension. Si le luminaire ne s’allume pas, répéter
les étapes 4.2 et 4.3.
4.4 Once the clip-on connector is in place, wrap
it with electrical tape for additional protection.
4.4 Une fois le connecteur en place, enveloper
le de ruban électrique pour une protection
supérieure.
4. Connect the fixture wire to the landscape wire
Connexion du câble du luminaire au câble pour jardin
4.1 Place the wire connector on
opposite sides of the low voltage
cable where the fixture will be
located.
4.1 Placer le connecteur de chaque
côté du câble bas voltage où sera
installé le luminaire.
ATTENTION
SOYEZ PRUDENT !
LES POINTES DES
CONNEXIONS SONT
TRÈS ACÉRÉES !
CAUTION
BE CAREFUL!
THE WIRE STABS
ARE VERY
SHARP!
5. Light adjustment
Réglage de la
lumière
* llustration of xture is for example only.
* Le luminaire illustré n’est qu’un exemple.
It is recommended to adjust your lighting effect at night before
burying the cable.
Nous recommandons de régler les effets de lumière la nuit avant
d’enterrer le câble.
LIFETIME LIMITED WARRANTY
This product, excluding electronic and/or electrical parts (if applicable), is guaranteed to be free from defects in material and workmanship for life. The fixture’s finish is guaranteed against peeling for two
(2) years. The electronic and electrical parts are guaranteed against defects for one (1) year. Should a defect occur, please contact our customer service line at 1-888-867-6095 or at the following email
address: customer[email protected]. A proof of purchase (sales receipt) is required. If we cannot replace the defective part you require, you can return your product to the original point of purchase
for a full refund or a replacement product. The consumer is responsible for the removal and reinstallation of the product. Damage to any parts as such by accident, misuse, or improper installation is NOT
covered by this warranty. Our policy does not include liability for incidental or consequential damages. Some states or provinces do not allow the exclusion or limitation of consequential damages; therefore,
the above exclusion may not apply to you. This warranty gives you specific legal rights and you may also have other rights that vary from place to place.
GARANTIE À VIE LIMITÉE
Ce produit, sauf les pièces électroniques et/ou pièces électriques (le cas échéant), est garanti contre tout vice de matériaux et de fabrication à vie. Le fini du luminaire est garanti contre l’écaillage pendant
deux (2) ans après achat. Les pièces électroniques et électriques sont garanties contre les vices pendant une (1) année après achat. Si un défaut se produit, veuillez contacter notre service à la clientèle
au 1-888-867-6095 ou à l’adresse électronique suivante: [email protected]. Une preuve d’achat (reçu de caisse) est requise. Si nous ne sommes pas en mesure de remplacer la pièce
défectueuse, rapporter votre produit à l’endroit où vous l’avez acheté pour un remboursement total ou le remplacement du produit. Le consommateur assume la responsabilité du retrait et de la
réinstallation du produit. L’endommagement de toute pièce à cause d’un accident, d’une mauvaise utilisation ou d’une mauvaise installation N’EST PAS couvert par cette garantie. Notre garantie ne
couvre pas les dommages directs ou indirects causés par nos produits. Certains États ou provinces ne permettent pas l’exclusion ou les limitations d’une garantie implicite, par conséquent, les limitations
et exclusions ci-dessus ne sont peut-être pas applicables. Cette garantie vous confère des droits précis auxquels peuvent s’ajouter d’autres droits variant d’un endroit à l’autre.
CUSTOMER SERVICE
SERVICE À LA CLIENTÈLE
1-888-867-6095 • cust[email protected] • servicealaclientele@niinorthern.com
All of the lights fail to
work
Aucune lumière ne
s’allume
• Check that the power is on.
• Check if there is a loose connection at the
transfomer screw terminal.
• Check that the power switch is not in the
OFF setting.
• Vérifier que les luminaires sont sous
tension.
• Vérifier que toutes les connexions sont
bien serrées aux bornes du transformateur.
• Vérifier que l’interrupteur n’est pas en
position ARRÊT « OFF ».
8. Maintenance
Entretien
• Pour nettoyer, laver avec un
chiffon doux et humide.
• Pour remplacer une ampoule,
inverser la démarche “Assemblage
du luminaire”.
• Les pièces de rechange peuvent
être commandées en mentionnant
le numéro de modèle du luminaire
et le nom de la pièce.
• To clean, wash with a damp
soft cloth.
• To replace the bulb, reverse
the procedure in the
“Assembly of the light
fixture”.
• Replacement parts may be
ordered by using the fixture
model number and the part’s
name.
6 ’’ (15,24cm) max.
* llustration of xture is for example only.
* Le luminaire illustré n’est qu’un exemple.
• The problem here is with the fixture’s
connector or light bulb.
• Check the connector to make sure the
wire stabs have pierced the landscape wire.
• To check a light bulb, exchange it with one
from a fixture that is working (remember to
be careful, as the bulbs can get very hot –
also touch bulbs with a soft cloth only).
• Le problème se situe au niveau du
connecteur du luminaire ou au niveau
de l’ampoule.
• Vérifier que les pointes de connexion ont
percé le câble de jardin.
• Pour vérifier une ampoule, l’échanger avec
l’ampoule d’un luminaire qui s’allume
(attention, les ampoules peuvent être
brûlantes - toucher aux ampoules qu’avec
un chiffon doux).
Only some light s work
Quelques lumières
s’allument
6. Bury the landscape wire
Enterrer le câble pour
jardin
7. Troubleshooting
Dépannage
The landscape wire and connector can also be hidden under stone or
buried under grass at a maximum depth of 6” (15,24cm).
Le câble pour jardin et le connecteur peuvent également être cachés par
du gravier ou être enterrés sous le gazon à une profondeur maximum de
15,24cm (6po).

Other HAMPTON BAY Outdoor Light manuals

HAMPTON BAY KJC2601LL-01 User manual

HAMPTON BAY

HAMPTON BAY KJC2601LL-01 User manual

HAMPTON BAY HBP609-35 User manual

HAMPTON BAY

HAMPTON BAY HBP609-35 User manual

HAMPTON BAY 84075 User manual

HAMPTON BAY

HAMPTON BAY 84075 User manual

HAMPTON BAY MIDSIZE LAMP User manual

HAMPTON BAY

HAMPTON BAY MIDSIZE LAMP User manual

HAMPTON BAY SL18P-R5X-DB-2 User manual

HAMPTON BAY

HAMPTON BAY SL18P-R5X-DB-2 User manual

HAMPTON BAY 49956 User manual

HAMPTON BAY

HAMPTON BAY 49956 User manual

HAMPTON BAY IMS1691L User manual

HAMPTON BAY

HAMPTON BAY IMS1691L User manual

HAMPTON BAY HD6587C User manual

HAMPTON BAY

HAMPTON BAY HD6587C User manual

HAMPTON BAY F319001A ROB User manual

HAMPTON BAY

HAMPTON BAY F319001A ROB User manual

HAMPTON BAY WARWICK LDN1603AX-01/BR User manual

HAMPTON BAY

HAMPTON BAY WARWICK LDN1603AX-01/BR User manual

HAMPTON BAY NXT-1005 User manual

HAMPTON BAY

HAMPTON BAY NXT-1005 User manual

HAMPTON BAY NTSW30030LBL-MS User manual

HAMPTON BAY

HAMPTON BAY NTSW30030LBL-MS User manual

HAMPTON BAY NXT-1915 User manual

HAMPTON BAY

HAMPTON BAY NXT-1915 User manual

HAMPTON BAY 62113 User manual

HAMPTON BAY

HAMPTON BAY 62113 User manual

HAMPTON BAY 752-396 User manual

HAMPTON BAY

HAMPTON BAY 752-396 User manual

HAMPTON BAY 29156 User manual

HAMPTON BAY

HAMPTON BAY 29156 User manual

HAMPTON BAY 857-394 User manual

HAMPTON BAY

HAMPTON BAY 857-394 User manual

HAMPTON BAY 62919 User manual

HAMPTON BAY

HAMPTON BAY 62919 User manual

HAMPTON BAY ELLENA HDP06533BL User manual

HAMPTON BAY

HAMPTON BAY ELLENA HDP06533BL User manual

HAMPTON BAY 18165-000 User manual

HAMPTON BAY

HAMPTON BAY 18165-000 User manual

HAMPTON BAY LBW1501AX-01 User manual

HAMPTON BAY

HAMPTON BAY LBW1501AX-01 User manual

HAMPTON BAY HD22750 User manual

HAMPTON BAY

HAMPTON BAY HD22750 User manual

HAMPTON BAY NXT-2322 User manual

HAMPTON BAY

HAMPTON BAY NXT-2322 User manual

HAMPTON BAY HD23192 User manual

HAMPTON BAY

HAMPTON BAY HD23192 User manual

Popular Outdoor Light manuals by other brands

Philips Ledino 168073116 brochure

Philips

Philips Ledino 168073116 brochure

RH METIER DOME SHADE TASK instructions

RH

RH METIER DOME SHADE TASK instructions

Cooper Lighting Solutions Galleon II Floodlight installation instructions

Cooper Lighting Solutions

Cooper Lighting Solutions Galleon II Floodlight installation instructions

JONATHAN Y JYL6201A quick start guide

JONATHAN Y

JONATHAN Y JYL6201A quick start guide

LIGMAN ATLANTIC 4 instruction manual

LIGMAN

LIGMAN ATLANTIC 4 instruction manual

AEC ILLUMINAZIONE BASE BA/1 Mounting instructions

AEC ILLUMINAZIONE

AEC ILLUMINAZIONE BASE BA/1 Mounting instructions

BOSS ILLUMINATION MAGNA 3 product manual

BOSS ILLUMINATION

BOSS ILLUMINATION MAGNA 3 product manual

Alice's Garden LED17SL100YEL manual

Alice's Garden

Alice's Garden LED17SL100YEL manual

MOOD BASIL Installation Notice

MOOD

MOOD BASIL Installation Notice

Vaughan WA0199 installation guide

Vaughan

Vaughan WA0199 installation guide

Gama Sonic DPEZ5F0 manual

Gama Sonic

Gama Sonic DPEZ5F0 manual

Lucci LEDlux 230319 installation instructions

Lucci LEDlux

Lucci LEDlux 230319 installation instructions

RUSTA Belys WHITE STONES 3X0 manual

RUSTA

RUSTA Belys WHITE STONES 3X0 manual

LF Allen + Roth LB2905 quick start guide

LF

LF Allen + Roth LB2905 quick start guide

LIGMAN ODESSA 1 OD-50001 installation manual

LIGMAN

LIGMAN ODESSA 1 OD-50001 installation manual

Quoizel CSE8406PN Assembly instruction sheet

Quoizel

Quoizel CSE8406PN Assembly instruction sheet

nordlux CROSS 25 manual

nordlux

nordlux CROSS 25 manual

IKEA SYMFONISK manual

IKEA

IKEA SYMFONISK manual

manuals.online logo
manuals.online logoBrands
  • About & Mission
  • Contact us
  • Privacy Policy
  • Terms and Conditions

Copyright 2025 Manuals.Online. All Rights Reserved.