Hang ups EZ Stretch F5-1124 User manual
DO NOT DISCARD - KEEP FOR FUTURE REFERENCE.
for Teeter Hang Ups®Inversion Tables
EZ StretchEZ Stretch
EZ StretchEZ Stretch
EZ StretchTMTM
TMTM
TM Traction HandlesTraction Handles
Traction HandlesTraction Handles
Traction Handles
USER INSTRUCTIONS
TeeterHangUps®is a registeredtrademarkof STL International,Inc., Inversion International, Ltd.and Teeter Ltd. ©COPYRIGHT 2006, STL International,Inc.,InversionInternational, Ltd. Teeter Ltd. Item #LF-7017 09/06-1
PRE-ASSEMBLY
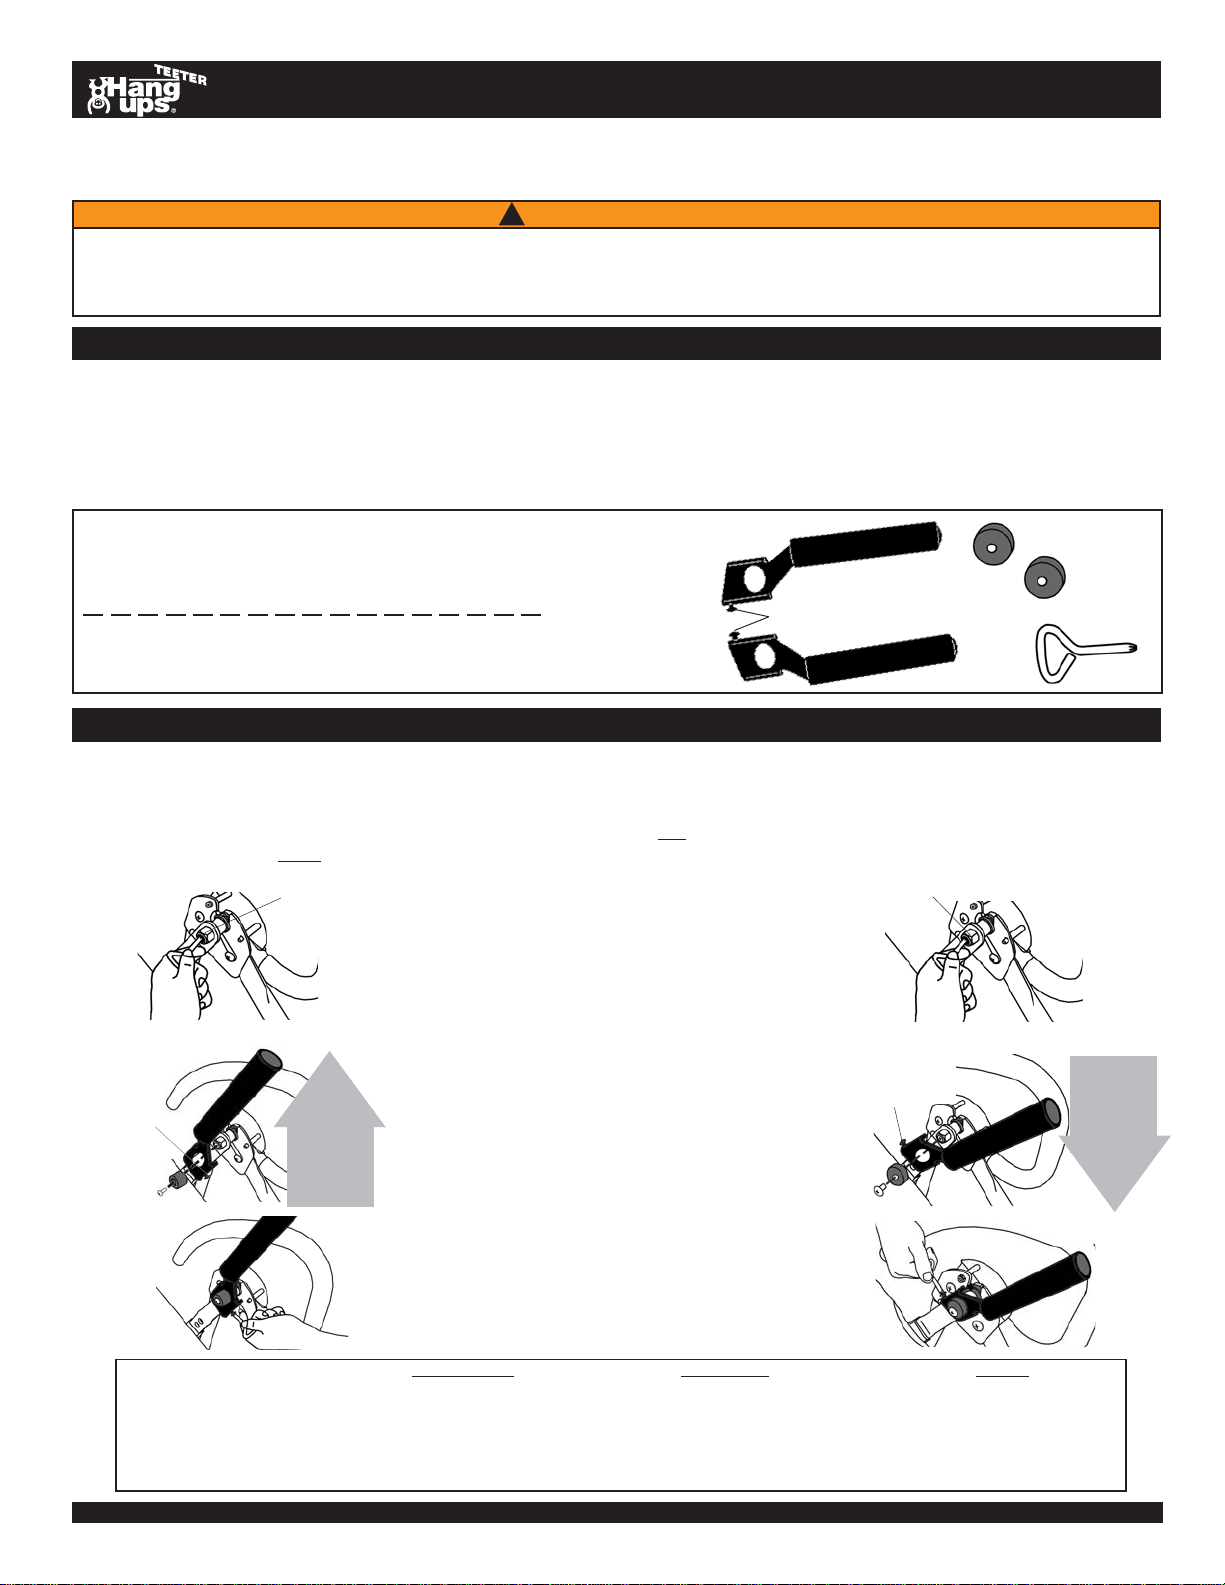
• UsetheScrewdriver(F5-1130)toremovetheRoller
Hinge Screw from the left Roller Hinge Bolt (See
Figure 1 or 1B). Do not discard! You will need this
part to assemble the Traction Handle.
• Place the bracket of the handle over the top of the
RollerHingeBolt,makingsurethattheboltfitsinside
oftheholeinthehandlebracket.Thehandleshould
point away from the table. (See Figure 2A or 2B)
• Placethe BoltCap (F5-1126)over theRoller Hinge
Bolt.
• Reinsert the Roller Hinge Screw into the pre-drilled
hole on the Roller Hinge Bolt and tighten using the
Screwdriver.
• TightentheDe-rattlerScrew. (SeeFigure3Aor3B)
Only tighten the screw until the Traction Handle is
reducedofexcessmovement.Partofthescrewmay
still protrude from the Traction Handle.
• Repeat on the opposite side.
IMPORTANT: The EZ StretchTM Traction Handles are an optional accessory to be used with Teeter Hang Ups®Inversion Tables
and are designed to add stretching and decompression benefits to inversion. It is recommended that you first become
comfortable using the inversion table as instructed in the Owner’s Manual before attempting to utilize the Traction Handles.
This accessory will not interfere with the normal operation of the table.
Note: If your inversion table roller hinges have not been pre-drilled for Traction Handle installation, you may purchase a
Traction Handle Adapter Kit, which comes complete with a set of handles and a set of Roller Hinges.
Figure 1B
ITEMS FORASSEMBLY ITEM #’S
Traction Handles w/ Derattler Screw F5-1124
Bolt Caps (2) F5-1126
Screwdriver F5-1130
F5-1124
F5-1130
De-rattler Screws
BEFORE STARTING to assemble your EZ StretchTM
Traction Handles, remove all the individual parts from
the carton. You should have the following items:
F5-1126
ASSEMBLY
Teeter Hang Ups®EZ StretchTM Traction Handles are designed for the advanced user to achieve maximum
decompression. DO NOT use if you are not comfortable with the stretch achieved during regular inversion.
DO NOT use until you have reviewed all accompanying documents regarding your table and Traction Handles.
Improper use can result in serious injury or death!
WARNING
!
EZ StretchTM Traction Handles are designed with a diagonal off-set to accommodate various arm lengths and desired traction
intensity. The handles can be positioned within closer reach to accommodate users with shorter arms or those who desire greater
traction. For users with longer arms or those who want less of a stretch, the handles can be reversed so that they are positioned
a greater distance from the shoulders. Refer to the drawings on the leftside of the page if you desire a greater stretch or have
shorter arms; follow the right side if you have longer arms or desire a lesser stretch.
RollerHinge Bolt
Figure 3B
RollerHinge Bolt
Figure 2A
Figure 3A
De-rattler
Screw
Figure 1A
De-rattler
Screw
Figure 2B
Traction
Handle
offset
UP
Traction
Handle
offset
DOWN
For information about the Teeter
Hang Ups®5-year warranty, or ifyou
haveany problems assembling the
equipmentor questions about itsuse,
pleasecontact CustomerService at
theappropriate location:
International:
Inversion International, Ltd.
PO Box: AP 59245
New Providence Island, Bahamas
(Phone) +1-242-362-1001
(Fax) +1-242-362-1002
(email) [email protected]
(web) www.InversionInternational.com
USA & Canada:
STL International, Inc.
9902 162nd St. Ct. E.
Puyallup, WA98375
(Phone) 253-840-5252,
(Fax) 253-840-5757
(email) [email protected]
(web)www.STLIntl.com
Europe:
Teeter Ltd.
Cygnet House, Sydenham Road
Croydon, Surrey CR0 2EE, UK
(Phone) +44-20-8667-0060
(Fax) +44-20-8680-3999
(email)mail@TeeterLtd.com
(web)www.TeeterLtd.com
USER INSTRUCTIONS
EZ StretchEZ Stretch
EZ StretchEZ Stretch
EZ StretchTMTM
TMTM
TM Traction HandlesTraction Handles
Traction HandlesTraction Handles
Traction Handles
DO NOT DISCARD - KEEP FOR FUTURE REFERENCE.
TeeterHang Ups®isa registered trademark of STL International,Inc.,InversionInternational, Ltd. and Teeter Ltd. © COPYRIGHT 2006,STLInternational, Inc., Inversion International, Ltd. Teeter Ltd.Item#LF-701709/06-1
Since you have adjusted the Main Shaft to a shorter setting, it is likely that you will be unable
to return upright by simply bringing your arms to your sides.
• Place your hands on the handles for support.
• Bend your knees to shift your body weight to the foot side of the pivot point.
• Do not lift your head or try to sit up.
TractionHandlescanactasa“pushbutton”releasewhenyouarefullyinverted.Tounlockyour
inversion table from the 90 degree position, slide your hands to the outward ends of the
Traction Handles and press firmly. The table bed should begin to rotate upright.
Return Upright:
Push
S T R E T C H
Figure 2
Oscillation is the technique of rocking back and forth for alternate stretching and relaxing. At your ideal height setting, the table
should automatically oscillate as you increase and decrease pressure on the Traction Handles.
• Set table at your ideal height setting specified in your Inversion Table Owner’s Manual.
• Once at a 45 degree angle, alternately increase and decrease pressure on the handles.
Oscillation:
Using the Traction Handles
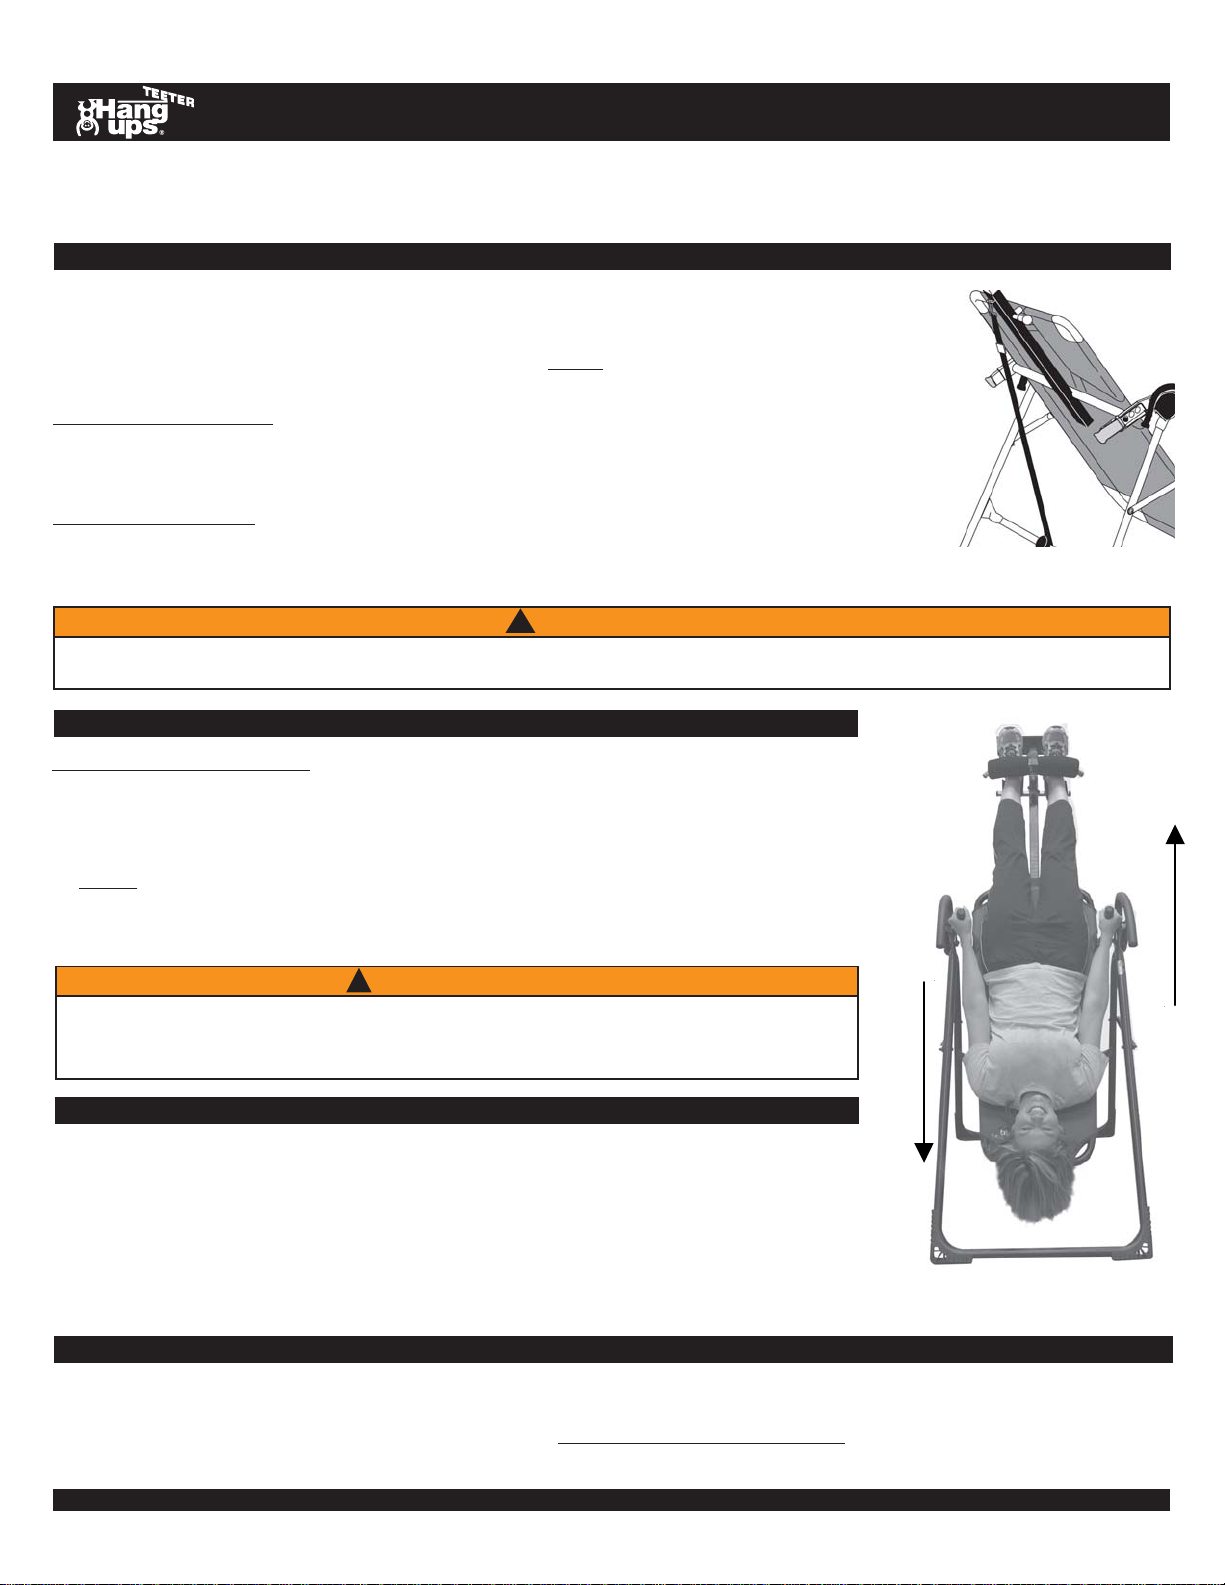
• Once you’ve inverted, slowly reach up toward the Traction Handles.
• Hold onto the Traction Handles. Your elbows should be slightly bent while the rest of your
upperbodyisstillrestingcomfortablyonthebed.Thegreaterthebendinthearms,themore
aggressive the stretch will be.
•Gently push against the handles and slowly straighten your arms (See Figure 2). Take a
deepbreathandexhale,attemptingtorelaxthemusclesinyourlowerback.Ifwhilepushing
you are unable to reach the maximum inversion angle that you desire, you may want to
shorten the Main Shaft an additional inch.
By adjusting your inversion table to a shorter setting the rate of rotation will be MORE responsive.
Use a spotter until you find your ideal setting.
WARNING
!
During Inversion:
Before Use:
Attach the Tether Strap
As you apply pressure to the Traction Handles, the table angle will increase due to weight displace-
ment caused by the spine lengthening. We recommend using the Tether Strap to stop the table at
your desired maximum angle (See Figure 1).
Adjust Height Setting
The ideal height setting for stretching would allow the table to remain inverted while Traction Handles
are in use. You may need to shorten the Main Shaft 1-2 inches (See Owner’s Manual on adjusting).
First try using the Traction Handles at your normal height setting and then adjust if necessary.
The inversion table is like a sensitively balanced fulcrum. By shifting weight to the head end of the
table, you will move in that direction, and vice versa. Your arms will provide most of the weight
needed to rotate the table. This means that if you want to utilize the EZ StretchTM Traction Handles,
you may need to adjust your inversion table so that you do not return upright when you place your
arms at your sides to push on the handles.
Figure 1
DO NOT use aggressive force! Too much traction may cause overstretching that
can stress your back muscles and may result in serious injury!
Stop immediately if you feel any pain!
WARNING
!
This manual suits for next models
2
Table of contents
Other Hang ups Fitness Equipment manuals


Popular Fitness Equipment manuals by other brands


GYM form
GYM form ABS-A-Round PRO instruction manual

Domyos
Domyos PA 150 operating instructions

GoFit
GoFit Broak Benter Training manual

Muscle Hammer
Muscle Hammer GLIDE quick start guide

NordicTrack
NordicTrack Nordic Fitness Chair Assembly, operating and training program

AmazonBasics
AmazonBasics B0753Q2GCX quick start guide