Harbor Freight Tools 93669 User manual

SKU 93669
For technical questions, please call 1-800-444-3353
Page 1
9" Jerky Kit
ASSEMBLY AND OPERATING INSTRUCTIONS
3491 Mission Oaks Blvd., Camarillo, CA 93011
Visit our Web site at http://www.harborfreight.com
Copyright © 2005 by Harbor Freight Tools®. All rights reserved.
No portion of this manual or any artwork contained herein may be reproduced in any shape or form without
the express written consent of Harbor Freight Tools®.
For technical questions and replacement parts, please call 1-800-444-3353
93669
Due to continuing improvements, actual product may differ slightly from the product described herein.

SKU 93669
For technical questions, please call 1-800-444-3353
Page 2
Specifications
Save This Manual
You will need the manual for the safety warnings and precautions, assembly instructions, operating
and maintenance procedures, parts list and diagram. Keep your invoice with this manual. Write the
invoice number on the inside of the front cover. Keep the manual and invoice in a safe and dry place for
future reference.
Safety Warnings and Precautions
WARNING:When using this product, basic safety precautions should always be followed to reduce
the risk of personal injury and damage to equipment.
Read all instructions before using this appliance!
1. Keep your work area clean and well lit. Cluttered benches and dark areas invite accidents.
2. Do not force the product. Use the correct product for your application. The correct product will
do the job better and safer at the rate for which it is designed.
3. Store idle product out of reach of children and other untrained persons. Use of this product by
children must be carefully supervised by responsible adults. This product is not a toy.
4. Maintain this product with care, keeping it clean and in good order. Properly maintained products
are less likely to malfunction or cause damage or injury. Do not use a damaged product.Tag damaged
products “Do not use” until repaired.
5. Check for misalignment or binding of moving parts, breakage of parts, and any other condition
that may affect the product’s operation. If damaged, have the product serviced before using.
Many accidents are caused by poorly maintained products.
6. Use only accessories that are recommended by the manufacturer for your model. Accessories
that may be suitable for one product may become hazardous when used on another.
7. Do not use this product if theTrigger does work properly. Any product that cannot be controlled
with the Trigger is ineffective and must be repaired or replaced.
8. Maintain product in sanitary condition. Since this product is used for food preparation, it must be
maintained in sanitary condition at all times. Do not store the appliance until it has been thoroughly
cleaned. Do not use the product until it has been thoroughly cleaned and sanitized.
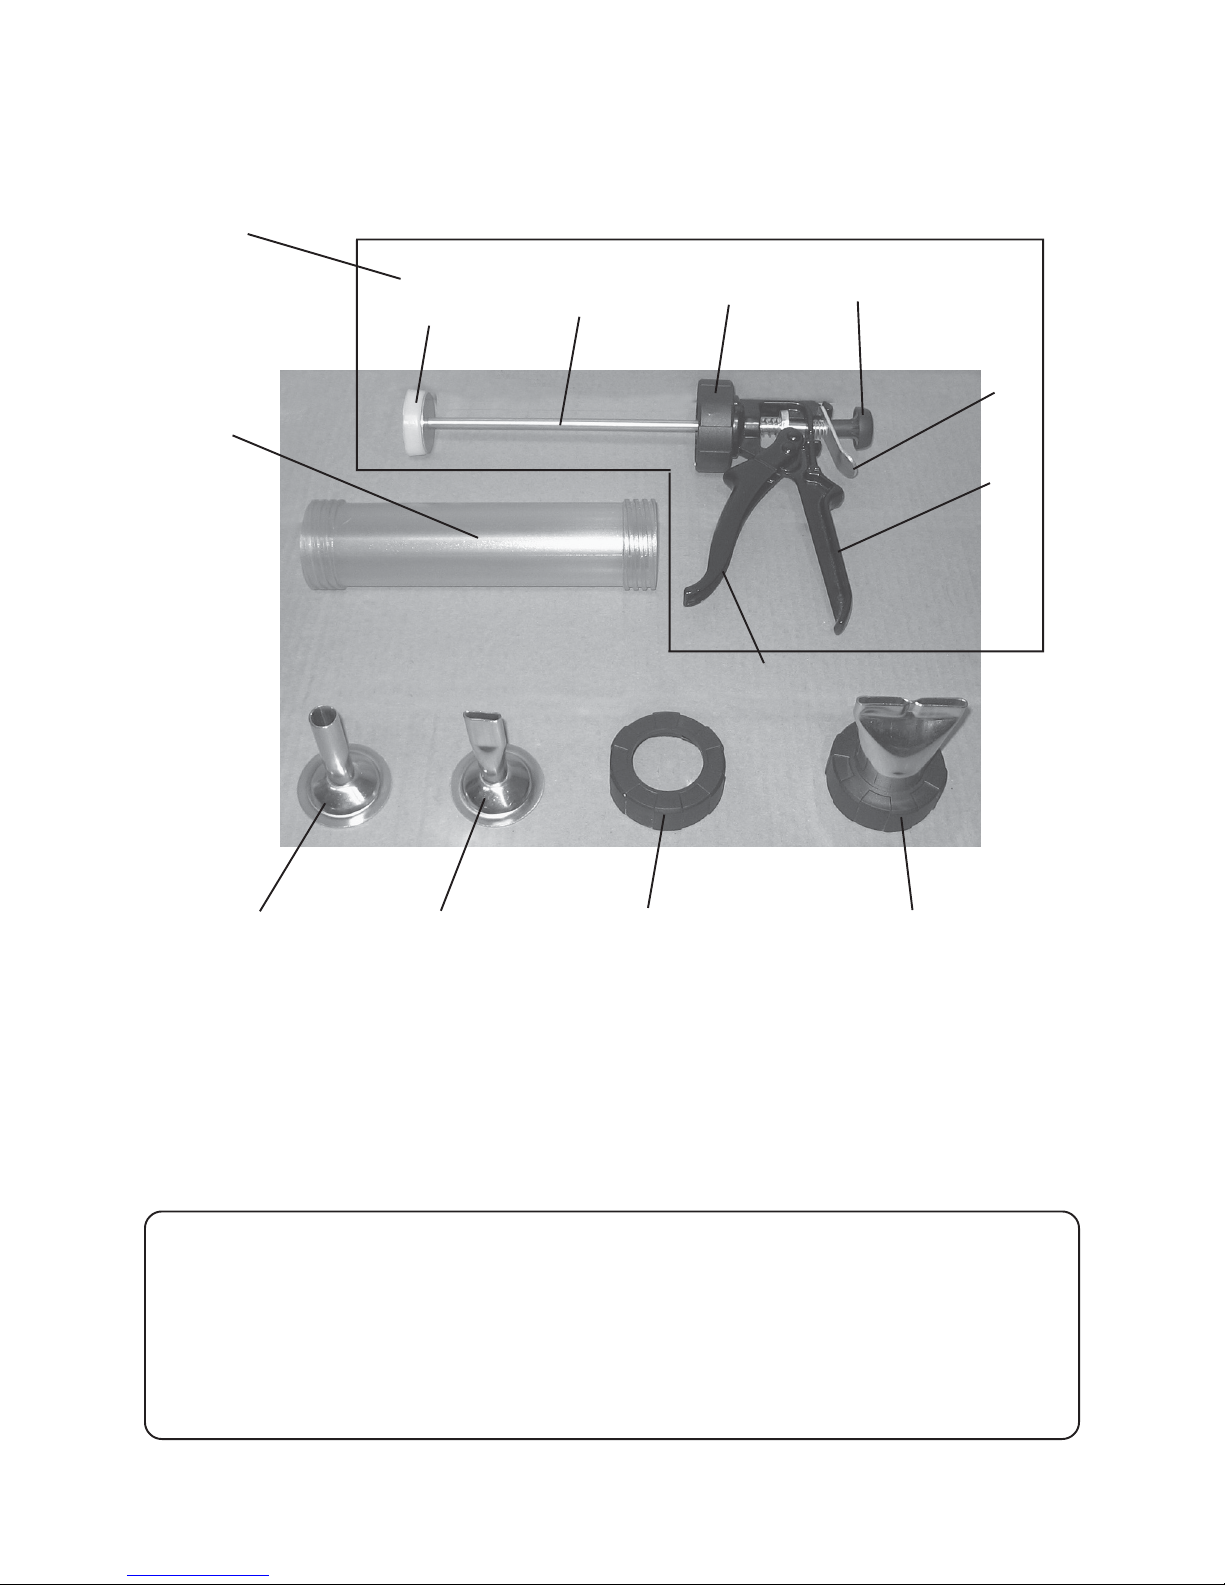
niaM
:noitcurtsnoC
reggirTdnaeldnaHmunimulAtsaC
lerraBdnasralloCenelyhteyloPhtiW
lanoitiddA
:noitcurtsnoC
enelyhteylopsiregnulP
leetssselniatseraspiT
llarevO
:snoisnemiD .maiD"¾-2xH"¼-8xL"71:thgieWteN.sbL0.2
dedulcn
I
:spiT
ykrejtalfrofpittalF)1(
ykrejdnuorrofpitdnuoR)1(
ykrejediwrofpitediwartxE)1(
ydoB
:yticapaC L"4/1-9x.
maiD"61/51-1
WARNING!
Health Risk: Improper meat handling, smoking or storage procedures can cause life threatening disease.
Please see the following website for meat safety http://www.fsis.usda.gov/oa/pubs/jerky.htm Also, any
sawdust used during jerky preparation procedures must be free from any preservatives, paints, etc. Only clean
sawdust from untreated, unpainted, “virgin" firewood should be used.

SKU 93669
For technical questions, please call 1-800-444-3353
Page 3
Specific Safety Rules
Unpacking
When unpacking, check to make sure the following parts are included.
(One) Jerky Extrusion Appliance with Body
(Three) InterchangeableTips including Tip Collar
If any parts are missing or broken, please call Harbor Freight Tools at the number on the cover of
this manual. Assembly
Your Jerky Kit is supplied fully assembled. All you have to install is the selected replaceable Tip. You
should take the assembled kit apart and thoroughly clean it per the instructions on page 4.
1. Select the desired Tip (C, D or E).NOTE: Tip 3 incorporates a Tip Collar.
2. Unscrew the Tip Collar (F) by turning counterclockwise.
3. Place Tip 1 or 2 into the Tip Collar.Tip 3 includes a built-in Collar. Screw the Tip and Tip Collar
Assembly onto the Body (B) by turning clockwise until hand tight. Do not overtighten.
4. To remove or change the Tip, unscrew the Tip Collar by turning counterclockwise.
Main Mechanism (A)
Body (B)
Tip 1 (C) Tip 2 (D) Tip 3 with Tip Collar (E)
Tip Collar (F)
CAUTION! Food Handling procedures:This appliance must not be used unless it has been thoroughly
sanitized. Risk of food contamination and severe personal injury may occur if this product is not properly
sanitized before, during and after use. All food products must be kept properly stored and refrigerated
before, during and after processing with this device. Even smoked meat should be kept refrigerated
during storage. Observe sanitary food handling practices at all times when using this item.

SKU 93669
For technical questions, please call 1-800-444-3353
Page 4
Operation
CAUTION: Before each use, you must thoroughly clean and sanitize the Jerky Kit.
Please refer to http://www.cfsan.fda.gov/~acrobat/fc05-4.pdf for FDA approved cleaning and
sanitizing standards for food handling equipment. NOTE: URL is controlled by the FDA and
may change without notice.
1. To clean your Jerky Kit, first disassemble it.
2. Remove the Tip and Tip Collar by unscrewing the Tip Collar counterclockwise.
3. Remove the Body from the Main Mechanism by unscrewing counterclockwise.
4. Clean and sanitize all components at least to standards prescribed by the U.S. Food and Drug
Administration 2005 Food Code parts 4-6 and 4-7. These standards include thorough cleaning and
chemical or hot water sanitizing procedures. Among these are water washing procedures in which
the item is washed in hot water with an appropriate detergent for at least 30 seconds, and surface
temperature of the item reaches at least 160° F. Dry items thoroughly with a clean cloth.
5. Reassemble the Body onto the main mechanism by screwing it clockwise until tight. Do not
overtighten. Pull the Plunger back into the full retracted position.
6. Prepare a jerky mix using any appropriate recipe of your choice.NOTE: food materials and recipes are
not included with this kit.You are strongly urged to use sanitary food preparation practices when
making a jerky or any other food mix for use with this kit. Please visit www.foodsafety.gov for current
standards and advice regarding safe and sanitary food preparation.
7. Roll the prepared jerky mix into a cylinder shape no larger than 1-7/8” Diameter.Cut the cylinder into
short sections 2-3” long. Insert each section into the Body until nearly filled. Leave at least 1” of the
Body unfilled to allow for compression and shaping of the food material.
8. Insert the selected Tip into the Tip Collar and attach to the Body. Screw the Tip / Tip Collar assembly
onto the Body by turning clockwise until tight. Do not overtighten.
9. Extrude the Jerky mix or other food material onto a clean and sanitary drying surface by squeezing
the Trigger. When the desired length food item is extruded, cut off with a clean utensil, and repeat.
10. Continue to extrude food items until the Jerky Kit is empty. Refill the Jerky Kit and continue the
process until the food mix has been used up.
11. Cover and refrigerate all food materials. Always follow recipe instructions for safe food handling and
storage of the Jerky mix or other food material.
12. Disassemble, clean and sanitize the Jerky Kit. Store it in a clean dry place for future use.
13. Prepare food according to your Jerky recipe.
NOTE: Specific recipes and procedures for food drying or Jerky making are not discussed in this
manual. Please refer to an authoritative source for this information. Sanitary procedures must be
used at all times during food preparation.

SKU 93669
For technical questions, please call 1-800-444-3353
Page 5
Parts List
Maintenance
1. Your Jerky Kit must be cleaned after each use. Food residue can more easily be removed when fresh
than if left for later cleaning. Clean and sanitize your Jerky Kit again before each use.
2. When not in use, store your Jerky Kit in a secure place where it is protected from damp or corrosive
materials, and where it will not be subject to accidental damage.
#traPnoitpircseD#traPnoitpircseD
AylbmessAniaM7-AreggirT
1-AregnulPBydoB
2-AdoRregnulPC1piT
3-AralloCydoBD2piT
4-AbonKregn
ulPE3piT
5-AkcoLregnulPFralloCpiT
6-AeldnaH

SKU 93669
For technical questions, please call 1-800-444-3353
Page 6
Assembly Drawing
PLEASE READ THE FOLLOWING CAREFULLY
THE MANUFACTURER AND/OR DISTRIBUTOR HAS PROVIDED THE PARTS DIAGRAM IN THIS MANUAL AS A REFERENCE
APPLIANCE ONLY. NEITHER THE MANUFACTURER NOR DISTRIBUTOR MAKES ANY REPRESENTATION OR WARRANTY
OF ANY KIND TO THE BUYER THAT HE OR SHE IS QUALIFIED TO MAKE ANY REPAIRS TO THE PRODUCT OR THAT HE
OR SHE IS QUALIFIED TO REPLACE ANY PARTS OF THE PRODUCT. IN FACT, THE MANUFACTURER AND/OR
DISTRIBUTOR EXPRESSLY STATES THAT ALL REPAIRS AND PARTS REPLACEMENTS SHOULD BE UNDERTAKEN BY
CERTIFIED AND LICENSED TECHNICIANS AND NOT BY THE BUYER. THE BUYER ASSUMES ALL RISK AND LIABILITY
ARISING OUT OF HIS OR HER REPAIRS TO THE ORIGINAL PRODUCT OR REPLACEMENT PARTS THERETO, OR
ARISING OUT OF HIS OR HER INSTALLATION OF REPLACEMENT PARTS THERETO.
NOTE: Some parts are listed and shown for illustration purposes only and are not available individually as
replacement parts.
A
A-1 A-2 A-3 A-4
A-5
A-6
A-7
B
CDFG
Table of contents
Other Harbor Freight Tools Kitchen Appliance manuals

Harbor Freight Tools
Harbor Freight Tools 63146 Assembly instructions

Harbor Freight Tools
Harbor Freight Tools 98412 User manual

Harbor Freight Tools
Harbor Freight Tools 92049 User manual

Harbor Freight Tools
Harbor Freight Tools 93001 User manual

Harbor Freight Tools
Harbor Freight Tools 91611 User manual

Harbor Freight Tools
Harbor Freight Tools 41420 Quick reference guide

Harbor Freight Tools
Harbor Freight Tools 66906 Parts list manual

Harbor Freight Tools
Harbor Freight Tools 99871 User manual

Harbor Freight Tools
Harbor Freight Tools 42787 Installation manual

Harbor Freight Tools
Harbor Freight Tools 66928 Parts list manual