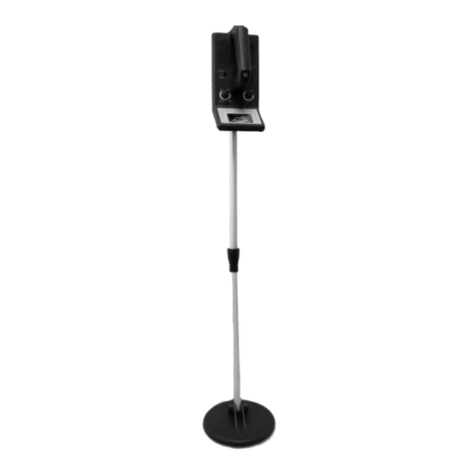
Harbor Freight Tools 98760 Installation manual

METAL DETECTOR
98760
SET UP AND OPERATING INSTRUCTIONS
Distributed exclusively by Harbor Freight Tools®.
3491 Mission Oaks Blvd., Camarillo, CA 93011
Visit our website at: http://www.harborfreight.com
Read this material before using this product.
Failure to do so can result in serious injury.
SAVE THIS MANUAL.
Copyright©2008 by Harbor Freight Tools®. All rights reserved. No portion of this manual or any artwork
contained herein may be reproduced in any shape or form without the express written consent of
Harbor Freight Tools. Diagrams within this manual may not be drawn proportionally. Due to continuing
improvements, actual product may differ slightly from the product described herein. Tools required for
assembly and service may not be included.
For technical questions or replacement parts, please call 1-800-444-3353.

SKU 98760 For technical questions, please call 1-800-444-3353. Page 2
SAVE THIS MANUAL
Keep this manual for the safety warn-
ings and precautions, assembly, operat-
ing, inspection, maintenance and cleaning
procedures. Write the product’s serial
number in the back of the manual near the
assembly diagram (or month and year of
purchase if product has no number). Keep
this manual and the receipt in a safe and
dry place for future reference.
IMPORTANT SAFETY
INSTRUCTIONS
In this manual, on the labeling,
and all other information
provided with this product:
This is the safety alert
symbol. It is used to alert
you to potential personal
injury hazards. Obey all
safety messages that
follow this symbol to avoid
possible injury or death.
DANGER indicates
a hazardous
situation which, if not
avoided, will result in death or
serious injury.
WARNING
indicates a
hazardous situation which, if
not avoided, could result in
death or serious injury.
CAUTION, used
with the safety
alert symbol, indicates a
hazardous situation which, if
not avoided, could result in
minor or moderate injury.
NOTICE is used to
address practices
not related to personal injury.
CAUTION, without
the safety alert
symbol, is used to address
practices not related to
personal injury.
When using this
Metal Detector,
basic safety precautions
should always be followed to
reduce the risk of personal
injury, including the following:
READ ALL INSTRUCTIONS
Personal Safety
1. Wear ANSI-approved
safety goggles and heavy-
duty work gloves. Use
face or dust mask if operation is
located in dusty area.
Stay Alert2. - Watch what you are
doing. Use common sense. Do not
operate this Metal Detector when you
are tired.
DO NOT use this Metal Detector if3.
under the inuence of alcohol or
drugs. Read warning labels on pre-
scriptions to determine if your judge-
there is doubt, do not operate this
Metal Detector.
Avoid electrical shock.4. Metal
detector may discover underground
power lines, explosives and/or other
items which could cause personal
injury. DO NOT use this product in
areas where there might be under-

SKU 98760 For technical questions, please call 1-800-444-3353. Page 3
ground electric lines, or pipes buried
in shallow depth. NEVER search
in military zones where any type of
explosive may be buried. Avoid strik-
ing any line and/or conduit known
or suspected to be carrying electric
power. Do not search over any pipe-
line, particularly if it could contain a
uncertain conditions, use reasonable
caution before using the Metal Detec-
tor. IF THERE IS ANY QUESTION
OF SAFETY, DO NOT USE THIS
METAL DETECTOR.
Use and Care
Handle the Metal Detector care-1.
fully. Dropping can cause damage to
circuit boards and/or the case, which
can cause the Metal Detector to fail,
or work improperly.
Avoid Dangerous Environments - Do2.
not use in damp or wet locations.
Only use and store this Metal Detec-3.
tor in normal temperature environ-
ments. Extremes in temperature can
shorten the effectiveness of any elec-
tronic device and/or damage plastic
parts.
When servicing, use only identical4.
replacement parts.
Do not use this Metal Detector for5.
any purpose except that for which it is
intended.
6.
in dry place and keep out of the reach
of children.
Maintain Metal Detector with care.7.
Follow instructions. Keep the Search
Coil clean. The Search Coil is water-
proof and may be washed.
Do not8. submerge the Control Hous-
ing. Protect the Control Housing from
rain and blowing surf or heavy mist.
Wipe the aluminum Stem clean after
use in sandy areas.
Check for Damaged Parts - Before9.
further use of the Metal Detector,
check for breakage of parts, and any
other condition that may affect its op-
eration. A part that is damaged should
be properly repaired or replaced by a
elsewhere in this manual.
Maintain labels and nameplates on10.
the Metal Detector. These carry
-
readable or missing, contact Harbor
Freight Tools for a replacement.
The warnings, precautions, and in-11.
structions discussed in this instruction
manual cannot cover all possible con-
ditions and situations that may occur.
that common sense and caution are
factors which cannot be built into this
product, but must be supplied by the
operator.
SAVE THESE
INSTRUCTIONS.

SKU 98760 For technical questions, please call 1-800-444-3353. Page 4
SPECIFICATIONS
Construction
Materials
Housing, Support Arm, Meter
Housing and Search Coil: PVC
Thermoplastic.
Stem: 2-Piece Aluminum Shaft.
Earphone Port 1/8” Diameter Jack. Earphones
not supplied.
Adjustable
Length
31” Minimum, 43” Maximum
(Overall).
Power Source 6-AA Batteries 1.5V (Not
Supplied).
Search Coil
Adjustment 180°
UNPACKING
When unpacking, check to make sure
any parts are missing or broken, please
call Harbor Freight Tools at the number
shown on the cover of this manual as soon
as possible.
SET UP INSTRUCTIONS
Read the ENTIRE IMPORTANT
SAFETY INSTRUCTIONS
section at the beginning of this
manual including all text under
subheadings therein before set
up or use of this product.
TO PREVENT
ACCIDENTAL
OPERATION:
Turn the Power Switch of the
Metal Detector to its “OFF”
before making any
adjustments.
ASSEMBLY
NOTE: There is NO assembly required for
this Metal Detector.
OPERATING INSTRUCTIONS
Read the ENTIRE IMPORTANT
SAFETY INFORMATION section
at the beginning of this manual
including all text under
subheadings therein before set
up or use of this product.
Before operating the Metal Detector,1.
and other safety gear. Safety gog-
gles and other safety gear are sold
separately.
Turn off the Volume Control.2.
Figure 1
Battery
Compartment
Cover (37)
Battery Com-
partment (36)
3.
Battery Compartment (36) is located
on the underside of the Control
Housing (9,17). Remove the Battery
-
ing careful to follow the Plus (+), and
minus (-) polarity markings inside the
Battery Compartment (36). Replace
the Battery Compartment Cover (37).
See Figure 1, above.

SKU 98760 For technical questions, please call 1-800-444-3353. Page 5
NOTE:4. Always remove old batteries
if the Metal Detector will be unused
for a prolonged period of time. Bat-
teries can leak chemicals that can
damage and/or destroy electronic
parts.
NOTE:5. Use only fresh AA batteries.
DO NOT mix old and new batteries.
DO NOT mix standard and recharge-
able batteries. Always dispose of old
batteries in accordance with all local
and federal regulations.
Control Functions
Power Switch: Thumb Dial Marked:1.
ON/OFF, Volume and Direction Ar-
row.
Audio Buzzer: Earphone Jack.2.
SENS (Sensitivity) Dial: Twist Marked3.
4.
5.
Search Coil, Stem Arm and
Controls Adjustment
Adjust the Search Coil (33). Loosen1.
Stem Arm (26) located just above the
Search Coil (33). Adjust the Search
Coil (33) to the desired angle (parallel
with the ground). Tighten the Knobs
just enough to keep the Search Coil
(33) from rotating or wobbling.
Adjust the Stem Arm (24,26) to the2.
correct height. You want to be able
to stand comfortably upright with the
Search Coil (33) able to sweep the
ground from side to side at a level of
1/2” to 2” from the ground with your
arm relaxed at your side. Twist the
Lock Nut Cover (29) that holds the
two sections of the Stem Arm (24,26)
together clockwise to loosen. Then
desired length and twist the Lock Nut
Cover (29) counterclockwise to lock
the stem. Do not overtighten. See
Figure 2 below.
Counterclockwise to tighten
Figure 2
Test the Metal Detector by laying3.
coins (copper, nickel or silver) on the
ground. You can also lay gold, brass,
tin or steel or any metal that you wish
to detect. Sweep the Search Coil
(33) just above the items and set the
Adjust the Volume to a comfortable4.
level. NOTE: You can extend the life
of your batteries by using earphones
(not supplied). Earphones also make
it easier to distinguish subtle changes
in the sounds you are hearing for
better detection results as well as for
blocking out some of the area noise.
Clockwise to loosen Lock Nut Cover (29)

SKU 98760 For technical questions, please call 1-800-444-3353. Page 6
5.
(not supplied), test and set the vol-
ume at its lowest setting before at-
tempting to search for objects. This
will prevent the possibility of hurting
your ears while using your Metal
Detector.
Set the SENS (Sensitivity) Dial (13)6.
clockwise for higher sensitivity. Set
the needle on the View Meter (5) to
“8” when the Search Coil (33) is di-
rectly above the metal it is detecting.
Take a different reading for each type
of metal.
View Meter (5) Earphone Jack (35)
Figure 3
7.
mode for sensing anything metallic
(ferrous or non-ferrous) within range
of the Detector. All Metal is the best
mode to discriminate between types
of metal.
NOTE:8. You will ordinarily set the
looking for. (See Table 1 for sample
readings, below.)
Table 1
Setting of
Metal Detected
Near 11:00
Near 12:00 Nickel Coin, Alu-
minum Pull Tab
Near 13:00 Zinc Coin
Near 15:00 Coper Coin
are based on a 24 hour clock (military
time). 12:00 would be straight up.
be pointed to the right center. By
Dial (15) is set when various metals
are detected, you can understand
metals. (See Step 7 of this section
for testing ideas.)
This Metal Detector will also search9.
in shallow water. The Search Coil is
waterproof. NOTE:
Coil with fresh water afterward to
prevent corrosion.

SKU 98760 For technical questions, please call 1-800-444-3353. Page 7
Using the Metal Detector to
Search
1.
mode, and the SENS Dial (13) to
“high” position (the larger white dots).
Hold the Search Coil (33) parallel2.
with the ground about 1” above the
surface. Sweep the Search Coil (33)
from side to side in a 3” arc.
When the Metal Detector detects a3.
buried metal object, it sounds a beep.
Make a visual note of the exact
spot on the ground where the beep
sounds.
Move the Search Coil (33) forward4.
and away from you and straight back
towards you a few times while ro-
away from All Metal, until the unit
does not beep.
You can then identify what type of5.
metal has been detected according to
The reading on the View Meter (5)6.
will read higher for larger deposits of
metal.
7.
Metal Detector, turn it off. Clean the
exterior surfaces with a soft cloth,
then store it indoors in a dry place,
out of the reach of children.
Listening Safely
Set the volume to lowest setting1.
before you begin listening. After you
begin, adjust the volume to a comfort-
able level.
2. WARNING: Do not listen at extremely
high volume levels. Extended high
volume can lead to partial or perma-
nent hearing loss.
MAINTENANCE AND
SERVICING
Procedures not specically
explained in this manual
must be performed only by a
qualied technician.
TO PREVENT
SERIOUS INJURY:
Do not use damaged
equipment. If anything
abnormal occurs, have the
problem corrected before
further use.
Cleaning and Maintenance
BEFORE EACH USE,1. inspect the
general condition of the Metal Detec-
tor. Check for loose screws, miss-
ing parts, cracked or broken parts,
damaged electrical wiring, and/or
any other condition that may affect its
safe operation.
AFTER USE,2. clean external surfaces
of the Metal Detector with soft, clean
cloth.

SKU 98760 For technical questions, please call 1-800-444-3353. Page 8
Troubleshooting
Problem Possible Causes Likely Solutions
Metal Detector will not
turn on
Old or worn batteries.1. Check battery position for correct1.
polarity.
Replace with fresh batteries of2.
similar type.
No response to any
metal
Battery voltage too low.1.
Defective meter.2.
Check and replace batteries.1.
2.
necessary, replace. Have all work
Follow all safety precautions whenever diagnosing or servicing the
appliance. Disconnect power supply before service.
PLEASE READ THE FOLLOWING CAREFULLY
PARTS LIST
Part Description Q’ty
1 PCB 1
2 2
3 Nut M3 2
4 LED 1
5 View Meter 1
6 Washer 3mm 2
7 2
8 Control Panel 1
9 Support Arm (Right Side) 1
10 Nut M4 4
11 4
12 1
13 SENS Dial 1
14 Knobs 2
15 1
16 Speaker 1
17 Support Arm (Left Side) 1
18 2
19 Cap 1
PARTS LIST
Part Description Q’ty
20 Left Arm Rest Support 1
21 3
22 Right Arm Rest Support 1
23 Support Arm Adjustment Knob 1
24 Outer Stem 1
25 Washer 1
26 1
27 1
28 Lock Nut Exterior 1
29 Lock Nut Cover 1
30 Bushing 1
31 Coil Button (Nut) 1
32 Coil Button (Screw) 1
33 Search Coil 1
34 Support Arm Pad 1
35 Earphone Jack 1
36 Battery Compartment 1
37 Battery Compartment Cover 1

SKU 98760 For technical questions, please call 1-800-444-3353. Page 9
ASSEMBLY DIAGRAM
Record Product’s Serial Number Here:
Note:
Note: Some parts are listed and shown for illustration purposes only, and are not avail-
able individually as replacement parts.
Table of contents
Other Harbor Freight Tools Metal Detector manuals

Harbor Freight Tools
Harbor Freight Tools 67378 Assembly instructions

Harbor Freight Tools
Harbor Freight Tools 62307 Original instruction manual

Harbor Freight Tools
Harbor Freight Tools 43150 User manual

Harbor Freight Tools
Harbor Freight Tools 43149 User manual

Harbor Freight Tools
Harbor Freight Tools 67378 Installation manual

Harbor Freight Tools
Harbor Freight Tools 43149 Installation manual