HARDKORR HKPACDC15A User manual

V1.0 - 8.2023
INSTRUCTION MANUAL
AC BATTERY CHARGER
• HKPACDC15A • HKPACDC25A

2WELCOME TO HARDKORR
In doing so, you now have the assurance and peace of mind that comes from
purchasing a product manufactured to the highest quality standards.
Our aim is for you to be completely satisfied with your purchase, and therefore your
new Hardkorr product is backed by a comprehensive warranty and an outstanding
after-sales customer service team.
We hope you will enjoy using this product for many years to come.
If you require technical support, or in the unlikely event your purchase appears to be
faulty, please contact our support team for immediate assistance. Contact details for
each country are contained within this user guide.
CONGRATULATIONS ON
PURCHASING THIS HIGH QUALITY
HARDKORR PRODUCT.
-the HARDKOrR TEaM

3CONTENTS
For assistance with assembly or installation, parts and service, please visit www.hardkorr.com or
contact customer service through the following:
Toll Free:
1800 533 544
Monday - Friday
9AM - 4PM (AEST)
Language spoken: English
support@hardkorr.com
DISCLAIMER
While caution has been taken to ensure the accuracy of the contents of this guide, Hardkorr assumes
no responsibility for errors or omissions. Please note that specifications and product functionality may
change without notice.
SAFETY INSTRUCTIONS 4
PRODUCT OVERVIEW 5
SPECIFICATIONS 6
OPERATION 7
TROUBLESHOOTING & MAINTENANCE 9
WARRANTY INFORMATION 10
CONTENTS

4SAFETY INSTRUCTIONS
DANGER
Ensure you read and understand all safety information before using this product. Failure to
follow safety instructions may result in electrical shock, fire or explosion.
• Children, those without the proper training or experience, or those under the influence of drugs or
alcohol should not operate this unit.
• This product is only to be used to charge undamaged 12V lead-acid AGM, LiFePO4, SLA, and
Calcium batteries. Incompatible or damaged batteries can explode if used with this charger.
• This product is an electrical device that can cause shock and serious injury. Do not allow the
charger to come into contact with water in any way, and do not cut the power cord.
• This product is designed to operate in ambient temperatures between -20°C and 45°C. Do not
operate outside of this temperature range. Do not use this product to charge a frozen battery.
Discontinue use if battery becomes excessively warm.
• Do not attempt to disassemble, modify or repair the charger. This will void your warranty and
may increase the risk of electric shock or fire. If your charger becomes damaged or malfunctions,
immediately cease use and contact Hardkorr.
• To reduce risk of damage to the electric plug and cord, pull by plug rather than cord when
disconnecting the charger. Make sure the cord is located so that it will not be stepped on, tripped
over, or otherwise subjected to damage or stress.
• When using this charger with an extension lead ensure the cord has the same number, size and
shape pins as the charger and that the cord is properly wired and in good condition
• If the charger or leads appear damaged, do not operate the charger.
• Do not use this product with accessories that are not recommended or sold by Hardkorr. Using such
accessories may result in a risk of fire or electric shock.
• Metals can cause a battery to spark or short circuit when they come in contact with the battery
terminals. Exercise caution when using tools or metal objects around the battery.
• When inspecting or cleaning the unit/battery connected to the charger, ensure that the charger is
disconnected from 240V power.
• Some batteries contain explosive gases. Before charging or using your battery, it is important you
read your battery’s user manual.
• Using the incorrect charging setting can be harmful to your battery and may reduce the lifespan of
your battery as a result. Use only the recommended charging setting for your battery.
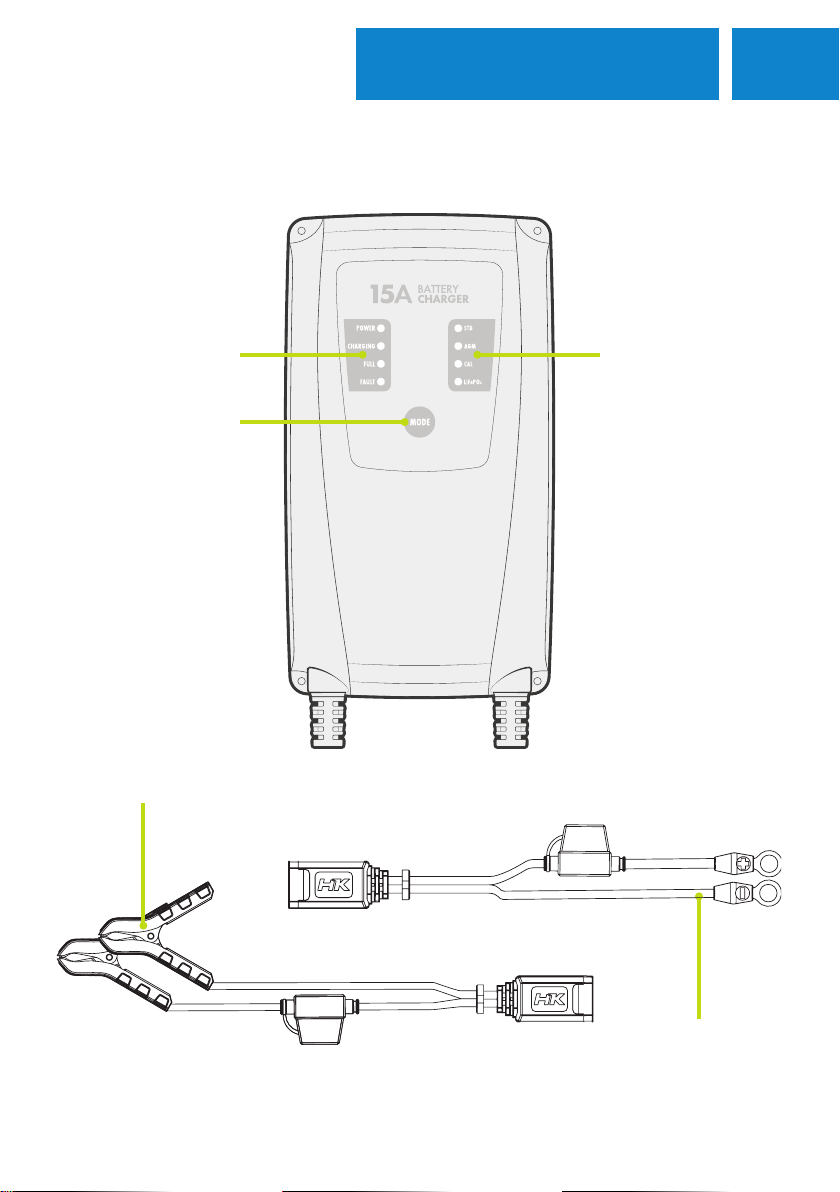
5PRODUCT OVERVIEW
Layout applies to both 15A (shown) and 25A models
Charging status Selected program
Mode button
Battery clamps cable
Eyelet cable

6SPECIFICATIONS
SPECIFICATIONS HKPACDC15A HKPACDC25A
INPUT VOLTAGE 220-240V, 50 Hz
CHARGE CURRENT 12V/15A 12V/25A
EFFICIENCY > 90%
BATTERY COMPATIBILITY 12V LiFePO4, AGM, SLA, Calcium
MAX VOLTAGE STD - 14.4V; AGM - 14.7V; CAL - 15.5V; LiFePO4 - 14.4V
STANDBY CONSUMPTION 3.8W
BACK CURRENT DRAIN 0.7mA/hr
OPERATING TEMPERATURE -25°C to 45°C
IP RATING IP20
DIMENSIONS (MM) 217 (L) x 108 (W) x 62 (D) 241 (L) x 133 (W) x 65 (D)
CERTIFICATIONS
AS/NZS 60335.1:2020+A1:2021
AS/ NZS 60335.2.29:2017+A1:2020
AS/NZS 3112:2017, AS/NZS 3100:2017
CHARGE ALGORITHM

7OPERATION
CONNECTING THE CHARGER
CHARGING THE BATTERY
IF YOUR BATTERY IS INSIDE A VEHICLE:
IF YOUR BATTERY IS NOT INSIDE A VEHICLE:
1. Position cables to ensure they are clear of doors, hood and engine components which could cause
damage to the cables.
2. Ensure you know which is the positive and which is the negative battery terminal.
3. Determine which battery terminal is grounded to the chassis. Generally (but not always) the
negative terminal is grounded.
4. For negative-grounded vehicles, connect the positive (red) battery clamp or ring terminal to the
positive terminal of the battery. Connect the negative (black) battery clamp or ring terminal to the
vehicle’s chassis, away from the battery, fuel lines or moving parts.
5. For positive-grounded vehicles, connect the negative (black) battery clamp or ring terminal to the
negative terminal of the battery. Connect the positive (red) battery clamp or ring terminal to the
vehicle’s chassis, away from the battery, fuel lines or moving parts.
6. Connect the battery to a suitable AC power socket, and check that the POWER LED light
illuminates.
1. Ensure you know which is the positive and which is the negative battery terminal.
2. Connect the positive (red) battery clamp or ring terminal to the positive terminal of the battery.
3. Connect the negative (black) battery clamp or ring terminal to the negative terminal of the battery.
4. Connect the charger to a suitable AC power socket, and check the POWER LED light illuminates.
1. Select the appropriate charge program by pressing the MODE button repeatedly until the LED light
next to your suited battery program is illuminated. Note: If only the POWER LED light is lit, it means
the charger is in standby mode.
2. Once a charge mode is selected, after a couple of seconds the charger will commence operation
and the CHARGE LED light will illuminate.
3. You can stop charging at any time by pressing the MODE button until the charger returns to
standby mode.
4. The charger has a memory function and will remember your program setting even if disconnected.

8OPERATION (CONT)
DISCONNECTING THE CHARGER
LITHIUM BATTERY BMS WAKEUP
LED INDICATORS
IF YOUR BATTERY IS INSIDE A VEHICLE:
IF YOUR BATTERY IS NOT INSIDE A VEHICLE:
1. Turn off the AC power at the switch and remove the AC cable from the socket.
2. Disconnect the battery clamp or ring terminal from the vehicle chassis.
3. Disconnect the battery clamp or ring terminal from the battery terminal.
This charger is equipped with the ability to wake-up a lithium battery BMS that is in protection (sleep)
mode. Simply connect the charger to the sleeping battery and it will automatically deliver special
small-current pulses until the battery has recovered enough to be charged normally.
1. Turn off the AC power at the switch and remove the AC cable from the socket.
2. Disconnect the battery clamp or ring terminal from the negative terminal of the battery.
3. Disconnect the battery clamp or ring terminal from the positive terminal of the battery.
LED LIGHT
STATUS
POWER CHARGING FULL FAULT STD/AGM/
CAL/LIFEPO4
ON OFF OFF OFF OFF Powered on, in Standby
mode.
ON ON OFF OFF ON Charging the battery.
ON OFF ON OFF ON Float charging the battery.
ON OFF OFF ON ON The charger has detected
a fault.

9
TROUBLESHOOTING &
MAINTENANCE
TROUBLESHOOTING
MAINTENANCE
If the fault light is illuminated, it will be due to one of three potential faults: reverse polarity, short circuit,
or over temperature. Faults can be identified and resolved using the following procedure:
1. Immediately disconnect the AC plug and clamps/ring terminals, taking care to follow correct
procedure (see page 8).
2. Feel the body of the charger to see if it has become excessively warm. If so, it is likely that the
over-temperature protection was activated. Allow the charger to cool before reconnecting.
Consider whether it is necessary to move the charger to a different location to prevent it
overheating again.
3. If it does not appear to be a temperature issue, try to reconnect the charger, taking care to
observe correct polarity. If the fault then appears to be resolved, it is likely that the reverse
polarity protection circuit was activated.
4. If the charger again displays the fault light after reconnection, and you are certain that the
clamps/eyelets are connected correctly, there may be a short circuit. Immediately discontinue use
of the battery charger and contact Hardkorr for further advice.
Follow these basic maintenance procedures to ensure your charger remains in optimum condition and
delivers years of dependable service.
1. After each use, wipe off the battery charger clamps or ring terminals and charger body with a
clean, damp cloth. A mild soap solution may be used if required.
2. Keep the charger cables loosely coiled during storage to prevent damage. We do not
recommend winding them around the charger body.
3. Store the charger in a cool, dry place.
4. Prior to next use, examine the charger cables, clamps and ring terminals to ensure they are free
of obvious damage. If any damage is apparent, do not use the charger. Contact Hardkorr for
further advice.

10 WARRANTY
TO BEGIN A WARRANTY CLAIM:
Our goods come with guarantees that cannot be excluded under the Australian Consumer Law. You
are entitled to a replacement or refund for a major failure and compensation for any other reasonably
foreseeable loss or damage. You are also entitled to have the goods repaired or replaced if the goods
fail to be of acceptable quality and the failure does not amount to a major failure.
Hardkorr warrants that this product will be free from defects in material and workmanship for two years.
The warranty commences on the date of purchase by the original purchaser, and is not transferable.
To access the benefits of this warranty, you must retain your proof of purchase and follow any other
direction we reasonably give you (e.g. completing and returning your warranty card if applicable).
If you believe your Hardkorr product is defective, it must be returned to Hardkorr for inspection by our
warranty claims department.
1. You must have a Return Authorisation (RA) number. To get your RA number, please complete the
form found on our website and wait for the warranty team to contact you.
2. Once you have an RA number, you must arrange for the product must be shipped at your own
expense back to Hardkorr (keep your receipt). The address for shipment will be provided when we
issue your RA number.
3. Please be sure that your RA number is clearly marked on the outside of the packaging used for
shipping.
Completing the steps as mentioned will ensure a faster process of your claim, so that Hardkorr can get
your product back to you as soon as possible.
Once we receive your returned product, our technicians will inspect it. We will then notify you of the
outcome of your claim.
If we accept your warranty claim, we will either repair, replace or refund the goods at our discretion. We
will also reimburse you for the shipping costs you incurred in sending the goods back to us. Any products

11WARRANTY
DISCONTINUED ITEMS
that we choose to replace or refund become the property of Hardkorr.
If we do not accept your claim, we will advise you of the reason and hold your product for collection.
You will need to arrange and pay for the product to be shipped back to you. If your product is not
collected within 30 days of your warranty claim being finalised, we may destroy it.
Your warranty is voided if we (at our sole discretion) determine that there is evidence of one or more of
the following:
Negligence: Improper installation, improper or extreme use, use that contravenes this instruction
manual, etc.
Abuse: Road hazards, Damage beyond the limits of “normal wear and tear.”
Unauthorised Repair: Repair service performed by an unauthorised service centre.
Disassembly: Any attempt to open, tamper with or otherwise compromise the integrity of the product.
Consequential damage: Damage to this product caused by the failure of another component of the
vehicle or device in which this product is installed.
Note regarding exterior finishes: Hardkorr uses the highest quality materials available, but depending on
location, environment and exposure, the colour of exterior surfaces can fade. We will not approve any
warranty claims that relate to fade.
Discontinued items that are still under warranty will be reviewed by Hardkorr. If a discontinued item is
covered under warranty it may be replaced by an equivalent or superior item. If an equivalent item is not
available Hardkorr will determine terms of resolution on a case-by-case basis.

This manual suits for next models
1
Other HARDKORR Batteries Charger manuals


