manuals.online logo
Brands
  1. Home
  2. •
  3. Brands
  4. •
  5. Jamara
  6. •
  7. Batteries Charger
  8. •
  9. Jamara Lipo 20 User manual

Jamara Lipo 20 User manual

46/20
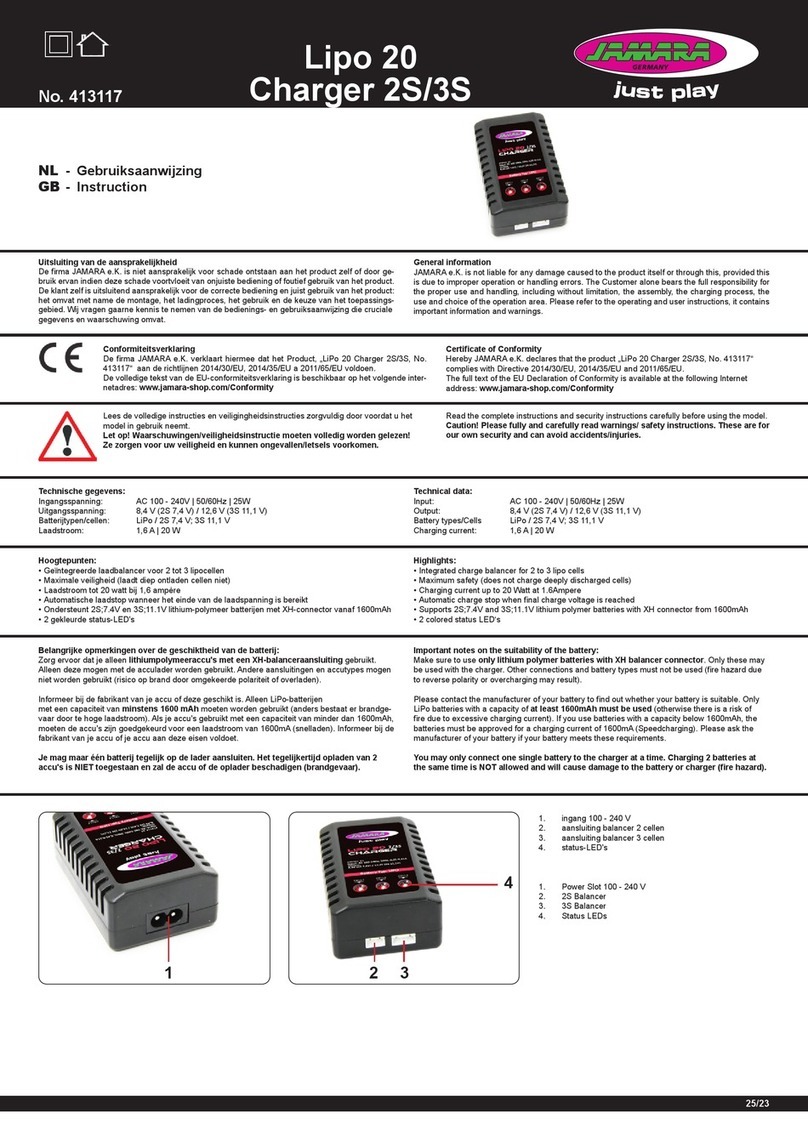
Lipo 20
Charger 2S/3S
No. 413117
1 2 3
4
Dichiarazione di conformità
Con la presente JAMARA e.K. dichiara che il prodotto‚ „LiPo 20 Charger 2S/3S,
No. 413117“ è conforme alla Direttiva 2014/30/UE, 2014/35/UE e 2011/65/UE.
Il testo integrale della dichiarazione di conformità UE è disponibile al seguente indirizzo
Internet: www.jamara-shop.com/Konformitaet
Certicate of Conformity
Hereby JAMARA e.K. declares that the product „LiPo 20 Charger 2S/3S, No. 413117“
complies with Directive 2014/30/EU, 2014/35/EU and 2011/65/EU.
The full text of the EU Declaration of Conformity is available at the following Internet
address: www.jamara-shop.com/Conformity
IT - Allgemeine Hinweise
JAMARA e. K. übernimmt keine Haftung für Schäden, die an dem Produkt selbst oder durch dieses
entstehen, sofern diese auf falsche Bedienung oder Handhabungsfehler zurückzuführen sind. Der
Kunde allein trägt die volle Verantwortung für die richtige Bedienung und Handhabung; dies umfasst
insbesondere die Montage, den Ladevorgang, die Verwendung bis hin zur Wahl des Einsatzberei-
ches. Bitte beachten Sie hierzu die Bedienungs- und Gebrauchsanleitung, diese enthält wichtige
Informationen und Warnhinweise.
GB - General information
JAMARA e.K. is not liable for any damage caused to the product itself or through this, provided this
is due to improper operation or handling errors. The Customer alone bears the full responsibility for
the proper use and handling, including without limitation, the assembly, the charging process, the
use and choice of the operation area. Please refer to the operating and user instructions, it contains
important information and warnings.
Dati tecnici:
Input: AC 100 - 240V | 50/60Hz | 25W
Output: 8,4 V (2S 7,4 V) / 12,6 V (3S 11,1 V)
Tipo batteria/Celle: LiPo / 2S 7,4 V; 3S 11,1 V
Corrente di carica: 1,6 A | 20 W
Technical data:
Input: AC 100 - 240V | 50/60Hz | 25W
Output: 8,4 V (2S 7,4 V) / 12,6 V (3S 11,1 V)
Battery types/Cells LiPo / 2S 7,4 V; 3S 11,1 V
Charging current: 1,6 A | 20 W
Highlights:
- Bilanciatore di carica integrato per 2 o 3 celle Lipo
- Massima sicurezza (non carica le celle profondamente scariche)
- Corrente di carica no a 20 watt a 1,6 ampere
- Arresto automatico della carica al raggiungimento della tensione di ne carica
- Supporta 2S; 7,4V e 3S; 11,1V batterie ai polimeri di litio con connettore XH da 1600mAh in su
- 2 LED di stato colorati
Highlights:
- Integrated charge balancer for 2 to 3 lipo cells
- Maximum safety (does not charge deeply discharged cells)
- Charging current up to 20 Watt at 1.6Ampere
- Automatic charge stop when nal charge voltage is reached
- Supports 2S;7.4V and 3S;11.1V lithium polymer batteries with XH connector from 1600mAh
- 2 colored status LED‘s
Note importanti sull'idoneità della batteria:
Assicurarsi di utilizzare solo batterie ai Polimeri di Litio con connettore XH balancer. Solo queste
possono essere utilizzate con il caricatore. Altri collegamenti e tipi di batterie non possono essere
utilizzati (si può vericare il rischio di incendio dovuto all'inversione di polarità o al sovraccarico).
Si prega di contattare il produttore della vostra batteria per sapere se la vostra batteria è adatta.
Utilizzare solo batterie LiPo con una capacità di almeno 1600mAh (altrimenti c'è il rischio di incen-
dio a causa della corrente di carica eccessiva). Se si utilizzano batterie con una capacità inferiore a
1600mAh, le batterie devono essere approvate per una corrente di carica di 1600mA (carica rapida).
Si prega di chiedere al produttore della vostra batteria se la vostra batteria soddisfa questi requisiti.
È possibile collegare solo una singola batteria alla volta al caricatore. Caricare 2 batterie
allo stesso tempo NON è permesso e causerà danni alla batteria o al caricatore (pericolo di
incendio).
Important notes on the suitability of the battery:
Make sure to use only lithium polymer batteries with XH balancer connector. Only these may
be used with the charger. Other connections and battery types must not be used (re hazard due to
reverse polarity or overcharging may result).
Please contact the manufacturer of your battery to nd out whether your battery is suitable. Only
LiPo batteries with a capacity of at least 1600mAh must be used (otherwise there is a risk of
re due to excessive charging current). If you use batteries with a capacity below 1600mAh, the
batteries must be approved for a charging current of 1600mA (Speedcharging). Please ask the
manufacturer of your battery if your battery meets these requirements.
You may only connect one single battery to the charger at a time. Charging 2 batteries at
the same time is NOT allowed and will cause damage to the battery or charger (re hazard).
IT
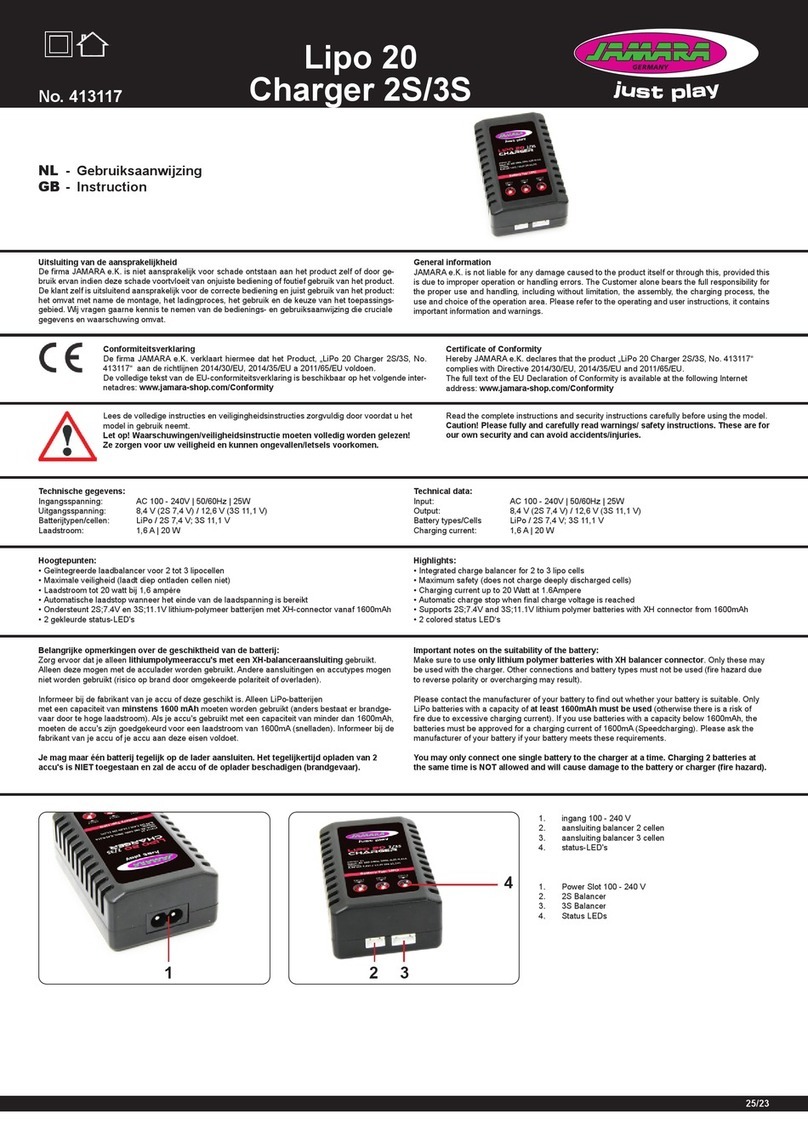
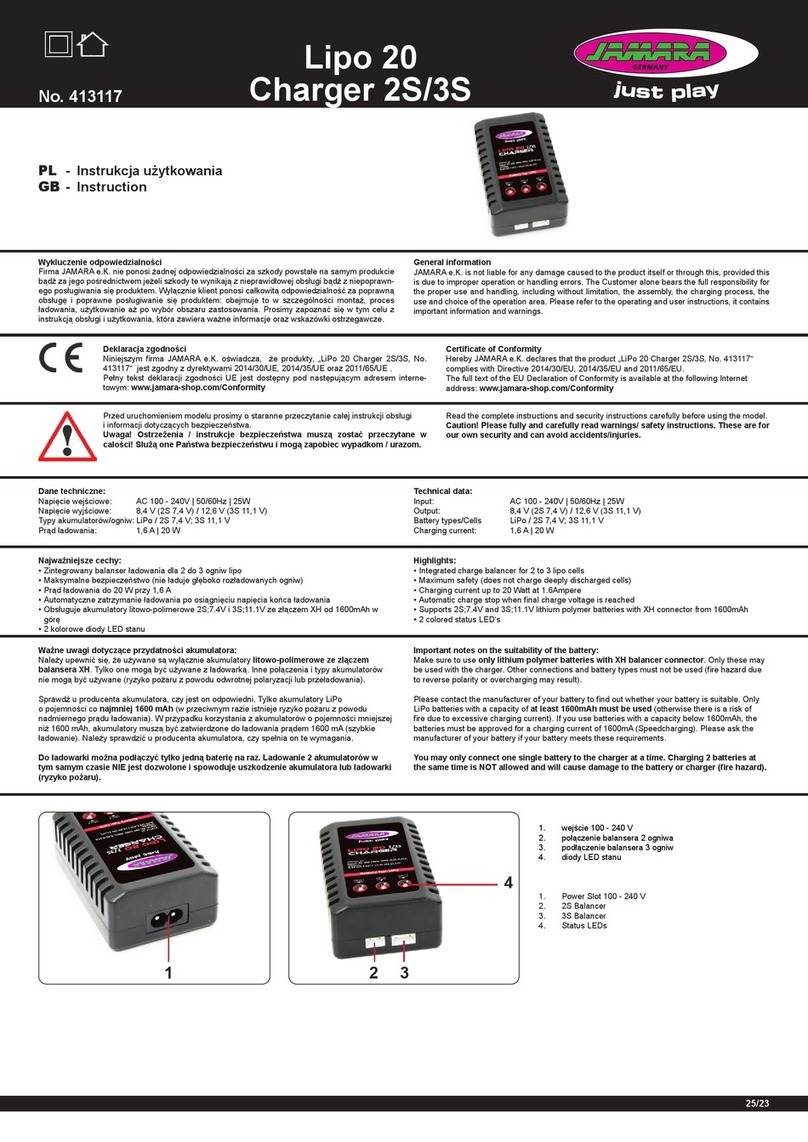
1. Ingresso 100 - 240 V
2. Attacchi di bilanciatore 2 Celle
3. Attacchi di bilanciatore 3 Celle
4. LED di stato
GB
Technical data:
1. Power Slot 100 - 240 V
2. 2S Balancer
3. 3S Balancer
4. Status LEDs
Vi preghiamo di leggere attentamente la istruzione completa e Istruzioni per la sicurezza
prima di usare il modello.
Attenzione! Leggere completamente le avvertenze / istruzioni di sicurezza, questi
sono per la vostra sicurezza può prevenire incidenti / infortuni.
Read the complete instructions and security instructions carefully before using the model.
Caution! Please fully and carefully read warnings/ safety instructions. These are for
our own security and can avoid accidents/injuries.
IT - Gebrauchsanleitung
GB - Instruction
JAMARA e.K.
Inh. Manuel Natterer
Am Lauerbühl 5 - DE-88317 Aichstetten
Tel. +49 (0) 75 65/94 12-0 - Fax +49 (0) 75 65/94 12-23
[email protected] ●www.jamara.com
Service - Tel. +49 (0) 75 65/94 12-777
kundenservice@ jamara.com
1 2
DE - Servicehändler | GB - Service centre | FR - Revendeur de service | IT - Centro assistenza | ES - Servicio asistencia | CZ - Servisní centrum
DE - Reitter Modellbau Versand, Patricia Reitter, Degerfeldstrasse 11, 72461 Albstadt, Tel. 07432 9802700, Fax 07432 2009594, [email protected], www.modellbauversand.de
DE - Bay-Tec, Martin Schaaf, Am Bahndamm 6, 86650 Wemding, Tel. 07151 5002192, Fax 07151 5002193, [email protected], www.bay-tec.de
CH - Modellbau Zentral, Peter Hofer, Bersteneggstrasse 2, CH-6460 Altdorf, Tel. +41 (0) 794296225, Fax +41 (0) 418700213, [email protected], www.modellbau-zentral.ch
EU - JAMARA e.K., Manuel Natterer, Am Lauerbühl 5, DE-88317 Aichstetten, Tel. +49 (0) 75 65/94 12-0, Fax +49 (0) 75 65/94 12-23, [email protected], www.jamara.com
CZ - PenTec s.r.o., distributor Jamara for Czech Republic and Slovakia, Veleslavínská 30/19, CZ -162 00 Praha 6, Tel. +420 235 364 664, Mobil +420 739 075 380, servis@topdrony.cz, www.topdrony.cz
S.e. & O. Copyright JAMARA e.K. 2020
Copia e la riproduzione totale o in parte, solo con il permesso di JAMARA e. K.
All rights reserved. Copyright JAMARA e.K. 2020
Copying or reproduction in whole or part, only with the expressed permission of JAMARA e.K.
IT - Caricare una batteria
1. Inserire il cavo di alimentazione del caricabatterie in una presa adatta. I LED si illuminano di
verde e indicano che la batteria è pronta per la ricarica
2. Ora collega la batteria vuota al caricatore. Batterie 2S da 7,4V al connettore a 3 poli o 11,1V
batterie 3S al connettore a 4 poli. Non usare la forza e fare attenzione a non invertire la polarità.
I LED diventeranno rossi dopo pochi secondi, indicando che le celle della batteria si stanno
caricando.
Attenzione!
Quando si collega una batteria 2S, solo i primi 2 LED (Cell1-2) diventano rossi, il LED
3 (Cell 3) rimane verde. Quando si collega una batteria 3S, tutti i LED (Cell1-3) diventano
rossi.
Non appena una cella della batteria è completamente carica, il LED corrispondente diventa
verde. Poiché le celle sono caricate individualmente, è possibile che una cella sia
completamente carica prima delle altre, a seconda dello stato della batteria. Lasciare sempre la
batteria sul caricatore no a quando tutte le celle collegate sono completamente cariche (verde)
per permettere al caricatore di bilanciare la batteria.
GB - Charging a battery
1. Plug the power cord of the charger into a suitable socket. The LEDS light up green and indicate
that the charger is ready for charging.
2. Now connect the empty battery to the charger. 7.4V 2S batteries to the 3 pin connector or 11.1V
3S batteries to the 4 pin connector. Do not use force and pay attention to reverse polarity. The
LEDs change to red after a few seconds and indicate that the battery cells are charging.
Attention:
When connecting a 2S battery, only the rst 2 LEDs (Cell1-2) change to red, LED 3 (Cell 3)
will remain green. When 3S batteries are connected, all LEDs are red (Cell1-3).
As soon as a the battery cell is full, the corresponding LED changes to green. Because the cells
are charged individually in a balanced way, it is possible that one cell is fully charged earlier than
the others. Always leave the battery on the charger until all connected cells are fully charged
(green) to allow the charger to balance your battery
Riconoscimento di una batteria carica.
Quando si collega una batteria carica al caricatore, i LED diventeranno rossi per alcuni secondi e poi
torneranno verdi. Questo signica che la batteria è già completamente carica.
Riconoscimento di una batteria difettosa.
Se i LED rimangono verdi quando si collega una batteria vuota, c'è un difetto nella batteria (difetto
della cella o scarica profonda). In questo caso, scollegare immediatamente la batteria dal caricatore
e utilizzare un'altra batteria.
Detecting a full battery.
When you connect a full battery to the charger, the LEDs will turn red for a few seconds and then
turn green again. This means that the battery is already fully charged.
Detecting a defective battery.
If the LEDs remain green when an empty battery is connected, there is a defect in the battery (cell
defect or deep discharge). In this case, immediately disconnect the battery from the charger and
use another battery.
Istruzioni per lo smaltimento
Apparecchi elettrici non devono essere smaltiti nei riuti domestici, ma devono essere smaltiti
separatamente. Siete obbligati di rimuovere le batterie e portare l´apparecchi elettrici vecchi
ai punti di raccolta comunali. Qualora ci sono dati personali sul apparecchio elettrico, devono
essere rimossi da voi stessi.
Disposal restrictions
Electrical appliances must not be disposed of in domestic waste and must be disposed of se-
parately. You are obliged to take out the batteries, if possible, and to dispose of the electrical
equipment at the communal collection points. Should personal data be stored on the electrical
appliance you must remove them by yourself.
Istruzioni di sicurezza
• La ricarica può essere e󰀨ettuata solo da adulti.
• Solo per uso interno.
• Non esporre mai il caricabatterie a polvere, sporco, umidità e luce solare diretta.
• Dopo l'uso, scollegare sempre il caricatore dalla fonte di alimentazione e rimuovere le
batterie collegate.
• Non aprire il caricatore per ripararlo. È pericoloso e perderete tutti i diritti di garanzia.
Inviare il caricabatterie al nostro servizio di assistenza per la riparazione.
• Seguire le istruzioni del produttore della batteria
Safety Information
• Charging may only be carried out by adults
• Only for indoor use.
• Never expose the charger to dust, dirt, moisture and direct sun light.
• After use always disconnect the charger from the power source and remove any
connected batteries.
• Do not open the charger to do repairs. This will void the guarantee and may be
dangerous. If the charger is damaged or faulty, return it to our service department
for repairs.
• Follow the instructions of the battery manufacturer.

This manual suits for next models

2

Other Jamara Batteries Charger manuals

Jamara X-Peak 80 BAL Pult Edition User manual

Jamara

Jamara X-Peak 80 BAL Pult Edition User manual

Jamara X-Peak 80 BAL V2 User manual

Jamara

Jamara X-Peak 80 BAL V2 User manual

Jamara X-Peak Touch USB 2L User manual

Jamara

Jamara X-Peak Touch USB 2L User manual

Jamara Lipo 20 User manual

Jamara

Jamara Lipo 20 User manual

Jamara X-Peak 80 BAL Pult Edition User manual

Jamara

Jamara X-Peak 80 BAL Pult Edition User manual

Jamara Lipo 20 Charger 2S User manual

Jamara

Jamara Lipo 20 Charger 2S User manual

Jamara Lipo 20 User manual

Jamara

Jamara Lipo 20 User manual

Jamara X-Peak 80 BAL V2 User manual

Jamara

Jamara X-Peak 80 BAL V2 User manual

Jamara X-Peak 80 BAL V2 User manual

Jamara

Jamara X-Peak 80 BAL V2 User manual

Jamara LiPo 2S User manual

Jamara

Jamara LiPo 2S User manual

Jamara Lipo 20 User manual

Jamara

Jamara Lipo 20 User manual

Jamara Lipo 20 User manual

Jamara

Jamara Lipo 20 User manual

Jamara Lipo 20 User manual

Jamara

Jamara Lipo 20 User manual

Jamara Lipo 20 User manual

Jamara

Jamara Lipo 20 User manual

Jamara X-Peak Touch USB 2L User manual

Jamara

Jamara X-Peak Touch USB 2L User manual

Jamara Lipo 20 Charger 2S/3S User manual

Jamara

Jamara Lipo 20 Charger 2S/3S User manual

Jamara Ride-on Strong Bull User manual

Jamara

Jamara Ride-on Strong Bull User manual

Jamara Ecological Wind User manual

Jamara

Jamara Ecological Wind User manual

Jamara Lipo 20 413117 User manual

Jamara

Jamara Lipo 20 413117 User manual

Jamara X-Peak Touch USB 2L User manual

Jamara

Jamara X-Peak Touch USB 2L User manual

Jamara Lipo 20 User manual

Jamara

Jamara Lipo 20 User manual

Jamara Lipo 20 User manual

Jamara

Jamara Lipo 20 User manual

Jamara X-Peak 90 Touch User manual

Jamara

Jamara X-Peak 90 Touch User manual

Jamara LiPo 2S User manual

Jamara

Jamara LiPo 2S User manual

Popular Batteries Charger manuals by other brands

GYS TCB 60 manual

GYS

GYS TCB 60 manual

Berner BBCF 14,4V-18V Original instructions

Berner

Berner BBCF 14,4V-18V Original instructions

e-bike vision WKC024420070 operating instructions

e-bike vision

e-bike vision WKC024420070 operating instructions

VOLTCRAFT BC16 operating instructions

VOLTCRAFT

VOLTCRAFT BC16 operating instructions

Holaday Industries 491198-48 Series user manual

Holaday Industries

Holaday Industries 491198-48 Series user manual

Schumacher SC1281 user manual

Schumacher

Schumacher SC1281 user manual

Clas Ohlson AC27C00 instruction manual

Clas Ohlson

Clas Ohlson AC27C00 instruction manual

Intermec MaxiScan 2400 user guide

Intermec

Intermec MaxiScan 2400 user guide

AMX MVP-TCS-52 installation guide

AMX

AMX MVP-TCS-52 installation guide

AEG BL18DPS Original instructions

AEG

AEG BL18DPS Original instructions

GN Hearing C-1 user guide

GN Hearing

GN Hearing C-1 user guide

Defort DBC-12 user manual

Defort

Defort DBC-12 user manual

Sterling Power Products Pro Charge B user manual

Sterling Power Products

Sterling Power Products Pro Charge B user manual

Cleanfix ASC 145 DUO Original instructions

Cleanfix

Cleanfix ASC 145 DUO Original instructions

VENOM VS5014 user guide

VENOM

VENOM VS5014 user guide

ABB HT842829 Operation manual

ABB

ABB HT842829 Operation manual

Schumacher SC-600A-CA owner's manual

Schumacher

Schumacher SC-600A-CA owner's manual

Hyundai HYSC-7000 user manual

Hyundai

Hyundai HYSC-7000 user manual

manuals.online logo
manuals.online logoBrands
  • About & Mission
  • Contact us
  • Privacy Policy
  • Terms and Conditions

Copyright 2025 Manuals.Online. All Rights Reserved.