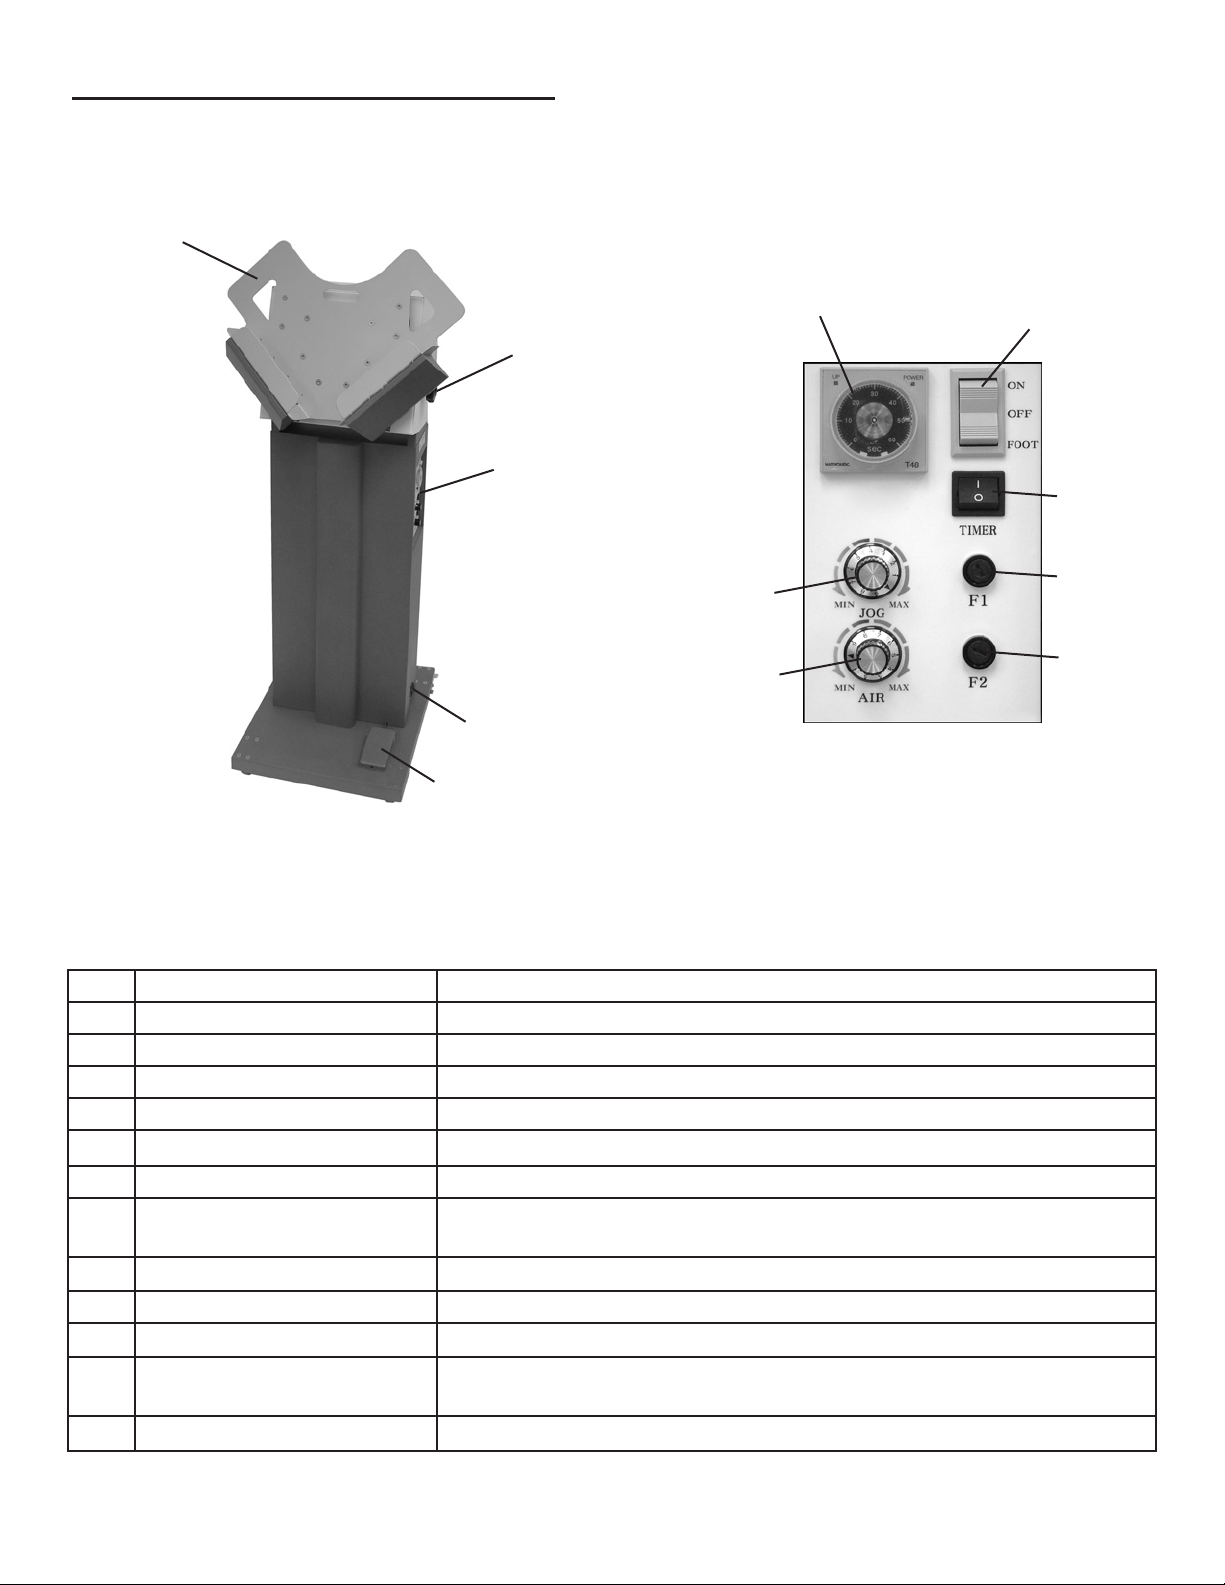
Hasler HJOG1011 User manual

HJOG 1011
Air Jogger
Part No. 8704796N

© 2009 Neopost USA Inc. All rights reserved.
Limitations of this Document
The information presented herein is subject to change. Neopost USA Inc. ASSUMES NO LIABILITY WHATSOEVER FOR
ANY LOSSES OR DAMAGES RESULTING FROM USE OF THIS INFORMATION

TABLE OF CONTENTS
SUBJECT PAGE
DESCRIPTION 1
SPECIFICATIONS 1
UNPACKING 1
SAFETY 1
FEATURES & CONTROL PANEL 2
OPERATION 3
BASIC JOGGING 3
PAPER TRAY TILT ADJUSTMENT 3
USING THE TIMER 4
TROUBLESHOOTING 4
DAILY MAINTENANCE 4
© 2009 Neopost USA Inc. All rights reserved

© 2009 Neopost USA Inc. All rights reserved

DESCRIPTION
FUNCTION
The HJOG 1011 High-Capacity Air Jogger aligns and dries
printed sheets in a single process while reducing static electricity.
Variable vibration speed and air pressure controls combine to
reduce jogging time, allowing press sheets and digital printouts
to be air-dried immediately.
1
SPECIFICATIONS
Variable Vibration Speed: Up to 3,000 vpm
Variable Air Control: Up to 29,000 rpm
Bin Size: 3.75” D x 20.375” W
Media Size: 5” x 7” Min up to 11” x 17” Max
Sheet Capacity: Up to 940 sheets 20#
Dimensions: 16” W x 16” L x 43” H
Weight: 77 lbs.
Voltage: 110 Volts (50/60Hz)
Safety Certications: CE approved
1. Check package for shipping damage. If there is shipping damage, do not discard the box.
2. Remove the machine and packed components from the box.
UNPACKING
SAFETY PRECAUTIONS
• Place the machine on a level and stable surface, to prevent it from falling over and causing personal injury
or damage to the machine. Avoid locations with direct sunlight, excessive dust and/or dirt, chemicals, salt or
vibrations.
• Connect the power plug to a grounded outlet and do not use any other voltage other than specied on the serial
plate. Do not share a wall outlet with another piece of equipment as overheating could occur. Be sure to route the
power cable to the wall outlet in a way which will prevent people from tripping over it.
• When cleaning the machine, turn off the power rst, then unplug from the wall outlet.
• Do not dismantle or attempt to repair the machine. Do not lubricate or apply grease to the machine. Call for
service.
© 2009 Neopost USA Inc. All rights reserved

2
No. NAME FUNCTION
1 Paper Tray Holds paper for jogging
2 Tray Tilt Adjustment Knob Used to alter the tilt angle of the paper tray
3 Control Panel Controls all functions of the jogger
4 Power Cord Receptacle Input power cord
5 Foot Switch Used for hands-free operation
6 Timer Adjustment Knob Choose jogging duration, from 0-60 seconds
7 3-Way Power Switch Provides different functions in combination with the Timer Knob (see
page 4)
8 Timer Off/On Switch Toggles between timed and untimed jogging (I = on, O = off)
9 Fuse 1 (3A) Fuse for jogging
10 Fuse 2 (7A) Fuse for air
11 Air Adjustment Knob Turn right for stronger air pressure, turn left for less air, all the way left
for no air
12 Jog Speed Adjustment Knob Turn right for increased vibrations, turn left for decreased vibrations
FEATURES & CONTROL PANEL
5
1
3
2
4
7
Control Panel
8
9
10
11
12
6
© 2009 Neopost USA Inc. All rights reserved

3
Paper Tray Tilt Adjustment
1. Hold the lower center of the paper tray. NOTE: Keep hands and ngers away from the lower portion of the
paper tray to avoid injury.
2. Loosen the tilt adjustment knob and adjust tilt angle.
3. Tighten adjustment knob. Be sure it is well tightened so it won’t become loose during jogging.
In general, the paper tray is tilted vertically for thick paper (Fig. 1). For thin paper, set the paper tray horizontally
to prevent the paper from being bent and folding over. (Fig. 2).
Fig. 1 Keep ngers away from this area
when adjusting tilt angle
Fig. 2
OPERATION
Basic Jogging
When the AIR adjustment knob is turned to the right (ON), air blows through vents in the paper tray while the
machine is operating.
When the JOG adjustment knob is turned to the right (ON), the paper tray vibrates.
For jogging regular paper, both switches should be set to ON, while the air-only option can be used to loosen
paper or dry ink.
Power Switch
Setting
Timer Setting Result
ON OFF Jogger operates continuously
ON ON Operation begins immediately
FOOT OFF Jogger operates continuously once foot switch is pressed
FOOT ON Operation begins by stepping on the foot switch
Tilt Adjustment Knob
© 2009 Neopost USA Inc. All rights reserved

4
Using the Timer
1. Set Timer switch to on (I).
2. Turn the Timer Adjustment Knob to the desired length of time you wish to jog. Choose from 0 to 60 seconds.
3. If the Power Switch is set to FOOT, air blow and vibrations begin when the foot switch is stepped on once.
Jogging and air blow will stop when the set time has passed.
4. If the Foot Switch is stepped on continuously, only the air blow will stop when the set time has passed. Then
when the Foot Switch is released jogging will also stop. Adjust depending on paper conditions.
TROUBLESHOOTING
TROUBLE POSSIBLE CAUSE REMEDY
Paper is not jogged
completely
Paper is a non-standard size Jog it while loosening it by hand.
Paper has static electricity Add some space between the sheets by
hand.
Too much paper in paper tray Reduce the volume of paper jogged at one
time.
Air blow is weak Air adjustment knob is set to
low volume
Turn knob to the right to increase air ow.
Paper or paper scrap is lodged
in air inlet or outlet
Clear air inlet and/or outlet.
If air ow problem is not xed following these suggestions, blower
maintenance may be required. Call for service.
No air is discharged Air adjustment knob is set to
OFF
Turn knob to the right to increase air ow.
Fuse 2 is blown Replace Fuse 2
If the fuse is blown again after replacement, the cause may be within the
machine. Call for service.
Paper tray will not vibrate Jogger adjustment knob is set
to OFF
Turn knob to the right to increase vibrations
Fuse 1 is blown Replace Fuse 1
If the fuse is blown again after replacement, the cause may be within the
machine. Call for service.
Clean the air outlet vents in the paper tray to remove paper scraps or dust.
Clean the air inlet lter (located on the left side of the machine) on a regular basis.
DAILY MAINTENANCE
© 2009 Neopost USA Inc. All rights reserved

© 2009 Neopost USA Inc. All rights reserved
Table of contents
Popular Office Equipment manuals by other brands

Kimball
Kimball Footprint Lateral File with Hinged Door... Assembly instructions

Steelcase
Steelcase 9000 Series installation instructions

Safco
Safco 3082 Assembly instructions

Mo Systeme
Mo Systeme modulbox mb3 user manual

Smart Technologies
Smart Technologies SMART Table 230i user guide

3-form
3-form SimpleSpec 300.44 installation manual

Fromm&Starck
Fromm&Starck STAR-DD-01 user manual

3-form
3-form SimpleSpec 600.06 installation manual

Jason.L
Jason.L Sapphire Meeting Table Assembly instructions

Herman Miller
Herman Miller Canvas Office Landscape Support Panel Installation and Disassembly for Recycling Instructions

Acroprint
Acroprint 125 user manual

Livescribe
Livescribe Echo user guide