HATHASPACE HARMONY 600 User manual

USER MANUAL
PURE AIR,
ALWAYS.
HARMONY 600
HEPA Air Purifier
HSE600

NOTE:
Remove plastic bag from
filter before use

1. Basic Information 4
2. Safety Instructions 5-6
3. Product Diagram 7
4. 4-in-1 Purication System 8
Buttons and Indicators 9-11
5.1. Control panel
5.2. Air quality indicator
5.3. Particle sensor
5.4. Brightness adjustment
5. Air Purier Maintenance 12-13
6.1. Cleaning the unit
6.2. Replacing the lter
6. Troubleshooting 14
7. Warranty 15
Contents

READ AND SAVE THESE INSTRUCTION
1. Basic Information
Use unit according to instructions provided in the manual. Keep this manual for
future reference.
This appliance can be used by children aged 8 years and above and individuals
with reduced physical, sensory, mental capabilities, or lack of experience if they’ve
been given supervision or instruction concerning the use of the appliance in a
safe way and understand the hazards involved. Children shall not play with the
appliance. Cleaning and user maintenance shall not be done by children without
supervision.
Model HSE600
Power Supply 120V/60HZ
Rated Power 40W
CADR 88 CFM
Noise Level 24dB-50 dB
Dimensions 205*205*313mm
8.07*8.07*12.32inch
Net Weight 2.35 KG
4

5
2. Safety Instructions
This appliance is a desktop air purier. To reduce the risk of re, electric shock,
or serious injury, basic safety precautions should always be followed when using
electrical appliances. Please read and follow all the safety instructions before
using and only use this air purier as described in this manual.
This appliance has a polarized plug, which means that one blade is wider than the
other. To reduce the risk of electric shock, this plug is intended to t in a polarized
outlet only one way. If the plug does not t fully in the outlet, reverse the plug. If it
still does not t, contact a qualied electrician. Do not attempt to bypass this safety
feature.
WARNING: To reduce the risk of re, electric shock or injury to persons, do not
use replacement parts that have not been recommended by the manufacturer
(e.g. parts made at home using a 3D printer).
• Do not use the air purier in wet or humid environments, or outdoors. This
appliance is designed for indoor use only.
• Do not put the air purier on an uneven oor such as a bed or sofa. Always
make sure to place the air purier on a at surface before operating. Leave
more than 20 cm distance between the air purier and the wall.
• Do not place the air purier near sources of heat, such as stove tops, ovens,
or radiators.
• Do not handle the unit with wet hands. Thoroughly dry your hands before
handling any part of the air purier.
• Do not use without removing the plastic wrap from the air purier and lters.
• Do not attempt to use other lters with this appliance. Only use Hathaspace
air replacement lters for this unit.
• Do not block the air inlet, outlet, or sensor.
• Do not insert ngers or objects into the air outlet.

2. Safety Instructions
6
• Do not immerse the air purier in liquids or clean the appliance with any
liquid to avoid electric shock and/or electrical res.
• Do not run the power cord under carpeting, rugs, furniture, or appliances.
Place the power cord away from high-trac areas.
• Do not operate the unit if the power cord or plug is damaged. Doing so may
result in injury or damage to the unit.
• Do not repair the air purier by yourself if it does not work; it will void your
warranty. If your appliance is no longer working, damaged, or not functioning
properly, discontinue use, unplug immediately and contact customer support.
• Do unplug the appliance from the power supply before servicing.
• Do inspect the unit frequently. Dirt that has been collected should be removed
regularly to prevent excessive accumulation that may result in ashover or
re.

Control Panel
HSE600 Air Purier
FRONT
REAR
Air Outlet
Air Inlet
Particle Sensor
Power Cord
7
3. Product Diagram

8
4. 4-in-1 Purification System
4-in-1 Air Filtration Sytem
1. 2. 3. 4.
Your new Hathaspace Air Purier uses advanced technology to clean the air in your
room.
Uses 4 advanced technologies to keep your air clean, capturing airborne particles:
1. Polypropylene Pre-filter
A preliminary Polypropylene Pre-lter removes large particles like pet hair,
dust, and oating debris. This helps extend the life of the composite lter.
2. Pre-filter
Non-woven materials serve as an extra pre-lter, capturing small corrosive
particles to extend the life of the H13 HEPA lter.
3. Activated carbon filter
Activated carbon absorbs smoke, odors. and gases in the air.
4. H13 HEPA filter
This high-eciency HEPA lter can capture small micron particles. These
smaller particles make up the majority of harmful air pollutants like tobacco
smoke and lead dust.

5. Buttons and Indicators
9
No. Icon Function
1Power on/o
2Timer button:1/2/4/8h
3
Fan speed buttons: Sleep mode, Levels 1, 2, 3
• Press the speed button to choose sleep mode. In
sleep mode, all other indicator lights are turned o.
4
Filter reset button
• After the unit has been used for 2000 hours, the unit
will remind the user to replace the lter when it is
powered on each time.
5
AUTO button and child lock button
• Short press the auto button to enter auto mode, and
long press 3 seconds to enter child lock mode. In
Auto mode, the fan speed will automatically adjust
according to the air quality.
6Light turn/o button
7 Brightness Adjustment button
8
Air quality indicator (Green, yellow, red)
• When on auto function, the color of the light will
change based upon the air quality.
1 3
54
76
8
2
5.1 Control Panel

5. Buttons and Indicators
10
5.2 Air Quality Indicator
5.3 Particle Sensor
Index (ug/m3) Air Quality Speed Color
PM2.5
0-75 Good 1 Green
75-150 Moderate 2 Yellow
150-500 Unhealthy 3 Red
Mode Operation
Particle
Sensor
Manual
Mode
Adjust fan speed based on your needs. Using
the Air Quality Indicator, change the fan speed
from 1 (low) to 3 (high) depending on the air
quality.
Auto
Mode
Purify the air automatically at dierent fan
speeds based on the air quality detected by
the sensor.
Note: Clean the appliance regularly with soft brushes, eg. a makeup brush.

11
5.4 Brightness Adjustment
5. Buttons and Indicators
There are three levels of light brightness:
• The default brightness of lights is 100% (including all indicators and air quality
lights)
• Press the brightness adjustment button to manually adjust the following air
quality indicator light levels: 30% » 60% » 100% » 30%
• The brightness is not memorized after the light is adjusted and will still be
100% when the machine is turned on next time (unless you press and hold the
brightness key for 3 seconds to set the memory brightness setting)
• After adjusting the brightness of the light, long press the brightness key for
3 seconds to set the memory light brightness (ex. to set 30%, long press for
3 seconds and the light brightness will be 30% after the next startup)

12
6. Air Purifier Maintenance
6.1 Cleaning the Unit
6.2 Replacing the filter
• Please turn o the power and unplug it before cleaning the air purier.
• To remove dust, lightly wipe the unit with a soft, clean cloth. If needed, wipe
the unit with a clean damp cloth, then immediately dry it with a clean dry
cloth. Don’t use alcohol, oil, or benzene to clean the unit
• Do not immerse the unit in water
Note: The HEPA lter, gray color non-woven pre-lter, and the activated carbon
lter cannot be reused, cleaned, or replaced after being used. Please don’t wash
them with water.
To maintain the air purier’s performance and purication eect, we suggest
replacing the lters every 3-4 months or 2000 hours.
1) Unplug the air purier from the electrical outlet.
2) Twist the bottom panel counterclockwise to remove the panel.

13
6. Air Purifier Maintenance
3) Remove the old lter and dispose of it properly. The lter is not recyclable.
4) Remove the new lter packaging and insert it into the air lter.
5) Turn it clockwise to tighten the bottom panel.
6) Place the air lter on the table again and plug it back into the electrical outlet.
The air purier will automatically clean the air again.
Note:
• The actual replacement frequency depends on use and air quality. If it is on day
and night or your surrounding air is highly polluted, it will need to be replaced
sooner.
• Please remember to press the “Filter Reset “ button for 3 seconds to reset the
air purier, otherwise, the lter light will keep blinking.

Troubleshooting
14
Problem Reasons Possible Solution
Air purier cannot be turned on
or respond to button controls.
A. No electricity.
B. Power cord is damaged.
C. The outlet is damaged.
D. The air purier malfunctioned.
A. Check that the unit is properly
plugged into an electrical outlet.
B. Contact Customer Service.
C. Plug into a dierent outlet.
D. Contact Customer Service.
Airow is signicantly reduced. A. The airow is blocked by packaging.
B. A low speed is being used.
C. There is not enough clearance for the
air inow.
D. The Pre-lter may be clogged by
large particles.
E. Filters are installed incorrectly.
A. Remove the packaging.
B. Increase the fan speed.
C. Leave 20cm clearance on all
sides of the air purier.
D. Clean the Pre-lter or replace
the lter.
E. Make sure the lters are
installed correctly.
Air purier makes an unusual
noise while the fan is on.
A. The airow is blocked by packaging.
B. The air purier is on an inclined place
making the fan blades rub with the
air purier’s lining.
C. The air purier may be damaged or a
foreign object may be inside.
A. Remove the packaging.
B. Put the air purier on even
places.
C. Contact Customer Service.
Strange smell comes from
the purier.
A. The airow is blocked by packaging.
B. The air purier is on an inclined place
making the fan blades rub with the
air purier’s lining.
C. The air purier may be damaged or a
foreign object may be inside.
A. Remove the packaging.
B. Put the air purier on even
places.
C. Contact Customer Service.
Poor air purication quality. A. A low speed is used.
B. The airow is blocked by packaging.
C. The air outlet is blocked.
D. Filters installed incorrectly.
E. Is being used in open places.
F. The applied area is larger than the
eective range.
G. The quality of the air in the room is
very poor.
H. The room layout is not good.
A. Increase the fan speed.
B. Remove the packaging.
C. Remove any matter that is
blocking the air outlet.
D. Make sure the lters are
installed correctly.
E. Close doors and windows while
using the air purier.
F. Consider a larger air purier.
G. Open the window to circulate
new air.
H. Buy more air puriers or change
the layout if possible.
Air purier always detects
high levels of particulates.
A. The unit is operating in a very dusty
environment.
A. Consider turning the fan to HIGH.
The lter light is still on after
replacing the lter.
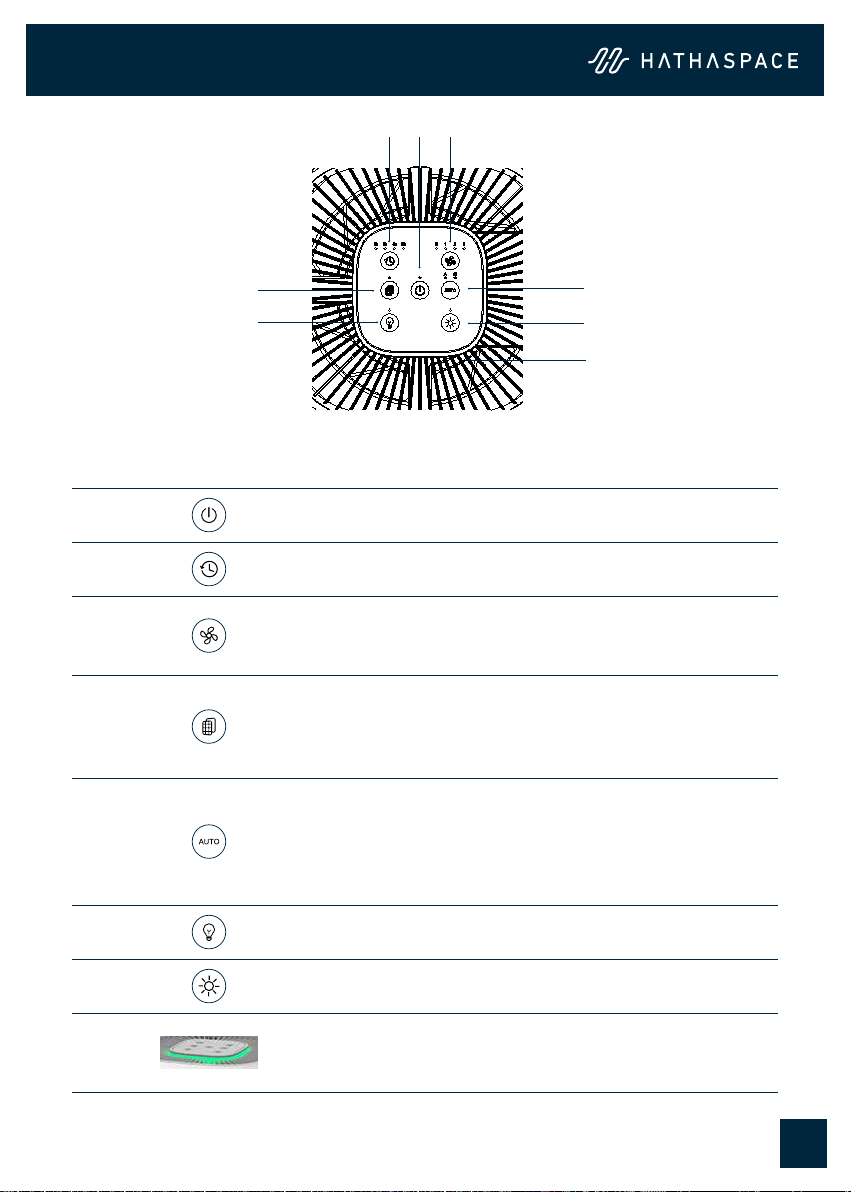
A. Forgot to reset the air purier. A. Press the “Filter Light” button for
5 seconds.
The lter light doesn’t turn on
within 8 months.
A. The appliance has been running
infrequently.
A. Not Applicable.
The lter light is on before
6 months.
A. The appliance is run frequently or the
air is highly polluted.
A. Replace the lters.

Hathaspace guarantees all products to be of the highest quality in material, craftsmanship,
and service, eective from the date of purchase.
Hathaspace will replace any product found to be defective due to manufacturer aws based
on eligibility.
Hathaspace is not responsible in any way for any damages, losses, or inconveniences
caused by equipment failure or by user negligence, abuse, or non-compliant use according
to the user manual or any additional safety, use, or warnings included in the product
packaging and manual.
This warranty does not apply to the following:
• Damage due to abuse, accident, alteration, misuse, tampering, or vandalism
• Improper or inadequate maintenance
• Damage in return transit
Please see warranty details at https://www.hathaspace.com
8. Limited Warranty
9. Customer Support
Hathaspace cherishes your experience. If you have any questions or concerns about your air
purier, please feel free to contact our customer support team.
Website: https://hathaspace.com
15

www.hathaspace.com
1-800-446-0535
Hathaspace
HARMONY 600
HEPA AIR PURIFIER
HSE600
Manufactured for Hathaspace EPA Est. No. 87627-CHN-1
© Hathaspace. All rights reserved.
This manual suits for next models
1
Table of contents
Other HATHASPACE Air Cleaner manuals

HATHASPACE
HATHASPACE HSP003 User manual

HATHASPACE
HATHASPACE HSP001 User manual

HATHASPACE
HATHASPACE HSP002 User manual

HATHASPACE
HATHASPACE HSP002 User manual

HATHASPACE
HATHASPACE HSP001 User manual

HATHASPACE
HATHASPACE HSP002 User manual

HATHASPACE
HATHASPACE HSP001 User manual

HATHASPACE
HATHASPACE HSP001 User manual

HATHASPACE
HATHASPACE HARMONY 1500 User manual

HATHASPACE
HATHASPACE HSP002 User manual