HATHASPACE HSP001 User manual

Smart True HEPA
Air Purier
User Guide
Model HSP001


Specications 1
Features 1
Product Diagram 3
Smart Air Quality Sensor 4
Filter Installation 5
Filter Maintenance 6
Operation 7
9
Precautions
Troubleshooting 11
CONTENTS
1
Product Name Smart True HEPA Air Purier
120V
Please refer to the nameplate on the back of machine.
60HZ
45W
Rated Voltage
Rated Frequency
Rated Power
Replaces the air 2x per hour in 350 Sq Ft
Replaces the air 1x per hour in 700 Sq Ft
Room Coverage
160 m3/hr
CADR
SPECIFICATIONS
FEATURES
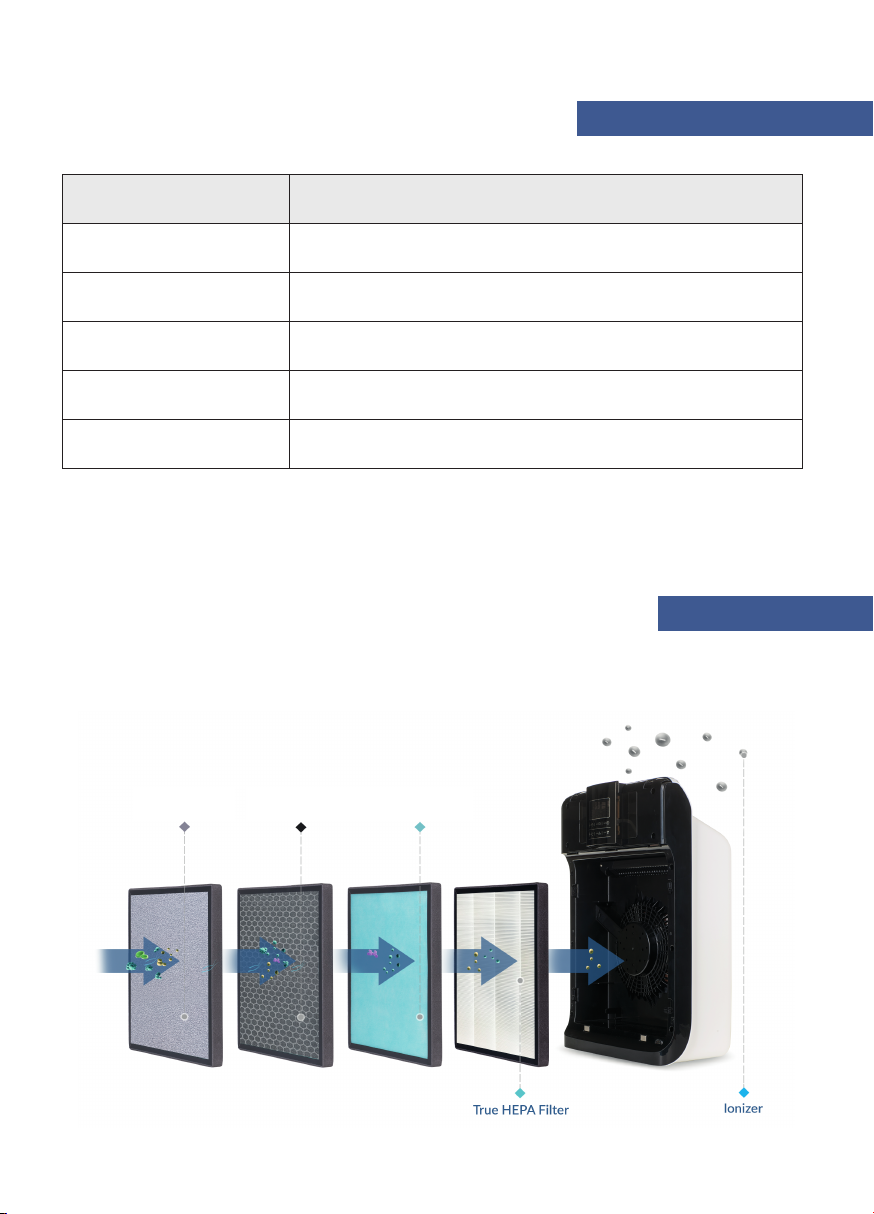
5-in-1 Purication System
Cold Catalyst
Filter
Cellular-Acvated
Carbon Filter
Anbacterial
Filter

Cold Catalyst Filter
High Grade Active Carbon absorbs smoke, odors, gases, and volatile
organic compounds (VOC’s). We don’t skimp on the carbon. Every
lter contains over 300 grams of high grade active carbon, meaning
more absorption, and a longer useful life of the lter.
Activated Carbon Filter
Antibacterial Filter
Nano-materials in the antibacterial lter target bacteria and germs.
2
True HEPA Filter
Ionizer/Anion Generation
First, a Cold Catalyst Filter targets and removes large particles including
but not limited to dust mites, pet hair, skin cells, and mold spores.
Additionally, it assists in the decomposition of formaldehyde, ammonia,
benzene, and TVOC’s.
Hathaspace HEPA material is the trusted standard in high eiciency
particulate air purication. 99.97% of airborne particles as small as
0.3 microns are eliminated from air passing through. These include
but are not limited to dust mites, pollen, mold spores, pet dander,
per hair, and much more.
Hathaspace’s California Air Resources Board (CARB) approved anion
feature uses voltage to electrically charge air molecules and can be
turned on or o anytime. When on, negative ions are released, which
are particles with one or more extra electron. This eliminates odors,
smoke, and gases in the air. It also makes smaller particles easier to
capture within the physical lters.
3
(10)
(11)
(12)
(1)(2)
(3)
(8)
(9)
(4)
(5)
(6)
(7)
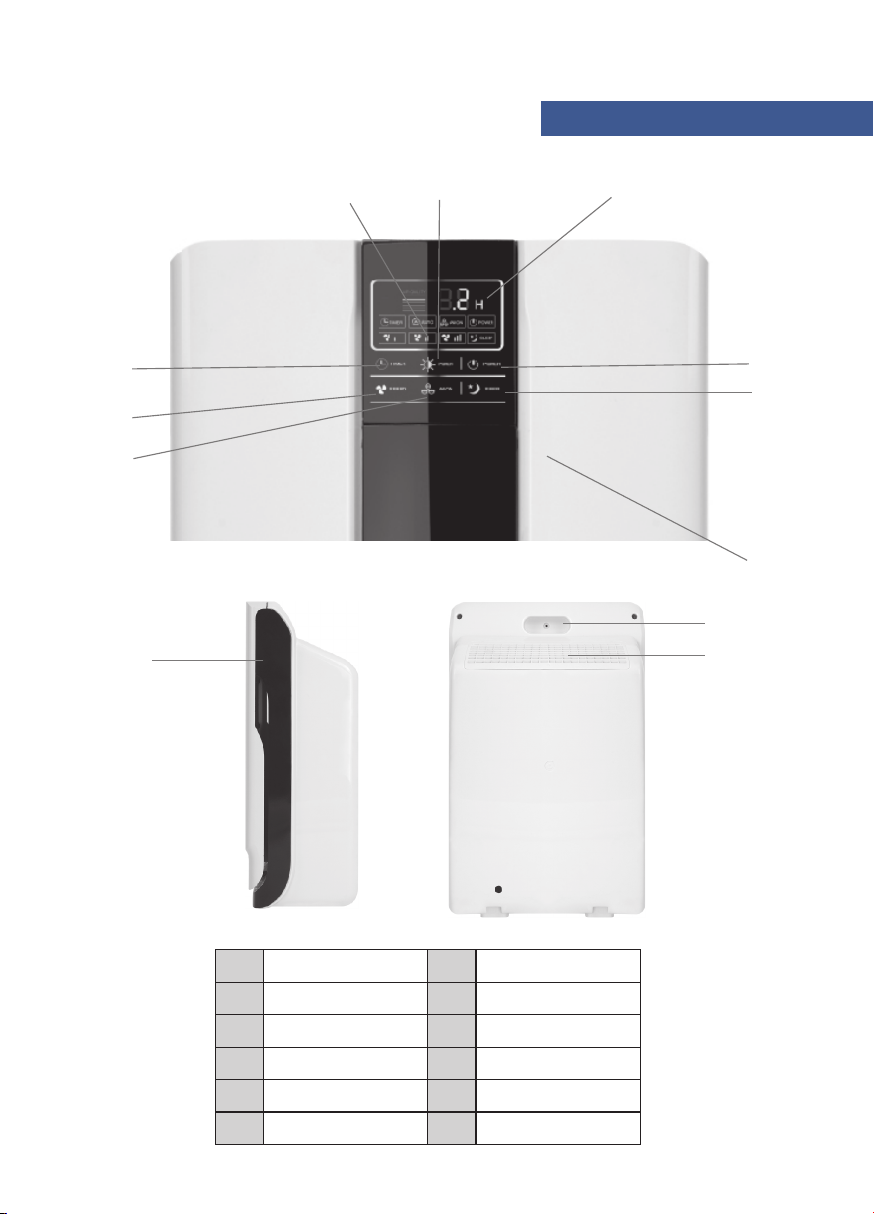
PRODUCT DIAGRAM
(1) Display
(2) Control Panel
(3) Power
(4) Light
(5) Timer
(6) Fan Speed
(7) Ionizer
(8) Sleep Mode
(9) Front plate
(10) Air Inflow
(11) Handle
(12) Air Outflow
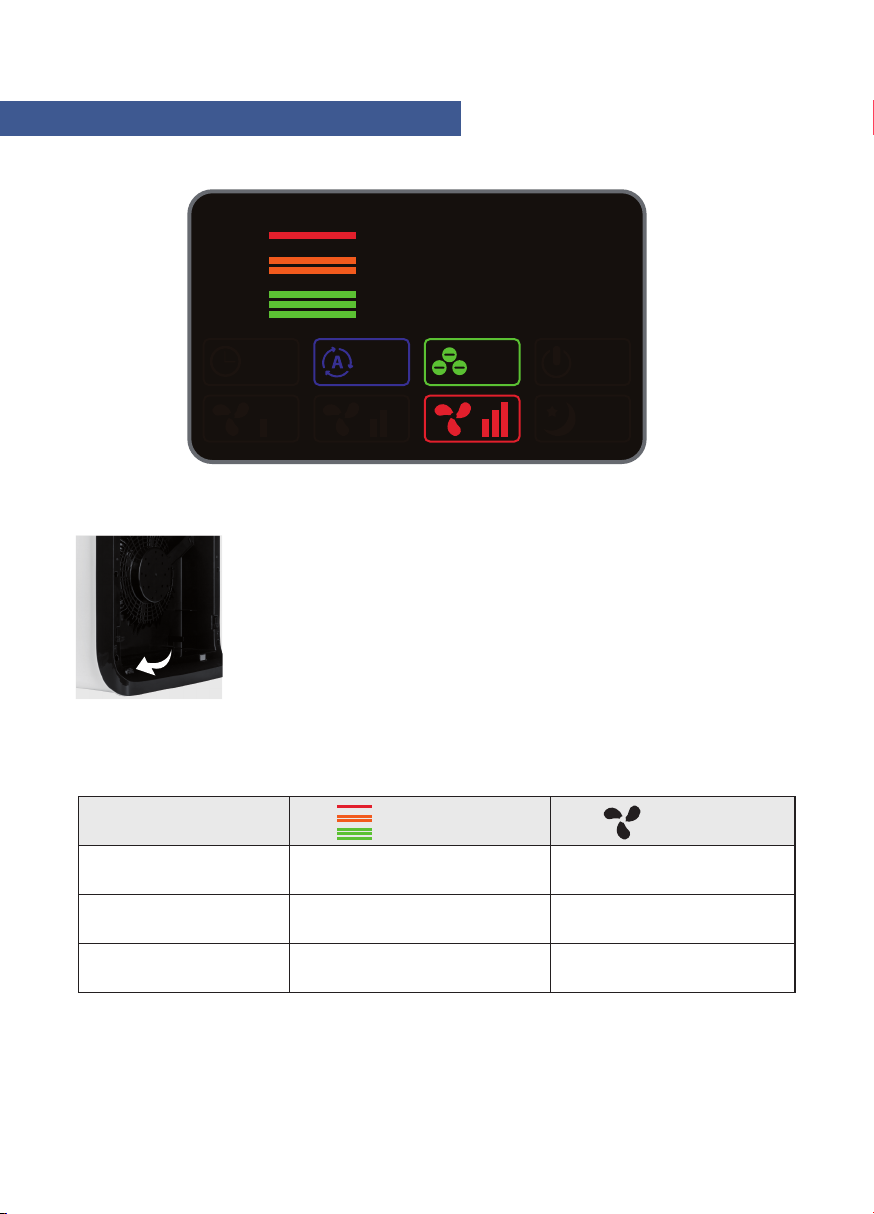
SMART AIR QUALITY SENSOR
4
88
H
SLEEP
POWERANiONTIMER
AIR QUALITY
AUTO
Color
Green
Yellow
Red
Good
Moderate
Bad
Low
Medium
High
Air Quality Fan Speed
The Smart Air Quality Sensor detects particles and
odors in real time, feeding that info to the purier so
it can adjust. This keeps your air quality consistently
clean, while reducing power consumption and your
electric bill.
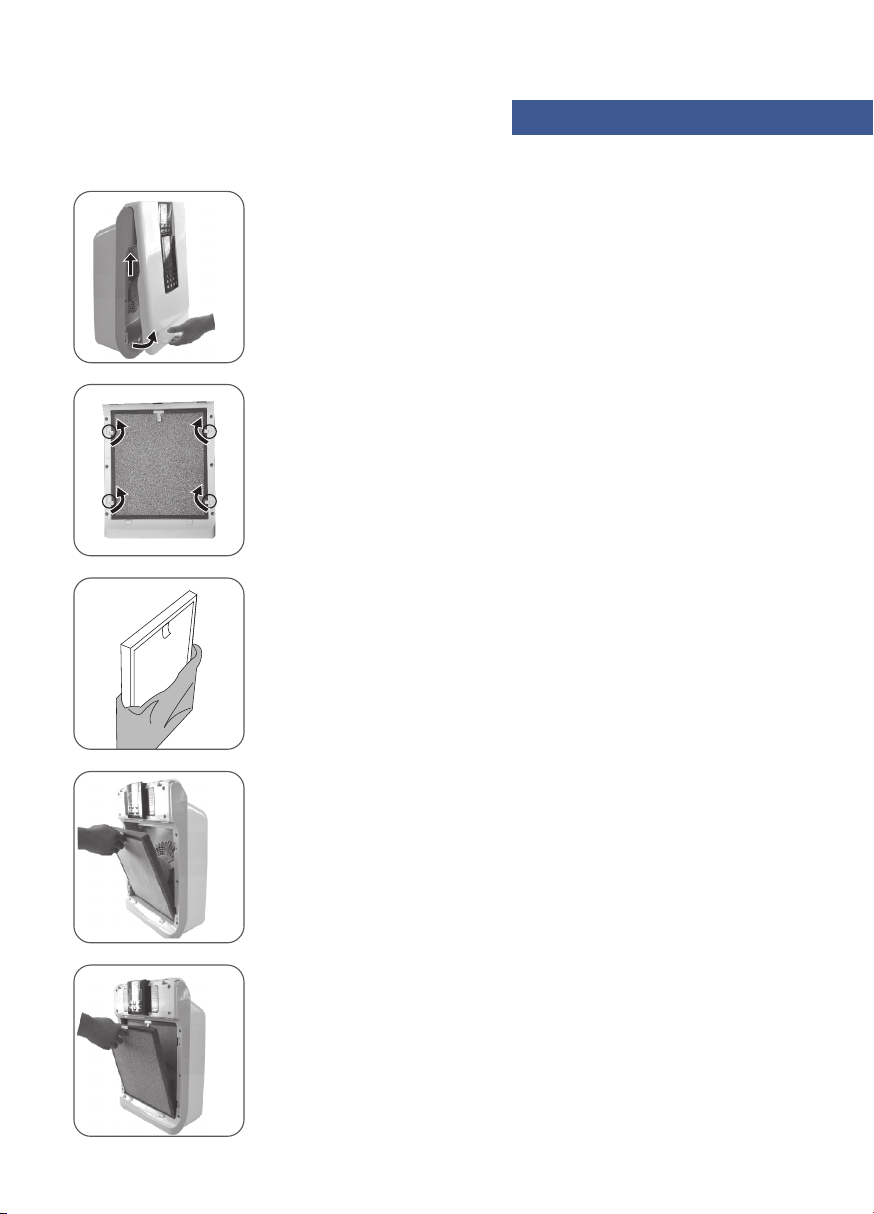
Place Filter 2 (Antibacterial and HEPA Filter) back into
the unit.
Note: ensure tab is facing you.
Place lter 1 (Cold Catalyst Filter) back into the unit.
Note: ensure tab is facing you.
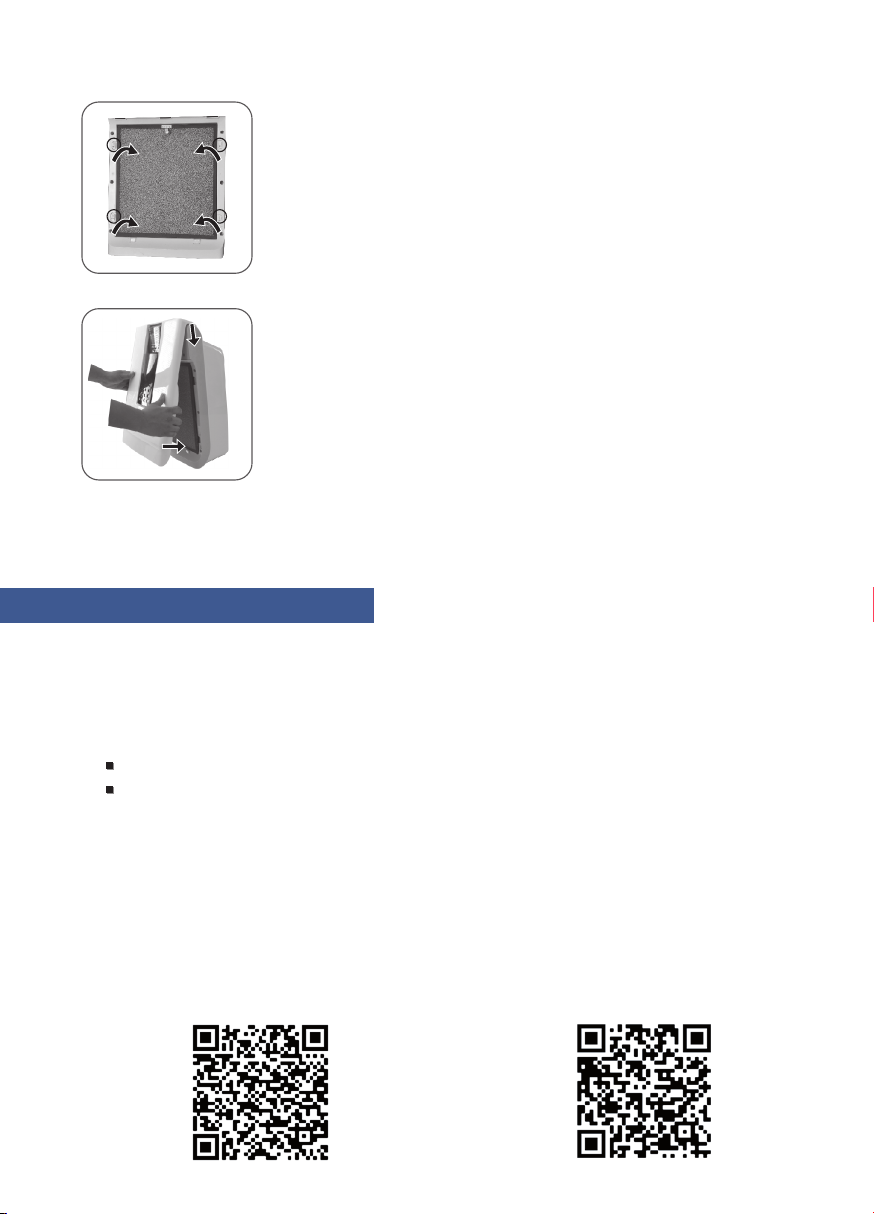
Pull the front plate toward you from its base and its
magnets will release the bottom of the front cover. Then
lift upward on the front plate to remove it completely,
exposing the lter.
Turn bucklesand remove lter gently by pulling outward.
Remove packaging lm from lters before use.
FILTER INSTALLATION
5
Note: To ensure your warranty remains active and to avoid shortening the
life of your air purier, use only certied Hathaspace lters.
Guidelines:
Purchasing Additional Air Filters
Replace lters every 4 months for optimal performance.
Do not clean the lters with water or other liquids. Use a keyboard
duster to gently remove any physical debris such as lint and hair.
Make sure lters are installed correctly, with tabs facing
you. Lock lters in place by turning the buckles to secure
them.
Reinstallthe front plate by rst placing the top of the
front plate into the notches on the top of the purier.
Next, let the bottom magnets connect. Make sure the
front plate is secure before powering on.
FILTER MAINTENANCE
6
https://amazon.com/hathaspace
OR
Scan below using your phone’s camera.
https://hathaspace.com/collections/lters
OR
Scan below using your phone’s camera.
Hathaspace Direct Amazon

Plug in the purier. The red power indicator will light up.
Use the Power button on the unit or remote to turn
on/o. The purier will start in AUTO mode and the
smart sensor will automatically initiate when the unit is
turned on. The unit will adjust the fan speed
automatically, beginning in high for a few minutes and
moving down as needed.
Press the Speed button on the unit or remote to adjust
the fan speed. A faster speed increases the airflow
through the unit, thus purifying your air faster. Choose
from Low (Green), Medium (Orange), High (Red), and
AUTO mode. In AUTO mode, the fan speed will
automatically adjust based on the air quality in the room.
Your included remote gives full control of your purier
from across the room and is powered by 2 AAA batteries
(not included).
On/Off
Speed
Sleep
Timer
Anion
Auto
Air Quality
H
Timer Auto Anion Power
Low Medium High Sleep
Power
Air Quality
H
Timer Auto Anion Power
Low Medium High Sleep
Timer
Air Quality
H
Timer Auto Anion Power
Low Medium High Sleep
Speed
OPERATION
7
Note: When restarting the air purier in AUTO mode, the unit will
always start back in high mode and slowly adjust down to make
sure the air is clean. Once in low mode, it will adjust in real time
according to your air environment.
The timer allows you to set your purier to turn o
after a set amount of time. You can choose up to
12 hours, or not use it at all and let the purier run
continuously. The time interval is displayed on the
unit. It will turn o once the timer runs out.

Press the Sleep button on the unit or remote to put the
purier in sleep mode. In sleep mode, the unit will run at
a whisper-quiet speed with the lights o, and the smart
sensor will turn o. If you would like to have the lights
o while operating in other fan modes, then just press
the Light button in your preferred mode and the lights
will shut o. Press any of the buttons to exit sleep mode.
Press the Anion button on theunit or remote to turn on
the ionizer. The Anion light will turn green on the
display when the ionizer is on.
Press the Light button on the unit or remote to turn
on/o the lights on the display. You can turn the lights
o in any of the fan modes (Low, Medium, High, or AUTO),
giving you more control over your purier. If you power
o the unit, the unit will always restart with the lights
back on.
Air Quality
H
Timer Auto Anion Power
Low Medium High Sleep
Sleep
Air Quality
H
Timer Auto Anion Power
Low Medium High Sleep
Anion
Light
8

9
Before use, read entire manual thoroughly and keep it for future reference.
Hazardous
To avoid electric shock or re, ensure that the product is dry at
all times and keep the product away from water or
any other liquid.
Warning
Make sure the local power supply voltage is the same as
indicated on the nameplate on the back of machine.
If the power cord is damaged, do not plug in or turn on the purier.
Keep the lters away from high temperatures or sparks/flames.
6.
1.
2.
3.
4.
Do not block the air inlet or outlet with any objects.
For safety, do not allow children to handle the purier
unsupervised.
PRECAUTIONS
Notice
Do not use the purier as a chemical ventilator, dust
cleaner, or cooker ventilation hood.
Ensure your power outlet is functioning properly.
Place the purier on a dry, stable, and flat surface.
Keep 8 inches of space on either side of the purier while in operation,
to allow proper airflow through the unit. Leave 12 inches of space above
the top of the air purier. Containing the purier in a small space will
restrict airflow and eiciency of the unit.
1.
2.
3.
4.
5.
To reduce the risk of electric shock, this equipment has a polarized
plug (one blade is wider than the other). This plug will t in a polarized
outlet only one way. If the plug does not t fully in the outlet, reverse
the plug. If it still does not t, contact qualied personnel to install the
proper outlet. Do not alter the plug in any way.

1.
2.
3.
Do not drop or hit the product, handle it gently.
Do not operate this product while using flammable gas sprays such as
insect repellent, and common household cleaning chemicals.
Unplug the power cord when cleaning or changing lters.
9.
Do not operate the purier in a space where temperature changes are
drastic. This will cause condensation to form in the unit and ruin
electrical components.
10.
This product is intended for household use under normal operating
conditions.
11.
8.
7.
6.
5.
Do not use this product near gas appliances, heating
devices, or near a stove.
Do not place the purier under an air conditioning unit, or any place
where water may drip onto it.
12. Do not use this product in a space with high humidity,
such as a bathroom with the shower on, sauna, or
steam room.
Smart Air Quality Sensor System memory reset instructions:
If the air quality indicator displays red color and the machine is cut
o suddenly, you may have to reset the memory. Otherwise, the
red color display will remain.
Unplug the machine and wait for 15-20 seconds. Plug again and start
the machine.
Keep the machine running for 1 minute. The air quality indicator should
begin functioning normally again.
Please perform the reset steps above in a clean environment without
air pollution. Otherwise, the air quality display lights will be disrupted.
10

11
Problem Solution
No air comes out from
the outlet
Check if purier is on using the red power
indicator on the display. Test outlet.
Decreased Airflow
The lters are dirty and they need to be cleaned
or replaced.
The lter packaging bag is not removed.
Please remove the lter packaging bag.
Air quality has not improved
after running the purier
Make sure the lters are installed in the proper
order and positioned correctly in the unit.
Filters are worn out, please replace all the
lters.
When to replace the lters
The lter replacement period is dependent on
If you notice a chemical/burning like smell
after using the unit for a while, this can be
from the active carbon being overly saturated
with gas. It is time to replace the lters.”
the air it lters, time used, and amount of
particles collected. For optimal air purication,
it is best to replace the lters every4 months.
When the surface of the rst lter is dirty and
fades in color, it has collected many particles,
and will perform better if replaced with a clean
lter. Typical operating conditions require
changing the lter every4 months.
Change the lter when the HEPA lter becomes
discolored, or every4 months.
TROUBLESHOOTING


www.hathaspace.com
1-800-446-0535
Hathaspace. All rights reserved. The Hathaspace logo is a registered trademark of The Hatha Company
@Hathaspace
Other manuals for HSP001
4
This manual suits for next models
2
Table of contents
Other HATHASPACE Air Cleaner manuals

HATHASPACE
HATHASPACE HSP002 User manual

HATHASPACE
HATHASPACE HSP001 User manual

HATHASPACE
HATHASPACE HSP001 User manual

HATHASPACE
HATHASPACE HSP002 User manual

HATHASPACE
HATHASPACE HARMONY 1500 User manual

HATHASPACE
HATHASPACE HSP002 User manual

HATHASPACE
HATHASPACE HSP002 User manual

HATHASPACE
HATHASPACE HSP001 User manual

HATHASPACE
HATHASPACE HARMONY 600 User manual

HATHASPACE
HATHASPACE HSP003 User manual


