manuals.online logo
Brands
  1. Home
  2. •
  3. Brands
  4. •
  5. HAUL MASTER
  6. •
  7. Automobile Accessories
  8. •
  9. HAUL MASTER 96198 User manual

HAUL MASTER 96198 User manual

INSTRUCTIONS AND PRECAUTIONS
Distributed exclusively by Harbor Freight Tools®.
3491 Mission Oaks Blvd., Camarillo, CA 93011
Visit our website at: http://www.harborfreight.com
SAVE THESE INSTRUCTIONS. READ ALL
PRECAUTIONS AND INSTRUCTIONS.
Copyright©2008 by Harbor Freight Tools®. All rights reserved. No portion of this document or any artwork contained
herein may be reproduced in any shape or form without the express written consent of Harbor Freight Tools.
Diagrams within this document may not be drawn proportionally. Due to continuing improvements, actual product
may differ slightly from the product described herein. Tools required for assembly and service may not be included.
For technical questions or replacement parts, please call 1-800-444-3353.
SPECIFICATIONS
Pintle Hook Material Cast and Forged Steel
Maximum Trailer Weight 16,000 lb
Vertical Load Capacity 3,000 lb
Mounting Capacity 6,000 lb
Mount Holes .525" Diameter (4)
Hitch Pin 1/4"
Hitch Ball 2" with 1-1/4" Threaded
Shank
UNPACKING
When unpacking, make sure that the item
is intact and undamaged. If any parts are missing
or broken, please call Harbor Freight Tools at the
number shown on the cover of this document as
soon as possible.
IMPORTANT SAFETY
INFORMATION
Assembly Precautions
Assemble only according to these instruc-1.
tions. Improper assembly can create haz-
ards.
Wear ANSI-approved safety goggles and2.
heavy-duty work gloves during assembly.
Keep assembly area clean and well lit.3.
Keep bystanders out of the area during as-4.
sembly.
Do not assemble when tired or when under5.
the inuence of drugs, alcohol or medication.
PINTLE HOOK
WITH 2" BALL
96198
SKU 96198 For technical questions, please call 1-800-444-3353. Page 2
Use Precautions
This product is not a toy. Do not allow chil-1.
dren to play with or near this item.
Use as intended only.2.
Inspect before every use; do not use if parts3.
are loose or damaged.
Be4. aware of dynamic loading! Sudden
load movement may briey create excess
load causing product failure.
Mount to proper surface of vehicle or receiver5.
plate with four Grade-8 bolts of proper size.
(Not included.)
Lower and latch Top Bracket (2) cautiously to6.
prevent crushing hands.
Read trailer and coupler manuals.7.
Use according to local Department Of Trans-8.
portation regulations.
Maintain product labels and nameplates.9.
These carry important safety information.
If unreadable or missing, contact Harbor
Freight Tools for a replacement.
ASSEMBLY INSTRUCTIONS
Read the ENTIRE IMPORTANT
SAFETY INFORMATION section at the
beginning of this document including
all text under subheadings therein
before set up or use of this product.
This product must be mounted to a Pintle1.
Mount (sold separately). Follow the instruc-
tions that come with the Pintle Mount.
Align holes in the Pintle Hook Base (6) to the2.
holes in the Pintle Mount and per mounting
hole attach with one bolt, two at washers,
one spring washer, and one nut (not includ-
ed) rated to a minimum of Grade-8 hardness.
Check with the vehicle manufacturer to make3.
sure the surface the Pintle Mount is attached
to, and vehicle drive train are able to handle
the weight of the load that will be applied.
OPERATION
Check Pintle Hook for loose parts and dam-1.
age before every use.
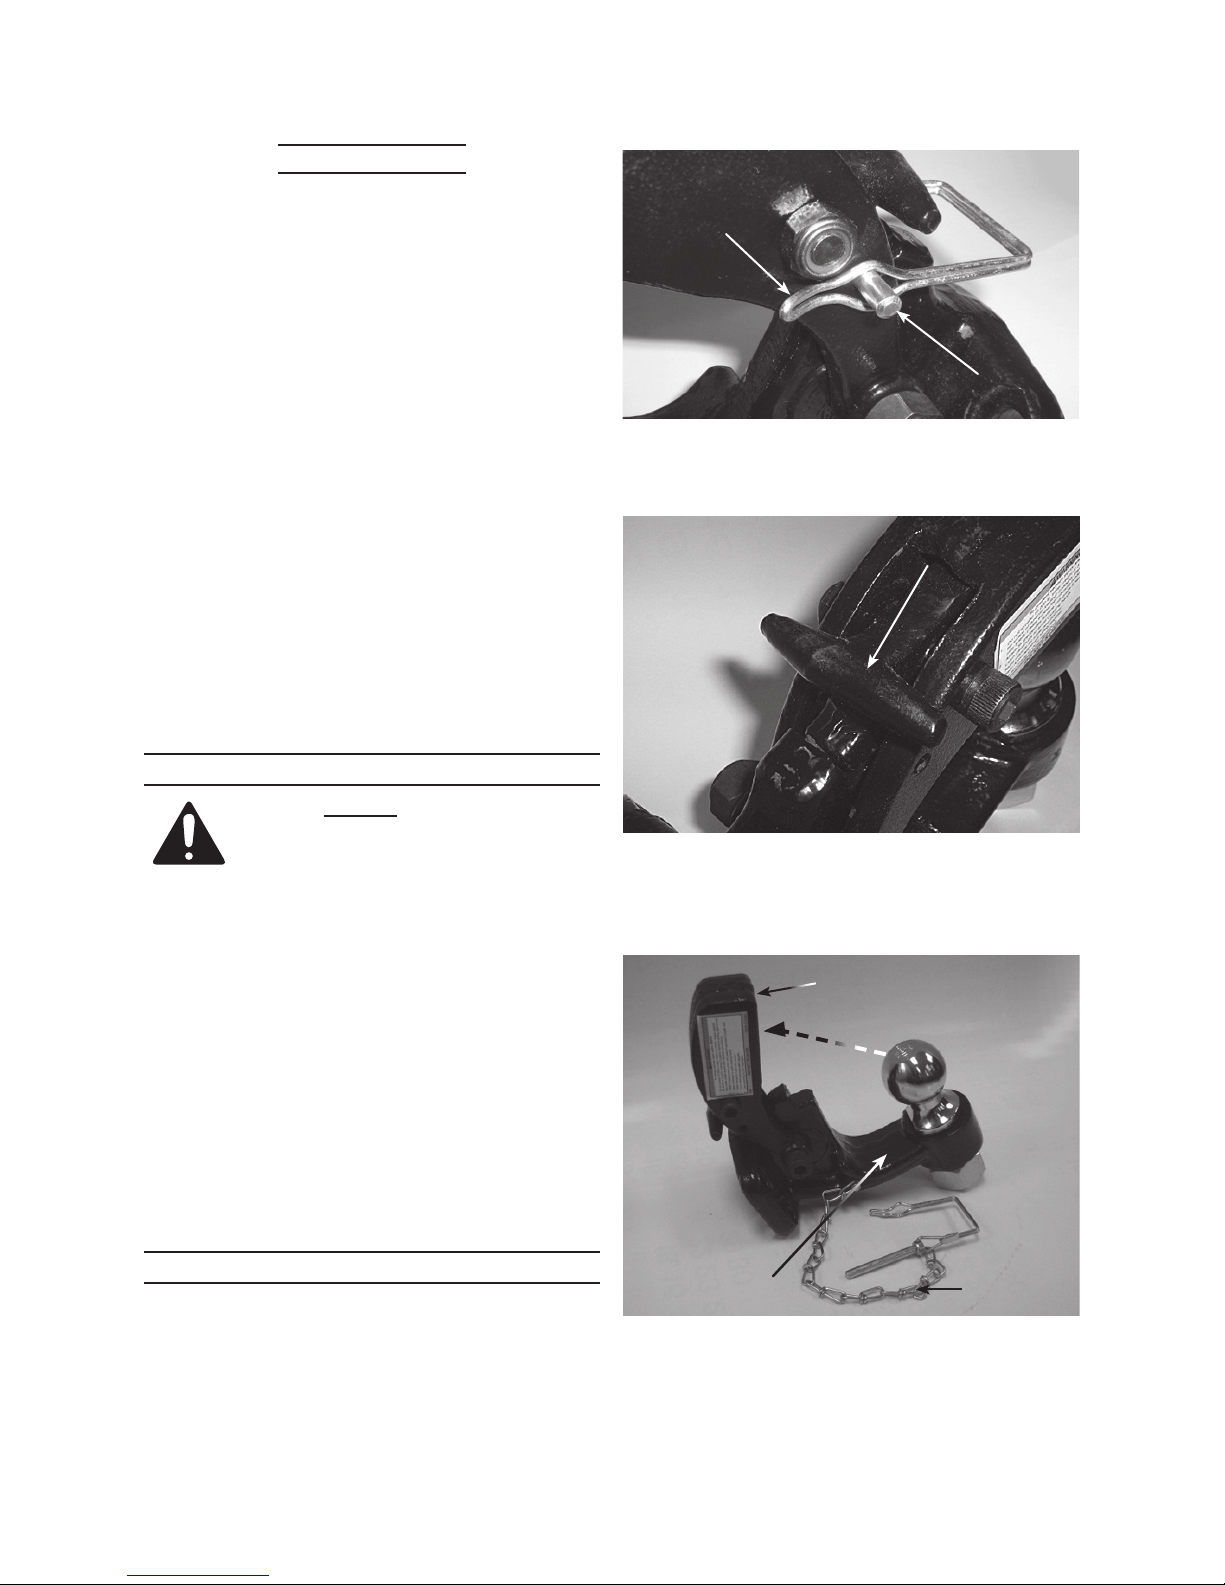
Unlock the Hitch Pin by pulling the end of the2.
Hitch Pin Spring Lock (5) away from the end
of the Hitch Pin and swing back out of the
way. (See Fig. 1.)
Fig. 1
Hitch Pin
Spring Lock (5)
Hitch Pin (7)
3. The Hitch Pin is now free to slide out from
the Hitch Pin channel.
Fig. 2
“T” Lock Handle (4)
4. Pull the “T” Handle upward unlocking the
Top Bracket (2), and swing the Top Bracket
upward, away from the Ball. (See Figs. 2, 3.)
Fig. 3
Top Bracket (2)
Horn (3) Spring Lock
Chain (8)
5. Position the trailer’s drawbar eye (not in-
cluded) over the Horn of the Pintle Hook and
lower into place. (See Fig. 3.)
SKU 96198 For technical questions, please call 1-800-444-3353. Page 3
Make sure the drawbar’s cupped end is prop-6.
erly aligned onto the Hitch Ball (1).
Lower the Top Bracket (2) down over the7.
cupped end of top of the trailer’s drawbar.
Insert the Hitch Pin (7) into its channel and8.
slide all the way in.
Swing the Spring Lock (5) back and snap9.
over the end of the Hitch Pin (7).
Double-check that the Spring Lock (5) is10.
applied properly so there is no way the Hitch
Pin (7) can work its way out.
MAINTENANCE
Remove dirt, mud and old grease and other1.
debris from hardware.
Wipe the Pintle Hook down with a clean2.
cloth.
Clean off the Hitch Ball (1) and Pintle Mount.3.
Apply a little grease to all moving parts on a4.
regular basis.
PLEASE READ THE FOLLOWING
CAREFULLY
THE MANUFACTURER AND/OR DISTRIBUTOR HAS
PROVIDED THE PARTS LIST AND ASSEMBLY DIAGRAM
IN THIS DOCUMENT AS A REFERENCE TOOL ONLY.
NEITHER THE MANUFACTURER OR DISTRIBUTOR
MAKES ANY REPRESENTATION OR WARRANTY OF ANY
KIND TO THE BUYER THAT HE OR SHE IS QUALIFIED
TO MAKE ANY REPAIRS TO THE PRODUCT, OR THAT
HE OR SHE IS QUALIFIED TO REPLACE ANY PARTS OF
THE PRODUCT. IN FACT, THE MANUFACTURER AND/OR
DISTRIBUTOR EXPRESSLY STATES THAT ALL REPAIRS
AND PARTS REPLACEMENTS SHOULD BE UNDERTAKEN
BY CERTIFIED AND LICENSED TECHNICIANS, AND NOT
BY THE BUYER. THE BUYER ASSUMES ALL RISK AND
LIABILITY ARISING OUT OF HIS OR HER REPAIRS TO THE
ORIGINAL PRODUCT OR REPLACEMENT PARTS THERETO,
OR ARISING OUT OF HIS OR HER INSTALLATION OF
REPLACEMENT PARTS THERETO.
Pintle Hook
Base (6)
Horn (3)
Hitch
Pin (7)
“T” Lock Handle (4)
Spring Lock (5)
Hitch Ball
(1)
Top Bracket (2)
Fig. 4
PARTS LIST & ASSEMBLY
DIAGRAM
Part Description Qty.
1 Hitch Ball 1
2 Top Bracket 1
3 Horn 1
4 “T” Lock Handle 1
5 Spring Lock 1
6 Pintle Hook Base 1
7 Hitch Pin 1
8 Spring Lock Chain 1
SKU 96198 For technical questions, please call 1-800-444-3353. Page 4
Record Serial Number Here:
Note: If product has no serial number, record month and year of purchase instead.
Note: Some parts are listed and shown for illustration purposes only, and are not available individually as
replacement parts.
LIMITED 90 DAY WARRANTY
Harbor Freight Tools Co. makes every effort to assure that its products meet high quality and dura-
bility standards, and warrants to the original purchaser that this product is free from defects in materials
and workmanship for the period of 90 days from the date of purchase. This warranty does not apply to
damage due directly or indirectly, to misuse, abuse, negligence or accidents, repairs or alterations outside
our facilities, criminal activity, improper installation, normal wear and tear, or to lack of maintenance. We
shall in no event be liable for death, injuries to persons or property, or for incidental, contingent, special
or consequential damages arising from the use of our product. Some states do not allow the exclusion or
limitation of incidental or consequential damages, so the above limitation of exclusion may not apply to
you. THIS WARRANTY IS EXPRESSLY IN LIEU OF ALL OTHER WARRANTIES, EXPRESS OR IM-
PLIED, INCLUDING THE WARRANTIES OF MERCHANTABILITY AND FITNESS.
To take advantage of this warranty, the product or part must be returned to us with transportation
charges prepaid. Proof of purchase date and an explanation of the complaint must accompany the mer-
chandise. If our inspection veries the defect, we will either repair or replace the product at our election
or we may elect to refund the purchase price if we cannot readily and quickly provide you with a replace-
ment. We will return repaired products at our expense, but if we determine there is no defect, or that the
defect resulted from causes not within the scope of our warranty, then you must bear the cost of returning
the product.
This warranty gives you specic legal rights and you may also have other rights which vary from
state to state.
3491 Mission Oaks Blvd. • PO Box 6009 • Camarillo, CA 93011 • (800) 444-3353

This manual suits for next models

1

Other HAUL MASTER Automobile Accessories manuals

HAUL MASTER 90018 Assembly instructions

HAUL MASTER

HAUL MASTER 90018 Assembly instructions

HAUL MASTER 92655 Assembly instructions

HAUL MASTER

HAUL MASTER 92655 Assembly instructions

HAUL MASTER 64793 Assembly instructions

HAUL MASTER

HAUL MASTER 64793 Assembly instructions

HAUL MASTER 93341 User manual

HAUL MASTER

HAUL MASTER 93341 User manual

HAUL MASTER 95408 User manual

HAUL MASTER

HAUL MASTER 95408 User manual

HAUL MASTER 41005 User manual

HAUL MASTER

HAUL MASTER 41005 User manual

HAUL MASTER 94564 User manual

HAUL MASTER

HAUL MASTER 94564 User manual

HAUL MASTER 67623 Assembly instructions

HAUL MASTER

HAUL MASTER 67623 Assembly instructions

HAUL MASTER 94643 Parts list manual

HAUL MASTER

HAUL MASTER 94643 Parts list manual

HAUL MASTER 58114 Assembly instructions

HAUL MASTER

HAUL MASTER 58114 Assembly instructions

HAUL MASTER 44649 Installation manual

HAUL MASTER

HAUL MASTER 44649 Installation manual

HAUL MASTER 34313 User manual

HAUL MASTER

HAUL MASTER 34313 User manual

HAUL MASTER 92655 Installation manual

HAUL MASTER

HAUL MASTER 92655 Installation manual

HAUL MASTER HAUL MASTER 98511 User manual

HAUL MASTER

HAUL MASTER HAUL MASTER 98511 User manual

HAUL MASTER 92174 Parts list manual

HAUL MASTER

HAUL MASTER 92174 Parts list manual

HAUL MASTER 69650 Assembly instructions

HAUL MASTER

HAUL MASTER 69650 Assembly instructions

HAUL MASTER 92626 Installation manual

HAUL MASTER

HAUL MASTER 92626 Installation manual

HAUL MASTER 90018 Assembly instructions

HAUL MASTER

HAUL MASTER 90018 Assembly instructions

HAUL MASTER 62837 Assembly instructions

HAUL MASTER

HAUL MASTER 62837 Assembly instructions

HAUL MASTER 96658 Manual

HAUL MASTER

HAUL MASTER 96658 Manual

HAUL MASTER 96349 Installation manual

HAUL MASTER

HAUL MASTER 96349 Installation manual

HAUL MASTER 95974 Parts list manual

HAUL MASTER

HAUL MASTER 95974 Parts list manual

HAUL MASTER 96406 Assembly instructions

HAUL MASTER

HAUL MASTER 96406 Assembly instructions

HAUL MASTER 94795 Quick reference guide

HAUL MASTER

HAUL MASTER 94795 Quick reference guide

Popular Automobile Accessories manuals by other brands

Code 3 GMB-TH21 Installation and operation instruction

Code 3

Code 3 GMB-TH21 Installation and operation instruction

TrailFX J026T quick start guide

TrailFX

TrailFX J026T quick start guide

Menabo FIX 501 FP Fitting instructions

Menabo

Menabo FIX 501 FP Fitting instructions

Chevrolet Colorado 2018 instructions

Chevrolet

Chevrolet Colorado 2018 instructions

RNS 850 instructions

RNS

RNS 850 instructions

Hama MagLock 210509 operating instructions

Hama

Hama MagLock 210509 operating instructions

Safe Fleet Rear View Safety G Series instruction manual

Safe Fleet

Safe Fleet Rear View Safety G Series instruction manual

XZENT N-XFDUC8 Mounting instruction

XZENT

XZENT N-XFDUC8 Mounting instruction

HY Technologies F2R4L user manual

HY Technologies

HY Technologies F2R4L user manual

BMW 84 64 0 153 226 installation instructions

BMW

BMW 84 64 0 153 226 installation instructions

CAN CONNECT CANHBIV1 manual

CAN CONNECT

CAN CONNECT CANHBIV1 manual

Havis-Shields KK-100-01 Specification sheet

Havis-Shields

Havis-Shields KK-100-01 Specification sheet

Thule 520 installation instructions

Thule

Thule 520 installation instructions

Hamron 007330 operating instructions

Hamron

Hamron 007330 operating instructions

Parrot MKi9200 RU user guide

Parrot

Parrot MKi9200 RU user guide

WeatherTech No-Drill MudFlap installation instructions

WeatherTech

WeatherTech No-Drill MudFlap installation instructions

AUSSIE TONNEAU ATB01097 Installation instruction

AUSSIE TONNEAU

AUSSIE TONNEAU ATB01097 Installation instruction

Tellur TLL622061 user manual

Tellur

Tellur TLL622061 user manual

manuals.online logo
manuals.online logoBrands
  • About & Mission
  • Contact us
  • Privacy Policy
  • Terms and Conditions

Copyright 2025 Manuals.Online. All Rights Reserved.