HBM ME50S6 User manual

Operating Manual | Bedienungsanleitung |
Manuel d'emploi
English Deutsch Français
ME50S6

Hottinger Baldwin Messtechnik GmbH
Im Tiefen See 45
D-64293 Darmstadt
Tel. +49 6151 803-0
Fax +49 6151 803-9100
www.hbm.com
Mat.: 7-2002.0380
DVS: A00260_04_Y00_01 HBM: public
12.2018
EHottinger Baldwin Messtechnik GmbH.
Subject to modifications.
All product descriptions are for general information only.
They are not to be understood as a guarantee of quality or
durability.
Änderungen vorbehalten.
Alle Angaben beschreiben unsere Produkte in allgemeiner
Form. Sie stellen keine Beschaffenheits- oder Haltbarkeits
garantie dar.
Sous réserve de modifications.
Les caractéristiques indiquées ne décrivent nos produits
que sous une forme générale. Elles n'impliquent aucune
garantie de qualité ou de durabilité.

Operating Manual | Bedienungsanleitung |
Manuel d'emploi
English Deutsch Français
ME50S6

2A00260_04_Y00_01 HBM: public ME50S6
English
1 Safety instructions 4........................................
2 Markings used 6............................................
2.1 The markings used in this document 6..........................
2.2 Symbols on the product 7.....................................
3 Measuring Amplifiers on Eurocards ME50S6 8................
4 Electrical Connection 9.....................................
4.1 Transducer Connection 9.....................................
4.2 Supply Voltage 10............................................
4.3 Output 10....................................................
4.4 Pin Assignment 11............................................
5 Putting into Operation 12....................................
5.1 Select Measuring Range 12....................................
5.2 Bridge Zero Balancing 12......................................
5.3 MR Fine Adjustment 12........................................
6 Individual Settings 14........................................
6.1 Operational Setting 14.........................................
6.2 Setting the Measuring Range 14................................
6.3 External Fine Balancing of the MR1 15..........................
6.4 Bridge Fine Balancing 16......................................
6.5 Calibration Signal 16..........................................
6.6 Measuring Frequency Range / Cut‐off Frequency fco 17...........
6.7 Synchronization 17............................................
7 Options 18..................................................
7.1 Stabilized Power Supply 18....................................
7.2 DC‐DC Converter 18..........................................
7.3 Current Output Module 19.....................................
7.4 Safety Barriers for use in Hazardous Areas 19....................

Safety instructions
4A00260_04_Y00_01 HBM: public ME50S6
1 Safety instructions
In order to ensure sufficient immunity from disturbance only use Greenline
shielding (see HBM's special publication ”Greenline” Screening Concept, elec
tromagnetic compatibility of measuring cable, downloadable from the Internet
at http://www.hbm.com/Greenline).
The connection lines' (≤50 V) minimum insulation strength must be 350 V (AC).
Appropriate use
The ME50S6 with the connected transducers may be used for measurement
and directly related control and regulation tasks, only. Any other use is not ap
propriate.
To ensure safe operation, the ME50S6 may only be used according to the
specifications given in this manual. When using the transducer, the legal and
safety regulations for the respective application must also be observed. The
same applies if accessories are used.
General dangers in the case of non‐observance of the safety instructions
The ME50S6 complies with the state of the art and is operationally reliable. If
the device is used and operated inappropriately by untrained personnel, resid
ual dangers might develop.
Any person charged with device installation, operation, maintenance or repair
must in any case have read and understood the operating manual and the
safety instructions, in particular.
Conditions on site
Protect the device from moisture or atmospheric influences such as rain, snow,
etc.

Safety instructions
ME50S6 A00260_04_Y00_01 HBM: public 5
Maintenance and cleaning
The Clip Electronic are maintenance‐free. Please note the following points
when cleaning the front panel:
SRemove the mains plug from the socket before cleaning.
SClean the front panel with a soft, slightly damp (not wet!) cloth. Never use
solvents, since they may damage the labelling on the front panel.
SWhen cleaning, please ensure that no liquid finds its way into the device or
onto the contacts.
Residual dangers
The ME50S6 scope of performance and supply covers part of the measuring‐
technology, only. The plant designer/constructor/operator must in addition de
sign, realise and take responsibility for the measuring‐system's safety such
that potential residual dangers are minimized. The respective regulations must
in any case be observed. Residual dangers regarding the measuring system
must be specified explicitly.
Reconstruction and modifications
HBM's express consent is required for modifications regarding the ME10
construction and safety. HBM does not take responsibility for damage resulting
from unauthorized modifications.
In particular, repair and soldering works on the boards are prohibited. If com
plete componentry is replaced use original HBM components, only.
Qualified personnel
The device may be used by qualified personnel, only; the technical data and
the special safety regulations must in any case be observed. When using the
device, the legal and safety regulations for the respective application must also
be observed. The same applies if accessories are used.
Qualified personnel means: personnel familiar with the installation, mounting,
start‐up and operation of the product, and trained according to their job.
Maintenance and repair work on an open device with the power on should only
be undertaken by trained personnel who are aware of the above‐mentioned
dangers.

Markings used
6A00260_04_Y00_01 HBM: public ME50S6
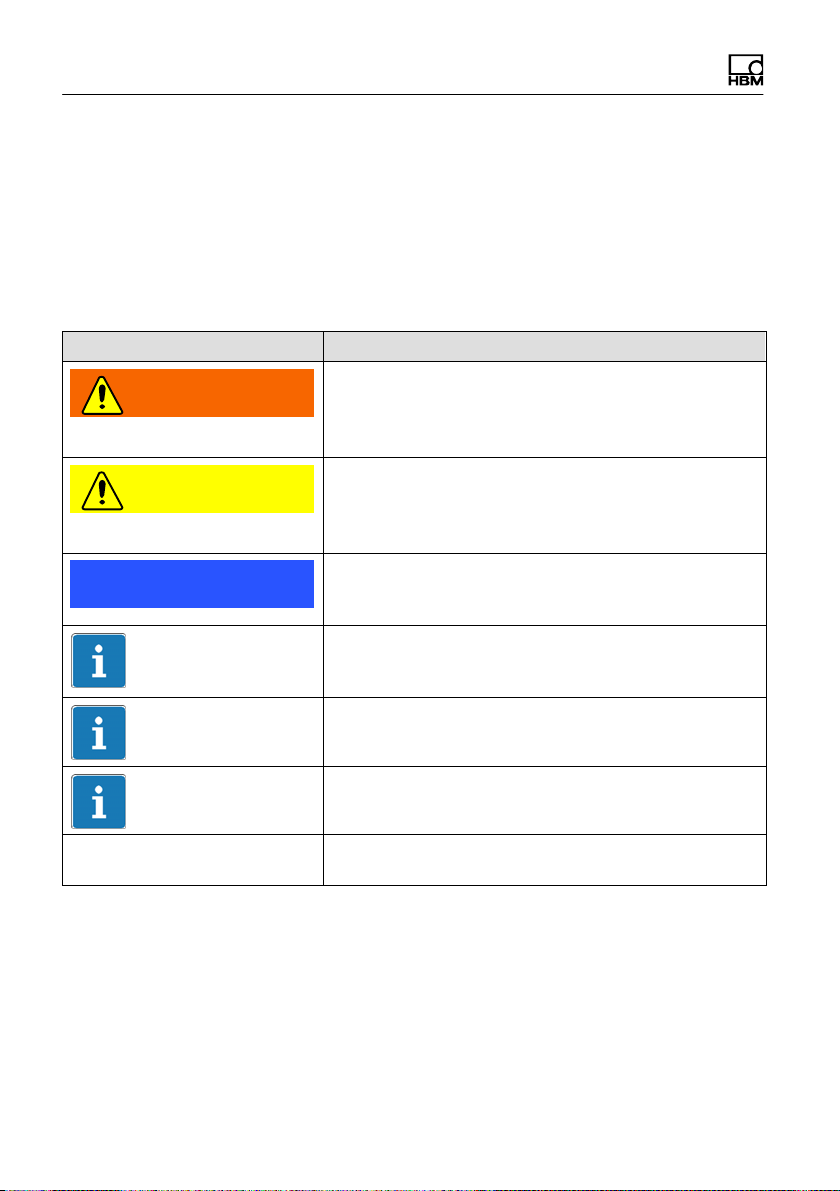
2 Markings used
2.1 The markings used in this document
Important instructions for your safety are specifically identified. It is essential to
follow these instructions in order to prevent accidents and damage to property.
Symbol Significance
WARNING This marking warns of a potentially dangerous
situation in which failure to comply with safety
requirements can result in death or serious physical
injury.
CAUTION This marking warns of a potentially dangerous
situation in which failure to comply with safety
requirements can result in slight or moderate physical
injury.
Notice This marking draws your attention to a situation in
which failure to comply with safety requirements can
lead to damage to property.
Important
This marking draws your attention to important
information about the product or about handling the
product.
Tip
This marking indicates application tips or other
information that is useful to you.
Information
This marking draws your attention to information
about the product or about handling the product.
Emphasis
See….
Italics are used to emphasize and highlight text and
references to other chapters and external documents.

Markings used
ME50S6 A00260_04_Y00_01 HBM: public 7
2.2 Symbols on the product
CE mark
The CE mark enables the manufacturer to guarantee that
the product complies with the requirements of the rele
vant EC directives (the declaration of conformity is avail
able at http://www.hbm.com/HBMdoc).
Statutory marking requirements for waste disposal
National and local regulations regarding the protection of
the environment and recycling of raw materials require
old equipment to be separated from regular domestic
waste for disposal.
For more detailed information on disposal, please contact
the local authorities or the dealer from whom you pur
chased the product.

Measuring Amplifiers on Eurocards ME50S6
8A00260_04_Y00_01 HBM: public ME50S6
3 Measuring Amplifiers on Eurocards ME50S6
The Eurocards ME50S6 are 4.8KHz carrier frequency measuring
single‐channel amplifiers for strain gauge transducers.
All plug‐in cards are delivered without housing or rack frame and without power
supply unit so that an individual setting in an existing 19” rack mounting system
is possible. Owing to the narrow width of the plug‐in cards (4 divs = 20.32mm)
up to 21 cards can be inserted into a 19” rack. The dimensions and connecting
details correspond to the IEC standards 48D and 297.
All controls necessary for easy operation are accessible from the front.
Individual adjustments are described in chapter four; factory settings are speci
fied on the back of the Eurocard.

Electrical Connection
ME50S6 A00260_04_Y00_01 HBM: public 9
4 Electrical Connection
4.1 Transducer Connection
Strain gauge transducers are connected by means of 4‐wire circuits.
measuring signal(-) pin 30a........
contact
rd
bk
wh
bu
ye
bridge supply voltage(-) pin 32a.....
measuring signal(-) pin 30a........
bridge supply voltage (+) pin 28a....
screen pins 31a+c...................
(alternatively 29a+c)
Fig. 4.1 Bridge connection
The required bridge supply voltage is 5 V (symmetrical about ground) as set
factory settings. It can be reduced to 1.0 V by switch S25.
UBBridge resistance Switch S25
5 V(factory settings) RB≥110...4000 Ω
1 V RB≥60...4000 Ω

Electrical Connection
10 A00260_04_Y00_01 HBM: public ME50S6
4.2 Supply Voltage
+14.5...+15.5 V (max.70 mA) pin 15a.........
-14.5...-15.5 V (max.65 mA) pin 16a..........
operating voltage zero pin 19c...............
The ripple on the supply voltage should not exceed 0.1 V peak‐to‐peak. The
supply connections are internally protected against reverse polarity. Single
sided connection of the supply voltage should be avoided. The supply voltage
should be kept as low as possible within the permissible range of
"15.6..."25 V in order to maintain the dissipation at a low value.
If a stabilized voltage is not available, the measuring amplifier can be operated
by means of a stabilized power supply or a DC‐DC converter (see chapter 7.1
and 7.2).
4.3 Output
Output voltage: "10 V; RL≥5 kΩpin 18C......
Operating voltage zero pin 20a...............
The output is provided for the connection of a display and/or recorders. A cur
rent output can be generated optionally (see chapter 7.3).
+
−
±

Electrical Connection
ME50S6 A00260_04_Y00_01 HBM: public 11
4.4 Pin Assignment
Line c :
1c housing
2c not occupied
3c not occupied
4c not occupied
5c not occupied
6c output Uadd.=+14.5...+15.5 V; <50 mA
7c MR1 external fine balance (R=5 kOhm)
8c MR1 external fine balance. tap
9c MR1 external fine balance (R=5 kOhm)
10c not occupied
11c not occupied
12c input synchronization
13c not occupied
14c not occupied
15c operating voltage zero
16c not occupied
17c not occupied
18c output UA="10 V; R>5 kOhm
19c operating voltage zero
20c not occupied
21c external zero balancing tap
22c not occupied
23c not occupied
24c external zero balancing (R=50 kOhm)
25c external switching from MR1 to MR2
26c external zero balancing (R=50 kOhm)
27c not occupied
29c operating voltage zero
30c measuring signal A(wh)
31c operating voltage zero (ye)
see also chapter 10 “Component Layout”, page 24
Line b : not
connected
64‐pin right
angle plug
Line a :
1a not occupied
2a not occupied
3a not occupied
4a DC‐DC converter positive pole
5a DC‐DC converter negative pole
6a not occupied
7a output
Uadd.=-14.5...-15.5 V; <50 mA
8a not occupied
9a not occupied
10a not occupied
11a not occupied
12a not occupied
13a internally connected
14a internally connected
15a supply voltage
+14.5...+15.5 V (standard)
16a supply voltage
-14.5...-15.5 V (standard)
17a not occupied
18a not occupied
19a current output with EM002
20a operating voltage zero
21a zero function, external
22a not occupied
23a not occupied
24a not occupied
25a calibration function, external
26a not occupied
27a not occupied
28a bridge supply voltage C(bu)
29a operating voltage zero
30a measuring signal D(rd)
31a operating voltage zero (ye)
32a bridge supply voltage B(bl)
St 21
cab
Line aLine c

Putting into Operation
12 A00260_04_Y00_01 HBM: public ME50S6
5 Putting into Operation
If the manufacturer's settings, such as the coarse measuring range, are
retained the operation is limited to the following points:
5.1 Select Measuring Range
With the factory settings measuring range 1 (±1 mV/V) is always switched on.
Measuring range 2 (calibration at ±0.2 mV/V) can be selected either internally
via DIP switch 24/4 or externally by connecting a single‐pole changeover
switch to pin 25c (see chapter 6.2).
5.2 Bridge Zero Balancing
The bridge zero balancing is carried out by means of the screwdriver poten
tiometers P23 (fine) and switches S22 (coarse) and S23 (polarity) (see also
chapter 6.4).
5.3 MR Fine Adjustment
The fine adjustment of the measuring range is made seperately for both ranges
by means of the screwdriver potentiometers P21 (measuring range 1) and P22
(measuring range 2). The potentiometers, which are accessible from the front,
permit corrections of approx. 35 % (related to the set measuring range). As far
as measuring range 1 is concerned, the fine adjustment is also possible via an
external potentiometer (see chapter 6.3).
Notice
P22 must not be altered in order not to detune the manufacturer's setting
(MR2 ±0.2mV/V) (see chapter 6.5).

Putting into Operation
ME50S6 A00260_04_Y00_01 HBM: public 13
P21
P22
ME50
S21
P23
S22
S23
Fig. 5.1 Front view ME50S6

Individual Settings
14 A00260_04_Y00_01 HBM: public ME50S6
6 Individual Settings
Various factory settings on the measuring amplifier card can be altered.
Adaptations, which are of no problem, can be carried out by means of the DIP
switch on the board or also by externally wired switching elements. If re
quested with the order, they can be carried out by the manufacturer.
6.1 Operational Setting
Zero
Switch S21 or connect pin 21a to pin 15c
or connect pin 25a to pin 15c
Measure Calibrate
The measuring signal is switched off in the ”Zero” function, so that the output
signal indicates the adjusted balance value as ”Zero value”. This function en
ables amplifiers to be replaced in measurement systems without the need for
rebalancing the bridge with zero load on the transducer. All that is required is
that the amplifier balance values are noted and then this value is set, if neces
sary, with P23, S22 and S23.
6.2 Setting the Measuring Range
Measuring range 1 is get factory settings. Measuring range 2 can be activated
by switching DIP switch S24/4 or by external switching.
Measuring Range S 24/4 Externally
MR 1 = ±1 mV/V
(factory settings) -
MR 2 = ±0.2 mV/V from MR1 to MR2;
connect 25c and 15c
Any alteration to the measuring ranges between "0.2 mV/V and "4 mV/V
with UB= 5 V (resp. "1.0 mV/V... "20 mV/V with UB= 1.0 V) can be made
by means of the DIP switches S26 and S27. For fine balancing see chap
ter 5.3).

Individual Settings
ME50S6 A00260_04_Y00_01 HBM: public 15
UB=5 V MR1:S26 ; MR2:S27 factory settings
Meas.range(mV/V) 1 2 3 4 5 6 7 8
0.17 …0.24 x o o o o o x o MR 2 ±0.2mV/V
0.22 … 0.32 x o o o o o o x
0.30 … 0.42 o x o o o o x o
0.39 … 0.55 o x o o o o o x
0.52 … 0.73 o o x o o o x o
0.68 … 0.97 o o x o o o o x
0.90 … 1.28 o o o x o o x o MR 1 ±1mV/V
1.18 … 1.69 o o o x o o o x
1.56 … 2.23 o o o o x o x o
2.07 … 2.94 o o o o x o o x
2.73 … 3.88 oooooxxo
3.61 … 5.13 oooooxox
o = open, x = closed
6.3 External Fine Balancing of the MR1
An external Potentiometer (5 kΩ) can be connected for fine adjustment of the
range.
This will enable about 35 % correction of the selected range.
Connections:
potentiometer pin 9c....................
wiper pin 8c...........................
potentiometer finish pin 7c...............
R=5 kΩ

Individual Settings
16 A00260_04_Y00_01 HBM: public ME50S6
6.4 Bridge Fine Balancing
a) Coarse Balancing
The 16‐stage switch S22 is used for the coarse balancing carried out from the
front panel; the polarity of the balancing direction can be chosen via switch
S23. The overall balancing range is approximately ±2 mV/V.
b) Fine Balancing
The potentiometer P23 is used for the fine balancing (±0.08 mV/V).
c) External Zero Balancing
A potentiometer of 50 kΩ, which can be connected externally, can be used for
settings within a balancing range of "0.12 mV/V set by the manufacturer.
Pin assignment:
potentiometer pin 26c....................
wiper pin 21c...........................
potentiometer finish pin 24c...............
6.5 Calibration Signal
The measuring amplifier ME50S6 operates on a 6‐wire technique, i.e. the cal
ibration and zero compensation signals are formed from the bridge supply volt
age fed back; thus they are independent of transducer, connecting cable and
pin resistances. If necessary, the sensitivity of the measuring amplifier can be
adjusted by means of an internal calibration signal of +1 mV/V with measuring
ranges > 1mV/V. Here the switch S21 must be kept in the calibration position
and the appropriate value must be be set simultaneously by means of the po
tentiometers P21 resp. P22. When using the factory settings calibration mea
suring range 2 the setting of P22 must be altered (see chapter 5.3).
R=50 kΩ

Individual Settings
ME50S6 A00260_04_Y00_01 HBM: public 17
6.6 Measuring Frequency Range / Cut‐off Frequency fco
The Butterworth low pass of the amplifier has been set to 0...250 Hz (-1 dB) by
the manufacturer. It can be readjusted by switching the DIP switch S24/3 to
0...40 Hz (-1 dB).
Measuring frequency range S 24/3
0...250 Hz (-1 dB) (factory settings)
0...40 Hz (-1 dB)
6.7 Synchronization
When synchronizing several units of the type ME50S6 one of them has to be
switched as master; its carrier frequency is used for reference. Pins 12c and
15c of all amplifiers concerned must be joined for synchronization. The master
amplifier is selected by switch S28.
Synchronization S S28
Slave amplifier (factory settings)
Master amplifier

Options
18 A00260_04_Y00_01 HBM: public ME50S6
7 Options
7.1 Stabilized Power Supply
The module KM001 can be used to connect the measuring amplifier to a sym
metrical supply voltage "15.6...25.0 V. When installing the module KM001,
attention must be paid to the marking. The jumpers BR3 and BR4 have to be
configured according to the table below.
Pin assignment:
positive pole pin 15a................
negative pole pin 16a...............
supply zero pin 19c.................
7.2 DC‐DC Converter
The manufacturer can mount a DC‐DC converter onto the board for the opera
tion of a simple operating voltage with simultaneous electrical isolation between
operating voltage and measuring circuit. The voltage converter can be deliv
ered for operation +9...+35 V (for unstabilized voltage).
Pin assignment:
positive pole pin 4a................
negative pole pin 5a...............
When using the modules KM001 resp. a DC‐DC converter attention has to be
paid to the jumpers BR3 and BR4 which are re‐configured.
factory settings:
1 2 3
BR3
BR4 I
I
With module KM001 resp. DC‐DC converter
1 2 3
BR3
BR4 I
I
Other manuals for ME50S6
2
Table of contents
Languages:
Other HBM Amplifier manuals
Popular Amplifier manuals by other brands

Altinex
Altinex Video and S-Video Distribution Amplifier Cards... user guide

Inter-m
Inter-m R-150 Plus Wiring diagram

Pass Laboratories
Pass Laboratories XP-30 owner's manual

McIntosh
McIntosh L11 CABINET - MOUTING instructions

Black Ice Audio
Black Ice Audio Fusion F100 owner's manual

Hartke
Hartke Bass Attack 2 owner's manual