HealthSmart 40-810-000 User manual
Instruction Manual
Fingertip
Pulse Oximeter
Item # 40-810-000 Item # 40-811-000
Item # 40-812-000 Item # 40-813-000
Please read this guidebook
completely before operating this unit.
English • Spanish

Limited Two-Year Warranty
Your pulse oximeter is guaranteed to be free of manufacturing
defects for a period of two years from the date of purchase under
normal use. This limited warranty does not apply to use in any
clinical or commercial applications. If the unit fails to operate
during the warranty period, please call our Customer Care Help
Line at 800-622-4714 and we will try to resolve the issue as soon
as possible. If the warrantor determines the unit failed to operate
due to a manufacturing defect, the unit will be replaced at the
option of the warrantor. A return shipping and handling fee may
be applied for all returns. Replacement of the unit is the sole
remedy under this limited warranty. This warranty gives you
specic legal rights, which vary from state to state. As a condition
of this warranty, the warranty registration must be completed
within 10 days of the purchase date at www.mabisdmi.com.
This warranty constitutes the warrantor’s only responsibility and
obligation to replace materials or components. We make no
other express or implied warranties, arising by operation of law
or otherwise, or any warranty of merchantability or tness for a
particular use or purpose whether or not the use or purpose has
been disclosed to the warrantor in specications, drawings or
otherwise, and whether or not the warrantor’s products are
specically designed and/or manufactured by the warrantor
for the buyer’s use or purposes, except for the limited warranty
stated above. The warrantor will not be responsible for any
indirect, incidental, special, consequential, or punitive damages
or other loss, including, but not limited to, damage to or loss of
other property or equipment and personal injuries, whether to
purchaser or others. The warrantor shall in no event be liable to
the purchaser for any amount in excess of the cost of
replacement of the unit.

IMPORTANT SAFEGUARDS
Note: Read all instructions carefully before use.
Caution: Failure to read and observe all precautions could result in
personal injury or equipment damage.
Product Identication, page 4
Product Function Identication, page 5
Operating Overview, pages 6-7
Battery Installation, page 7
Important Information Before Use, page 8
Using Your Pulse Oximeter, page 9
Cleaning and Maintenance, page 10
Description of Display Symbols, page 10
Troubleshooting, page 11
Specications, pages 11-12
Your Fingertip Oximeter is intended for measuring the pulse rate
and functional oxygen saturation (SpO2) through the nger. It is
applicable for spot-checking of SpO2 and pulse rates in homes.
This ngertip pulse oximeter is not a medical device and can not
be used for medical diagnostic and treatment activities.
3
Index

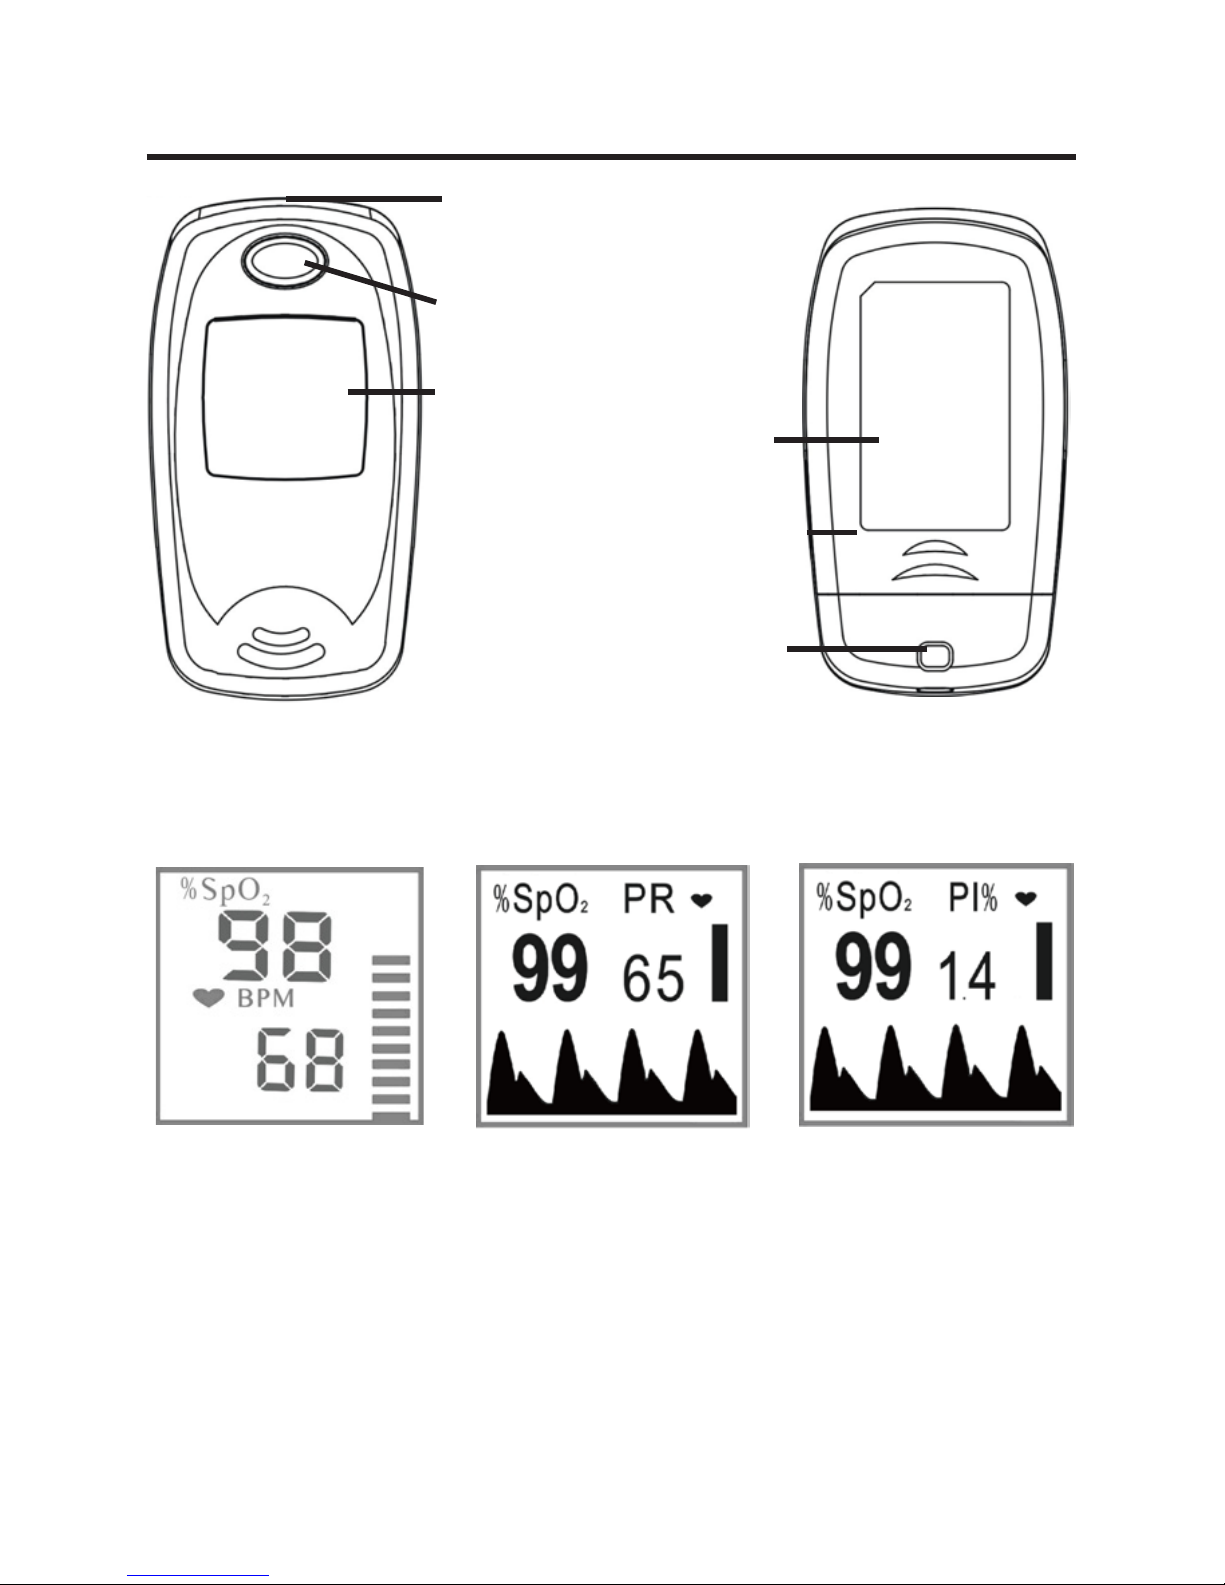
Product Identication
Front Back
Display Key
Display
Screen
Rubber
Cushions
Nameplate
Battery Cover
Hanging Hole
Measuring screen
for Standard,
40-810-000
Measuring screen for
Select, 40-811-000
Deluxe, 40-812-000
Premium, 40-813-000
SpO2 and PI
screen for
Select, 40-811-000
Deluxe, 40-812-000
Premium,
40-813-000
4

Product Function Identication
Model 40-810/ 40-811/ 40-812/ 40-813/
Standard Select Deluxe Premium
Display LCD OLED OLED OLED
Color None Monochrome 2 color Full color
Rotation 1 Direction 2 Direction 2 Direction 4 Direction
SpO2 X X X X
PR X X X X
PI X X X
Pulse Bar X X X X
Plethys- X X X
ogram
Anti-Motion
Technology X X X
Auto Finger
Detection X X X
Auto On X X X
Auto O X X X X
Auto X
Rotation
Function
5

Operating Overview
Operating Cautions
• Checkthedevicetomakesurethereisnovisibledamagethat
may aect the user’s safety or measurement performance with
regard to sensors and clips. It is recommended that the device
should be inspected minimally once a week. When there is
obvious damage, stop using the device.
• Necessarymaintenancemustbeperformedbyqualied
service technicians. Users are not permitted to maintain it by
themselves.
• Theoximetercannotbeusedtogetherwithdevicesnot
specied in this Instruction Manual.
Cautions
• Explosivehazard–DONOTusethisoximeterinan
environment with inammable gas such as some ignitable
anesthetic agents.
• DONOTusetheoximeterwhilethetesteeisunderMRIorCT
scanning.
Warnings
• Anuncomfortableorpainfulfeelingmayappearifusing
the oximeter continuously on the same place for a long time,
especially for poor micro circulation patients. It is
recommended that the oximeter should not be applied to the
same location for longer than two hours. If any abnormal
condition is found, please change the position of oximeter.
• DONOTclipthisdeviceonedemaortendertissue.
• Thelight(infraredlightisinvisible)emittedfromthedeviceis
harmful to the eyes, so service technician or testee should not
stare at the light.
• Thelocallawmustbefollowedwhendisposingofthedevice.
6

Attention
• Keeptheoximeterawayfromdust,vibration,corrosive
substances, explosive materials, high temperature and moisture.
• Thedeviceshouldbekeptoutofthereachofchildren.
• Iftheoximetergetswet,pleasestopusingitanddonotresume
operation until it is dry. When it is carried from a cold
environment to a warm and humid environment, please do not
use it immediately.
• DONOToperatethebuttononthefrontpanelwithsharp
materials.
• DONOTusehightemperatureorhighpressuresteam
disinfection on the oximeter. Refer to page 10 for instructions
of cleaning and disinfection.
• DONOTuseifthesensorisdamaged.
Battery Installation
1. Slide cover o of backside of pulse oximeter.
2. Insert two“AAA” batteries into the compartment, matching the
indicated polarity symbols.
3. To close, slide cover back into place.
It is recommended to remove the batteries if the unit will not be
used for an extended period of time.
7

Important Information Before Use
• Thengershouldbeputinproperlyandcorrectly.
• Donotshakethenger.Keepateaseduringmeasurement.
• Avoidplacingthedeviceonthesamelimbwhichiswrapped
with a cu for blood pressure measurement during venous
infusion.
• Donotletanythingblocktheemittinglightfromdevice.
• Vigorousexerciseandelectrosurgicaldeviceinterferencemay
aect the measuring accuracy.
• Thegravitysensorworksonthebasisofgravity.Asmall
movable metal ball is built in the gravity-sensor for detecting
the orientation of the oximeter. When you want to change the
oximeter’s display direction, if you move the oximeter too
slowly, the movable ball will also move slowly because of not
enough acceleration. Consequently the response of orientation
detection would be delayed. Please move the oximeter with a
bit of force if you want to change the display direction (such as
bend/extend your nger quickly), so an acceleration is provided
to the gravity-sensor for quick sensing the orientation change.
• Duetotheworkingprincipleoforientationsensorusedinthe
oximeter, there is a small metal ball which is movable within
its compartment of the gravity sensor. Therefore you may hear
a slight“clatter” sound when you wave or shake the oximeter. It
is normal and not caused by an unwanted part.
• Usingenamelorothermakeuponthenailmayaectthe
accuracy of the measurement.
8

Using Your Pulse Oximeter
Standard, 40-810-000
1. Open the clip and place nger into the rubber cushions of the
clip, and clip shut.
2. Press the display key to begin measurement.
3. Remove nger and the oximeter will power o automatically.
Select, 40-811-000 and Deluxe, 40-812-000
1. Open the clip and place nger into the rubber cushions of the
clip, and clip shut.
2. Wait two seconds and the oximeter will power on automatically
and begin measurement.
3. Press and release the Display Key to change the display
direction.
4. Press and hold the Display Key to shift the parameter display
between PR and PI.
5. Remove nger and the oximeter will power o automatically.
Premium, 40-813-000
1. Open the clip and place nger into the rubber cushions of the
clip, and clip shut.
2. Wait two seconds and the oximeter will power on automatically
and begin measurement. Tilt the oximeter to change display
direction.
3. Press and hold the Display Key to shift the parameter display
between PR and PI.
4. Remove nger and the oximeter will power o automatically.
9

Cleaning & Maintenance
Cleaning
• Surface-cleansensorwithasoftclothbywettingwithasolution,
such as 75% isopropyl alcohol. If low-level disinfection is
required, use a 1:10 bleach solution.
• Surface-cleanbodywithaclothsaturatedwithcleanwaterand
dry with a clean, soft cloth.
Caution: Donotsterilizebyirradiationsteamorethyleneoxide.
Maintenance
In order to ensure long service life for your pulse oximeter, please
follow the below maintenance guidelines.
• Changethebatterieswhenthelowindicatorlightappears.
• Cleanthesurfaceofthedevicebeforeusing.
Caution:
• High-pressuresterilizationcannotbeusedonthisdevice.
• Donotimmersedeviceinliquid.
• Itisrecommendedthatthedeviceshouldbekeptinadry
environment. Humidity may reduce the life of the device, or
even damage it.
Description of Display Symbols
Pulse oxygen saturation
Pulse rate (beats per minute)
Perfusion Index (%)
Pulse intensity bar graph
Low battery indicator
10

Troubleshooting
Display direction does
not change or changes
slowly.
The SpO2 and pulse
rate are unstable.
The device will not
turn on.
Display is blank.
Shake the oximeter with minimal
force to make the movable metal ball
move freely.
Make sure the nger is inserted
correctly. Review the“Important
Information Before Use”section.
Check and correct the polarity of the
installed batteries. Reinstall or replace
batteries.
Check and correct the polarity of the
installed batteries. Reinstall or replace
batteries.
Specications
Name and Item No. Standard Pulse Oximeter, 40-810-000
Select Pulse Oximeter, 40-811-000
Deluxe Pulse Oximeter, 40-812-000
Premium Pulse Oximeter, 40-813-000
PowerSource 2“AAA”batteries(1.5V)
Supplyvoltage:3VDC
Operating current: ≤40mA
SpO2 Parameter Measuring range: 35% - 99%
Accuracy: 70% - 100% ± 3%
11

Specications
Pulse Rate Measuring range: 30bpm - 240 bpm
Parameter Accuracy: ± 2bpm or ± 2% (whichever is
greater)
Perfusion Index Range: 0% - 20%
(PI) Display
Operation Temperature: 41°F - 104°F (5°C - 40°C)
Environment Humidity: 30% - 80%
Pressure: 70kPa - 106kPa
Performance Under Same with modulation amplitude as low as
Low Perfusion 0.6%
Condition
Resistance to ± 1%
Light Interference
Resistance to Precise
50Hz/60Hz
Interference
Unit Dimensions 2.6” L x 1.4”W x 1.3”H
UnitWeight 2oz.
Accessories Lanyard, two“AAA”batteries, pouch,
detailed guidebook
Specications are subject to change without notice.
Manufactured for:
Briggs Medical Service Company
1931 Norman Drive
Waukegan, IL 60085
www.mabisdmi.com 12
#91-810-000 05/11
© 2011 Briggs Medical
Service Company
Instructivo
Pulsioxímetro
de dedo
Artículo # 40-810-000 Artículo # 40-811-000
Artículo # 40-812-000 Artículo # 40-813-000
Lea esta guía por completo antes
de operar esta unidad.
Inglés • Español

Garantía limitada de dos años
Segarantizaquesupulsioxímetroestarálibrededefectosde
fabricación durante un período de dos años a partir de la fecha
de compra con un uso normal. Esta garantía limitada no se aplica
al uso de ninguna aplicación clínica o comercial. Si la unidad pre-
senta fallas de operación durante el periodo de garantía, llame a
nuestra Línea de ayuda de atención al cliente al 800-622-4714 y
trataremos de resolver el problema tan pronto como sea posible.
Si el garante determina que la unidad ha dejado de funcionar
debidoaundefectodefabricación,sereemplazarálaunidada
discreción del garante. Se puede aplicar un cobro por envío y
manejoparatodaslasdevoluciones.Elreemplazodelaunidades
el único recurso cubierto por esta garantía limitada. Esta garantía
le ofrece derechos legales especícos, que varían de un estado a
otro. Como condición de esta garantía, el registro de la garantía
deberácompletarsedentrodeunplazode10díasdelafechade
compra en www.mabisdmi.com.
Esta garantía constituye la única responsabilidad y obligación del
garantedereemplazarlosmaterialesocomponentes.Norealiza-
mos ninguna otra garantía expresa o implícita, que surja por la
aplicación de la ley u otras disposiciones, ni ninguna garantía de
comerciabilidad o aptitud para un uso o n particular ya sea que
el uso o n se haya revelado o no al garante en las especica-
ciones,planososimilares,ysilosproductosdelgaranteestán
diseñados y/o fabricados especícamente por el garante para
el uso o el n del comprador, excepto por la garantía limitada
mencionadaanteriormente.Elgarantenoseresponsabilizará
de ningún daño indirecto, incidental, especial, consecuente ni
punitivo u otro tipo de pérdida, entre los que se incluyen, entre
otros, los daños o la pérdida de otros bienes o equipos y lesiones
personales, ya sea hacia el comprador o terceros. El garante no
seráresponsableanteelcompradorenningúncasoporningún
montoqueexcedaelcostodelreemplazodelaunidad.

PRECAUCIONES IMPORTANTES
Nota: Lea todas las instrucciones detenidamente antes del uso.
Precaución: No leer ni respetar todas las precauciones podría
ocasionar una lesión personal o daño al equipo.
Identicacióndelproducto,página16
Identicacióndelafuncióndelproducto,página17
Informacióngeneraldelaoperación,páginas18-19
Instalacióndelasbaterías,página19
Informaciónimportanteantesdeusarelproducto,página20
Cómousarsupulsioxímetro,página21
Limpiezaymantenimiento,página22
Descripcióndelossímbolosdelapantalla,página22
Resolucióndeproblemas,página23
Especicaciones,páginas23-24
Su pulsioxímetro de dedo tiene la función de medir la frecuencia
del pulso y la saturación de oxígeno funcional (SpO2) por medio
deldedo.Esaplicablepararevisionesinstantáneasencasade
SpO2 y de las frecuencias del pulso.
Este pulsioxímetro de dedo no es un dispositivo médico y no
puedeutilizarseparaactividadesdediagnósticoytratamiento
médico.
15
Índice
Identicación del producto
Parte frontal Parte trasera
Tecla de
pantalla
Pantalla
Cojines de
goma
Placa de
identicación
Cubierta
de la batería
Oricio para
colgar
Pantalla de
medición para
Standard,
40-810-000
Pantalla de medición
para
Select, 40-811-000
Deluxe, 40-812-000
Premium, 40-813-000
Pantalla SpO2 y
PI para
Select, 40-811-000
Deluxe, 40-812-000
Premium,
40-813-000
16

Identicación de las funciones del producto
Modelo 40-810/ 40-811/ 40-812/ 40-813/
Standard Select Deluxe Premium
Pantalla LCD OLED OLED OLED
Color Ninguna Monocromática 2 colores A todo color
Rotación 1 dirección 2 direcciones 2 direcciones 4 direcciones
SpO2 X X X X
PR X X X X
PI X X X
Barra de pulso X X X X
Pletiso- X X X
grama
Tecnología
antimovimiento X X X
Detección
automática X X X
de dedo
Encendido
automático X X X
Apagado
automático X X X X
Rotación X
automática
Función
17

Información general de la operación
Precauciones de operación
• Reviseeldispositivoparaasegurarsedequenohayadañovisible
enlossensoresylaspinzasquepuedaafectarlaseguridaddel
usuario o el desempeño de la medición. Se recomienda
inspeccionareldispositivocomomínimounavezalasemana.
Cuando haya daño evidente, suspenda el uso del dispositivo.
• Elmantenimientonecesariodebeserrealizadoportécnicosde
servicio calicados. No se permite que los usuarios realicen el
mantenimiento.
• Eloxímetronopuedeutilizarsejuntocondispositivosno
especicados en este instructivo.
Advertencias
• ERiesgoexplosivo–NOUSEesteoxímetroenunambientecongas
inamable como algunos agentes anestésicos combustibles.
• NOuseeloxímetroenunapersonaaquienseleestérealizando
unaresonanciamagnéticaounatomografíacomputarizada.
Advertencias
• Puedepresentarseunasensaciónincómodaodolorosasiseusael
oxímetro continuamente en el mismo lugar durante mucho
tiempo, especialmente en pacientes con micro circulación
deciente. Se recomienda que el oxímetro no se aplique al mismo
lugardurantemásdedoshoras.Siseencuentracualquier
condición anormal, cambie la posición del oxímetro.
• NOsujeteestedispositivosobreunedemaotejidosensible.
• Laluz(laluzinfrarrojaesinvisible)emitidaporeldispositivoes
dañina para los ojos, por lo que el técnico de servicio o la persona a
quienselerealizalamedicióndebenevitarmirardirectamentela
luz.
• Debeseguirselalegislaciónlocalaldesechareldispositivo.
18

Atención
• Mantengaeloxímetroalejadodepolvo,vibraciones,sustancias
corrosivas, materiales explosivos, alta temperatura y humedad.
• Eldispositivodebemantenersefueradelalcancedelosniños.
• Sieloxímetrosemoja,suspendasuusoyesperehastaqueesté
seco para volverlo a usar. Al trasladarlo de un ambiente frío a un
ambiente caluroso y húmedo, no lo utilice inmediatamente.
• NOpresioneelbotóndelpaneldelanteroconmateriales
puntiagudos.
• NOusemétodosdedesinfecciónaaltatemperaturaodevapor
aaltapresióneneloxímetro.Consulteenlapágina10las
instruccionesdelimpiezaydesinfección.
• NOuselaunidadsielsensorestádañado.
Instalación de las baterías
1. Deslice y quite la cubierta de la parte posterior del
pulsioxímetro.
2. Inserte dos baterías “AAA”en el compartimiento, con la
orientación indicada de los símbolos de polaridad.
3. Para cerrar, deslice de nuevo la cubierta en su lugar.
Serecomiendaretirarlasbateríassilaunidadnosevaautilizar
durante un periodo largo de tiempo.
19

Información importante antes de usar el producto
• Eldedodebecolocarseapropiadaycorrectamente.
• Noagiteeldedo.Manténgaserelajadodurantelamedición.
• Evitecolocareldispositivoenelmismomiembrodondetenga
el medidor de presión arterial durante una infusión venosa.
• Nopermitaquenadaobstruyalaluzqueemiteeldispositivo.
• Elejerciciovigorosoylainterferenciadeaparatos
electroquirúrgicos pueden afectar la precisión de la medición.
• Elsensordegravedadfuncionamediantegravedad.Una
pequeñabolademetalmóvilestáubicadadentrodelsensorde
gravedad para la detección de la orientación del oxímetro.
Cuando usted desea cambiar la orientación de la pantalla del
oxímetro, si mueve el oxímetro muy lentamente, la bola móvil
tambiénsemoverálentamentedebidoalafaltadesuciente
aceleración. Por lo tanto, la respuesta de la detección de
orientación sería retrasada. Mueva el oxímetro con algo de
fuerzasideseacambiarlaorientacióndelapantalla(exione
oextiendaeldedorápidamente),demaneraqueseaplique
aceleración al sensor de gravedad para que detecte
rápidamenteelcambiodeorientación.
• Debidoalprincipiodefuncionamientodelsensorde
orientación que se usa en el oxímetro, hay una pequeña bola de
metal móvil dentro del compartimiento del sensor de gravedad.
Por lo tanto, es posible que escuche un ligero sonido al mover o
agitar el oxímetro. Es normal y no lo ocasiona una parte en
malas condiciones.
• Elusodeesmaltedeuñasoalgúnotrotipodedecoraciónenlas
mismas puede afectar la precisión de la medición.
20
Other manuals for 40-810-000
1
This manual suits for next models
3
Table of contents
Languages:
Other HealthSmart Medical Equipment manuals


Popular Medical Equipment manuals by other brands


Power Plate
Power Plate Pro7M Instructions for use

panthera
panthera Anti-Snoring Device Instruction booklet

Beka Hospitec
Beka Hospitec AVERO Premium Plus user manual

Aesculap
Aesculap AdTec mini Instructions for use/Technical description

Vitalograph
Vitalograph VitaloJAK 7100 Instructions for use

Erbe
Erbe 20191-331 Notes on Use


