HealthSmart 18-210-000 User manual


2
• Thank you for purchasing the Compact Infrared Ear Thermometer.
• Remove safety tab from battery. Open battery case and gently pull out the
plastic safety tab from underneath the battery. Thermometer will not activate
until this has been performed.
• For safe and proper use of this product, be sure to read and fully understand
Safety Precautions contained in this instruction manual.
• Keep this Manual with you for a convenient reference.
• The reference body site is core and mode of operation is adjusted mode.
• The user can measure and change the battery under normal circumstances
and maintain the device and its accessories according to the user manual.
Index
Introduction ............................... 2
Intended for Use ............................. 3
Safety Precautions ........................... 3-4
Recommendations ............................ 5
Body Temperature Chart ......................... 5
Product Overview / LCD Display ...................... 6
Temperature Taking Hints ......................... 7
Before Use................................ 7
Switching Between Fahrenheit and Celsius ................. 8
How To Take A Reading ..........................8-9
Memory Recall .............................. 10
Setting the Date & Time .......................... 10
Replacing The Battery........................... 11
FCC Statement and EMC Compatibility ................ 11-12
Maintenance, Storage and Calibration .................. 12
Troubleshooting ........................... 13 - 14
Product Specifications .......................... 15
Normalized Symbols ......................... 15-16
Important Information Regarding Electromagnetic
Compatibility (EMC) ......................... 16 - 22
Warranty ................................ 22
Introduction

3
Intended for Use
The device is intended for the intermittent measurement and monitoring of
human body temperature in the ear by consumers in the home. This device is
intended for use on people of all ages.
Safety Precautions
Proper technique is critical to obtaining accurate temperatures. Therefore, in
order to obtain an accurate measurement, please read this manual carefully
before using.
• Use of this thermometer is not intended as a substitution for consultation
with your physician. Measurement results are for reference only. Contact your
physician if you have or suspect any health concerns.
• The infrared sensor must be kept clean, dry and undamaged at all times to
ensure accurate measurements.
• Earwax and other debris in the ear canal may cause an inaccurate measure-
ment. Ensure the ear canal is clean when taking a measurement.
• Do not touch or blow on the infrared sensor. A dirty sensor may cause
inaccuracy.
• Avoid measuring the ear temperature if the ear is inamed or inected.
• If the temperature of the storage area diers greatly from that of the
measurement area, please wait for the thermometer temperature to equalize
to the room temperature for about 30 minutes before use.
• Keep the device out of the reach of children and pets to avoid inhalation or
swallowing of small parts. Do not allow children to take their own tempera-
tures unattended. Children may not be able to use the device according to
the instructions in this user manual. This is not a toy.
• Do not discard the battery into a re. The battery is likely to explode.
• Do not store the thermometer in extreme temperatures below -4°F (-20°C) or
over 131°F (55°C) or in humidity below 15% RH or over 90% RH. Failing to do
so may cause inaccuracy. Do not use the thermometer under temperature

4
extremes (below 50°F / 10°C or over 104°F / 40°C) or humidity extremes
(below 15%RH or over 85%RH). If you do so, this may cause inaccurate
measurements.
• Do not use the thermometer if the main body is damaged (for example the
infrared sensor is broken) The continuous use of a damaged unit may result
in false readings or injury.
• Do not take the thermometer apart, attempt a repair or change any parts on
the unit at any time.
• Do not use a mobile phone nearby when the thermometer is working.
• If your thermometer will not be used for a long time, it is advised to remove
the battery to prevent possible damage due to chemical leakage. If the
battery does leak, remove them carefully. Do not allow bare skin to touch
the leaking uid.
• This product needs special precautions regarding EMC and needs to be in-
stalled and put into service according to the EMC information provided. This
unit can be aected by portable and mobile RF communications equipment.
• The materials (e.g. ABS) of expect contact with patient had passed the ISO
10993-5 and ISO 10993-10 standards test, no toxicity, allergy and irritations
reaction. However, based on current science and technology, other potential
allergic reactions are unknown. If you have allergic reaction to the materials,
please stop using immediately and consult your physician.
• Store the thermometer in a dry, clean place. Do not leave the thermom-
eter exposed to any chemical solvent, lint, dust direct sunshine or high
temperatures.
• When using, do not touch the battery and the patient simultaneously.
• Do not maintain or service the device while the device is in use.
• The patient may be the proper operator of the thermometer.
CAUTION: This device should not be used adjacent to or stacked with
other equipment and that if adjacent or stacked use is necessary,
this machine should be observed to verify normal operation in the
conguration in which it will be used.

5
Recommendations
– Don’t use the product for other purposes than what it is intended to be
used. Only designed for use on the human body.
– It is not a waterproof device. Clean it with a soft, wet cloth or cotton swab.
– Do not leave the product exposed to any chemical solvent, direct sunshine or
high temperature.
– Don’t drop or impose any vibration or impact on the product.
– Don’t use a mobile phone nearby when the thermometer is working.
– Please act according to the native law in handling and disposing
of the batteries.
– Take out the batteries if you are not going to use the unit for a long
period of time.
Body Temperature Chart
A person’s normal temperature will vary and trends to decrease with age. The
following table shows normal temperature ranges by age:
Normal temperature ranges by age:
The range of normal temperature varies from person to person and can be
inuenced by many factors such as time of day, measure from dierent sites,
level of activity, medications, emotion, etc. We recommend that you practice
with the thermometer when you or family members are healthy, so you are
familiar with the readings when they are ill.
Age Temperature (°F) Temperature (°C)
0 - 2 years 97.5 - 100.4 °F 36.4 - 38.0 °C
3 - 10 years 97.0 - 100.0 °F 36.1 - 37.8 °C
11 - 65 years 96.6 - 99.7°F 35.9 - 37.6 °C
> 65 years 96.4 - 99.5°F 35.8 - 37.5 °C
6
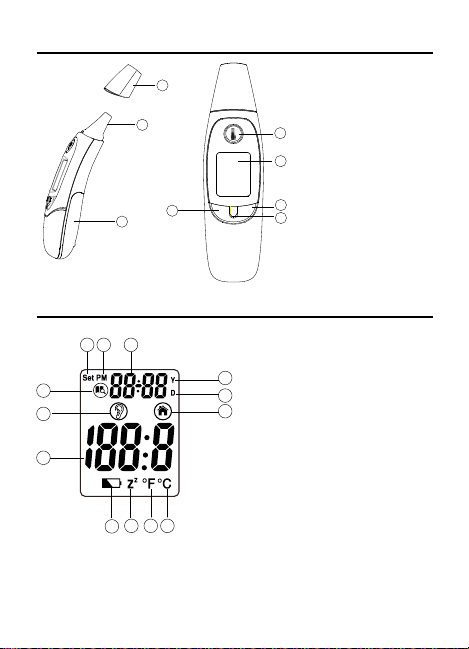
Product Overview
1. Infrared Sensor
2. Battery Cover
3. Measurement Button
4. Probe Cap
5. LCD Display
6. Memory Button
(MEMORY)
7. Fever Indicator
8. Settings Button (SET)
LCD Display
1. Memory mode symbol
2. Ear temperature symbol
3. Temperature readout
4. Low battery symbol
5. Sleep mode symbol
6. Fahrenheit degree symbol
7. Celsius degree symbol
8. Ambient temperature
symbol
9. Date display symbol
10. Year Display symbol
11. Display date and time in
standby mode
12. PM display
13. Setup Mode
This package contains: (1) Thermometer, (2) 1.5v AAA Batteries, (1) User Manual
1
2
3
13 12 11
10
9
8
456 7
4
1
2
3
5
67
8
MS

7
Before Use
1. To achieve an accurate measurement, it is important to check the infrared
sensor and ensure it is clean before use. To clean the sensor, gently wipe its
surface with a cotton swab slightly moistened with alcohol and immediately
wipe dry with a clean cotton swab. After cleaning, allow at least 20 minutes
drying time before taking temperatures.
2. Earwax in the ear canal may cause an inaccurate measurement, so please
ensure the ear canal is clean. If you clean the ear canal, wait 5~10 minutes
before measuring.
3. If the temperature of the storage area diers greatly from that of the
measuring area, please wait 30 minutes for the thermometer and room
temperature to equalize before measuring.
4. Open the battery cover and remove the insulating plastic from the battery
compartment. The thermometer should turn on automatically.
CAUTION: In Standby Mode, the LCD display will show the
environment temperature along with the current date and time.
Temperature Taking Hints
1.A temperature measurement taken from the right ear may dier from
measurement taken from the left ear. For this reason, always try to take the
temperature in the same ear.
2.External factors may inuence ear temperature, particularly when an
individual has:
• been lying on one ear or the other
• had their ears covered
• been exposed to very hot or very cold temperatures
• been recently swimming or bathing
In any of these cases listed above, remove the person from the situation or
uncover their head and wait 30 minutes prior to taking a temperature.
3. For people wearing hearing aids or ear plugs, remove the device and wait 30
minutes prior to taking a temperature.
4. Use the untreated ear if ear drops or other medications have been placed in
the ear canal.

8
Switching Between Fahrenheit and Celsius
This thermometer is set to measure in Fahrenheit, but can be switched to
measure in Celsius.
To switch from Fahrenheit to Celsius
1. Press the SCAN button to turn the thermometer ON. It will now be in Standby
mode measuring ambient temperature.
2. Press and hold the M (Memory) and S (Set) buttons for 2 seconds until the
screen changes from °F to °C. Once the thermometer beeps, the unit is ready
for measurement.
NOTE: To switch the mode again, wait until the unit beeps and then press and
hold the SET button again until the mode switches.
Stored readings in memory will automatically be converted to the new
temperature scale (°F to °C ) that is selected.
How To Take A Reading
The ear is an ideal measurement
site because body temperature
is regulated by the hypo-
thalamus, which shares the same
blood supply as the tympanic
membrane or more commonly
called eardrum.
NOTE: Make sure the measurement sensor is clean before
taking a reading. Attempting to take a measurement
anywhere else on the body may result in an inaccurate
reading.
1. Remove the probe cap before using and make sure the
probe is clean before using, Fig. 1.
2. If the thermometer is OFF, press any button to turn it ON.
The screen should display the ambient temperature, Fig 2.
FIG. 1
FIG. 2

9
0”~2”
3. Insert the probe VERY gently and slowing into the ear canal.
• Hold the thermometer so the probe faces straight
in the direction of the eardrum, Fig 3.
• It is important to point the probe tip toward the
eardrum and is inserted inside the ear canal until
slight resistance is felt.
• Hold the outer ear and gently pull it up and toward
the back of the head to straighten the ear canal,
Fig 4 & Fig 5.
• Always insert the thermometer into the same ear
with the same direction and depth.
4. Press and hold the SCAN button. The thermometer take a
reading and make a‘beep’sound, indicating the measure-
ment is complete.
5. Remove the thermometer from the ear canal. The
thermometer will display the result on the backlit LCD
screen.
NOTE: After each measurement “ “ will
display above the measurement. Once the
“ “ disappears (approx. 6 seconds), a new
measurement can be taken, Fig 6.
6. After the test is complete, press the M (Memory)
button or wait 1 minute for the display to
return to standby mode and display the
ambient temperature. After 1 minute in standby
mode, the thermometer will automatically
shut OFF.
NOTE: The LED light between the Memory and Settings button will illuminate
according to the temperature reading.
• GREEN = 93.2°F ~ 100.3°F (34.0°C ~ 37.9°C)
• RED = 100.4°F ~ 109.3°F (38.0°C ~ 42.9°C)
• LO = < 89.6°F (32.0°C)
• HI = > 109.3°F (42.9°C)
FIG. 3
FIG. 4
FIG. 5
FIG. 6
10
Memory Recall
There are a total of 9 memory readings.
The current measurement is always stored in the last
position (number 9).
To recall measurements in memory:
1. If the thermometer is OFF, press any button to turn it ON.
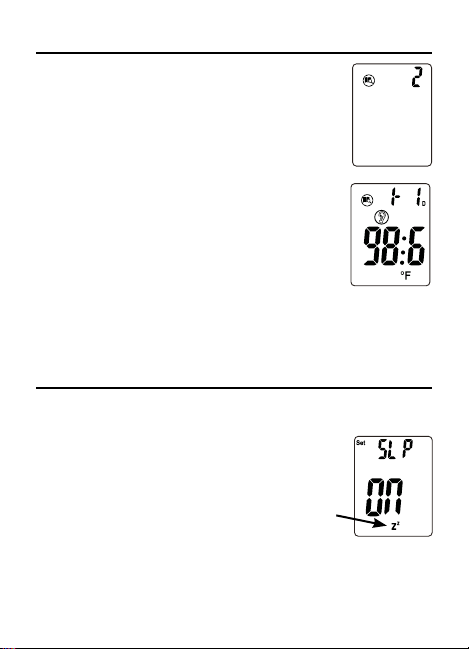
2. Press the M (Memory) button. It will show the position of
the most current measurement Fig 1. Followed by the
actual temperature measurement along with the time and
date Fig 2.
NOTE: All subsequent measurements taken will ll the
memory spaces until they reach the number 1 spot. Once all
of the spaces are lled, the oldest measurement will automati-
cally be deleted from memory.
3. Continue to press the MEMORY button to scroll the stored measurements.
4. Press the SET and MEMORY button at the same time to return to the Standby
mode.
FIG. 1
FIG. 2
Setting the Date and Time
1. Press the SET button to enter the setting mode. In the settings mode, you
can set the following items: Time Format (12hr or 24hr), Time, Date and Sleep
Mode.
2. Press the MEMORY button again to scroll through the
options. Press the SET button to select the desired option.
Note that“PM”will appear on the display in 12hr mode.
NOTE: When the Sleep Mode is activated (display shows ZZ),
the thermometer will turn OFF automatically when not in use,
Fig 3. When the sleep mode is deactivated, the thermometer
will remain ON. To conserve battery life, we recommend
keeping the Sleep Mode turned ON.
FIG. 3

11
Replacing the Battery
When the low battery indicator“ “ appears on the screen, or the
thermometer does not turn ON, it is time to replace the batteries.
To Replace the batteries:
1. Gently slide the battery cover back.
2. Carefully remove the old batteries and properly
discard.
3. Insert 2 new AAA 1.5v batteries. Ensure they are
inserted correctly according to the proper polarity,
Fig 1.
4. Slide the battery cover back on until it snaps into place.
To protect the environment, please dispose of exhausted batteries
according to current federal, state and local regulations. Keep batteries
out of the reach of children.
+
+
-
-
FIG. 1
FCC Statement and EMC Compatibility
This equipment has been tested and found to comply with the limits for a
Class B digital device, pursuant to part 15 of the FCC Rules. These limits
are designed to provide reasonable protection against harmful interference
in a residential installation. This equipment generates, uses, and can radiate
radio frequency energy and, if not installed and used in accordance with
the instructions, may cause harmful interference to radio communications.
However, there is no guarantee that interference will not occur in a particular
installation. If this equipment does cause harmful interference to radio or
television reception, which can be determined by turning the equipment off and
on, the user is encouraged to try to correct the interference by one or more of
the following measures:
• Reorient or relocate the receiving antenna.
• Increase the separation between the equipment and receiver.
• Connect the equipment into an outlet on a circuit different from that to
which the receiver is connected.
• Consult the dealer or an experienced radio/TV technician for help.

12
Maintenance, Storage and Calibration
Maintenance:
1. To ensure accurate measurements, keep the infrared
sensor tip clean and free of scratches. Finger prints, ear
wax or dirt will aect the accuracy of the thermometer.
2. To clean the infrared sensor gently wipe the sensor with
a cotton swab slightly moistened with alcohol and
immediately wipe dry with a clean cotton swab (Fig 1).The
thermometer can be used after the alcohol dries.
3. Use a soft dry cloth to clean the body of the thermometer
(Fig 2).
4. Never clean the thermometer with an abrasive cleanser,
thinner, benzene or submerge the thermometer into water
or other liquids.
Storage:
1. After each use clean the thermometer.
2. Store in a clean dry place at room temperature. NEVER leave the
thermometer exposed to direct sun, high temperatures, humidity, re,
ames, shocks or impacts.
3. If you do not use the thermometer for a long time, take out the batteries.
Calibration:
1. The thermometer is factory-calibrated. If the thermometer is used according
to the user manual, periodic calibration is not required. Do not try to modify
or reassemble the thermometer.
FIG. 1
FIG. 2
FCC Statement and EMC Compatibility
This device complies with part 15 of the FCC Rules. Operation is subject to the
following two conditions: (1) This device may not cause harmful interference,
and (2) this device must accept any interference received, including interference
that may cause undesired operation.
Changes or modifications to the product not expressly approved by the party
responsible for compliance could void the user’s authority to operate the
equipment.
13
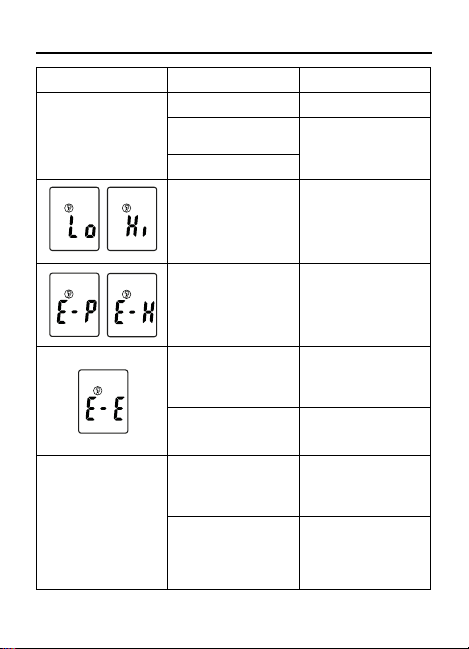
Troubleshooting
Problem Check lists Action
No response/
Automatic reset when
the plastic battery insu-
lator tab is pulled out
Battery used up? Change new battery
Battery in wrong
polarity? Take out battery,
reinsert battery
correctly
Poor battery contact
The measured
temperatures is lower
than 89.6°F (32.0°C) or
higher than 109.3°F
(42.9°C). Check the
method of operation
Follow the instructions
for use.
Indicates a hardware
problem Contact your
distributor
Operating
temperatures is out
of range
Use the thermometer
within the range of
operating
temperatures
The sensor
temperature has not
been stabilized
Wait 10 seconds and
take the measurement
again
The measurement is
not accurate or if there
is any doubt on the
measured result
Please check if the
infrared sensor is clean
Clean the infrared
sensor with a cotton
swab according to the
instructions.
Please check if the
measurement method
is correct and in the
correct mode
Ensure you have fully
read the user
instructions and know
how to properly use
the thermometer.
14
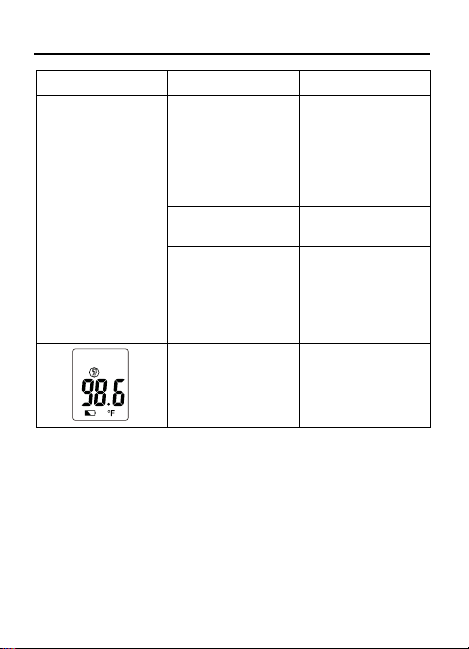
Problem Check lists Action
The measurement is
not accurate or if there
is any doubt on the
measured result
Please check if you
have let the
thermometer and
patient temperature
get stabilized
in the room for at least
30 minutes
Please keep the
thermometer and
patient in the
measuring room at
least 30 minutes
before using
Are you using the
thermometer indoor?
Please take the
measurement indoor
Please check if you
held the thermometer
in your hand too long
and aect the accuracy
Put the thermometer
on the table in the
room where the
measurement is taking
place and let it cool
down rst
Please check if there
is low battery symbol
on LCD
Change new battery
Troubleshooting
This infrared thermometer meets requirements established in ASTM Standard E
1965-98 for the thermometer system.
ASTM laboratory accuracy requirements for the thermometer only in the
display range of 98°F to 102.2°F (37°C to 39°C) for infrared thermometers is ±
0.4°F(±0.2°C), whereas for mercury-in-glass and electronic thermometers, the
requirement per ASTM standard E 667-86 and E 1112-86 is ±0.2°F (±0.1°C)
15
Normalized Symbols
Applied part of type BF
Disposal in accordance with Directive
2012/19/EU (WEEE)
The name and the address of the manufacturer.
Caution
Refer to Instruction Manual.
Serial Number
Date of Manufacture
Specications
• Product Name: Compact Infrared Ear Thermometer
• Model: 18-210-000 / TH1009C
• Power supply: DC 3V (2 x AAA battery)
• Ear Measuring Range: 89.6°F –109.3°F (32.0°C – 42.9°C)
Laboratory Measuring Accuracy: ± 0.4°F (or ± 0.2°C)
from 95°F –107.6°F (or 35°C – 42.0°C) ± 0.5°F ( ± 0.3°C) for other temperature
range
• Ambient Temperature Range: 41.0°F –139.8°F (5.0°C – 59.9°C)
• Ambient Temperature Accuracy: ± 2°F (± 1°C)
• Measurement Time: 1 Second
• Resolution: 0.1°F (0.1°F)
• Dimension: 5.18 (L) x 1.48 (W) x 1.46 (D) in. [131.8(L) x 37.7(W) x 37.3(D) mm]
• Weight: 53.54g (without batteries)
• Operation Temperature: 50.0°F – 104.0°F (10°C – 40°C)
• Operation Relative Humidity: 15% RH – 85%
• Storage & Transportation Temperature: -4°F – 131°F (-20°C – 55°C)
• Storage & Transportation Relative Humidity: 15% RH – 90% RH
• Service Life: 2 years
• Battery Life: Approximately 6 months with 5 tests per day

16
Important Information Regarding Electromagnetic
Compatibility (EMC)
With the increased number of electronic devices such as PC’s and mobile
(cellular) telephones, medical devices in use may be susceptible to
electromagnetic interference from other devices. Electromagnetic interference
may result in incorrect operation of the medical device and create a potentially
unsafe situation. Medical devices should also not interfere with other devices.
In order to regulate the requirements for EMC (Electro Magnetic Compat-
ibility) with the aim to prevent unsafe product situations, the EN60601-1-2
standard has been implemented. This standard denes the levels of immunity
to electromagnetic interferences as well as maximum levels of electromagnetic
emissions for medical devices. Medical devices manufactured by HealthSmart
International conform to this EN60601-1-2:2007 standard for both immunity
and emissions.
Nevertheless, special precautions need to be observed: The use of accessories
and cables other than those specied by manufacturer, with the exception of
cables sold by manufacturer as replacement parts for internal components,
may result in increased emission or decreased immunity of the device.
• The medical devices should not be used adjacent to or stacked with other
equipment. In case adjacent or stacked use is necessary, the medical device
should be observed to verify normal operation in the conguration in which
it will be used.
• Refer to further guidance below regarding the EMC environment in which
the device should be used.
Normalized Symbols
The rst number 2: Protected against solid foreign objects of
12,5 mm Ф and greater. The second number: Protected against
vertically falling water drops when enclosure tilted up to 15º.
Vertically falling drops shall have no harmful eects when the
enclosure is tilted at any angle up to 15º on either side of the
vertical.
IP22

17
Guidance and Manufacturer’s Declaration
Not applicable
Voltage
fluctuations/
flicker emissions
IEC61000-3-3
(Table 1)
Guidance and manufacturer’s declaration
– electromagnetic emissions
The thermometer are intended for use in the eIectromagnetic enviroment
specified below. The customer or the user of these thermometer should
assure that it is used in such environment.
Emissions test Compliance Electromagnetic environment
- guidance
RF emissions
CISPR 11 Group 1
The thermometer use RF energy only
for its internal function. Therefore, its
RF emissions are very low and are not
likely to cause any interference in
nearby electronic equipment.
RF emissions
CISPR 11 Class B
Harmonic
emissions
IEC 61000-3-2
The thermometer are suitable for use
in all establishments, including
domestic establishments and those
directly connected to the public low-vo
ltage power supply network that
supplies buildings used for domestic
purposes.
Not applicable

18
(Table 2)
Guidance and manufacturer’s declaration
– electromagnetic immunity
The thermometer are intended for use in the eIectromagnetic enviroment
specified below. The customer or the user of these thermometer should
assure that it is used in such environment.
Immunity test IEC 60601
Test level
Compliance
level
Electrostatic
discharge
(ESD)
IEC 61000-4-2
±6 kV
contact ±8
kV air
Electromagnetic
environment – guidance
±6 kV
contact ±8
kV air
Floor should be wood,
concrete, or ceramic tile. If
floors are covered with
synthetic material, the
relative humidity should be
at least 30 %.
Electrical fast
transient/burst
IEC 61000-4-4
Not
applicable
Not
applicable Not applicable
Surge
IEC 61000-4-5
Not
applicable
Not
applicable Not applicable
Power
frequency (50/
60 Hz)
magnetic field
IEC 61000-4-8
3A/m
Power frequency magnetic
fields should be at levels
characteristic of a typical
location in a typical
commercial or hospital
environment.
Voltage dips,
short
interruptions
and voltage
variations on
power supply
IEC 61000-4-11
Not
applicable
Not
applicable Not applicable
3A/m

19
The thermometer are intended for use in the electromagnetic
environment specified below. The customers or the users of these
thermometer should assure that it is used in such environment.
(Table 4)
Guidance and manufacturer’s declaration
– electromagnetic immunity
Immunity
test
IEC 60601
Test level
Compliance
level
Electromagnetic
environment – guidance
Conducted
RF
IEC 61000
-4-6
Not
applicable
Radiated
RF IEC
61000-4-3
3 V/m
80 MHz to
2.5 GHz
Portable and mobile RF
communications equipment
should be used no closer to any
part of the thermometer including
cables, than the recommended
separation distance calculated
from the equation appropriate to
the frequency of the
transmitter.
Recommend separation distance
d = 1.2 √P
d = 1.2 √P 80 MHz to 800 MHz
d = 2.3 √P 800 MHz to 2.5 GHz
where P is the maximum output
power rating of the transmitter in
watts (W) according to he
transmitter manufacturer and d is
the recommended separation
distance in meters (m).
Field strengths from fixed RF
transmitters as determined by an
electromagnetic site survey,
3 V/m

20
a. should be less than the
compliance level in each
frequency range.
b. Interference may occur in the
vicinity of equipment marked with
he following symbol:
Note1: At 80 MHz and 800 MHz, the higher frequency range applies.
Note2: These guidelines may not apply in all situations.
Electromagnetic propagation is
affected by absorption and reflection from structures, objects, and
people.
aField strengths from fixed transmitters, such as base stations for
radio (cellular/ cordless) telephones and land mobile radio, AM and
FM radio broadcast, and TV broadcast cannot be predicted theoretically
with accuracy. To assess the electromagnetic environment
due to fixed RF transmitters, an electromagnetic site survey should
be considered. If the measured field strength in the location in which
the thermometer are used exceeds the applicable RF
compliance level above, the thermometer should be
observed to verify normal operation. If abnormal performance is
observed, additional measures may be necessary, such as
reorienting or relocating the thermometer.
Over the frequency range 150 kHz to 80MHz, field strengths should
be less than 3 V/m.
b
Table of contents
Languages:
Other HealthSmart Thermometer manuals

HealthSmart
HealthSmart 15-990-000 User manual

HealthSmart
HealthSmart 18-935-000 User manual

HealthSmart
HealthSmart 15-901-000 User manual

HealthSmart
HealthSmart 18-545-000 User manual

HealthSmart
HealthSmart 15-930-000 User manual

HealthSmart
HealthSmart FeverVue 15-905-000 User manual

HealthSmart
HealthSmart kids 15-801-000 User manual

HealthSmart
HealthSmart 18-220-000 User manual
Popular Thermometer manuals by other brands

Hanna Instruments
Hanna Instruments Pool Line HI985394 instruction manual

Taylor
Taylor 9848FDA / 806 instruction manual

YOKOGAWA
YOKOGAWA TX1001 user manual

B.Well
B.Well MED-3000 user manual

Reed Instruments
Reed Instruments R2330-NIST instruction manual

Hanna Instruments
Hanna Instruments HI 93551R instruction manual


