Heatit Z-TRM3 User manual
INTRODUCTION
Heatit Z-TRM3 is an electronic thermostat for electrical oor
heating, designed to be mounted in a standard ush box. The
thermostat has a built-in Z-Wave chip that can be connected with
Home Automation systems. Heatit Z-TRM3 is equipped with a
single pole relay and ts into System 55 frames. The thermostat
can withstand a load of max 16A /3600W at 230V. The thermostat
may be used for water based heating if the thermostat is linked
with the Heatit Z-Water.
NB! If the sensor mode is changed to A or AF mode then a room
sensor compensation process will start, which limits maximum
power output to 75%. The thermostat adapts to the environment
within a few days. No internal sensor calibration should be
performed during the rst few days.
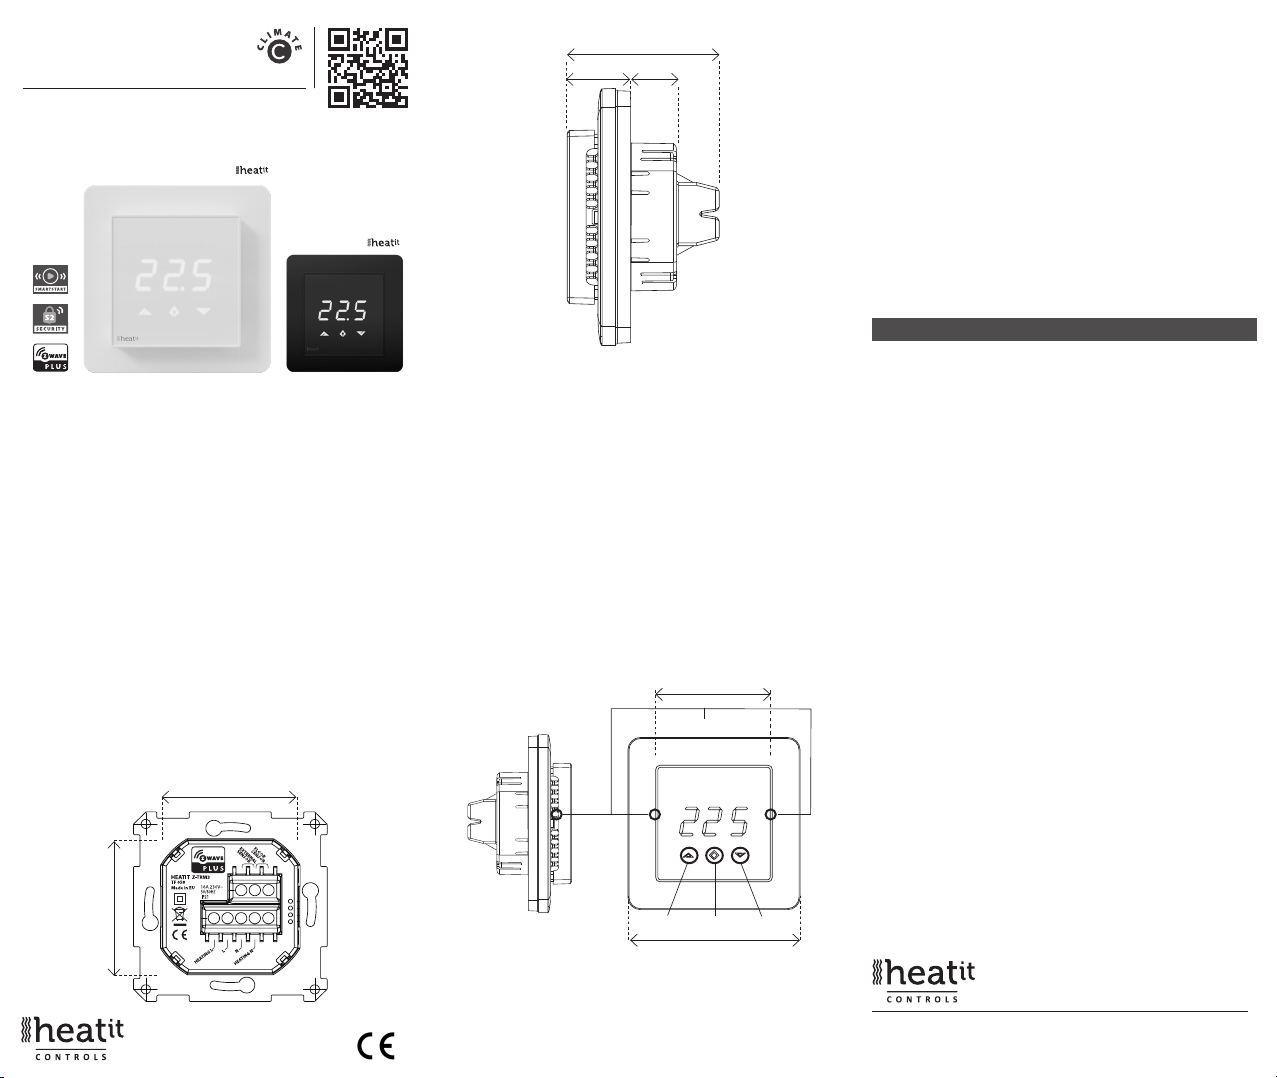
INSTALLATION
Use e.g. a small slotted screwdriver. Start by carefully removing the
front cover by pushing the release springs. The front cover and the
frame may now be removed. Connect the wires to the thermostat
terminals: Use 1,5mm² or 2,5mm² according to load.
HEATING (N) Heating cable connection (Neutral)
N Power connection (Neutral) 230V
L Power connection (Live) 230V
HEATING (L) Heating cable connection
FLOOR SENSOR NTC type (10, 12, 15, 33 or 47kΩ). Standard 10kΩ.
EXTERNAL SENSOR NTC type (10, 12, 15, 33 or 47kΩ). Standard 10kΩ.
Next, position the thermostat and fasten it onto the wall
mounting box using 2-4 screws. Position the frame, then position
and carefully press the front cover until it snaps in place. Check
that the front cover has snapped in place properly on both left
and right side. The front cover should now be rmly xed on all
sides. To be able to to read the Power Metering, the load needs to
be connected to both heating L + N.
49,5mm
8
7
6
5
D
C
B
A
B
C
D
E
F
1
2
3
4
5
6
7
8
F
E
A
Date
Pages
Author
Designer
Scale
Document type
Document description
Item
Document code and revision
1/1
Modifier
Page size
-- A4
XL1331-A-01
XL1331
Drawing
PRINTED Z-TRM3
THERMOSTAT BOTTOM
17.01.2020
MM
--
This document and all information and data inclosed herein or herewith are the condential and proprietary property of Ouman Oy
and are not to be used, reproduced or disclosed in whole or in part to anyone without written permission of Ouman Oy.
Part: XKA367
Tool: YP1079
49,5mm
51,1mm
21,3mm 15,6mm
Release spring
1: Left 2: Center 3: Right
MULTIREG®Z -WAVE
51,1mm
87mm
HEATIT Z-TRM3
Quick Guide
Ver 2020-A Read the full manual at:
manuals.heatit.com
ADD/REMOVE
1. Press Center (conrm) for 10 seconds.The display will show OFF.
2. Press Right (down) 5 times till you see Con in the display.
3. Now start the add/remove device process in your home
automation software.
4. Start adding/removing mode by pressing Center (conrm)
for approximately 2 seconds.
Adding/removing mode is indicated in the display by rotating LED
segments in the display until the timeout occurs after 90 seconds,
or if the module has been added/removed in the network.
Conrmation will show Inc/EcL in the display. Leave programming
mode by choosing ESC in the menu. Your thermostat is now ready
for use with default settings.
Protocol Z-Wave - 868,4MHz
Chip Z-Wave 500 chip
Rated voltage 230V 50/60Hz
Max load 3600W (resistive load)
750W self-limiting heating cable
Max current 16A
Power consumption <2,0W
Ambient temperature 0°C to 40° (during operation)
Temperature range 5°C to 40°C
Hysteresis 0,3°C to 3,0°C (default 0,5°C)
Compatible with NTC
sensors with values 10, 12, 15, 22, 33 og 47 kΩ @ 25°C
IP Code IP 21
Approvals Z-Wave Plus, CE,
EN 60730-1
EN 60730-2-9
EMC 2014/30/EU
RoHS 2011/65/EU
LVD 2014/35/EU
Approved for use in bathrooms.
TECHNICAL DATA
Heatit Controls AB can not be held liable for typographical errors, other errors or
omittances in our information. Product specifications may change without further notice.
All electrical installations must be carried out by a licensed electrician. The product must
be installed in accordance with national building codes and our installers manual.
Heatit Controls AB l Läkarvägen 4, 454 31 BRASTAD, SWEDEN

INNLEDNING
Heatit Z-TRM3 er en elektronisk termostat for elektrisk gulvvarme,
designet for montering i en standard veggboks. Termostaten har
en innebygd Z-Wave-brikke som kan kobles til smarthussystemer.
Heatit Z-TRM3 er utstyrt med et enpolet rele og passer inn i
System 55-rammer. Termostaten tåler en belastning på maks 16A
/ 3600W ved 230V. Termostaten kan brukes til vannbåren varme
hvis termostaten er koblet til Heatit Z-Water.
NB! Hvis sensormodus blir endret til A- eller AF-modus, starter en
romfølerkompensasjonsprosess, som begrenser maksimal eekt
til 75%. Termostaten tilpasser seg miljøet i løpet av få dager. Ingen
kalibrering på internsensoren bør utføres i løpet av de første
dagene etter endring av sensor.
INSTALLASJON
Bruk f.eks. en liten, at skrutrekker. Start med å erne
frontdekselet forsiktig ved å skyve låseklipsene. Frontdeksel og
ramme kan nå ernes. Koble ledningene til termostaten etter
følgende skjema: Bruk 1,5 mm² eller 2,5 mm² kabel i henhold til
belastningen.
HEATING (N) Varmekabeltilkobling (nøytral)
N Strømtilkobling (Nøytral) 230V
L Strømtilkobling (Live) 230V
HEATING (L) Varmekabeltilkobling (Live)
GULVFØLER NTC type (10, 12, 15, 33 or 47kΩ). Standard 10kΩ.
EKSTERN FØLER NTC type (10, 12, 15, 33 or 47kΩ). Standard 10kΩ.
Sett deretter termostaten på plass i veggboksen og fest den med
2 til 4 skruer. Plassér rammen først, deretter frontdekselet og
press forsiktig til dekselet klikker på plass på begge sider. Se til at
ramme og deksel er festet på alle sider. For å bruke strømmåling
må strømmen være tilkoblet både inngang L + N.
49,5mm
8
7
6
5
D
C
B
A
B
C
D
E
F
1
2
3
4
5
6
7
8
F
E
A
Date
Pages
Author
Designer
Scale
Document type
Document description
Item
Document code and revision
1/1
Modifier
Page size
-- A4
XL1331-A-01
XL1331
Drawing
PRINTED Z-TRM3
THERMOSTAT BOTTOM
17.01.2020
MM
--
This document and all information and data inclosed herein or herewith are the condential and proprietary property of Ouman Oy
and are not to be used, reproduced or disclosed in whole or in part to anyone without written permission of Ouman Oy.
Part: XKA367
Tool: YP1079
49,5mm
Låseklips
1: Venstre 2: Senter 3: Høyre
MULTIREG®Z -WAVE
51,1mm
87mm
HEATIT Z-TRM3
Quick Guide
Ver 2020-A
INKLUDERING OG EKSKLUDERING
1. Hold den midtre (bekreft) knappen inne i 10 sekunder til det
vises OFF i displayet.
2. Trykk på den høyre (ned) knappen 5 ganger til det står Con i displayet.
3. Start “legg til ny enhet”i gatewayen din.
4. Start inkluderingen ved å trykke på den midtre (bekreft)
knappen i ca. 2 sekunder.
Inkluderingmodus indikeres i displayet av“roterende” LED-
segmenter inntil enheten har blitt lagt til i nettverket, eller
at prosessen får et tidsavbrudd etter 90 sekunder. Vellykket
inkludering bekreftes av at Inc/EcL vises i displayet. Gå ut av
programmeringsmodus ved å velge ESC i menyen. Termostaten er
klar til bruk med standardinnstillinger.
Protokoll Z-Wave - 868,4MHz
Chip Z-Wave 500 chip
Spenning 230V 50/60Hz
Maks belastning 3600W (resistiv last)
750W selvbegrensende varmekabel
Maks strøm 16A
Eektforbruk <2,0W
Omgivelsestemperatur 0°C til 40° (min/maks)
Reguleringstemperatur 5°C til 40°C
Hysterese 0,3°C til 3,0°C (standard 0,5°C)
Kompatibel med
NTC-følere m/verdi 10, 12, 15, 22, 33 og 47 kΩ @ 25°C
IP-klasse IP 21
Sertisering Z-Wave Plus, CE,
EN 60730-1
EN 60730-2-9
EMC 2014/30/EU
RoHS 2011/65/EU
LVD 2014/35/EU
Kan monteres i baderom i hht NEK 400-7-701.537.1
(ikke krav om to-polet brudd).
TEKNISKE DATA
Heatit Controls AB tar forbehold om typografiske feil, andre feil eller mangler i vår
informasjon. Det tas forbehold om feil oppgitte priser på produktene. Produkt-
spesifikasjoner og priser kan endres uten forvarsel. Alle elektriske installasjoner
skal utføres av autorisert installatør. Produktet skal installeres i henhold til gjeldende
NEK 400 og installasjonsveiledning.
Komplett manual nnes på:
heatit.com eller
manuals.thermo-oor.no
51,1mm
21,3mm 15,6mm
Heatit Controls AB l Läkarvägen 4, 454 31 BRASTAD, SWEDEN
Table of contents
Languages:
Other Heatit Thermostat manuals

Heatit
Heatit Z-TEMP2 User manual

Heatit
Heatit ET-7AW User manual

Heatit
Heatit Z-TEMP2 User manual

Heatit
Heatit Z-TRM6 User guide

Heatit
Heatit ZM 16A User guide

Heatit
Heatit Z-TEMP2 User guide

Heatit
Heatit Z-TRM2 User guide

Heatit
Heatit Z-WAVE User guide

Heatit
Heatit 7S NFC User guide

Heatit
Heatit Z-TRM3 User manual


Popular Thermostat manuals by other brands

INSTEON
INSTEON 2441ZTH quick start guide

Carrier
Carrier TP -PRH installation instructions

Honeywell
Honeywell WebStat T7350 user guide

Radio Thermostat
Radio Thermostat CT110 Operation guide

Heating Style
Heating Style SMART Program manual

ComfortNET
ComfortNET Touchscreen Thermostat System Homeowner user guide


