Heiniger saphir User manual

swiss made
Ausgabe/Index: Saphir/K 09-22
de
en
fr
it
es
nl
da
sv
nb
fi
pt
ja
Kleintier-Schermaschine Original-Betriebsanleitung
Small animal clipper Translation of the original instructions
Tondeuse pour petits animaux Traduction de la notice originale
Esquiladora para animales pequeños Traducción del manual original
Tosatrice per animali piccoli Traduzione delle istruzioni originali
Scheermachine voor kleine dieren Vertaling van de originele gebruikshandleiding
Klipper til små dyr Oversættelse af den originale brugsanvisning
Klipper för små djur Översättning av bruksanvisning i original
Klipper for små dyr Oversettelse av den originale brukerveiledningen
Pieni karvanleikkuri Alkuperäisten ohjeiden käännös
Máquina de tosquiar para animais pequenos Tradução do manual original
小動物向けバリカン オリジナル取扱説明書

2Translation of the original instructions / Small animal clipper
Table of contents
1 Safety .................................................................................................3
1.1 Personal ............................................................................................. 3
1.2 Symbols and warning notes ............................................................... 3
1.3 Stipulated usage................................................................................. 4
1.4 Personal protective equipment........................................................... 4
1.5 Power supply ...................................................................................... 4
1.6 Animals............................................................................................... 6
1.7 Battery ................................................................................................ 6
1.8 Blades................................................................................................. 7
1.9 Children .............................................................................................. 7
2 Generalities ........................................................................................8
2.1 Guarantee conditions ......................................................................... 8
2.2 Customer service ............................................................................... 8
2.3 Limitation of liability ............................................................................ 8
3 Technical data ....................................................................................9
3.1 General information............................................................................ 9
3.2 Mains voltage ..................................................................................... 9
3.3 Operating conditions .......................................................................... 9
4 Assembly and function.......................................................................9
4.1 Scope of delivery................................................................................ 9
4.2 Overview........................................................................................... 10
4.3 Abstract ............................................................................................ 10
4.4 Operating elements .......................................................................... 10
4.5 Charging station ................................................................................11
4.6 Battery ...............................................................................................11
5 Transport, packaging and storage ................................................... 11
6 Operation ......................................................................................... 12
6.1 Initial start-up.................................................................................... 12
6.1.1 Setting up the charging station......................................................... 12
6.1.2 Charge battery.................................................................................. 13
6.1.3 Fitting the clipperhead...................................................................... 14
6.2 Activities during operation................................................................ 14
6.2.1 Clipping............................................................................................. 14
6.2.2 Changing the battery ........................................................................ 15
6.2.3 Changing the clipperhead ................................................................ 15
6.2.4 Lubrication ........................................................................................ 16
6.2.5 Cleaning............................................................................................ 16
7 Troubleshooting................................................................................ 17
8 Spare parts....................................................................................... 18
9 Disposal ........................................................................................... 19

Translation of the original instructions / Small animal clipper 3
IMPORTANT SAFETY INSTRUCTIONS
NOTE!
When using an electrical appliance, basic precautions are requi-
red to always be followed, including the following:
Read all instructions before using (this appliance)
1 Safety
The non-observance of the instructions and safety regulations
mentioned in this manual can cause operating malfunctions or
serious injury to persons.
1.1 Personal
yThe operator must be experienced in handling the animals to
be clipped.
yChildren are not permitted to operate the equipment.
Operation of the clipper is only permitted by personal expected
to do their work reliably. Persons, whose reactivity is aected by
drugs, alcohol or pharmaceuticals, are not permitted to operate
the equipment.
1.2 Symbols and warning notes
Various symbols are used in the operating instructions. These
symbols indicate possible hazards or bring to the user‘s attention
such technical information that, if not complied with, may lead to
personal injury and material damage or to uneconomic operation.
Hazard symbols
WARNING/DANGER!
Denotes a possibly hazardous situation. Serious injury and even
death can result if such situations are not avoided.
CAUTION!
Denotes a possibly hazardous situation. Light or slight injury can
result if such situations are not avoided.
Information symbols
NOTE!
A note which, if not complied with, can lead to operational stop-
pages or damage.

4Translation of the original instructions / Small animal clipper
1.3 Stipulated usage
The equipment is exclusively designed and conceived for the
here described use and intention.
The equipment is exclusively intended for use on dogs, cats, cat-
tle and horses. The appliance is intended for commercial use.
The compliance of all indications in this manual is part of the in-
tended use.
Other uses are expressly prohibited.
The appliance is only to be used with the power supply unit pro-
vided.
X For a wall-hung appliance: Periodically inspect the wall unit for
secure mounting.
WARNING!
Expressly prohibited are:
yUsing the machine on persons.
yClipping other animals, in particular dangerous animals such
as beasts of prey.
1.4 Personal protective equipment
Antislip shoes. For protection against slipping on slippery under-
ground.
1.5 Power supply
DANGER!
To reduce the risk of electric shock:
X Do not reach for an appliance that has fallen into water. Unplug
immediately from receptacle.
X Do not use while bathing or in a shower.
X Do not place or store appliance where it is able to fall or be
pulled into a tub or sink. Do not place in or drop into water or
other liquid.
X Except when charging, always unplug this appliance from the
electrical outlet immediately after using.
X Unplug this appliance before cleaning.

Translation of the original instructions / Small animal clipper 5
WARNING!
To reduce the risk of burns, re, electric shock, or injury to per-
sons:
X An appliance shall never be left unattended when plugged in.
X This appliance is not intended for use by persons (including
children) with reduced physical, sensory or mental capabilities,
or lack of experience and knowledge, unless they have been
given supervision or instruction concerning use of the appli-
ance by a person responsible for their safety. Children should
be supervised to ensure that they do not play with the appli-
ance.
X Use this appliance only for its intended use as describe in this
manual. Do not use attachments not specied by the manufac-
turer.
X Never operate this appliance when it has a damaged cord or
plug, when it is not working properly, after it has been dropped
or damaged, or after it has been dropped into water. Return the
appliance to a service center for examination and repair.
X Keep the cord away from heated surfaces.
X Keep the air openings free of lint, hair, and similar objects.
X Never drop or insert any object into any opening.
X Do not use outdoors or operate while aerosol (spray) products
are being used.
X Do not use this appliance with a damaged or broken comb, as
it has the potential to result in facial injury.
X Always attach plug to appliance rst, then to outlet. To discon-
nect, turn all controls to o position (e.g. “0”) then remove plug
from outlet.
X Plug charger directly into receptacle, do not use an extension
cord.
X Unplug charger before plugging or unplugging appliance.
WARNING!
Keep the appliance dry.

6Translation of the original instructions / Small animal clipper
1.6 Animals
The appliance is intended for trimming purposes only.
WARNING!
The noise of the clipper can trouble animals. A kick, an attack or
the weight of the animal can cause serious injuries.
Therefore:
X Just persons being experienced in handling with animals are
allowed to clip the animals.
X Fix and calm the animal suciently before clipping.
X Work carefully.
X Unauthorised persons are not permitted to approach the clip-
ping place
X Do not charge, place or leave the appliance where it is expect-
ed to be:
ySubject to damage by an animal, or
yExposed to weather
1.7 Battery
WARNING!
Danger of injury from incorrect handling of battery!
The rechargeable battery must be handled with particular care.
Therefore:
X Just use original batteries.
X Do not throw the battery into the re or expose to high tempera-
tures. There is a risk of explosion.
X Just use undamaged batteries.
X Battery and charging station must never be exposed to direct
sunlight or humidity.
X Never short-circuit the battery. Because of overheating the bat-
tery can blow out.
X Never open the battery. In case of incorrect use, escaping liq-
uid can cause skin irritation. Avoid any contact with the liquid
of the battery. In case of contact wash up the liquid with a lot of
water. If the liquid enters in the eyes, wash out immediately for
10 minutes and call on a doctor without delay.
X For the purposes of recharging the battery, only use the de-
tachable supply unit provided with this appliance.

Translation of the original instructions / Small animal clipper 7
X No shipping with the battery inserted
Remove the battery from the machine before transporting it.
Batteries may only be shipped in accordance with national and
international regulations bearing the prescribed labelling. The
regulations for transporting defective batteries must be strictly
adhered to.
CAUTION!
Reduced lifetime of battery if handled incorrectly!
The eciency of the battery may be reduced by incorrect han-
dling. Therefore:
X Just use the original charging station. Other charging stations
could damage the battery beyond repair.
X When not in use for a longer time, separate the charging sta-
tion from the power supply.
X Remove the battery and clipper from the charging station,
when the station is not connected to the power supply.
X Never insert any objects into any opening of the charging sta-
tion or into the charging cavity of the clipper.
X A battery no longer capable of being charged will damage the
charging station and must be replaced.
1.8 Blades
WARNING!
Moving blades and sharp edges of the blades can cause injuries
on the skin. Therefore:
X Work carefully.
X Avoid any contact with the moving blades.
1.9 Children
WARNING!
Never let the equipment unsupervised und use it very carefully when
children or persons who cannot judge the dangers are nearby.
Children are not permitted to operate the equipment.
Children should be supervised to ensure that they do not play
with the appliance.
SAVE THESE INSTRUCTIONS

8Translation of the original instructions / Small animal clipper
2 Generalities
This manual facilitates a safe and ecient machine handling.
Read these instructions carefully before starting operation.
Basic requirements for a safe operation are the adherence of all
the information regarding safety and operation in this manual.
Keep this manual permanently. If you hand on the equipment to
other persons, provide them with this manual.
2.1 Guarantee conditions
The guarantee conditions are included in the general terms and
conditions of the manufacturer.
2.2 Customer service
For technical information, our customer service and our autho-
rised service centres are at your disposal.
Furthermore, our sta is interested in new information and expe-
rience resulting from the operation which could be useful for the
improvement of our products.
2.3 Limitation of liability
All data and information in this instruction manual were arranged
in consideration of the current standards and regulations and
state of the art as well as our realizations and experiences of
many years.
The manufacturer assumes no liability for disadvantages due to:
yNon-observance of the instruction manual.
yOperation of the clipper for not intended use.
yAssignment of not instructed personal.
yTechnical modications.
yUse of not approved spare parts.
The actual scope of delivery can dier from specially designed
models, from additional ordering options or due to the latest state
of the art from the here described annotations and illustrations.
This product has been developed and assembled using the best
individual components available. It is designed to give longevity
and high performance. If spare parts are used during the life of
this product, please ensure that they are genuine Heiniger parts.
Failure to use genuine Heiniger spares may reduce the perfor-
mance of this precision engineered product and will void any war-
ranty claim.

Translation of the original instructions / Small animal clipper 9
3 Technical data
3.1 General information
Clipper Length 204 mm
Width 50 mm
Height 41 mm
Weight with battery 425 g
Charging station Charging time at 20 °C 60 min
Battery Type Li-Ion
Voltage according rating plate
Capacity according rating plate
3.2 Mains voltage
Electrical
(charging station)
Voltage 100–240 V
Charging rate, maximum according rating plate
3.3 Operating conditions
Environment Temperature range 0–40 °C
Relative humidity,
maximum
75%
Vibration ahv < 2,5 m/s2
Noise emission (LpAm): < 70 dB
4 Assembly and function
4.1 Scope of delivery
Clipper 1 pce
Clipperhead (equipment oriented) 1 pce
Spare battery (equipment oriented) 1 pce
Charging station 1 pce
Oil dispenser 1 pce
Cleaning brush 1 pce
Operating instructions 1 pce
Packaging for transport and storage 1 pce

10 Translation of the original instructions / Small animal clipper
4.2 Overview
1 Battery
2 Switch lever
3 Clipper
4 Clipperhead
5 Interlock clipperhead
6 Interlock battery
Fig. 1
Fig. 2
4.3 Abstract
Fig. 3
The clipper serves to clip dogs,
cats, cattle and horses. Two comb-
shaped blades are the cutting tool.
The bottom blade facing the skin (3)
is standing rm and is xed on the
blade hinge (4). The top blade (2)
is agitated crossways that one. The
top blade is moving by the help of
a turning lever (1).
4.4 Operating elements
Fig. 4 Switch in OFF-position (“0”) Fig. 5 Switch in ON-position (“I”)
Fig. 6 Interlock clipperhead Fig. 7 Interlock battery

Translation of the original instructions / Small animal clipper 11
4.5 Charging station
1 Charging station
2 Power adapter
3 Apart charging cavity for the
battery
4 Charging cavity for the clipper
with integrated battery
Fig. 8
4.6 Battery
1 Interlock battery
2 Contacts
Fig. 9
5 Transport, packaging and storage
Check the delivery on receipt immediately on completeness and damage
in transit.
NOTE!
Complain any damage as soon as you discover it. Claims for damages only
may be made within the valid time.
For the packaging, just non-polluting material is being used.
The packaging is to protect the individual components from transport dam-
age, corrosion and other forms of damage prior to use.
Store clipper and accessories on the following conditions:
X Always store in the packaging supplied with it.
X Do not store outdoor.
X Store dry and dust-free.
X Protect against solar irradiation.
X Avoid mechanical shocks.
X Storage temperature: 0 until 40 °C.
X Relative humidity: max. 75%.When storing longer than 3 months, check
periodically the general condition of all parts. If necessary, refresh or
renew the conservation.

12 Translation of the original instructions / Small animal clipper
6 Operation
WARNING!
Incorrect operation may cause damage on persons or objects. Therefore:
yDo all the steps of operation according to the indications in this instruc-
tion manual.
6.1 Initial start-up
6.1.1 Setting up the charging station
yObserve all technical data according to the operating conditions (3 Tech-
nical Data).
yThe installation surface must be even and must dispose of sucient sta-
bility and payload.
yThe location of installation must be protected against humidity and rain.
yPower outlets in the outer area must be equipped with a residual current
circuit breaker (FI).
yThe workplace must dispose of sucient illumination and ventilation.
yThe location of installation must be out of reach of children.
Fig. 10
1. Place the charging station on a
rm, even, dry, clean and free
underground.
2. Plug the charging station in the
power outlet.
3. If possible, wall mounting on the
suspension guides (1) provided
for this purpose on the back of
the charging station (screw di-
ameter 4.5 mm).
4. The charging station has electronics that constantly check its functions.
A switchover may therefore last up to 3 seconds.
5. The permanent light of the green LED signalises, that the plug is connect-
ed correctly to the power outlet and the charging station is ready for use.
6. If the battery is very depleted, the charging station wakes the battery.
This may require up to 5 minutes. After that the normal charging process
will start.

Translation of the original instructions / Small animal clipper 13
6.1. 2 Charge battery
Fig. 11
1. Test the contacts of the clipper (1)
and the battery (2) for foreign par-
ticles and contamination.
2. Assure, that the switch lever of
the clipper is in OFF-position (“0”)
(g. 4).
Fig. 12
3. Insert the battery (2) in the clipper
(3), until the battery interlock (1) is
engaged on both sides.
Fig. 13
4. Put the clipper with the inserted
battery (1) or spare battery (2)
from above without force into the
provided charging cavity of the
charging station.
5. Waiting for the battery charging
time (3 specications).
6. Battery is charging. During the
charging time the control light is
illuminating red (3). As soon as
the battery has been charged to
a min. 90%, the indicator lamp will
change to green and the charging
station switch to “trickle charging”.
7. Hold the charger rmly with one hand and pull the clipper (1) or the bat-
tery (2) out with the other.
NOTE!
If the shearer (1) and the reserve battery (2) are both on the charging station
at the same time, the battery in the shearer (1) will be charged up rst.
The reserve battery (2) will only charged up when the shearer is charged.

14 Translation of the original instructions / Small animal clipper
6.1.3 Fitting the clipperhead
1. If the blade hinge (2) is acciden-
tally closed, lift the latter up using
a screwdriver (1) while simultane-
ously pressing the blade lock.
Fig. 14
2. Fit the clipperhead (1) on the open
blade hinge (2).
Fig. 15
3. Fold the clipperhead (2) by light
pressure on to the clipper (1)
which is switched on.
Fig. 16
4. Make sure, that the clipperhead (1)
is engaged rmly.
Fig. 17
NOTE!
For proper operation make sure that the clipperhead (1) is engaged correctly.
6.2 Activities during operation
6.2.1 Clipping
1. Fix and calm the animal suciently before clipping.
2. Switch on the clipper already in the eld of vision of the animal.
3. Approach to the animal from ahead.
4. During clipping, look at the behaviour of the animal.

Translation of the original instructions / Small animal clipper 15
6.2.2 Changing the battery
When the battery is unloaded, the clipper is turned o by a protective circuit.
1. Move the switch to position “0”
(g. 4).
2. Push the battery interlock (2) on
both sides inward and pull the bat-
tery (1) out of the clipper.
Fig. 18
3. Insert charged battery (1) into the
shearer (2), until the battery lock
is locked in on both sides.
Fig. 19
6.2.3 Changing the clipperhead
1. Move the switch to position “0”
(g. 4).
2. Push the interlock clipperhead.
Fig. 20
3. Fold the clipperhead ahead
when the interlock clipperhead is
pressed.
4. Take o the clipperhead.
5. Clean the opened hinge by the
help of the provided brush.
Fig. 21
6. Fit the favoured clipperhead to the blade hinge and fold it on to the
switched-on clipper by light pressure. (g. 15, 16, 17).
NOTE!
Only work with sharp blades, replace blunt or defective blades without teeth.
The correct resharpening of blades is only to do by special machines or by
a specialist. In that case, contact your service centre.
16 Translation of the original instructions / Small animal clipper
6.2.4 Lubrication
To receive good clipping results and to increase the durability of the clipper
and the clipperhead, it is necessary to apply a thin oil coat between top and
bottom blade (g. 22).
CAUTION!
Unsucient lubrication of the clipperhead causes heating and a reduced
durability of clipper and blades, as well as a reduction of the battery runtime.
Therefore:
X Lubricate the blades suciently during the clipping (at least every
15 minutes), so that they do not drain (g. 22).
X Only use the lubricants prescribed by the manufacturer.
NOTE!
Only use our special oil or a paran oil meeting the ISO VG 15 specication.
The provided oil is non-toxic and produces no irritation on contact with the
skin or the mucous membranes. This paran oil degrades to some 20%
after 21 days (CEL-L-33-T-82).
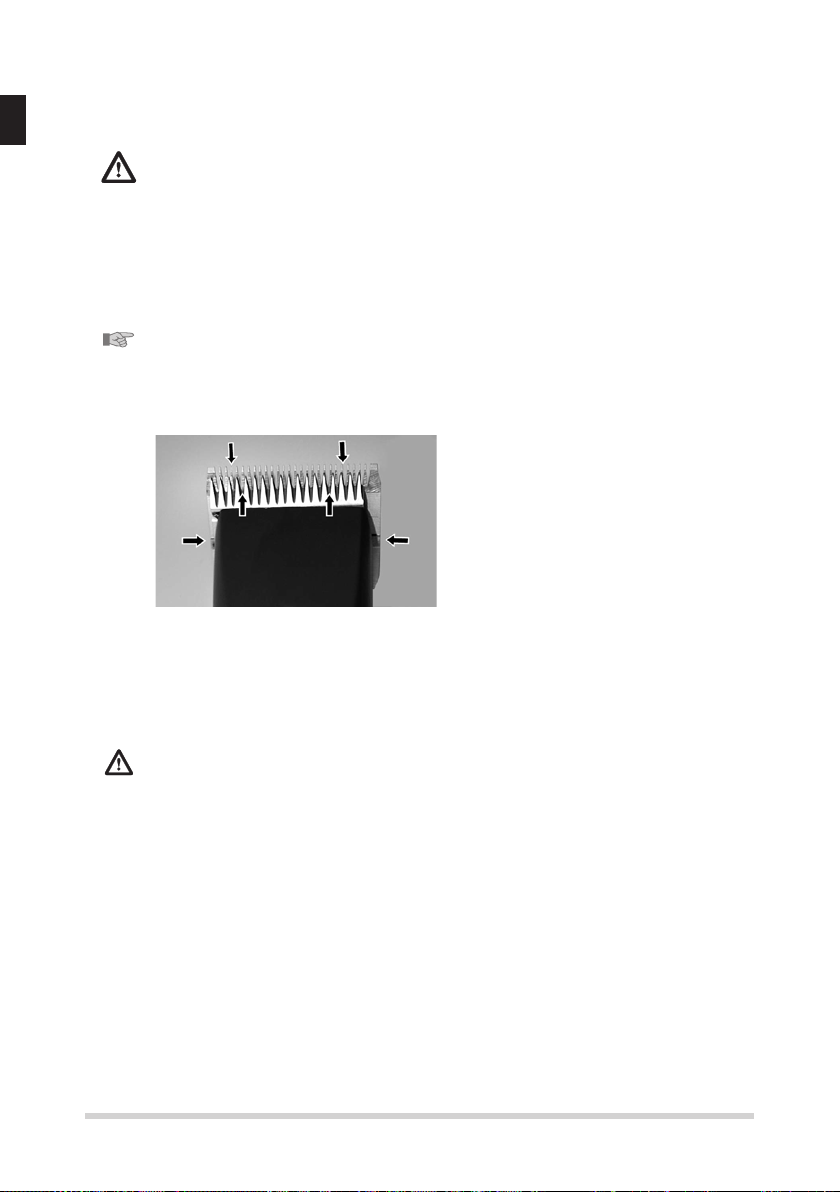
Fig. 22
The blades must be oiled before,
during and after every use. When
the blades of the clipper are leaving
stripes or are running with reduced
speed, this is a signal that oil is re-
quired. Place a few drops of oil ahead
and laterally on the clipper blades
(see arrows in g. 22). Wipe o the
excessive oil with a smooth, dry cloth.
Lubrication sprays do not have su-
cient oil for a good lubrication, but
serve for cooling the blades. Imme-
diately change damaged or crenated
blades to avoid injuries.
CAUTION!
Remove all the leaking, used up or excessive grease from all the lubrication
points, and it is to be disposed in accordance with the local regulations.
6.2.5 Cleaning
To receive good clipping results and to increase the durability of the clipper
and the clipperhead, it is necessary to apply a thin oil coat between top and
bottom blade (6.2.4 Lubrication).
Clipperhead and hinge
Clean clipperheads und hinge between the dierent clippings.

Translation of the original instructions / Small animal clipper 17
Charging station
1. Disconnect the charging station
from the power supply.
2. If necessary, take away hairs from
both charging cavities.
3. If required, clean the contacts (1)
and (2) with a dry cloth.
Fig. 23
Contacts
Clean the contacts of the battery and the shearer with a dry cloth as nec-
essary.
NOTE!
If not using daily, store shearer and charging station in the packaging sup-
plied with them. When in use daily, we recommend to put clipper and re-
serve battery in the charging station.
7 Troubleshooting
yThe here described tasks for troubleshooting can be done mostly by the
operator.
ySome tasks only may be done by especially trained personal or by an
authorised service centre. These tasks are marked with (S).
Malfunction Cause Rectication
Top blade does not
move
Clipperhead is not well
engaged
Engage the clipperhead correctly
when the motor is running
Turning lever is defective Replace turning lever (S)
Clipper cuts badly or
not at all
Clipper blade is blunt Have top and bottom blades resharp-
enend by service centre (S)
Clipper blades have not
been correctly ground
Clipper blades are not oiled Oil clipper blades every 15 minutes
The animal‘s hair is wet Only clip dry hair
Hairs jammed between top
and bottom blades
Take o clipperhead, push the top
blade half away from the clipperhead,
take away hairs between top and
bottom blade
Clipperhead has too little
clipping pressure
Have clipperhead inspected (S)
Motor is not running Battery is dead Charge battery
Contacts dirty Switch clipper o and clean the
contacts
Faulty battery Replace battery
Smell of burning from
the motor housing. Motor
burned out
Have motor and / or electronics
replaced (S)

18 Translation of the original instructions / Small animal clipper
Malfunction Cause Rectication
Motor does not work Faulty motor and / or elec-
tronics
Have motor and / or electronics
replaced (S)
Clipperhead blocked Clean and oil clipperhead
Motor runs very
slowly
Clipper blades were not
oiled suciently
Oil clipper blades
Running time of a
fully charged battery
is too short and / or
blades are getting
hot
Clipper blades were not
oiled suciently
Oil clipper blades
Dead, not fully charged or
defective battery has been
used
Only use intact and completely
charged original battery
The control light of
the charging station
in not on
Charging station is not con-
nected to the power supply
Connect the charging station to the
power supply
Charging station is faulty Have charging station inspected (S)
When battery is un-
loaded the light does
not change from
green to red
Contacts of battery and/or
charging station are dirty
Clean contacts
Faulty battery Replace battery
Contacts of the charging
station are deformed
Have the charging station repaired (S)
LED ashes alter-
nately red / green
Faulty battery Replace battery. Individually test bat-
teries if two batteries are inserted into
the charging station at the same time.
Translation of the original instructions / Small animal clipper 19
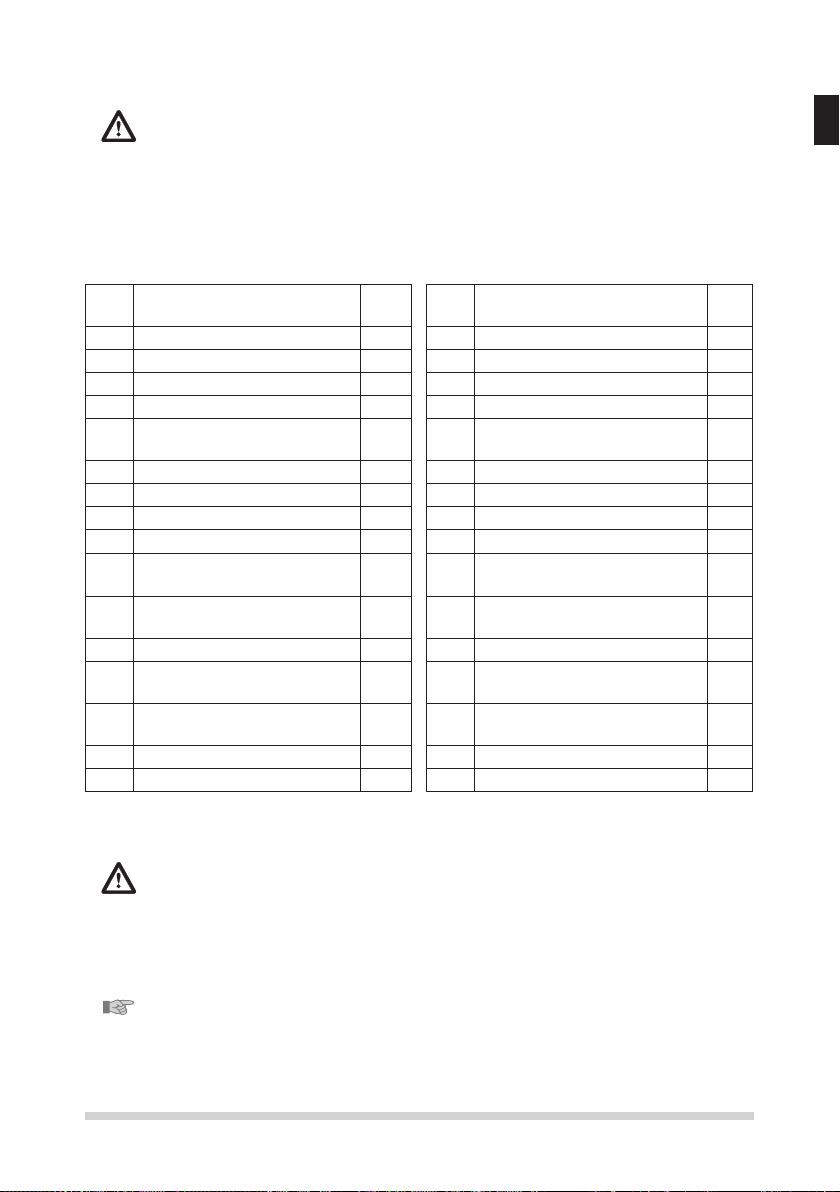
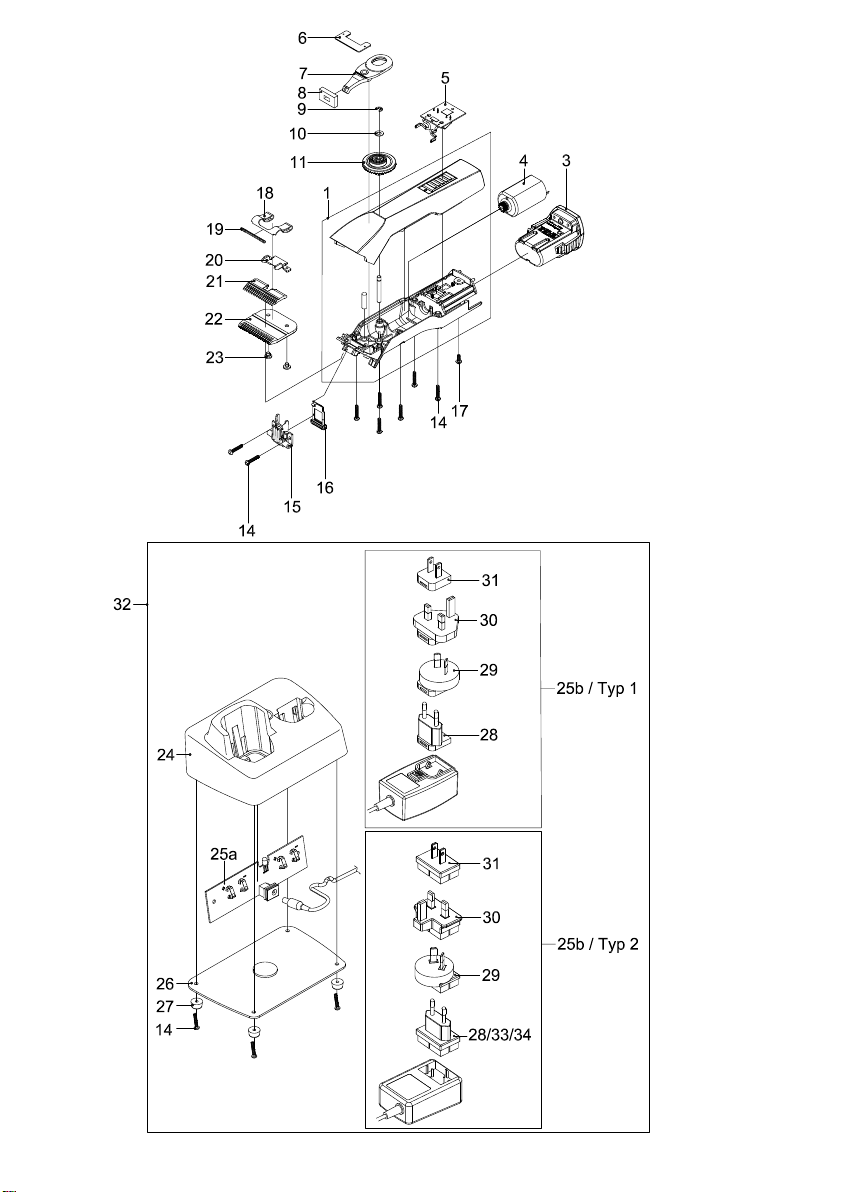
8 Spare parts
See illustration spare parts at the end of this instruction manual.
WARNING!
Faulty spare parts may cause damages, malfunctions or total loss and may
reduce security. Therefore:
X Only use original spare parts from the manufacturer. Purchase the spare
parts at the ocial distributor or directly at the manufacturer.
X If using no original spare parts all warranty and service claims are ex-
piring.
Pos.
No.
Description Qty. Pos.
No.
Description Qty.
1Complete housing set 120 Clamp holder 1
3 Li-Ion battery 7.4 V / 1.6 Ah 1 21 Top blade 1
4Motor complete 122 Bottom blade 1
5PCB clipper 123 Screw M3,5x4 2
6Rubber tap 124 Charging station upper hous-
ing part
1
7Turning lever 125a PCB charging station 1
8Seal 125b Power supply with plug 1
9Circlip Ø3.2 126 Charging station base plate 1
10 Washer Ø4x0.5 127 Rubber foot 4
11 Eccentric cogwheel, pre-as-
sembled
128 Plug EU 1
14 PT-screw Kombitorx
KA30x16
12 29 Plug AU Type 1
Plug AU/ARG Type 2
1
15 Blade support 1 30 Plug GB 1
16 Blade interlock red 1 31 Plug US Type 1
Plug US-JP Type 2
1
17 PT-screw Kombitorx KA30x8 132 Charging station with/without
power supply unit and plug
1
18 Clipping pressure spring 133 Plug KR 1
19 Blade guide 134 Plug BR 1
9 Disposal
CAUTION!
Environmental damages when disposing incorrectly!
Electronic scrap, batteries, lubricants and other indirect materials are sub-
ject to hazardous waste treatment and may only be disposed of by approved
specialist companies!
NOTE!
For disposal hand the clipper and charging station over to a nearby service
centre or specialist shop for electronics.
Other manuals for saphir
3
Table of contents
Other Heiniger Commercial Food Equipment manuals


Popular Commercial Food Equipment manuals by other brands


Hussmann
Hussmann RGDC Installation & operation guide

Oscartielle
Oscartielle MINOR 2000 Series instruction manual

Jackson
Jackson NXP-HTU Operation guide

Brunner Anliker
Brunner Anliker XXL operating manual

Hoshizaki
Hoshizaki ice mate SRM-270AA instruction manual

Falcon
Falcon Dominator Series User, installation and servicing instructions


