Hema 80.01.0055 User manual

Instructions for use
Stand fan 45W
Gebruiksaanwijzing
Ventilator op standaard 45W
Mode d'emploi
Ventilateur sur pied 45W
Gebrauchsanleitung
Stand Ventilator 45W
Instrucciones de uso
Ventilador de pedesta 45W

- 1 - 80.01.0055
Inhoud –Teneur –Content –Inhalt –Contenido
Gebruiksaanwijzing –Dutch ......................................................................- 2 -
Mode d‘emploi – French ...........................................................................- 9 -
Instruction manual –English ...................................................................- 16 -
Bedienungsanleitung –German .............................................................. - 22 -
Manual de Instrucciones –Spanish .........................................................- 29 -

- 2 - 80.01.0055
Gebruiksaanwijzing –Dutch
art.nr. 80.01.0055
TECHNISCHE GEGEVENS
Voedingsspanning:
220-240V ~ 50/60Hz
Opgenomenvermogen: 45W
VEILIGHEIDSVOORSCHRIFTEN
Voor gebruik dient u alle onderstaande instructies te lezen om
letsel en schade te voorkomen en om de beste resultaten met
het apparaat te bereiken. Bewaar deze handleiding op een
veilige plek. Mocht u dit apparaat aan iemand anders
overhandigen, dient u ook de gebruiksaanwijzing te
overhandigen.
In geval van schade die wordt veroorzaakt doordat de
gebruiker de instructies in deze gebruiksaanwijzing niet in
acht heeft genomen, komt de garantie te vervallen. De
fabrikant/importeur is niet aansprakelijk voor schade die
wordt veroorzaakt door het niet in acht nemen van de
gebruiksaanwijzing, door nalatig gebruik of gebruik dat niet in
overeenstemming is met de bepalingen van deze
gebruiksaanwijzing.
1. Dit apparaat mag worden gebruikt door kinderen vanaf 8
jaar en personen met beperkte fysische, visuele of mentale
vaardigheden, of die een gebrek aan ervaring en kennis
hebben, indien ze gepaste instructies hebben gekregen
zodat ze het apparaat op een veilige manier kunnen
gebruiken, op de hoogte zijn van de gevaren die het gebruik
van het apparaat met zich meebrengt en deze gevaren
begrijpen.
2. Laat kinderen niet met het apparaat spelen.
3. Kinderen mogen het apparaat niet reinigen of
onderhouden zonder toezicht.
4. Als het snoer is beschadigd, moet het worden vervangen
door de fabrikant, zijn klantenservice of gelijksoortig
geschoolde personen om gevaar te vermijden.

- 3 - 80.01.0055
5. Voordat u de stekker in het stopcontact steekt, dient u te
controleren of de netspanning en de frequentie
overeenkomen met de specificaties van het typeplaatje.
6. Trek de stekker uit het stopcontact als het apparaat niet in
gebruik is en voordat u het apparaat reinigt.
7. Let op dat de stroomkabel niet over scherpe randen hangt
en niet in de buurt komt van hete voorwerpen en open vuur.
8. Dompel het apparaat of de stekker niet onder in water of
andere vloeistoffen. Er bestaat levensgevaar als gevolg van
een elektrische schok!
9. Om de stekker uit het stopcontact te halen, dient u aan de
stekker zelf te trekken. Trek niet aan de stroomkabel.
10. Raak het apparaat niet aan als het in water is gevallen. Trek
de stekker uit het stopcontact, schakel het apparaat uit en
breng het ter reparatie naar een geautoriseerd
servicecenter.
11. Steek de stekker niet in het stopcontact en haal hem er niet
uit als u natte handen heeft.
12. Probeer nooit de motorbehuizing van het apparaat te
openen en probeer nooit zelf het apparaat te repareren. Dit
kan een elektrische schok veroorzaken.
13. Laat het apparaat nooit onbeheerd achter wanneer het in
gebruik is.
14. Dit apparaat werd niet ontworpen voor commercieel
gebruik.
15. Gebruik het apparaat niet voor andere doeleinden dan het
beoogde doel.
16. Draai de kabel niet om het apparaat en buig hem niet.
17. Houd het apparaat uit de buurt van vocht en bescherm het
tegen spatten.
18. Gebruik het apparaat op een vlak, droog en hittebestendig
oppervlak.
19. Bewaar en gebruik het apparaat niet in de open lucht.
20. Bewaar het apparaat op een droge plek, buiten het bereik
van kinderen (in de originele verpakking).
21. Steek nooit uw vingers of andere voorwerpen door het
rooster van de ventilator als de ventilator in gebruik is.

- 4 - 80.01.0055
22. Neem het product nooit zonder correct gemonteerde
beschermende roosters in gebruik, aangezien dit ernstig
persoonlijk letsel tot gevolg kan hebben.
23. Het apparaat moet volledig gemonteerd worden voordat u
het gebruikt.
24. Pas op met lang haar! Het haar kan door de
luchtturbulentie terecht komen in de ventilator.
25. Richt de luchtstroom nooit gedurende een langere tijd op
mensen.
26. Controleer dat de stekker uit het stopcontact is getrokken
voordat u het beschermend rooster verwijdert.

- 5 - 80.01.0055
BESCHRIJVING VAN DE ONDERDELEN
1. Klemring
2. Voorste rooster
3. Borgschroef voor ventilatorblad
4. Ventilatorblad
5. Borgschroef voor rooster
6. Achterste rooster
7. Motoras
8. Oscillatieknop
9. Snelheidsschakelaar
10. Fixatieschroef
11. Instelbuis voor de hoogte
12. Vastzetring
13. Poot
14. Afdekkap
15. Steunbasis
16. Netsnoer en stekker
INSTRUCTIES VOOR DE MONTAGE
** Gelieve het toestel juist te monteren door de volgende stappen te ondernemen.
1. Steun
Maak een kruis om de twee delen van het voetstuk aan elkaar te bevestigen.
Schroef de vier schroeven uit het voetstuk.
Bevestig de poot op het voetstuk en zet het stevig vast met behulp van de vier schroeven.
Draai de vastzetring los en verwijder deze van de poot. Breng de afdekkap via de poot op het voetstuk aan.
Plaats de vastzetring terug.
2. Behuizing ventilator
Trek de instelbuis voor de hoogte uit en draai de vastzetring vast.
Maak de behuizing van de ventilator vast op de instelbuis voor de hoogte met behulp van de fixatieschroef.

- 6 - 80.01.0055
3. Achterste beschermingsrooster
Draai de borgschroef voor ventilatorblad en de borgschroef voor rooster los van de motoras.
Plaats het achterste rooster op de twee steunen van de voorste motorschacht.
Draai de fixatieschroef van de borgschroef voor rooster met de klok mee vast.
4. Ventilatorblad
Plaats het ventilatorblad op de motoras en zorg ervoor dat de borgpen in de opening van het motorasgat
past.
Maak de borgschroef voor het ventilatorblad vast op de motoras. Opmerking: De borgschroef voor het
ventilatorblad dient tegen de klok in vastgedraaid te worden.
5. Voorste beschermingsrooster
Plaats het voorste rooster tegen het achterste rooster en maak vast met de klemring. Zorg dat de klemring
juist over de rand van de roosters is aangebracht.
Draai de schroef op de klemring vast.
BEDIENINGSINSTRUCTIES
1. Steek de stekker in een gepast stopcontact.
2. Oscillatie: Om het ventilatorhoofd te laten oscilleren, druk de Oscillatieknop in. Om het oscilleren van het
ventilatorhoofd te stoppen, trek de Oscillatieknop omhoog.
3. De ventilator is ingeschakeld zodra een van de knoppen op het bedieningspaneel wordt ingedrukt. 0: Uit,
1 = Lage snelheid, 2 = Medium snelheid , 3 = Hoge snelheid.
OPGELET: U mag enkel één van de snelheidsknoppen per keer indrukken. Als u twee of meer knoppen
tegelijkertijd indrukt, kan dit het controlepaneel permanent beschadigen.
4. Schakel het toestel uit en neem de stekker uit het stopcontact telkens na ieder gebruik.
REINIGING
1. Schakel het toestel uit en neem de stekker uit het stopcontact, alvorens de ventilator te reinigen en telkens
na ieder gebruik.
2. Dompel het toestel nooit onder in water (risico op kortsluiting). Om het toestel te reinigen, gebruik een
vochtige doek en droog het toestel vervolgens zorgvuldig af. Neem altijd eerst de stekker uit het
stopcontact.
3. Zorg ervoor dat er zich geen grote hoeveelheden stof ophopen in het luchtinvoer- en luchtuitvoerrooster
van het moterhuis. Reinig deze rooster regelmatig met een droge borstel of stofzuiger.
RECYCLING
Dit apparaat draagt het symbool voor gescheideninzameling van afgedankte elektrische en
elektronische apparatuur.
Het valt hierdoor onder de bepalingen van richtlijn 2012/19/EU die voorschrijft dat het gerecycled
dan wel ontmanteld moet worden teneinde het milieu te sparen.
U kunt u voor nadere inlichtingen wenden tot uw gemeente.
Elektronische producten die niet gescheiden worden ingezameld vormen een potentieel gevaar voor het
milieu en de volksgezondheid wegens de gevaarlijke stoffen die deze apparatuur bevat.
KWALITEIT
HEMA hecht grote waarde aan veiligheid en kwaliteit. We beschikken over een eigen laboratorium. Dit
laboratorium beoordeelt vóór opname in het assortiment, alle apparaten op elektrische veiligheid en
gebruikseigenschappen. Daarnaast bewaakt HEMA samen met de fabrikant de productkwaliteit.

- 7 - 80.01.0055
BEVEILIGING
Het is mogelijk dat dit HEMA-artikel voorzien is van een kunststof beveiligingsstrip. U vindt de strip dan aan de
onderzijde van het apparaat. Deze strip heeft geen invloed op de kwaliteit of werkwijze van het artikel en kan
zonder problemen worden verwijderd.
STORINGEN EN REPARATIE
Bij een defect toestel, het apparaat ter reparatie aanbieden bij een Hema-vestiging.
Voer zelf geen reparaties uit aan het toestel.
In het geval dat er reparatie nodig is, kunt u het apparaat goed verpakt, bij voorkeur in de originele verpakking,
inleveren bij een Hema-vestiging. Indien binnen de garantietermijn, de garantiebon meebrengen.
GARANTIE
Garantietermijn is 2 jaar na de datum van aankoop. Bewaar altijd goed uw bon. Het is handig als u een foto van
de bon maakt en deze ergens opslaat. Dan heeft u altijd een goed leesbare bon in het bezit.
GARANTIEBEPALINGEN
HEMA-kwaliteitsgarantie
HEMA garandeert dat het door u gekochte artikel aan de kwaliteit en eigenschappen voldoet die u ervan mag
verwachten. Deze garantiebepalingen gelden onverminderd de wettelijke rechten van de klant en zijn van
toepassing in alle landen waar HEMA-vestigingen heeft.
Aanspraak op garantie
Als u aanspraak wenst te maken op garantie dan dient u het artikel samen met het aankoopbewijs in een van
onze vestigingen aan te bieden. De betreffende vestiging bepaalt dan of het artikel (door hetzelfde of een
gelijkwaardig artikel) wordt vervangen, binnen een redelijke termijn wordt gerepareerd of u uw aankoopbedrag
terugkrijgt.
Verval van garantie
De garantie op het artikel vervalt indien het gebrek of defect is veroorzaakt door:
a) normale slijtage;
b) een gebeurtenis van buitenaf (bijvoorbeeld zand-, val- of vochtschade);
c) verkeerd of oneigenlijk gebruik; of
d) achterstallig of onjuist onderhoud, waaronder mede wordt verstaan een reparatie die niet op initiatief
van HEMA is verricht.
Deze opsomming is niet limitatief.
Extra zekerheid voor een goede keus
U mag het artikel binnen 30 dagen na aanschaf (mits onbeschadigd en met aankoopbewijs) ruilen of retourneren.
1 november 2019
Hema B.V.
Postbus 37110
1030 AC Amsterdam
Nederland
Deze garantiebepalingen gelden onverminderd de wettelijke rechten of vorderingen van de klant.

- 8 - 80.01.0055
ERP-informatie (NL)
Leverancier: Hema B.V.
Postbus 37110
1030 AC Amsterdam
Nederland
Verklaart dat onderstaand vermeld product:
Informatie-eisen
Informatie voor het identificeren van de 80.01.0055 waarop de informatie betrekking heeft
[Ventilator op standaard]
Beschrijving
Symbool
Waarde
Eenheid
Maximale stroomsnelheid van
ventilator
F
60,98
m3/min
Ingangsvermogen ventilator
P
43,9
W
Servicewaarde
SV
1,388
(m3/min)/W
Stroomverbruik in stand-by
PSB
0,00
W
Geluidsvermogenniveau van
ventilator
LWA
56,0
dB(A)
Maximale luchtsnelheid
c
3,25
meter/sec
Meetstandaard voor servicewaarde
IEC 60879:1986+(corr.1992),
EN 60704-1:2010+A11:2012 & EN 60704-2-7:1998,
EN 50564:2011
Contactgegevens voor meer
informatie
Hema B.V.
Postbus 37110
1030 AC Amsterdam
Nederland
Voldoet aan de eisen van de Richtlijnen van de raad:
VERORDENING (EU) Nr. 206/2012 VAN DE COMMISSIE van 6 maart 2012 en VERORDENING TOT
WIJZIGING (EU) 2016/2282 VAN DE COMMISSIE ter uitvoering van Richtlijn 2009/125/EU van het
Europees Parlement en de Raad betreffende de eisen inzake het ecologisch ontwerp voor
airconditioners en ventilatoren
Voor informatie voor de consument over de installatie, de werking en het onderhoud van het product
en de AEEA-informatie, raadpleeg de gebruiksaanwijzing die zich in de verpakking bevindt.

- 9 - 80.01.0055
Mode d‘emploi – French
art.n°. 80.01.0055
DONNÉES TECHNIQUES
Tension d’opération: 220-240V ~ 50/60Hz
Consommation énergétique: 45W
CONSIGNES DE SÉCURITÉ
Avant d’utiliser l’appareil, lisez toutes les consignes suivantes
pour éviter des blessures et des dommages, et pour optimiser
les performances de votre appareil. Conservez cette notice
d’utilisation dans un endroit sûr. Si vous donnez ou transférez
cet appareil à un tiers, veillez à lui remettre également cette
notice d’utilisation.
En cas de détérioration due au non-respect par l’utilisateur
des instructions de cette notice d’utilisation, la garantie est
annulée. Le fabricant/importateur rejette toute
responsabilité en cas de dommages dus au non-respect des
instructions de la notice d’utilisation, à un usage négligent ou
à l’usage non conforme aux exigences de cette notice
d’utilisation.
1. Cet appareil peut être utilisé par des enfants âgés de 8 ans
et plus et les personnes ayant des capacités physiques,
sensorielles ou mentales, ou un manque d'expérience et de
connaissances si elles ont été formées et encadrées pour
l'utilisation de cet appareil en toute sécurité et de
comprendre la risques impliqués.
2. Les enfants ne doivent pas jouer avec l’appareil.
3. Le nettoyage et la maintenance ne doivent pas être
effectués par des enfants sans surveillance.
4. Si le câble d'alimentation est endommagé, il doit être
remplacé par le fabricant, son service après vente ou des
personnes de qualification similaire afin d'éviter un danger.
5. Avant d’insérer la fiche de l’appareil dans une prise secteur,
vérifiez que la tension et la fréquence du secteur
correspondent aux spécifications indiquées sur la plaque
signalétique.

- 10 - 80.01.0055
6. Débranchez la fiche électrique de la prise électrique quand
l’appareil n’est pas utilisé et avant de le nettoyer.
7. Veillez à ce que le cordon d’alimentation ne pende pas sur
des arêtes coupantes et maintenez-le éloigné des objets
chauds et des flammes nues.
8. N'immergez jamais l'appareil ou sa fiche dans de l'eau ni
dans aucun autre liquide. Cela peut provoquer un choc
électrique !
9. Pour débrancher la fiche de la prise, saisissez la fiche et
tirez-la hors de la prise. Ne tirez pas sur le cordon
d’alimentation.
10. Ne touchez pas l’appareil s’il tombe dans de l’eau.
Débranchez la fiche de la prise électrique, éteignez
l’appareil et rapportez-le au centre de réparation agréé
pour le faire réparer.
11. Ne branchez pas et ne débranchez pas l’appareil de la prise
électrique avec les mains mouillées.
12. N’essayez pas d’ouvrir le boîtier de l’appareil ni de réparer
l’appareil vous-même. Cela peut provoquer un choc
électrique.
13. Ne laissez jamais l'appareil sans surveillance quand il est en
fonctionnement.
14. Cet appareil n’est pas conçu pour un usage commercial.
15. N’utilisez pas cet appareil à un usage autre que celui pour
lequel il a été conçu.
16. N’enroulez pas le cordon d’alimentation autour de
l’appareil et ne le pliez pas.
17. Maintenez l’appareil éloigné des endroits mouillés et
protégez-le des éclaboussures.
18. Placez l’appareil sur une surface plane, sèche et résistante
à la chaleur.
19. Ne rangez pas et n’utilisez pas l’appareil en plein air.
20. Rangez l’appareil dans un endroit sec et inaccessible aux
enfants (dans son emballage).
21. N’insérez jamais vos doigts ni aucun objet dans les grilles
du ventilateur quand il est en fonctionnement.

- 11 - 80.01.0055
22. N’utilisez jamais le produit sans ses grilles assemblées, car
cela pourrait provoquer de graves blessures corporelles.
23. L’appareil doit être correctement assemblé avant d’être
utilisé.
24. Faites attention aux cheveux longs ! Ils peuvent être happés
par le ventilateur à cause des turbulences de l’air.
25. Ne dirigez pas le flux d’air vers des personnes pendant
longtemps.
26. Etre sûr que le ventilateur soit débranché de la prise de
courant avant d’enlever la protection.

- 12 - 80.01.0055
DESCRIPTION DES PIECES
1. Anneau de fixation
2. Grille de protection avant
3. Écrou de fixation des pales
4. Pales
5. Écrou de fixation de la grille
6. Grille de protection arrière
7. Arbre du moteur
8. Bouton d’oscillation
9. Interrupteur de vitesse
10. Vis de fixation
11. Tube de réglage de la hauteur
12. Bague de blocage
13. Montant
14. Capuchon
15. Pied
16. Cordon électrique et fiche
INSTRUCTIONS DE MONTAGE
** Veuillez assembler le produit correctement conformément aux consignes suivantes avant toute utilisation.
1. Montage du pied
Assemblez ensemble les deux pièces du pied en croix.
Dévissez les quatre vis du pied.
Attachez le montant sur le pied et fixez-le solidement avec les quatre vis.
Dévissez la bague de blocage du montant. Insérez le capuchon sur le montant et abaissez-le jusqu’au pied.
Revissez la bague de blocage.
2. Montage complet
Tirer le tube de réglage de la hauteur et serrer la bague de blocage.
Joindre le corps principal du ventilateur au tube de réglage de la hauteur avec la vis de fixation et les fixer.

- 13 - 80.01.0055
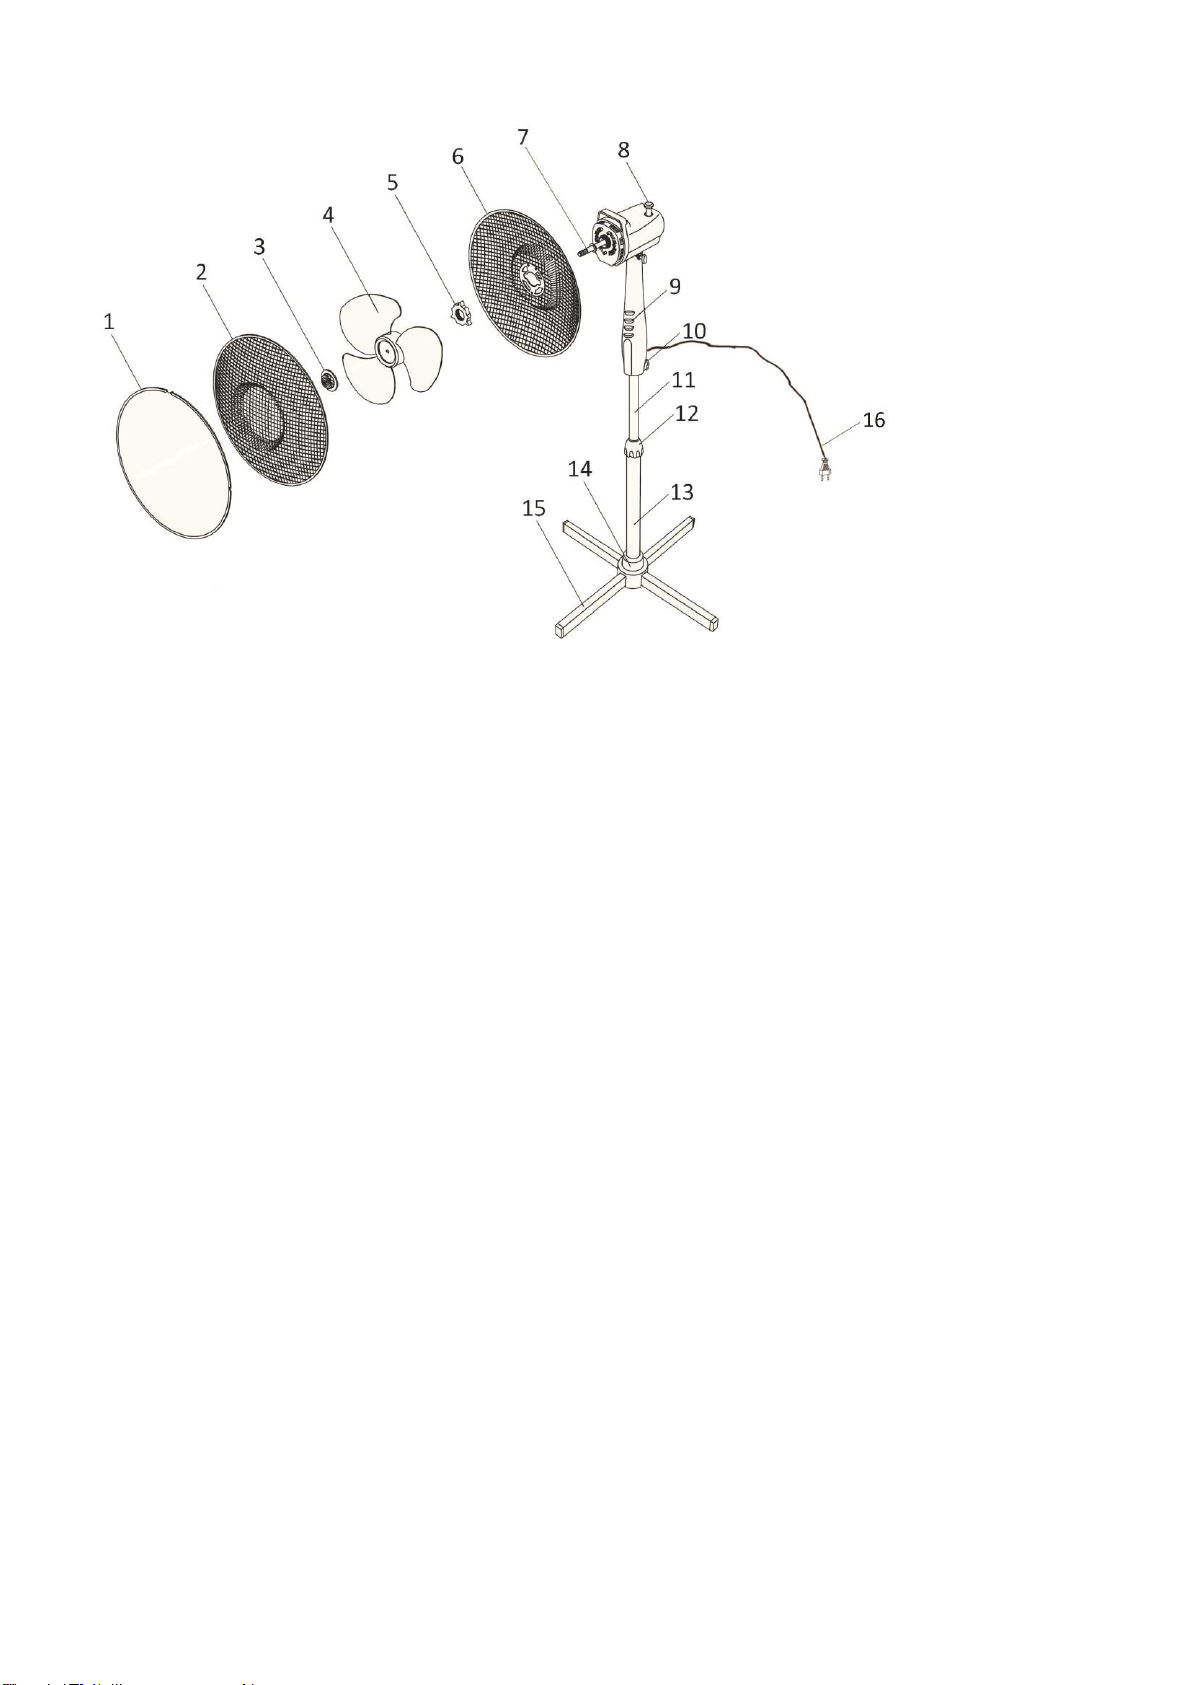
3. Montage de la grille arrière
Dévissez l’écrou de fixation des pales et l’écrou de fixation de la grille et retirez-les de l’axe du moteur.
Fixez la grille de protection arrière sur les deux tiges de la coque avant du moteur.
Vissez fermement l’écrou de fixation de la grille dans le sens des aiguilles d’une montre.
4. Montage de les pales du ventilateur
Insérer les pales du ventilateur en s’assurant qu’elle s’emboite correctement sur les rainures situées sur
l’arbre.
Visser fermement l’écrou de les pales sur l’arbre. Remarque: L’écrou de les pales doit être vissé dans le sens
contraire des aiguilles d’une montre.
5. Montage de la grille avant
Placez la grille avant contre la grille arrière et fixez-les avec l’anneau de fixation. Vérifiez que l’anneau de
fixation est correctement positionné sur le bord des grilles.
Vissez la vis de l’anneau de fixation.
CONSIGNES D’UTILISATION
1. Brancher le cordon d’alimentation sur une prise secteur.
2. Oscillation: Pour l’oscillation de la tête du ventilateur, appuyer sur le bouton Oscillation. Pour arrêter
l’oscillation de la tête du ventilateur, tirer le Bouton d’Oscillation vers le haut.
3. Le ventilateur se met en marche à l’aide des boutons-poussoir situé sur le panneau de contrôle. 0: Arrêt, 1
= Basse vitesse, 2 = Moyenne vitesse, 3 = Haute vitesse.
AVERTISSEMENT: Appuyer uniquement sur un bouton de contrôle de vitesse à la fois. Le boîtier de commande
pourrait être endommagé de manière permanente en cas d’utilisation simultanée de plus d’un bouton.
NETTOYAGE
1. Éteindre l’appareil et débrancher le cordon d’alimentation de la prise avant de procéder à toute réparation
du ventilateur et après chaque utilisation.
2. Ne jamais plonger l’appareil dans l’eau (danger de court-circuit). Utiliser un chiffon humide pour nettoyer
l’appareil, puis le sécher soigneusement. Toujours débrancher la prise secteur au préalable.
3. Veiller à ce qu’aucun excédent de poussière ne s’accumule dans la grille d’entrée ou de sortie d’air et la
nettoyer de temps à autre à l’aide d’une brosse sèche ou d’un aspirateur.
RECYCLAGE
Cet appareil est marqué du symbole du tri sélectif relatif aux déchets d’équipements électriques
et électroniques.
Cela signifie que ce produit doit être pris en charge par un système de collecte sélectif
conformément à la directive européenne 2012/19/EU afin de pouvoir soit être recyclé soit
démantelé afin de réduire tout impact sur l’environnement.
Pour plus de renseignements, vous pouvez contacter votre administration locale ou régionale.
Les produits électroniques n’ayant pas fait l’objet d’un tri sélectif sont potentiellement dangereux pour
l’environnement et la santé humaine en raison de la présence de substances dangereuses.
QUALITÉ
HEMA attache une grande importance à la sécurité et à la qualité. Nous disposons de notre propre laboratoire.
Ce laboratoire évalue la sécurité électrique et les propriétés d’utilisation de tous les appareils avant leur
insertion dans l’assortiment. En outre, HEMA contrôle la qualité du produit en collaboration avec le fabricant.

- 14 - 80.01.0055
SÉCURITÉ
Il est possible que cet article HEMA soit pourvu d’une bande de protection en plastique. Cette bande se trouve
en dessous de l’appareil. Elle n’a aucune influence sur la qualité ou le fonctionnement de l'article et peut être
enlevée sans problème.
RÉPARATION
Si une réparation est nécessaire, vous pouvez rapporter l’appareil, bien emballé, dans un magasin HEMA. S’il est
toujours sous garantie, il doit être accompagné du bon de garantie et du bon d’achat. Vous pouvez porter votre
appareil à réparer dans tous les magasins HEMA. Vérifiez régulièrement si le cordon n’est pas abîmé. Lorsque le
cordon est abîmé, faites réparer l’appareil dans un magasin Hema. Ne pas remplacer le cordon soi-même. Pour
des raisons de sécurité, il est conseillé de ne pas réparer soi-même des appareils électriques.
GARANTIE
La période de garantie est de 2 ans à compter de la date d'achat. Gardez toujours votre reçu dans un endroit
sûr. C’est pratique de prendre une photo du reçu et de l’enregistrer quelque part. Vous avez alors toujours sur
vous un reçu facile à lire.
CLAUSES DE GARANTIE
Garantie de qualité HEMA
HEMA garantit que l'article que vous avez acheté satisfait à la qualité et aux caractéristiques que vous pouvez en
attendre. Ces clauses de garantie valent sans préjudice des droits légaux du client et sont applicables dans tous
les pays où HEMA possède des magasins.
Réclamation au titre de la garantie
Si vous souhaitez faire une réclamation au titre de la garantie, vous devez présenter l'article ainsi que le justificatif
d'achat dans l'une de nos magasins. Ce magasin déterminera alors si l'article doit être remplacé (par le même
article ou un article équivalent), réparé dans un délai raisonnable ou si le prix d'achat doit vous être remboursé.
Annulation de la garantie
La garantie sur un article est annulée si le défaut ou la panne sont dus à :
a) une usure normale ;
b) un événement extérieur (par exemple dommages causés par du sable, une chute ou de l'humidité) ;
c) une utilisation incorrecte ou impropre ; ou
d) un manque d'entretien ou un entretien impropre, ce qui inclut entre autres une réparation qui n'a pas
été effectuée par HEMA.
Cette énumération n'est pas limitative.
Sécurité supplémentaire pour un bon choix
Vous pouvez échanger ou retourner l'article dans les 30 jours à compter de l'achat (à condition qu'il ne soit pas
endommagé et sur présentation du justificatif d'achat).
Le 1er novembre 2019
Hema B.V.
Boîte postale 37110
1030 AC Amsterdam
Pays-Bas
Ces conditions de garantie sont valables sans préjudice des droits légaux du client ou des actions intentées par
lui.

- 15 - 80.01.0055
Informations ERP (FR)
Fournisseur : Hema B.V.
Postbus 37110
1030 AC Amsterdam
Pays-Bas
Déclare que le produit désigné ci-dessous :
Exigences en matière d'informations
Informations d'identification 80.01.0055 sur lesquelles portent les informations
(Ventilateur sur pied)
Description
Symbole
Valeur
Unité
Débit d’air maximal
F
60,98
m3/min
Puissance absorbée
P
43,9
W
Valeur de service
SV
1,388
(m3/min)/W
Consommation d'électricité en mode
veille
PSB
0,00
W
Niveau de puissance acoustique
LWA
56,0
dB(A)
Vitesse maximale de l’air
c
3,25
mètres/sec
Norme de mesure de la valeur de
service
IEC 60879:1986+(corr.1992),
EN 60704-1:2010+A11:2012 & EN 60704-2-7:1998,
EN 50564:2011
Coordonnées de contact pour tout
complément d'information
Hema B.V.
Postbus 37110
1030 AC Amsterdam
Pays-Bas
Satisfait aux exigences des Directives du Conseil :
Règlement (UE) n° 206/2012 de la Commission du 6 mars 2012 et amendé par le règlement (UE) n°
2016/2282 de la Commission portant application de la directive 2009/125/CE du Parlement européen
et du Conseil en ce qui concerne les exigences d'écoconception applicables aux climatiseurs et aux
ventilateurs de confort.
En ce qui concerne les informations pour les consommateurs sur comment installer, utiliser et
entretenir le produit, les informations DEEE, consultez le manuel d’instruction fourni avec l’emballage.

- 16 - 80.01.0055
Instruction manual –English
art.no. 80.01.0055
TECHNICAL DATA
Operating voltage: 220-240V ~ 50/60Hz
Power consumption: 45W
SAFETY INSTRUCTIONS
Before use make sure to read all of the below instructions in
order to avoid injury or damage, and to get the best results
from the appliance. Make sure to keep this manual in a safe
place. If you give or transfer this appliance to someone else
make sure to also include this manual.
In case of damage caused by user failing to follow the
instructions in this manual the warranty will be void. The
manufacturer/importer accepts no liability for damages
caused by failure to follow the manual, a negligent use or use
not in accordance with the requirements of this manual.
1. This appliance can be used by children aged from 8 years
and above and persons with reduced physical, sensory or
mental capabilities or lack of experience and knowledge if
they have been given supervision or instruction concerning
use of the appliance in a safe way and understand the
hazards involved.
2. Children shall not play with the appliance.
3. Cleaning and user maintenance shall not be made by
children without supervision.
4. If the supply cord is damaged, it must be replaced by the
manufacturer, its service agent or similarly qualified
persons in order to avoid a hazard.
5. Before inserting the plug into the mains socket, please
check that the voltage and frequency comply with the
specifications on the rating label.
6. Disconnect the mains plug from the socket when the
appliance is not in use and before cleaning.

- 17 - 80.01.0055
7. Ensure that the mains cable is not hung over sharp edges
and keep it away from hot objects and open flames.
8. Do not immerse the appliance or the mains plug in water
or other liquids. There is danger to life due to electric shock!
9. To remove the plug from the plug socket, pull the plug. Do
not pull the power cord.
10. Do not touch the appliance if it falls into water. Remove the
plug from its socket, turn off the appliance and send it to
an authorized service center for repair.
11. Do not plug or unplug the appliance from the electrical
outlet with a wet hand.
12. Never attempt to open the housing of the appliance, or to
repair the appliance yourself. This could cause electric
shock.
13. Never leave the appliance unattended during use.
14. This appliance is not designed for commercial use.
15. Do not use the appliance for other than intended use.
16. Do not wind the cord around the appliance and do not
bend it.
17. Keep the appliance away from damp, and protect from
splashes.
18. Use the appliance on a flat, dry and heat resistance surface.
19. Do not store or operate the appliance in the open air.
20. Keep the appliance in a dry place for storage, inaccessible
to children (in its packaging).
21. Never put fingers or any other objects through the fan
guards when the fan is running.
22. Never operate the product without the fan guards in place,
as serious personal injury may result.
23. The appliance must be assembled completely before use.
24. Watch out for long hair! It can be caught in the fan owing
to the air turbulence.
25. Do not point the air flow at people for a long time.
26. Ensure that the fan is switched off from the supply mains
before removing the guard.

- 18 - 80.01.0055
PARTS DESCRIPTION
1. Clamping ring
2. Front guard
3. Blade fastening screw
4. Fan blade
5. Guard fastening screw
6. Rear guard
7. Motor shaft
8. Oscillation button
9. Speed switch
10. Fastening screw
11. Height adjustment pipe
12. Fasten set
13. Standing shaft
14. Cover piece
15. Standing base
16. Power cord and plug
ASSEMBLING INSTRUCTIONS
** Please assemble correctly by the following orders when using.
1. Assemble the stand
Connect the two parts of the base together into a cross.
Unscrew the four screws from the base.
Attach the standing shaft onto the base and fix firmly with the four screws.
Rotate the fasten set out of the standing shaft. Put the cover piece on the base through the standing shaft.
Rotate back the fasten set.
2. The whole assembly
Pull the height adjustment pipe out and tighten the fasten set.
Link the fan main body and the height adjustment pipe together by the fastening screw and then fix them.

- 19 - 80.01.0055
3. Rear grille assembly
Unscrew the blade fastening screw and the guard fastening screw from the motor shaft.
Fix the rear guard onto the two pillars of the motor front shell.
Screw the guard fastening screw tightly in clockwise direction.
4. The assembly of fan blade
Insert fan blade onto shaft ensuring blade fits properly onto clip on shaft.
Tighten blade screw onto shaft. Note: Blade screw should be tightened in anti-clockwise.
5. Front grille assembly
Put the front guard against the rear guard and fix with the clamping ring. Make sure the clamping ring is set
properly at the rim of the fan guards.
Tighten the screw on the clamping ring.
OPERATING INSTRUCTIONS
1. Plug the power cord into a suitable socket.
2. Oscillation: To make the fan head oscillate, push down the oscillation knob. To stop the fan head from
oscillating, pull up the oscillation knob.
3. The fan is switched on by using the push buttons on the control panel, i.e. 0: Off, 1 = Low Speed, 2 = Medium
speed, 3 = High speed.
CAUTION: Press only one of the speed control button at a time. Permanent damage to the switch housing may
result if two or more of the buttons are pressed simultaneously.
CLEANING
1. Before servicing the fan and after each occasion of use, switch off the appliance and unplug the mains cable
from the socket.
2. Never immerse the appliance in water (danger of short-circuit). To clean the appliance, only wipe it down
with a damp cloth and dry it carefully. Always take out the mains plug first.
3. Take care that excessive dust does not build up in the air-intake and air-outlet grille, and clean it occasionally
using a dry brush or vacuum cleaner.
RECYCLING
This product bears the selective sorting symbol for waste electrical and electronic equipment
(WEEE).
This means that this product must be handled pursuant to European Directive 2012/19/EU in
order to be recycled or dismantled to minimize its impact on the environment.
For further information, please contact your local or regional authorities.
Electronic products not included in the selective sorting process are potentially dangerous for the environment
and human heath due to the presence of hazardous substances.
QUALITY
Safety and quality is very important to HEMA. We have our own laboratory, which assesses all equipment in
terms of electrical safety and ease of use, before it is included in our range. HEMA also monitors the product
quality in collaboration with the manufacturer.
SECURITY
This HEMA item may be fitted with a plastic anti-theft strip. You will find the strip on the bottom of the product.
This strip does not influence the quality or the operation of the product and can be removed without a problem.
Other manuals for 80.01.0055
2
Table of contents
Languages:
Other Hema Fan manuals

Hema
Hema 80.01.0054 User manual

Hema
Hema 80.06.0016 User manual

Hema
Hema 80.01.0055 User manual

Hema
Hema Desk fan 25W User manual

Hema
Hema 80.06.0022 User manual

Hema
Hema 80.06.0019 User manual

Hema
Hema 80.01.0072 User manual

Hema
Hema 80.06.0021 User manual

Hema
Hema 80.01.0055 User manual

Hema
Hema 80.06.0010 User manual
Popular Fan manuals by other brands

Fanimation
Fanimation Enigma FP2120 Series Specification sheet

Manrose
Manrose FAN7180 manual

Home Decorators Collection
Home Decorators Collection RADLEY AM690-BN Use and care guide

Hunter
Hunter T Installation and operation manual

Vornado
Vornado Zippi owner's guide

DuraVent
DuraVent duraplus htc installation instructions