Hema 80.01.0055 User manual

Instructions for use
Stand fan 45W
Gebruiksaanwijzing
Ventilator op standaard 45W
Mode d'emploi
Ventilateur sur pied 45W
Gebrauchsanleitung
Stand Ventilator 45W
Instrucciones de uso
Ventilador de pedesta 45W

- 1 -
Content –Inhoud –Teneur –Inhalt –Contenido
Instruction manual –English .....................................................................- 2 -
Gebruiksaanwijzing –Dutch ......................................................................- 7 -
Mode d‘emploi – French ......................................................................... - 13 -
Bedienungsanleitung –German ..............................................................- 19 -
Manual de Instrucciones –Spanish ......................................................... - 25 -

- 2 -
Instruction manual –English
SAFETY INSTRUCTIONS
Before use make sure to read all of the below instructions in
order to avoid injury or damage, and to get the best results
from the appliance. Make sure to keep this manual in a safe
place. If you give or transfer this appliance to someone else
make sure to also include this manual.
In case of damage caused by user failing to follow the
instructions in this manual the warranty will be void. The
manufacturer/importer accepts no liability for damages
caused by failure to follow the manual, a negligent use or use
not in accordance with the requirements of this manual.
1. This appliance can be used by children aged from 8 years
and above and persons with reduced physical, sensory or
mental capabilities or lack of experience and knowledge if
they have been given supervision or instruction concerning
use of the appliance in a safe way and understand the
hazards involved.
2. Children shall not play with the appliance.
3. Cleaning and user maintenance shall not be made by
children without supervision.
4. If the supply cord is damaged, it must be replaced by the
manufacturer, its service agent or similarly qualified
persons in order to avoid a hazard.
5. Before inserting the plug into the mains socket, please
check that the voltage and frequency comply with the
specifications on the rating label.
6. Disconnect the mains plug from the socket when the
appliance is not in use and before cleaning.
7. Ensure that the mains cable is not hung over sharp edges
and keep it away from hot objects and open flames.
8. Do not immerse the appliance or the mains plug in water
or other liquids. There is danger to life due to electric shock!
9. To remove the plug from the plug socket, pull the plug. Do
not pull the power cord.

- 3 -
10. Do not touch the appliance if it falls into water. Remove the
plug from its socket, turn off the appliance and send it to
an authorized service center for repair.
11. Do not plug or unplug the appliance from the electrical
outlet with a wet hand.
12. Never attempt to open the housing of the appliance, or to
repair the appliance yourself. This could cause electric
shock.
13. Never leave the appliance unattended during use.
14. This appliance is not designed for commercial use.
15. Do not use the appliance for other than intended use.
16. Do not wind the cord around the appliance and do not
bend it.
17. Keep the appliance away from damp, and protect from
splashes.
18. Use the appliance on a flat, dry and heat resistance surface.
19. Do not store or operate the appliance in the open air.
20. Keep the appliance in a dry place for storage, inaccessible
to children (in its packaging).
21. Never put fingers or any other objects through the fan
guards when the fan is running.
22. Never operate the product without the fan guards in place,
as serious personal injury may result.
23. The appliance must be assembled completely before use.
24. Watch out for long hair! It can be caught in the fan owing
to the air turbulence.
25. Do not point the air flow at people for a long time.
26. Ensure that the fan is switched off from the supply mains
before removing the guard.

- 4 -
80.01.0055 EN
TECHNICAL DATA
Operating voltage: 220-240V ~ 50/60Hz
Power consumption: 45W
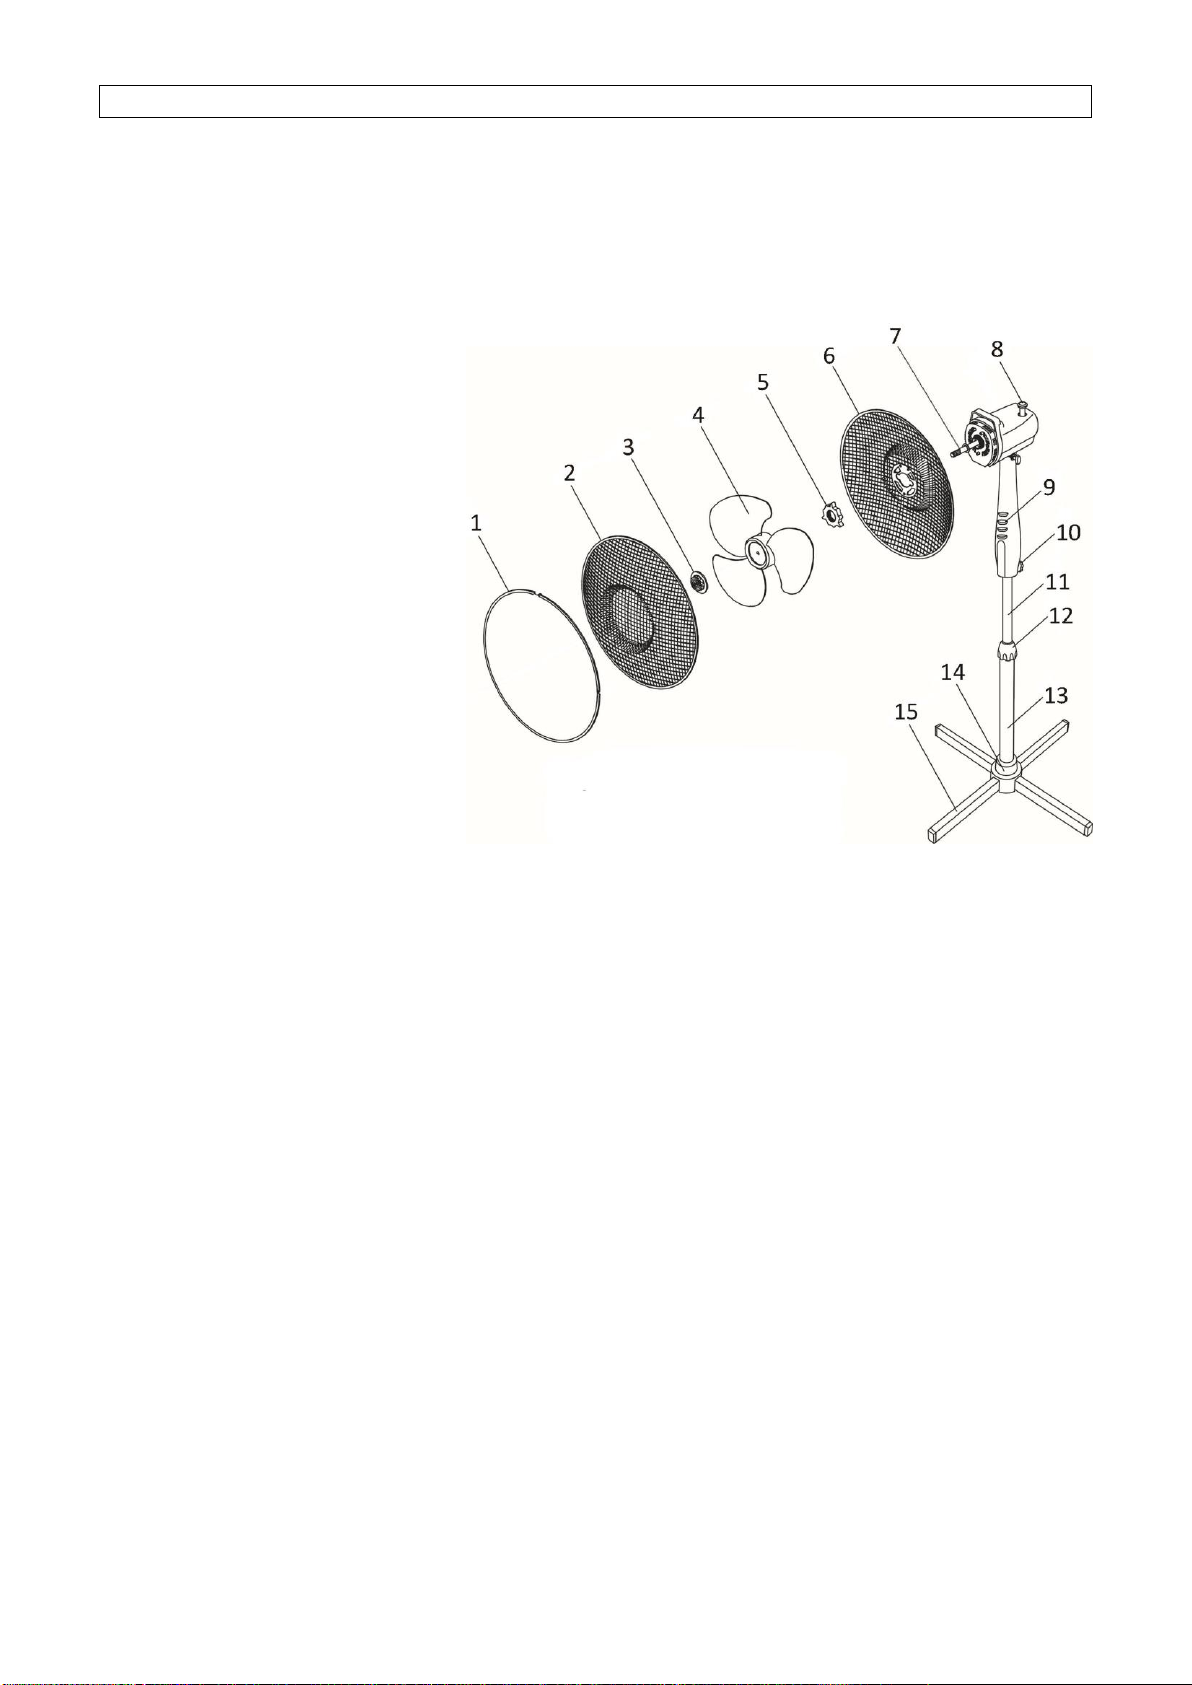
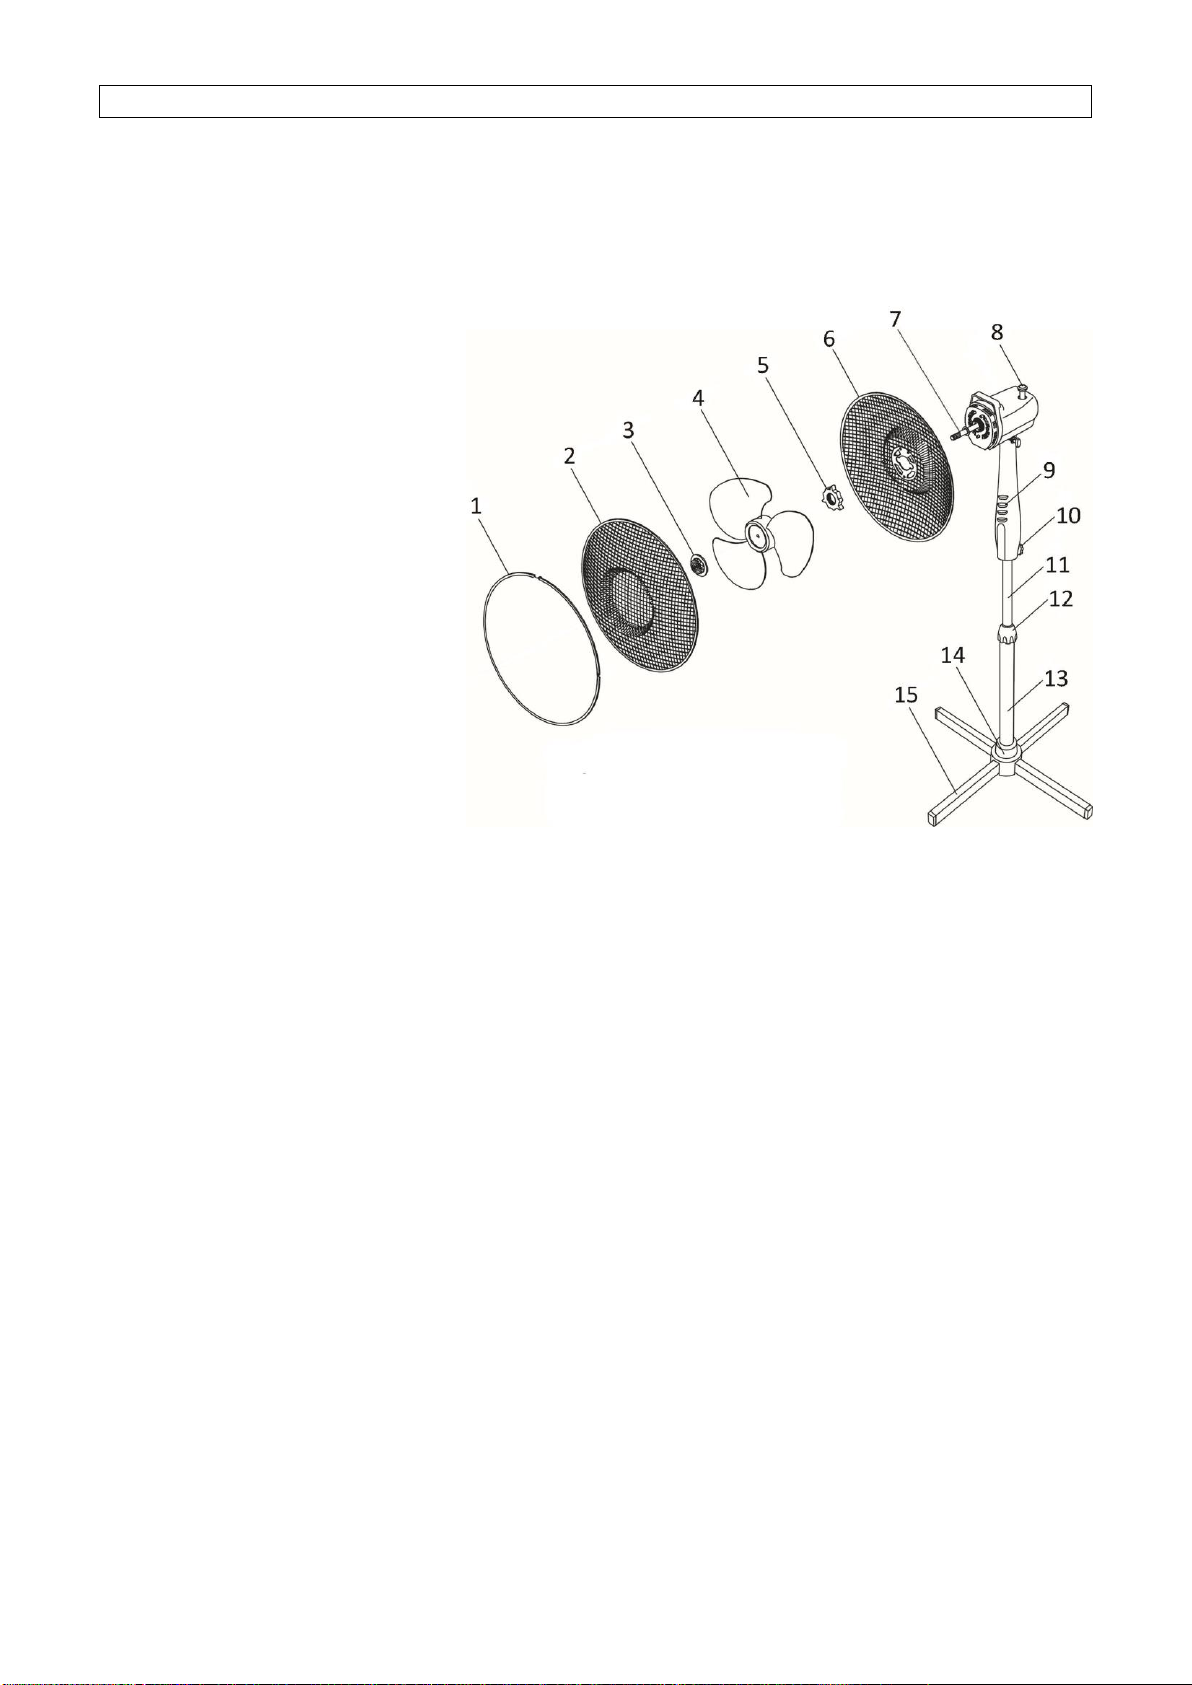
PARTS DESCRIPTION
1. Clamping ring
2. Front guard
3. Blade fastening screw
4. Fan blade
5. Guard fastening screw
6. Rear guard
7. Motor shaft
8. Oscillation button
9. Speed switch
10. Fastening screw
11. Height adjustment pipe
12. Fasten set
13. Standing shaft
14. Cover piece
15. Standing base
ASSEMBLING INSTRUCTIONS
** Please assemble correctly by the following orders when using.
1. Assemble the stand
Connect the two parts of the base together into a cross.
Unscrew the four screws from the base.
Attach the standing shaft onto the base and fix firmly with the four screws.
Rotate the fasten set out of the standing shaft. Put the cover piece on the base through the standing shaft.
Rotate back the fasten set.
2. The whole assembly
Pull the height adjustment pipe out and tighten the fasten set.
Link the fan main body and the height adjustment pipe together by the fastening screw and then fix them.
3. Rear grille assembly
Unscrew the blade fastening screw and the guard fastening screw from the motor shaft.
Fix the rear guard onto the two pillars of the motor front shell.
Screw the guard fastening screw tightly in clockwise direction.
4. The assembly of fan blade
Insert fan blade onto shaft ensuring blade fits properly onto clip on shaft.
Tighten blade screw onto shaft. Note: Blade screw should be tightened in anti-clockwise.
- 5 -
5. Front grille assembly
Put the front guard against the rear guard and fix with the clamping ring. Make sure the clamping ring is set
properly at the rim of the fan guards.
Tighten the screw on the clamping ring.
OPERATING INSTRUCTIONS
1. Plug the power cord into a suitable socket.
2. Oscillation: To make the fan head oscillate, push down the oscillation knob. To stop the fan head from
oscillating, pull up the oscillation knob.
3. The fan is switched on by using the push buttons on the control panel, i.e. 0: Off, 1 = Low Speed, 2 = Medium
speed, 3 = High speed.
CAUTION: Press only one of the speed control button at a time. Permanent damage to the switch housing may
result if two or more of the buttons are pressed simultaneously.
CLEANING
1. Before servicing the fan and after each occasion of use, switch off the appliance and unplug the mains cable
from the socket.
2. Never immerse the appliance in water (danger of short-circuit). To clean the appliance, only wipe it down
with a damp cloth and dry it carefully. Always take out the mains plug first.
3. Take care that excessive dust does not build up in the air-intake and air-outlet grille, and clean it occasionally
using a dry brush or vacuum cleaner.
ENVIRONMENT FRIENDLY DISPOSAL
Recycling –European Directive 2012/19/EU
This marking indicates that this product should not be disposed with other household wastes. To
prevent possible harm to the environment or human health from uncontrolled waste disposal, recycle
it responsibly to promote the sustainable reuse of material resources. To return your used device,
please use the return and collection systems or contact the retailer where the product was purchased. They can
take this product for environmental safe recycling.
WARRANTY CONDITIONS
HEMA B.V. fully guarantees the product named on the warranty receipt, against all defects caused by material
and manufacturing errors.
For all domestic electrical appliances, the warranty period is 2 years from the date of purchase.
The warranty on this article is invalidated if:
a. the defect occurs through incorrect or improper use, neglect, connection to the wrong power voltage, or if
dropped or knocked;
b. you have attempted to repair the article yourself, or have had it repaired by a repair service other than HEMA
during the warranty period.
If you wish to make a claim under the warranty terms:
You will need to hand in the article at one of our branches together with the warranty receipt. Under normal
circumstances the article will be repaired free of charge within 14 workdays.
Extra certainty for the right choice
If, after purchasing the article, you are dissatisfied (because it is not exactly what you expected or you already
have this article), you can return the article within 30 days of purchase, on condition that it is undamaged and
in the original packaging.

- 6 -
Remember that you must always bring your sales receipt.
You can either exchange the article or request a refund.
The warranty conditions apply in all countries where there are HEMA branches.
Hema BV
PO Box 37110
1030 AC Amsterdam
Netherlands
These warranty conditions apply without prejudice to the customer’s statutory rights or any other claims by the
customer.

- 7 -
Gebruiksaanwijzing –Dutch
VEILIGHEIDSVOORSCHRIFTEN
Voor gebruik dient u alle onderstaande instructies te lezen om
letsel en schade te voorkomen en om de beste resultaten met
het apparaat te bereiken. Bewaar deze handleiding op een
veilige plek. Mocht u dit apparaat aan iemand anders
overhandigen, dient u ook de gebruiksaanwijzing te
overhandigen.
In geval van schade die wordt veroorzaakt doordat de
gebruiker de instructies in deze gebruiksaanwijzing niet in
acht heeft genomen, komt de garantie te vervallen. De
fabrikant/importeur is niet aansprakelijk voor schade die
wordt veroorzaakt door het niet in acht nemen van de
gebruiksaanwijzing, door nalatig gebruik of gebruik dat niet in
overeenstemming is met de bepalingen van deze
gebruiksaanwijzing.
1. Dit apparaat mag worden gebruikt door kinderen vanaf 8
jaar en personen met beperkte fysische, visuele of mentale
vaardigheden, of die een gebrek aan ervaring en kennis
hebben, indien ze gepaste instructies hebben gekregen
zodat ze het apparaat op een veilige manier kunnen
gebruiken, op de hoogte zijn van de gevaren die het gebruik
van het apparaat met zich meebrengt en deze gevaren
begrijpen.
2. Laat kinderen niet met het apparaat spelen.
3. Kinderen mogen het apparaat niet reinigen of
onderhouden zonder toezicht.
4. Als het snoer is beschadigd, moet het worden vervangen
door de fabrikant, zijn klantenservice of gelijksoortig
geschoolde personen om gevaar te vermijden.
5. Voordat u de stekker in het stopcontact steekt, dient u te
controleren of de stroom en de frequentie overeen komen
met de specificaties van het typeplaatje.

- 8 -
6. Trek de stekker uit het stopcontact als het apparaat niet in
gebruik is en voordat u het apparaat reinigt.
7. Let op dat de stroomkabel niet over scherpe randen hangt
en niet in de buurt komt van hete voorwerpen en open vuur.
8. Dompel het apparaat of de stekker niet onder in water of
andere vloeistoffen. Er bestaat levensgevaar als gevolg van
een elektrische schok!
9. Om de stekker uit het stopcontact te halen, dient u aan de
stekker zelf te trekken. Trek niet aan de stroomkabel.
10. Raak het apparaat niet aan als het in water is gevallen. Trek
de stekker uit het stopcontact, schakel het apparaat uit en
breng het ter reparatie naar een geautoriseerd
servicecenter.
11. Steek de stekker niet in het stopcontact en haal hem er niet
uit als u natte handen heeft.
12. Probeer nooit de behuizing van het apparaat te openen en
probeer nooit zelf het apparaat te repareren. Dit kan een
elektrische schok veroorzaken.
13. Laat het apparaat nooit onbeheerd achter wanneer het in
gebruik is.
14. Dit apparaat werd niet ontworpen voor commercieel
gebruik.
15. Gebruik het apparaat niet voor andere doeleinden dan het
beoogde doel.
16. Draai de kabel niet om het apparaat en buig hem niet.
17. Houd het apparaat uit de buurt van vocht en bescherm het
tegen spatten.
18. Gebruik het apparaat op een vlak, droog en hittebestendig
oppervlak.
19. Bewaar en gebruik het apparaat niet in de open lucht.
20. Bewaar het apparaat op een droge plek, buiten het bereik
van kinderen (in de originele verpakking).
21. Steek nooit uw vingers of andere voorwerpen door het
rooster van de ventilator als de ventilator in gebruik is.

- 9 -
22. Neem het product nooit zonder correct gemonteerde
beschermende roosters in gebruik, aangezien dit ernstig
persoonlijk letsel tot gevolg kan hebben.
23. Het apparaat moet volledig gemonteerd worden voordat u
het gebruikt.
24. Pas op met lang haar! Het haar kan door de
luchtturbulentie terecht komen in de ventilator.
25. Richt de luchtstroom nooit gedurende een langere tijd op
mensen.
26. Controleer dat de stekker uit het stopcontact is getrokken
voordat u het beschermend rooster verwijdert.
- 10 -
80.01.0055 NL
TECHNISCHE GEGEVENS
Voedingsspanning:
220-240V ~ 50/60Hz
Stroomverbruik: 45W
BESCHRIJVING VAN DE ONDERDELEN
1. Klemring
2. Voorste rooster
3. Borgschroef voor ventilatorblad
4. Ventilatorblad
5. Borgschroef voor rooster
6. Achterste rooster
7. Motoras
8. Oscillatieknop
9. Snelheidsschakelaar
10. Fixatieschroef
11. Instelbuis voor de hoogte
12. Vastzetring
13. Poot
14. Afdekkap
15. Steunbasis
INSTRUCTIES VOOR DE MONTAGE
** Gelieve het toestel juist te monteren door de volgende stappen te ondernemen.
1. De steun monteren
Maak een kruis om de twee delen van het voetstuk aan elkaar te bevestigen.
Schroef de vier schroeven uit het voetstuk.
Bevestig de poot op het voetstuk en zet het stevig vast met behulp van de vier schroeven.
Draai de vastzetring los en verwijder deze van de poot. Breng de afdekkap via de poot op het voetstuk aan.
Plaats de vastzetring terug.
2. De volledige montering
Trek de instelbuis voor de hoogte uit en maak de vastzetring vast.
Maak de behuizing van de ventilator vast op de instelbuis voor de hoogte met behulp van de fixatieschroef.
3. Montering van het achterste beschermingsrooster
Draai de borgschroef voor ventilatorblad en de borgschroef voor rooster los van de motoras.
Plaats het achterste rooster op de twee steunen van de voorste motorschacht.
Draai de fixatieschroef van het borgschroef voor rooster vast in kloksgewijze richting.
4. Het ventilatorblad monteren
Steek het ventilatorblad in de motoras en zorg ervoor dat de schoep in de groeven van de motoras past.
Maak de borgschroef voor het ventilatorblad vast op de motoras. Opmerking: De borgschroef voor het
ventilatorblad dient anti-kloksgewijs vastgedraaid worden.

- 11 -
5. Het voorste beschermingsrooster monteren
Plaats het voorste rooster tegen het achterste rooster en maak vast met de klemring. Zorg dat de klemring
juist over de rand van de roosters is aangebracht.
Draai de schroef op de klemring vast.
BEDIENINGSINSTRUCTIES
1. Steek de stekker in een gepast stopcontact.
2. Oscillatie: Om het ventilatorhoofd te laten oscilleren, druk de Oscillatieknop in. Om het oscilleren van het
ventilatorhoofd te stoppen, trek de Oscillatieknop omhoog.
3. De ventilator is ingeschakeld zodra een van de knoppen op het bedieningspaneel wordt ingedrukt. 0: Uit,
1 = Lage snelheid, 2 = Medium snelheid , 3 = Hoge snelheid.
OPGELET: U mag enkel één van de snelheidsknoppen per keer indrukken. Als u twee of meer knoppen
tegelijkertijd indrukt, kan dit het controlepaneel permanent beschadigen.
REINIGING
1. Schakel het toestel uit en neem de stekker uit het stropcontact, alvorens de ventilator te laten herstellen
en na iedere gebruiksbeurt.
2. Dompel het toestel nooit onder in water (risico op kortsluiting). Om het toestel te reinigen, gebruik een
vochtige doek en droog het toestel vervolgens zorgvuldig af. Neem altijd eerst de stekker uit het
stopcontact.
3. Zorg ervoor dat er zich geen grote hoeveelheden stof ophopen in het luchtinvoer- en luchtuitvoerrooster.
Reinig deze rooster regelmatig met een droge borstel of stofzuiger.
MILIEUVRIENDELIJKE AFVALVERWERKING
Recycling –Europese Richtlijn 2012/19/EU
Deze markering betekent dat dit product niet samen met ander huishoudelijk afval mag worden
afgedankt. Om het milieu en de volksgezondheid niet in gevaar te brengen en het hergebruik van
grondstoffen te bevorderen, moet dit product op verantwoordelijke wijze worden afgevoerd. Lever
verbruikte apparatuur a.u.b. in bij de hiervoor bestemde inzamelpunten of bij de winkel waar het product was
aangeschaft. Zij zullen dit product accepteren voor milieuvriendelijke afvalverwerking.
GARANTIEBEPALINGEN
Wij garanderen de kwaliteit
Hema B.V. garandeert het op de garantiebewijsbon vermelde artikel volledig tegen gebreken als gevolg van
materiaal- en fabricagefouten.
Voor alle elektrisch huishoudelijke apparaten is de garantietermijn 2 jaar na de datum van aankoop.
De garantie op het artikel vervalt indien:
a. het defect is ontstaan door ondeskundig of oneigenlijk gebruik, verwaarlozing, aansluiten op de verkeerde
netspanning of door vallen of stoten;
b. u, gedurende de garantieperiode, het artikel zelf of door een niet-HEMA reparateur heeft geprobeerd te
herstellen.
Als u aanspraak kunt en wilt maken op garantie:
Dient het artikel, vergezeld van de garantiebewijsbon, te worden aangeboden in één van onze vestigingen. In het
algemeen zal, behoudens bijzondere omstandigheden, de reparatie binnen 14 werkdagen geheel gratis worden
uitgevoerd.

- 12 -
Extra zekerheid voor een goede keus
Als u met de aankoop van het artikel achteraf toch niet gelukkig bent (bijvoorbeeld omdat de uitvoering tegenvalt
of een dubbele aankoop heeft plaatsgevonden), kunt u binnen 30 dagen na aankoop, mits onbeschadigd en in
originele verpakking, het artikel terugbrengen.
Neem dan wel altijd de kassabon mee.
U kunt het artikel dan ruilen of desgewenst uw geld terug krijgen.
Deze garantiebepalingen zijn van toepassing in alle landen waar Hema vestigingen heeft.
Hema B.V.
Postbus 37110
1030 AC Amsterdam
Nederland
Deze garantiebepalingen gelden onverminderd de wettelijke rechten of vorderingen van de klant.

- 13 -
Mode d‘emploi – French
CONSIGNES DE SÉCURITÉ
Avant d’utiliser l’appareil, lisez toutes les consignes suivantes
pour éviter des blessures et des dommages, et pour optimiser
les performances de votre appareil. Conservez cette notice
d’utilisation dans un endroit sûr. Si vous donnez ou transférez
cet appareil à un tiers, veillez à lui remettre également cette
notice d’utilisation.
En cas de détérioration due au non-respect par l’utilisateur
des instructions de cette notice d’utilisation, la garantie est
annulée. Le fabricant/importateur rejette toute
responsabilité en cas de dommages dus au non-respect des
instructions de la notice d’utilisation, à un usage négligent ou
à l’usage non conforme aux exigences de cette notice
d’utilisation.
1. Cet appareil peut être utilisé par des enfants âgés de 8 ans
et plus et les personnes ayant des capacités physiques,
sensorielles ou mentales, ou un manque d'expérience et de
connaissances si elles ont été formées et encadrées pour
l'utilisation de cet appareil en toute sécurité et de
comprendre la risques impliqués.
2. Les enfants ne doivent pas jouer avec l’appareil.
3. Le nettoyage et la maintenance ne doivent pas être
effectués par des enfants sans surveillance.
4. Si le câble d'alimentation est endommagé, il doit être
remplacé par le fabricant, son service après vente ou des
personnes de qualification similaire afin d'éviter un danger.
5. Avant d’insérer la fiche de l’appareil dans une prise secteur,
vérifiez que la tension et la fréquence du secteur
correspondent aux spécifications indiquées sur la plaque
signalétique.
6. Débranchez la fiche électrique de la prise électrique quand
l’appareil n’est pas utilisé et avant de le nettoyer.

- 14 -
7. Veillez à ce que le cordon d’alimentation ne pende pas sur
des arêtes coupantes et maintenez-le éloigné des objets
chauds et des flammes nues.
8. N'immergez jamais l'appareil ou sa fiche dans de l'eau ni
dans aucun autre liquide. Cela peut provoquer un choc
électrique !
9. Pour débrancher la fiche de la prise, saisissez la fiche et
tirez-la hors de la prise. Ne tirez pas sur le cordon
d’alimentation.
10. Ne touchez pas l’appareil s’il tombe dans de l’eau.
Débranchez la fiche de la prise électrique, éteignez
l’appareil et rapportez-le au centre de réparation agréé
pour le faire réparer.
11. Ne branchez pas et ne débranchez pas l’appareil de la prise
électrique avec les mains mouillées.
12. N’essayez pas d’ouvrir le boîtier de l’appareil ni de réparer
l’appareil vous-même. Cela peut provoquer un choc
électrique.
13. Ne laissez jamais l'appareil sans surveillance quand il est en
fonctionnement.
14. Cet appareil n’est pas conçu pour un usage commercial.
15. N’utilisez pas cet appareil à un usage autre que celui pour
lequel il a été conçu.
16. N’enroulez pas le cordon d’alimentation autour de
l’appareil et ne le pliez pas.
17. Maintenez l’appareil éloigné des endroits mouillés et
protégez-le des éclaboussures.
18. Placez l’appareil sur une surface plane, sèche et résistante
à la chaleur.
19. Ne rangez pas et n’utilisez pas l’appareil en plein air.
20. Rangez l’appareil dans un endroit sec et inaccessible aux
enfants (dans son emballage).
21. N’insérez jamais vos doigts ni aucun objet dans les grilles
du ventilateur quand il est en fonctionnement.
22. N’utilisez jamais le produit sans ses grilles assemblées, car
cela pourrait provoquer de graves blessures corporelles.

- 15 -
23. L’appareil doit être correctement assemblé avant d’être
utilisé.
24. Faites attention aux cheveux longs ! Ils peuvent être happés
par le ventilateur à cause des turbulences de l’air.
25. Ne dirigez pas le flux d’air vers des personnes pendant
longtemps.
26. Etre sûr que le ventilateur soit débranché de la prise de
courant avant d’enlever la protection.
- 16 -
80.01.0055 FR
DONNÉES TECHNIQUES
Tension d’opération: 220-240V ~ 50/60Hz
Consommation énergétique: 45W
DESCRIPTION DES PIECES
1. Anneau de fixation
2. Grille de protection avant
3. Écrou de fixation des pales
4. Pales
5. Écrou de fixation de la grille
6. Grille de protection arrière
7. Arbre du moteur
8. Bouton d’oscillation
9. Interrupteur de vitesse
10. Vis de fixation
11. Tube de réglage de la hauteur
12. Bague de blocage
13. Montant
14. Capuchon
15. Pied
INSTRUCTIONS DE MONTAGE
** Veuillez assembler le produit correctement conformément aux consignes suivantes avant toute utilisation.
1. Montage du pied
Assemblez ensemble les deux pièces du pied en croix.
Dévissez les quatre vis du pied.
Attachez le montant sur le pied et fixez-le solidement avec les quatre vis.
Dévissez la bague de blocage du montant. Insérez le capuchon sur le montant et abaissez-le jusqu’au pied.
Revissez la bague de blocage.
2. Montage complet
Tirer le tube de réglage de la hauteur et serrer la bague de blocage.
Joindre le corps principal du ventilateur au tube de réglage de la hauteur avec la vis de fixation et les fixer.
3. Montage de la grille arrière
Dévissez l’écrou de fixation des pales et l’écrou de fixation de la grille et retirez-les de l’axe du moteur.
Fixez la grille de protection arrière sur les deux tiges de la coque avant du moteur.
Vissez fermement l’écrou de fixation de la grille dans le sens des aiguilles d’une montre.
4. Montage de les pales du ventilateur
Insérer les pales du ventilateur en s’assurant qu’elle s’emboite correctement sur les rainures situées sur
l’arbre.
Visser fermement l’écrou de les pales sur l’arbre. Remarque: L’écrou de les pales doit être vissé dans le sens
contraire des aiguilles d’une montre.

- 17 -
5. Montage de la grille avant
Placez la grille avant contre la grille arrière et fixez-les avec l’anneau de fixation. Vérifiez que l’anneau de
fixation est correctement positionné sur le bord des grilles.
Vissez la vis de l’anneau de fixation.
CONSIGNES D’UTILISATION
1. Brancher le cordon d’alimentation sur une prise secteur.
2. Oscillation: Pour l’oscillation de la tête du ventilateur, appuyer sur le bouton Oscillation. Pour arrêter
l’oscillation de la tête du ventilateur, tirer le Bouton d’Oscillation vers le haut.
3. Le ventilateur se met en marche à l’aide des boutons-poussoir situé sur le panneau de contrôle. 0: Arrêt, 1
= Basse vitesse, 2 = Moyenne vitesse, 3 = Haute vitesse.
AVERTISSEMENT: Appuyer uniquement sur un bouton de contrôle de vitesse à la fois. Le boîtier de commande
pourrait être endommagé de manière permanente en cas d’utilisation simultanée de plus d’un bouton.
NETTOYAGE
1. Éteindre l’appareil et débrancher le cordon d’alimentation de la prise avant de procéder à toute réparation
du ventilateur et après chaque utilisation.
2. Ne jamais plonger l’appareil dans l’eau (danger de court-circuit). Utiliser un chiffon humide pour nettoyer
l’appareil, puis le sécher soigneusement. Toujours débrancher la prise secteur au préalable.
3. Veiller à ce qu’aucun excédent de poussière ne s’accumule dans la grille d’entrée ou de sortie d’air et la
nettoyer de temps à autre à l’aide d’une brosse sèche ou d’un aspirateur.
APPAREIL RESPECTUEUX DE L’ENVIRONNEMENT
Recyclage –Directive européenne 2012/19/EU
Ce symbole indique que le produit ne doit pas être jeté avec les ordures ménagères. Pour limiter les
risques pour l’environnement et la santé entraînés par le rejet non contrôlé des déchets, recyclez ce
dernier pour promouvoir une réutilisation responsable de ses matériaux. Pour recycler votre produit,
utilisez les réseaux de collecte de votre région ou prenez contact avec le revendeur du produit. Ce dernier pourra
vous aider à le recycler.
CONDITIONS DE GARANTIE
Nous vous garantissons la qualité
Hema B.V. offre une garantie totale sur l'article mentionné sur le bon de garantie en cas de défauts occasionnés
par des vices de fabrication ou de matériel. Pour tous les appareils ménagers électriques, le délai de garantie est
de 2 ans après la date d'achat.
La garantie est annulée dans le cas suivants:
a. le défaut est causé par une utilisation incompétente ou abusive, par négligence, par un mauvais branchement
ou suite à une chute ou un choc ;
b. vous avez tenté, durant la période de garantie, de réparer vous-même l'article ou de le faire réparer par un
réparateur autre que HEMA .
Si vous voulez et pouvez faire usage de la garantie:
L'article, accompagné du ticket de caisse, doit être apporté en répara tion dans l'un de nos magasins. En règle
générale la réparation est effectuée dans un délai de 15 jours - sauf en cas de circonstances exceptionnelles - et
entièrement gratuitement.

- 18 -
Une sécurité supplémentaire pour être sûr de votre choix
Si toutefois vous n'étiez pas satisfait de l'article (par exemple, si le modèle ne vous plaît pas ou que vous avez
fait un achat double), vous pouvez ramener l'article intact et dans son emballage d'origine dans les 30 jours qui
suivent son achat. N'oubliez pas le ticket de caisse. Vous pouvez échanger l'article ou, si vous le souhaitez, être
remboursé.
Ces conditions de garantie s'appliquent dans tous les pays où HEMA possède des magasins.
Hema B.V.
Postbus 37110
1030 AC Amsterdam
Pays-Bas
Ces conditions de garantie sont valables sans préjudice des droits légaux du client ou des actions intentées par
lui.

- 19 -
Bedienungsanleitung –German
SICHERHEITSHINWEISE
Lesen Sie vor dem Gebrauch unbedingt die nachfolgenden
Anleitungen, um Verletzungen oder Beschädigungen zu
vermeiden und das beste Ergebnis mit dem Gerät zu erzielen.
Bewahren Sie diese Bedienungsanleitung an einem sicheren
Ort auf. Wenn Sie dieses Gerät an eine andere Person
weitergeben, stellen Sie sicher, dass Sie auch diese
Bedienungsanleitung aushändigen.
Im Falle von Beschädigungen, die durch die Missachtung der
Anleitungen in dieser Bedienungsanleitung verursacht
wurden, wird die Garantie ungültig. Der Hersteller/Importeur
haftet nicht für Schäden, die durch Missachtung der
Bedienungsanleitung, fahrlässigen Gebrauch oder Benutzung,
die nicht in Übereinstimmung mit den Anforderungen dieser
Bedienungsanleitung erfolgt, verursacht wurden.
1. Dieses Gerät kann von Kindern ab 8 Jahren und Personen
mit eingeschränkten körperlichen, sensorischen oder
geistigen Fähigkeiten oder mangelnder Erfahrung und
Kenntnis benutzt werden, wenn sie beaufsichtigt werden
oder in die sichere Benutzung des Gerätes unterwiesen
werden und die damit verbundenen Gefahren verstehen.
2. Kinder dürfen nicht mit dem Gerät spielen.
3. Die Reinigung und vom Benutzer auszuführende
Wartungsarbeiten dürfen von Kindern nur unter Aufsicht
durchgeführt werden.
4. Wenn das Netzkabel beschädigt ist, muss es vom Hersteller,
seinem Kundendienst oder einer ähnlich qualifizierten
Person ausgewechselt werden, um Gefahren zu vermeiden.
5. Bevor Sie den Stecker mit der Netzsteckdose verbinden,
prüfen Sie bitte, ob die Spannung und die Frequenz mit den
Angaben auf dem Typenschild übereinstimmen.
6. Ziehen Sie den Netzstecker aus der Steckdose, wenn das
Gerät nicht benutzt und bevor es gereinigt wird.
Other manuals for 80.01.0055
2
Table of contents
Languages:
Other Hema Fan manuals

Hema
Hema 80.01.0072 User manual

Hema
Hema 80.06.0010 User manual

Hema
Hema 80.01.0055 User manual

Hema
Hema Desk fan 25W User manual

Hema
Hema 80.01.0054 User manual

Hema
Hema 80.06.0009 User manual

Hema
Hema 80.01.0055 User manual

Hema
Hema 80.06.0016 User manual

Hema
Hema 80.01.0072 User manual

Hema
Hema 80.06.0021 User manual


Popular Fan manuals by other brands


Caframo
Caframo Ultimate 757 DC-WBX user manual

Monte Carlo Fan Company
Monte Carlo Fan Company 5HS52XXD-L Series owner's manual

ElectrIQ
ElectrIQ FRF12B user manual

getAir
getAir SmartFan XR Installation and operating instructions

Alpha
Alpha Vannus VC 1 instruction manual

Henley
Henley AEOLUS Installation & operating manual


