Hemingworth Thread Cabinet User manual

The thread cabinet is packaged in two separate cartons. Depending on how the cabinet is delivered, both cartons may not necessarily arrive together.
TopPanel (T)Hemingworth Thread CabinetAssembly InstructionsIdentifying the PartsCabinet FrameDrawers2x BackingBoardsBacking JoinerWall-Mount Plugsand Screws14x DrawerRunners12x Dowels22x PinsSafetyBracket4x SmallClamps42x DrawerScrews22x TwistlocksRight Panel (R)BottomPanel (B) Left Panel (L)Back Support - Top (BT)Back Support - Bottom (BB)Wall Mount (W)Front Panel (F)You’ll Also Need:- Phillips head screwdriver- Large flat-head screwdriver- Drill with No. 2 Phillips bit (optional, recommended)
Pin DepthGuage

1. Attach Hardware to Panels
Right Panel (R)Left Panel (L)Closest Holeto WheelClosest Holeto Wheel
Tip: Use the Pin Depth Guage to make sure pin is screwed to correct depth.
26 mmHead of Pin flushwith top of Guage
•Place Left (L) and Right (R) Panels on a flat surface as shown•Place seven of “Left” drawer runners on the Left Panel (L). Repeat for Right Panel (R)Left Drawer RunnerRight Drawer RunnerUsing drawer screws, attach the drawer runners as shown. Repeat until there are 7 runners on each Left (L) and Right (R) panel. Insert 4 wooden dowels in each Panel as shown.Insert 9 Pins in each Left (L) and Right (R) Panel as shownPlace 2 Small Clamps along the groove for each Left (L) and Right (R) Panel as shown. Be sure it is positioned so the groove remains open.YesNo
Orientation: Hole Top Left
Orientation: Hole Top Right

Back Support Top (BT)Front Panel (F)(”Hemingworth” on other side)Once twist-locks are inserted, flip Top Panel (T) over and insert 2 pins. Insert 2 pins in Front Panel (F)
Top Panel (T)(top, outside)(inside)Bottom Panel (B)(bottom, outside)(inside)
Insert 6 Twistlocks in Back Support Top (BT), 2 in Front Panel (F), 6 in Top Panel (T), 4 in Bottom Panel (B), 4 in Bottom Back Support (BB)Important: Orient the Twistlock so that the arrow points toward the hole in the side. Pieces will not fit together unless Twistlocks are pointing in the right direction.YesNoBack Support Bottom (BB)
(front)(rear)(front)(rear)(rear)(front)(rear)(front)
1. Attach Hardware (continued)
No Hardware needed

2. Assemble Top
Fit together and tighten as shown. Tighten Twistlocks by rotating clockwise. Pin and adjoining panel should be pulled together tightly.GrooveOpenTightened
1. Fit
2. Tighten2. Tighten
3. Fit Together
1. Fit Together
2. Tighten
2. Tighten Twistlockon Reverse of Front Panel
Front Panel
2. Tighten2. Tighten
1. Fit Together
1. Fit Together
2. Tighten1. Slide into Grooves
Fit
ABABCD
1. Push Together
While Fitting into Grooves
1. Push Together
While Fitting in Groove
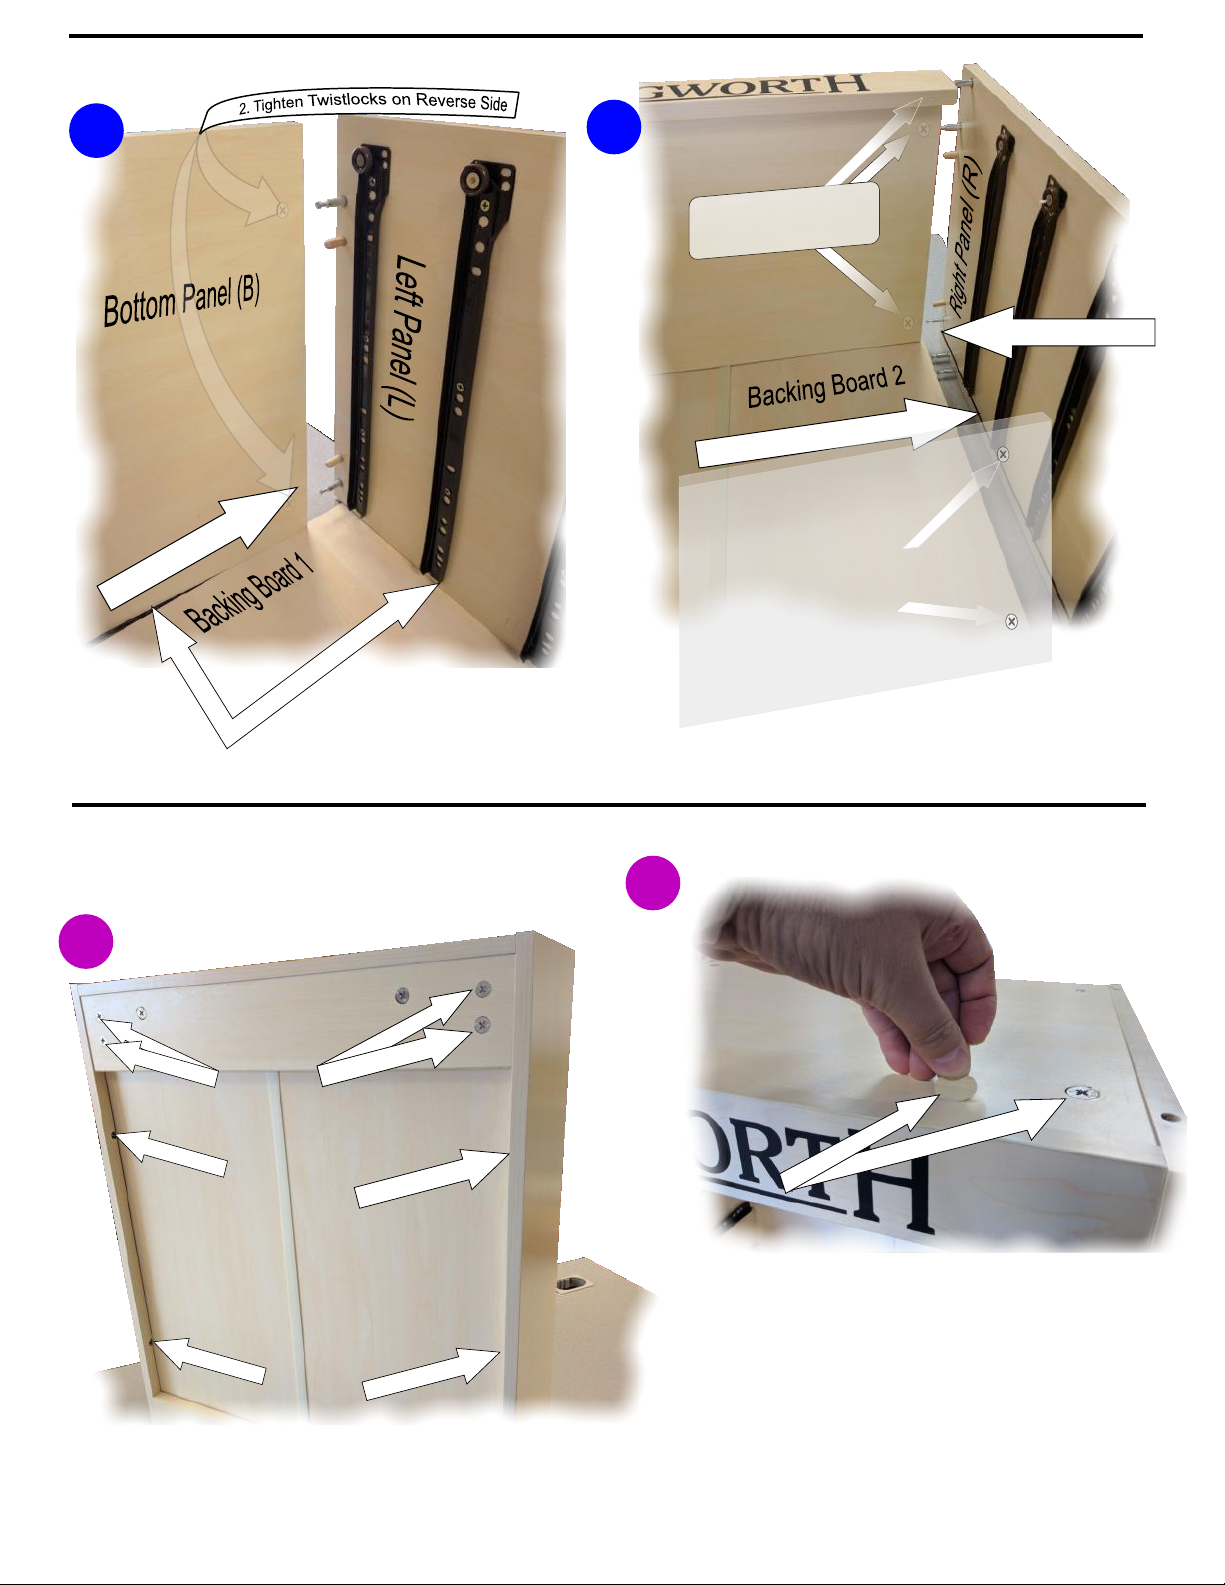
2. Tighten TwistlocksOn Reverse Side
3. Tighten Twistlockson Bottom Panel (B)
4. Turn Cabinet Upright
Tighten
TightenTightenTighten
TightenTighten
Tighten Remaining TwistlocksApply Wood Stickers over Twistlocks on Top
Place
EFAB
3. Fit Together (continued)

5. Assemble the DrawersSafety InformationWall MountingDesk MountingStacking. Affix two runners to each of the top 7 drawers as shown. Any three screw holes can be used to attach each runner, but avoid placing screws near the nails already in the panel. As the holes are not pre-drilled, using a drill or electric screwdriver is recommended. Ensure the runners are positioned firmly against the front and side of the drawer.WARNING: If the thread cabinet is not mounted or anchored securely, it could topple forward and cause serious injury. Ensure it is fastened before use.For your safety, it is essential that the finished cabinet is securely anchored to a wall or sturdy desk before being filled with thread. Follow the appropriate mounting instructions below for your situation, or consult your local hardware store for alternatives.When full with thread the cabinet can weigh up to 100 lbs.It can be hung on a wall using the included wall mount panel. It is strongly recommended that wall mounting should only be attempted by an experienced tradesperson.The Wall Mount (W) panel should be secured horizontally in the desired location, ensuring it is level and facing the wall as shown. It is essential that the panel is screwed firmly into the wall frame or an otherwise solid wall - plasterboard alone will not support the weight of the cabinet. Note: the supplied wall plugs are for solid walls only and must not be used on plasterboardThe cabinet can now be hung from the Wall Mount panel. For extra stability, the included safety bracket can be used to anchor the base of the stand to the wall.Multiple thread cabinets are designed to be stacked together to create a larger storage unit. To stack two units, insert 4x dowels in the top of one cabinet and then carefully position the base of another cabinet over the top. Ensure both cabinets are independently affixed to a wall or desk - the stacking dowels are designed only to provide alignment, they will not prevent the cabinets from toppling. Need assistance? Call us at (800) 428-7606Insert all 7 finished drawers into the cabinet. If desired, apply the included stickers to the front face of each drawer to organise your Hemingworth threads. The stickers may need to be trimmed to size. Note that it is normal to have spare parts left over (dowels, screws, etc).Your cabinet is now complete!Made in ChinaDistributed by:Embroidery Central1638 North 200 WestLogan, UT 84341www.embroidery.comEnsure the runner is firmly up against the front and side of the drawer.If the cabinet is placed on a desk, the included safety bracket should be used to attach it securely to either the desk surface or a wall behind the cabinet as shown.Attach the back, side or top of the cabinet to a desk or wall
Note position of angled edgeMin. 21cm clearancefrom bottom edgeMin. 60cm clearancefrom bottom edge
Table of contents
Popular Display Case manuals by other brands


Hillphoenix
Hillphoenix OWZA P074749F Installation & operation handbook

Diamond
Diamond RDN 600 F Instructions for installation and use

True
True TCGR-50-CD installation manual

forcar
forcar VBR4751 Operation and maintenance manual

FPG
FPG INLINE 5000C Series product manual

CENTRAL RESTAURANT PRODUCTS
CENTRAL RESTAURANT PRODUCTS 69K-054 instruction manual