HemoCue HbA1c 501 User manual

Operating Manual
HbA1c 501
Analyzer
GB
DE
NL
SE
DK
NO


1
TABLE OF CONTENTS
1. INTENDED USE
2. GENERAL INFORMATION
3. PRINCIPLES OF OPERATION
4. HemoCue® HbA1c 501 Analyzer CONTENTS
5. STORAGE INSTRUCTIONS
6. DEVICE DESCRIPTION
7. LIST OF ICONS
8. INSTALLATION
9. OPERATION
10. ANALYZER SET UP
11. RUN a HbA1c TEST
12. REVIEWING RESULTS
13. SYSTEM CHECK
14. OPTIONS
15. PRODUCT LIST
16. TROUBLESHOOTING
17. SPECIFICATION
18. MAINTENANCE
19. SAFETY
20. DISPOSAL
21. PRECAUTION
22. SYMBOLS & DESCRIPTIONS
2
2
2
3
4
4
5
6
7
8
10
16
17
26
31
32
34
35
36
36
37
39
GB

2
1. INTENDED USE
The Hemocue® HbA1c 501Test Cartridge, together with the Hemocue® HbA1c
501 Analyzer, which are parts of the Hemocue® HbA1c 501 system provides a
convenient method for measuring the percentage of hemoglobin A1c (HbA1c %) in
both capillary and anticoagulated venous whole blood samples. The test is for point
of care use to monitor glycemic control in patients with diabetes mellitus.
The Hemocue® HbA1c 501 system uses a boronate affinity assay to separate the
glycated hemoglobin fraction from the nonglycated fraction. The Hemocue®
HbA1c 501 system is intended to be used by professionals in laboratories, clinics
and hospitals.
IMPORTANT: Please read through and familiarize yourself with the contents of
this operating manual before using the system for the first time.
2. GENERAL INFORMATION
The HemoCue® HbA1c 501 system is a small, portable, and fully automated point-
of-care system for all healthcare environments. The system delivers rapid results
with laboratory equivalent accuracy and precision across all test parameters.
The HemoCue® HbA1c 501 system may be used as a basic test system where the
user manually records the results, or as an advanced system where accessories
enable automatic printing of results, input of patient and operator identification
numbers, and full connectivity to a PC. This makes the system highly versatile as it
can be tailored to specific user needs.
This manual contains all the information needed to operate and maintain the
HemoCue® HbA1c 501 system.
3. PRINCIPLES OF OPERATION
The HemoCue® HbA1c 501 system is a fully automated boronate affinity assay for
determination of the Hemoglobin A1c percentage (HbA1c %) in whole blood.
The Test Cartridge consists of a cartridge and a reagent pack containing the
reagents necessary for the determination of hemoglobin A1c, with a sampling area
for blood collection.
The reagent pack is pre-filled with reagent solution and rinsing solution. The reagent
solution contains agents that hemolyse erythrocytes and bind hemoglobin specifically
as well as a boronate resin that binds to the cis-diols of glycated hemoglobin.

3
3. PRINCIPLES OF OPERATION
The blood sample (4μL) is collected at the sampling area of the reagent pack, which
is then inserted into the cartridge, where the blood is instantly lysed releasing the
hemoglobin and the boronate resin binding the glycated hemoglobin.
The reagent pack containing the blood sample is inserted in HemoCue® HbA1c 501
Analyzer (in which the cartridge has been placed). The cartridge is automatically
rotated, placing the blood sample in the measuring zone. The total hemoglobin is
photometrically measured by the diffused reflectance of the optical sensor
composed of both a LED (Light Emitting Diode) and a PD (Photo Diode).
The assembled cartridge is rotated and the rinsing solution washes out non-
glycated hemoglobin from the blood sample, enabling photomectical measurement
of glycated hemoglobin.
The ratio of glycated hemoglobin and total hemoglobin is calculated.
HbA1c % = A x [ x 100 ] + B
Where ‘HbA1c’ and ‘Total Hemoglobin’ are the signals obtained from the HemoCue HbA1c 501
system, ‘A’ and ‘B’ are the slope and intercept factors to correct the value for the calibration
standard of NGSP.
* NGSP: National Glycohemogolbin Standardization Program
4. HemoCue® HbA1c 501 Analyzer CONTENTS
At delivery carefully inspect the product for any obvious physical damage.
If any damage is evident, please consult your local distributor.
HbA1c
Total Hemoglobin
+
Contents
1. Hemocue® HbA1c 501 Analyzer 2. Operating Manual 3. Exclusive Power Adapter
4. Fan Filters 5. Daily Check Cartridge 6. Monthly Check Cartridge
GB

4
5. STORAGE INSTRUCTIONS
The HemoCue® HbA1c 501 Analyzer must be stored at 10-35°C (50-95°F).
Test Cartridges must be stored at 2-32°C (36-90 °F) and at a relative humidity of
10-90% until expiry date printed on the package.
6. DEVICE DESCRIPTION
6.1 Analyzer
6.2 Test Cartridge
Cartridge Reagent Pack
Reagent
Solution
Sampling Area
Safety Guard
Rinsing
Solution
Cartridge
Code Area
Lid
Display
Arrow Buttons
Power & Connector
Mode Button
Printer Button
GB
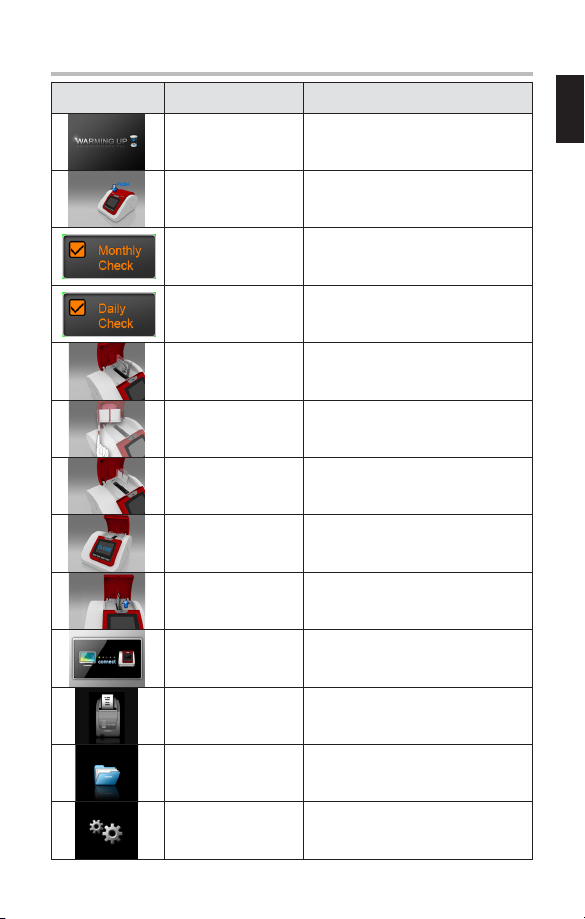
7. LIST OF ICONS
5
Icon Name Function
Warming up Displayed on the analyzer when
turned on.
Open the lid Open the lid of the analyzer.
Monthly Check Mode Display Monthly Check mode on
Analyzer.
Daily Check Mode Display Daily Check mode on
Analyzer.
Insert Cartridge Insert Cartridge into the analyzer.
Filling sample to
Sampling area
Fill blood sample to Sampling area of
reagent pack.
Insert Reagent Pack Insert reagent pack with blood
sample into the analyzer.
Close the lid Close the lid of the analyzer.
Remove cartridge Remove the cartridge from the
analyzer.
PC Connection The analyzer is connected to a PC.
Printer The thermal printer use is active.
Memory View saved test results.
Set up Select this icon to set up the
analyzer.
6
8. INSTALLATION
Overview
This section provides detailed installation instructions for the HemoCue® HbA1c
501 Analyzer. The installation steps must be followed correctly to ensure proper
installation, operation, and service.
CAUTION
Always handle the analyzer with care.
Do not drop or misuse. The calibrated optics, electronics or other internal
parts may be disrupted or damaged.
Do not expose the HemoCue® HbA1c 501 Analyzer to extreme temperature
variations.
Avoid open windows, direct sunlight, ovens, hot plates, open burners, radiators
and dry ice baths.
Place the Hemocue® HbA1c 501 Analyzer on a rigid surface, free from anyvibration.
Unpack the Analyzer
Your Hemocue® HbA1c 501 Analyzer is delivered in a shipping carton.
1. Carefully remove the contents from the shipping carton.
2. Inspect the carton and analyzer for any visible damage.
3. Make sure that all items are included.
4. If any damages is found or parts are missing, contact your local distributor.
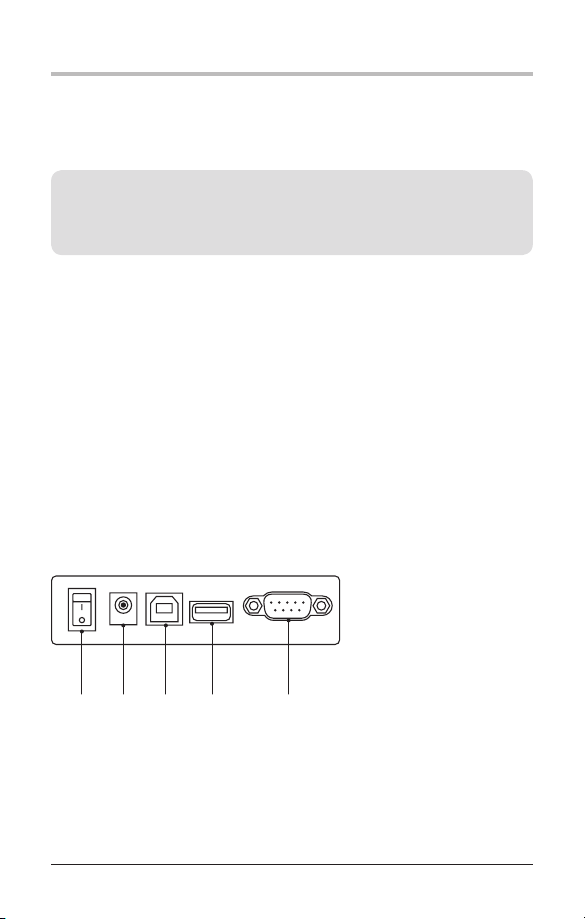
Installing Connections
Analyzer Connections:
1. Power Button
2. DC 9 V adaptor port
3. USB port
4. Barcode Scanner port
5. Thermal Printer port & PC
Connection Port (RS 232)
1 2 3 4 5
Power connection
1. Ensure that the analyzer power button is off and the lid is closed.
2. Connect the power adaptor to the analyzer (port 2) to appropriate grounded AC
electrical outlet.
7
9. OPERATION
9.1 Power On
On/Off 9V USB Barcode Printer
After proper installation, start the HemoCue® HbA1c 501 Analyzer by turning the
power switch “ON”.
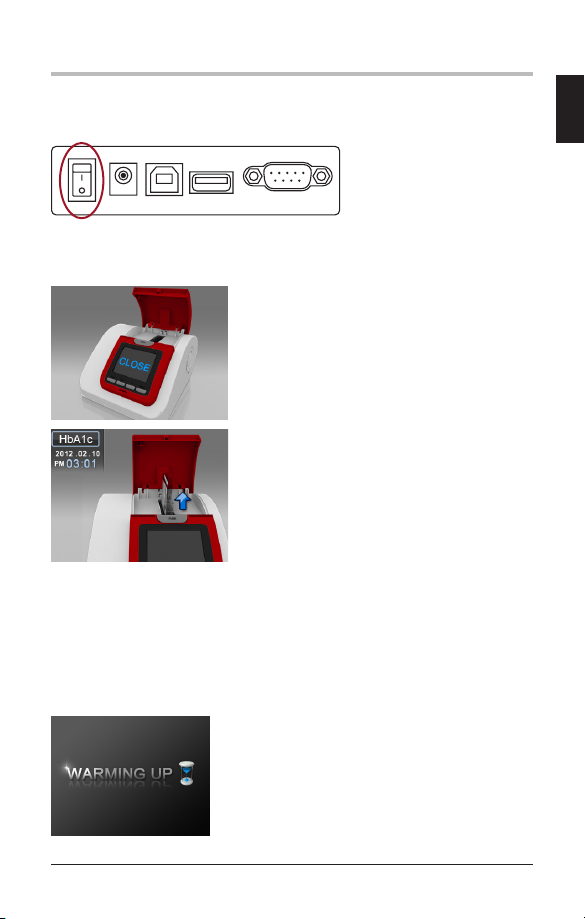
If the lid is open, the icon "Close the lid"
is displayed.
Close the lid - warming up will start.
If the cartridge is inserted, the icon "Take
out the cartridge" is displayed.
Take out the cartridge and close the lid.
Warming up will start.
9.2 Warm up
When the power is connected, the display will show 'Warming up' until the device is
ready for use.
Warming up will take approximately 5 minutes depending on the ambient
temperature.
While warming up, the HemoCue®
HbA1c 501 Analyzer performs hardware
functionality test to verify that the
internal optics and the mechanical
system are operating correctly.
GB

8
9. OPERATION
9.3 Stand-by
After warming, the Analyzer switches to
'Stand-by' mode.
9.4 Power Save
After 30 minutes in 'stand-by' mode, without action, the Analyzer switches to 'Power
Save' mode.
To return to 'Stand-by' mode, press quickly, or open the lid for testing.
10. ANALYZER SET UP
Getting into set up mode
In stand-by mode, press the
button and hold for 3 seconds. Choose
between set up and data mode by
pressing or button.
Press button to select. Choose
set-up mode.
Date
Select the date format ('yy/mm/dd' or 'mm/
dd/yy' or 'dd/mm/yy') by pressing or
, press .
Next, set the date by pressing or
button.
Hold the arrow keys to scroll through the
dates faster.
Time
Select the time format by pressing the
or button, then press .
12h for standard time / 24h for military time.

9
10. ANALYZER SET UP
HbA1c test result unit
Select HbA1c test unit by pressing the
or , then press .
[ NGSP ] [ IFCC ]
Barcode use
Select to use the barcode system or not by
pressing or , then press .
Printer use
Select to use the printer or not by
pressing or , then press .
If 'Use' is selected, Printer mode option is
displayed.
Printer mode
After printer option is selected, choose
'Automatic' or 'Manual' by pressing the
or .
• Automatic: Result is printed automatically
after each test.
• Manual: Result will only be printed when
print button is pressed.
GB

10
11. RUN a HbA1c TEST
Procedure
Blood Sample
The HemoCue® HbA1c 501 test can be performed on a capillary blood sample or
on venous whole blood collected using K2EDTA, lithium heparin, sodium citrate or
sodium fluoride/oxalate as an anticoagulant.
Test Procedure
STEP 1.
When the power is connected, the display will show'Warming up' until the device is
ready for use.
This will take approximately 5 minutes depending on the ambient temperature.
IMPORTANT: Do not move the Analyzer during ‘Warming up’.
STEP 2.
Open the lid of the HemoCue® HbA1c 501 Analyzer, when the 'Open the lid' icon is
shown.
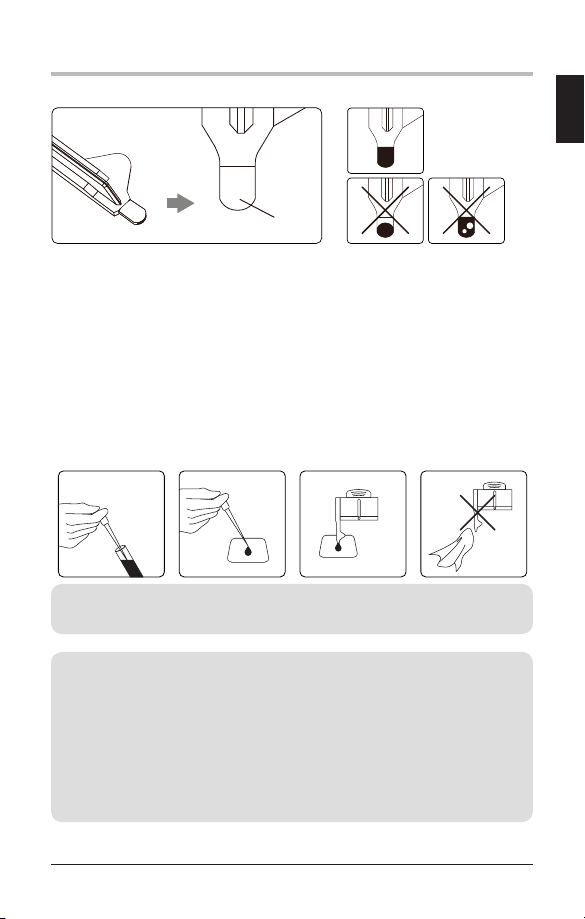
STEP 3.
Open the cartridge package by tearing
the pouch on the side with the serrated
edge.
DO NOT use scissors to open the
pouch. Scissors can damage the
reagent pack.
Use the test cartridge within 2 minutes of opening.

11
11. RUN a HbA1c TEST
CAUTION: When handling the reagent pack and cartridge, do not touch
the cartridge code area on the front or the bead window at the back. Any
contamination of these areas may cause erroneous values.
STEP 4.
Carefully insert the cartridge into the cartridge compartment when the ‘Insert
Cartridge’ icon is displayed. Hold the cartridge with barcode facing left. Ensure
gentle snap is heard or felt to confirm proper placement.
NOTE: Do not force the cartridge into the compartment. The cartridge is
designed to only fit one way.
STEP 5.
The display will show the icon ‘Insert Reagent Pack’ and ‘Filling sample to
sampling area’.
Bead Window
Cartridge Code
Area
GB

12
11. RUN a HbA1c TEST
STEP 5-1.
Gently mix by turning the reagent pack back and forth 5 - 6 times before applying
blood sample.
CAUTION: Do not mix too vigorously, it may cause air bubbles. If bubbles are
present wait until they disappear.
Capillary whole blood from fingertip and venous whole blood can be used for
HbA1c test. 4 μL capillary whole blood from fingertip or venous whole blood is
needed for HbA1c testing
STEP 5-2.
Apply the blood sample by gently touching the drop of blood with the tip of the
sampling area. Ensure that the sampling area is completely filled.
IMPORTANT: Place the reagent pack in the cartridge compartment and start
test within 30 seconds once blood has been applied.
Sample Collection and Handling
- Use of Capillary Blood
Puncture the fingertip to get a minimum of 4μL of capillary blood sample. Gently
touch the blood sample with the tip of the sampling area of the Reagent Pack. The
blood is automatically drawn in via capillary action.
Ensure that the sampling area is completely filled.
13
11. RUN a HbA1c TEST
Reagent pack sampling area
Use of Venous Blood
Venous whole blood collected in tubes with K2EDTA, lithium heparin, sodium
citrate or sodium fluoride/oxalate as an anticoagulant can be used.
Venous whole blood can be stored at 2-8°C for 7 seven days with unbroken seal (only
3 days when seal is broken) and at 20-25°C for 3 days.
Mix the tube thoroughly prior to testing. Open the lid and take out one drop of
blood with a pipette. Place a drop of blood on a hydrophobic surface. Gently touch
the drop of blood with the tip of the sampling area of the reagent pack. Ensure that
the sampling area is completely filled.
NOTE: Do not wipe off excess blood outside the sampling area.
Do not touch the open end of the sampling area.
CAUTION: There is a potential risk of biological hazard.
All parts of the HemoCue® HbA1c 501 System should be considered
potentially infectious.
• Use gloves
• Dispose used test cartridges in a sturdy containerwith lid
• Consult local environmental authorities for proper disinfection
procedures as well as disposal of consumables
[adequate]
[inadequate]
sampling area
GB

14
11. RUN a HbA1c TEST
STEP 6.
Insert the reagent pack in the cartridge and gently push into cartridge compartment
of the analyzer. The icon ‘Close the lid’ will be displayed.
NOTE: Do not force the reagent pack into the cartridge, it will only fit one
way.
STEP 7.
The test starts automaticallywhen the lid is closed.
IMPORTANT: Do not open the lid during testing.
Do not move the analyzer during testing.
Do not expose the analyzer to vibration during testing.
STEP 8.
The HbA1c result displays after 5 minutes.

15
11. RUN a HbA1c TEST
NOTE: If the results “>14%” or “<4%” are displayed repeat testing to confirm
result. If the second result also is outside the range, contact your local
distributor.
STEP 9.
After the test is completed, open the analyzer lid. The display will show 'Remove
Cartridge'. Take out the cartridge from the analyzer by gently pushing it to the left
and pulling it out.
CAUTION: Do not force the cartridge to remove it from the analyzer.
Dispose all waste in accordance with applicable national and/or local
regulations.
Code confirmation display after testing
If an error in the cartridge code recognition process occurs, the analyzer will ask for
type and code of the cartridge.
1.Take out the cartridge, use and
to match the type of cartridge, press
to confirm.
2. After selecting the type of cartridge, use
and to match the code
number of the cartridge, press to
confirm, and the test result is shown.
GB

16
11. RUN a HbA1c TEST
Expected values
ADA's most recent Clinical Practice Recommendation for diabetes specifies a
treatment goal of less than 7.0 HbA1c %, 53 mmol/mol.
[Reference]
The American Diabetes Association’s (ADA’s) 2012 Clinical Practice.
Recommendation for diabetes specifies a treatment goal of less than 7 HbA1c %, 53
mmol/mol.
Limitation of Procedure
The HemoCue® HbA1c 501 assay gives accurate and precise hemoglobin results in
the range 7 to 20 g/dL. Most patients will have hemoglobin concentrations within
this range.
However, patients with severe anemia may have hemoglobin concentrations below
7 g/dL, and patients with polycythemia may have hemoglobin concentrations above
20 g/dL. Patients known to have these conditions should be tested with another
method for determination of HbA1c%.
12. REVIEWING RESULTS
STEP 1.
In stand-by mode, press button for 3 seconds for or .
Press or button to select Data, then press .
STEP 2.
The test results will appear chronologically starting with the most recent date.
Press and buttons to scroll through the test results.

17
13. SYSTEM CHECK
Quality Control
The HemoCue® HbA1c 501 Check Cartridge screens the optical and operating
systems of the Analyzer.
Type of Check Cartridges
• HemoCue® HbA1c 501 Daily Check Cartridge
• HemoCue® HbA1c 501 Monthly Check Cartridge
Storage Instruction
The Check Cartridges must be protected from sunlight during storage;
• Store the Check Cartridge at 2 - 32°C (36 -90°F) and humidity < 90%
• Always store the Check Cartridge in its protective packaging to prevent
scratches which may affect the result.
• If the Check Cartridge is refrigerated, allow to reach room temperature before
use. (~1 hour).
Precautions/Warings
• For In Vitro Diagnostic Use.
• Do not use the Check Cartridge beyond the expiration date.
• Do not use the Check Cartridge if stored incorrectly or if it is dirty, scratched
or damaged.
Daily Check Cartridge
When to Use the Daily Check Cartridge
• Once a day before samples are tested.
• After moving the analyzer.
• After an error message. (Er 1 or Er 3)
The Daily Check Cartridge consists of a cartridge without a reagent pack (packed in
a pouch).
Life-time: Until stated expiration date printed on the cartridge label.
GB

18
13. SYSTEM CHECK
NOTE:
• Store the Daily Check Cartridge in its
original package when not in use.
• The Daily Check Cartridge can be
purchased separately from your local
distributor.
How to use the Daily Check Cartridge
1) Open the lid of the HemoCue®HbA1c 501 Analyzer.
2) Press to enter Daily Check Cartridge mode.
3) Insert Daily Check Cartridge while ‘Daily Check’ is displayed.
Table of contents
Languages:
Other HemoCue Medical Equipment manuals


