Hendi MYCOOK 1.8 User manual

INDUCTIVE FOOD PROCESSOR
MYCOOK 1.8
ROBOT KUCHENNY INDUKCYJNY
MYCOOK 1.8
Item: 226384
User manual
Instrukcja obsługi
You should read this user manual carefully before
using the appliance
Przed uruchomieniem urządzenia należy koniecznie
dokładnie przeczytać niniejszą instrukcję obsługi

2
Keep this manual with the appliance.
Zachowaj instrukcję urządzenia.
For indoor use only.
Do użytku wewnątrz pomieszczeń.

3
EN
Dear customer,
Many thanks for choosing to purchase a HENDI brand product.
Thanks to its technology, design and operation and the fact that it exceeds the strictest quality standards,
a fully satisfactory use and long product life can be assured.
Safety advice and warnings
• Read these instructions carefully before switching
on the appliance and keep them for future refer-
ence. Failure to follow and observe these instruc-
tions may result in an accident.
• Clean all the parts of the product that will be in
contact with food, as indicated in the cleaning sec-
tion, before use.
Use or working environment:
• This appliance heats by induction. No metal ob-
jects such as knives, forks, spoons or lids should
be placed on the work surface as they may become
hot.
• Keep children and bystanders away when using
this appliance.
• Place the appliance on a horizontal, flat, stable
surface, suitable for withstanding high tempera-
tures and away from other heat sources and con-
tact with water.
Electric safety
• Do not use the appliance if the cable or plug is
damaged.
• Ensure that the voltage indicated on the name-
plate matches the mains voltage before plugging
in the appliance.
• Connect the appliance to a base with an earth
socket withstanding a minimum of 16 amperes.
• The appliance’s plug must fit into the mains socket
properly. Do not alter the plug. Do not use plug
adaptors.
• Do not use or store the appliance outdoors.
• If any of the appliance casings breaks, immediately
disconnect the appliance from the mains to pre-
vent the possibility of an electric shock.
• Do not use the appliance if it has fallen on the floor,
if there are visible signs of damage or if it has a leak.
–Never use the electric wire to lift up, carry or
unplug the appliance.
–Do not allow the connection cable to come into
contact with the appliance’s hot surfaces.
• Retract the required length of wire to operate the
appliance, making sure to prevent any risk of acci-
dent.
• Do not touch the plug with wet hands.
Personal safety
• Take the necessary measures to avoid starting the
appliance involuntarily.
• Do not touch any of the appliance’s moving parts
while it is operating.
• Do not touch metal parts or the body when it is op-
erating, as it may cause serious burns.
• Do not use the appliance, in the case of you have
medical implants (such as a cardiac pacemaker…).

4
EN
Use and care:
• Do not use the appliance if the accessories attached
to it are defective. Replace them immediately.
• Do not use the appliance if the accessories or
parts are not fastened together properly.
• Do not use the appliance while the jug is empty.
• Do not use the appliance if the on/off switch does
not work.
• Do not move the appliance while in use.
• Do not force the appliance’s work capacity.
• Respect the MAX and MIN levels.
• After its use, disconnect the appliance; do not trust
the container’s detector.
• Disconnect the appliance from the mains when
not
in use, before cleaning, making any adjustment
,
battery charge or accessory change.
• This appliance is for household use only, not pro-
fessional or industrial use.
• This appliance can be used by people unused to its
handling, disabled people or children aged from
8 years and above if they have been given supervi-
sion or instruction concerning use of the appliance
in a safe way and understand the hazards involved.
• Cleaning and user maintenance shall not be made
by children unless they are older than 8 and super-
vised
• Keep the appliance and its cable out of reach of
children under the age of eight.
• This appliance is not a toy. Children should be su-
pervised to ensure that they do not play with the
appliance.
• This appliance should be stored out of reach of
children and/or the disabled.
• Do not use the appliance in association with a pro-
grammer, timer or other device that automatically
switches it on.
• Do not put the appliance away if it is still hot.
• Make sure that dust, dirt or other foreign objects
do not block the fan grill on the appliance.
• Keep the appliance in good condition. Check that
the moving parts are not misaligned or locked and
make sure there are no broken parts or anomalies
that may prevent the appliance from operating
correctly.
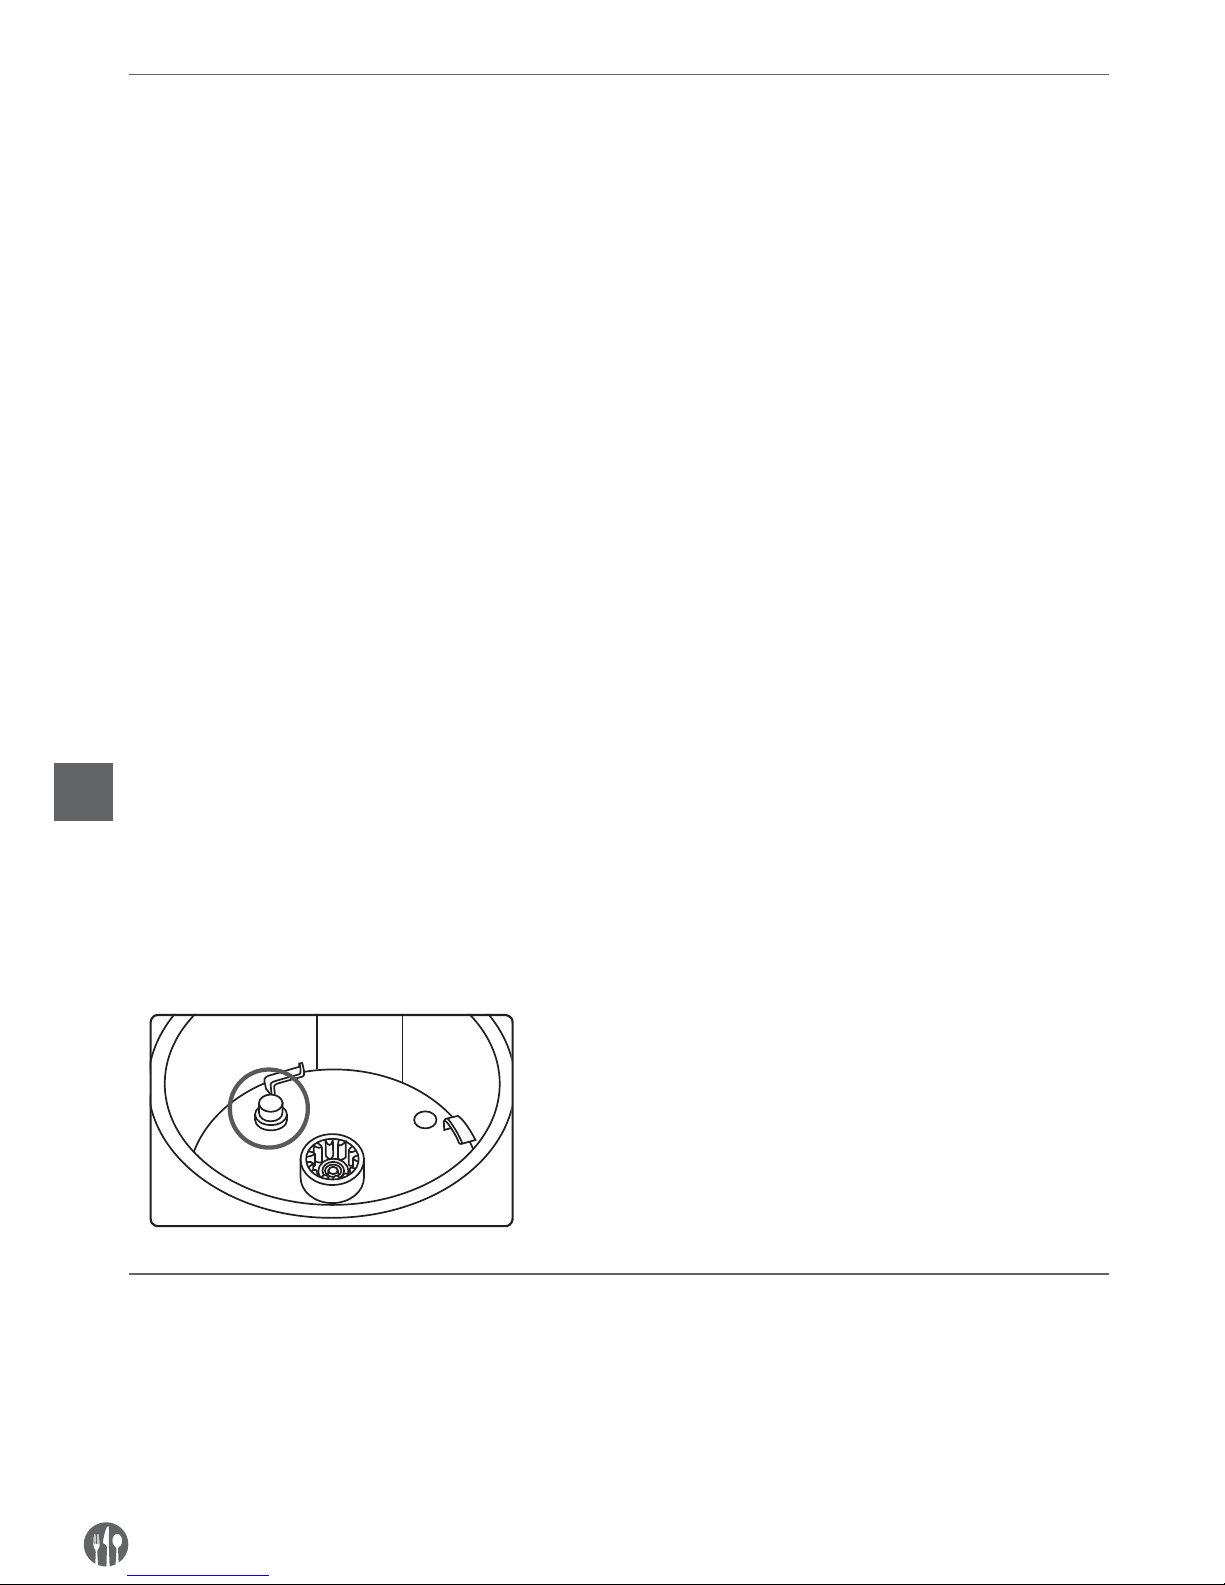
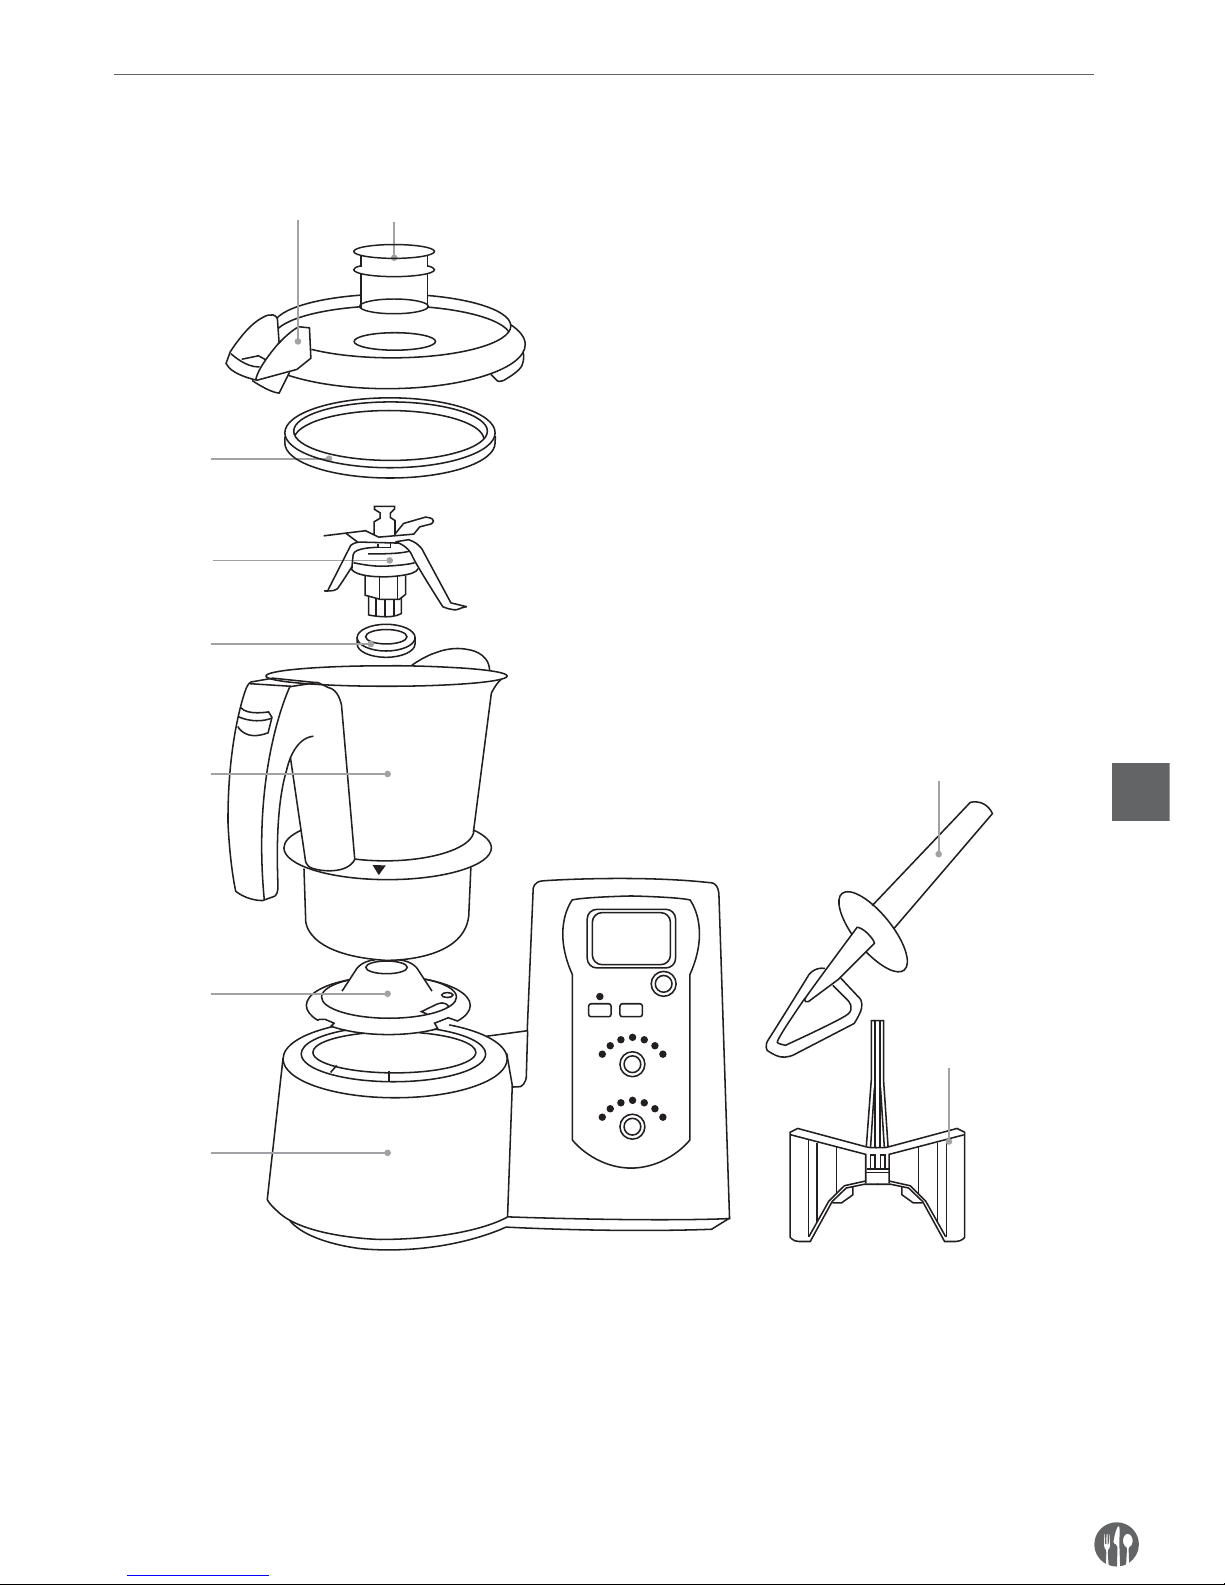
• Ensure that the base of the jug and the jug temper-
ature sensor remain clean at all times for its cor-
rect operation (Figure 1).
• Make periodical checks of the condition of the lid
joint.
• Check that the lid is closed properly before start-
ing the appliance.
• Do not open the lid while the liquid contained in-
side the recipient is boiling.
• Never leave the appliance unattended while in use.
• In view of the sharpness of the cutting blades, take
extra care when adding or removing accessories;
proceed cautiously and avoid direct contact with
the blades.
• Any misuse or failure to follow the instructions for
use renders the guarantee and the manufacturer’s
liability null and void.
Figure 1

5
EN
Description, accessories and documentation
Accessories
A Central unit
B Jug stand with attachment clamp
C Jug
D Blade gasket
E Blades
F Lid gasket (black)
G Jug lid
H Measuring cup
I Mixing paddle
J Spatula
C
B
A
F
D
J
H
G
E
I

6
EN
Documentation
• Instructions Manual
• Warranty certificate.
• Technical Assistance Services Brochure.
• Cooking technique guide.
For space-saving purposes, the appliance comes
packed with the jug positioned in a non-operational
position.
To remove the jug from the central unit:
Take it by the handle, turn it clockwise until it stops,
and lift upwards (Figure 2)
Measuring jug
(Figure 3)
The measuring jug is used:
1. To measure the quantity of the different ingredients.
Contains measurement levels. Maximum capacity
when filled to the rim is 100ml.
2. To prevent splashes.
3. To prevent heat loss during cooking (Figure 4).
You can add liquid to the jug with the measuring cup
positioned on the lid.
Jug lid
(Figure 5).
The lid is used to close the jug and activate the safety
sensors. It has a slot in the front which engages the
jug spout and a perforated flap at the back which fits
into and attaches to the handle slot.
There is a hole through which food can be added, and
the spatula is used to stir or to attach the measuring
jug. The silicone gasket prevents liquids from over-
flowing into the space between the jug and lid (Figure 6).
When mounting the gasket, ensure that the thick side
is in contact with the lid.
Figure 2
Figure 3
Figure 4
Figure 5
Figure 6

7
EN
CAUTION.
Never use the lid without first ensuring that the gas-
ket is properly fitted. (Figures 6 and 7).
CAUTION.
Never open the jug lid when the appliance is running
to prevent the risk of overflowing and / or burns. Be-
fore opening the jug lid, stop the Mycook and wait
a few seconds until the blades have come to a com-
plete stop.
The jug
(Figure 8)
The jug has a maximum capacity of 2 litres. Contains 1
litre, 1.5 litre and 2 litre measurement levels in the
interior.
To remove lid from the jug:
Slide the handle tab downwards, pulling it to remove it
once the lid becomes detached.
(Figure 9).
To fit the lid on the jug:
Insert the back flap into the handle slot (Figure 10),
lower the front part and push the lid in the direction
indicated by the arrow until you hear a click (Figure 11),
indicating that it has properly locked.
To attach the jug:
Take the jug and turn it anti-clockwise until the arrow
on the jug base lines up with the central unit lock
(Figure 12).
Lid
(1)
(1) This thick side of the jug should
be mounted in contact with the lid.
Figure 7
Figure 8
Figure 9
Figure 10
Figure 11

8
EN
To detach the jug:
Take the jug by the handle and turn it clockwise until it
stops (with the two arrows lined up) and lift it upwards
(Figure 13).
CAUTION.
For safety reasons, the lid of the jug cannot be re-
moved or fitted when secured in the central unit.
Do not use force as this could damage part of the
safety element.
The jug must be first removed from the central unit
by turning it clockwise until it stops, with the jug
base arrow lined up with the central unit arrow, pri-
or to removing or fitting the lid (Figure 13).
Never activate the heating function when the jug is
empty.
Jug stand with attachment clamp
(Figure 14).
The stand is used to:
1. Fit the blades into the jug.
2. Secure the jug to the central unit:
3. Support the jug on any surface when it is hot to pre-
vent burns of any type. (Figure 15)
Blades
(Figure 16)
The blades contain two lateral pivots embedded in the
stand which are used to line them up and secure them
properly with the jug.
To remove the blades from the jug:
1. Turn the attachment clamp 180 º into the open posi-
tion and pull it from the jug stand, as indicated by
the arrows. (Figures 17 and 18).
2. Remove the blades from the jug, being careful not
to cut yourself (Figure 19).
Figure 12
Figure 13
Figure 14
Figure 15
Figure 16

9
EN
To insert the blades into the jug:
1. Place the blades into the jug fitting, being careful
not to cut yourself (Figure 19).
2. Turn the jug, securing the blades in the fitting with
your hand (Figure 20).
3. Fit the jug stand (with attachment clamp in the open
position) onto the blade and the three pivots of the
jug base (Figure 21).
4. Turn the clamp 180º to a closed position, ensuring
that it is fully locked (Figure 22).
CAUTION
The blade flange must be properly fitted at all times.
Take special care when handling the blades as they
are very sharp.
NEVER IMMERSE THE BLADES IN WATER OR WASH
THEM IN THE DISHWASHER AS THE INTERNAL
MECHANISM MAY BECOME DAMAGED IF ANY WATER
WERE TO GET INSIDE.
Figure 17
Figure 18
Figure 19
Figure 20
Figure 21 Figure 22

10
EN
Spatula
(Figure 23)
The spatula is used to stir food, prevent it sticking to
the sides of the jug and to help empty the jug.
CAUTION
Never insert the spatula through the centre hole of
the lid, if you are using the mixing paddle that comes
with the blades. (Figure 24).
Never use any utensil other than the spatula as this
could be dangerous. (Figure 25).
Mixing paddle
(Figure 26)
The mixing paddle is used to:
1. Beat cream, egg whites, etc.
2. Stir food without shredding.
3. Prevent food from sticking to the jug when working
in hot mode.
How to fit the mixing paddle:
It is fitted into a single position onto the blades, push-
ing slightly downwards until you hear a click, indicat-
ing that it is properly secured. (Figure 27).
To remove the mixing paddle:
Pull it upwards until it detaches. (Figure 28).
CAUTION
Never use the mixing paddle at speeds greater than 5.
Figure 23
Figure 24
Figure 25
Figure 26
Figure 27 Figure 28

11
EN
Instructions for use
Control panel
A Digital screen
B Time selector control
C LED display to indicate
kneading function activated
D Kneading key
E TURBO speed key
F LED temperature display
G Temperature selector control
H LED speed display
I Speed selector control
Central unit
J Ventilation grill
K Jug pad sensor
L Blade tow
M Power supply cable
N Stop/start switch
O Jug temperature sensor
O K
C
D
G
H
B
F
E
A
I
J
M
N
L

12
EN
Place the appliance on a flat, stable surface that can
withstand high temperatures, located at a safe dis-
tance from other sources of heat or possible water
splashes.
Do not cover or obstruct the ventilation grills located
at the rear of the appliance.
1. Retract the required length of cable from its stowa-
way (Figure 34).
2. Connect the appliance to the power supply.
3. Turn the appliance on by pressing the start /stop
switch (Figure 35). The appliance carries out a selftest
with the digital display reading 00:00 (Figure 36).
The appliance is now ready to operate.
Digital screen
(Figure 37)
Function icons at the top:
P Blades activated.
Q Heating activated.
R Timer activated.
Control display icons in the centre:
S Timer
Weight counter. Grams symbol (scales function).
Information icons in the bottom:
T Jug missing, not properly covered or improperly
fitted onto the central unit.
U The jug and the temperature sensor are hot.
V Timer finished.
SWITCH
ON / OFF
P Q R
TU VS
Figure 34
Figure 35
Figure 36
Figure 37

13
EN
Time selector control
(Figure 38)
Turn the control slowly to the right to select the oper-
ation time.
Maximum: 90 minutes.
Turn the control slowly to the left to reduce the time.
Activation scale:
• From 0 to 1 minute:
Counted in seconds.
• From 1 to 10 minutes:
Counted in 30 second intervals.
• From 10 to 90 minutes:
Count in minutes.
Turning the control quickly allows a faster selection.
Kneading key
(Figure 39)
Press the button to activate the Kneading function.
The light up display lights up in green and the opera-
tion timer begins.
Press the button to deactivate the Kneading function.
The LED display turns off.
Once the pre-selected operation time for the kneading
function has elapsed, the appliance sounds an audible
warning and the light flashes on and off.
(Figure 40).
To stop:
Press the kneading key once again.
This is the recommended function to prepare a stand-
ard mixture for all kinds of doughs.
THE KNEADING FUNCTION IS ACTIVATED WHEN THE
MACHINE IS NOT RUNNING. THIS FUNCTION SHOULD
NOT BE ACTIVATED IF THE JUG TEMPERATURE IS
OVER 60ºC.
BEEP!
Figure 38
Figure 39
Figure 40

14
EN
TURBO speed key
(Figure 41)
Keep the key pressed DOWN to activate the Turbo
function, and the 10 maximum speed indicators will
light up (Figure 41).
If working in cold mode: Once the key has been re-
leased, the Turbo function is disabled. The maximum
speed LED displays turn off.
If working with hot mode: For safety reasons and in
order to prevent splashes the “TURBO speed” pro-
gressively speeds up and operates while the key is
held down.
THE TURBO FUNCTION CANNOT BE ACTIVATED IN
SPEEDS 1, 2 OR 3.
The Turbo function is faster and more powerful and is
ideal for shredding hard or large quantities of food.
How to process in hot mode
Proceed as follows:
1. Select time. Turn the time selector control slowly to
the right/left to select the operation time (Figure 42).
2. Select temperature. Turn the temperature selector
control slowly to the right/left to select the heating
temperature. The selected temperature LEDs light
up in green (Figure 43).
3. Select speed. Turn the speed selector control slowly
to the right/left to select the operation speed.
The selected speed LEDs light up in green and the
selected temperature LEDs turn red. The appliance
will start to heat up (Figure 44).
CAUTION
Speed 1 (S) should only be used for “sofritos”.
Never activate the heating function when the jug is
empty.
Figure 41
Figure 42
Figure 43

15
EN
Once the operation is complete, the appliance sounds
an audible warning, the selected temperature LEDs
flash on and off and the blades begin to rotate at speed
2 to prevent the food from sticking or burning. (Figure
45).
To stop:
Turn the speed selector control to the left until the
speed LEDs turn off.
CAUTION.
Always stop the machine using the speed selector
control. Wait a few seconds until the blades have
come to a complete stop before opening the jug lid.
Never open the jug lid when the appliance is run-
ning, due to the risk of overflowing and /or burns.
How to process in hot mode:
Turn the control slowly to the right/left to select the
speed operation. The selected speed LEDs light up in
green and the appliance starts up (Figure 46).
Once the pre-selected time for the operation in ques-
tion has elapsed, the appliance sounds an audible
warning and the light flashes on and off (Figure 47).
To stop:
Turn the speed selector control to the left until the
LEDs turn off.
If the jug or the lid are not properly fitted when the
appliance is started up, an audible warning will sound
and the digital screen will display the information icon
(Figure 48).
After processing in hot mode, the digital screen dis-
plays the following information icon: Jug and temper-
ature sensor hot (Figure 49).
Figure 44
Figure 45
Figure 46

16
EN
If you wish to now process in cold mode, you must al-
low the jug and temperature sensor to cool down (Fig-
ure 1) by running the jug under the tap, then fitting it
into the central unit and waiting for the information
icon to turn off.
If you are not going to be using the appliance straight
away:
1. Stop the appliance by prising the start/stop switch.
2. Unplug the appliance from the power supply.
3. Wind up and stow away the cable.
Stand-by function
In versions with the standby or prepared mode for the
purpose of energy saving, the appliance will go into
power saving mode after a few minutes if left un-
touched in this time period. The Stby. symbol will be
displayed on the screen. To return to normal opera-
tion, turn the selector control to the right.
(Figure 50).
Cleaning
• Disconnect the appliance from the power supply
and allow it to cool before beginning to clean it.
• Clean the appliance with a damp cloth containing
a few drops of detergent and then leave to dry.
• Do not use solvents or products with an acid or a base
ph such as bleach, or abrasive products to clean the
equipment.
• Do not allow water or other liquids to enter the ven-
tilation grills to prevent damage to the appliance’s
internal operating parts.
• Do not immerse the appliance in water or other liquid,
or run it under the tap.
• Special care must be taken while cleaning the
blades as they are very sharp.
• The appliance should be cleaned after each use, re-
moving all traces of food.
• The gasket should be removed and cleaned sepa-
rately when cleaning the lid or stainless steel tray.
Figure 47
Figure 48
Figure 49
Figure 50

17
EN
• All accessories EXCEPT BLADES can be washed in
the dishwasher. They can also be washed with
soapy water with the aid of a non-abrasive sponge
or brush.
• Clean the blades with a brush and under the tap en-
suring that the water only has contact with the top of
the blades (Figure 51).
CAUTION.
Never immerse the blades in water or wash them in
the dishwasher as the internal mechanism may be-
come damaged if any water were to get inside.
• Do not place the jug in the dishwasher without first
removing the blades.
• Clean the jug with hot water containing a mild de-
tergent.
• You can clean the inside of the jug and blades by
filling the jug halfway with water and selecting the
hot or cold mode TURBO speed.
Problems and solutions
The appliance includes electronic safety systems de-
signed for its protection and that of the user in the
event of overload or misuse, displaying a range of
warning messages or digital display errors as well
as sounding different acoustic warnings.
In the event of a breakdown or if the problem cannot
be resolved by following the procedures described in
the table, take the appliance to any authorised Tech-
nical Assistance Service Centre. If the power con-
nection is damaged, this must be replaced, following
the same steps as in the case of breakdown.
PROBLEM MESSAGE REPAIR
The digital screen
displays:
Err 4
Possible engine overload.
Remove all contents from the jug.
The digital screen
displays:
Err 5
Possible engine overheating.
Leave the appliance to cool down.
The digital screen
displays:
Err 1, 2, 3, 6, 7, 10
Disconnect/connect to the power supply. If it continues displaying an error
message, make a note of the number displayed and take the appliance to
a Hendi Technical Assistance Service centre.
The digital screen
displays:
Err 8
Possible induction overheating.
Disconnect from the power supply and remove the jug. Let it cool down.
The digital screen
displays:
Err 9
Possible induction overheating. Disconnect from the power supply
and remove the jug. Let it cool down. If it continues displaying an error
message, make a note of the number displayed and take the appliance
to a Hendi Technical Assistance Service centre.
Figure 51

18
EN
The digital screen
displays:
Err 11
The jug and/or lid has become detached. Ensure that the jug
and lid are properly fitted.
PROBLEM REPAIR
Do not start up Check that it is connected to the power supply.
Check that the general switched is in the “ON” position.
Check that the lid and the jug are properly fitted.
Do not heat Check that the following steps have been followed:
1st Time selection.
2nd Temperature selection.
3rd Speed selection.
Too much heat Check that the correct temperature has been selected. Check that the temperature
sensor is clean and has proper contact with the jug.
Environment & recycling
The materials of which the packaging of this appli-
ance consists are included in a collection, classifica-
tion and recycling system.
Should you wish to dispose of them, use the appro-
priate public containers for each type of material.
The product is free of concentrations of substances
that could be considered harmful to the environment.
If you wish to dispose of the product once its working
life has ended, take it to an authorised waste agent
for the selective collection of Waste from Electric
and Electronic Equipment.
Technical characteristics
Maximum jug capacity: 2 litres.
This appliance complies with Directive 2006/95/EC on Low Voltage and directive 2004/108/EC on electro-
magnetic compatibility.

19
PL
Drogi Kliencie,
Dziękujemy za wybranie produktu marki HENDI.
Dzięki zastosowanej technologii, projektowi i sposobowi działania, a także temu, że urządzenie wykracza
poza najsurowsze standardy jakości, możemy zapewnić pełne zadowolenie z eksploatacji i długi jej okres.
Informacje i ostrzeżenia dotyczące bezpieczeństwa
• Przed uruchomieniem urządzenia należy przeczy-
tać niniejszą instrukcję i zachować ją na przy-
szłość. Nieprzestrzeganie niniejszej instrukcji moż
e
prowadzić do wypadku.
• Przed użyciem należy umyć wszystkie części
urządzenia mające kontakt z żywnością, zgodnie
z instrukcjami z rozdziału dotyczącego mycia.
• Środowisko robocze:
• Urządzenie nagrzewa się indukcyjnie. Na powierzch-
n
i roboczej nie należy pozostawiać metalowych
przedmiotów, np. noży, widelców, łyżek ani pokry-
wek, ponieważ mogą się nagrzewać.
• Podczas obsługi urządzenia nie dopuszczać do
niego dzieci ani osób postronnych.
• Umieścić urządzenie na poziomej, płaskiej i stabil-
nej powierzchni odpornej na wysokie temperatury,
z dala od innych źródeł ciepła i wody.
Bezpieczeństwo elektryczne:
• Nie używać urządzenia, jeśli kabel zasilający albo
wtyczka są uszkodzone.
• Przed podłączeniem urządzenia upewnić się, że
napięcie wskazane na tabliczce znamionowej od-
powiada napięciu sieciowemu.
• Podłączyć urządzenie do gniazdka z uziemieniem
o przynajmniej 10 A.
• Wtyczka urządzenia musi być dopasowana do
gniazdka sieciowego. Nie modyfikować wtyczki.
Nie stosować przejściówek.
• Nie używać ani nie przechowywać urządzenia na
zewnątrz.
• W przypadku pęknięcia obudowy urządzenia nale-
ży niezwłocznie odłączyć urządzenie od zasilania,
aby wyeliminować ryzyko porażenia prądem.
• Nie używać urządzenia, jeśli upadło ono na podłogę,
jeśli widoczne są ślady uszkodzenia lub w przy-
padku wycieku.
–Nie używać kabla zasilania do podnoszenia,
przenoszenia ani nie ciągnąć za kabel, aby odłą-
czyć urządzenie.
–Nie dopuszczać do kontaktu kabla zasilającego
z gorącą powierzchnią urządzenia.
• Wciągnąć odpowiednią długość kabla, aby obsłu-
giwać urządzenie, nie dopuszczając do ryzyka wy-
padku.
• Nie podłączać wtyczki mokrymi dłońmi.
Bezpieczeństwo własne
• Zachować odpowiednie środki ostrożności, aby
przypadkowo nie uruchomić urządzenia.
• Nie dotykać ruchomych części urządzenia pod-
czas pracy.
• Nie dotykać metalowych części urządzenia podcza
s
pracy, może spowodować to poważne poparzenia.
• Nie używać urządzenia przy wszczepionych im-
plantach medycznych (np. przy rozruszniku serca).

20
PL
Obsługa i konserwacja:
• Nie używać urządzenia, jeśli akcesoria są uszko-
dzone. Niezwłocznie je wymienić.
• Nie używać urządzenia, jeśli akcesoria albo części
urządzenia nie są poprawnie połączone.
• Nie używać urządzenia z pustym naczyniem mik-
sującym.
• Nie używać urządzenia, jeśli nie działa przełącz-
nik wł./wył.
• Nie należy przenosić pracującego urządzenia.
• Nie przepełniać urządzenia.
• Nie przekraczać poziomów MAX i MIN.
• Po zakończeniu korzystania odłączyć urządzenie,
nie polegać wyłącznie na czujnikach urządzenia.
• Gdy urządzenie nie jest używane, odłączyć je od
zasilania przed czyszczeniem, regulacją, ładowa-
niem akumulatora albo wymianą akcesorium.
• Urządzenie przeznaczone jest wyłącznie do użyt-
ku domowego, a nie do celów profesjonalnych ani
przemysłowych.
• Urządzenie może być używane przez osoby niena-
wykłe do korzystania z niego, dzieci od 8 roku życia
pod warunkiem nadzoru i przeszkolenia w zakre-
sie bezpiecznej eksploatacji i zapoznania z poten-
cjalnymi zagrożeniami.
• Czyszczenie i czynności konserwacyjne mogą być
wykonywane przez dzieci od 8 roku życia.
• Nie dopuszczać do urządzenia i kabla zasilającego
dzieci poniżej 8 roku życia.
• Niniejsze urządzenie to nie zabawka. Urządzenie
nie jest przeznaczone do zabawy dla dzieci.
• Urządzenie należy przechowywać poza zasięgiem
dzieci i osób niepełnosprawnych.
• Nie używać urządzenia z programatorem, zega-
rem ani innym urządzeniem, które powoduje jego
automatyczne włączenie.
• Nie odstawiać urządzenia, jeśli jest nadal gorące.
• Upewnić się, że pył, kurz ani ciała obce nie blokują
otworów wentylacyjnych urządzenia.
• Utrzymywać urządzenie w dobrym stanie tech-
nicznym. Sprawdzać, czy ruchome części nie są
niedopasowane albo zablokowane, upewnić się,
czy nie występują uszkodzone części albo inne
nieprawidłowości, które mogą uniemożliwić po-
prawną pracę urządzenia.
• Upewnić się, ze podstawa dzbanka i czujnik tem-
peratury naczynia miksującego są zawsze czyste
(Rysunek 1).
• Okresowo sprawdzać stan uszczelki pokrywki.
• Przed uruchomieniem urządzenia sprawdzać, czy
pokrywka jest dokładnie zamknięta.
• Nie zdejmować pokrywki, gdy zawartość naczynia
miksującego wrze.
• Nigdy nie pozostawiać pracującego urządzenia
bez nadzoru.
• Noże urządzenia są ostre, zachować szczególną
ostrożność podczas zakładania albo zdejmowania
akcesoriów, unikać bezpośredniego kontaktu z nożami.
• Nieprawidłowa obsługa albo nieprzestrzeganie
instrukcji powoduje unieważnienie gwarancji
i zniesienie odpowiedzialności producenta.
Rysunek 1
This manual suits for next models
1
Table of contents
Languages:
Other Hendi Food Processor manuals