manuals.online logo
Brands
  1. Home
  2. •
  3. Brands
  4. •
  5. HENN
  6. •
  7. Indoor Furnishing
  8. •
  9. HENN Wardrobe Cavic II 02 Sliding Doors D225-108 User manual

HENN Wardrobe Cavic II 02 Sliding Doors D225-108 User manual

Item
Caixa
Caja
Box
Qtd
Ctd
Qty
Descrição
Descripción
Description
Medidas (mm) |
Dimensions (mm)
| Size (measure-
ments) (mm)
01 2/6 01 Base | Base | Base 2085x481x15
02 2/6 02 Travessa lateral base | Carril lateral base | Base side crossbar 470x90x15
03 2/6 01 Travessa central base | Carril central base | Central base rail 451x70x15
04 1/6 01 Travessa frontal base | Carril delantera de la base | Base front crossbar 2115x90x25
05 1/6 01 Lateral esquerda | Lateral izquierda | Left side 2295x500x15
06 2/6 01 Divisão menor | División menor | Minor division 814x450x15
07 2/6 01 Prateleira do calceiro | Calceiro estantería | Shelf calceiro 597x450x15
08 3/6 01 Prateleira | Estante | Shelf 438x400x15
09 3/6 01 Divisão | División | Division 1836x450x15
10 3/6 01 Chão do Maleiro | Piso del Armario de Equipaje | Floor of the Maleiro 2085x450x15
11 2/6 01 Ripa do Maleiro | Listón del Armario de Equipaje | Clapboard luggage locker 414x73x15
12 2/6 01 Divisão das gavetas | División de los cajones | Division of drawers 831x450x15
13 4/6 02 Prateleira Menor | Estante Menor | Small Shelf 400x384x15
14 4/6 01 Tampo das Gavetas | Tapa de los cajones | Drawer Top 1035x450x15
15 4/6 02 Prateleira da colméia | Estante de la colmena | Shelf of the hive 1035x450x15
16 4/6 04 Divisão da colméia | División de la colmena | Division of the hive 400x320x15
17 2/6 01 Tampo | Tapa | Top 2085x481x15
18 1/6 01 Lateral direita | Lateral derecha | Right side 2295x500x15
19 3/6 01 Fundo Superior | Fondo Superior | Superior background 2096x436x6
20 5/6 02 Fundo | Fondo | Bottom 1858x1047x6
21 1/6 02 Moldura Lateral | Marco lateral | Lateral Frame 2351x80x30
22 1/6 01 Moldura Superior | Marco superior | Upper Frame 2115x80x30
23 5/6 02 Painel Central | Panel central | Central Panel 1040x566x15
24 5/6 e 6/6 02 Painel Inferior Superior | Panel Inferior Superior | Top Bottom Panel 1040x566x15
25 6/6 02 Painel Central espelho | Panel central espejo | Mirror Central Panel 1040x566x15
26 6/6 02 Painel Inferior Superior Espelho | Panel Inferior Superior Espejo | Bottom Top Panel Mirror 1040x566x15
27 6/6 04 Espelho com furo | Espejo con orificio | Mirror with hole 1000x540x3
28 2/6 03 Frente de gaveta | Frente de cajón | Front of drawer 628x200x15
29 2/6 03 Vidro incolor com furo | Vidrio incoloro con agujero | Colorless glass with hole 540x100x3
30 2/6 06 Lado de gaveta | Lado del cajón | Side of drawer 400x180x15
31 2/6 03 Fundo de gaveta recortado | Fondo del cajón recortado | Cropped drawer bottom 592x411x3
32 2/6 03 Ripa de trás | Malla detrás | Rear lath 611x180x15
ITM/D225- Rev.000
LISTA DE PEÇAS | LISTA DE PIEZAS | LIST OF PARTS
16 1
Roupeiro Cavic II 02 Portas Deslizantes | Ropero Cavic II 02 Puertas Deslizantes |
Wardrobe Cavic II 02 Sliding Doors
c D225-108 Duna/Off White
01
04
05
06
07
08
09
10
11
12
13
13
14
15
15
16
16 16
16
17
18
19
20
20
21
22
23
23
24
24
27
27
27
27
28
29
30
32
21
Ind. e Com. de Móveis Henn
Mondaí - SC - Brasil
+55 49 3674.3500
@moveishenn
www.henn.com.br
INSTRUÇÕES DE
MONTAGEM
INSTRUCCIONES DE MONTAJE
ASSEMBLY INSTRUCTIONS
Para limpeza de seu móvel, use uma flanela seca ou umedecida, e não utilize
produtos químicos que possam danificar seu produto.
Para limpieza de su móvil, use una franela seca o húmeda, y no utilice
productos químicos que puedan dañar su producto.
O sistema de montagem dos produtos, funciona de acordo com a ordem
crescente dos números indicados no desenho. Ex: 01, 02, 03, 04... até a
conclusão da montagem.
El sistema de montaje de los productos funciona de acuerdo con el orden
creciente de los números indicados en el dibujo. Ej.: 01, 02, 03, 04... hasta la
conclusión del montaje.
AVISO
ADVERTENCIA
SISTEMA DE MONTAGEM
SISTEMA DE MONTAJE
To clean your furniture, use a dry or wet cloth, and do not use chemicals that
may damage your product.
The products’ assembly system works according to the increasing order of
the indicated numbers. For example: 01, 02, 03, 04 … to the end of the as-
sembly.
NOTICE
ASSEMBLY SYSTEM
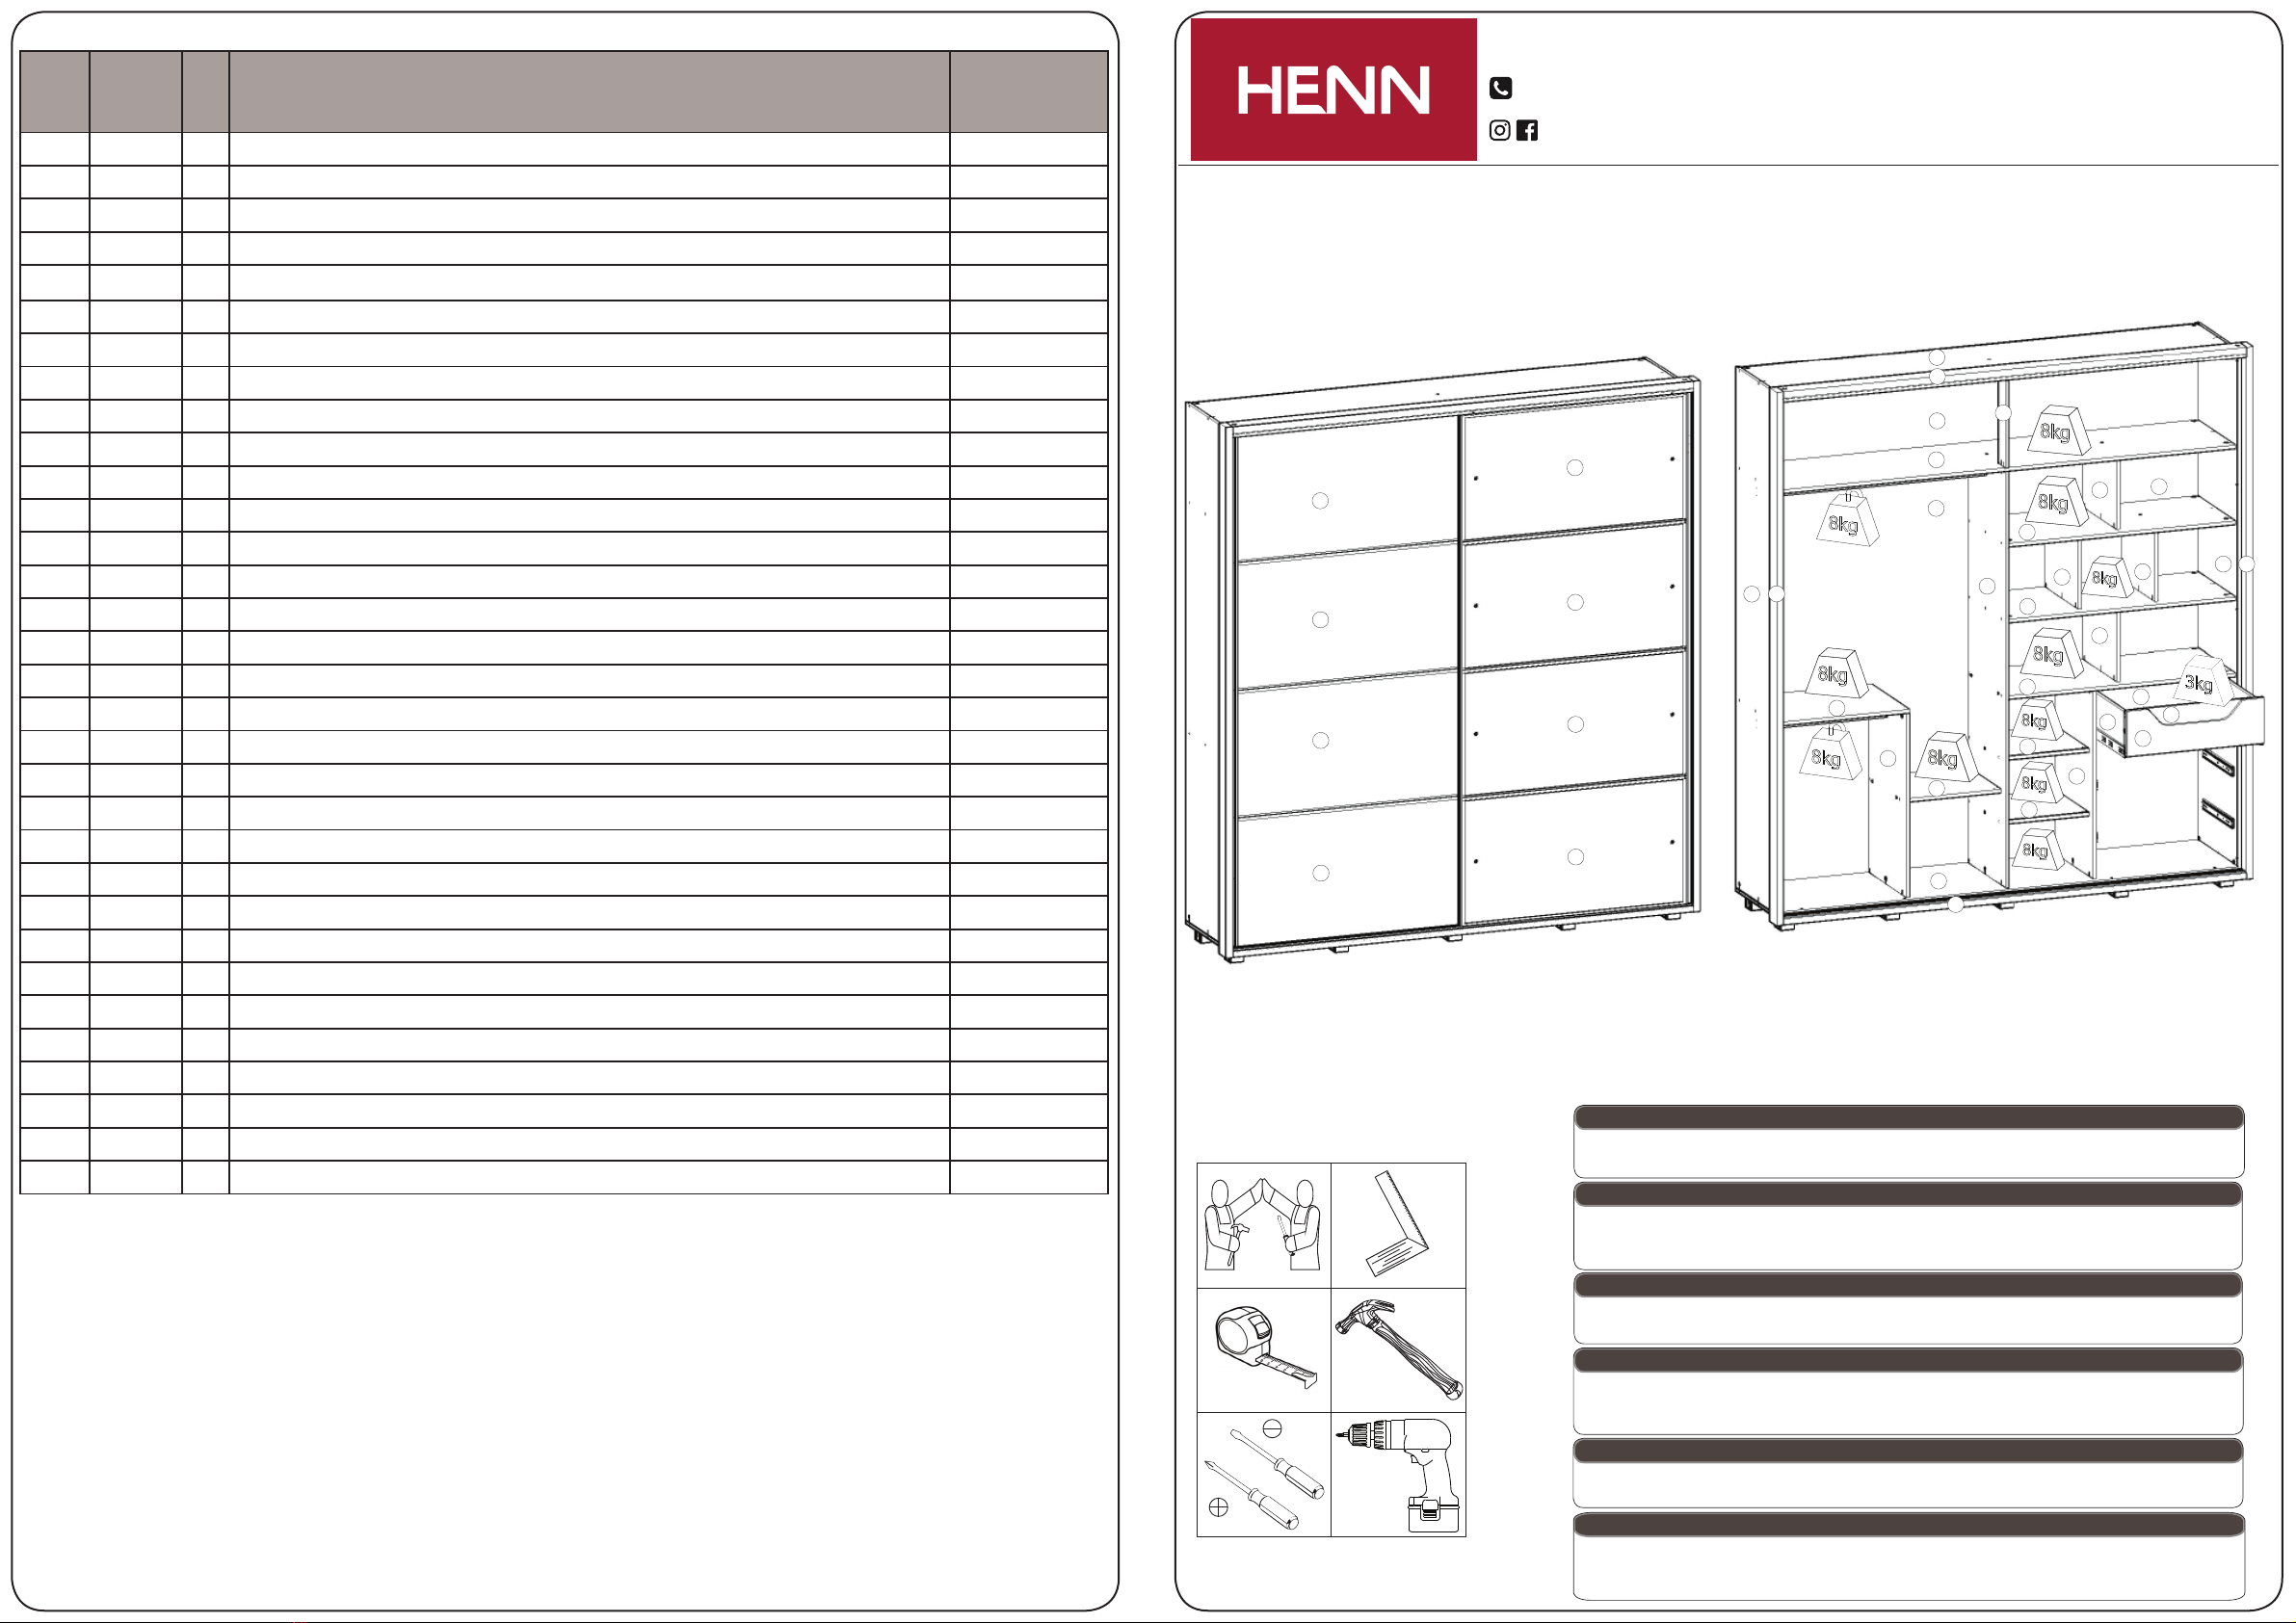
Imagens meramente ilustrativas
Imágenes meramente ilustrativas
Images for illustration only
Requisitos para montagem
Requisitor para la montaje
Assembly Requirements
Pesos máximos recomendados com carga distribuída
Peso máximo recomendado con la carga distribuida
Recommended maximum weights with evenly distributed.
ITM/D225-
Para a colocação da travessa
frontal base (04) alinhar a mesma
com as travessas laterais base
(02).
For placement of the base front
strut (04) to align the same with
the base side beams (02).
Para la colocación del travesaño
delantero base (04) para
alinearlo con las vigas de base
lateral (02).
C
C
AB
AB
AB
AB
AB
S
B
B
BB
BB
B
B
B
B
B
B
B
B
B
B
B
B
B
B
B
B
S
S
S
S
S
S
S
S
S
C
C
C
C
C
C
C
C
C
KK
KK
KK
1º
2º
3º
01
01
02
02
03
03
02
04
04
2
Ferragens | Herrajes | Hardware
22x
102x
08x
85x
15x11x
34x06x
143x06x
D
F
S
K
AC
MN
GE
Parafuso 3,5x40mm CHT.
Parafuso 3,5x12mm CHT.
Sapata retangular 70x60mm
Cavilha 8x25mm
Parafuso 4,0x35mm CHT. Parafuso 4,0x25mm CHT.
Cantoneira suporte triangular Bucha Fixador de Espelho
Parafuso 3,0x20mm FLA.
Parafuso 3,5x14mm FLA Cromado
Tornillo 3,5x40mm CHT.
Tornillo 3,5x12mm CHT.
Zapata rectangular 70x60mm
Cinta 8x25mm
Tornillo 4,0x35mm CHT. Tornillo 4,0x25mm CHT.
Cantonera soporte triangular Buje de sujeción del espejo
Tornillo 3,0x20mm FLA.
Tornillo 3,5x14mm FLA Cromado
Screw 3,5x40mm CHT.
Screw 3,5x12mm CHT.
Rectangular shoe 70x60mm
Dowel 8x25mm
Screw 4,0x35mm CHT. Screw 4,0x25mm CHT.
Triangle support angle Mirror fixing bush
Screw 3,0x20mm FLA.
Screw 3,5x14mm FLA Chrome
04x
45x
31x
01x
01x
01x
45x
51x
01x
O
I
AA
P
Q
AC
J
AB
AE
Suporte cabideiro oblongo Zamac ZB
Parafuso minifix
Adesivo tapa parafuso 17mm
Cabideiro Alum. 574mm
Cabideiro Alum. 1027mm
Sachê de cola
Tambor minifix
Adesivo tapa parafuso 10mm
Etiqueta resinada Henn
Soporte de cabina oblongo Zamac ZB
Tornillo minifix
Adhesivo tapón de tornillo 17mm
Alu 574mm percha
Alu 1027mm percha
Bolsa de pegamento
Tambor minifix
Adhesivo tapón de tornillo 10mm
Etiqueta resinada Henn
Zamac ZB oblong hanger bracket
Minifix bolt
Bolt cover adhesive 17mm
Alu coat hanger 574mm
Alu coat hanger 1027mm
Glue bag
Minifix drum
Bolt cover adhesive 10mm
Henn resin label
03x
Z
Giz de correção
Tiza de corrección
Chalk of correction
17x
B
Parafuso 4,0x30mm FLA.
Tornillo 4,0x30mm FLA.
Screw 4,0x30mm FLA.
03x
R
Corrediça telescópica
Corredera telescópica
Telescopic slide
02x
Y
Perfil Puxador MOV4072 - 2264mm
Perfil Tirador MOV4072 - 2264mm
Profile Handle MOV4072 - 2264mm
46x
H
Parafuso 3,0x16mm CHT.
Tornillo 3,0x16mm CHT.
Screw 3,0x16mm CHT.
18x
02x
02x
08x
L
T
V
AD
Suporte metal
Kit Amortecedor
Perfil Anti-empeno U 2264mm
Batente PVC para Porta
Soporte metálico
Kit de amortiguador
Perfil anti-empeno U 2264mm
Parada de PVC para Puerta
Metal support
Shock Absorber Kit
Anti-warp profile U 2264mm
PVC Door Stop
01x
U
Kit Roldana JM841R (2Portas)
Kit Roldán JM841R (2 Puertas)
Kit Roldana JM841R (2 Doors)
01x01x
WX
Trilho Superior 2115mm Trilho Inferior 2113mmm
Carril superior 2115mm Carril Inferior 2113mmm
Top Rail 2115mm Lower Rail 2113mm
ITM/D225-
15
28
28
28
28
28
30
30
30
30
31
32
32
32
29
29
29
K
K
K
N
E
K
F
F
F
R
R
R
H
M
K
KI
I
K
AC
AC
K
K
I
I
J
J
JAA
AA J
ITM/D225-
16º
14
ITM/D225-
Recomenda-se montar estas
peças separadamente, antes
de fixar no móvel.
It is recommended to mount
these parts separately before
attaching to the cabinet.
Se recomienda montar estas
piezas por separado, antes
de fijar en el mueble.
05
06
08
09
07
11
10
D
D
D
D
K
K
K
K
K
K
K
K
K
K
K
J
J
I
II
I
I
I
II
D
J
J
J
J
J
J
AA
AB
AB
AB
AB
AA
AA
AA
AA
K
4º
5º
3
ITM/D225-
12
13
13
14
15
15
16
16 16
16
K
K
K
K
K
K
K
K
K
K
K
K
K
K
K
K
K
K
D
D
D
DD
D
DD
D
AB
AB
AB
AB AB
AB
AB AB
AB
Recomenda-se montar estas
peças separadamente, antes
de fixar no móvel.
It is recommended to mount
these parts separately before
attaching to the cabinet.
Se recomienda montar estas
piezas por separado, antes
de fijar en el mueble.
6º
7º
4
23
23
24
27
27
27
27
24
Fixar as corrediças nessas furações
Fix slides in these drillings
Fijar las diapositivas de estos agujeros
Para a desmontagem da corrediça
siga a instrução ao lado.
For the dismount of the sliding onem follows
the instruction aside.
Para el desmontaje seguimiento de diapositivas
la instrucción siguiente a.
ITM/D225-
14º
13
ITM/D225-
25
25
26
26
26
27
27
27
27
Y
Y
F
F
F
F
F
F
U
U
U
U
T
T
U
V
Z
AB
AB
AB
AB
AB
AB
H
H
H
H
H
H
U
U
U
U
U
25
26
L
FF
13º
12
ITM/D225-
K
K
K
K
K
K
K
KK
K
K
K
K
K
K
K
K
I
I
I
I
I
I
I
J
J
J
J
J
J
J
DD
AB
AB
AA
AA
AA
AA
AA
AA
AA
D
D
D
D
D
AB
AB
AB
AB
8º
5
ITM/D225-
17
18
J
I
I
I
I
I
I
I
I
I
IK
I
I
I
I
K
K
K
K
K
K
K
J
J
J
D
AA
AA
AA
AA AA
AA
AA
AA
AA
AA
AA
AA
J
J
J
J
J
J
J
J
J
J
9º
6
U
UU
U
U
ITM/D225-
23
23
23
24
24
24
24
Y
Y
F
FF
FF
F
U
U
U
V
V
H
H
H
H
H
H
AB
AB
AB
AB
AB
AB
L
FF
U
U
U
T
T
12º
11
U
U
U
U
Calço 1,5mm
Calço 1,0mm
Calço 1,5mm
Calço 1,0mm
Acionador
Este lado para fora
Este lado para fora
Acionador
U
U
TT
TT
TT
T
Y
Y
TTTT
T
Detalhe para Instação do Kit Roldanas (U) e Kit Amortecedor (T) nas Portas.
Detail for Installation of the Pulley Kit (U) and Kit Kit (T) in the Doors.
Detalle para Instalación del Kit Roldanas (U) y Kit Amortiguador (T) en las Puertas.
ITM/D225-
Interno da Porta (Lado direito)
Interno de la Puerta (Lado derecho) | Internal Door (Right Side)
Interno da Porta (Lado esquerdo)
Interno de la Puerta (Lado izquierdo) | Door Inner (Left side)
10
ITM/D225-
Colocar os parafusos (G) a uma distância de 100mm de um para outro.
Colocar los tornillos (G) a una distancia de 100 mm de uno a otro.
Place the screws (G) at a distance of 100mm from one another.
19
20
20
20 20
20
19
19
05
18
MGGGGG
G
G
G
G
G
G
H
10º
7
ITM/D225-
I
A
A
A
O
F
F
F
F
F
R
R
A
A
FF
FFF
J
J
A
AB
AB
AB
AB
AB
AB
AB
AB
AB
AB
AB
AB
AB
AB
AB
A
A
A
A
A
A
A
A
A
W
X
F
F
F
F
F
I
I
I
J
J
21
21
05
12
12
18
18
06
09
22
Os Trilhos (AA e AB) deverão ser fixados
depois que as Molduras (21 e 22) estiverem
acopladas ao produto.
O Trilho (AA) deverá ficar alinhado
com a Moldura Superior (22).
El carril (AA) debe alinearse con el
marco superior (22).
The Rail (AA) should align with the
Top Frame (22).
Los raíles (AA y AB) deben fijarse después
de que los marcos (21 y 22) estén
acoplados al producto.
The Rails (AA and AB) should be secured
after the Frames (21 and 22) are attached to
the product.
11º
8
ITM/D225-
T
T
T
T
T
T
T
T
U
U
U
U
22
22
17
05
18
17
21
21
Detalhe para Instação do Kit Amortecedor (T) no Trilho Superior
Detalle para la instalación del Kit amortiguador (T) en el riel superior
Detail for Installing Shock Absorber Kit (T) on Top Rail
Amortecedor do Kit (T)
Lado esquerdo do Produto | Lado izquierdo del producto | Left side of Product
Lado direito do Produto | Lado derecho del producto | Right side of Product
Kit Damper (T)
Kit Damper (T)
Amortiguador del Kit (T)
Freio do Kit (U)
Freio do Kit (U)
Alinhar (U e T) com a peça 21.
Align (U and T) with part 21.
Alinear (U y T) con la pieza 21.
Freio do Kit (U)
Freio do Kit (U)
Freio do Kit (U)
Freio do Kit (U)
9

Other HENN Indoor Furnishing manuals

HENN I117-10 User manual

HENN

HENN I117-10 User manual

HENN IA710-10 User manual

HENN

HENN IA710-10 User manual

HENN IE72-18 User manual

HENN

HENN IE72-18 User manual

HENN C428-23 User manual

HENN

HENN C428-23 User manual

HENN CAMPECHE D516-10 User manual

HENN

HENN CAMPECHE D516-10 User manual

HENN Wardrobe Cavic 02 Sliding Doors D209-23 User manual

HENN

HENN Wardrobe Cavic 02 Sliding Doors D209-23 User manual

HENN IEC129-05 User manual

HENN

HENN IEC129-05 User manual

HENN c C50-23 Duna User manual

HENN

HENN c C50-23 Duna User manual

HENN IEC124-10 User manual

HENN

HENN IEC124-10 User manual

HENN IE80-18 User manual

HENN

HENN IE80-18 User manual

HENN IE61-119 User manual

HENN

HENN IE61-119 User manual

HENN C63-35 User manual

HENN

HENN C63-35 User manual

HENN Dora S211-127 User manual

HENN

HENN Dora S211-127 User manual

HENN AQUARELA 712-10 User manual

HENN

HENN AQUARELA 712-10 User manual

HENN I11-10 User manual

HENN

HENN I11-10 User manual

HENN Moscow D315-10 User manual

HENN

HENN Moscow D315-10 User manual

HENN 102-10 User manual

HENN

HENN 102-10 User manual

HENN CHANEL User manual

HENN

HENN CHANEL User manual

HENN Branco HP IE95-05 User manual

HENN

HENN Branco HP IE95-05 User manual

HENN Adoleta I715-10 User manual

HENN

HENN Adoleta I715-10 User manual

HENN IEC125-10 User manual

HENN

HENN IEC125-10 User manual

HENN Crib Alegria User manual

HENN

HENN Crib Alegria User manual

HENN S426-128 User manual

HENN

HENN S426-128 User manual

HENN Aerial 01 Door 400mm Connect User manual

HENN

HENN Aerial 01 Door 400mm Connect User manual

Popular Indoor Furnishing manuals by other brands

Article NERA Assembly instructions

Article

Article NERA Assembly instructions

Gami ALIKA G71 100 manual

Gami

Gami ALIKA G71 100 manual

Woodstock Shop FoxD3640 instruction sheet

Woodstock

Woodstock Shop FoxD3640 instruction sheet

Next 875368 Assembly instructions

Next

Next 875368 Assembly instructions

Crate&Barrel Caicos quick start guide

Crate&Barrel

Crate&Barrel Caicos quick start guide

Craftsman 81338 Operator's manual

Craftsman

Craftsman 81338 Operator's manual

bbf A195545 Assembly guide

bbf

bbf A195545 Assembly guide

Home Decorators Collection TJ-0237V6022BE Assembly instructions

Home Decorators Collection

Home Decorators Collection TJ-0237V6022BE Assembly instructions

FMD FELIX 2 Assembly instructions

FMD

FMD FELIX 2 Assembly instructions

Habitat Rope 822540 manual

Habitat

Habitat Rope 822540 manual

Sportplus SP-AT-100 operating instructions

Sportplus

Sportplus SP-AT-100 operating instructions

Intercon SU-TA-40104-BCL-TOP Assembly instructions

Intercon

Intercon SU-TA-40104-BCL-TOP Assembly instructions

Argos Ohio Bookcase Assembly instructions

Argos

Argos Ohio Bookcase Assembly instructions

Westfalia 629865 instruction manual

Westfalia

Westfalia 629865 instruction manual

ARTIVA AF20203-MSR Assembly instructions

ARTIVA

ARTIVA AF20203-MSR Assembly instructions

ZENVIDA 255-CONVSET1 Assembly instruction

ZENVIDA

ZENVIDA 255-CONVSET1 Assembly instruction

Cooper Lighting Sure-Lites CC7 Specification sheet

Cooper Lighting

Cooper Lighting Sure-Lites CC7 Specification sheet

LAZY MAISONS LM-BZS3 Assembly instructions

LAZY MAISONS

LAZY MAISONS LM-BZS3 Assembly instructions

manuals.online logo
manuals.online logoBrands
  • About & Mission
  • Contact us
  • Privacy Policy
  • Terms and Conditions

Copyright 2025 Manuals.Online. All Rights Reserved.