Hertz HX 300.5 SUB COMP User manual

(044)361-05-06
(067)469-02-12
(099)048-99-03
(093)672-77-76
ICQ:495-089-192
ICQ:613-211-859
User's Manual
Car subwoofer Hertz HX 300.5
In the online store Winauto you also can buy auto subwoofer Hertz HX 300.5 . Delivery in Kiev and throughout Ukraine
with payment upon receipt!
http://winauto.ua
Car Receivers - Facia Plates - Head Units - Car TVs and Monitors - Antennas - Car Audio - DVR - GPS Navigation - Trip Computers - Alarm
Systems - Mechanical Locking - Parking Systems - Car Cameras - Optics and Light - Established Optics - Tuning - Car Heating and Cooling - Sound
Marine and Electronics - Car Accessories - Isolation - Installation Components - Batteries, Power - Oils and Fluids -

ADVANCED
MANUAL
www.hertzaudiovideo.com
07.0
62018 Potenza Picena (MC) Italy - Tel. +39 0733 870870 - Fax +39 0733 870880 - www.elettromedia.it
HX SUB COMP
Electro - Acoustic parameters
D
mm
Xmax
mm
Re
ohm
Fs
Hz
Le
mH@1kHz
Le
mH@10kHz
Vas
lit
Mms
gr
Cms
mm/N
BL
T-m
Qts
Qes
Qms
Spl
dB
210 253 320 210 253 320
14 14 14 14 14 14
2,9 2,9 2,9 5,8 5,8 5,8
37 33 30 34 31 27
1,79 1,83 1,88 7,27 7,28 7,40
0,57 0,56 0,61 2,42 2,59 2,61
24,04 49,62 123,20 20,54 43,47 130,60
129,3 167,1 203,8 176,9 211,9 252,1
0,14 0,13 0,13 0,12 0,12 0,14
13,16 13,57 13,17 23,34 23,27 23,22
0,44 0,47 0,55 0,37 0,41 0,41
0,49 0,53 0,62 0,39 0,43 0,43
4,70 4,40 4,80 6,80 6,90 6,20
89 90 92 88 90 92
HX 250 HX 300 HX 380 HX 250 D* HX 300 D* HX 380 D*
* Coils in series
Esec_Advanced Manual HiEnergy 17-10-2007 17:23 Pagina 1
Car audio and car goods internet store Winauto
winauto.ua

Gentile Cliente,
complimenti per aver acquistato un prodotto HERTZ HI-ENERGY. La vostra soddisfazione è il primo
requisito cui devono rispondere i nostri prodotti: la stessa soddisfazione di chiunque voglia vivere
l’emozione del car audio.
I SUBWOOFER HERTZ HI-ENERGY SONO IN GRADO DI
CREARE SISTEMI AUDIO AD ALTA POTENZA CHE POSSONO
GENERARE ELEVATISSIME PRESSIONI SONORE INDISTORTE.
RICORDATE CHE PROLUNGATE ESPOSIZIONI AD UN LIVELLO
ECCESSIVO DI PRESSIONE ACUSTICA POSSONO PRODURRE
DANNI AL VOSTRO UDITO; UTILIZZATE DUNQUE EQUILIBRIO
E BUON SENSO NELL’ASCOLTO.
La sicurezza durante la marcia deve restare sempre al
primo posto. In ogni situazione il volume d’ascolto deve avere un
livello tale da non coprire i rumori provenienti dall’esterno; dovreste
essere in condizione di udire anche quelli del Vostro veicolo per
affrontare prontamente situazioni di emergenza.
Per ottenere il massimo delle prestazioni dal Vostro nuovo
subwoofer Vi consigliamo di seguire attentamente le istruzioni del
presente manuale. La realizzazione di un sistema hi-fi car di alto livello
richiede una buona conoscenza delle problematiche meccaniche ed
elettriche delle autovetture; qualora riteneste di non possedere gli
attrezzi necessari o la conoscenza adeguata, non esitate a contattare
un installatore specializzato. Un’installazione a regola d’arte Vi
assicurerà prestazioni entusiasmanti e coinvolgenti, senza influire
sulla sicurezza e l’affidabilità della Vostra autovettura.
Questo manuale è stato redatto per fornire le indicazioni
principali e necessarie all’installazione e all’uso del sistema. La
varietà delle applicazioni possibili è tuttavia molto ampia; per avere
ulteriori informazioni non esitate a contattare il Vostro rivenditore
HERTZ o l’assistenza ufficiale HERTZ via mail, scrivendo direttamen-
te agli indirizzi:
SAFE SOUND
Dear Customer,
Congratulation for purchasing a product of the HERTZ HI-ENERGY line. Your satisfaction is the first
requirement that our products must meet: the same satisfaction as that of those who long for the car
audio emotion.
HERTZ HI-ENERGY SUBWOOFERS ARE DESIGNED FOR HIGH POWER AUDIO SYSTEMS WHICH
CAN GENERATE VERY HIGH UNDISTORTED SOUND PRESSURE. PLEASE REMEMBER THAT
LONG EXPOSURE TO AN EXCESSIVELY HIGH SOUND PRESSURE LEVEL MAY DAMAGE
YOUR HEARING; THEREFORE , PLEASE USE COMMON SENSE AND PRACTICE SAFE SOUND.
Safety must be at the first place while driving. In every situation, the listening volume should not cover
the noise coming from outside the car; You should also be able to hear the noise generated by Your
car in order to promptly face any emergency.
In order get the best performance from Your new subwoofer we recommend to carefully follow the
instructions herein. In order to make a top level car hi-fi system, You need to know the car mechanical
and electrical issues very well; if You think You lack the required tools or the sufficient knowledge,
please contact a specialty installer. A workmanlike installation will ensure You exciting, enthralling
performance, without affecting Your car’s safety and reliability.
This manual has been drawn to provide the main instructions required to install and use the system.
However, the range of possible applications is very wide; in order to get further information, please
contact Your HERTZ dealer or HERTZ authorized service by sending an e-mail directly to the following
email address:
INDICE / TABLE OF CONTENTS
Safe Sound /Safe Sound 02
Indice /Table of contents 03
Progetti /Applications 04
Find your Box 06
HX 250 - HX 250D 06
HX 300 - HX 300D 07
HX 380 - HX 380D 08
Dimensionamento del cablaggio /Choosing your cables 09
Connessioni /Connections 10
Connessioni Sub singola bobina /
Single voice coil configurations 12
Connessioni Sub doppia bobina /
Dual voice coil configurations 14
Installazione /Installation 16
Come fissare il sub /Fixing your Sub 18
Come girare il gasket / Front Back Gasket 18
Griglia /Grille 19
Taratura Elettroacustica /Electro-acoustic tuning 20
Taratura Reflex /Reflex tuning 21
Technical specifications 22
Italiano | English
02 03
Esec_Advanced Manual HiEnergy 17-10-2007 17:23 Pagina 3
Car audio and car goods internet store Winauto
winauto.ua

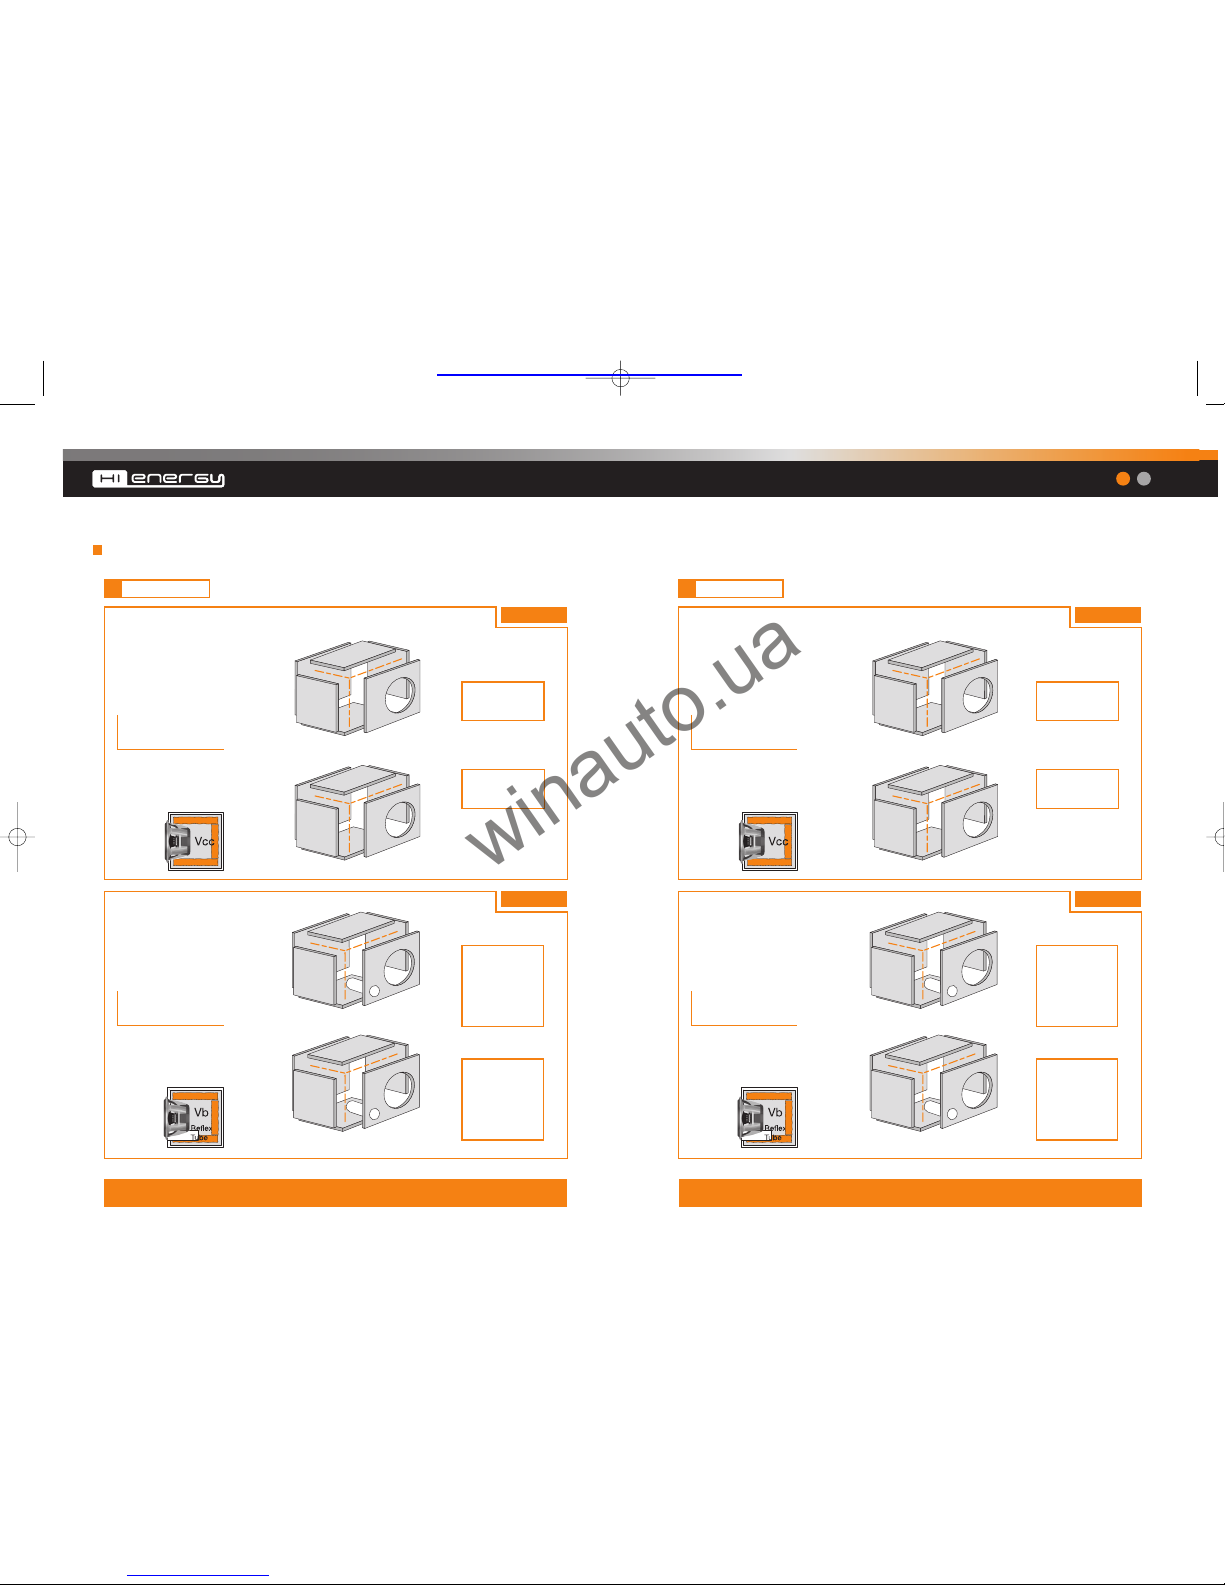
Progetti / Applications
I parametri elettroacustici dei Subwoofer HX sono ottimizzati per un uso in cassa.
TUTTI I PROGETTI SONO STATI REALIZZATI, TESTATI E OTTIMIZZATI SIA IN
LABORATORIO CHE IN ABITACOLO.
The HX Subwoofers electro-acoustic parameters are optimized to be used in an enclosure.
ALL OF THESES PROJECTS HAVE BEEN DESIGNED, TESTED AND OPTIMIZED IN THE
LABORATORY AND THEN PERFECTED IN THE ACTUAL TESTING VEHICLE.
Avvertenze / Warnings
1_ Nei progetti riportati il volume del box NON comprende l'ingombro dell'altoparlante.
Esempio con magnete fuori la cassa: Volume della cassa chiusa suggerito
(Vcc) 16,13 litri = Volume totale da realizzare 16,13 litri;
Esempio con magnete dentro la cassa: Volume della cassa chiusa suggerito (Vcc) 16,13 litri +
ingombro dell’altoparlante (Total driver displacement) 2,1 litri= Volume totale da realizzare 18,23 litri;
2_ I condotti di accordo dichiarati nei Reflex Box sono intesi per un montaggio vicino ad un
angolo della cassa e il loro ingombro è già calcolato nel progetto;
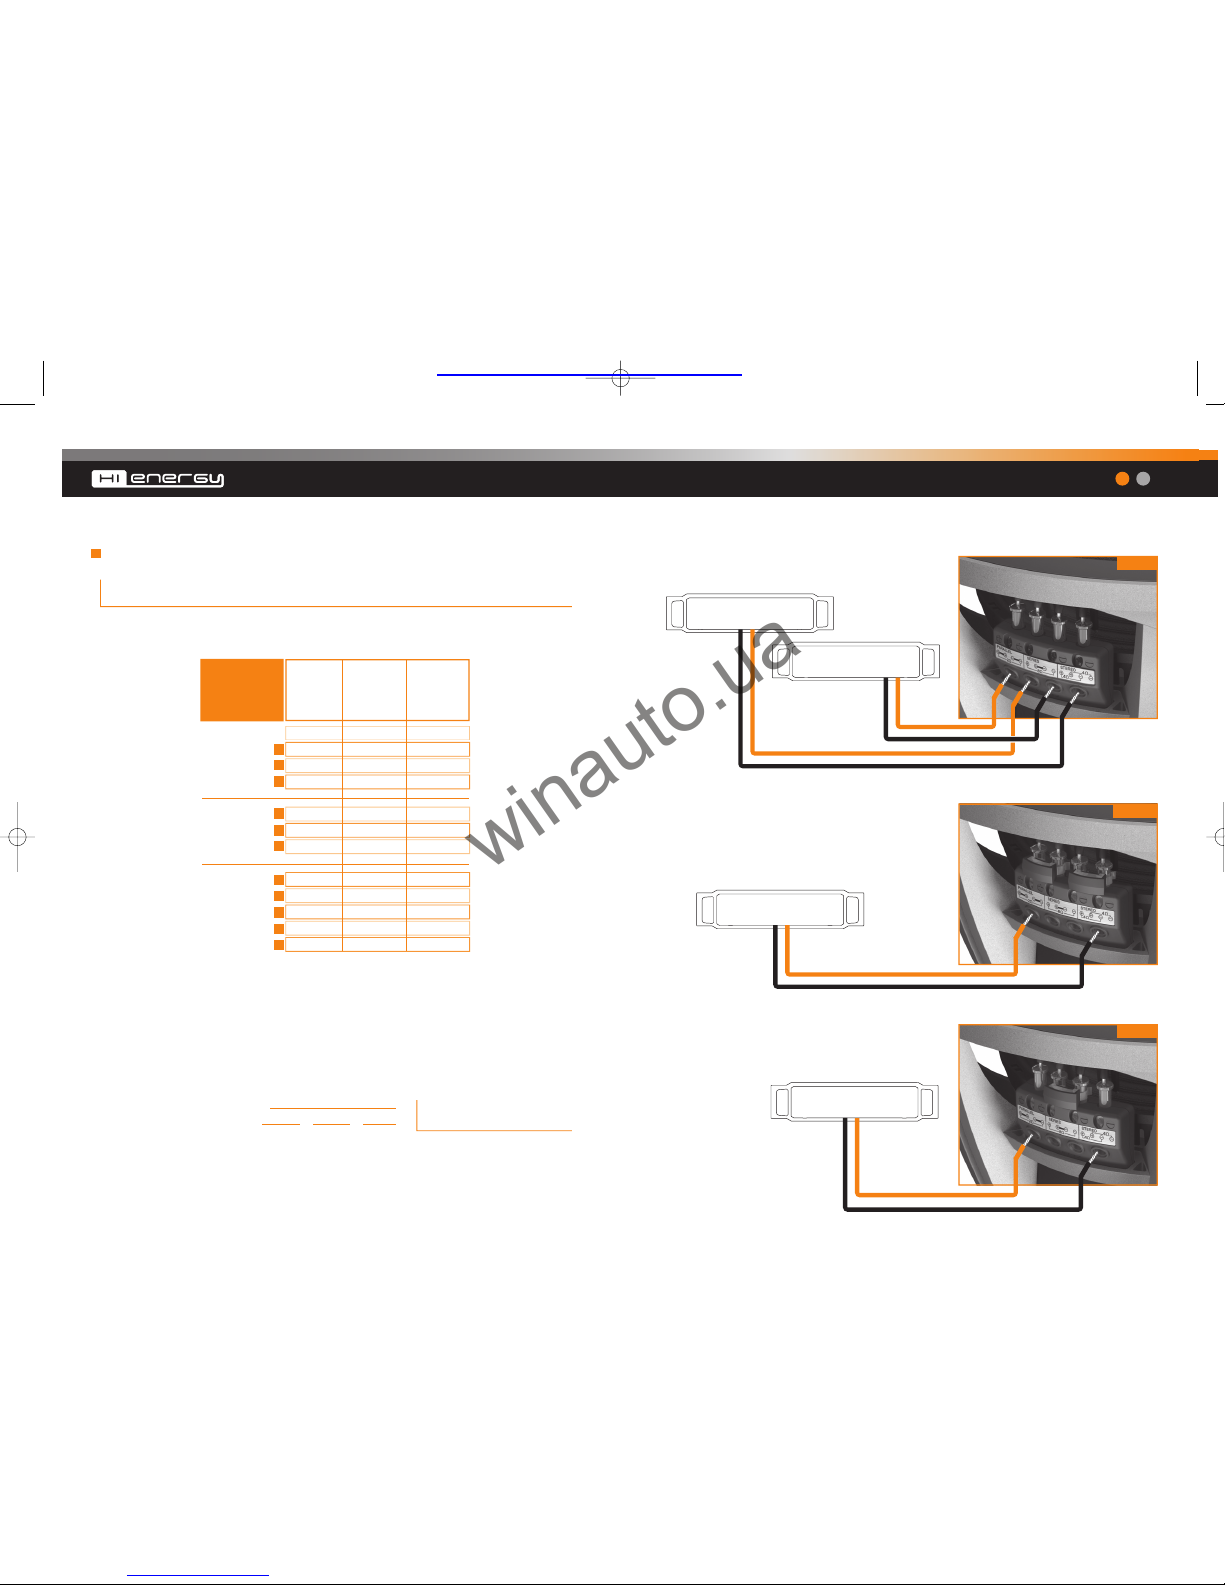
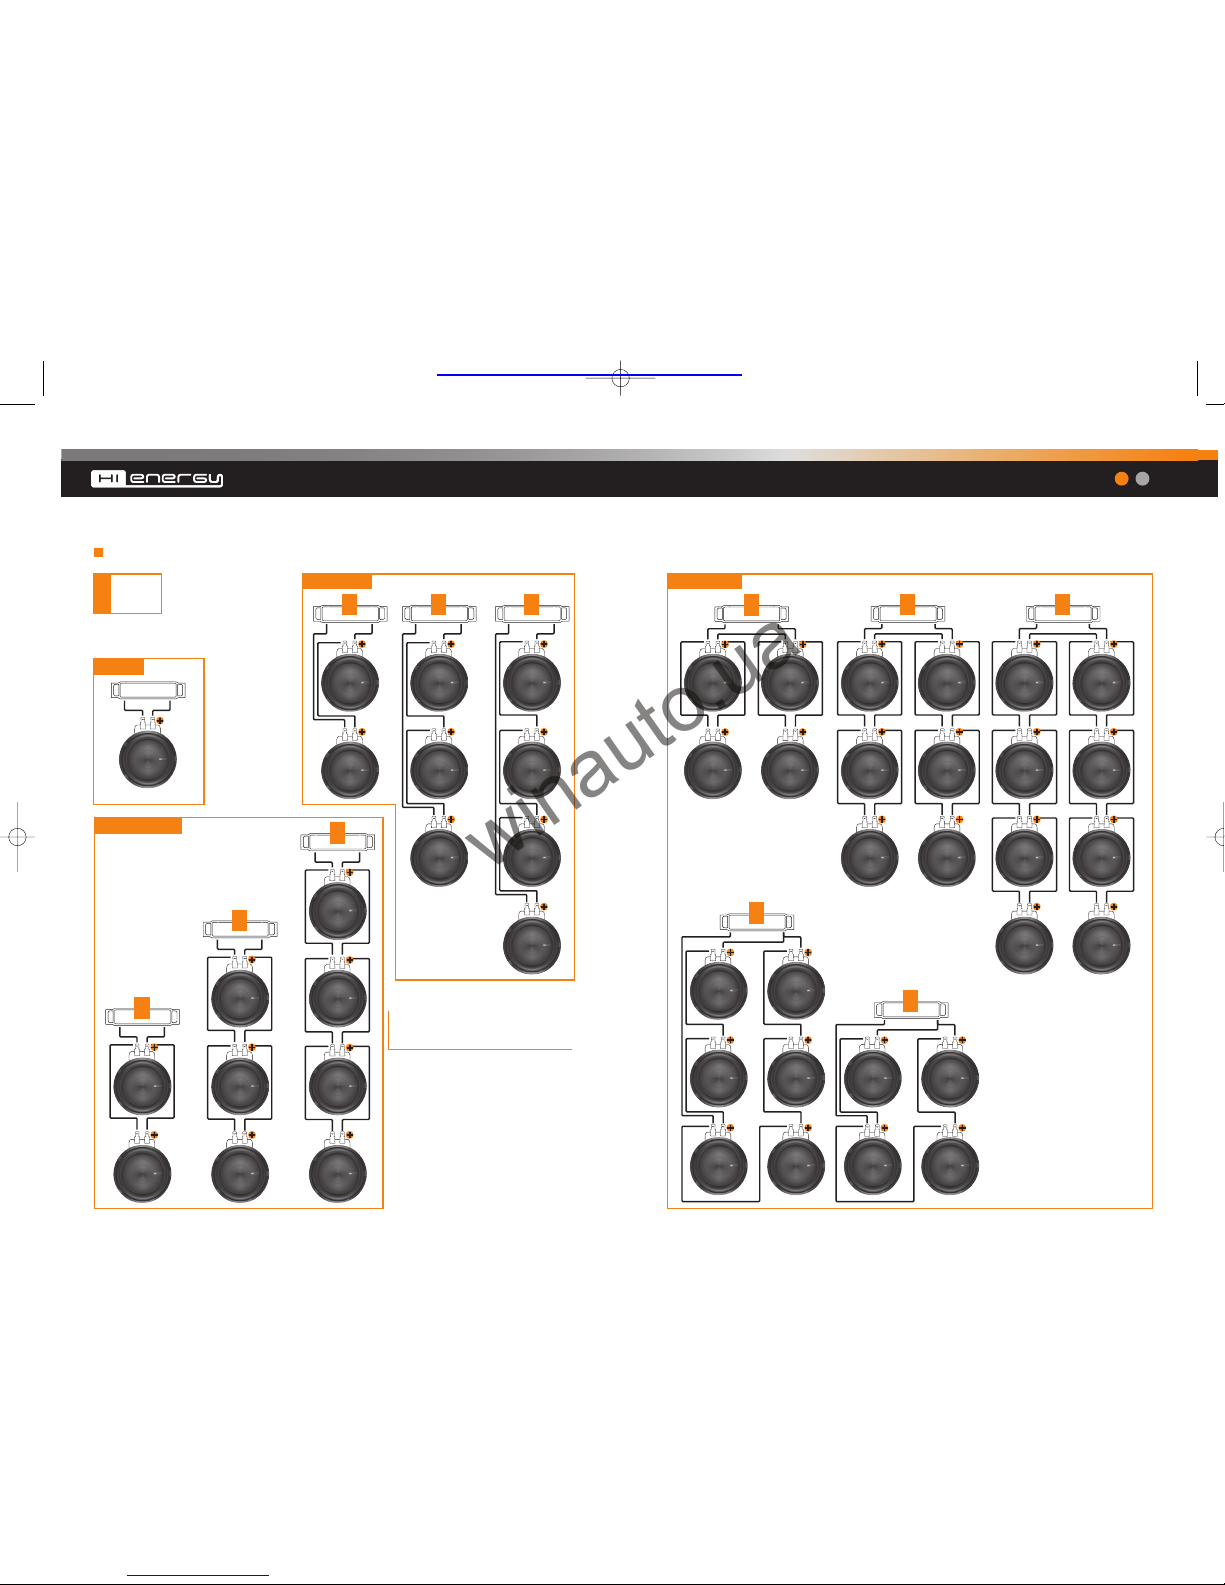
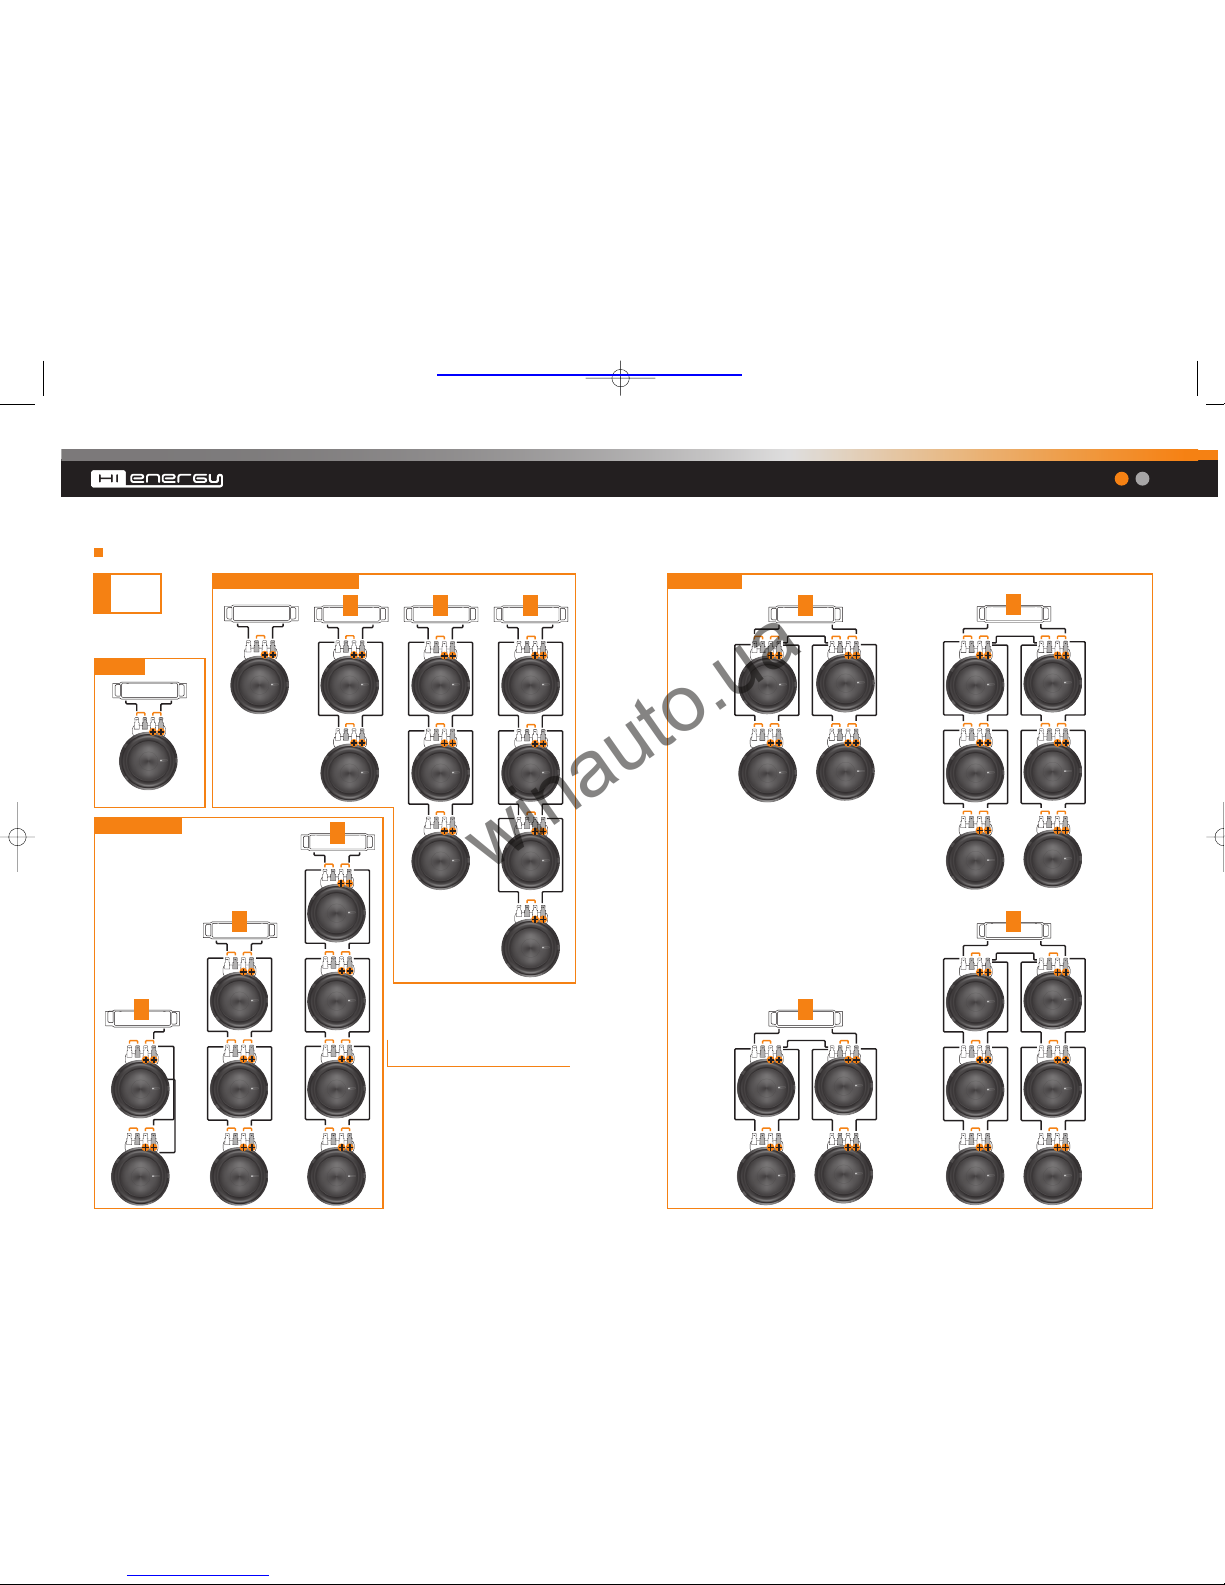
3_ Se volete realizzare una sezione bassi con più di un altoparlante, montate lo stesso modello di
subwoofer utilizzando la stessa tipologia di allineamento. Realizzate una serie di box identici,
ognuno dedicato ad un subwoofer o disegnate una struttura unica suddivisa in singoli box;
1_ In the designs included in this manual, the box volume DOES NOT includes the displacement
volume of the speaker itself.
Example considering the magnet structure outside the box: Suggested sealed box volume
(Vcc) 16,13 liter = Real total volume 16,13;
Example considering the magnet structure inside the box: Suggested sealed box volume
(Vcc) 16,13 liter + Total driver displacement 2,1 liter = Real total volume 18,23;
2_ The tuning ports specified in the reflex (vented) designs are meant for mounting near one of
the box corners and their material displacement volume is already included in the overall box
volume;
3_ If you wish to design an enclosure with several subwoofers, use only the same subwoofer
model with the same enclosure configuration. Each subwoofer should have its own separate
chamber within the single enclosure.
Dimension:
Mantiene le dimensioni simili al Sealed Box
Performance, ma offre una maggiore
estensione, con un suono energico e
un’ottima articolazione.
Almost the same dimensions as the
Sealed Box Performance, yet offering a
wider extension, with a strong sound and
an excellent articulation.
Performance:
Grande tenuta in potenza, elevati valori di
sensibilità e grande impatto; è il sub di
maggiori dimensioni per un basso
possente con ogni genere musicale.
Great power handling, high sensitivity
values and great impact loudest bass
performance with all kinds of miusic.
Cassa Accordata / Reflex box
Dimension:
La cassa è volutamente piccola per
ottimizzare al massimo gli ingombri
complessivi; è la soluzione giusta per chi
ha problemi di spazio, ma non vuole
rinunciare ad un basso potente.
The box is deliberately small in order to
optimize the overall dimension; this is the
right solution for those who have a narrow
space but not sacrifising the powerful bass.
Performance:
Più grande sia sotto l’aspetto fisico che
acustico, risponde con una gamma bassa
piena e corposa e un’ottima dinamica.
Bigger, both in dimensions and sound, it
responds with excellent dynamics that
You can feel with your body.
Cassa Chiusa / Sealed Box
Italiano | English
04 05
Esec_Advanced Manual HiEnergy 17-10-2007 17:23 Pagina 5
Car audio and car goods internet store Winauto
winauto.ua

Find your box
Sealed Box
Tutte le quote indicate sono interne ed espresse in millimetri (mm).
Materiali fonoassorbenti e tubi reflex sono scelti dal catalogo AZ audiocomp.
Attenzione
All of the dimensions shown on illustration are internal and measured in millimeters (mm).
Damping materials and reflex tubes are chosen from AZ audiocomp catalog
Caution
Reflex Box
HX 250 - HX 250D HX 300 - HX 300D
Sealed Box
Vcc = 16,13 Lit
Fc = 55 Hz
Sealed Box
Vcc = 11,03 Lit
Fc = 50 Hz
Reflex Box
Vb = 20,64 Lit
Fb = 38 Hz
Reflex Tube
Ø = 66 mm
L = 250 mm
Reflex Box
Vb = 15,15 Lit
Fb = 40 Hz
Reflex Tube
Ø = 66 mm
L = 240 mm
Fonoassorbente:
FONOFORM
su tutte le pareti esclusa
quella dell’altoparlante
Damping material:
FONOFORM
on all the inside walls
except for the speaker’s
Fonoassorbente:
FONOFORM
su tutte le pareti esclusa
quella dell’altoparlante
Damping material:
FONOFORM
on all the inside walls
except for the speaker’s
Sealed Box
Reflex Box
Sealed Box
Vcc = 26,30 Lit
Fc = 50 Hz
Sealed Box
Vcc = 17,08 Lit
Fc = 57 Hz
Reflex Box
Vb = 34,88 Lit
Fb = 40 Hz
Reflex Tube
Ø = 82 mm
L = 220 mm
Reflex Box
Vb = 21,95 Lit
Fb = 44 Hz
Reflex Tube
Ø = 66 mm
L = 210 mm
Fonoassorbente:
FONOFORM
su tutte le pareti esclusa
quella dell’altoparlante
Damping material:
FONOFORM
on all the inside walls
except for the speaker’s
Fonoassorbente:
FONOFORM
su tutte le pareti esclusa
quella dell’altoparlante
Damping material:
FONOFORM
on all the inside walls
except for the speaker’s
DIMENSION
PERFORMANCE
DIMENSION
PERFORMANCE
DIMENSION
PERFORMANCE
DIMENSION
PERFORMANCE
Italiano | English
Reflex tube: AR 70 Reflex tube: AR 80V
Reflex tube: AR 70Reflex tube: AR 70
220 280
280
210
250
250
250
270
270
290 280
280
230 330
330
210
310
310
240
350
350
310 350
350
06 07
Esec_Advanced Manual HiEnergy 17-10-2007 17:23 Pagina 7
Car audio and car goods internet store Winauto
winauto.ua

Italiano | English
All of the dimensions shown on illustration are internal and measured in millimeters (mm).
Damping materials and reflex tubes are chosen from AZ audiocomp catalog
Caution
HX 380 - HX 380D
Sealed Box
Reflex Box
Sealed Box
Vcc = 39,42 Lit
Fc = 50 Hz
Sealed Box
Vcc = 22,02 Lit
Fc = 61 Hz
Reflex Box
Vb = 60,10 Lit
Fb = 31 Hz
Reflex Tube
Ø = 100 mm
L = 250 mm
Reflex Box
Vb = 39,42 Lit
Fb = 32 Hz
Reflex Tube
Ø = 82 mm
L = 220 mm
Fonoassorbente:
FONOFORM
2,5 / 3 fogli
Damping material:
FONOFORM
2.5 / 3 sheets
Fonoassorbente:
FONOFORM
1,5 / 2,5 fogli
Damping material:
FONOFORM
1.5 / 2.5 sheets
DIMENSION
PERFORMANCE
DIMENSION
PERFORMANCE
Reflex tube: AR 100V
Reflex tube: AR 80V
300 380
380
200
360
360
300
380
380
400 400
400
Potenza applicata / Applied power
Diametro del cavo / Cable diameter
Lunghezza del collegamento / Connection length
Dimensionamento del cablaggio / Choosing your cables
Il cablaggio di potenza riveste un ruolo importante poichè influenza direttamente il fattore di
smorzamento del sistema e la qualità del suono; nella tabella allegata potete trovare una indicazione
della sezione del cavo, consigliata in funzione della lunghezza e della potenza applicata.
Power cables are extremely important since they directly affect the system damping factor
and sound quality; in the table below we show cable diameter, which we recommend
according to length and applied power.
La tavola si riferisce alla potenza continua su un carico di 4 ohm.
Qualora il carico scenda, si dovranno aumentare proporzionalmente le dimensioni del cavo.
The table refers to continuous power with 4 Ohm load. If load decreases,
the cable size needs to be proportionally increased.
08 09
Esec_Advanced Manual HiEnergy 17-10-2007 17:23 Pagina 9
Car audio and car goods internet store Winauto
winauto.ua

Connessioni / Connections
Facendo riferimento alla tabella sottostante, verificate l’impedenza minima accettata dall’amplificatore
nei dati dichiarati dal costruttore. Non scendete mai sotto tale valore.
Referring to the following table, check the minumum impedance that your amplifier can accept by the
manufacturer amplifer reccomendations. Never go below the min impedance specified.
Misure espresse in Ohm //Measure in Ohms
Di seguito riportiamo anche le formule che permettono di calcolare l’impedenza per differenti tipologie
di connessione.
Use these formulas to calculate the impedance for different types of connection.
Connessioni in serie / Connections in series:
Impedenza totale / Total impedance = ΩSub1 + ΩSub 2 + ΩSub 3…
Connessioni in parallelo / Connections in parallel:
Impedenza totale / Total impedance = dove “ΩSub” è l’impedenza
del Subwoofer numero 1 etc. …
where "ΩSub" is the impedance
of Subwoofer number 1 etc. ...
ΩSub1
1
ΩSub2
1
++
...
...
1
ΩSub3
1
1 Speaker
Serie
Parallel
Mixed
FREE AIR DC
RESISTANCE
1
2
3
1
2
3
4
5
2,90
5,80
8,70
11,60
1,45
0,97
0,73
2,90
1,93
1,45
2,90
4,35
HX 200
HX 300
HX 380
5,80
11,60
17,40
23,20
2,90
1,93
1,45
5,80
3,87
-
5,80
8,70
1,45
2,90
4,35
5,80
0,73
0,48
0,36
1,45
0,97
-
1,45
2,18
HX 250 D
HX 300 D
HX 380 D
Coils in
parrallel
HX 250 D
HX 300 D
HX 380 D
Coils in
series
1
2
3
Esempi di collegamento dei modelli a doppia bobina
Dual voice coil subwoofer connection patterns
Italiano | English
Stereo
4 Ω
4 Ω
8 Ω
Series
2 Ω
Parallel
10 11
Esec_Advanced Manual HiEnergy 17-10-2007 17:23 Pagina 11
Car audio and car goods internet store Winauto
winauto.ua

Connessioni Sub singola bobina / Single voice coil configurations
Misto / Mixed
1 Speaker
Serie / Series
12 3
5
4
Parallelo / Parallel
3
3
2
2
1
1
HX 250
HX 300
HX 380
Fate riferimento alla tabella di pag. 10
per verificare l’impedenza minima della
configurazione prescelta.
Please refer to “FREE AIR DC
RESISTANCE” table on page 10 to find
out the co-responding impedance of
the different configurations.
Italiano | English
12 13
Esec_Advanced Manual HiEnergy 17-10-2007 17:23 Pagina 13
Car audio and car goods internet store Winauto
winauto.ua

Connessioni Sub doppia bobina / Dual voice coil configurations
Misto / Mixed
Bobine in serie / Series-Parallel
Parallelo / Parallel
HX 250 D
HX 300 D
HX 380 D
Factory configuration
1 Speaker
3
2
2
1
5
4
1
321
Fate riferimento alla tabella di pag. 10
per verificare l’impedenza minima della
configurazione prescelta.
Please refer to “FREE AIR DC
RESISTANCE” table on page 10 to find
out the co-responding impedance of
the different configurations.
Italiano | English
14 15
Esec_Advanced Manual HiEnergy 17-10-2007 17:23 Pagina 15
Car audio and car goods internet store Winauto
winauto.ua

19 mm
MIN
75° 90°
L
L-25/30%
Vtrp = Volume tablet reflex port
Vb1
+
Vtrp
Vb2
+
Vtrp
30 mm
MIN
Damping materials
Se avete deciso di realizzare da soli la cassa armonica per il
Vostro HX Sub seguite questi piccoli accorgimenti:
If You have decided build your own HX Subwoofer enclosure,
please refer to the following table:
Usate un materiale di buon spessore, molto
compatto e meccanicamente inerte, come MDF o
multistrato di legno ad alta densità.
Use a thick material as stiff and vibration-free as possible,
such as MDF or high density multilayer wood.
1
Utilizzate materiali smorzanti come il FONOMAT di
AZ Audiocomp nelle pareti interne.
Use damping materials like AZ Audiocomp
FONOMAT on the internal walls.
3
Se possibile utilizzate almeno una parete inclinata.
If possible, use at least one inclined wall.
5
Non è importante su quale lato del box metterete il condotto
reflex, poiché i cambiamenti nella risposta del sistema, introdotti
dalla distanza del condotto dall’altoparlante, sono trascurabili.
The side You choose to put the reflex port in makes no difference,
as the distance between the port and the speaker does not
introduce any perceivable change.
8
Lasciate almeno 30 mm tra il fondo
del Subwoofer e la parete posteriore.
Leave at least 30 mm between the
Subwoofer bottom and the back wall.
6
Fissate in maniera adeguata la cassa del Sub alla struttura del veicolo.
Firmly fix the Sub box to the car chassis.
7
Se mettete il condotto di accordo vicino ad un angolo, a causa
del prolungamento virtuale dovuto alla vicinanza delle pareti,
fatelo più corto del 25-30% rispetto a quanto simulato.
Fate la stessa cosa se il condotto progettato è di tipo lamellare.
Se possibile, Vi consigliamo di misurare la frequenza di accordo
con uno strumento adeguato.
If You place the tuning port next to a corner, because of the
virtual extension from the short distance to the walls, shorten it
by 25-30% compared to the simulation. Do the same if using a
rectangular port design. Whenever possible, we recommend to
measure the tuning frequency with a suitable tool.
9
Nel caso dei progetti in Reflex, Asymmetric Bandpass e
Doppio Reflex, non aggiungete al volume totale l’ingombro
dei tubi e dei condotti di accordo, ma solo il volume del tipo
di supporto utilizzato; es.: la tavola di legno nel caso del
condotto lamellare.
When designing Reflex, Asymmetric Bandpass and Double
Reflex enclosure, only increase the overall dimension when
addictional materials/panels are added.
10
2Incollate e sigillate tutte le pareti del box usando colla vinilica
di buona qualità in abbondante quantità. Dopo l’incollaggio,
ripassate tutte le giunzioni interne.
Glue and seal all the box walls using sufficient a mount of
good quality vinyl glue. Put some more glue over all the
internal joints.
4Utilizzate sempre la guarnizione di tenuta tra
cestello e piano di battuta e serrate con
decisione le viti seguendo un ordine a croce.
Always use the gasket between the basket and
the mounting surface, and fasten the screws
gradually in a criss-cross until tight.
Installazione / Installation
Italiano | English
16 17
Esec_Advanced Manual HiEnergy 17-10-2007 17:23 Pagina 17
Car audio and car goods internet store Winauto
winauto.ua

Come fissare il sub / Fixing your Sub
I subwoofer HX hanno una guarnizione rifinita da clip che copre le viti di fissaggio. Questo gasket
può essere montato sia in posizione tradizionale (impostazione standard) che rovesciato, in maniera
da completare l’installazione quando si utilizza il subwoofer con il magnete a vista.
The HX subwoofers feature a front/back gasket assembly, provided with clips that cover the mounting
screw locations. This gasket is designed to” finish off” the installation when used in traditional mounting
methods, or can be positioned on the back side of the frame when the woofer is mounted inverted,
as used in “highlighted” installations.
Italiano | English
1 2
34
1
1
2
2
34
Griglia / Grille
Le griglie HXG 250/300/380 GR sono disponibili come accessorio e completano l’estetica e la funzionalità
dei subwoofer HX. La griglia può essere montata solo dopo aver tolto il Front/Back Gasket e fissato il subwoofer
The HXG 250/300/380 GR grilles are available as accessory and add to the HX subwoofers
cosmetics and functionality.The front/back gasket must be removed before these grilles can be used.
Come girare il gasket / Front Back Gasket
3
45
18 19
Esec_Advanced Manual HiEnergy 17-10-2007 17:23 Pagina 19
Car audio and car goods internet store Winauto
winauto.ua

Effettuate delle prove in entrambi i sensi
e scegliete secondo i vostri gusti.
Test both ways and choose according to
your preference.
0Hz20 200 2K
SUBSONIC 24 dB/Oct.
Loudness
22
30 37
43
70
90 110
130
15050
20 Hz200 2K 20K
50÷150
CROSSOVER
Taratura Elettroacustica / Electro-acoustic Tuning
Una volta realizzato il box e terminata l’installazione in vettura, dedicate alcune attenzioni alla messa a punto
dell’impianto e alla taratura dell’amplificazione specifica. Ricordate che è più facile danneggiare un
altoparlante usando un amplificatore poco potente in piena distorsione. Viceversa, un amplificatore molto
potente in zona di funzionamento lineare non è quasi mai responsabile di malfunzionamenti del sistema.
After finishing Your box and installing it in Your car, spend some time to tune Your system and its amplifiers.
Remember that it is easier to damage a speaker with a under powering amplifier in full distortion.
On the contrary, a very powerful amplifier with a linear operation rarely causes system failures.
Taratura Reflex / Reflex Tuning
Se state realizzando un box reflex, effettuate alcune prove di ascolto in abitacolo prima di chiudere
definitivamente la cassa, solo in questo modo avrete la certezza di ottenere il miglior risultato
acustico secondo i Vostri gusti:
If You are making a reflex box, test it in Your car before sealing the enclosure; this is the only way to
be sure to achieve the best sound corresponding to Your preference:
Variate la frequenza di accordo modificando la lunghezza del condotto
o la quantità di materiale fonoassorbente presente all’interno.
Vary the tuning frequency by changing the port length or the
quantity of damping material inside the box.
Accorciando il condotto o diminuendo la quantità di fonoassorbente
la frequenza di accordo sale e il basso avrà un suono più netto e
deciso, viceversa sarà più profondo ma meno incisivo.
If You shorten the port or reduce the quantity of damping material,
the tuning frequency increases and the bass will be tighter and
leaner, otherwise, it will be deeper but less tight.
Variate la posizione del subwoofer all’interno del bagagliaio
spostando il subwoofer box e la direzione di emissione
di condotto di accordo e altoparlante.
Vary the subwoofer position inside Your trunk by moving
the subwoofer box, the tuning port and speaker output
direction.
Regolate il livello del gain dell’amplificatore in modo da sfruttare tutta la potenza indistorta dell’amplificatore.
Adjust the amplifier gain level so as to utilize all the amplifier undistorted power.
Utilizzate, se possibile, il filtro subsonico settando
la frequenza di taglio nei dintorni dei 25 Hz.
If possible, use the subsonic filter, setting the
cut-off frequency around 25 Hz.
0Hz20 200 2K
Flat Evitate l’utilizzo del loudness o di equalizzazioni in gamma bassa.
Do not use loudness or equalizers at low frequencies.
Impostate la frequenza di taglio tra i 120 e i 45 Hz
a seconda del tipo di allineamento utilizzato.
Set the low-pass frequency between 120 and 45
Hz according to the type of configuration used.
ALERT:
Distortion 0° - Phase
180° - Out of phase
Italiano | English
20 21
Esec_Advanced Manual HiEnergy 17-10-2007 17:23 Pagina 21
Car audio and car goods internet store Winauto
winauto.ua

Power
handling
(Watt)
Component
Size mm
250 (10”)
250 (10”)
300 (12”)
300 (12”)
380 (15”)
380 (15”)
Magnet
Double Magnet
High density flux ferrite
Dual Coil, Double Magnet
High density flux ferrite
Double Magnet
High density flux ferrite
Dual Coil, Double Magnet
High density flux ferrite
Double Magnet
High density flux ferrite
Dual Coil, Double Magnet
High density flux ferrite
Cone / Dome
Polypropylene with
Mica injection
Polypropylene with
Mica injection
Polypropylene with
Mica injection
Polypropylene with
Mica injection
Polypropylene with
Mica injection
Polypropylene with
Mica injection
peak
900
900
1200
1200
1400
1400
continuous
program
450
450
600
600
700
700
*Sensitivity dB/SPL
89
88
90
90
92
92
Magnet size mm
190
190
190
190
190
190
Weight of
one
component kg
9,5
9,5
9,7
9,7
10,1
10,1
Voice coil
diameter mm
65
65
65
65
65
65
Total driver
displacement
2
2
2,9
2,9
3,5
3,5
** X-mech
23
23
23
23
23
23
Impedance ohm
4
4+4
4
4+4
4
4+4
Frequency
response Hz
34 - 800
34 - 800
28 - 700
28 - 700
25 - 600
25 - 600
234
234
284
284
351
351
Mounting
hole diameter mm
B
Outer
diameter mm
268
268
318
318
391
391
A
mm
Total depth
178
178
190
190
202
202
C
Mounting
depth mm
150
150
162
162
174
174
D
Technical specifications
Italiano | English
A
D C
B
* Il dato di sensibilità non è indicativo della pressione acustica generata in abitacolo e non
deve essere utilizzato per confronti con altri subwoofer.
* The stated sensitivity is not directly connected with the acoustic pressure generated
inside the car interior and should not be used as the sole comparison to other subwoofers.
** Xmech: massima escursione meccanica, indica il range di movimento in zona di
funzionamento lineare dell’altoparlante, in entrambi i sensi.
** Xmech maximum mechanic excursion: indicates the linear motion range of the speaker
in both directions.
HX 250
HX 250 D
HX 300
HX 300 D
HX 380
HX 380 D
Subwoofer
Dual Coil
Subwoofer
Subwoofer
Dual Coil
Subwoofer
Subwoofer
Dual Coil
Subwoofer
22 23
Esec_Advanced Manual HiEnergy 17-10-2007 17:23 Pagina 23
Car audio and car goods internet store Winauto
winauto.ua
Poweredby TCPDF (www.tcpdf.org)
This manual suits for next models
6
Table of contents
Other Hertz Subwoofer manuals

Hertz
Hertz SPL Show ST 25K Neo User manual

Hertz
Hertz SX 250D Setup guide

Hertz
Hertz diECi User manual

Hertz
Hertz SPL Monster M12 Setup guide

Hertz
Hertz HX 250; HX 250 D; HX 300; HX 380; HX 300 D*; HX 380... Setup guide

Hertz
Hertz HX 200 User manual

Hertz
Hertz MILLE ML2500 User manual

Hertz
Hertz Cento Series User manual

Hertz
Hertz Dieci Series Setup guide

Hertz
Hertz Mille LEGEND ML 1650.3 User manual