Herz MILUX 3 F799 06 User manual

HERZ 3 F799 06
Page 1
HERZ Electronical room thermostat
MILUX
Data sheet for 3 F799 06, Issue 0715
Dimensions in mm
Characteristics
Wireless communication by radio signal to the receiver connected to the installation.
Weekly program by step of 1 hour.
9 Built-in programs and 4 User programs.
Program graphic display.
Room temperature and time display.
Comfort / Reduced / Anti-freeze temperatures.
Temporary temperature override.
Automatic or Manual operation.
Holiday function.
Keypads lock function (child safety).
Battery operated > 2 years.
Battery replacement without loss of the program memory (< 1minute).
Reset function.
ITCS function (optional): Intelligent Temperature Control System.
HERZ 3 F799 06
Page 2
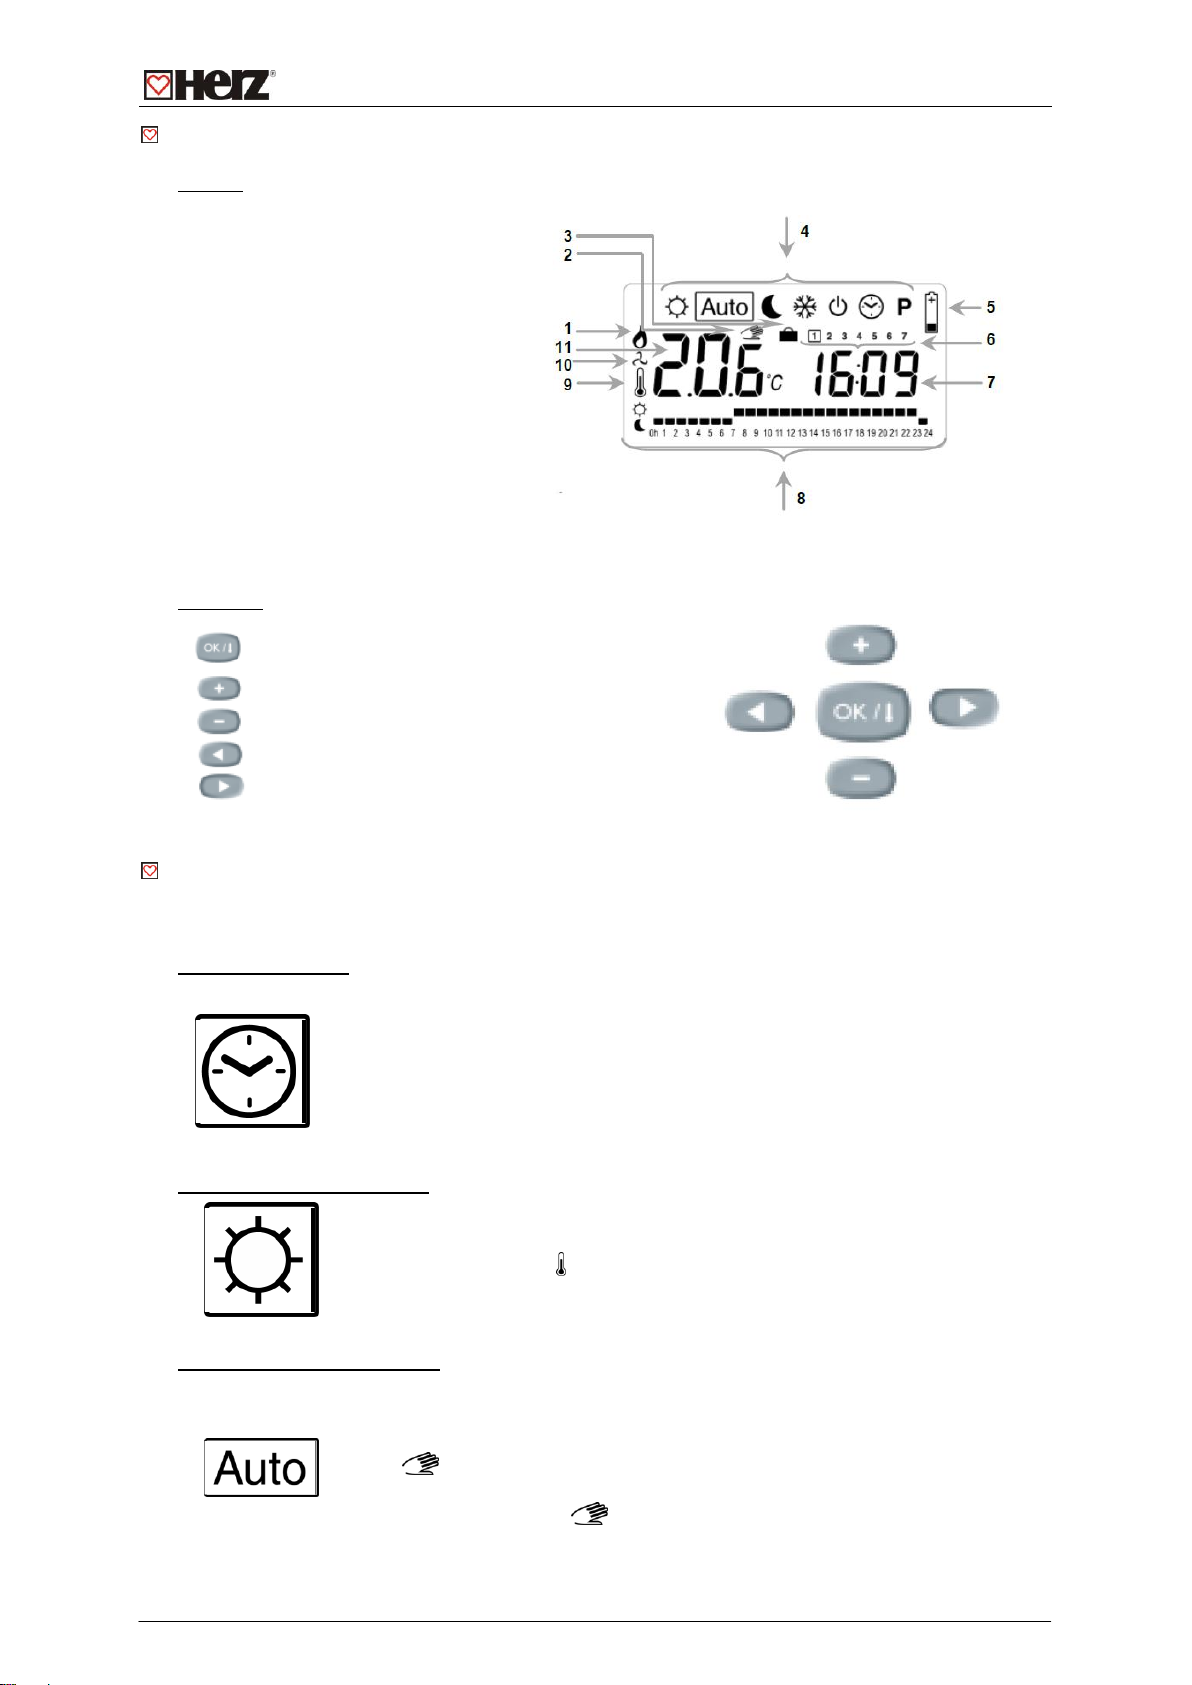
Display
Display
1: Heating indicator
2: Temperature overridden
3: Holiday function activated
4: Operating mode menu
5: Batteries weak
6: Day of the week
7: Time
8: Current day graphic
program display and radio
transmission activity
9: If lit-up 11 display the
current room temperature
10: Cooling indicator
11: Room temperature or set
temperature
Keyboard
Validation key (OK)
plus key (+)
Navigation key right (-)
Navigation key left (◄)
Navigation key right (►)
Modes Discription
Use (◄) & (►) keys to change the mode in the Operating mode menu. For all operating modes
the receiver switch should be placed on AUTO position.
Set CLOCK Menu :
Use this menu to adjust the clock.
Use (+) & (-) to adjust the minutes.
Then press (Ok) key
Use (+) & (-) to adjust the hours.
Then press (Ok) key
Use (◄) & (►) to adjust the day.
Then press (Ok) key
COMFORT operating mode:
By pressing (+) or (-) keys the comfort temperature starts to blink and can be
adjusted.
The room temperature reappears after a few seconds.
The MILUX RF regulation will now follow indefinitely the comfort temperature.
AUTOMATIC operating mode:
MILUX RF will follow automatically the program according to the actual time.
By pressing (+) or (-) key you can override the current set temperature until
the next change in the program.
The segment will lit up. Use (+) or (-) keys to adjust the temporary
required temperature.
At the next pro gram change the will disappear and the program
continues without any alteration.
HERZ 3 F799 06
Page 3
REDUCED operating mode:
By pressing (+) or (-) keys the comfort temperature starts to blink and can be
adjusted.
The room temperature reappears after a few seconds
The MILUX RF regulation will now follow indefinitely the reduced temperature.
ANTI FREEZE operating mode :
Prevent your installation from freezing.
By pressing (+) or (-) keys the anti freeze temperature starts to blink and can
be adjusted.
The room temperature reappears after a few seconds
Now the MILUX RF will keep the temperature above freezing.
STANDBY mode :
Use this mode to switch heating off. The MILUX RF first switches off the
heating and then automatically switches off itself (the screen goes blank). The
programs and the time of day are all saved, and the consumption is
significantly reduced. To switch back on, press a key.
Press (OK) key to view for a moment the room temperature.
DANGER: Has your thermostat is stopped YOUR INSTALLATION CAN
FREEZE.
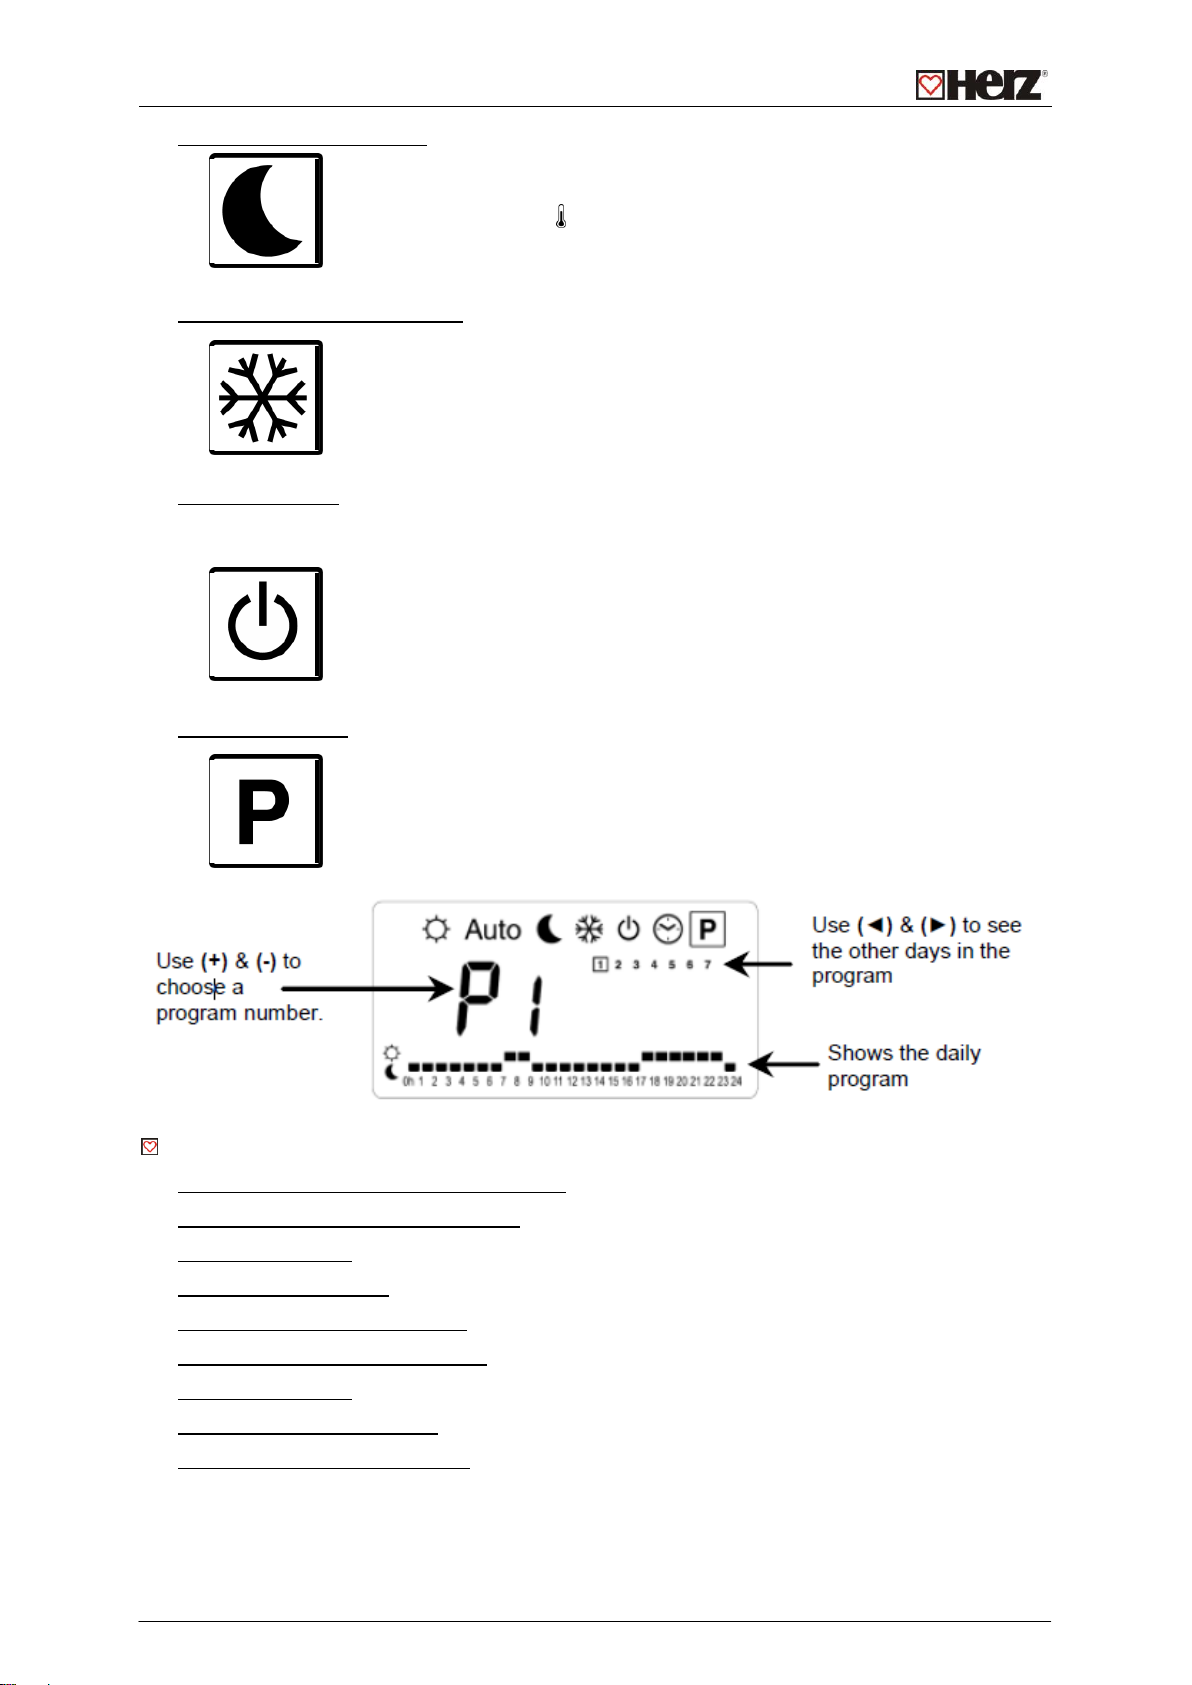
PROGRAM mode :
By pressing (+) or (-) keys the Program number starts to blink.
1/ If you select a built-in program “P1 to P9” and press (Ok) this program will
be followed in mode.
Built-in programs description
Program P1, Morning, Evening & Weekend
P2 Morning, Midi, Evening & Weekend
P3 Day & Weekend
P4 Evening & Weekend
P5 Morning, Evening (bathroom)
P6 Morning, Afternoon & Weekend
P7 7h - 19h (Office)
P8 8h - 19h, Saturday (Shop)
P9 Weekend (Secondary House)
HERZ 3 F799 06
Page 4
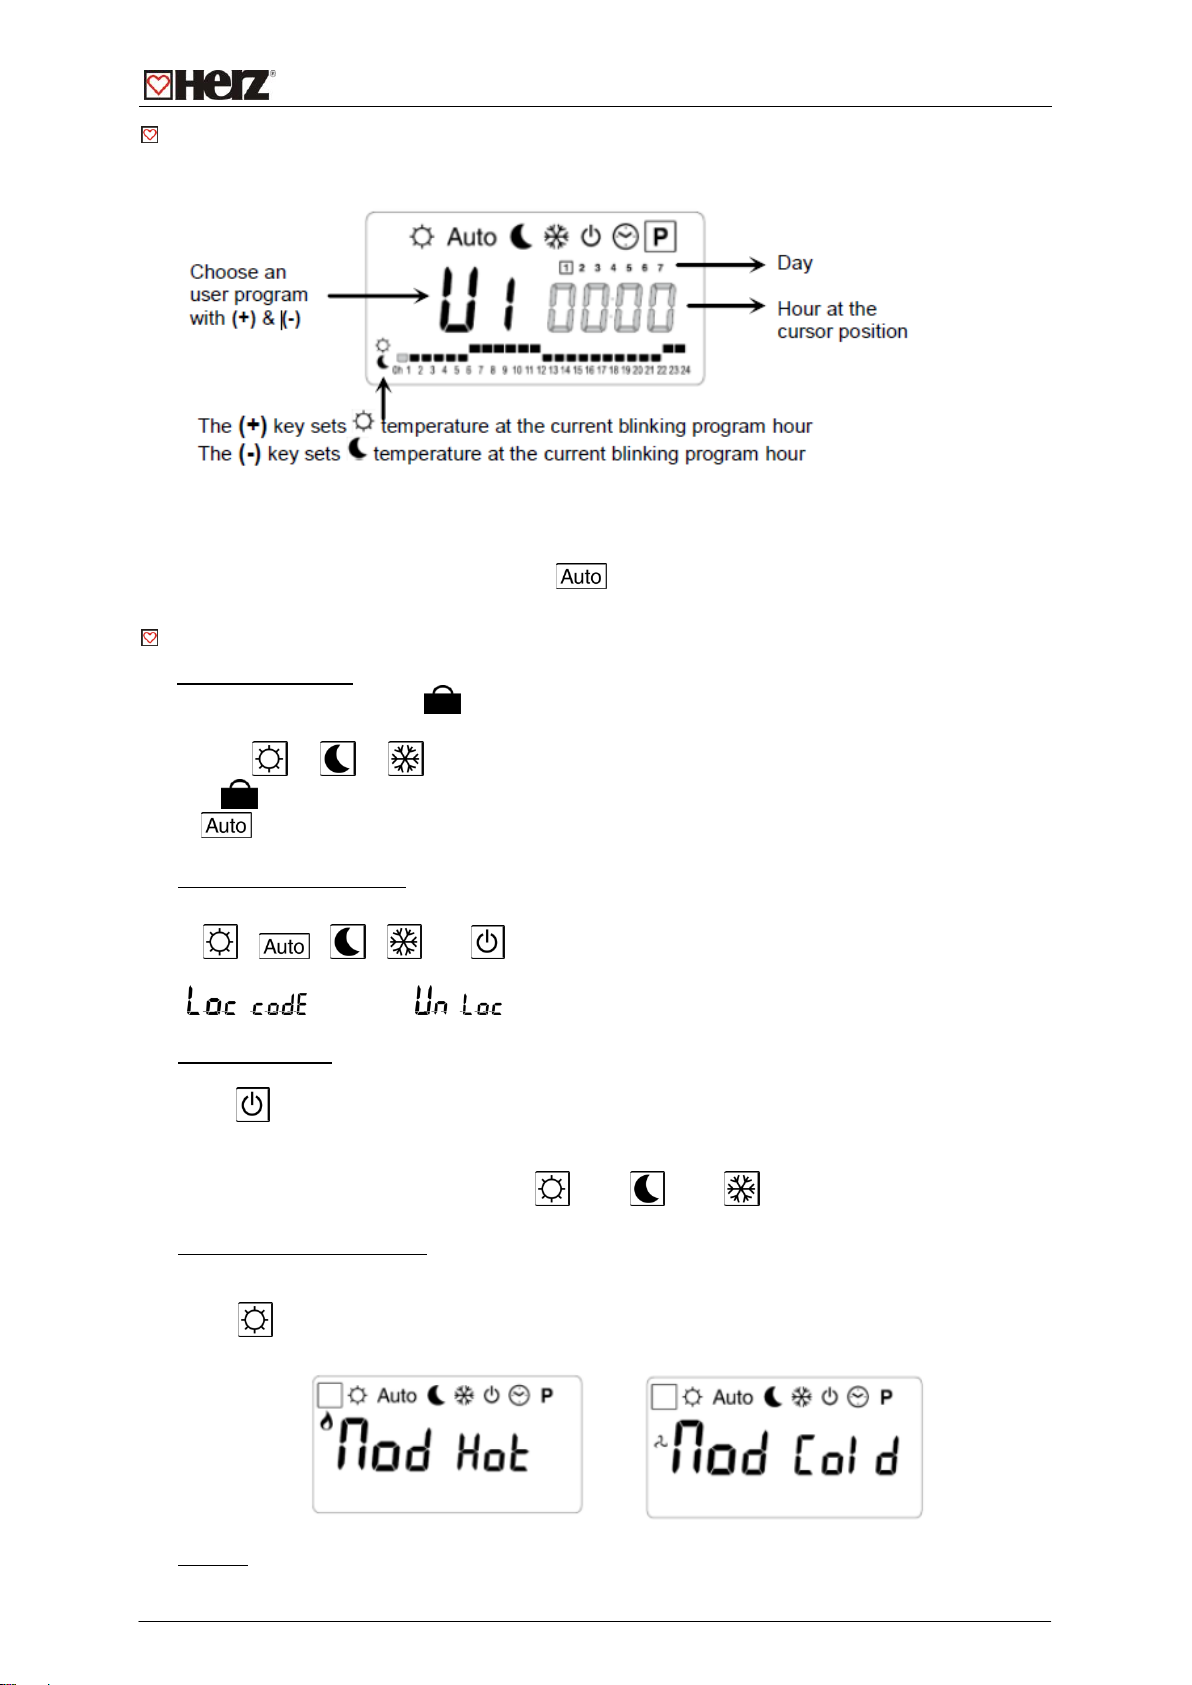
User program edition
If you select a built-in program ”U1 to U4” and press (Ok) you will enter in user program edition.
Use (◄) or (►) keys to slide the blinking cursor position in the day and modify or correct easily
the program. When the displayed day is correct, press (Ok) to jump to the following day. When
you’ll press (Ok) on day 7, your program is finish and validate.
Now your user program will be followed in operating mode.
Special functions
HOLIDAY Function:
With (◄) & (►) keys, go to function.
Then select with (+) & (-) keys the delay in hours ( H ) if below 24h then in days ( d ). Then select
a mode or or .
The logo is active and the number of hours/days left is displayed until the MILUX RF returns
in mode and continues to follow the program.
KEYPAD LOCK Function:
Function to prevent any modification of the parameters.
In , , , and operating modes you can maintain the (Ok) key pressed and
press simultaneously on the (+) or (-) key to lock
( ) or unlock ( ) the keypad.
RESET Function:
Erase all user programs and sets the factory parameters by default.
Go to mode, maintain the (Ok) key pressed 10s. All segments will show during a few seconds
showing that the MILUX RF has been erased and restarted with factory defaults parameters.
Factory parameters are: Temperatures 21°C 17°C 6°C, Program U1 all comfort.
Heating or cooling Function:
Your MILUX RF could be use to manage your cooling installation.
To change the regulation mode of your MILUX RF, move the operating mode cursor to the comfort
mode . Then maintained the (Ok) key and press the (◄) key. Normally one of the following
screens is displayed.
Use (+) or (-) to change the regulation mode, press (►) to exit this submenu.
Remark: In COLD mode the antifreeze function is removed.

HERZ 3 F799 06
Page 5
ITCS (Optional)
The thermostat Intelligent Temperature Control System will activate your installation in advance to
assure the desired temperature at the hour programmed following your weekly program.
This automatic control system works in the following way:
When you start your thermostat for the first time, it will measure the time taken by your installation
to reach the set temperature. The thermostat will re-measure this time at each program change to
compensate external temperature change & influence. You can now program your thermostat
without the need to adjust the temperature in advance because your thermostat does it
automatically for you.
Radio Configuration
1. To assign the MILUX RF thermostat with the receiver you must put the receiver in “RF init”
mode, please refer to the receiver leaflet. (*)
2. On the MILUX RF, select operating mode. Then press the (Ok) key during 5 seconds,
you will enter in the Radio configuration mode “ “ must be displayed. The
thermostat is now sending by radio signal its configuration signal.
3. Check on the receiver the good configuration (see the receiver leaflet for more information)
4. You can now perform a radio range verification. Place the MILUX RF in the room where you
need to regulate the temperature and leave it in Radio configuration mode ( ). Close the doors
and come back to the Receiver. Verify that the RF LED blinks at each radio signal received:
- If it blinks regularly 4 times per second, the installation of the MILUX RF and Receiver is
correct.
- If it blinks irregularly or never, you are at the range limit. Try to Install the receiver closer to
the thermostat.
5. On the MILUX RF press on the (Ok) key to exit the radio configuration mode. Now your
MILUX RF can controls the Receiver.
* (In this mode it is better that the thermostat is close to the receiver)
Technical Characteristics
Operating temperature 0°C - 50°C (o 32°F –122°F)
Set temperature precision 0.5°C (or 0.5°F)
Regulation characteristics Cycle (PWM): 15 minutes for 2°C
With Anti-short cycle of 3 minutes in OFF and 2 minutes in ON
Electrical Protection^ Class II - IP30
Batteries & Operating life 3x LR6 AA 1.5V alkaline batteries (> 2 years)
IMPORTANT: You have 1 minute to change the batteries.
Past this time, you may have to reprogram your thermostat if
all segments lit up at power up.
Radio Frequency 433.92 MHz, <10mW.
868.3 MHz, <10mW
RF Certifications EN 300220-1, -2
EN 301489-1, -3
All specifications and statements within this document are according to information available at the time of printing and meant for informational
purpose only. Herz Armaturen reserves the right to modify and change products as well as its technical specifications and/or it functioning
according to technological progress and requirements. It is understood that all images of Herz products are symbolic representations and
therefore may visually differ from the actual product. Colours may differ due to printing technology used. In case of any further questions don’t
hesitate to contact your closest HERZ Branch-office.
Table of contents
Other Herz Thermostat manuals

Herz
Herz 3 F800 50 User manual

Herz
Herz H7990 Series User manual

Herz
Herz H7714 Series Operating manual

Herz
Herz 3 F800 55 User manual

Herz
Herz clever&smart Clima 3 F810 22 User guide

Herz
Herz F799 User manual

Herz
Herz ETKF+ User manual

Herz
Herz H7711 Series User manual

Herz
Herz H7990-08 Series User manual

Herz
Herz 1 7795 01 User manual

Popular Thermostat manuals by other brands


Johnson Controls
Johnson Controls T26 Series user manual

Roth
Roth EnergyLogic Touchline Guidelines for the electrician

American Standard
American Standard AZON1050AC52ZAA user guide

Emerson
Emerson White Rodgers 1F86-344 Installation and operation instruction

Hunter
Hunter 44372 owner's manual

proSmart
proSmart BBoil instruction manual


