HG E1000 User manual

User Manual HG E1000 HIGH TIP
Side 1
USER MANUAL
HG E1000 HIGH TIP
SUPER SKUB

User Manual HG E1000 HIGH TIP
Side 2
Table of Contents
User Manual ................................................................................................................................................................ 1
Introduction................................................................................................................................................................. 3
1.Safety instruction............................................................................................................................................... 4
1.1 Read the manual ........................................................................................................................................ 4
1.2 Education.................................................................................................................................................... 5
1.3 The most common causes of accidents are............................................................................................... 5
1.4 Preparation................................................................................................................................................. 5
1.5 Noise and vibration level ............................................................................................................................ 6
1.6 Operation.................................................................................................................................................... 7
1.7 Maintenance............................................................................................................................................... 8
1.8 Transport & Towing .................................................................................................................................... 9
1.9 Disposal & Dismantling............................................................................................................................. 10
2. Charging and Storage .................................................................................................................................... 11
2.1 Charging ................................................................................................................................................... 11
2.2 Storage ..................................................................................................................................................... 12
3. Functions ........................................................................................................................................................ 14
3.1 Instrument panel....................................................................................................................................... 14
3.2 The machine's functional units................................................................................................................. 15
4. Precautions before starting............................................................................................................................. 18
4.1 Tire pressure and tension......................................................................................................................... 18
5. Driving............................................................................................................................................................. 20
5.1 Operation of HIGH TIP ............................................................................................................................. 21
6. Maintenance................................................................................................................................................... 22
6.1 Towing and side tipping of the container during maintenance, service, engine failure, hydraulic failure or
power failure. ...................................................................................................................................................... 23
6.2 Maintenance Points.................................................................................................................................. 24
7. FAQ................................................................................................................................................................. 28
8. Hydraulic diagram and Electrical diagram...................................................................................................... 29
9. Technical specifications.................................................................................................................................. 30
10. Warranty ....................................................................................................................................................... 31
11. EU declaration of conformity ........................................................................................................................ 32
User Manual HG E1000 HIGH TIP
Side 3
Introduction
The HG E1000 High Tip is an electrical, high-
quality dumper with an added benefit –the
ability to unload directly over the rim and into
containers and trailers. It is user-friendly and
provides the same outstanding performance as
the combustion engine alternatives. The high-tip
function is particularly popular for work sites in
tight spaces, such as cities, among rental
companies, landscapers, contractors, and
demolition companies. The HG dumper has total
safety measures that ensure the highest safety
standards for users while being able to load up
to 1000 kg.
Find out more at:
www.hg-machines.com
• Very low noise level
• Minimal maintenance - built to last
• Particle free working environment • Lithium
battery technology
•12 hour run time, more than a full day work
• Fast charging - 20 to 80% battery charge in 90
min.
Manufacturer:
HG Poland Sp. Z. O. O.
+48 91 885 23 04
Prosta 34
72-100 Łozienica
Poland
CVR-nr.: PL7010040430
HG Machines ApS
+45 75 89 12 44
hello@hg-machines.com
www.hg-machines.com
Vejlevej 15
8722 Hedensted
Denmark

User Manual HG E1000 HIGH TIP
Side 4
1. Safety instructions
1.1 Read the manual
Read the manual carefully and make sure that
other potential users of the machine read it as
well. If the user is unaware of certain details
about the machine, this could lead to hazards.
If one of the warning labels is loose, worn or
damaged so that the symbol is illegible, the label
must be replaced.
WARNING!
Next to a text in the manual highlights a risk of
injury if users do not follow the instructions
WARNING!
Hot parts
Do not touch the electric motor during operation
or when the motor has just stopped. Hot parts
can cause severe burns.
WARNING!
Electric shock
We recommend the use of qualified service
staff/workshop for servicing or troubleshooting,
as there is a risk of electric shock. Electric shock
can cause fire damage, death and/or long-term
injuries.
Manuals, parts lists and instructional videos can
be found at www.hg-machines.com.
WARNING!
Danger of crushing
Avoid contact with moving machine parts. This
applies to both fingers and clothing, as this can
lead to mutilation.
WARNING!
Danger
When servicing and parking the machine, the
motor must be switched off, the ignition key
removed and the main switch turned off.
At HG, we always recommend qualified
staff/workshops for servicing and
troubleshooting.
At HG, we always recommend authorized
personnel/workshop for servicing and
troubleshooting.

User Manual HG E1000 HIGH TIP
Side 5
1.2 Education
Read the instructions carefully. You should be
familiar with all controls, switches, etc. and how
to use the equipment correctly.
To use the motor barrow, the operator must be
over 18 years of age and have normal mental
condition and mobility. Relevant legislation may
mandate a different age limit for operators of the
motor barrow in specific situations.
Remember that the operator is responsible for
any accidents or hazardous situations that may
occur involving other people or their property.
The operator should be given adequate
instructions for using the motor barrow. These
instructions should focus on:
1. The need to be careful and focused
when working with self-propelled
machines.
2. The fact that the operator must have
a good overview of what is
happening in front of/behind the
vehicle - especially where other
people may be present.
1.3 The most common
causes of accidents are
1. Lack of overview
2. The operator's knowledge of the vehicle
is insufficient.
3. Overly steep terrain conditions.
4. Insufficiently stable terrain.
5. The vehicle being used in conditions with
insufficient space.
1.4 Preparation
•Be sure not to wear loose clothing when
driving.
•Ensure that he machine is adequately
charged. HG does not recommend driving
with less than 15% battery capacity.
•Ensure that the machine holds sufficient
hydraulic oil for the tipping function.
•Top up hydraulic oil if required, before
activating the main switch and ignition key to
ON position. Never remove the hydraulic
tank cap or top up the hydraulic oil while the
motor is running or hot.
•In case of spilling hydraulic oil, do not
attempt to turn on the machine until the
hydraulic oil spilled on the machine has been
removed. Hydraulic oil can create very

User Manual HG E1000 HIGH TIP
Side 6
slippery surfaces and can thus increase the
risk of accidents while driving.
•If you get hydraulic oil on your skin, you
should wash your skin thoroughly with soap.
If irritation persists, consult a physician.
•Ingestion of hydraulic oil is potentially fatal.
1.5 Noise and vibration level
Noise level
According to ISO 6396, the max. energy
equivalent sound pressure level is 71 dB (A) at
the operator location, measured during tipping
with an empty skip and at maximum motor
speed.
According to ISO 6396, the highest energy
equivalent sound pressure level is 70 dB (A) at
the operator location, measured during
simulated operating conditions between driving
and tipping.
The uncertainty of the above measurements is ±
2 dB.
HG recommends the use of hearing protection,
even if the noise is below the statutory limit.
Vibration level
According to ISO 1032, the maximum weighted
arm/hand vibration level at the operator location,
measured at empty skip tipping and maximum
motor speed, is: ahv = 5.0 m/s2.
According to ISO 1032, the maximum weighted
arm/hand vibration level at the operator's seat
under simulated driving and tipping operating
conditions is measured as: ahv = 3.0 m/s2.
The uncertainty of the above measurements is
± 25%

User Manual HG E1000 HIGH TIP
Side 7
1.6 Operation
WARNING!
Failure to observe the following operating
instructions may result in injury:
•When driving indoors, make sure you
observe the rules and instructions in force on
site.
•Do not use the machine in places with
flammable dust or explosive gases.
•As far as possible, only use the motor
barrow in daylight or in good artificial
lighting.
Do not drive on
slopes exceeding 5%
(4,5 degrees).
Do not drive across
slopes exceeding: 10°
(10 degrees) on hard
surfaces such as
concrete and asphalt.
5° (4,5 degrees) on
compacted ground
such as gravel and
grass.
•In case of overturning, let go of the
machine and keep your distance. Never
try to hold onto the machine.
•Be aware that the driving characteristics
of the motor barrow change significantly
between an empty and a full skip, as the
center of gravity of the motor barrow is
higher when the skip is full.
Do not use the motor
barrow with insufficient
ceiling height.
NEVER drive on slopes
with an empty or full
container when HIGH TIP
is activated.
Only drive on horizontal
and stable ground when
the HIGH TIP has been
driven out.
Do not drive and unload
close to excavations and
unstable edges.
•Unloading of frozen loads or highly adhesive
materials such as clay must not be
performed by tipping, as the machine may
tip over.
•Driving on soft, loose and uneven surfaces is
prohibited, as the operator may be exposed
to inappropriate loads on the body when
operating the machine.

User Manual HG E1000 HIGH TIP
Side 8
•When leaving the motor barrow, remove the
ignition key and turn off the main switch.
•Always turn off the ignition and main switch
before carrying out any service or repair
works.
•Always turn off the ignition and main switch
before charging the machine.
•Do not touch the motor or other electrical
parts when the machine is on and/or
running.
•The machine may only be used for
transporting materials.
When reversing, the
operator must pay
special attention to
uneven surfaces and
objects that the
operator may fall
over or drive into.
The operator must be
aware of persons in the
area so that they are
not crushed under the
truck bed when it is
being lowered.
•The area around the machine must be
kept tidy to avoid accidents caused by
falling.
1.7 Maintenance
Each time the machine is used, visual inspection
and inspection must be performed to ensure:
•That there are no leaks in the hydraulic
system by hoses, tank etc.
•That there are no worn or damaged cables.
•That bolts, nuts, etc. are properly tightened.
•That the radiator grille and radiator fins on
the motor are free of dirt.
•That no hydraulic oil has been spilled on or
around the machine.
•That the motor barrow is stationary when the
propulsion lever is not activated.
•That the safety plate activates forward
movement when activated.
•That the tires have the correct pressure and
are lubricated.
•That the battery pack is not defective or has
loose plug connections.

User Manual HG E1000 HIGH TIP
Side 9
WARNING! Always fit the safety bracket of the
tipping cylinder before starting the inspection
work.
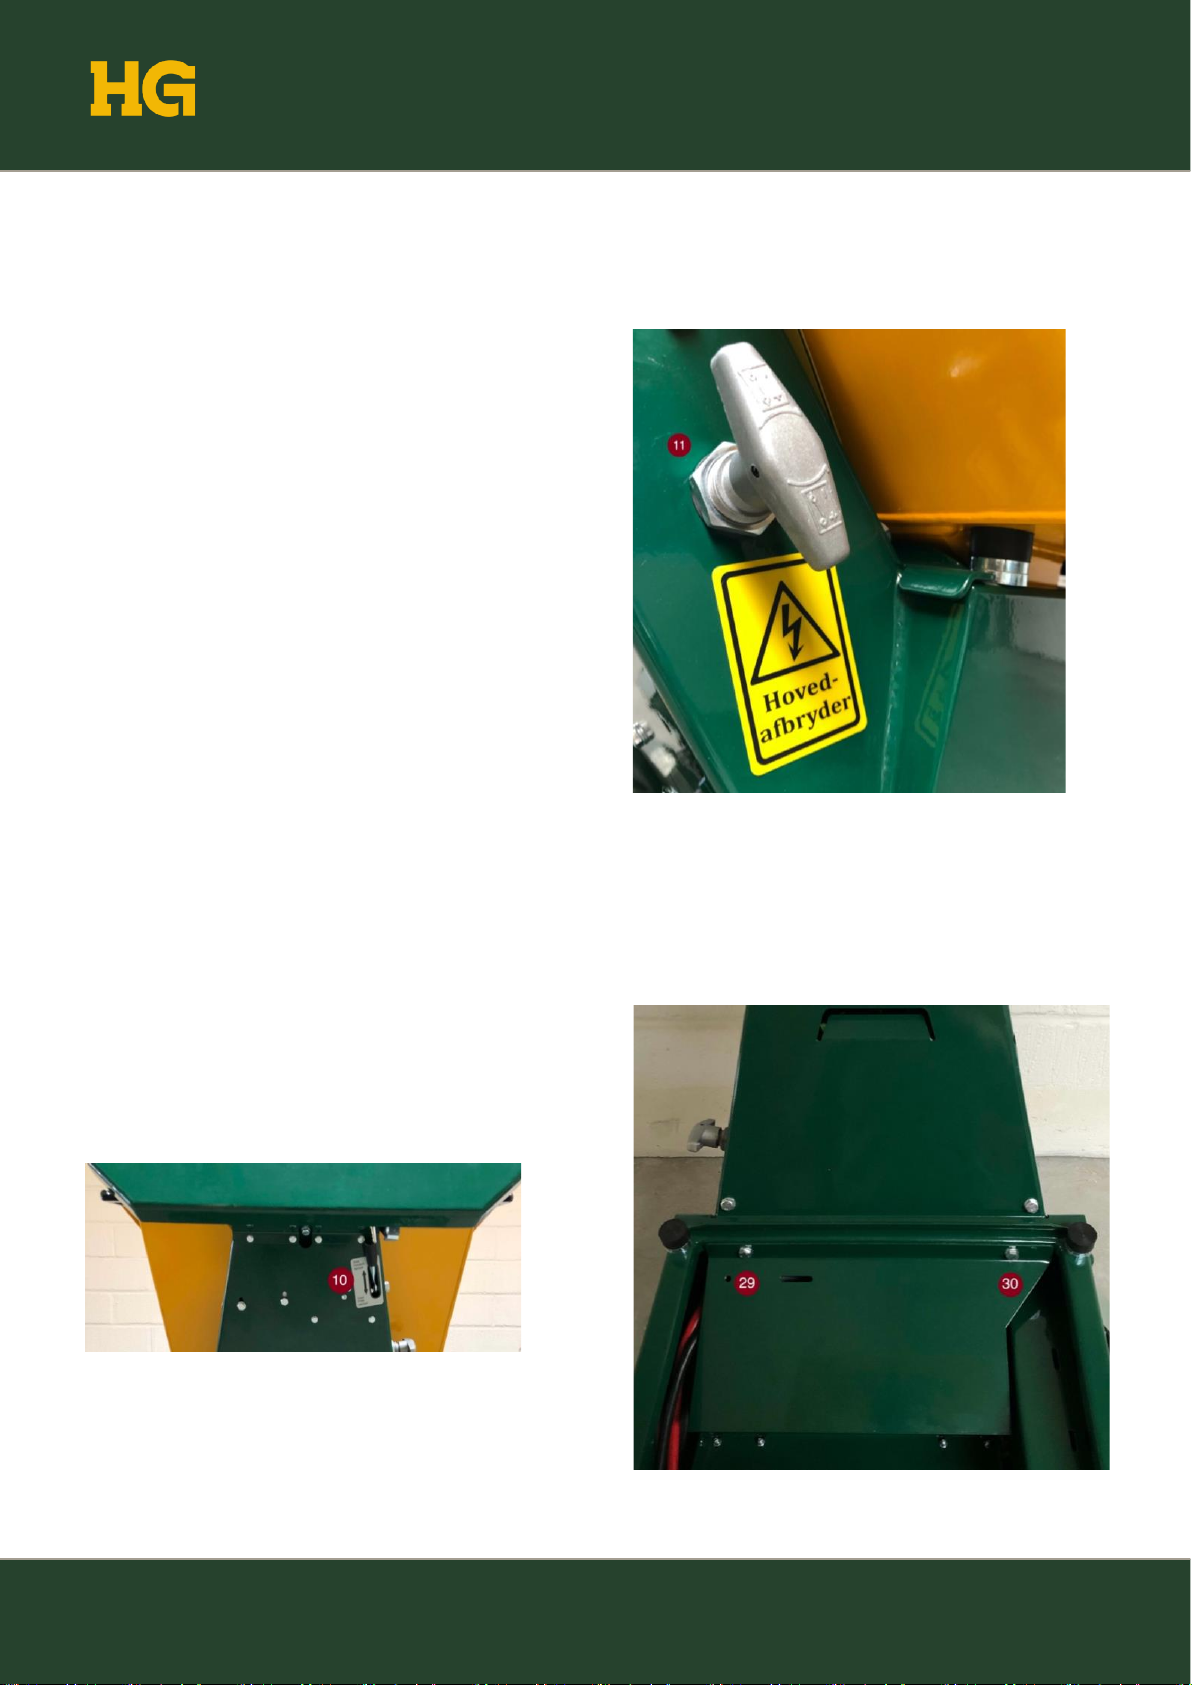
1.8 Transport & Towing
In order for the machine to be towed without the
motor being started, the release button on the
right side below the control panel must be
activated. The traction wheels are released and
the machine can be moved. See pos. 10
NOTE: The release handle must always be
pushed up during normal operation, as the
brake is otherwise disengaged
When lifting the machine, the three attachment
points on the front and on the instrument panel
must be used. Attachment must be sufficiently
stable and executed in such a way that
detachment cannot take place.
Lifting of the machine may ONLY be done with
an empty container.
NEVER use the control handle, safety plates or
anything else around the instrument panel to
clamp the machine.
The image may differ depending on the model
type.

User Manual HG E1000 HIGH TIP
Side 10
The machine may only be
transported with means of
transport with sufficient
ground clearance, as
there is a risk of serious
injury to the
operator/damage to the
machine and means of
transport
During transportation, the machine must be
attached to the load surface or cargo hold in
accordance with relevant regulations.
1.9 Disposal & Dismantling
When, many years from now, the motor barrow
is worn out and has to be disposed of,
Hedensted Gruppen will perform the dismantling
by agreement, as this should take place in an
environmentally sound manner. During
dismantling, the machine parts are sorted
according to type of material: in other words,
steel separately, rubber seals separately etc.
The various types of material are then disposed
of in accordance with relevant current
legislation.

User Manual HG E1000 HIGH TIP
Side 11
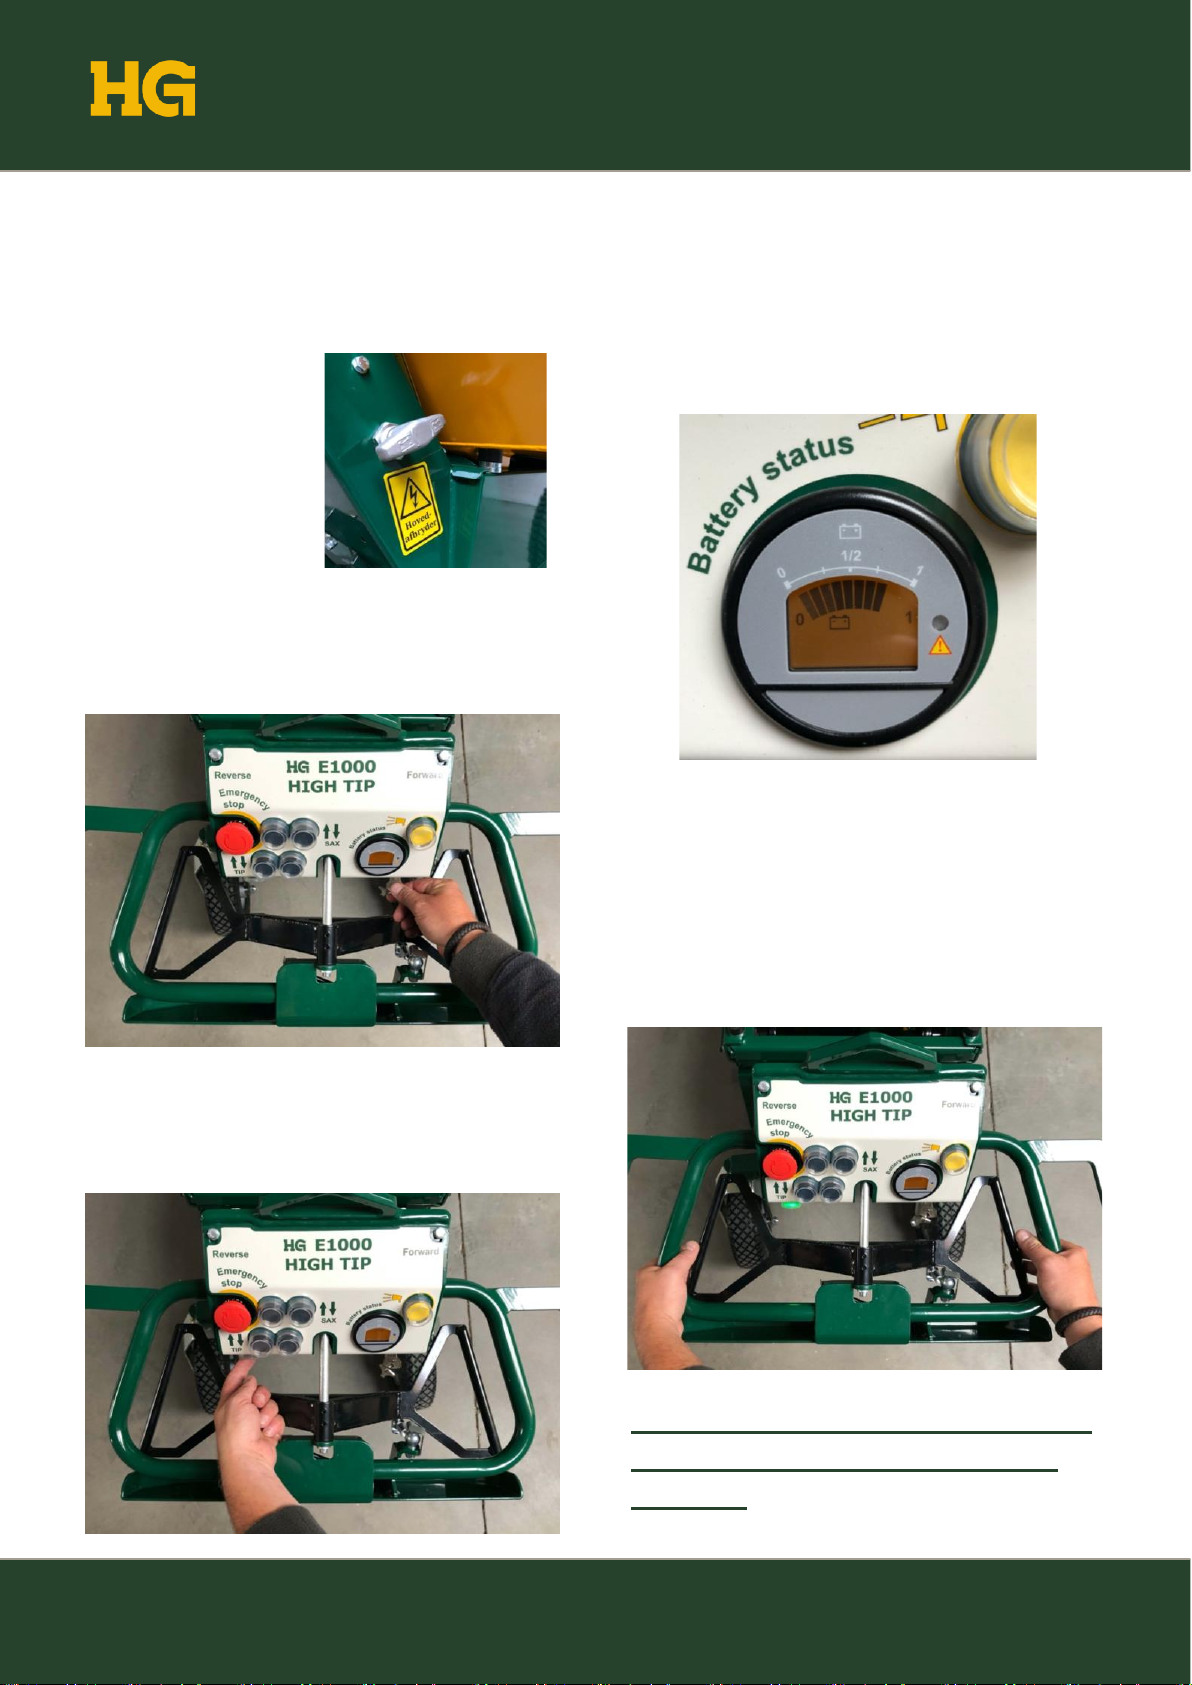
2. Charging and
Storage
2.1 Charging
1) Switch off the
machine at the main
switch, see figure pos.
11.
2) The charging plug is
found behind the door
on the left side of the
machine seen from the
direction of travel see figure pos.13
3) Connect the plug to the mains, see figure pos.
15
4) ) Check that the machine is charging the
battery. On the right side of the machine, seen
from the direction of travel, a pictogram is
mounted which describes the charger's various
indicator lamp states. At the bottom of the
pictogram there is an arrow, below the arrow
and through the ventilation holes on the side of
the machine you can see the indicator lights on
the charger. During charging, the yellow lamp on
the charger will flash. See figure item 16.
5) When the machine is fully charged, the green
lamp on the charger will light up steadily. Then
remove the plug from the mains and roll the
charging cable around the hangers on the
battery door. Then close the door, see pos. 13.
6) When the machine has been inspected as
described under "safety" and "precautions
before start-up", it is ready for operation.
User Manual HG E1000 HIGH TIP
Side 12
2.2 Storage
In conditions where a machine is to be stored
without operation for a longer period, HG
recommends that the machine's battery pack be
placed in "storage mode" and with a minimum of
40% power on the battery pack.
If the machine does not have at least 40%
power on the battery pack at the time of the
recommendation, it must be charged to this or
above. The current power level can be read on
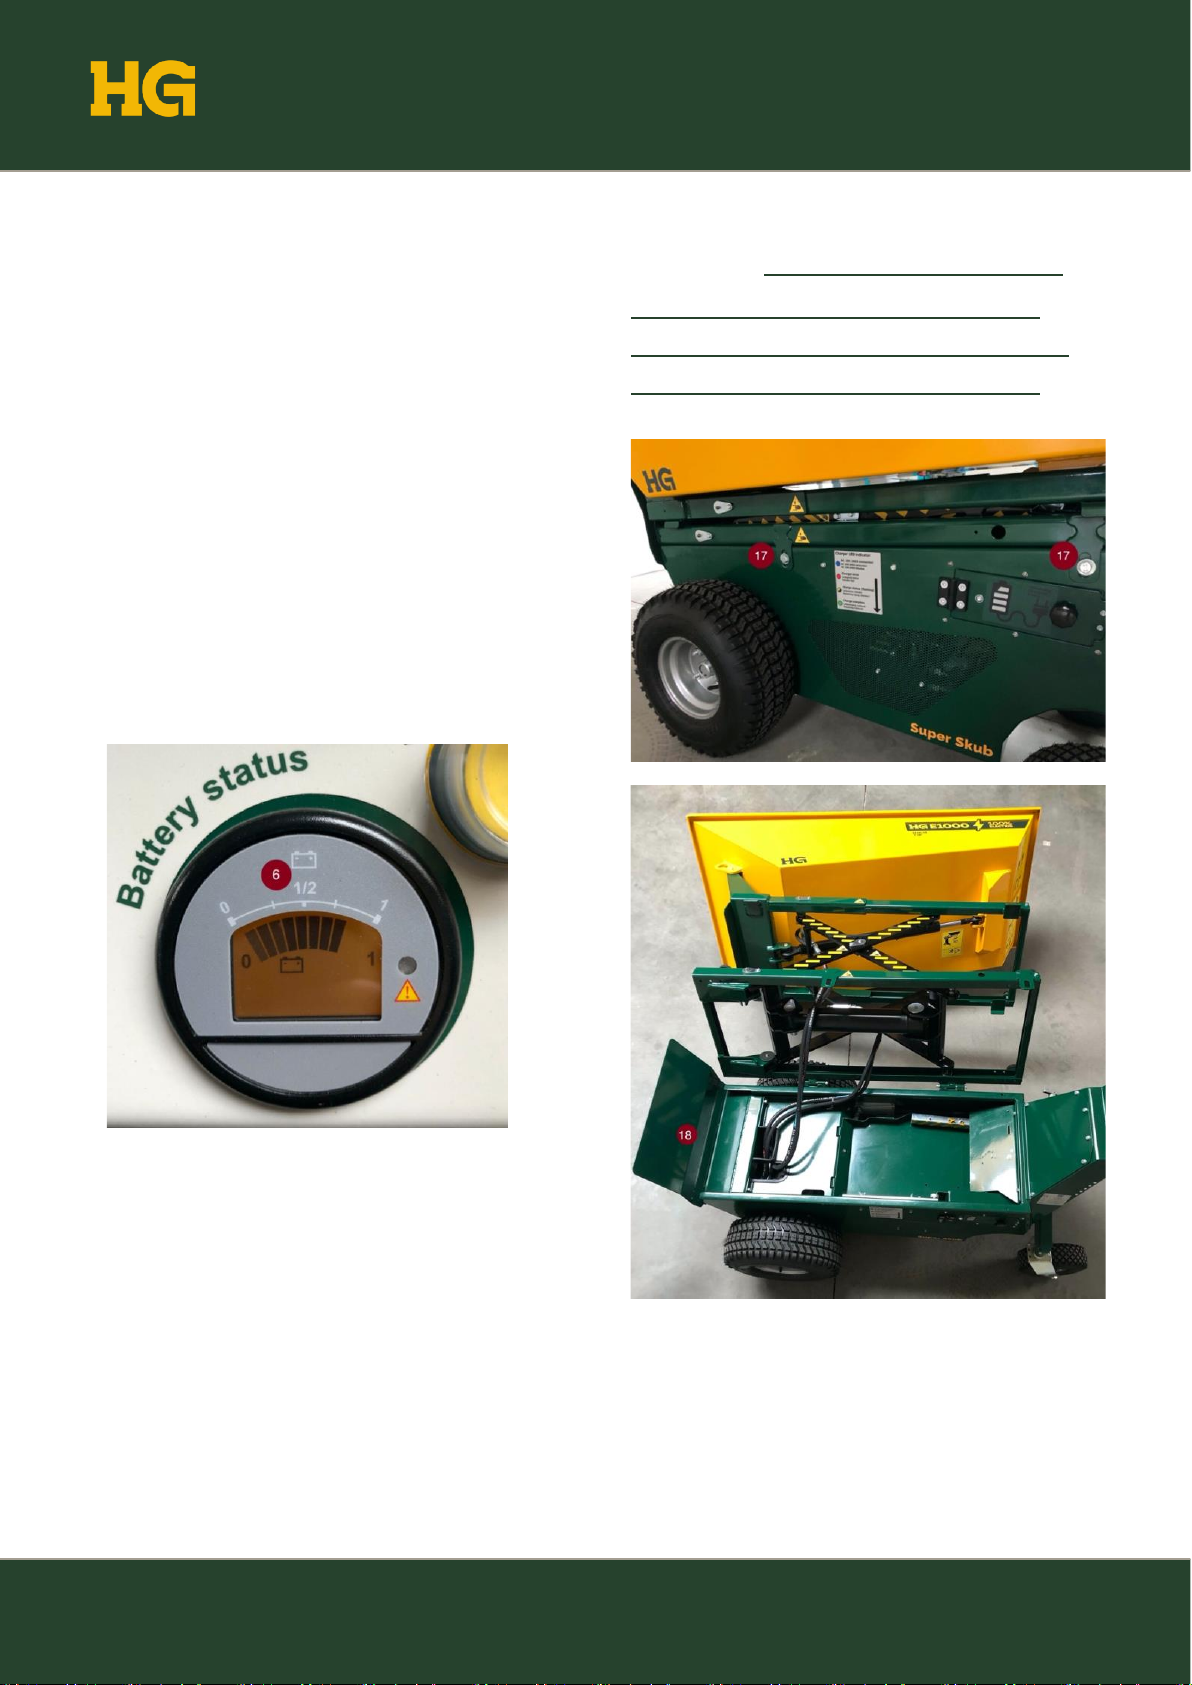
the battery indicator mounted in the instrument
panel. See figure item 6.
When the machine's battery pack has reached a
current level of at least 40% or more, the entire
container is tipped to the side, this is done by
loosening the two bolts on the left side and
rotating around the hinges on the right side seen
from the direction of travel. See figure pos 17
and 18.
WARNING! The rotation of the container
must be carried out by two people. The
container must be so long that there is no
possibility of tipping back accidentally.
User Manual HG E1000 HIGH TIP
Side 13
The top plate for the battery compartment is
then removed by lifting into the elongated hole.
The plate is held in place by magnets. See
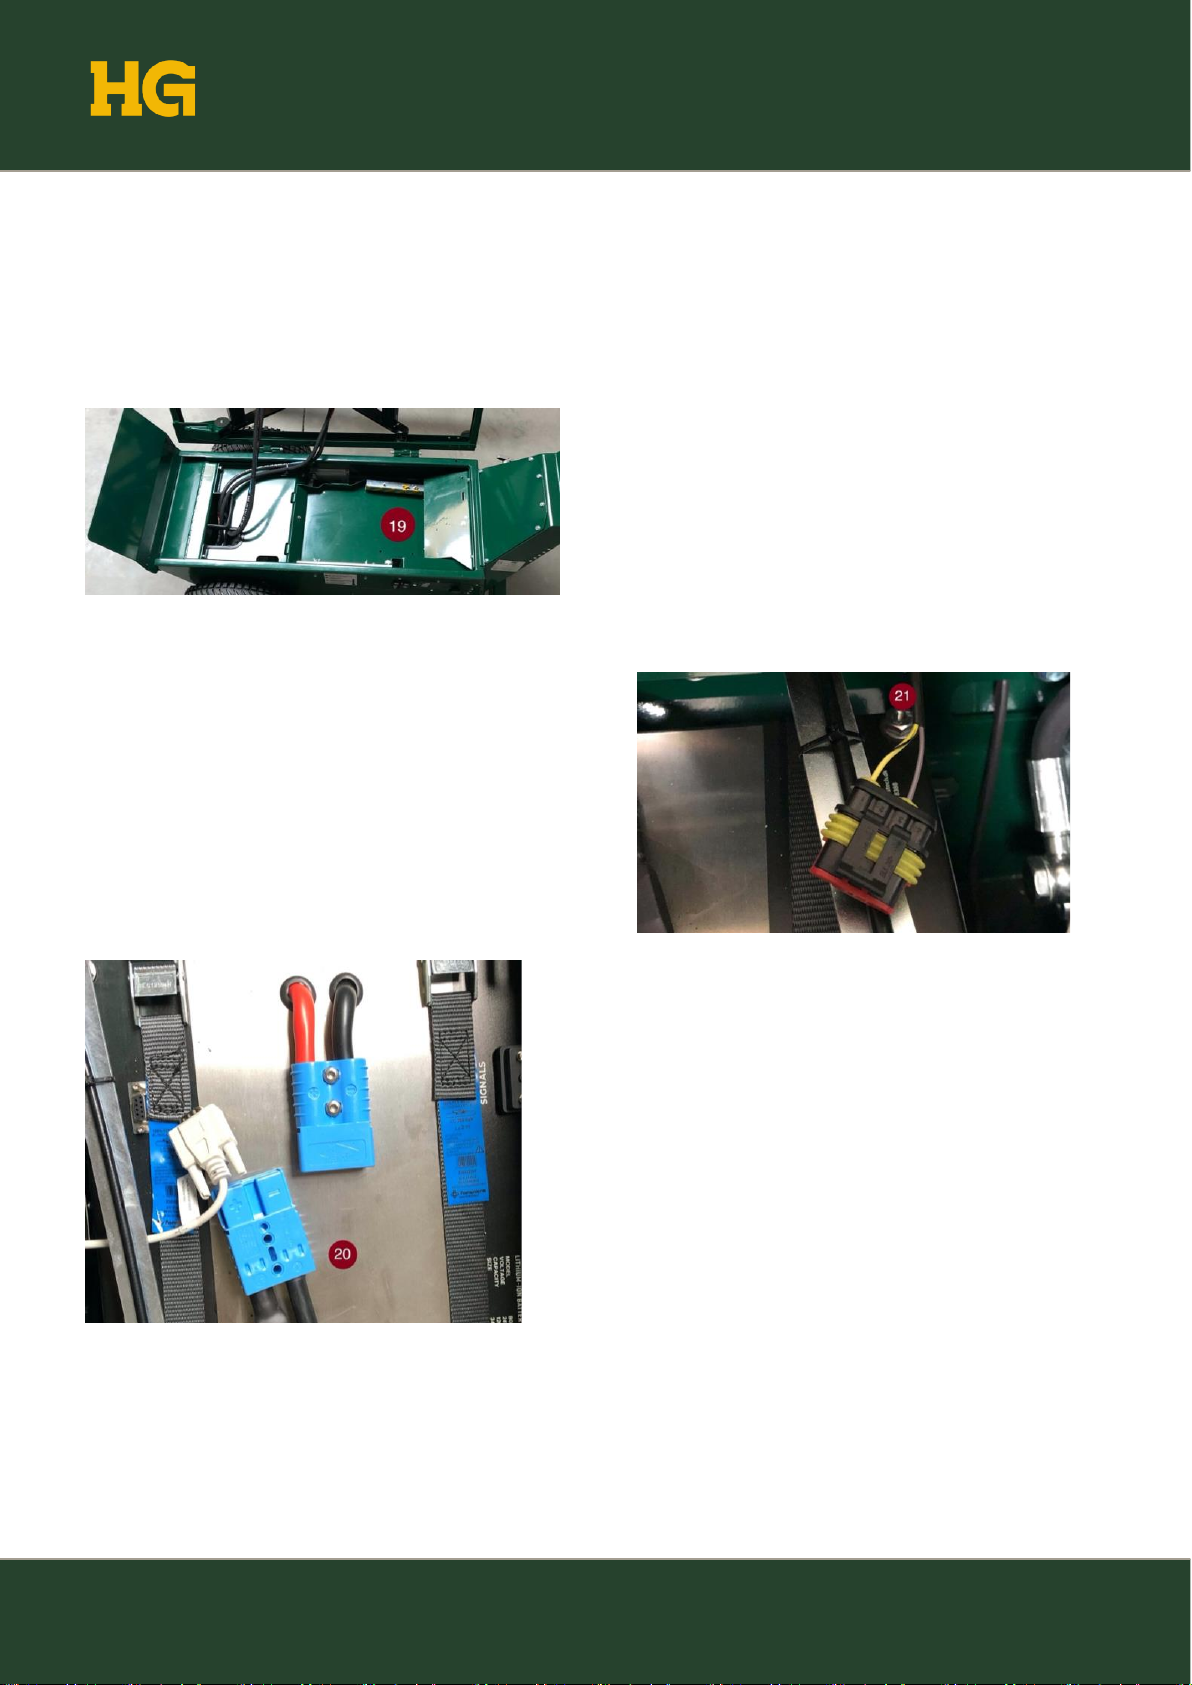
figure pos. 19
The blue connector on the battery, which
consists of two counterparts, is pulled apart. The
gray COM connector must also be removed.
See figure pos. 20. When the two blue
counterparts and the COM connector are
separated, the top plate for the battery
compartment can be fitted again and the
container can be rotated into place.
The machine is now ready for storage and will
automatically go into "storage mode" as it will
not register any discharge. In "storage mode"
the battery pack will only consume 1-2% of
operation ready level mode. However, the
battery must be inspected every 2.5 months and
recharged to a minimum of 40%. If the machine
in use or the battery pack is to be recharged,
follow the same procedure as above, where the
blue connector consisting of two halves and the
COM connector, instead of being separated, are
instead assembled.
This is a programming plug. See pos. 21.

User Manual HG E1000 HIGH TIP
Side 14
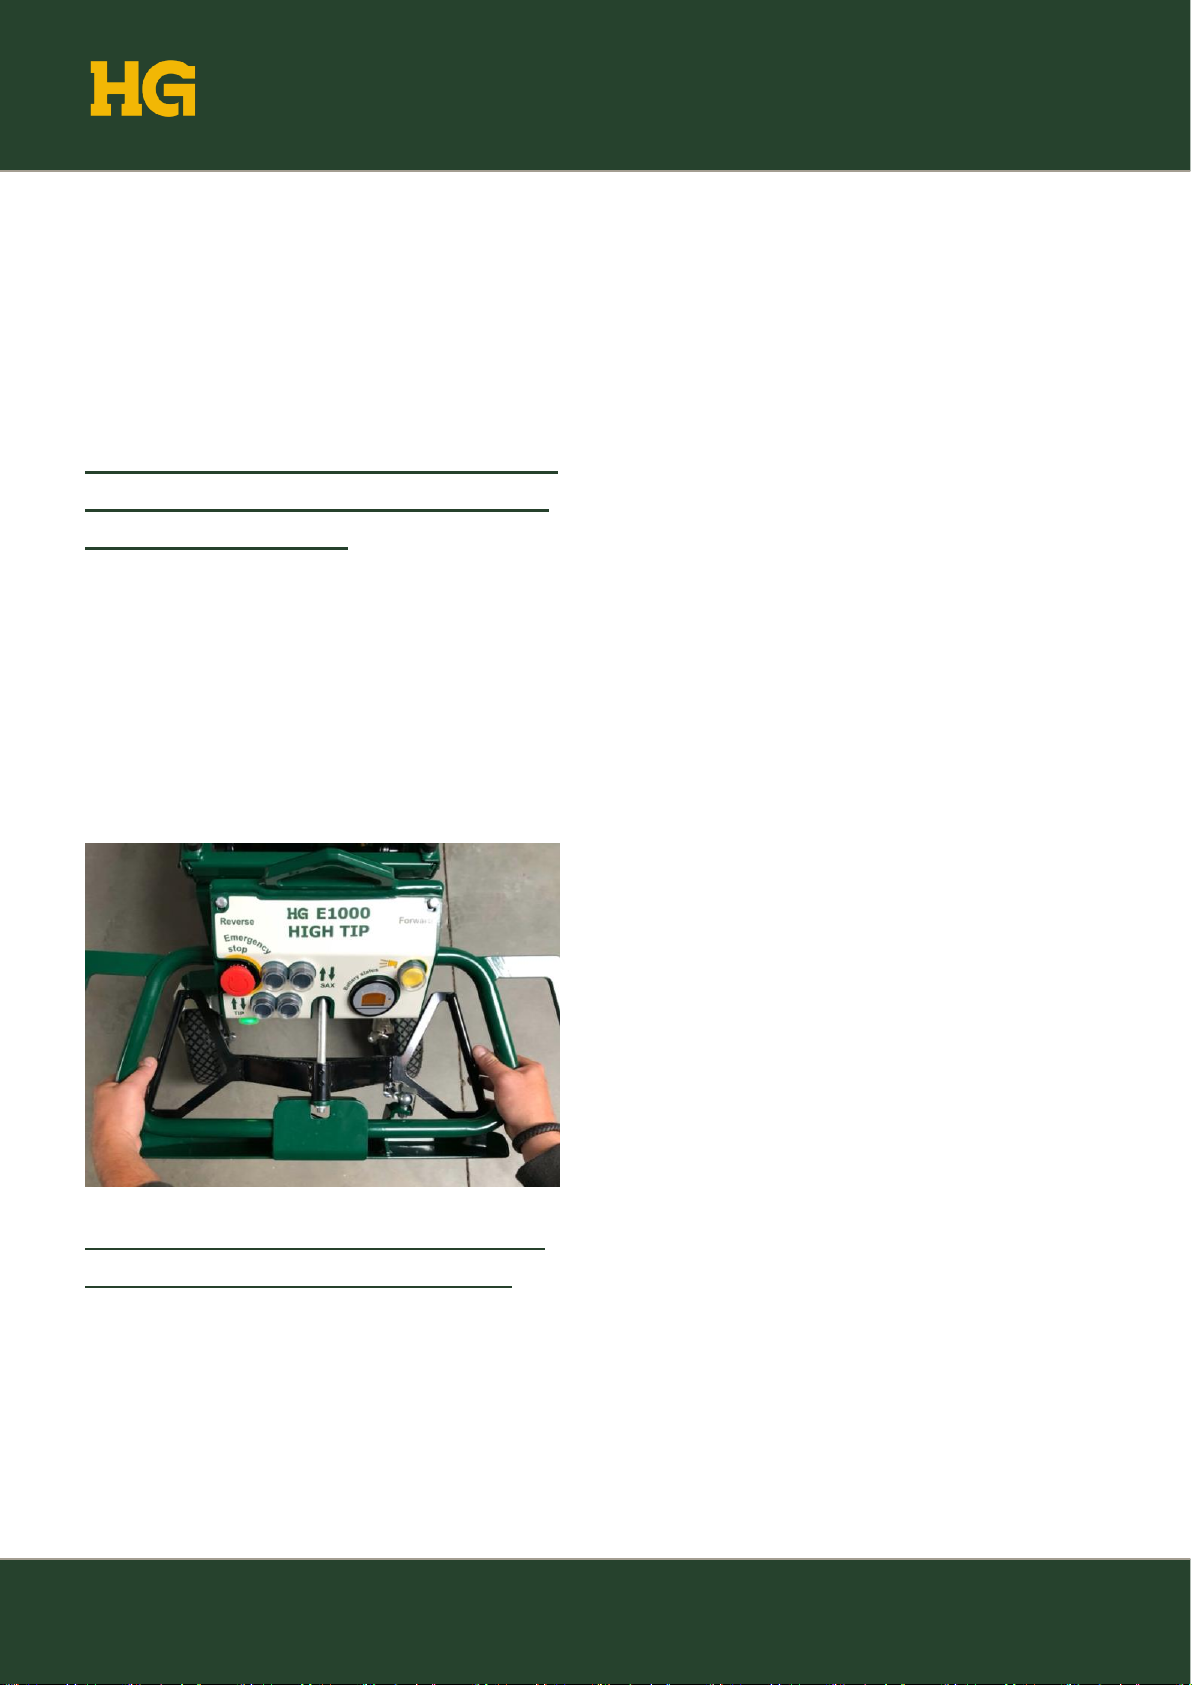
3. Functions
3.1 Instrument panel
1) Operating push buttons for HIGH TIP
function. If the left button is pressed and
held, the container will lift. If the right button
is pressed and held, the container will lower.
2) Operating push buttons for tipping the
container. Press and hold the left button to
tilt the container. Press and hold the right
button to lower the container.
3) Emergency stop. If the emergency stop is
pressed, the machine and all its functions
will stop immediately. To activate the
machine again after pressing the emergency
stop, the emergency stop must be rotated ¼
clockwise, then the machine can be
activated again.
4) Signal horn. When the horn is pressed, it
emits a loud noise. The horn is used, for
example, to prevent or avert hazardous
situations.
5) Emergency stop/safety plate. Activating the
plate activates forward movement so the
operator does not risk getting trapped.
6) Control handle for driving backwards. The
handle is clamped up against the handlebar.
The more the lever is squeezed, the higher
the speed.
7) Battery indicator. Shows a snapshot of the
power level of the machine battery pack.
8) Control lever for forward travel. The handle
is pulled up towards the handlebar. The
User Manual HG E1000 HIGH TIP
Side 15
higher up the lever is pulled, the higher the
speed.
9) Key start ON/OFF - when OFF the machine
is turned off; when the key is turned to ON,
the machine is turned on.
10) Activation button. Pressing the button
activates the machine. A green light
indicates that the machine is activated and
the timer function has started. If the machine
is not operated for 5 minutes, the machine
will shut down and the button must be
activated again for driving to take place (the
timer is not active when driving the
machine).
3.2 The machine's functional
units
Release. If the release lever is pushed down,
the electric motor is disengaged and the
machine can be pushed. If the lever is pushed
up, the electric motor is engaged and the
machine can be operated via the control levers.
See figure pos. 10.
Main switch seen in switched off position. When
using the machine the main switch is rotated 90º
clockwise. HG recommends using the turned-off
position when the machine is not used for a
longer period, e.g. at the end of the working day.
See figure pos. 11
Filling the hydraulics. Remove the plate using
the two screws and add hydraulic oil to the
plastic tank. See figure pos. 29, 30 and 31.

User Manual HG E1000 HIGH TIP
Side 16
For charging, the charging connection is located
behind the door. The charger can be connected
to 16-30A group 220V . The plug is of the type
is of the type 16A 2P+E Male type F. See figure
pos. 13.
Tip protection for the container's hydraulic
cylinder. The tipping protection is mounted on
the cylinder's stick during service or other
inspection where the container must be tipped
up. See figure pos. 14.
Side tipping of container. To facilitate
accessibility of the machine's internal parts,
the container can be advantageously tipped
to the side by loosening the two bolts on the
left side of the machine. See figure pos. 17.
NOTE: This operation must be performed
by two people, as heavy lifting will occur.
With the help of two people, the container
can be tipped to the side. HIGH TIP does not
need to be raised as shown in figure pos. 24.
Alternatively, the machine's container can
also be tipped without HIGH TIP is raised
figure pos. 27 and 28. The advantage of a

User Manual HG E1000 HIGH TIP
Side 17
raised HIGH TIP or only tipped container is
that the container can thereby be placed
directly on the surface on which the machine
stands. See figure pos. 28.
If the HIGH TIP is not raised, the container,
when it is tipped to the side, must be
supported by a suitable stable object such
as support frame
with approved
carrying capacity of
at least 200kg. See
figure pos. 25.
NOTE: In this case, it must always be
ensured that the container is tipped at least
125* degrees above the horizontal surface
where the container has its normal position,
precisely to avoid the container falling back.

User Manual HG E1000 HIGH TIP
Side 18
4. Precautions before
starting
Visual inspection of the machine. Make sure the
machine and all warning pictograms are intact.
Make sure the control panel buttons and
handles are intact.
Tip the container up and install the tip protection
on the cylinder block.
Remove the top plate for the battery
compartment and visually inspect the battery
pack, make sure that the battery pack is
fastened so that it cannot move while driving,
tighten if necessary the battery stoppers. After
inspection,
the top plate
is fitted, the
tip
protection is
removed
and the
container is
closed.
4.1 Tire pressure and tension
To achieve optimal ergonomic conditions, all
tires must have the correct air pressure.
•Driving wheels: 53 psi/3,7 bar
•Steering wheels: 67 psi/4,6 bar.
Tighten wheels once a week.
Tightening torque:100 Nm
User Manual HG E1000 HIGH TIP
Side 19
Safety plate test
The safety plate must activate forward travel
upon impact, so that the operator is not pinched
in connection with reversing/reversing.
NOTE: Before the test is started, a free space
of at least 15 meters must be ensured all the
way around the machine.
Start the machine and test the plate. In order to
simulate a possible pinching during
reverse/reversing, the safety plate is pressed in
quietly, the machine must start moving forward,
the more the plate is pressed in, the faster it
runs.
The machine must not be used if it does not
move forward when pressed on the plate
The system must be undamaged and able to be
moved without difficulty.
User Manual HG E1000 HIGH TIP
Side 20
5. Driving
Turn the main switch
to the closed position.
The battery pack is
now connected to the
machine's
components.
Turn the ignition key to the ON position, the
battery status indicator should now light up.
Press the activation button (now lights up
green) and the machine is now active.
Check via the battery status that the machine is
sufficiently charged. HG does not recommend
driving with current below 10%, as this can
damage and shorten the life of the batteries.
Both hands are placed on the handlebars so that
the fingers can reach the propulsion handle. The
machine moves forward by pulling up on the
right side of the handle and stops by letting go. If
the left side of the handle is pulled up, the
machine moves backwards.
NOTE: Backing/reversing requires thorough
orientation to the rear before starting the
movement.
Other manuals for E1000
1
Table of contents
Other HG Farm Equipment manuals


