PBZ CropCare A311K Installation guide

by PBZ
Form: A311KAM_REV-A
Assembly Instruction Manual
Kit: Power wash and jug rinse
Model: A311K
Manufactured by PBZ LLC
A Paul B Zimmerman Inc. Company
www.CropCareEquipment.com

2
A311K Assembly Instructions
The purpose of this document is to show the procedure for installing a powerwash and jug rinse unit onto a sprayer.
Installation Time:
• Approximately 4 hours
Recommended Tools
• 3/8” socket or wrench
• 9/16” socket or wrench
• 6mm socket or wrench
• Phillips head screw driver
• Adjustable wrench or pliers
• Pipe sealant
• Thread tape
• Hose cutter or knife to cut hoses to length
• 3/4” Forstner bit
• 5/16” drill bit
• Drill
Subject

3
4
5
9
10
11
12
13
14
15
16
2
6
7
8
1
23
24
25
29
30
31
32
33
34
35
36
22
26
27
28
21
17
18
19
20
37
38 39
40
43
44
45
42
41
46 47
3
A311K Assembly Instructions
Ref# Qty. Part Number Description
1 40 FT 1008 Hose, EPDM Rubber 1/2" 300 PSI
2 1 21010010 Nozzle, Garden Hose Pistol Grip Plastic
3 1 2101830 Garden hose washer, red rubber
4 1 38027 Cap, Nozzle Tip/barb 11/16-16 UNF Poly
5 2 3A100 Adapter, Hose 1" MPT x 1" HB
6 2 3A100114 Fitting, Hose 1" MPT x 1-1/4" HB
7 2 3A1212 Adapter, Hose 1/2" MPT x 1/2" HB
8 1 3A3412 Fitting, Hose 3/4" MPT x 1/2" HB
9 3 3A3812 Fitting, Hose 3/8" MPT x 1/2" HB
10 1 3D3412 Fitting, Garden Hose 3/4" MGHT x 1/2" HB Poly
A311K Kit Contents

4
A311K Assembly Instructions
A311K Kit Contents
Ref# Qty. Part Number Description
11 1 3EL1412 Elbow, Hose 90° 1/4" MPT x 1/2" HB
12 8 6806052 Hose Clamp, 1/2" - 29/32" SS
13 2 6816052 Hose Clamp, 11/16" - 1-1/2" SS
14 2 6820052 Hose Clamp, 3/4" - 1-3/4" SS
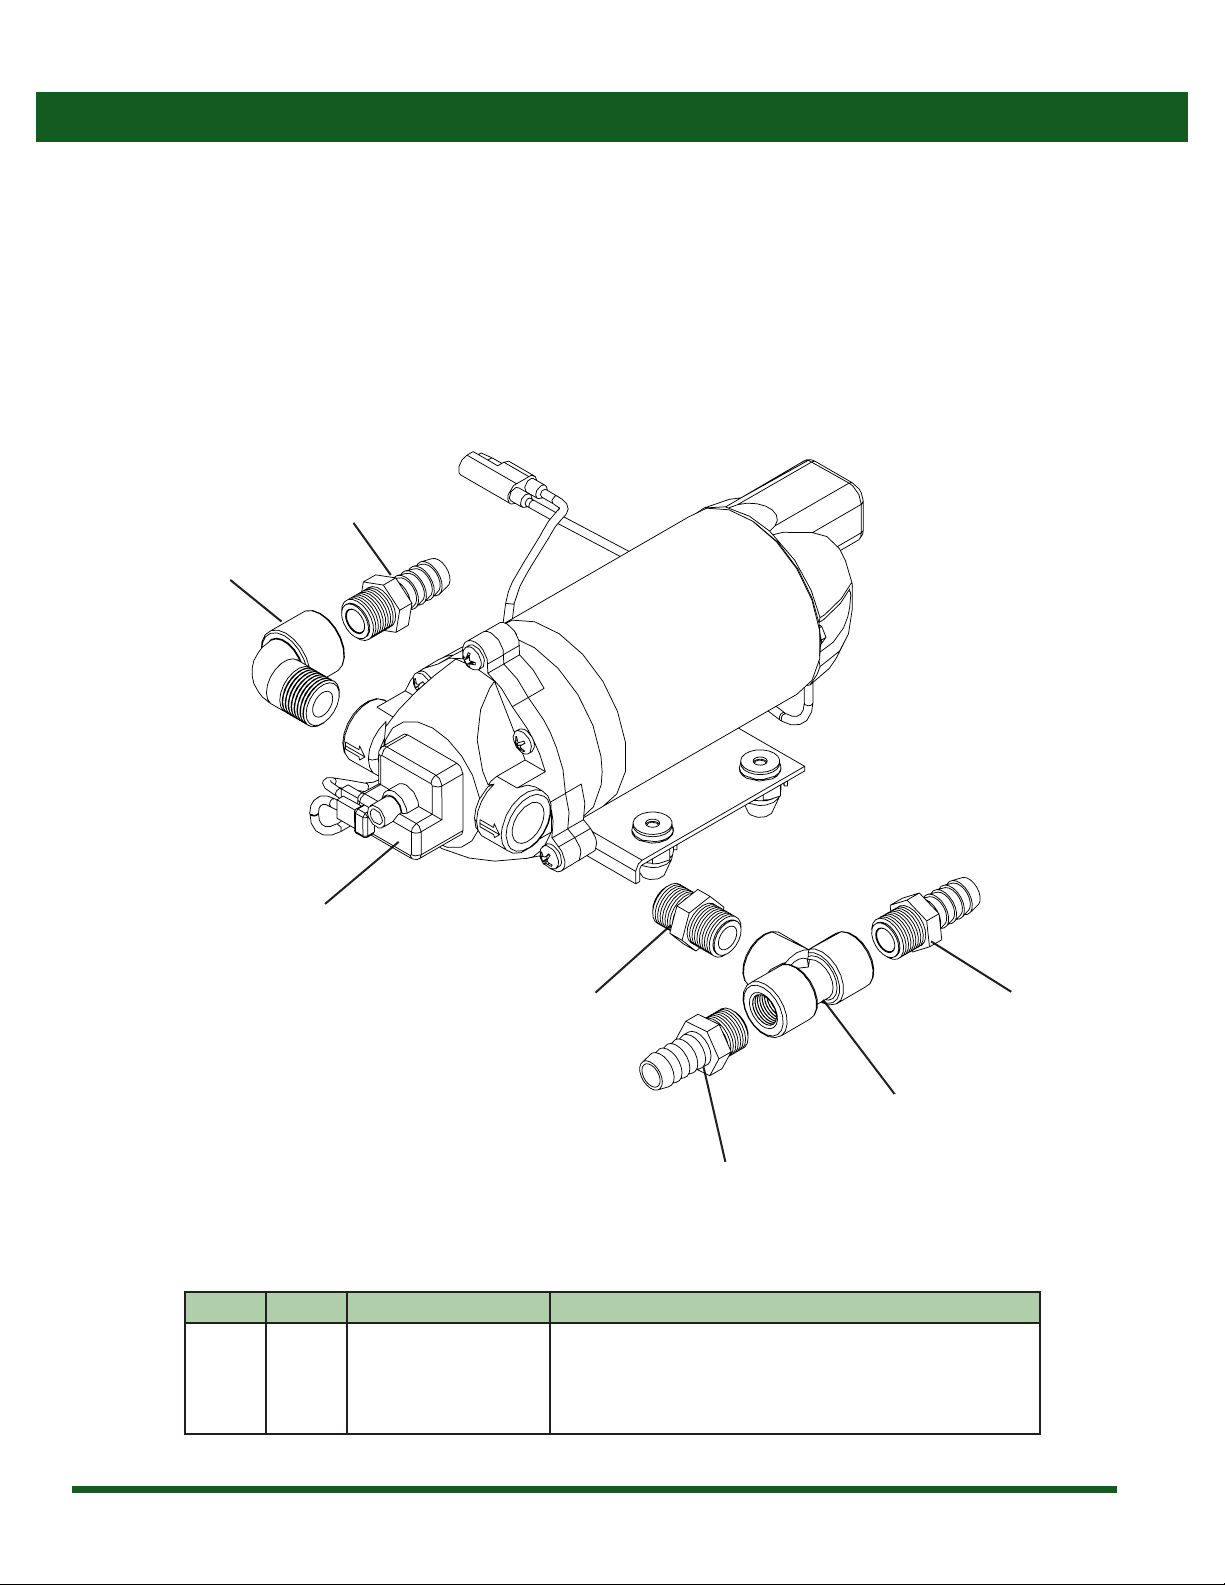
15 1 8007-594-838 Pump, 12V w/Switch & Fuse 2.1 GPM Vi-Santo
16 1 8M38 Nipple, 3/8" MPT x short, sch 80 poly
17 1 8RB134 Bushing, Reducer 1" MPT x 3/4" FPT Sch 80 Poly
18 1 8SE38 Elbow, Street 90° Poly 3/8" NPT Sch 80
19 1 8TT100 Tee, 1" FPT Sch 80 Poly
20 1 8TT38 Tee, 3/8" FPT Sch 80 Poly
21 1 90FMB14 Valve, Ball 1/4" FPT x 1/4" MPT 300 PSI
22 1 A311KAM Assembly manual, Kit: Powerwash and jug rinse
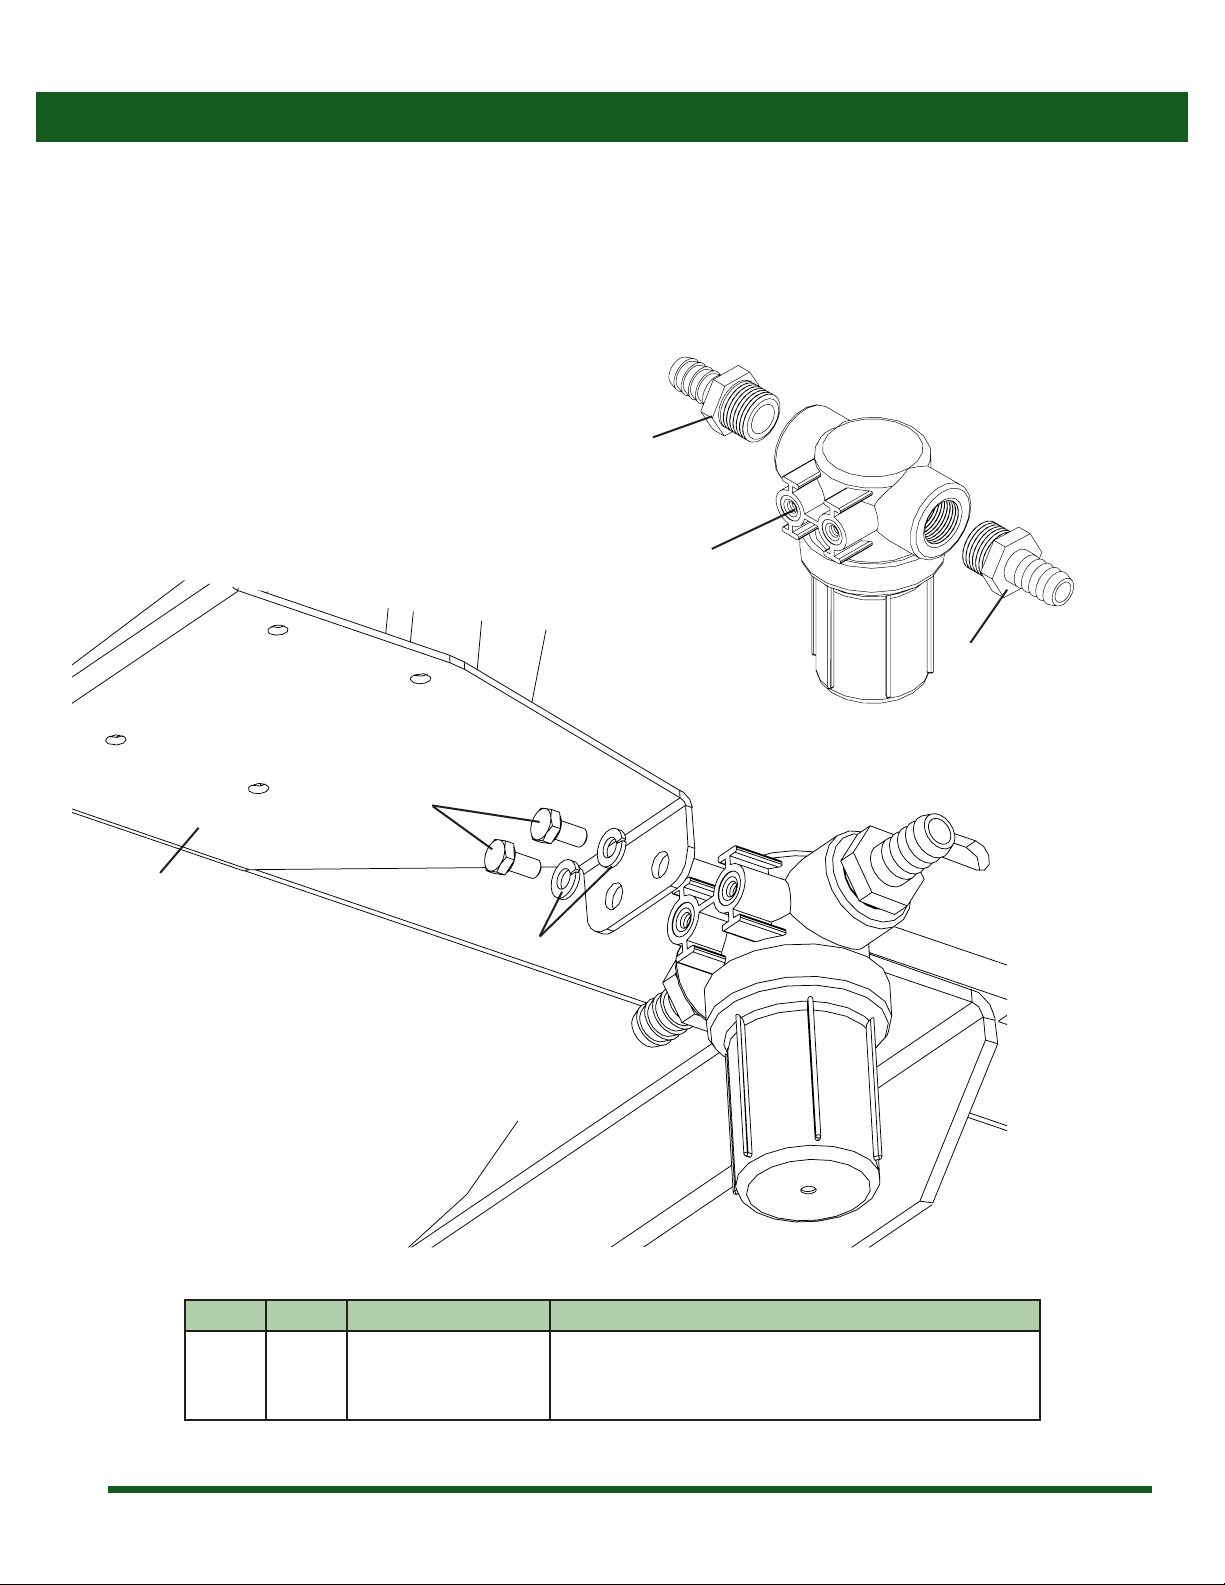
23 1 AA122ML12PP50 Strainer, Line 1/2" FPT 50 MS w/Mounting Holes
24 3 CB38*34G5 Bolt, Carriage 3/8-16 x 3/4" Gr 5
25 1 CP12094NYB Body, Nozzle Type-1/4 Inlet-NYB Nylon
26 1 DC56NY Core, TeeJet Nylon Black
27 8 FT DC784 Loom, Flex-Gard 3/8"
28 1 DE111 Decal, powerwash label
29 1 DE113 Decal, Jug Rinse Label
30 1 DVP6 Orice Disc, Polymer Red
31 1 F1204 Foamer tank bolt, 5/16-18 x 1 1/2"
32 3 FN38 Nut, Flange 3/8-16
33 4 FW10 Washer, Flat #10 SS
34 2 H6*12M Bolt, Hex 6mm x 12mm 1.0 Pitch
35 1 L14S Elbow, 90° 1/4" NPT SS
36 2 LW14 Washer, Lock 1/4"
37 4 MR1024*114 Screw, Machine Rd Hd 10-24 x 1-1/4"
38 1 N14*2S Nipple, 304 SS pipe 1/4" MPT x 2"
39 1 N14X4S Nipple, 304 SS Pipe 1/4" MPT x 4"
40 4 NNC1024 Nut, Lock Nylon 10-24 SS
41 1 NNC516 Nut, Lock Nylon 5/16-18
42 1 RM1414 Washer, Buna N Rubber 1/4" x 1-1/4" x 1/16"
43 1 SKU28315 Fitting, Bulkhead Brass 1/4" NPT Female to Male
44 1 SPT-WHE-96-16G Harness, Wire 8 Ft 14G Extension
45 1 T1029 Powerwash pump and lter mount
46 1 T513 Hose hanger, rinse system
47 1 CB516*34G5 Bolt, Carriage 5/16-18 x 3/4" Gr 5

1
2
a
2
3
3
5
Step 1
A311K Assembly Instructions
Ref# Qty. Part Number Description
1 1 T1029 Powerwash pump and lter mount
2 3 CB38*34G5 Bolt, Carriage 3/8-16 x 3/4" Gr 5
3 3 FN38 Nut, Flange 3/8-16
• Bolt pump and lter mounting bracket (Item 1) to the eduction mount (a).

1
2
3
4
1
a
6
Step 2
A311K Assembly Instructions
Ref# Qty. Part Number Description
1 2 3A1212 Adapter, Hose 1/2" MPT x 1/2" HB
2 1 AA122ML12PP50 Strainer, Line 1/2" FPT 50 MS w/Mounting Holes
3 2 H6*12M Bolt, Hex 6mm x 12mm 1.0 Pitch
4 2 LW14 Washer, Lock 1/4"
• Install ttings onto the lter (Figure 1). Use Teon tape and pipe sealant on all threads.
• Install the lter onto the pump and lter mounting bracket (a) installed in Step 1 (Figure 2).
Figure 1
Figure 2

1
2
3
1
1
4
5
7
Step 3
A311K Assembly Instructions
Ref# Qty. Part Number Description
1 3 3A3812 Fitting, Hose 3/8" MPT x 1/2" HB
2 1 8007-594-838 Pump, 12V w/Switch & Fuse 2.1 GPM Vi-Santo
3 1 8M38 Nipple, 3/8" MPT x short, sch 80 poly
4 1 8SE38 Elbow, Street 90° Poly 3/8" NPT Sch 80
5 1 8TT38 Tee, 3/8" FPT Sch 80 Poly
• Install ttings onto pump as shown. Use Teon tape and pipe sealant on all threads.
• NOTE: The elbow is on the inlet side of the pump and the tee is on the outlet side.

2
3
1
a
b
1
1
8
Step 4
A311K Assembly Instructions
Ref# Qty. Part Number Description
1 4 FW10 Washer, Flat #10 SS
2 4 MR1024*114 Screw, Machine Rd Hd 10-24 x 1-1/4"
3 4 NNC1024 Nut, Lock Nylon 10-24 SS
• Install the pump assembly (a) from the previous step onto the pump and lter mounting bracket (b).

4 1/2”
5 1/2”
3/4” hole for
jug rinse
9
Step 5
A311K Assembly Instructions
• Drill a 3/4” hole into the side of the eduction tank (a) for the jug rinse.
• NOTE: The side of the tank closest to the hitch of the sprayer. The hole will be 4 1/2”from the top of the tank and 5 1/2”
from the corner.

2
3
1
4
5
6
7
8
10
Step 6
A311K Assembly Instructions
Ref# Qty. Part Number Description
1 1 38027 Cap, Nozzle Tip/barb 11/16-16 UNF Poly
2 1 CP12094NYB Body, Nozzle Type-1/4 Inlet-NYB Nylon
3 1 DC56NY Core, TeeJet Nylon Black
4 1 DVP6 Orice Disc, Polymer Red
5 1 L14S Elbow, 90° 1/4" NPT SS
6 1 N14*2S Nipple, 304 SS pipe 1/4" MPT x 2"
7 1 N14X4S Nipple, 304 SS Pipe 1/4" MPT x 4"
8 1 SKU28315 Fitting, Bulkhead Brass 1/4" NPT Female to Male
• Assemble ttings for the jug rinse nozzle as shown. Use Teon tape and pipe sealant on all threads.

1
a
11
Step 7
A311K Assembly Instructions
Ref# Qty. Part Number Description
1 1 2101830 Garden hose washer, red rubber
• Install assembled jug rinse ttings (a) from previous step into eduction tank.
• NOTE: The gasket (Item 1) is installed on the inside of the tank.

2
3
1
4
12
Step 8
A311K Assembly Instructions
Ref# Qty. Part Number Description
1 1 3EL1412 Elbow, Hose 90° 1/4" MPT x 1/2" HB
2 1 90FMB14 Valve, Ball 1/4" FPT x 1/4" MPT 300 PSI
3 1 DE113 Decal, Jug Rinse Label
4 1 DE111 Decal, powerwash label
• Install ball valve (Item 2) and elbow (Item 1) onto the jug rinse nozzle bulkhead tting. Use Teon tape and pipe sealant
on all threads.
• Apply the jug rinse label (Item 3) to the eduction tank.
• Apply powerwash label (Item 4) onto the pump and lter mount above the pump.

2
3
1 *
4
1 *
5 5
13
Step 9
A311K Assembly Instructions
Ref# Qty. Part Number Description
1 2 3A100114 * Fitting, Hose 1" MPT x 1-1/4" HB
2 1 3A3412 Fitting, Hose 3/4" MPT x 1/2" HB
3 1 8RB134 Bushing, Reducer 1" MPT x 3/4" FPT Sch 80 Poly
4 1 8TT100 Tee, 1" FPT Sch 80 Poly
5 2 6820052 Hose Clamp, 3/4" - 1-3/4" SS
• Assemble pipe ttings as shown (Figure 1). Use Teon tape and pipe sealant on all threads.
• NOTE: If installing on a 200, 300, or 400 gallon trailer, use 3A100 instead of Item 1.
• Install tee in rinse suction line (Underneath the sprayer, routed from the bottom of the rinse tank to the quick ll).
Shown in Figure 2.
Rinse Tank Quick Fill
Tee location in the rinse
suction line
(Routed from the quick ll
to the rinse tank.)
* Use 3A100 in place of 3A100114 and 6816052 instead on 6820052 included in the lit if installing on a 200, 300, or 400 gallon trailer.
Figure 2
Figure 1

2
1
14
Step 10
A311K Assembly Instructions
Ref# Qty. Part Number Description
1 1 21010010 Nozzle, Garden Hose Pistol Grip Plastic
2 1 3D3412 Fitting, Garden Hose 3/4" MGHT x 1/2" HB Poly
• Assemble garden hose nozzle and hose barb tting.

1
1
2
3
4
5
1
3
a
15
Step 11
A311K Assembly Instructions
Ref# Qty. Part Number Description
1 1 T513 Hose hanger, rinse system
2 1 CB516*34G5 Bolt, Carriage 5/16-18 x 3/4" Gr 5
3 1 NNC516 Nut, Lock Nylon 5/16-18
4 1 RM1414 Washer, Buna N Rubber 1/4" x 1-1/4" x 1/16"
5 1 F1204 Foamer tank bolt, 5/16-18 x 1 1/2"
• Install the hose hanger bracket (Item 1) as shown.
• On a 200, 300, or 400 gallon trailer the hose hanger bracket (Item 1) is installed on the safety rinse tank pan (a) Figure 1.
Use items 1, 2, and 3.
• On a 500 gallon trailer, the hose hanger bracket (Item 1) is bolted onto the tank saddle using existing hardware (Figure 2)
• On a 750 gallon trailer, drill a 5/16” hole into the main tank for installing the hose hanger bracket (Item 1). Use Items 1, 3,
4, and 5 (Items 4 and 5 are installed inside the tank).
Figure 2
Figure 1
Figure 3

2
1
1
1
12
2
2
2
2
16
Step 12
A311K Assembly Instructions
Ref# Qty. Part Number Description
1 40 FT 1008 Hose, EPDM Rubber 1/2" 300 PSI
2 8 6806052 Hose Clamp, 1/2" - 29/32" SS
• Install hoses onto hose barb ttings.

a
The pump harness needs to be hooked up to the sprayer controls. On electric controls with the CropCare Wiring Harness the
pump wiring harness is connected to terminals inside of a junction box.
• Plug the wiring extension harness (Item 1) into the pump plug and then route the wiring harness extension (Item 1) to
the junction box. See your sprayer’s owner’s manual for the junction box location (See the “Accessing Junction Box and
Control Manifold” Section).
• Route through the strain reliefs on the junction box (a, Figure 1)
• Trim the ends of the extension wiring harness (Item 1).
• WARNING: Make sure the sprayer is disconnected from the battery.
• Install the extension wire harness ends into the proper terminals for connecting the lap nozzle, 12V+ and ground wires.
See the decal on the inside of the junction box lid (Figure 2), or see the “Wiring” section in the sprayer’s owner’s manual.
• Install wire loom (Item 2) onto the extension wiring harness.
Figure 1 Figure 2
17
Step 13
A311K Assembly Instructions
Ref# Qty. Part Number Description
1 8 FT DC784 Loom, Flex-Gard 3/8"
2 1 SPT-WHE-96-16G Harness, Wire 8 Ft 14G Extension
Table of contents
Other PBZ Farm Equipment manuals
Popular Farm Equipment manuals by other brands

Veris
Veris iScan Installation/Removal Guide

Monosem
Monosem MECA V4-2007 Assembly, Adjustment and Maintenance Instructions

Bridgeview
Bridgeview BALE KING 8200 Operator's & parts manual

Meijer Holland
Meijer Holland Flintstone manual

Landoll
Landoll 7812 Operator and parts manual

APV
APV LF 600 M1 operating manual

Bourgault
Bourgault FreeForm AGCO WR9900 Series Assembly instructions & operation

Gaspardo
Gaspardo ALIANTE DD Use and maintenance

Teagle
Teagle Tomahawk 8080S Instruction book / parts list

SaMASZ
SaMASZ Spin Operator's manual

Goldacres
Goldacres Batchmate Operator's & parts manual

MacDon
MacDon 912 Operator's manual