High Link GF302 User manual

Version 1.1
VOIP PHONE
High Link Co.,Ltd
GF302 User Guide
SIP and IAX2

4
4
4
4
5
5
5
5
5
6
7
7
7
8
8
8
8
8
8
8
8
8
8
8
9
9
9
9
9
9
9
10
10
10
10
10
10
10
10
10
10
3.Configuration with Web Browser
3.1 Settings Menu
3.1.1 Network Settings
3.1.2 Voice Settings
3.1.4 IAX2 settings
3.1.5 Dial Plan Setting
3.1.6 System Settings
3.1.3 SIP settings
3.2 Phonebook Settings
3.3 Upgrade Firmware
5. Call Log
6.7 Blind Transfer
4.8 Save the settings
5.1 Save/Delete a CALL HISTORY
4. Configuration with keypads
4.1 Enter main menu
4.2 Scroll menu option
4.3 Enter the submenu
6.5 Call Hold
6.8 Attend Transfer
6.6 Call Waiting and Resume
6.4 Speed dial
5.2 Add a contact entry
5.3 Modify a contact entry
5.4 Delete a contact entry
5.5 Delete all contact entry
5.6 Assign a SPEED DIAL entry
5.7 Save PHONE BOOK
6. User Guideline
6.2 Dial with CALL HISTORY
6.1 Dial Directly
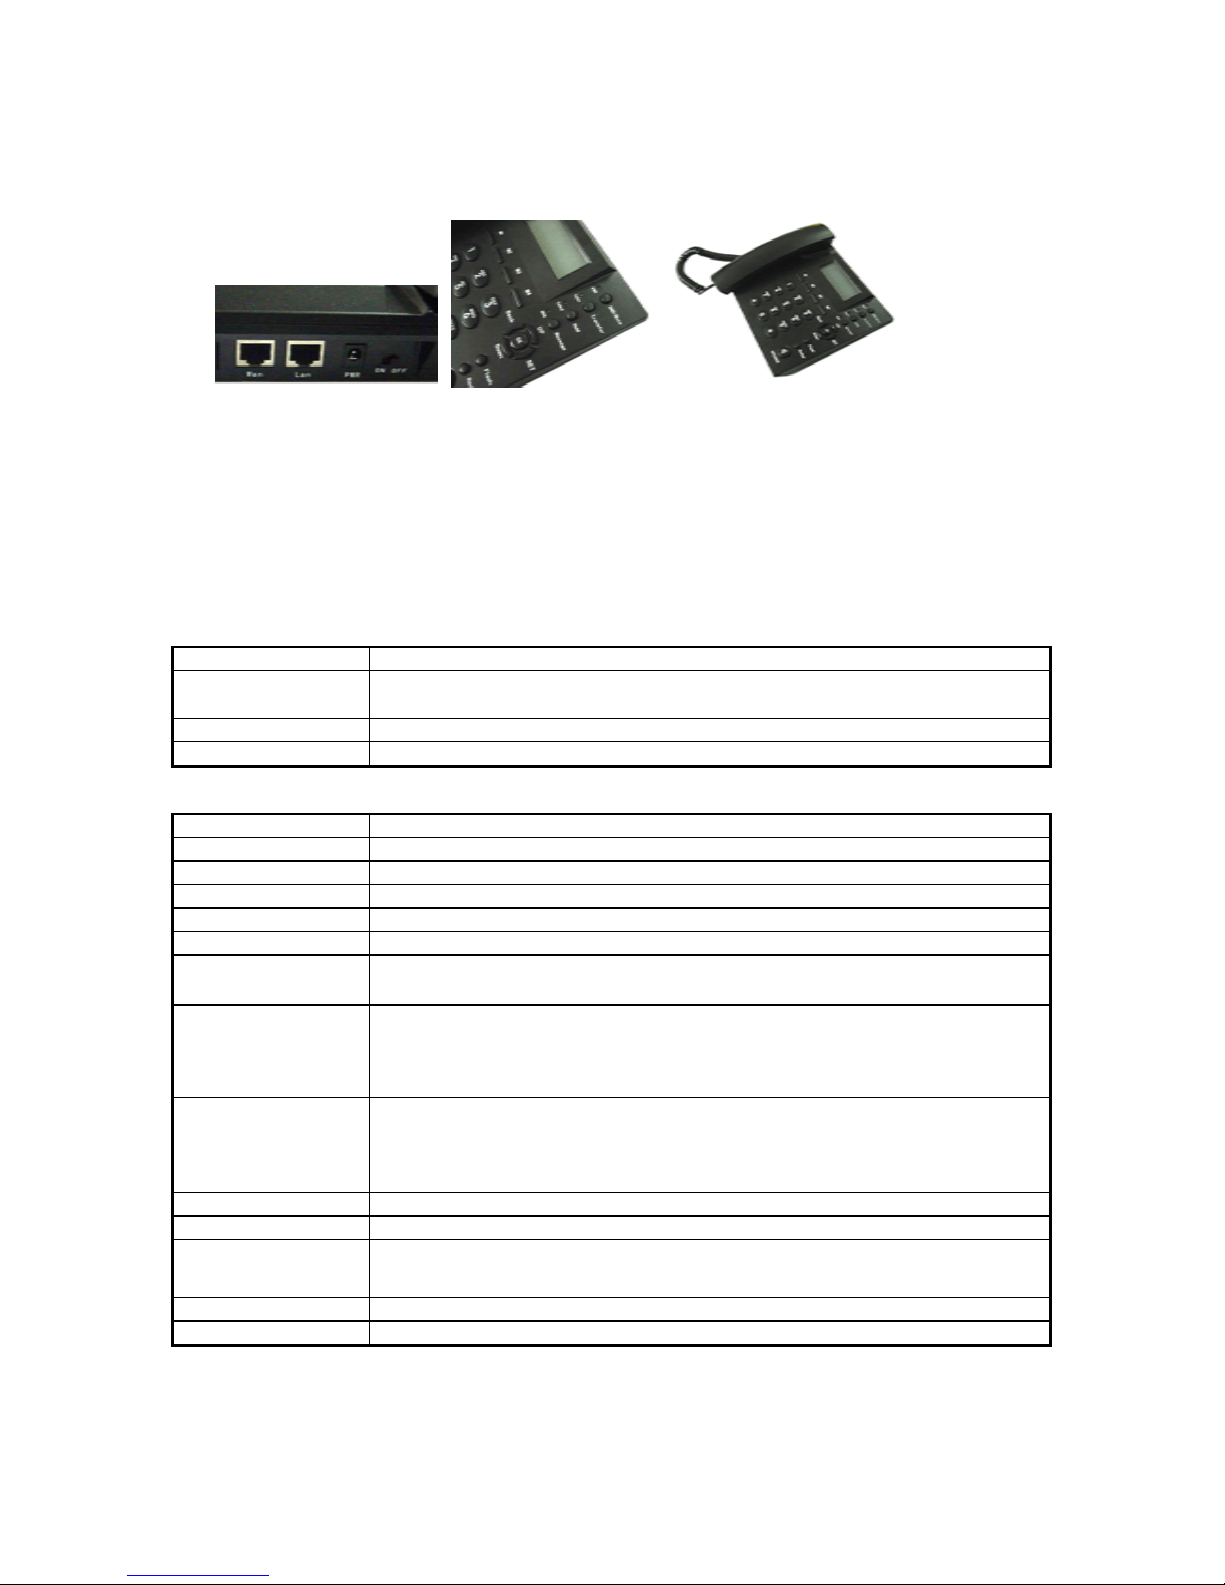
1.1 Hardware Overview
1.Introducing
2. Installing Guide
Content
1.2 LED and Interface Description
1.3 Keypads Description
4.4 Edit and confirm
4.6 Return to the upper menu
4.5 Delete
4.7 Abort the settings
6.3 Dial with PHONE BOOK

11
11
11
11
11
11
11
11
11
12
12
12
12
13
13
13
13
14
14
14
14
14
14
15
15
15
8. Digit Maps
6.11 Checking Message
6.9 Mute
6.10 Don’t Disturb (DND)
7.1 Settings file and firmware file
7. HTTP Auto-Provisioning
7.2 Preparing firmware file
6.12 RESTORE FACTORY CONFIGURATION
7.3 Set server address and port
7.4 Auto-upgrade settings file and firmware file
10.3 Update Phonebook
10.4 Update Ringtone File
9. Tftp Update
9.1 Tftp description
9.2 Update firmware
9.3 Update Ring Tone
9.4 Update Call Hold Music
9.5 Update Settings
10. HTTP Update
10.1 Update Firmware
10.2 Update Configurations
11.3 Update Music File
10.5 Update Call Hold Music File
11. Create Music File
11.1 Record Music
11.2 Cut Music File
Rear View Top View Total View
Power LED
Mute/DND LED
Network LED
Message LED
0-9,*,#
M1-M4
Mute/DND
Hold
Transfer
Msg
OK
UP
DOWN
Back
Menu
Flash
Redial
Speaker
With the handset picked,press this key to decrease the volumes of handset;
With the hand-free key pressed,press this key to decrease the volumes of speaker and ring.
In MENU mode; press this key to scroll down menu options.
In EDIT status, press this key to shift cursor right
In MENU mode, press this key to back the upper menu.
1.2 LED and interface Description
1. Introducing
Press this key to call the pre-set voice mail service number
1.3 Keypads Description
12 standard Digit, * keys are usually used to Input IP address that replace 。
1.1 Hardware Overview
Figure 1-1 Hardware Overvie
w
Two RJ45 connectors for network connection
One switch for power ON/OFF
In MENU mode to enter next menu and confirm the input.
In the off-hook or hand-free mode dial numbers without delay
Speed-Dial keys
Press this key to turn DND on or off during on-hook mode ;Mute or resume during talking.
One Power connector for +5V power adapter
One LED for Mute/DND status Indicator
One LED for Power Indicator
One LED for network link and activit
y
One LED for Message LE
D
Temporarily hold the current call.
When the current call on hold, dial the number to which you want to transfer
Lights up indicate power OK
During talking Lights up indicating other party cannot hear you.During on-hook mode lights up
indicating the phone is in the mode of “Do Not Disturb”
LED Flash:Data transmitting/receiving.
Turns off: no voice mail.Flashing: voice mail coming in
With the handset picked,press this key to Increase the volumes of handset;
With the hand-free key pressed, press this key to Increase the volumes of speaker and ring.
In MENU mode; press this key to scroll up menu options.
In EDIT status, press this key to backspace.
Dial the last connected party from the phone
Enter hands-free mode. The second press will switch to the handset mode.
With the on-hook, press this key to enter MENU mode
With handset picked or hand-free key pressed, function as beat the hook. In the call waiting
status, Press this key switch to the waiting call. The second press will switch back to current call.

Default value Description
DHCP Enable or Disable DHCP
0.0.0.0 Static IP address of ipphone , which will take effect if
DHCP is disabled
255.255.255.0 The NetMask used when DHCP is disabled
0.0.0.0 The default gateway used when DHCP is disable
0.0.0.0 when "Use following DNS Server IP", this will be the
primary DNS server
0.0.0.0 when "Use following DNS Server IP" selected, this will be
the secondary DNS server
0When layer 3 Qos is adopted, set the Precedence value of
IP frames.
0When layer2 Qos is adopted, set VLAN tags (802.1Q) and
priority value of Ethernet frame (802.1P) respectively.
Select phone settings ,enter password(default 12345678) to enter settings page.
Set the rate as 6.3K or 5.3K of G723.1 Codec
Automatic Gain Control (AGC)
Acoustic Echo Cancellation (AEC)
iLbc Frame Size
Enable/disable VAD.
Enable/disable AGC.
3.1.2 Voice Settings
Secondary DNS
Layer 3 Qos
Layer 2 Qos
2. Installin
g
Guide
2. Connect the RJ-45 connector labeled 'LAN' to a PC.
3. Optionally, you can connect the connector labeled 'Lan' to a switch / hub and connect multiple PCs to the latter.
Please follow the instruction below for setup
open the IE browser and input the IP address of the phone into address bar.input password to access the settings page ,
phonebook and upgrade page.(default password is 12345678.)
3.1.1 Network Settings
3.1 Settings Menu
4.Connect the +5V switching power adapter to Power jack
5.Move the power switch to ON
After booting ok,LCD will display ip address of device.Then you can use Web Browser for system
configuration.(Notes:configuration and update can only be done with handset down and speaker key not be pressed.)
3. Configuration with Web Browser
1. Connect the RJ-45 connector labeled WAN to a router
Option
Connection Type
Voice Activity Detection (VAD)
Enable/disable AEC.
This parameter defines the iLbc Frame Size as 20ms or 30ms.
Set the number of voice frames transmitted per RTP packet. The suggested number is
below 3(including 3) in order to reduce delay.
6 different Voice Codec types including g729,g7231,g711u,g711a , gsm and iLBC
G.723.1 rate
IP Address
Subnet Mask
Default Gateway
Primary DNS
Preferred Voice Codec
iLbc Payload Type
Voice Frames per Tx

Default Value Description
No Make calls through SIP Proxy Server If enable;otherwise,
only IP-to IP calls is allowed.
SIP Proxy Server for all outbound requests
5060 SIP Proxy Server port
Domain name of the SIP Proxy Server
No Enable/disable Outbound proxy
No
Enable/disable SIP Proxy used DNS Server record to reach
a user within the domain and to point to a SIP Proxy
somewhere
User ID, usually same as phone number
SIP service authenticate ID
Password for authenticate ID
user name that will be displayed in LCD
5060 local port to send and received register message
6000 local port to send and received for RTP
60
Expires value in a REGISTER request.A registration will
periodically renew shortly before the current registration
expired.
20
This parameter specifies how often a blank UDP packet is
sent to the SIP server in order to keep the port mapping on
the NAT device
Inband audio Set DTMF methods: Inband audio, RFC2833 and sip info
101 the indicating Value of RTP payload type
the numbers of the voice-mail for inquiry
No When set to YES, A subscribe for message waiting
indication will be sent periodically
No Enable/disable support pre-ack (100rel, RFC3262)
This field is used to indicate proxy-sensitive features that
MUST be supported by the proxy.
Disable select NAT Traversal type : Disabled, use STUN server
and use NAT IP
NAT Traversal server address
STUN server address
3478 service port for STUN server
Nat Traversal
Nat IP
STUN server
STUN server port
Proxy Require
SIP authenticate ID
SIP domain
SIP server as outbound proxy
Use DNS SRV
SIP user ID
local RTP port
Register expiration
Keep alive interval
Send DTMF
SIP registration
SIP server
Sip server port
SIP authenticate password
User Name
local SIP port
Option
3.1.3 SIP settings
When running with firmware based on sip protocol,sip setting can be access here.if based on iax2 protocol,iax2 setting s can
be access here.you can upgrade firmware from sip to iax2 or from iax2 to sip with web browswer or TFTP
DTMF payload type
Message service number
SUBSCRIBE for MWI
Support PRACK

Default Value Description
No Make calls through Asterisk Server if Enable;otherwise,
only IP-to IP calls is allowed
IP address or URI of Asterisk Server
4569 Asterisk Server port
user ID, usually being the form of phone number
IAX2 service authenticate ID
IAX2 service password
User name that will be displayed in LCD
4569 Local port to send and received IAX2 Packet
60
Numbers of the voice-mail for inquiry
No Enable/disable service’s dialplan
Default Value Description
82378008 The number to which you want to forward the call
No When set to yes, all incoming calls will be forwarded to
another party.
No If the line is busy, the incoming calls will be forwarded to
another party
No Without replying for a certain period of time, the incoming
calls will be forwarded to another party.
5The entries of the seconds before the phone answer the call
automatically or forward the calls
No Enable/disable call waiting
p
Disable
Dial the number automatically when the handset is picking
up. Blank for disable.
Default Value Description
12345678 Password to enter this web (max length 16 characters)
6 Input level of the handset
20 Output level of the handset
20 Output level of the speaker
Address for the Auto-provisioning Server
80 Port for the Auto-provisioning Server
24 Interval of auto-upgrade,with the unit of minute
time.windows.com Address of the SNTP server
Time zone of user location
No Enable/disable daylight saving time
Forward when no answer
No answer timeout
3.1.6 System Settings
3.1.4 IAX2 settings
3.1.5 Dial Plan Setting
Option
Forward-to Number
Forward Unconditionally
Forward when busy
Register expiration
Message service number
Use service’s dialplan
User Name
IAX2 User ID
IAX2 Authenticate ID
IAX2 Authenticate Password
When running with firmware based on sip protocol,sip setting can be access here.if based on iax2 protocol,iax2 setting s can
be access here.you can upgrade firmware from sip to iax2 or from iax2 to sip with web browswer or tftp
Speaker output volume
Local IAX2 Port
Option
IAX2 Registration
IAX2 Server
IAX2 Server Port
Call waiting
Dial prefix
Hot line number
Administration Password
Option
daylight saving time setting
Handset input volume
Handset output volume
Auto-provisioning Server
Auto-provisioning port
Auto-upgrade interval
SNTP Server
Time Zone
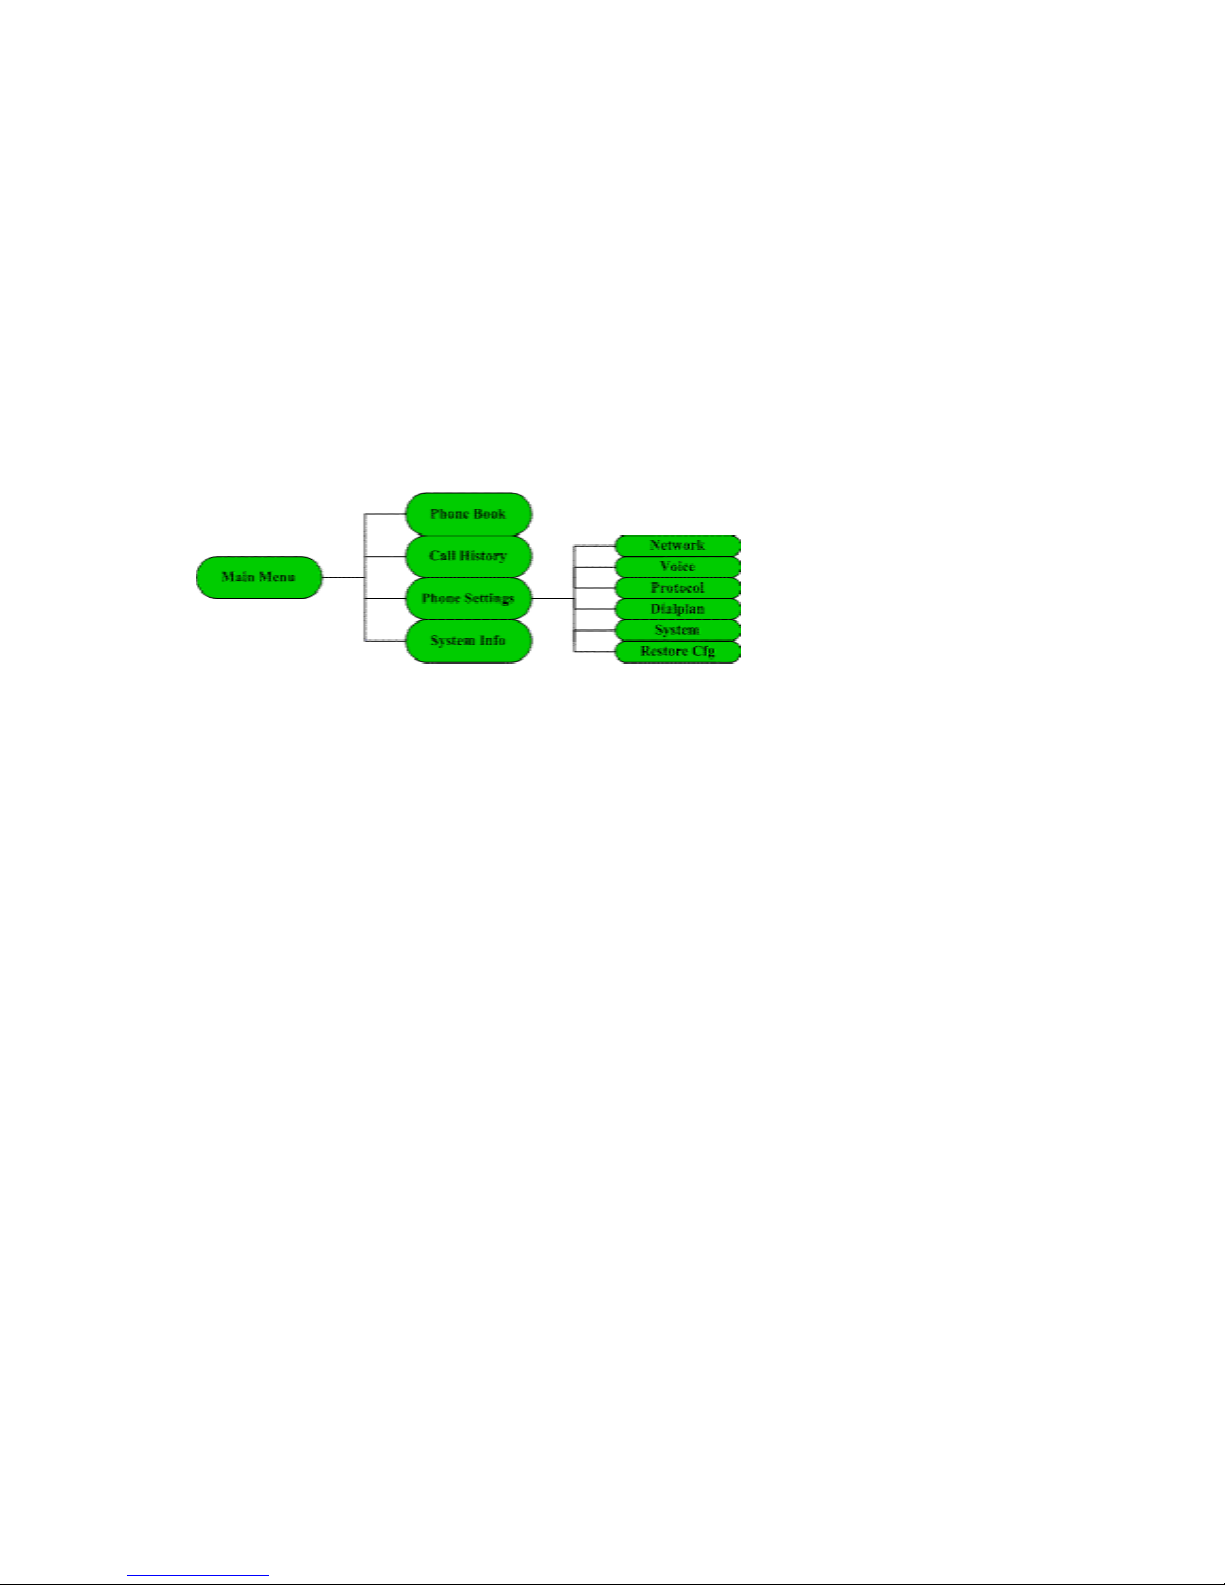
Figure 4.1 Main Menu and Phone Settings
4.7 Abort the settings
4.8 Save the settings
When some parameters have been modified and press CANCEL button to the upper menu, LCD will display "Save
settings?" options, press OK button will save the settings and press CANCEL will cancel all the settings and return main
menu
4.4 Edit and confirm
Press OK button to enter the edit mode, when there is no submenu existed.Press OK button to confirm the item after
amending through the key pad
4.5 Delete
Press UP button backspace and press DOWN button to shift cursor right in edit mode.
4.6 Return to the upper menu
Press CANCEL button back to the upper menu when phone is in MENU mode
Pick up the handset or press hand-free key to exit Menu and reject an amendment.AR168X IP phone will function with the
current settings.
3)Press “Start Upgrade” button to start the upgrade
3.3 Upgrade Firmware
2)Use“browse……” to open the select window, and then select the upgrade file
3.2 Phonebook Settings
You can set 100 entries for contacting persion
4. Configuration with keypads
With the phone on-hook, press MENU button to enter the main menu. The screen will display “Phone Book”;”Call
History”; “Phone Settings”; “System Info”refer to Figure 4.1
4.3 Enter the submenu
1)Select the upgrade item according to the phone status. The available options include “Firmware, Configuration,
Phonebook and Ringtone”
Press OK button to enter the submenu in menu mode
4.1 Enter main menu
4.2 Scroll menu option
Press UP, DOWN button to scroll though menu options

2. Select the entries of PHONE BOOK: Press UP or DOWN key to select a contact entry as desired.
3. Assign the SPEED DIAL Entry: When a contact entry selected. Press any key of M1-M4 as desired to assign a contact
entry as Speed dial entry.
NOTE: When a contact entry of PHONE BOOK was assigned as speed dial entry.The mark [M n] will be displayed ahead
the entry.
1. Enter the MENU. Press UP or DOWN key to select PHONE BOOK. Press OK key to into next submenu.
2. Select DELETE ALL item: Press UP key to scroll“—End of List—“, press OK key to select“Delete All?”item.
Press OK key to confirm all entries deleted.
5.6 Assign a SPEED DIAL entry
1. Enter the MENU. Press UP or DOWN key to select PHONE BOOK.
1. Select the entries of PHONE BOOK: Specific operation please refers to the steps 1-2 in the section 6.9.2. Press OK key to
into next submenu.
2. Delete a contact entry: Press UP or DOWN key to select“DELETE?”item and press OK key to confirm the entry
3. Delete other contact entries: Repeating step 1 and 2 can delete more contact entries of the phone book.
5.5 Delete all contact entry
2. Select the entries of PHONE BOOK: Press UP or DOWN key to select a contact entry as desired. Press OK to into next
submenu
3. Modify a contact entry: Press UP or DOWN key to select“EDIT?”item and press OK key to confirm. When“Enter
name”item displayed on LCD, then enter first/last name through the keypad, Press OK key to confirm and will be displayed
“Enter Number”item. Enter the number as desired through the keypad. Press OK key to confirm the entry modified.
4. Modify other contact entries: Repeating step 2 and 3 can modify more contact entries of the phone book.
5.4 Delete a contact entry
5.2 Add a contact entry
1. Enter the MENU. Press UP or DOWN key to select PHONE BOOK. Press OK key to into next submenu.
2. Select ADD item: Press UP key to scroll“—End of List—“, press OK key to select“Add Newly?”item. Press OK
key to confirm. Or when any detail contact entries display on LCD. Press OK key to into next submenu and press UP or
DOWN key to select “Add Newly?” item
2. Press UP or DOWN key to select from“ANSWERED”, “DIALED”, “MISSED”as desired
3. Select call record:Press OK key to confirm with call history type selected, Call record will be displayed and then press
OK key to select a call record. With more than one call record, press UP or DOWN key to view.
4. Delete call record: After a call record is selected, press OK key to next Submenu. Select DELETE item, and press OK to
delete a call record.Repeating step 3 and 4 can delete more entries of the call records
5.1 Save/Delete a CALL HISTORY
1. Enter the Menu. Press UP or DOWN key to select CALL HISTOYR. Press OK key to into next submenu
3. Enter a contact entry: When “Enter name”item displayed on LCD, then enter first/last name through the keypad, Press
OK key to confirm and will be displayed“Enter Number”item. Enter the number as desired through the keypad. Press OK
key confirm the entry added
,p y p y
confirm. Then it will be display“Enter Name”. Enter first/last name from the keypad. Press OK to save a call record to
PHONE BOOK.
5. Call Log
5.3 Modify a contact entry
6.Repeating step 3 and 5 can save more entries of the call records.
1. Enter the MENU. Press UP or DOWN key to select PHONE BOOK. Press OK key to into next submenu

When some contact entries have been modified or deleted or assigned as speed dial and press CANCEL button to the upper
menu, LCD will display“Save Phonebook?”query item. Press OK key to save the amendment entry of phonebook, press
CANCEL key to reject the amendment of phonebook.
5.7 Save PHONE BOOK
During a current call, press FLASH key to place the current call on hold and obtain the dial tone, enter the number to which
you want to transfer the call. Press TRANSFER key to complete a blind transfer (without consultation).
Transfer will be failed if the other party is busy or no answer.
6.8 Attend Transfer
During a current call, press FLASH key to place the current call on hold and obtain the dial tone, enter the number to which
you want to transfer the call. And press CALL key. After consulting with the new party, Press TRANSFER key to complete
the transfer. If the new party is busy or nobody answers, gently press the hook once to obtain the dial tone again. Enter
another number and repeat the corresponding steps.If the transferred call is ended without any other new transfer, press
FLASH key to resume the original call
During a current call, press HOLD. The call will be placed on hold temporarily, and send music to the other party
6.6 Call Waiting and Resume
When "Call waiting" option enable. If there is a new incoming call during the current call, press FLASH key to place the
current call on hold to answer the new incoming call
6.7 Blind Transfer
3. When an entry of the PHONE BOOK as desired, press OK key to enter next Submenu and will display“Call?”query
item.Pess OK key to make a call.
6.4 Speed dial
With Handset off hook, or in Hand-free mode, pre-assigned numbers of PHONE BOOK can be associated with speed dial
key (M1-M4) for rapid automatic dialing.
6.5 Call Hold
4. When an entry of the call recode as desired, press OK key to enter next Submenu and will display“Call?”query
item.Pess OK key to make a call
6.3 Dial with PHONE BOOK
1. Enter the MENU, Press UP or Down to enter the PHONE BOOK. And press OK key to enter into next submenu.
2. Press UP or DOWN key to view the entries of PHONE BOOK.
1. Press MENU key to enter into the menu. And press UP or Down to select the CALL HISTORY. And then press OK key to
enter into next submenu
2. Press UP or DOWN to select “MISSED CALLS “; “RECEIVED CALLS “; “DIALED CALLS”as desired
6. User Guideline
6.1 Dial Directly
3. Press OK key to view and the call record will be displayed. View the more entries by pressing UP or DOWN key.
Dial the desired number or input the IP address (Press * for.), and press CALL to complete the call.To make a direct IP
address call, disable the "Registration" option at configuration page
6.2 Dial with CALL HISTORY

After the properly setting phone starts, it will get the settings file from the upgrade server. If onfig_id in the settings file is
different from the one in the phone, the phone will be updated with all the parameters in the file.
After setting parameters, the phone will restart to make the parameter valid. If prov_filename item in new parameters i
s
different from the firmware filename in the phone, the phone will connect with the server to get the firmware file and update
automatically.
When “auto-upgrade interval”in the phone settings expires, the phone will connect with the server to get [MAC].txt
automatically. If config_id is the same with the one in the phone, it will stand by.
Save the firmware file for upgrading in the server. Rule of name is gf302_protocol_language_version.bin
7.3 Set server address and port
Please choose the keyboard or WEB orders and set Auto-provisioning server address and server port. For more details see ph
o
7.4 Auto-upgrade settings file and firmware file
prov_filename=gf302_iax2_us_009011.bin (for setting a file name for upgrading the firmware)
………….
digit_dialing=0
7.2 Preparing firmware file
7 HTTP Auto-Provisioning
7.1 Settings file and firmware file
Prepare the settings file named [MAC].txt in the upgrade server. [MAC] is MAC address of the phone to be upgraded, such
as 00-18-1f-01-00-3a.txt. a settings file can be created by getopt.bat command and for more details see getopt section in
chapter 5. A settings file example:
config_id=0008 (as a flag for settings file)
mac_address=0x00,0x18,0x1f,0x01,0x00,0x3a
……………
provision_server=192.168.1.251
provision_port=8080
provision_ttl=60
3. Restore factory configuration: Press OK key to confirm.AR168X SIP Phone will reboot automatically and restore to
factory default settings.
6.12 RESTORE FACTORY CONFIGURATION
1. Enter the menu mode: Press MENU key to main menu. Select“PHONE SETTINGS”and press OK key to into next
submenu.
2. Select DEFAULT item: Use UP or DOWN to scroll to“Default Cfg ”item.
6.11 Checking Message
The incoming messages will be indicated by a flashing message LED. Press MESSAGE key to trigger the phone to call the
pre-set service number The flashing LED will be out after checking voice messages.
6.9 Mute
During a current call, press MUTE Key. The LED on the phone lights up, indicating that the other party cannot hear you.
To cancel this set, press MUTE Key again, LED of MUTE out
6.10 Don’t Disturb (DND)
Wh
en
Ph
one on
h
oo
k
, press
M
u
t
e
/DND
K
ey
t
o
t
r
i
gger
th
e p
h
one
t
o
DND
s
t
a
t
us.
Th
e
LED
o
f
M
u
t
e
li
g
ht
s up
i
n
di
ca
ti
ng
th
a
t
phone will send the busy tone to the caller during an incoming call.To cancel this set, press Mute/DND Key again, LED of
MUTE out.

8. Digit Maps
9.1 Tftp description
Example2:
X.T: Any digit number and users have waited T seconds after dialed the last digits.
X. [T#*]: Any digit number and users have waited T seconds after dialed the ast digits or used #,* represent as finish dialing.
If the digit dialed match some item in the digit map, or it doesn’t match any item,this digit dialed will be call out
013xxxxxxxxx: Any 12 digits number starting with 013.
02[0-57-9] xxxxxxxx: Any number starting with 02, the third number is between 0 and 5 or between 7 and 9, and total length
03[02-689] xxxxxxxx: Any number starting with 03, the third number is 0,between 2 and 6, 8, 9, and total length is 11.
T represents a period of time after the user dialed the last digit and it defined the value of “Digitmap timeout” option. The
minimum value is 3; maximum value is 60, with the unit of second.
Digit map is a set of rules to determine when the user has finished dialing. With digit map, users don’t have to press ‘#’
key or "call" key after dialing.
Examples of the digit map refer to Fig 5.2.8 and the detail of digit map explaining as below.
X represents any number between 0 and 9.
13xxxxxxxxx: Any 11 digits number starting with 13.
9. Tftp Update
Updating operation of gf300 series phones supports TFTP and HTTP protocols.
Enter DOS window and input tftp(enter), help information for this command displays.
Tftp command syntax:
[destination]:specified output destination file.
tftp [-i] host [get | put] source [destination]
"[ ]" denotes optional parameters. We explain parameters only for phone update operation:
[-i]: indicates binary file mode. This mode must be chosen.
Host: to update the phone IP.
9.2 Update Firmware
Use parameter put to update a phone program. Command syntax:
tftp –i host put source (Enter)
D:\>tftp -i 192.168.1.205 put gf302_iax2_us_010010.bin (Enter)
Default directory is D:\
Update page0, phone IP is 192.168.1.205, program file is gf302_none_us_010010.bin. Command syntax:
D:\>tftp -i 192.168.1.205 put gf302_none_us_010010.bin (Enter)
“source” is a program file. For example:
Example1:
Update phone program, phone IP is 192.168.1.205 and program file is gf302_iax2_us_010010.bin. Command syntax:
[get]: to read phone information and write to specified file.
[put]: Write the data into the phone. Updating phone program, ring tone and setting information are all writing operation
and this parameter is needed.
Source: source binary file to be written, such as program file, other information file.

9.3 Update Ring Tone
Example:
9.5 Update Settings
Example:
Use parameter put to update ring tone. Command syntax:
tftp –i host put source (Enter)
"source" is ring tone data file and the filename must begin with“ringtone_”, namely ringtone_xxx.dat. How to make this
file will be described in chapter 4. For example:
Example:
Update ring tone. Phone IP is 192.168.1.205 and ring tone file is ringtone_aiya.dat, command line:
D:\>tftp -i 192.168.1.205 put ringtone_aiya.dat (Enter)
9.4 Update Call Hold Music
Use parameter put to update call hold music. Command syntax:
tftp –i host put source (Enter)
"source" is call hold music file and the filename must begin with "holdmusic_", namely holdmusic_xxx.dat. How to make this
file will be described in chapter 4. For example:
Update call hold music. Phone IP is 192.168.1.205 and call hold music file is holdmusic_aiya.dat, command line:
D:\>tftp -i 192.168.1.205 put holdmusic _aiya.dat (Enter)
Use parameter put to update phone settings. Command syntax:
tftp –i host put source (Enter)
"source" is phone settings file and the filename must begin with "settings_", namely settings_xxx.dat. How to make this file
will be described in chapter 4. For example:
Update phone settings information, phone IP is 192.168.1.205 and settings information file is settings_82378008.dat.
Command syntax:
D:\>tftp -i 192.168.1.205 put settings_82378008.dat (Enter)
10. HTTP Update
Enter phone setting WEB page, select update program item and open update program page, as follows:
updating files.

Warning:
10.1 Update Firmware
Updating phone program files, such as gf302_iax2_us_010010.bin
10.2 Update Configurations
Settings file of the phone is a binary file(.dat). Steps of generating the file are:
1. use getopt.bat to get the settings.txt, for example:
getopt 192.168.1.200 (Enter)
2. Modify settings.txt and save it if necessary
3. Use convert command to convert a text file settings.txt to a binary file settings.dat.
Input:
convert -c settings.txt settings.dat (Enter)
4. Update the phone with settings.dat
Note:getopt.bat and convert.exe can be found at: http://www.goldenfuture.com.cn/download_en.html
10.3 Update Phonebook
Phonebook file is a binary file. Steps of generating it are:
1. Use getpb.bat to get phonebook.txt, for example:
getpb 192.168.1.200(Enter)
2. Modify phonebook.txt and save it if necessary
3. Use convert command to convert phonebook.txt to a binary file phonebook.dat, for example:
convert -p phonebook.txt phonebook.dat (Enter)
4. Update the phone with phonebook.dat
Note:getpb.bat and convert.exe can be found at: http://www.goldenfuture.com.cn/download_en.html
10.4 Update Ringtone File
It is a binary file for updating phone ring tone. Steps of generating it are:
1. Record a pcm ring (check related chapter)
2. Use convert command to convert ringtone.pcm to a binary file ringtone_allice.dat, for example:
convert -r ringtone.pcm ringtone_allice.dat (Enter)
3. Update the phone with ringtone_allice.dat
10.5 Update Call Hold Music File
It is a binary file for updating call hold music. Steps of generating it are:
1. Record a pcm ring (check related chapter)
2. Use convert command to convert holdmusic.pcm to a binary file holdmusic_allice.dat, for example:
convert -r holdmusic.pcm holdmusic_allice.dat (Enter)
3. Update the phone with holdmusic_allice.dat
11. Create Music File
Music file, including phone ringtone file and call hold music file, is a binary file and can be updated to a phone. Phone
ringtone file is stored in page2-page4 and call hold file in page5-page7, each part is 192K(3×64K ).
T
one
i
s samp
l
e
d
at
8k
po
i
nts per secon
d
an
d
compresse
d
b
y
8
-
bi
t mu
l
aw w
i
t
h
1
B
yte per samp
l
e po
i
nt.
W
e set
32768
B
yte
s
(32K) as a section and use 32640Bytes of them;the last 128Bytes are not used. So, 4.08 seconds music can be stored in one
section.The size of a music file is 196608Bytes (6×32768Bytes) and the music stored in it can plays 6×4.08=24.48
seconds.
The size of music file must be 196608 Bytes. If not, errors will take place.

11.1 Record Music
Use CoolEdit to record music, here take example for Cool Edit Pro Version 2.1.
Set recording control property:
1. Click PC volume property ;
2. Point “property”on ”options”menu and click it;
3. Select “record”in “adjust volume”;
4. Select all volume control in “display volume control”and click “OK”;
5. Select “wave output balance “only and exit;
Use CollEdit to record:
1. Run CoolEdit.exe;
2. Point “New”on “File”menu and click it;
3. Select “8000”in “Sample Rate”, “Mono”in “Channels”, “8-bit”in “resolution”and click “OK”.;
4. Point “Show Transport Buttons”on “View”menu and select it. The following controllers display at the down-left
5. Open player ”Windows Media Player”;
6. Point “Transport Buttons”and click the record button ;
7. Time for record ring tone is 24.48 seconds;
8. Point “Save As…” on “File”menu and click it;
9. Click “Options:
10. Select “8-bit mu-Law Compressed”in “Data Formatted As”;
11. Select “PCM Raw Data (*.pcm, *.raw)”in “Save Type”;
12. Input filename and click “Save”;
11.2 Cut Music File
Music file updated to a phone must be a binary data file. After recording music, use convert command to cut a music
file(.pcm) to 196608Bytes and save as a binary data
Input command format:
Convert –r|--ring2bin srcFile dstFile(Enter)
11.3 Update Music File
Music Files include ring tone and call hold music. These file are named according to the file naming principle, namely
ringtone_xxx.dat and holdmusic_xxx.dat. Then copy the music file and convert.exe to D:\>, and use tftp command to update
the phone..
Example 1, Update ring tone file:
1. record a music file allice.pcm;
2. use convert command to cut the music file and convert it to binary data file;
D:\>convert -r allice.pcm ringtone_allice.dat(Enter)
3. Using the following commands to update:
D:\>tftp -i 192.168.1.205 put ringtone_allice.dat (Enter)
"192.168.1.205" is phone IP address.
Table of contents
Other High Link IP Phone manuals


