Hitachi Koki CG40EAS User manual

Brush Cutter
肩掛式割草機
CG 40EAS
Read through carefully and understand these instructions before use.
使用前務請詳加閱讀
Handling instructions
使用說明書
000BookCG40EASTha.indbA000BookCG40EASTha.indbA 2009/05/1516:33:072009/05/1516:33:07

1
123
456
789
1
2
3
8
7
5
6
4
9
A
000BookCG40EASTha.indb1000BookCG40EASTha.indb1 2009/05/1516:33:082009/05/1516:33:08

2
10 11
12 13
14 15 16
17 18 19
10 11
12
000BookCG40EASTha.indb2000BookCG40EASTha.indb2 2009/05/1516:33:082009/05/1516:33:08

3
20 21 22
23 24 25
26 27 28
29 30
13
14
15 18 14
16
17
13
ab
T
19
10
000BookCG40EASTha.indb3000BookCG40EASTha.indb3 2009/05/1516:33:082009/05/1516:33:08

English
4
MEANINGS OF SYMBOLS
NOTE: Some units do not carry them
Symbols
WARNING
The engine exhaust from this product contains chemicals known to the State of California to
cause cancer, birth defects and other reproductive harm.
It is important that you read, fully
understand and observe the
following safety precautions and
warnings. Careless or improper
use of the unit may cause serious
or fatal injury.
Shows maximum shaft speed.
Do not use the cutting attachment
whose max rpm is below the shaft
rpm.
Read, understand and follow all
warnings and instructions in this
manual and on the unit.
Gloves should be worn when
necessary,e.g.,whenassembling
cutting equipment.
Always wear eye, head and ear
protectors when using this unit.
Use anti-slip and sturdy
footwear.
Keep all children, bystanders and
helpers 15 m away from the unit. If
anyone approaches you, stop the
engine and cutting attachment
immediately.
Blade thrust may occur when
the spinning blade contacts a
solid object in the critical area.
A dangerous reaction may occur
causing the entire unit and
operator to be thrust violently.
This reaction is called BLADE
THRUST. As a result, the
operator may lose control of the
unit which may cause serious or
fatal injury. Blade thrust is more
likely to occur in areas where it
is difficult to see the material to
be cut.
Be careful of thrown objects.
000BookCG40EASTha.indb4000BookCG40EASTha.indb4 2009/05/1516:33:082009/05/1516:33:08

5
English
WHAT IS WHAT?
1. Fuel cap
2. Throttle lever
3. Starter handle
4. Blade guard
5. Cutting attachment
6. Drive shaft tube
7. Handle
8. Suspension eyelet
9. Ignition switch
10. Harness
11. Clutch case
12. Choke lever
13. Engine
14. Angle transmission
15. Combi box spanner
16. Handling instructions
5
14
416
15
1
3
12
7
8
6
10
2
911
13
000BookCG40EASTha.indb5000BookCG40EASTha.indb5 2009/05/1516:33:082009/05/1516:33:08

English
6
WARNINGS AND SAFETY INSTRUCTIONS
Operator safety
○Always wear a safety face shield or goggles.
○Always wear heavy, long pants, boots and gloves. Do not
wear loose clothing, jewelry, short pants, sandals or go
barefoot. Secure hair so it is above shoulder length.
○Do not operate this tool when you are tired, ill or under the
influence of alcohol, drugs or medication.
○Never let a child or inexperienced person operate the
machine.
○Wear hearing protection. Pay attention to your
surroundings. Be aware of any bystanders who may
be signaling a problem. Remove safety equipment
immediately upon shutting offengine.
○Wear head protection.
○Never start or run the engine inside a closed room or
building. Breathing exhaust fumes can kill.
○Keep handles free of oil and fuel.
○Keep hands away from cutting equipment.
○Do not grab or hold the unit by the cutting equipment.
○When the unit is turned off, make sure the cutting
attachment has stopped before the unit is set down.
○When operation is prolonged, take a break from time to
time so that you may avoid possible Hand-Arm vibration
syndrome (HAVS) which is caused by vibration.
WARNING
○Antivibration systems do not guarantee that you will not
sustain HAVS or carpal tunnel syndrome. Therefore,
continual and regular users should monitor closely the
condition of their hands and fingers. If any of the above
symptoms appear, seek medical advice immediately.
○If you are using any medical electric/electronic devices
such as a pacemaker, consult your physician as well as
the device manufacturer prior to operating any power
equipment.
Unit/machine safety
○Inspect the entire unit/machine before each use. Replace
damaged parts. Check for fuel leaks and make sure all
fasteners are in place and securely tightened.
○Replace parts that are cracked, chipped or damaged in
any way before using the unit/machine.
○Make sure the safety guard is properly attached.
○Keep others away when making carburetor adjustments.
○Use only accessories as recommended for this unit/
machine by the manufacturer.
WARNING
Never modify the unit/machine in any way. Do not use
your unit/machine for any job except that for which it is
intended.
Fuel safety
○Mix and pour fuel outdoors and where there are no sparks
or flames.
○Use a container approved for fuel.
○Do not smoke or allow smoking near fuel or the unit/
machine or while using the unit/machine.
○Wipe up all fuel spills before starting engine.
○Move at least 3 m away from fueling site before starting
engine.
○Stop engine before removing fuel cap.
○Empty the fuel tank before storing the unit/machine. It is
recommended that the fuel be emptied after each use. If
fuel is left in the tank, store so fuel will not leak.
○Store unit/machine and fuel in area where fuel vapors
cannot reach sparks or open flames from water heaters,
electric motors or switches, furnaces, etc.
WARNING
Fuel is easy to ignite or get explosion or inhale fumes, so
that pay special attention when handling or filling fuel.
Cutting safety
○Do not cut any material other than grass and brush.
○Inspect the area to be cut before each use. Remove
objects which can be thrown or become entangled.
○For respiratory protection, wear an aerosol protection
mask when cutting the grass after insecticide is
scattered.
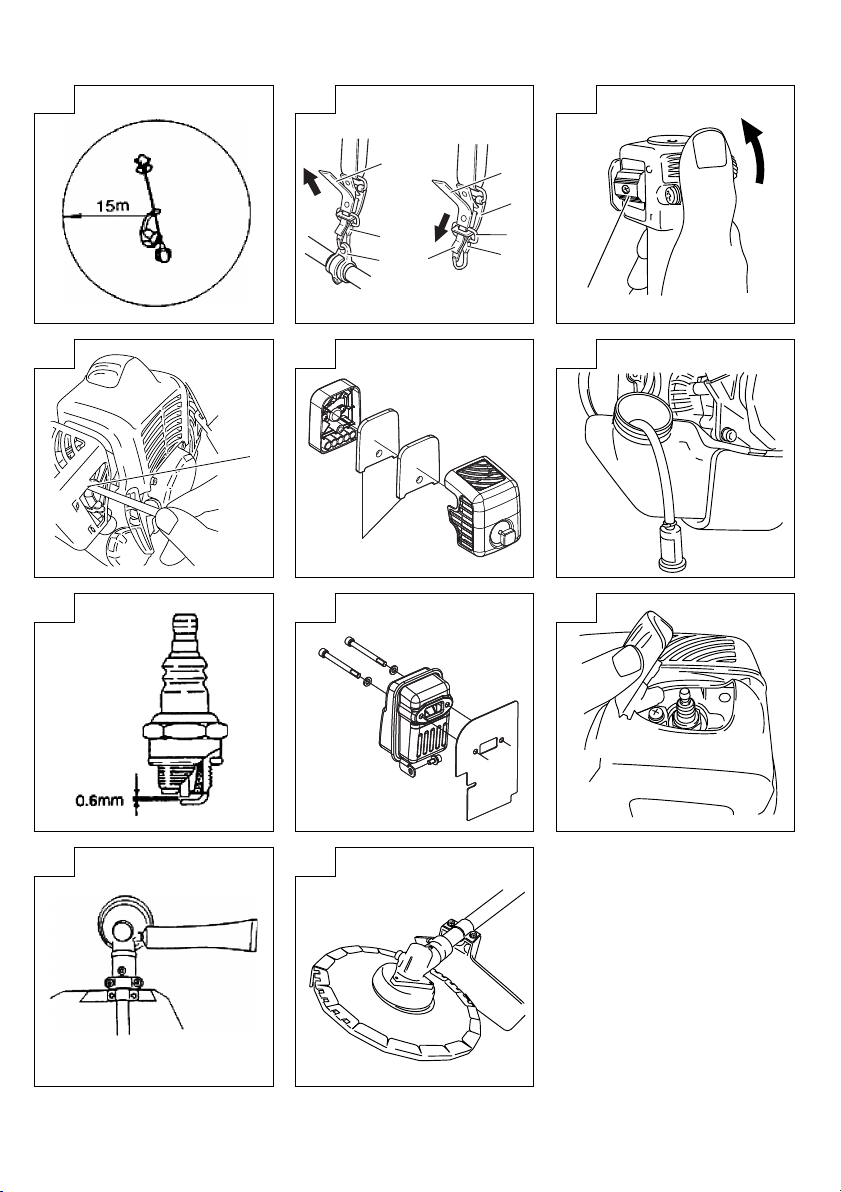
○Keep others including children, animals, bystanders and
helpers outside the 15 m hazard zone. Stop the engine
immediately if you are approached.
○Always keep the engine on the right side of your body.
○Hold the unit/machine firmly with both hands.
○Keep firm footing and balance. Do not over-reach.
○Keep all parts of your body away from the muffler and
cutting attachment when the engine is running.
○Keep cutting attachment below waist level.
○When relocating to a new work area, be sure to shut off
the machine and ensure that all cutting attachments are
stopped.
○Never place the machine on the ground when running.
○Always ensure that the engine is shut offand any cutting
attachments have completely stopped before clearing
debris or removing grass from the cutting attachment.
○Always carry a first-aid kit when operating any power
equipment.
○Never start or run the engine inside a closed room
or building and/or near inflammable liquid. Breathing
exhaust fumes can kill.
Maintenance safety
○Maintain the unit/machine according to recommended
procedures.
○Disconnect the spark plug before performing maintenance
except for carburetor adjustments.
○Keep others away when making carburetor adjustments.
○Use only genuine HITACHI replacement parts as
recommended by the manufacturer.
Transport and storage
○Carry the unit/machine by hand with the engine stopped
and the muffler away from your body.
○Allow the engine to cool, empty the fuel tank, and secure
the unit/machine before storing or transporting in a
vehicle.
○Empty the fuel tank before storing the unit/machine. It is
recommended that the fuel be emptied after each use. If
fuel is left in the tank, store so fuel will not leak.
○Store unit/machine out of the reach of children.
○Clean and couduct maintenance on the unit carefully and
store it in a dry place.
○Make sure engine switch is offwhen transporting or
storing.
○When storing or transporting in a vehicle, cover blade
with blade cover.
If situations occur which are not covered in this manual, take
care and use common sense. Contact a HITACHI dealer if
you need assistance. Pay special attention to statements
preceded by the following words:
WARNING
Indicates a strong possibility of severe personal injury or
loss of life, if instructions are not followed.
CAUTION
Indicates a possibility of personal injury or equipment
damage, if instructions are not followed.
NOTE
Helpful information for correct function and use.
CAUTION
Do not disassemble the recoil starter. You may get a
possibility of personal injury with recoil spring.
000BookCG40EASTha.indb6000BookCG40EASTha.indb6 2009/05/1516:33:092009/05/1516:33:09

7
English
SPECIFICATIONS
MODEL CG40EAS
Engine Size (ml) 39.8
Spark Plug NGK BPMR6A
Fuel Tank Capacity (ℓ) 1.00
Dry Weight (kg) 7.4
ASSEMBLY PROCEDURES
Drive shaft to engine (Fig. 1)
Loosen tube locking bolt (1) about ten turns so that the bolt
point will not obstruct drive shaft tube to be inserted. When
inserting drive shaft tube, hold the tube locking bolt outward
preventing inside fitting from obstructing as well.
NOTE
When it is hard to insert drive shaft up to the marked
position on the drive shaft tube, turn drive shaft by the
cutter mounting end clockwise or counter-clockwise.
Tighten tube locking bolt lining up the hole in the shaft
tube. Then tighten clamp bolt securely (1).
Installation of handle
Remove the handle bracket (2) from the assembly. (Fig. 2)
Place the handles and attach the handle bracket with four
bolts lightly. Adjust to appropriate position. Then fix it firmly
with the bolts.
Fix protection tube on drive shaft or handle using cord
clamps (3). (Fig. 3)
NOTE
If the protection tube is set apart from the handle or pipe,
it will be caught by something during operation and it may
cause serious injury. Do not set the protection tube apart
from the handle or pipe.
Throttle wire/stop cord
Remove air cleaner cover. (Fig. 4)
Connect stop cords. (Fig. 5)
Insert the stay (4) under the nut (5) screwed onto the outer
end of the throttle wire (6) and connect the end of the throttle
wire (7) to the carburetor (8). Then tighten the nut (5) to fix the
throttle wire to the stay (4). (Fig. 6)
NOTE
Check that the carburetor throttle returns to the idle
position and also that it can be opened wide by operating
the throttle lever.
Cover throttle wire and stop cords together with protective
tube provided up to air cleaner cover. (Fig. 7)
Installation of blade guard (Fig. 8)
Install the blade guard on drive shaft tube against angle
transmission (9). Tighten the guard bracket firmly so that the
blade guard does not swing or move down during operation.
Install the gear case and blade guard so that A is approx.
40 mm. (Fig. 9)
CAUTION
The blade guard must be in place when operating.
If the blade guard is not in place when operating, you may
get the serious injury.
Installation of cutting blade (Fig. 10)
When installing a cutting blade, make sure that there are no
cracks or any damage in it and that the cutting edges are
facing the correct direction.
Align the notch hole of the cutter holder with the hole on the
gear case (Top the gear case) and insert the Allen wrench
to stop turning. Turn the fixing nut clockwise and remove the
fixing nut, cutter holder cap, and toothed lock washers.
The installation of the cutting blade is as follows: insert the
Allen wrench into the notch hole of the cutter holder and the
hole on the gear case. Then, install the cutting blade (check
the installing direction, as referring to Fig. 12), the cutter
holder cap and toothed lock washers onto the cutter holder
in this order. Finally, tighten the fixing nut securely by turning
counterclockwise with the Combi box spanner. (Fig. 10)
CAUTION
○When installing the cutting blade, set its center hole to
the convex part of the cutter holder and hold it with the
concave surface of the cutter holder cap. Then, tighten
the fixing nut to prevent the cutting blade from being
eccentric. (Fig. 11)
After installing the cutting blade, be sure to remove the
Allen wrench and Combi box spanner.
○Before operation, make sure the blade has been properly
installed.
○Cutter holder cap under a cutting blade, check it for wear
or cracks before operation. If any damage or wear is
found, replace it, as it is an article of consumption.
NOTE
The blade must be retained with a new cotter pin each
time installed. (Fig. 10)
OPERATING PROCEDURES
Fuel (Fig. 13)
WARNING
○The Brush cutter is equipped with a two-stroke engine.
Always run the engine on fuel, which is mixed with oil.
Provide good ventilation, when fueling or handling fuel.
○Fuel contains highly flammable and it is possible to get
the serious personal injury when inhaling or spilling on
your body. Always pay attention when handling fuel.
Always have good ventilation when handling fuel inside
building.
Fuel
○Always use branded 89 octane unleaded gasoline.
○Use genuine two-cycle oil or use a mix between 25:1 to
50:1, please consult the oil bottle for the ratio or HITACHI
dealer.
○If genuine oil is not available, use an anti-oxidant added
quality oil expressly labeled for air-cooled 2-cycle engine
use (JASO FC GRADE OIL or ISO EGC GRADE). Do not
use BIA or TCW (2-stroke water-cooling type) mixed oil.
○Never use multi-grade oil (10 W/30) or waste oil.
○Always mix fuel and oil in a separate clean container.
Always start by filling half the amount of fuel, which is to be
used. Then add the whole amount of oil. Mix (shake) the fuel
mixture. Add the remaining amount of fuel.
Mix (shake) the fuel-mix thoroughly before filling the fuel
tank.
Fueling
WARNING
○Always shut offthe engine before refueling.
○Slowly open the fuel tank, when filling up with fuel, so that
possible overpressure disappears.
○Tighten the fuel cap carefully, after fueling.
○Always move the Brush cutter at least 3 m (10 ft.) from
the fueling area before starting.
000BookCG40EASTha.indb7000BookCG40EASTha.indb7 2009/05/1516:33:092009/05/1516:33:09

English
8
○Always wash any spilled fuel from clothing immediately
with soap.
○Be sure to check any fuel leaking after refueling.
Before fueling, clean the tank cap area carefully, to ensure
that no dirt falls into the tank. Make sure that the fuel is well
mixed by shaking the container, before fueling.
Starting (Fig. 14)
CAUTION
Before starting, make sure the cutting attachment does
not touch anything.
1. Slide ignition switch (10) to RUN position. (Fig. 14)
Push priming bulb (11) several times so that fuel flows
through return pipe. (Fig. 15)
2. Set the throttle lever upward to the “idle” position.
(Fig. 14)
3. Set choke lever to CLOSED position (12). (Fig. 16)
4. Pull recoil starter briskly, taking care to keep the handle in
your grasp and not allowing it to snap back. (Fig. 17)
5. When you hear the engine want to start, return choke
lever to RUN position (open). Then pull recoil starter
briskly again.
NOTE
If engine does not start, repeat procedures from 2 to 5.
Cutting (Fig. 18, 19, 20)
○When cutting, operate engine at over 6500 rpm.
Extended time of use at low rpm may wear out the clutch
prematurely.
○Cut grass from right to left.
○Blade thrust may occur when the spinning blade contacts
a solid object in the critical area.
A dangerous reaction may occur causing the entire unit
and operator to be thrust violently. This reaction is called
BLADE THRUST. As a result, the operator may lose
control of the unit which may cause serious or fatal injury.
Blade thrust is more likely to occur in areas where it is
difficult to see the material to be cut.
○Wear the harness as shown in the figure. The blade turns
counter-clockwise, therefore, be advised to operate the
unit from right to left for efficient cutting. Keep onlookers
out of working area at least 15 m (50 ft.).
How to use the shoulder harness
Wear the shoulder harness on your shoulder as shown
Fig. 19 and hook it on the hanger of the machine. Adjust
the length of the shoulder harness to the most comfortable
position. (Fig. 19)
To remove the machine from the shoulder harness, hold the
main pipe of the machine firmly by one hand and then remove
the hook (14) of the shoulder harness from the hunger (15).
(Fig. 21-a)
How to reinstall the hook after using the emergency
release pinch
It needs to go through the buckle (16) of the hook (14) to the
metal plate (17) on the harness and go through the plate (18)
of the emergency release pinch to the metal plate (17) on the
harness. (Fig. 21-b)
After installing the buckle onto the harness, pull the hook
(14) and make sure the hook (14) is securely fixed on the
harness, then hook it to the hunger (15). (Fig. 21-a)
WARNING
○When using the machine, wear the shoulder harness and
hold the machine correctly with both hands.
If you feel that there is something dangerous, separate
the brush cutter from your body by pulling the emergency
release pinch (13) of the harness to the direction of the
arrow showing on Fig. 21-a.
○If cutting attachment should strike against stones or
other debris, stop the engine and make sure that the
attachment and related parts are undamaged. When
grass or vines wrap around attachment, stop engine and
attachment and remove them.
NOTE
If you pull the emergency release pinch without holding
the machine, the machine will fall to your feet. Pull the
emergency release pinch as holding the main pipe of the
machine by one hand.
Before operation, make sure that the emergency release
pinch on the shoulder harness is working properly.
Stopping (Fig. 22)
Decrease engine speed and run at an idle for a few minutes,
then turn offignition switch (10).
WARNING
A cutting attachment can injure while it continues to spin
after the engine is stopped or power control is released.
When the unit is turned off, make sure the cutting
attachment has stopped before the unit is set down.
MAINTENANCE
MAINTENANCE, REPLACEMENT, OR REPAIR OF THE
EMISSION CONTROL DEVICES AND SYSTEMS MAY
BE PERFORMED BY ANY NON-ROAD ENGINE REPAIR
ESTABLISHMENT OR INDIVIDUAL.
Carburetor adjustment (Fig. 23)
WARNING
The cutting attachment may be spinning during carburetor
adjustments.
Never start the engine without the complete clutch cover
and tube assembled! Otherwise the clutch can come
loose and cause personal injuries.
In the carburetor, fuel is mixed with air. When the engine is
test run at the factory, the carburetor is basically adjusted.
A further adjustment may be required, according to
climate and altitude. The carburetor has one adjustment
possibility:
T = Idle speed adjustment screw.
Idle speed adjustment (T)
Check that the air filter is clean. When the idle speed is
correct, the cutting attachment will not rotate. If adjustment
is required, close (clockwise) the T-screw, with the engine
running, until the cutting attachment starts to rotate. Open
(counter-clockwise) the screw until the cutting attachment
stops. You have reached the correct idle speed when the
engine runs smoothly in all positions well below the rpm
when the cutting attachment starts to rotate.
If the cutting attachment still rotates after idle speed
adjustment, contact a HITACHI dealer.
NOTE
Standard Idle rpm is 2200 – 2800 rpm.
WARNING
When the engine is idling the cutting attachment must
under no circumstances rotate.
Air filter (Fig. 24)
The air filter must be cleaned from dust and dirt in order to
avoid:
○Carburetor malfunctions.
○Starting problems.
○Engine power reduction.
○Unnecessary wear on the engine parts.
○Abnormal fuel consumption.
Clean the air filter daily or more often if working in
exceptionally dusty areas.
000BookCG40EASTha.indb8000BookCG40EASTha.indb8 2009/05/1516:33:092009/05/1516:33:09

9
English
Cleaning the air filter
Remove the air filter cover and the filter (19). Rinse it in warm
soap suds. Check that the filter is dry before reassembly. An
air filter that has been used for some time cannot be cleaned
completely. Therefore, it must regularly be replaced with a
new one. A damaged filter must always be replaced.
Fuel filter (Fig. 25)
Drain all fuel from fuel tank and pull fuel filter line from tank.
Pull filter the element out of the holder assembly and rinse
the element in warm water with detergent.
Rinse thoroughly until all traces of detergent are eliminated.
Squeeze, do not wring, away excess water and allow the
element to air dry.
Spark plug (Fig. 26)
The spark plug condition is influenced by:
○An incorrect carburetor setting.
○Wrong fuel mixture (too much oil in the gasoline).
○A dirty air filter.
○Hard running conditions (such as cold weather).
These factors cause deposits on the spark plug electrodes,
which may result in malfunction and starting difficulties. If the
engine is low on power, difficult to start or runs poorly at idling
speed, always check the spark plug first. If the spark plug
is dirty, clean it and check the electrode gap. Re-adjust if
necessary. The correct gap is 0.6 mm. The spark plug should
be replaced after about 100 operation hours or earlier if the
electrodes are badly eroded.
Muffler (Fig. 27)
Remove the muffler and clean out any excess carbon from the
exhaust port or muffler inlet every 100 hours of operation.
Cylinder (Engine cooling) (Fig. 28)
The engine is air cooled, and air must circulate freely around
the engine and over the cooling fins on the cylinder head to
prevent overheating.
Every 100 operating hours, or once a year (more often if
conditions require), clean fins and the external surfaces of
engine of dust, dirt and oil deposits which can contribute to
improper cooling.
NOTE
Do not operate the engine with the engine shroud or
muffler guard removed as this will cause overheating and
engine damage.
Angle transmission (Fig. 29)
Check angle transmission or angle gear for grease level
about every 50 hours of operation by removing the grease
filler plug on the side of angle transmission.
If no grease can be seen on the flanks of the gears, fill the
transmission with quality lithium based, multipurpose grease
up to 3/4.
Do not completely fill the transmission.
Blade
WARNING
Wear protective gloves when handling or performing
maintenance on the blade. (Fig. 30)
○Use a sharp blade. A dull blade is more likely to snag
and thrust. Replace the fastening nut if it is damaged and
hard to tighten.
○When replacing the blade, purchase one recommended
by HITACHI, with a 25.4 mm (one inch) fitting hole.
○When installing saw blade, always face the stamped side
up. 80-tooth blades can be used with either side facing
up.
○Use the correct blade for the type of work.
○When replacing blades, use appropriate tools.
○When cutting edges become dull, re-sharpen or file
as shown in figure. Incorrect sharpening may cause
excessive vibration.
○Discard blades that are bent, warped, cracked, broken or
damaged in any way.
NOTE
When sharpening blades it is important to maintain the
original shape of the radius at the base of the tooth to
avoid cracking.
Maintenance schedule
Below you will find some general maintenance instructions.
For further information please contact a HITACHI dealer.
Daily maintenance
○Clean the exterior of the unit.
○Check that the harness is undamaged.
○Check the blade guard for damage or cracks.
○Change the guard in case of impacts or cracks.
○Check that the cutting attachment is properly centred,
sharp, and without cracks. An off-centred cutting
attachment induces heavy vibrations that may damage
the unit.
○Check that the cutting attachment nut is sufficiently
tightened.
○Make sure that the blade transport guard is undamaged
and that it can be securely fitted.
○Check that nuts and screws are sufficiently tightened.
Weekly maintenance
○Check the starter, especially cord and return spring.
○Clean the exterior of the spark plug.
○Remove it and check the electrode gap. Adjust it to
0.6 mm, or change the spark plug.
○Clean the cooling fins on the cylinder and check that the
air intake at the starter is not clogged.
○Check that the angle gear is filled with grease up to 3/4.
○Clean the air filter.
Monthly maintenance
○Rinse the fuel tank with gasoline.
○Clean the exterior of the carburetor and the space around
it.
○Clean the fan and the space around it.
NOTE
When ordering parts from your nearest dealer, please
use the item number shown on the parts breakdown
section in this instruction.
000BookCG40EASTha.indb9000BookCG40EASTha.indb9 2009/05/1516:33:092009/05/1516:33:09

標誌的意義
註: 某些裝置並沒有附帶此標誌
標誌
警告
本產品引擎廢氣包含加州政府已知可導致癌症、先天性缺陷,以及其他傷害生殖系
統的化學物質。
閱讀並完全瞭解及遵守以下
的安全預防措施與警告是非
常重要。疏忽或不當使用此
裝置,可能會造成嚴重或致
命的傷害。
顯示最大轉軸速度。
當修剪配件最大轉速低於轉
軸速度時,請勿使用。
請閱讀、暸解並遵循所有本
手冊以及裝置上的警告與指
示。
需要時請配戴手套,例如:
組裝修剪配件時。
使用此裝置時請隨時配戴
眼、頭及耳保護裝置。 穿著防滑且堅固的鞋子。
裝置與兒童、旁觀者及協助
人員應保持15公尺的距離。
假如任何人靠近您,請立刻
停止引擎及修剪配件。
當旋轉刀片在關鍵區域接觸
到堅硬物體,會產生刀片推
力。
產生危險的反作用力,會使
得整個裝置以及操作者受到
猛烈的推動。
這反作用力稱為刀片推力。
此將造成操作者無法控制裝
置,進而導致嚴重或致命的
傷害。刀片推力較易發生於
不易看出待割除物體的區
域。
請小心拋出物體。
中國語
10
000BookCG40EASTha.indb10000BookCG40EASTha.indb10 2009/05/1516:33:092009/05/1516:33:09

11
中國語
零 件 名 稱
1. 燃料蓋
2. 節流閥操作桿
3. 開機把手
4. 刀片護罩
5. 修剪配件
6. 驅動軸管
7. 把手
8. 懸吊觀察孔
9. 點火開關
10. 背帶
11. 離合器箱
12. 阻氣門操作桿
13. 引擎
14. 角度變速器
15. 複合箱扳手
16. 使用說明書
5
14
416
15
1
3
12
7
8
6
10
2
911
13
000BookCG40EASTha.indb11000BookCG40EASTha.indb11 2009/05/1516:33:092009/05/1516:33:09

警告與安全指示
操作者安全
○ 請隨時配戴安全面罩或護目鏡。
○ 請隨時穿著厚重長褲、靴子以及手套。請勿穿著
寬鬆衣物、佩戴珠寶、短褲、拖鞋,或赤腳。固
定頭髮並使其高於肩部。
○ 當您疲累、生病、飲酒後、藥物影響或醫療過程
中,請勿操作此工具。
○ 絕對不可讓小孩或是無經驗人員操作機器。
○ 配戴聽力保護裝置。注意您的周圍。小心任何可
能造成困擾的旁觀者。關閉引擎時,請立刻移除
安全保護裝置。
○ 配戴頭部保護裝置。
○ 絕對不可在封閉的房間或建物中,啟動或運作引
擎。吸入廢氣燻煙可能會致命。
○ 保持把手無油汙或燃油附著。
○ 手部需遠離修剪設備。
○ 請勿藉由修剪設備抓取或握持裝置。
○ 當裝置關閉時,確認修剪配件已經在單元關閉前
停止。
○ 當長期操作時,適時的休息可避免因振動而導致
的手臂振動症候群 (HAVS)。
警告
○ 反振動系統並無法保證您不會罹患HAVS或腕管症
候群。因此,連續或長時間且定期的使用者,必
須謹慎監視他們的手及手指狀況。若有任何上列
徵狀出現,請立刻尋求醫療諮詢。
○ 若您正在使用醫療電氣電子裝置,例如心律調
整器,請在操作任何動力設備前,徵詢您的醫師
及裝置製造商。
裝置與機器安全
○ 每次使用前檢視整個裝置與機器。更換損壞零
件。檢查燃料漏洩以及確認所有固定件已到位,
並且穩固地鎖緊。
○ 無論如何請在使用裝置與機器前,更換破裂、缺
損或損毀的零件。
○ 確認安全護罩已經連接妥當。
○ 進行汽化器調整時,請他人遠離。
○ 請使用本裝置與機器製造商所建議的配件。
警告
無論如何請勿修改裝置與機器。請勿使用您的裝
置與機器,於任何非為其設計目的之工作。
燃料安全
○ 請於室外混合傾注燃料,而該處不得有火花或火
焰。
○ 使用認證過適用於燃料的容器。
○ 請勿吸菸或允許在燃料或裝置與機器附近、亦或
是使用裝置與機器時吸菸。
○ 啟動引擎前,擦乾所有溢出燃料。
○ 啟動引擎前,移動至離處理燃料處至少3公尺以
上。
○ 開啟燃料蓋前,請先停止引擎。
○ 儲藏裝置與機器前先清空燃料箱。建議每次使用
後將燃料清空。若燃料殘留於箱內,儲藏時需使
燃料不會漏洩。
○ 儲藏裝置與機器以及燃料於燃料蒸氣無法傳達至
熱水器、電氣馬達或開關、爐具等,可產生火花
或開放性火燄之處所。
警告
燃料極易點燃、爆炸或吸入燻煙,因此處理或填
充燃料時請特別注意。
修剪安全
○ 請勿進行修剪青草及灌木叢以外的物體。
○ 每次使用前請檢查修剪區域。移除可能拋出或糾
纏的物件。
○ 於施放除蟲劑後除草,為了保護呼吸系統請穿戴
煙霧防護面罩。
○ 請其餘人員包含兒童、動物、旁觀者和協助人
員,保持遠離15公尺危險區。有人接近您時,請
立即停止引擎。
○ 隨時將引擎保持於您身體右側。
○ 以雙手緊握裝置與機器。
○ 保持穩固步伐與平衡。請勿過度伸展。
○ 當引擎運作時,請保持您身體所有部位遠離消音
器及修剪配件。
○ 保持修剪配件低於腰部高度。
○ 當重新配置至新工作區域時,請務必關閉機器並
確認所有修剪配件都已停止。
○ 運作時絕對不要將機器置於地面。
○ 由修剪配件上清理碎片或移除青草前,務必確認
引擎關閉且所有修剪配件皆已完全停止。
○ 當操作任何動力設備時,務必攜帶急救套件。
○ 絕對不可在封閉的房間或建物中,啟動或運作引
擎及或靠近可燃性液體。吸入廢氣燻煙可能會
致命。
保養安全
○ 根據建議的程序保養裝置與機器。
○ 除了調整汽化器外,在進行保養前拔請除火星
塞。
○ 進行汽化器調整時,請他人遠離。
○ 僅可使用HITACHI正廠替換物件。
運輸與儲藏
○ 以手搬運裝置與機器,引擎必須已經停止並將身
體遠離消音器。
○ 在儲藏或由機動車輛運輸前,請將引擎降溫、清
空燃料箱,並且固定裝置與機器。
○ 儲藏裝置與機器前先清空燃料箱。建議每次使用
後將燃料清空。若燃料殘留於箱內,儲藏時需使
燃料不會漏洩。
中國語
12
000BookCG40EASTha.indb12000BookCG40EASTha.indb12 2009/05/1516:33:092009/05/1516:33:09

13
中國語
○ 將裝置與機器儲藏於孩童無法觸及處。
○ 清理裝置並小心執行保養,並將其儲藏於乾燥
處。
○ 確認運輸或儲藏時引擎開關已經關閉。
○ 當儲藏或由機動車輛運輸時,請使用刀片外殼罩
住刀片。
若發生的狀況未包含在本手冊內,請小心並用一般常
識處理。若需協助,請聯絡HITACHI經銷商。請特別
注意以下警語之聲明:
警告
表示若未依循指示,極可能造成嚴重的人身傷害
或喪命。
注意
表示若未依循指示,將可能造成人身傷害或機器
損毀。
註
對正確的運行及使用提供有用的資訊。
注意
請勿拆解手拉式啟動器。您有可能會因彈簧反作
用力,而遭致人身傷害。
規 格
型號 CG40EAS
引擎尺寸(毫升) 39.8
火星塞 NGK BPMR6A
燃料箱容量(升) 1.00
乾重(公斤) 7.4
組 裝 程 序
驅動軸至引擎(圖1)
約十轉鬆開管鎖螺栓 (1),使得螺栓點不會阻礙驅動
軸管的插入。當插入驅動軸管時,請握住管鎖螺栓向
外,避免由內鎖合時造成阻礙。
註
當很難將驅動軸插入至驅動軸管上標記的位置
時,請將驅動軸藉由割剪器安裝端,將其順時針
或逆時針轉動。
鎖緊管鎖螺栓對齊軸管內洞口,然後穩固鎖緊鉗栓
(1)。
安裝把手
將把手托架 (2) 由組件上移除。(圖2)
將把手平置並以四個鏍栓輕輕鎖附把手托架,接著調
整至適當位置,然後用螺栓將其穩定固定住。
用束線帶 (3) 將保護管固定於驅動軸或把手上。
(圖3)
註
若保護管由把手或管線上分離,在操作時,其將
會被某些物件纏住,且可能因此造成嚴重傷害。
請勿將保護管自把手或管線上分離。
節流閥電線與停止線
移除空氣清淨器外殼(圖4)。
連接停止線。(圖5)
將拉桿 (4) 插入至鎖附於節流閥電線 (6) 外側端的螺
帽 (5) 下方,並連結節流閥電線端至汽化器 (8)。然
後鎖緊螺帽 (5) 以將節流閥電線固定至拉桿 (4) 上。
(圖6)
註
檢查化油器的節流閥是否回到怠速位置,並檢查
是否可操作節流閥操作桿使節流閥完全打開。
將節流閥電線與停止線一同使用所提供的保護管蓋
住,最高至空氣清淨器外殼。(圖7)
刀片護罩之安裝(圖8)
將刀片護罩安裝在靠於角度變速器 (9) 之驅動軸管
上。將護罩穩固鎖緊使得刀片護罩無法搖擺,或在操
作時向下移動。
安裝齒輪箱及刀片護罩,使得A大約為40公釐。
(圖9)
注意
操作時刀片護罩必須到位。
若操作時刀片護罩未到位,您將可能因此遭受嚴
重傷害。
安裝修剪刀片(圖10)
安裝修剪刀片時,請確認其上無破裂或任何損傷,且
割剪刀緣面對正確方向。
請將修剪刀具支架的凹槽孔對齊齒輪箱上開孔(齒輪
箱上),並插入六角扳手以停止其旋轉。順時針轉動
固定螺帽,接著移除固定螺帽、修剪刀具支架蓋,以
及有齒墊圈。
依照下列說明安裝修剪刀片:
將六角扳手插入修剪刀具支架的凹槽孔,以及齒輪箱
上開孔。然後按順序將修剪刀片(檢查安裝方向,參
考圖12)、修剪刀具支架蓋,以及有齒墊圈安裝於
修剪刀具支架。最後用複合扳手,將固定螺帽以反時
針方向旋轉穩固鎖緊。(圖10)
000BookCG40EASTha.indb13000BookCG40EASTha.indb13 2009/05/1516:33:092009/05/1516:33:09

注意
○ 安裝修剪刀片時,請將其的中心開孔對準修剪刀
具支架凸起部,並用修剪刀具支架蓋的凹入表面
支撐。然後鎖緊固定螺帽以防止修剪刀片偏移。
(圖11)
安裝完修剪刀片後,請務必移除六角扳手及複合
箱扳手。
○ 在操作前,確認刀片已正確安裝完畢。
○ 修剪刀具支架蓋位於修剪刀片下,請在操作前檢
查其磨損或破裂狀況。若有任何損傷或磨損請更
換,因其屬於消耗品。
註
每次安裝刀片時,必須使用新的插銷固定。
(圖10)
操 作 程 序
燃料(圖13)
警告
○ 本割草機配置一具二行程引擎。
請使用燃料讓引擎運行,並混入機油。
當於填充或處理燃料時,請保持良好通風。
○ 燃料含有高度可燃性並且在吸入或噴濺到您的身
體時,可能會造成嚴重的個人傷害。處理燃料
時,請務必隨時注意小心。
於建物內處理燃料時,請隨時保持良好通風。
燃料
○ 請使用有廠牌之辛烷值89無鉛汽油。
○ 使用正廠二行程機油,或使用混合比介於25:1
至50:1者,請參閱機油瓶上比例說明,或洽詢
HITACHI經銷商。
○ 若是正廠機油無法取得,請使用標籤上註明為添
加抗氧化劑應用於氣冷式二行程引擎之高品質機
油 (JASO FC GRADE OIL或ISO EGC GRADE)。請勿
使用BIA或TCW(二行程水冷型)混合機油。
○ 切勿使用複級機油 (10 W/30) 或廢棄油品。
○ 請分別在乾淨的容器中混合燃料及機油。
請先注入預計使用之一半容量的燃料,然後再添加機
油總量。混合(搖動)燃料混合物後,再將其餘燃料
量加入。
在注入燃料箱前,徹底混合(搖動)燃料混合物。
燃料
警告
○ 重新添加燃料前,請務必關閉引擎。
○ 添加燃料時,請緩慢開啟燃料箱使可能產生的過
壓狀況消失。
○ 添加燃料後請謹慎鎖緊燃料蓋。
○ 啟動前請將割草機移至遠離添加燃料處至少3公尺
(10英呎)外。
○ 請立刻用肥皂清洗噴濺在衣物上的燃料。
○ 重新添加燃料後,請務必檢查是否有漏油現象。
添加燃料前,請小心清理箱蓋區域以確保無灰塵落入
箱內。添加燃料前,搖動容器確保燃料充分混合。
啟動(圖14)
注意
啟動前請確認修剪配件沒有接觸任何物體。
1. 將點火開關 (10) 滑動至運行位置(圖14)
推啟動注給器 (11) 數次,使燃料可以流過折返
管。(圖15)
2. 將節流閥操作桿向上移動,設定至「待機」位
置。(圖14)
3. 設定阻氣門操作桿至關閉位置 (12)。(圖16)
4. 迅速拉動手拉式啟動器,請小心緊握把手,並勿
使把手猛然彈回。(圖17)
5. 當您聽到引擎快要啟動時,請將阻氣門操作桿退
回至運作位置(開啟)。然後再次迅速拉動手拉
式啟動器。
註
若是引擎無法啟動,請重複2至5程序。
進行修剪(圖18, 19, 20)
○ 當修剪時,請讓引擎以超過每分鐘6500轉速運
轉。長時間使用低轉速,可能會使離合器提早磨
損。
○ 請由右至左除草。
○ 當旋轉刀片在關鍵區域接觸堅硬物體,會產生刀
片推力。
可能產生危險的反作用力,而使整個裝置及操作
者受到猛烈推動。此反作用力稱為刀片推力。此
將造成操作者無法控制裝置,進而造成嚴重或致
命的傷害。
刀片推力較易發生於,不易看出待割除物體的區
域。
○ 穿戴如圖中所示的背帶。刀片以逆時針方向旋
轉,因此請依建議由右至左操作裝置以有效地進
行修剪。請旁觀者遠離工作區域至少15公尺(50
英呎)。
如何使用肩背帶
如圖19所示,將肩背帶穿戴在您的肩上並將其鉤在
機器的掛鉤上。調整肩背帶的長度至最舒適的位置。
(圖19)
要從肩背帶移除機器時,請以一手緊握機器的主
管,然後將肩背帶的鉤 (14) 自掛鉤 (15) 上移除。
(圖21-a)
中國語
14
000BookCG40EASTha.indb14000BookCG40EASTha.indb14 2009/05/1516:33:092009/05/1516:33:09

15
中國語
如何在使用緊急釋放夾扣後,重新裝上鉤子
應先穿過鉤子(14)的扣環(16)達背帶上的金屬板
(17),再穿過緊急釋放夾扣的板(18)到背帶上的金屬
板(17)。(圖21-b)
將扣環裝於背帶後,拉動鉤子(14)並確定鉤子(14)已
牢固地固定在背帶上,然後將鉤子扣入掛鉤(15)內。
(圖21-a)
警告
○ 使用機器時,請穿戴肩背帶並以雙手正確握住機
器。
若您感覺附近有危險物體,請以圖21-a上箭頭顯
示的方向拉動肩帶的緊急釋放夾扣(13),將割草
機自身上移開。
○ 若修剪配件撞擊石塊或其他碎片,請停止引擎並
確認附件及相關零件沒有損傷。當草或藤蔓纏繞
附件時,請停止引擎及附件,並清除纏繞的草或
藤蔓。
註
若未握住機器而拉動緊急釋放夾扣,可能會導致
機器掉落砸到您的腳。請一手握緊機器的主管,
再拉動緊急釋放夾扣。
在操作前,請先確定肩背帶上的緊急釋放夾扣可
正常運作。
停止(圖22)
降低引擎速度並以待機狀態運行一段時間,然後關閉
點火開關 (10)。
警告
修剪配件在引擎關閉或是動力控制釋放後,如仍
繼續旋轉則將可能會造成傷害。
當單元關機後,確認修剪配件在單元設定停機前
已經停止。
保 養
可由任何非公路用引擎修理機構或人員進行保養、更
換或修理排氣控制裝置以及系統。
化油器調整(圖23)
警告
當調整化油器時,修剪配件可能會旋轉。
尚未將完整的離合器蓋及管路組裝完成前,請勿
啟動引擎!否則離合器可能會鬆脫並造成人身傷
害。
燃料與空氣在化油器中混合。當引擎在工廠做測
試運作時,化油器已作基本調整。
根據氣候與海拔作進一步調整是有其必要性。化
油器有一種調整可能性:
T=怠速調整螺絲
怠速調整 (T)
檢查空氣過濾器是否清潔。當怠速正確時,修剪配件
並不會轉動。若調整為必要,請在引擎運作時將T-螺
絲關閉(順時針),直到修剪配件開始轉動為止。開
啟(逆時針)螺絲直到修剪配件停止。當引擎在所有
低於修剪配件開始轉動的位置皆能順暢運作時,此即
代表您已經調到正確怠速。
當修剪配件在完成怠速調整後仍繼續轉動時,請聯絡
HITACHI經銷商。
註
標準待機轉速為每分鐘2200-2800轉。
警告
當引擎處於待機狀態時,於任何狀況下修剪配件
都不應該會轉動。
空氣過濾器(圖24)
空氣過濾器必須保持乾淨且無塵土附著,以避免:
○ 化油器故障
○ 啟動問題
○ 引擎動力減損
○ 引擎零件上不必要的磨損
○ 燃料耗用異常
每天清理空氣過濾器或在塵土極高區域工作時,應更
加頻繁清理。
清理空氣過濾器
移除空氣過濾器蓋及濾心 (19)。以溫肥皂水清洗。
重新安裝前,請檢查濾心是否已乾燥。當空氣過濾器
在使用過一段時間後,即無法完全清理乾淨,因此必
須定期更換新的過濾器。而毀損的濾心必須隨時更
換。
燃料過濾器(圖25)
將所有的燃料自燃料箱排乾,並將燃料過濾線自箱中
拉出。
將過濾器單元自支架組件中拉出,並將該單元置於含
洗潔劑的溫水中清洗。
徹底清洗直到所有洗潔劑無殘留為止。
將多餘的水分擠出(請勿用擰的),並讓該單元在空
氣中乾燥。
火星塞(圖26)
火星塞的狀態會受下列影響:
○ 不正確的化油器設定。
○ 錯誤的燃料混合物(汽油中含過多機油)。
○ 空氣過濾器髒汙。
○ 運作困難的狀態下(例如:寒冷的天氣)。
造成火星塞電極上沉積的幾個因素,將可能導致故障
或是啟動困難。若引擎動力低落、難以啟動或是在怠
速時運作不良,請務必先檢查火星塞。若是火星塞髒
汙,請清理並檢查電極間距,必要時請進行調整。正
確的間距為0.6公釐。火星塞大約在操作100小時後
必須更換,或當電極嚴重磨耗時提早更換。
000BookCG40EASTha.indb15000BookCG40EASTha.indb15 2009/05/1516:33:092009/05/1516:33:09

消音器(圖27)
移除消音器,並在每操作100小時清除排氣口或消音
器進氣口上過多的積碳。
氣缸(引擎冷卻)(圖28)
此引擎為氣冷,且空氣必須在引擎周圍及汽缸頭上的
冷卻鰭翼上,無阻礙地流動以避免過熱。
每操作100小時或每年一次(視狀況需要時可以更頻
繁),請清理鰭翼及引擎外部表面上,可能造成散熱
不良之塵土、油漬。
註
請勿在移除引擎護罩或消音器護罩下操作引擎,
此舉會造成過熱及損傷引擎。
角度變速器(圖29)
每操作50小時,請移除在角度變速器側邊的潤滑油
添加塞,並檢查角度變速器或角度齒輪箱內潤滑油高
度。
若是在齒輪兩側無法目視到潤滑油,請注入高品質鋰
基多效潤滑油至3/4滿。
請勿完全填滿變速器箱。
刀片
警告
當處理或是對刀片進行保養時,請穿戴防護手
套。(圖30)
○ 請使用鋒利的刀片。鈍刀較可能造成遲滯及反作
用推力。若固定螺帽已損傷且難以鎖緊,請更
換。
○ 更換刀片時,請採購HITACHI推薦具有25.4公釐
(一英吋)裝配孔者。
○ 當安裝鋸齒刀片時,請保持齒面朝上。80齒的刀
片可以任一面朝上使用。.
○ 請針對工作種類使用正確的刀片。
○ 請使用適當的工具更換刀片。
○ 當修剪邊變得不鋒利時,請如圖所示將之磨銳或
銼利。不正確的磨銳方式可能會造成過度振動。
○ 當刀片彎折、彎曲、破裂、斷裂或損傷時,請即
拋棄不再使用。
註
當磨銳刀片時,維持原本齒型基底半徑的形狀,
對於防止破裂相當重要。
保養時程
下述提供一些基本保養說明。
若需更進一步的訊息,請聯絡HITACHI經銷商。
日常保養
○ 清潔單元外部。
○ 檢查背帶無破損。
○ 檢查刀片護罩是否有損傷或破裂。
○ 若有撞擊或裂痕時,請更換護罩。
○ 檢查修剪配件已正確位於中心、鋒利,並且沒有
裂痕。偏離中心的修剪配件,將會引發可能損害
單元的巨大振動。
○ 檢查修剪配件螺帽是否已經充分鎖緊。
○ 確認刀片傳輸護罩沒有損傷,且也已穩固裝配完
成。
○ 檢查螺帽與螺絲是否已經充分鎖緊。
每週保養
○ 檢查啟動器,尤其是電線及回彈彈簧。
○ 清潔火星塞外部。
○ 移除火星塞並檢查電極間距。調整至0.6公釐或更
換火星塞。
○ 清潔氣缸上的散熱鰭翼,並檢查啟動器進氣口無
阻塞。
○ 檢查角度齒輪箱已填滿3/4的潤滑油。
○ 清潔空氣過濾器。
每月保養
○ 以汽油沖洗燃料箱。
○ 清潔化油器外部及其周邊空間。
○ 清潔風扇及其周邊空間。
註
當向離您最近的經銷商訂購零件,請使用本說明
書中零件分解章節所示之料號。
中國語
16
000BookCG40EASTha.indb16000BookCG40EASTha.indb16 2009/05/1516:33:092009/05/1516:33:09

17
:
15
""
000BookCG40EASTha.indb17000BookCG40EASTha.indb17 2009/05/1516:33:092009/05/1516:33:09

1.
2.
3.
4.
5.
6.
7.
8.
9.
10.
11.
12.
13.
14.
15.
16.
5
14
416
15
1
3
7
8
6
10
2
911
12
13
18
000BookCG40EASTha.indb18000BookCG40EASTha.indb18 2009/05/1516:33:092009/05/1516:33:09

19
○
○
○
○
○
○
○
○
○
○
○
○
(HAVS)
HAVS
/
/
○/
○
/
○
○
○/
/ /
○
○
○/
/
○
○
3
○
○/
○/
○
○
○
○
15
○
○/
○
○
○
○
○
○
○
○ /
○/
○
○
○
○/
○
/
○/
000BookCG40EASTha.indb19000BookCG40EASTha.indb19 2009/05/1516:33:102009/05/1516:33:10
Other manuals for CG40EAS
1
Table of contents
Languages:
Other Hitachi Koki Brush Cutter manuals