Holman 40983 Manual

Instruction Guide
40983
Holman
Rancho Cordova, CA 95742
800-343-7486
InstallationSupport@Holman.com
20190705R1
DATE: ______________

Instructions –40983
For Technical Support Call: 800-343-7486, Monday-Friday, 7AM - 4 PM (PST) Page 2
*PLEASE READ ALL INSTRUCTIONS AND WARNINGS PRIOR TO ASSEMBLING,
INSTALLING, AND USING THIS PRODUCT.*
Warning
Always check for wires, fuel tanks and lines, brake lines and other important vehicle
functionality items prior to drilling and installing all products.
Tools Needed
7/16” Socket and Wrench
1/2”Socket and Wrench
9/16” Socket and Wrench
Table of Contents
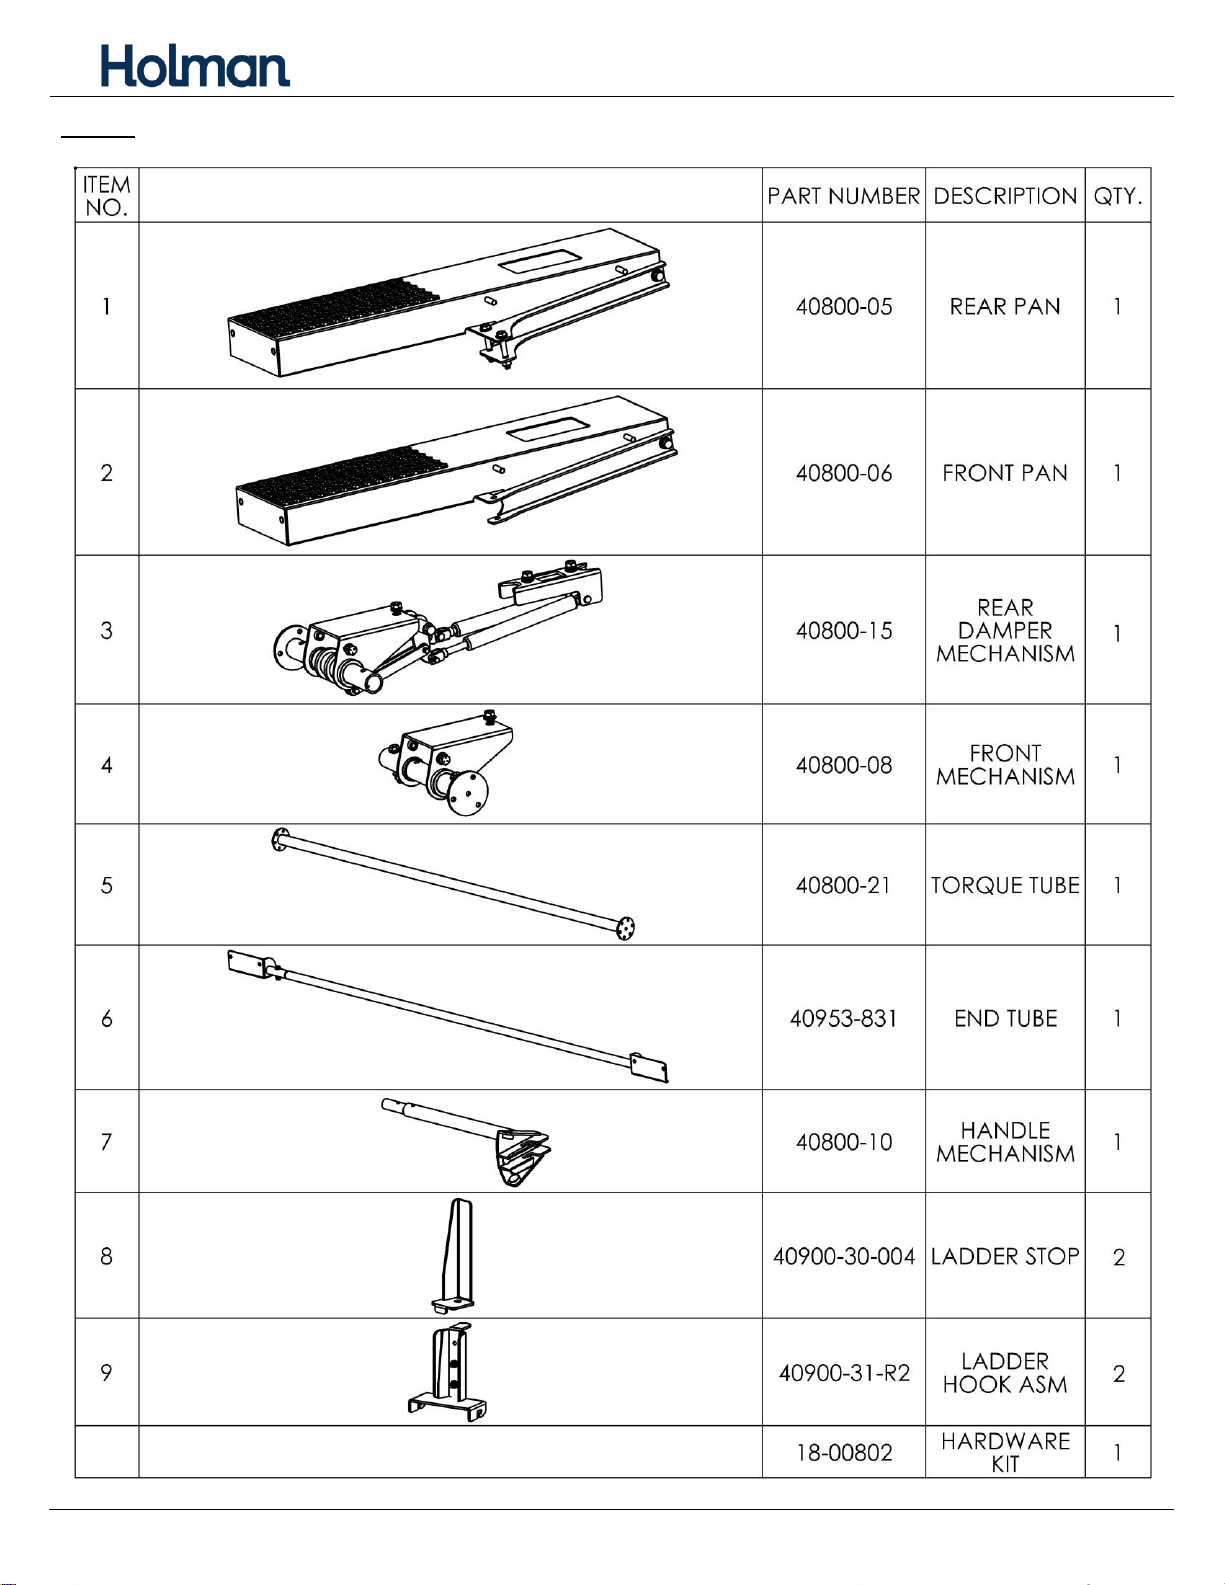
Parts List ..........................................................................................................................................3
Hardware List ..................................................................................................................................4
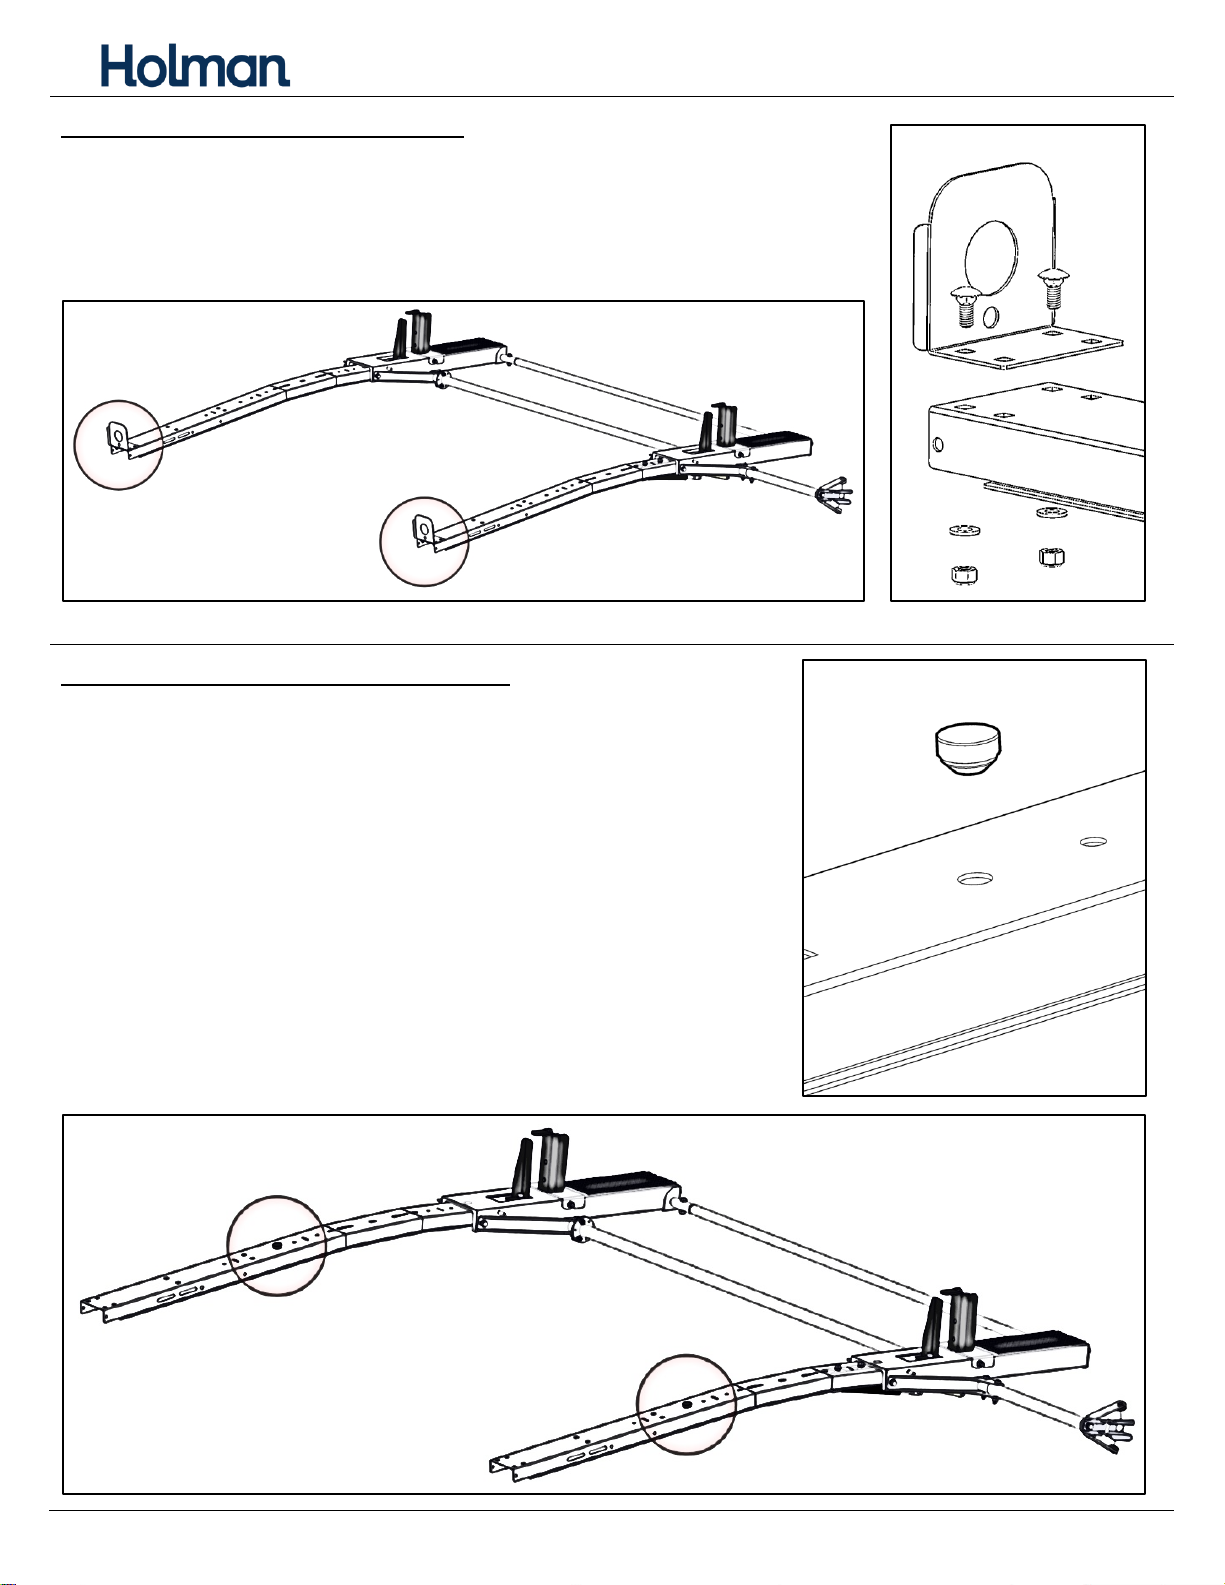
Step 1 –Remove Bow Stops ...........................................................................................................5
Step 2 –Install Rubber Bumpers .....................................................................................................5
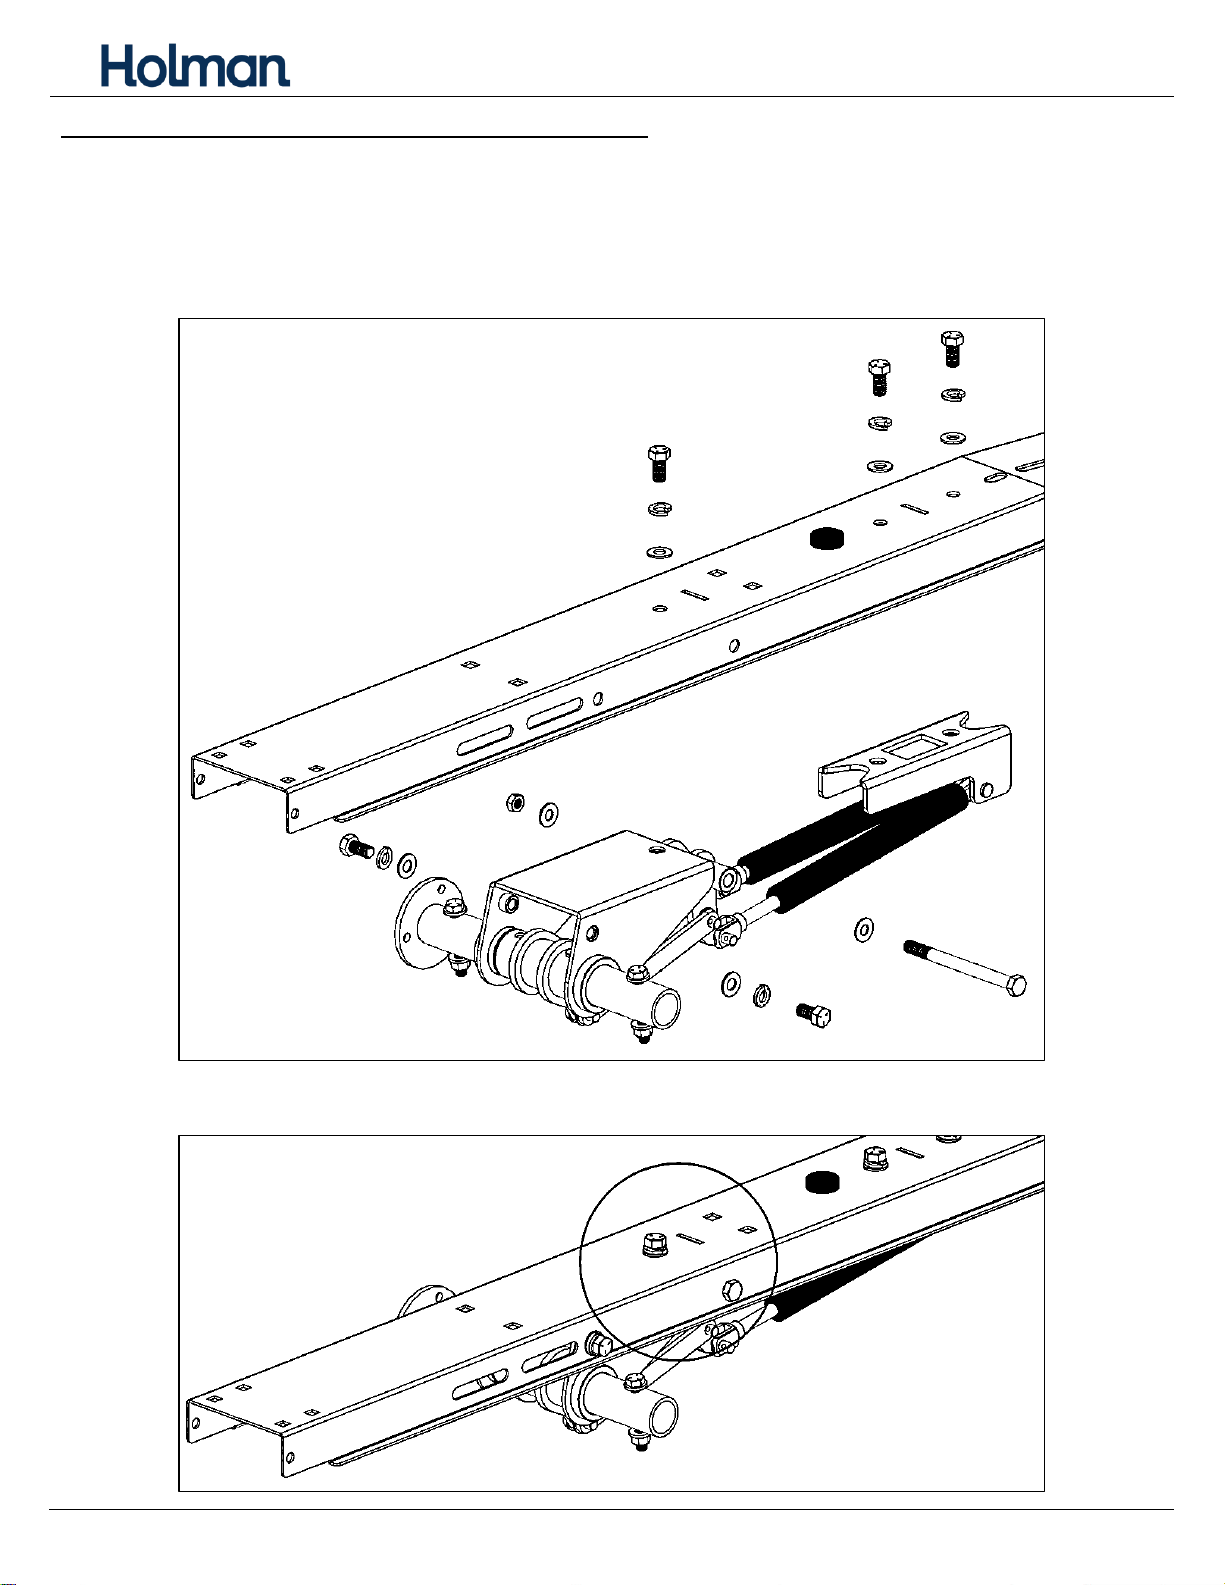
Step 3 –Install Rear Damper Mechanism .......................................................................................6
Step 4 –Install Rear Wheels ...........................................................................................................7
Step 5 –Install Rear Pan .................................................................................................................8
Step 6 –Install Front Mechanism ...................................................................................................9
Step 7 –Install Front Wheels ........................................................................................................10
Step 8 –Install Front Pan ..............................................................................................................11
Step 9 –Install Torque Tube .........................................................................................................12
Step 10 –Install End Tube .............................................................................................................13
Step 11 –Install Ladder Hooks ................................................................................................ 14-16
Step 12 –Install Ladder Stops........................................................................................................17
Step 13 –Install Handle Mechanism .............................................................................................18
Step 14 –Use Handle ....................................................................................................................19
Before You Begin
Read all instructions.
Be sure to have ladder rack installed on vehicle. This kit is a driver side addition.
DO NOT EXCEED MANUFACTURERS WEIGHT CAPACITY FOR ROOF.

Instructions –40983
For Technical Support Call: 800-343-7486, Monday-Friday, 7AM - 4 PM (PST) Page 3
Parts

Instructions –40983
For Technical Support Call: 800-343-7486, Monday-Friday, 7AM - 4 PM (PST) Page 4
Hardware

Instructions –40983
For Technical Support Call: 800-343-7486, Monday-Friday, 7AM - 4 PM (PST) Page 5
Step 1 –Remove Bow Stops
If installed, remove the bow stops from the end of each bow on
the drivers’ side of the ladder rack.
Step 2 –Install Rubber Bumper
Install the rubber bumper in the large round hole on
each bow in the location shown below. These rubber
bumpers push into place.

Instructions –40983
For Technical Support Call: 800-343-7486, Monday-Friday, 7AM - 4 PM (PST) Page 6
Step 3 –Install Rear Damper Mechanism
Mount the rear bow damping mechanism to the underside of the rear bow in the locations
shown. Use the hardware pre assembled in the damping mechanism to attach to the bow.
The damper may need to be removed to attach all necessary hardware. The damper can
be re-attached once the rack is complete and the handle can be used as leverage.
TIGHTEN.
While installing the 3/8” x 4-1/2” hex head bolt, be sure to NOT lose the pre-assembled
nylon washers. These nylon washers go to the inside of the bow.

Instructions –40983
For Technical Support Call: 800-343-7486, Monday-Friday, 7AM - 4 PM (PST) Page 7
Step 4 –Install Rear Wheels
Slide the wheel axle through the holes at the end of the bow. Place a nylon washer on the
axle against the outside of the bow. Place a wheel at each end of the axle, one on each
side of the bow. Cap each wheel with a wheel cap.
**WHILE PLACING THE PAN IN THE NEXT STEP, BE SURE THE WHEEL CAPS DO NOT COME OFF.**

Instructions –40983
For Technical Support Call: 800-343-7486, Monday-Friday, 7AM - 4 PM (PST) Page 8
Step 5 –Install Rear Pan
Identify the rear pan
assembly, it will have two
mounting locations on one
of the arms as shown.
Remove the pre-installed
hardware from the damper
mechanism.
Place the rear pan on top of
the wheels and bow. BE
SURE THE WHEEL CAPS DID
NOT COME OFF.
Align the arms from the rear
pan with the holes in the
tube on the damper
mechanism where the
previous hardware was
removed.
Bolt ONLY the front side of
the rear pan assembly to
the tube using the hardware
removed previously in this step. At the rear of the pan assembly, insert the hex head bolt
to align the pan arm with the tube. DO NOT LOSE this hardware. It will be permanently
installed when the handle mount mechanism is installed.
Snug tighten, but allow movement.

Instructions –40983
For Technical Support Call: 800-343-7486, Monday-Friday, 7AM - 4 PM (PST) Page 9
Step 6 –Install Front Mechanism
Mount the front mechanism to the underside of the front bow in the location shown.
Use the hardware pre-installed on the mechanism to attach to the front bow.
TIGHTEN.

Instructions –40983
For Technical Support Call: 800-343-7486, Monday-Friday, 7AM - 4 PM (PST) Page 10
Step 7 –Install Front Wheels
Slide wheel axle in the holes at the end of the front bow. Place a nylon washer on the axle
up against the outside of the bow. Place a wheel at each end of the axle, one on each side
of the bow. Cap each wheel with a wheel cap.
**WHILE PLACING THE PAN IN THE NEXT STEP, BE SURE THE WHEEL CAPS DO NOT COME OFF.**

Instructions –40983
For Technical Support Call: 800-343-7486, Monday-Friday, 7AM - 4 PM (PST) Page 11
Step 8 –Install Front Pan
Remove the hardware shown below from the damper mechanism.
Place the front pan on top of the wheels and bow. BE SURE THE WHEEL CAPS DID NOT
COME OFF.
Align the arms from the front pan with the holes in the tube of the front mechanism
where the previous hardware was removed.
Snug tighten, but allow movement.

Instructions –40983
For Technical Support Call: 800-343-7486, Monday-Friday, 7AM - 4 PM (PST) Page 12
Step 9 –Install Torque Tube
Place the torque tube in between the front and rear bow in the location shown.
Attach the torque tube to the front and rear bow using one 1/4" x 7/8” hex head,
two 1/4" flat washers and one 1/4" nyloc nut for each of the 3 holes. Repeat on each bow.
Snug tighten, but allow movement.

Instructions –40983
For Technical Support Call: 800-343-7486, Monday-Friday, 7AM - 4 PM (PST) Page 13
Step 10 –Install End Tube
Place the end tube assembly at the end of the front and rear bow.
Attach the end tube assembly to both bows using 5/16" x 5/8” hex heads, 5/16” lock
washers and 5/16" flat washers in that order.
Snug tighten, but allow movement.

Instructions –40983
For Technical Support Call: 800-343-7486, Monday-Friday, 7AM - 4 PM (PST) Page 14
Step 11 –Install Ladder Hooks
Determine best location for the ladder hooks. There are two options on each bow. These
options can be identified by locating the threaded studs sticking outwards from the bow.
Typically, the ladder hook on the front bow is installed on the threaded stud closest to the
end of the bow.

Instructions –40983
For Technical Support Call: 800-343-7486, Monday-Friday, 7AM - 4 PM (PST) Page 15
Typically, the ladder hook on the rear bow changes with the type of ladder being used on
the rack.
When using an extension ladder, place the ladder hook at the threaded location closest to
the end of the pan.

Instructions –40983
For Technical Support Call: 800-343-7486, Monday-Friday, 7AM - 4 PM (PST) Page 16
When using a step ladder, place the ladder hook at the threaded location closest to the
center of the bow.
Using the hardware and the threaded studs on the bows, loosen the nuts and slide ladder
hook into place. Be sure the washers are on the outside of the ladder hook.
TIGHTEN.

Instructions –40983
For Technical Support Call: 800-343-7486, Monday-Friday, 7AM - 4 PM (PST) Page 17
Step 12 –Install Ladder Stops
Identify the potential ladder stop location near the previously installed ladder hooks.
Remove the installed hardware on the bows next to the rectangular cut outs near the
installed ladder hooks.
The ladder stop and the ladder hook will provide a secure location for a ladder to be
placed.
Be sure the flange on the ladder stop aligns inside the rectangular cut out in the bow.
Attach the ladder stop using the hardware previously removed.
TIGHTEN.

Instructions –40983
For Technical Support Call: 800-343-7486, Monday-Friday, 7AM - 4 PM (PST) Page 18
Step 13 –Install Handle Mechanism
Place sealant along the swage joint to ensure no water can enter the tube.
Insert the handle mechanism into the swage on the rear bow. Use the hardware removed
in Step 5 to attach the mechanism.
TIGHTEN.

Instructions –40983
For Technical Support Call: 800-343-7486, Monday-Friday, 7AM - 4 PM (PST) Page 19
Step 14 –Use Handle
Go back and tighten all hardware on rack. Start at the rear and in the middle of the rack
and work your way forward.
Use the handle that is included with the main rack assembly to operate the rack. Be sure
there are no issues with operation.
If the dampers were not able to be installed in previous steps, go back and install the
dampers as needed by using the handle as leverage.

Instructions –40983
For Technical Support Call: 800-343-7486, Monday-Friday, 7AM - 4 PM (PST) Page 20
ENSURE ALL HARDWARE IS TIGHT.
DO NOT EXCEED MANUFACTURERS WEIGHT CAPACITY.
YOUR INSTALLATION IS NOW COMPLETE.
Table of contents
Other Holman Automobile Accessories manuals
Popular Automobile Accessories manuals by other brands

Keith
Keith WALKING FLOOR Workhorse owner's manual

Monster
Monster iCruze MPC FX IC-MB1 Installation & user guide

Carefree
Carefree FREEDOM FREESTYLE WM Service manual

AdvanceTec
AdvanceTec AT6549A user manual

IN-COMMAND
IN-COMMAND NCTP100 Installation and operation manual

Pogo
Pogo Alert+ operating instructions