HOMCOM B71-057 Installation guide

ASSEMBLY & INSTRUCTION MANUAL
IMPORTANT, RETAIN FOR FUTURE REFERENCE: READ CAREFULLY
INac009_IT
B71-057

1
Owner’s Manual Index
Introduction
● The Owner’s Responsibility
● Trailer Compatibility.
● Reflectors
● Trailer Warnings
● Pre-Ride Safety Check
Assembly
● Introduction to Assembly
● Assembling the Frame
● Setting up the Hitch Arm
● Installing the Wheels.
● Installing the Push Bar and front wheel
● Attaching the Trailer to Bike
● Attaching Safety Strap to Bike
● Fixed the front wheel as trailer
● Installing Flag
The Owner’s Responsibility
WARNING: The trailer is designed and constructed to provide a portable,
comfortable and sturdy addition to your outdoor ventures. Please read these
instructions and all warnings carefully before using and keep the instructions for
future reference.
If the Trailer was purchased unassembled, it is the owner’s responsibility to follow
all assembly and adjustment instructions exactly as written in this manual, and any
“special instruction” supplied to ensure complete and proper assembly. Make sure
all fasteners and components are securely tightened during installation.
NOTE:
● Periodically check that all fasteners and components are securely tightened.
● Check the working conditions of both bike and trailer before each use. If you
discover broken components, misalignment or missing parts, correct the
problem prior to use.
If the Trailer was purchased assembled, it is the owner’s responsibility before using
the Trailer for the first time, to make sure the Trailer has been assembled and
adjusted exactly as written in this manual, and any “Special Instructions” supplied
and to make sure all fasteners and components are securely tightened.
Thank you for your purchase. If you have problems, do not return to store. Call
customer service. Please refer to model/date code label on product or cover of
manual.
EN

2
Warning and Safety Information
Reflectors
WARNING: For your safety, do not use the Trailer if the reflectors are incorrectly
installed, damaged, or missing. Make sure the reflectors are vertical and pointing
straight back. Do not allow the visibility of the reflectors to be blocked by clothing or
other articles. Dirty reflectors do not work well. Clean the reflectors, as necessary,
with soap and a damp cloth.
Trailer warnings
WARNING: Failure to comply with the manufacture’s instructions can lead to
serious injury or death of the passenger/rider.
ŸAdult assembly required.
ŸThis trailer is only for cargo use, not for use as a child carrier.
ŸOnly use bicycles with 26” or 28” wheels capable of pulling a 40 kg trailer.
Contact your manual or bicycle retailer for more information
ŸCaution on driving behavior of cycle/cycle trailer set, especially when driving
downhill or around corners.
ŸNever exceed a safe speed. Recommended maximum speed is 8 MPH(13KMH)
and slowing to no more than 3 MPH(5KMH) when turning.
ŸNot for cargo(such as but not limited to bricks, debris, logs,etc.).
ŸAs cargo trailer: Maximum weight is 88lb (40KG). Maximum load weight is 66lb
(30KG). .
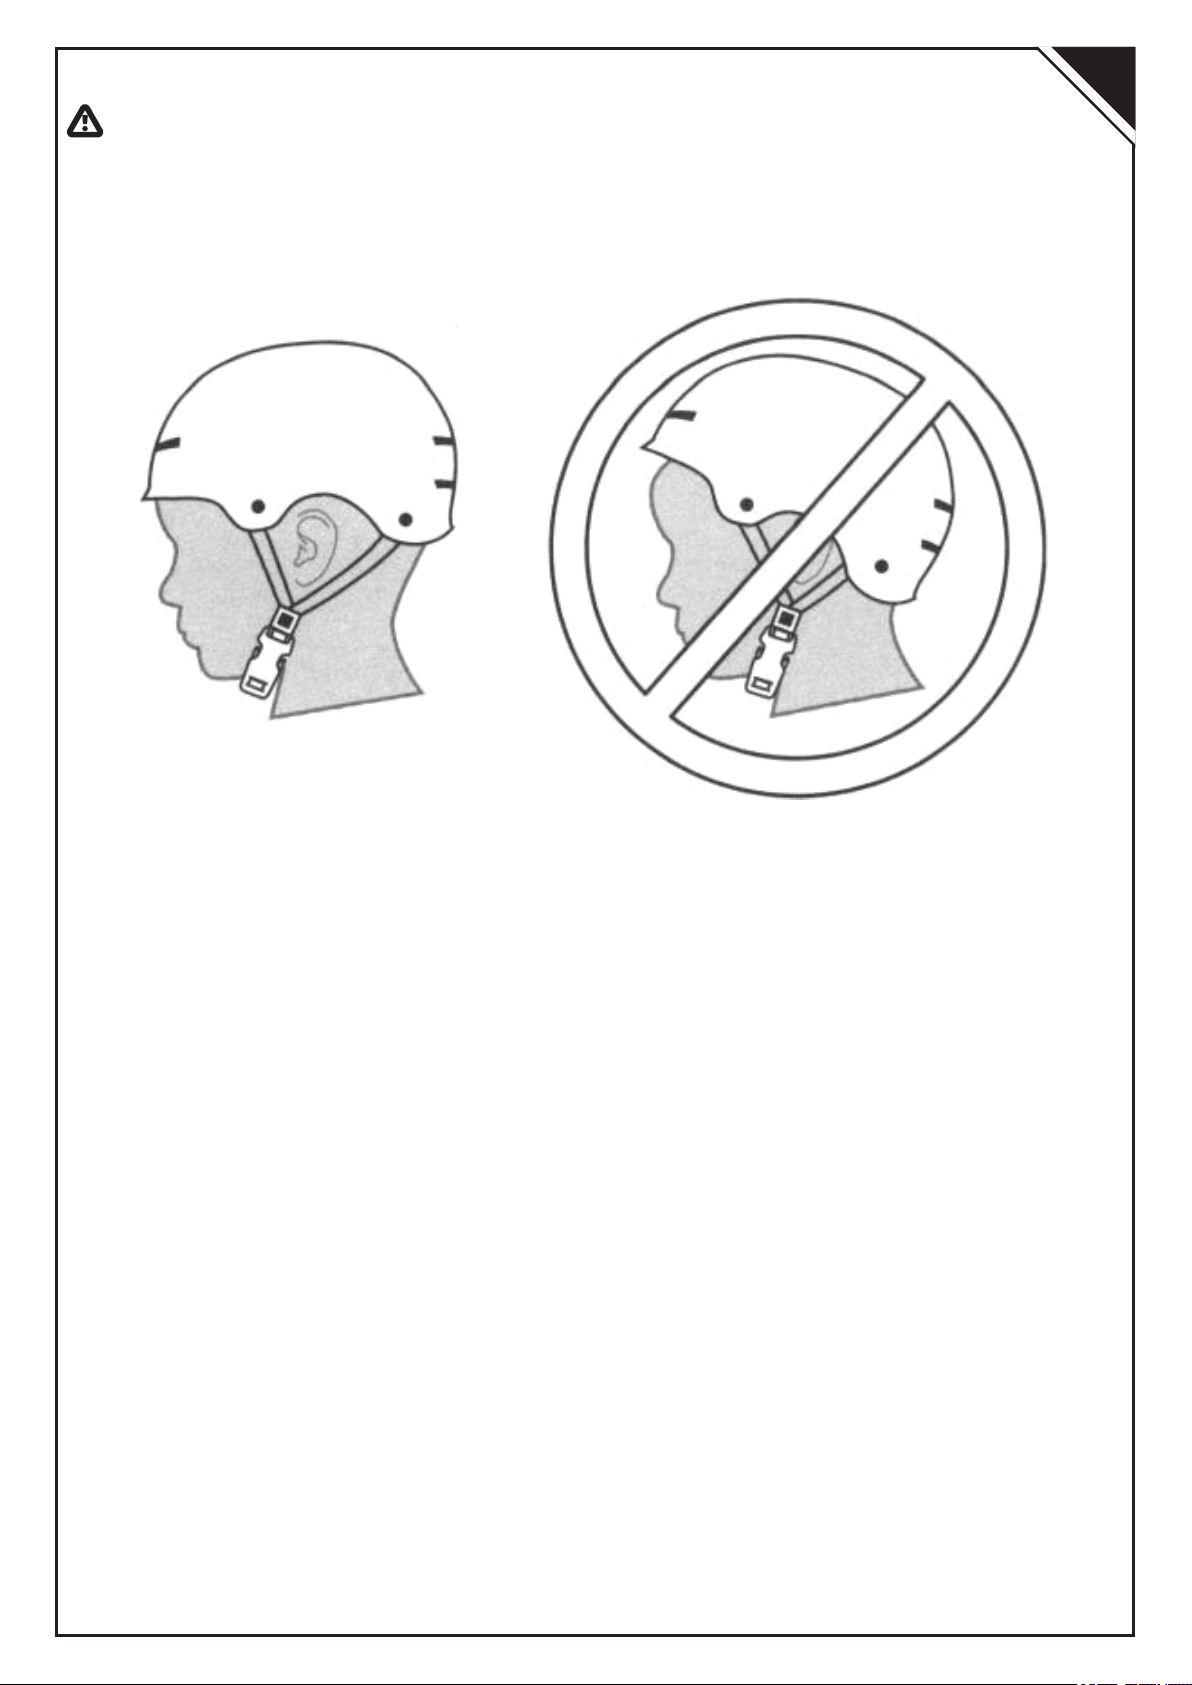
ŸRiders must wear an approved bicycle helmet when riding in this product.
ŸThe trailer is not suitable for running or skating. Do not use trailer in snow or icy
conditions.
ŸDo not install a car seat or any other seating device not approved by the
manufacturer inside the trailer.
ŸDo not use on rocky or uneven road surfaces.
ŸDo not park near inclines or uneven roads that may cause the trailer to tip.
ŸMake no modification to the trailer.
ŸBefore each ride, ensure the attached trailer and trailer components do not
interfere with braking, pedaling, or steering of the bicycle.
ŸNever use a trailer at night or times of limited visibility.
ŸObey all local laws and regulations for bicycles and trailers.
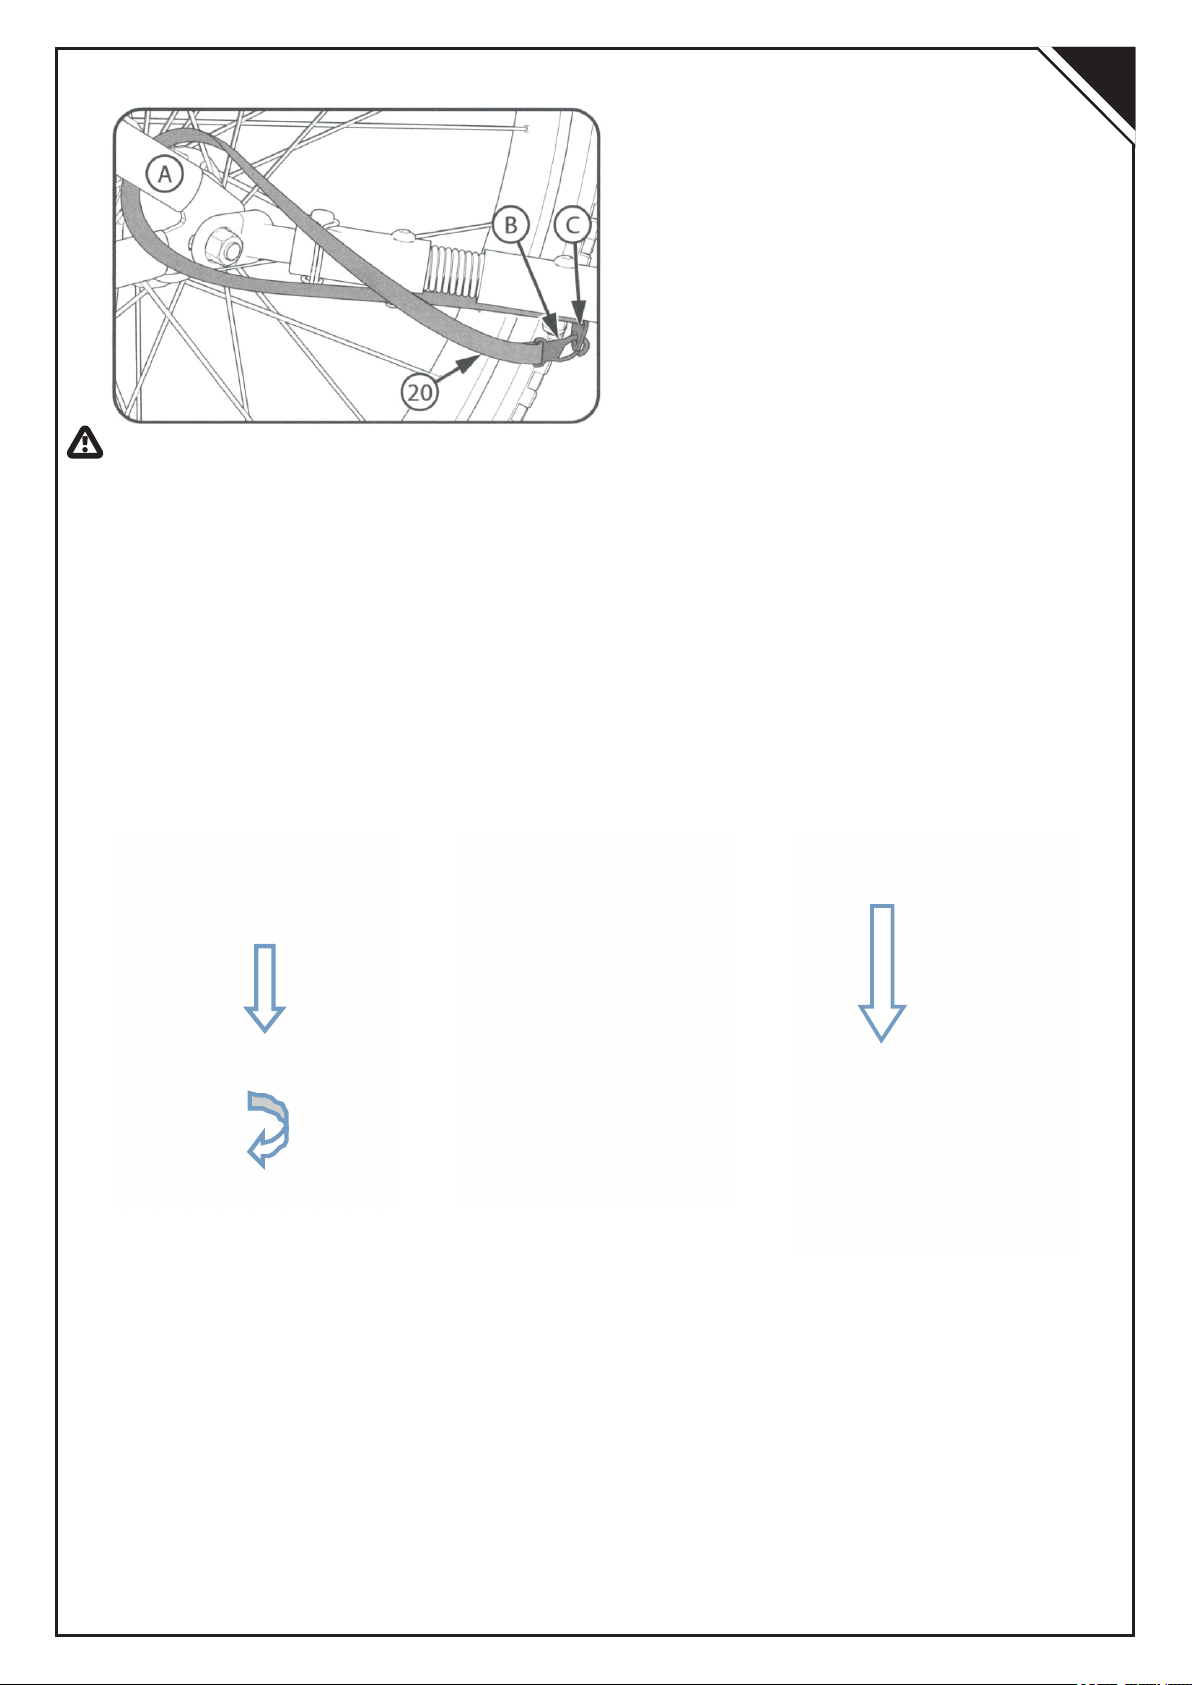
ŸCheck all fasteners before each ride.
ŸEnsure lock pins are fully inserted/engaged before each ride.
ŸAlways use the safety flag when pulling this trailer.
ŸThe bicycle to which the trailer is attached should undergo a safety check by a
qualified bicycle mechanic before attaching the trailer to it.
ŸCheck tires before rider. Inflate tires to recommended pressure shown on tire
sidewall.p
EN

3
● Ensure brakes on your bicycle work properly before each ride. Braking distance
is increased when pulling a trailer.
● Do not use cleaning solvents. Clean only with soap and water.
Draw bar Load between 30N and 80N !
Checking the draw bar load:
Pull the draw bar up to the front of the bike.
Pull it up straight ahead with the tension meter.
The tension range is between 30-80N.
● Note to draw the attention of the user to possible nation legal requirement
when the cycle is to be used on public roads (e.g.lighting and reflector)
● Cycle trailers pulled by an EPAC can be restricted by law.
● The person riding the towing bicycle should be at least 16 years of age and in
good physical condition.
● On the negative influence of the trailer on the braking distance of the cycle when
the trailer is attached.
Pre-Ride Safety check
Before each ride:
1. Ensure Bike and Trailer are in top working condition.
2. Check TIRE AIR PRESSURE of both Bike and Trailer.
3. Check to ensure Hitch Connector and Safety Strap are secured.
4. Secure all cargo and fasten top cover.
5. HELMETS ON! Ensure rider is on and secure.
Introduction to Assembly
This Owner’s Manual is made for several different Trailers:
● Some illustrations may vary slightly from the actual product.
● Follow instruction completely.
● If the trailer has any parts that are not described in this manual, look for
separate “Special Instructions” that are supplied with the Trailer.
● Models may have different accessory items such as bags, baskets, reflectors,
cup holder, rack, etc.
● All features, components and accessories are not included no all models.
● Use the index page to locate specific sections of this manual.
● Please read through this entire manual before beginning assembly or
maintenance.
● If you are not confident with assembling this unit, refer to local bike shop.
WARNING: Keep small parts away from children during assembly.
NOTE: All of the directions (right, left, front, rear,etc.) in this manual are as seen by
the rider.
Do not dispose of the carton and packaging until you complete the assembly of the
Trailer. This can prevent accidentally discarding parts of the Trailer.
EN

4
Trailer Parts Include In The Box
Assembling the Frame
Steps:
1. Place the cargo basket frame on a flat surface.
2. Unfold Side Frames so they are upright.
3. Then unfold other two-directions Frame, push side frames apart and insert end of
bar into clamp bracket.
4. Insert Safety Pin and snap clip ring over end of Safety pin as show.
Safety Pin
Setting up the Hitch Arm
Steps:
1. Turn the unit on it’s side.
2. Remove the Safety Pin from rear hole as shown.
3. Rotate Hitch Arm so that it points forward.
4. Insert Safety Pin in FORWARD hole and snap clip ring over end of Safety Pin as
shown.
EN

5
Installing the Wheels
Steps:
1. Turn the unit on it’s back.
2. Slide each Wheel Shaft (A) into the Trailer Axle (B).
3. Press the Lock Button (C) until the Wheel locks into position and cannot be
pulled out. .
4. Repeat for opposite side.NOTE: To remove the Wheel, push in the Lock Button
and pull the Wheel out of the Axle.
WARNING:
ŸFor easy towing and safe handling, check tires often for proper inflation and
wear. Check tire pressure regularly and inflate tires to within the range shown on
the tire sidewall.
ŸFailure to properly install wheels could allow them to come off during use. This
could lead to serious injury.
Installing the Pull Bar and Front Wheel
Steps: see the picture as blow
EN
Safety Pin Hitch Arm
WARNING:Do not use the trailer without proper installation of the safety pin.

6
6.Pull 7. Fixed pull handle
EN
1.insert front wheel to hole 2. spin the knob 3. insert the screw to hole
4. spin the knob 5. parking

7
EN
WARNING: Ensure there is fully thread engagement and threads are visible past
the end of the nut.
If there are not threads visible past the end of the nut, contact a local bicycle shop
for proper installation.
WARNING: If the Hitch interferes with your bike or other bike attachments, or if it
does tighten securely, do not use the Trailer. Contact a local bicycle shop for help
with proper installation.
Attaching Safety Strap to Bike
Steps:
1. Route Safety Strap (20) around Bike’s Frame (A) as shown.
2. Securely fasten Strap Clamp (B) to Bracket (C) as shown.
3. Ensure wheel functions properly with no interference.
1. Remove the left rear Axle Nut (A) from the bike.
2. Fasten the Hitch Connector (9) onto the rear axle using the existing Axle Nut as
shown.
3. Ensure wheel is properly aligned and chain properly tightened as described in
bicycle owner’s manual.
4. Install and tighten Axle Nut as described in bicycle owner’s manual.
Attaching the Trailer to Bike
Steps:
(Hitch Connector (9) may be pre-install from the factory)
1. Insert the Hitch Connector (9) into the Hitch Arm (5).
2. Insert Safety Pin (7) and snap Clip Ring (A) over end of Safety Pin as shown.

8
EN
WARNING: If the Safety Strap interferes with your bike or other bike attachments,
or if it does not tighten securely, do not use the Trailer. Contact your a local bicycle
shop for proper installation.
NOTE: To remove the Trailer from the bike, reverse these installations steps.
Ensure wheel is properly aligned and chain properly tightened as described in
bicycle owner’s manual. Install and tighten Axle Nut as described in bicycle owner’s
manual.
Fixed the front wheel as trailer
Installing Flag
The Flag slides into the Slot in the side of the left Frame.
Steps:
1. Connect both sections of the Flag as shown.
2. Locate the Slot on the rear corner of the frame and slide flag shaft all the way in
so that it is secure.

9
EN
WARNING: Do not use Trailer without Flag installed.
WARNING:
ALWAYS WARE YOUR HELMET WHEN RIDING THIS PRODUCT!
CORRECT INCORRECT

10
Contenuti
Introduzione
Ÿ Responsabilità del proprietario
Ÿ Compatibilità del rimorchio
Ÿ Riflettori
Ÿ Avvertenze per il trailer
ŸControlli di sicurezza prima dell’uso
Assemblaggio
Ÿ Introduzione al montaggio
Ÿ Assemblaggio il telaio
Ÿ Installazione del braccio di traino
Ÿ Installazione delle ruote.
Ÿ Installazione della barra di spinta e della ruota anteriore
Ÿ Fissaggio del rimorchio alla bicicletta
Ÿ Fissaggio della cinghia di sicurezza alla bicicletta
Ÿ Fissaggio della ruota anteriore come rimorchio
Ÿ Installazione della bandierina
Responsabilità del Proprietario
AVVERTENZA: Il rimorchio è progettato per divenire un'aggiunta portatile, comoda
e robusta alle vostre avventure all'aperto. Si prega di leggere con attenzione
queste istruzioni e avvertenze prima dell'uso – conservarle per riferimenti futuri.
Se il rimorchio è stato acquistato smontato, è responsabilità del proprietario
seguire le istruzioni contenute nel presente manuale, insieme alle "istruzioni
speciali", per garantire che questo prodotto sia assemblato in maniera corretta.
Assicurarsi che tutti i dispositivi di fissaggio e i componenti siano stretti in
sicurezza durante l'installazione.
NOTA:
Ÿ Controllare regolarmente tutti i dispositivi di fissaggio e i componenti,
assicurandosi che siano stretti in sicurezza.
Ÿ Controllare le condizioni della bicicletta e del rimorchio prima di ogni uscita. Se
si rilevano parti rotti, disallineamenti o parti mancanti, correggere il problema
prima dell'uso.
Se il rimorchio è stato acquistato già assemblato, è responsabilità del proprietario
assicurarsi che sia stato assemblato e regolato in maniera coerente con quanto
descritto nel presente manuale. Assicurarsi che vengano seguite eventuali
"istruzioni speciali". I dispositivi di fissaggio e le parti devono essere stretti in
sicurezza durante l'installazione.
Vi ringraziamo per il vostro acquisto. In caso di problemi, non tornare in
direttamente presso il punto vendita. Contattare il servizio clienti. Fare riferimento
all'etichetta del codice modello/data sul prodotto o sulla copertina del manuale.
IT

11
Compatibilità del Rimorchio
Riflettori
AVVERTENZA:
Per la vostra sicurezza, non utilizzare il rimorchio se i riflettori sono installati
incorrettamente, danneggiati o mancanti. Assicurarsi che i riflettori posteriori siano
installati in verticale. Non permettere che la visibilità dei riflettori sia bloccata da
indumenti o altri oggetti. Se i riflettori sono sporchi non funzioneranno al meglio.
Pulirli con sapone e un panno umido.
Avvertenze sul rimorchio
AVVERTENZA:
Ÿl mancato rispetto delle istruzioni può causare lesioni gravi o mortali.
Ÿ Deve essere assemblato da un adulto.
Ÿ Questo rimorchio è progettato solo per trasportare merci– non usarlo per
trasportare i bambini.
Ÿ La velocità massima consigliata è di 8 mph (13 kmh). In curva, la velocità
massima consigliata è di 5 km/h.
Ÿ Come rimorchio da carico: il peso massimo è di 45 kg (100 libbre). Il carico
massimo è di 77,4 libbre (34,7 kg). Il peso del rimorchio è di 22,6 libbre (10,3 kg).
Ÿ Durante la guida è necessario indossare un elmetto adeguato.
Ÿ Il rimorchio non è adatto per correre o pattinare. Non utilizzare il rimorchio in
condizioni di neve o ghiaccio.
Ÿ Non installare all'interno del rimorchio un seggiolino per auto o qualsiasi altro
dispositivo di seduta non approvato dal produttore.
Ÿ Non utilizzare su strade rocciose o irregolari.
Ÿ Non parcheggiare il rimorchio vicino a strade ripide o irregolari: potrebbe
ribaltarsi.
Ÿ Non apportare alcuna modifica a questo rimorchio.
Ÿ Prima di ogni uscita, assicurarsi che il rimorchio e i componenti collegati non
interferiscano con la frenata, la pedalata o lo sterzo.
Ÿ Non utilizzare mai un rimorchio di notte o in orari in cui la visibilità è ridotta.
Ÿ Seguire tutte le normative e i regolamenti locali per biciclette e rimorchi.
Ÿ Controllare tutti i dispositivi di fissaggio prima di ogni uscita, assicurandosi che
siano stretti in sicurezza.
Ÿ Assicurarsi che i perni bloccanti siano completamente inseriti/innestati prima di
ogni uscita.
Ÿ Utilizzare sempre la bandierina di sicurezza quando si traina questo rimorchio.
Ÿ Prima di agganciarle al rimorchio, le biciclette devono essere sottoposte a
controlli di sicurezza da parte di un meccanico qualificato.
Ÿ Controllare le gomme prima di mettersi alla guida. Gonfiare gli pneumatici fino a
raggiungere la pressione indicata sul fianco dello stesso pneumatico.
Ÿ Assicurarsi che i freni della bicicletta funzionino correttamente prima di ogni
uscita. Lo spazio di frenata aumenta quando si traina un rimorchio.
Ÿ Non utilizzare solventi chimici per la pulizia. Pulire solo con acqua e sapone.
ENIT

12
Ÿ Ensure brakes on your bicycle work properly before each ride. Braking distance
is increased when pulling a trailer.
Ÿ Do not use cleaning solvents. Clean only with soap and water.
ŸPrestare la massima attenzione in discesa o in curva.
Ÿ Rimorchio da carico: il peso massimo è di 40 kg (88 libbre). Il carico massimo è
di 66 libbre (30 kg).
Ÿ
ŸTirare la barra di carico tra 30-80 N.
ŸControllare la barra di carico:
ŸTirarla fino alla parte anteriore della bicicletta.
ŸTirarla dritta in avanti con il tensiometro.
ŸL'intervallo di tensione deve essere compreso tra 30-80N.
Ÿ
Ÿ Prima di utilizzare questo prodotto su strade pubbliche, assicurarsi di
conoscere la normativa locale e nazionale (ad es. norme sull'illuminazione e sui
riflettori).
Ÿ I rimorchi per biciclette trainati da un EPAC potrebbero essere soggetti a
limitazioni per legge.
Ÿ Per guidare questa bicicletta da traino è necessario avere almeno 16 anni ed
essere in buone condizioni fisiche.
Ÿl Quando il rimorchio è agganciato a una bicicletta, lo spazio di frenata
necessario si allungherà.
Controllo di Sicurezza Pre-Uscita
Prima di ogni uscita in bici:
1. Assicurarsi che la bicicletta e il rimorchio siano in condizioni di funzionamento
ottimali
2. Controllare la pressione dell'aria degli pneumatici sia della bicicletta che del
rimorchio.
3. Assicurarsi che il gancio di traino e la cinghia di sicurezza siano fissati
saldamente.
4. Aggiungere il carico da trainare e fissare il coperchio superiore.
5. È necessario indossare l’elmetto durante la guida.
Istruzioni di Assemblaggio
Questo manuale è consultabile per diversi tipi di rimorchio:
Ÿ Alcune figure possono differire rispetto al prodotto reale.
Ÿ Assicurarsi di seguire tutte le istruzioni.
Ÿ Se il rimorchio è dotato di parti che non sono menzionate in questo manuale,
controllare le "istruzioni speciali" in dotazione con il rimorchio.
Ÿ Se non si è sicuri di come assemblare questa unità, rivolgersi a un negozio
specializzato di biciclette locale.
AVVERTENZA: Tenere le parti di piccole dimensioni lontano dalla portata dei
bambini durante il montaggio.
NOTA: Tutte le direzioni (destra, sinistra, fronte, retro, etc.) in questo manuale
sono viste dal punto di vista del guidatore.
Non smaltire alcun imballaggio fino a quando il rimorchio non è completamente
assemblato. Ciò impedirà di gettare via accidentalmente le parti.
ENIT

13
Parti del rimorchio incluse nella confezione
Assemblare il telaio
Passaggi:
1. Posizionare il telaio del cestello del carico su una superficie in piano.
2. Estendere i telai laterali, in modo che siano in rivolti in verticale.
3. Aprire l'altro telaio nelle due direzioni: separare i telai laterali e inserire
l'estremità della barra nella staffa di fissaggio.
4. Inserire il perno di sicurezza, quindi inserire l'anello a scatto sull'estremità del
perno di sicurezza, come mostrato in figura di seguito.
Spilla di sicurezza
Installare il braccio di traino
Passaggi:
1. Capovolgere l'unità su un lato.
2. Rimuovere il perno di sicurezza dal foro posteriore come mostrato in figura.
3. Ruotare il braccio di traino e rivolgerlo in avanti.
4. Inserire il perno di sicurezza nel foro anteriore, quindi posizionare l'anello a
scatto sull'estremità del perno di sicurezza, come mostrato in figura di seguito.
EN
Ruota anteriore
Barra trasversale Bandierina
Ruota
Telaio cestello di carico
Barra di traino
IT

14
Installare le ruote
Passaggi:
1. Capovolgere l'unità sul lato posteriore.
2. Far scorrere ciascun asse della ruota (A) nell'asse del rimorchio (B).
3. Premere il pulsante di blocco (C) finché la ruota non è entrata in posizione
corretta e non può essere estratta.
4. Ripetere i passaggi per il lato opposto.
NOTA: per rimuovere la ruota, premere il pulsante di blocco ed estrarla dall'asse.
AVVERTENZA:
Ÿ Per facilitare il traino e la manipolazione in sicurezza, controllare regolarmente
gli pneumatici per verificare che siano gonfiati correttamente e l’eventuale
usura. Controllare regolarmente la pressione degli pneumatici, assicurandosi
che siano gonfiati entro l'intervallo mostrato sul fianco degli stessi.
Ÿ Se le ruote non fossero installate correttamente, potrebbero cadere durante
l'uso, causando gravi lesioni personali.
Installare la barra di traino e la ruota anteriore
Passaggi: vedere le figure sottostanti
EN
Coppiglia Braccio di traino
AVVERTENZA:
Prima dell'uso, assicurarsi che la coppiglia sia installata correttamente.
IT

15
6.Tirare 7. Fissare la barra di traino
EN
1.inserire la ruota
anteriore nel foro
4. ruotare la manopola 5. parcheggiare
2. ruotare la manopola 3. inserire la vite nel foro
IT

16
EN
AVVERTENZA: Assicurarsi che le filettature siano visibili oltre l'estremità del dado.
Se così non fosse, contattare un negozio specializzato di biciclette locale per una
corretta installazione.
AVVERTENZA: Se il gancio di traino interferisce con la bicicletta o altri accessori, o
non è stretto in sicurezza, non utilizzare il rimorchio. Contattare un negozio
specializzato di biciclette locale per una corretta installazione.
Fissare la cinghia di sicurezza alla bicicletta
Passaggi:
1. Avvolgere la cinghia di sicurezza (20) attorno al telaio della bicicletta (A) come
mostrato in figura.
2. Fissare saldamente il morsetto della cinghia (B) alla barra (C) come mostrato in
figura.
3. Assicurarsi che le ruote ruotino correttamente senza alcuna ostruzione.
3. Rimuovere dalla bicicletta il dado dell'asse posteriore sinistro (A).
4. Fissare il connettore del gancio di traino (9) sull'asse posteriore, tramite il dado
dell'asse come mostrato in figura seguente.
5. Seguire il manuale d’uso della bicicletta, assicurandosi che le ruote siano
correttamente allineate e la catena ben tesa.
6. Segui il manuale d’uso della bicicletta, assicurandosi che il dado dell'asse sia
installato e stretto correttamente.
Fissare il rimorchio alla bici
Passaggi:
(Il gancio di traino (9) potrebbe essere stato installato precedentemente in
fabbrica).
1. Inserire il connettore del gancio di traino (9) nel braccio di traino (5).
2. Inserire il perno di sicurezza (7), quindi posizionare l'anello a scatto (A)
sull'estremità del perno di sicurezza, come mostrato in figura seguente.
IT

17
EN
AVVERTENZA: Se la cinghia di sicurezza interferisce con la bicicletta o altri
accessori, o non è stretta in sicurezza, non utilizzare il rimorchio. Contattare un
negozio specializzato di biciclette locale per una corretta installazione.
NOTA: Per rimuovere il rimorchio dalla bicicletta, seguire questi passaggi di
installazione al contrario. Assicurarsi che la ruota sia correttamente allineata e la
catena ben tesa, come indicato nel manuale d’uso della bicicletta. Installare e
stringere il dado dell'asse, come descritto nel manuale d’uso della bicicletta.
Fissare la ruota anteriore come rimorchio
Installare la bandierina
La bandiera deve scorrere nella fessura situata sul lato del telaio sinistro.
Passaggi:
1. Connettere entrambe le sezioni della bandiera come mostrato in figura.
2. Far scorrere l'asta della bandierina nella fessura situata trova sull'angolo
posteriore del telaio. Assicurarsi che sia inserita completamente, in questo modo è
sicura.
IT

18
EN
CORRETTO
INCORRETTO
FR
AVVERTENZA:
INDOSSARE SEMPRE IL CASCO
DURANTE LA GUIDA!
IT
Table of contents
Languages:
Other HOMCOM Bicycle Accessories manuals