HOMCOM 440-030V70 User manual

IMPORTANT, RETAIN FOR FUTURE REFERENCE: READ CAREFULLY
IMPORTANTE! CONSERVARE IL PRESENTE MANUALE PER FUTURO RIFERIMENTO E
LEGGERLO ATTENTAMENTE.
INfhb007_UK_IT
440-030V70_440-030V00
Baby Stroller User's Manual
Passeggino Manuale Utente
* Suitable for children of 0-36 months.
* Adatto a bambini di 0-36 mesi.

2
EN

3

)2//2:7+(0$18)$&785(56,16758&7,216
86(%5$.(6:+(1(9(5<283$5.7+(386+&+$,5
'2127/($9(&+,/'5(181$77(1'('
'2127&$55<(;75$&+,/'5(125%$*6217+,6
386+&+$,5
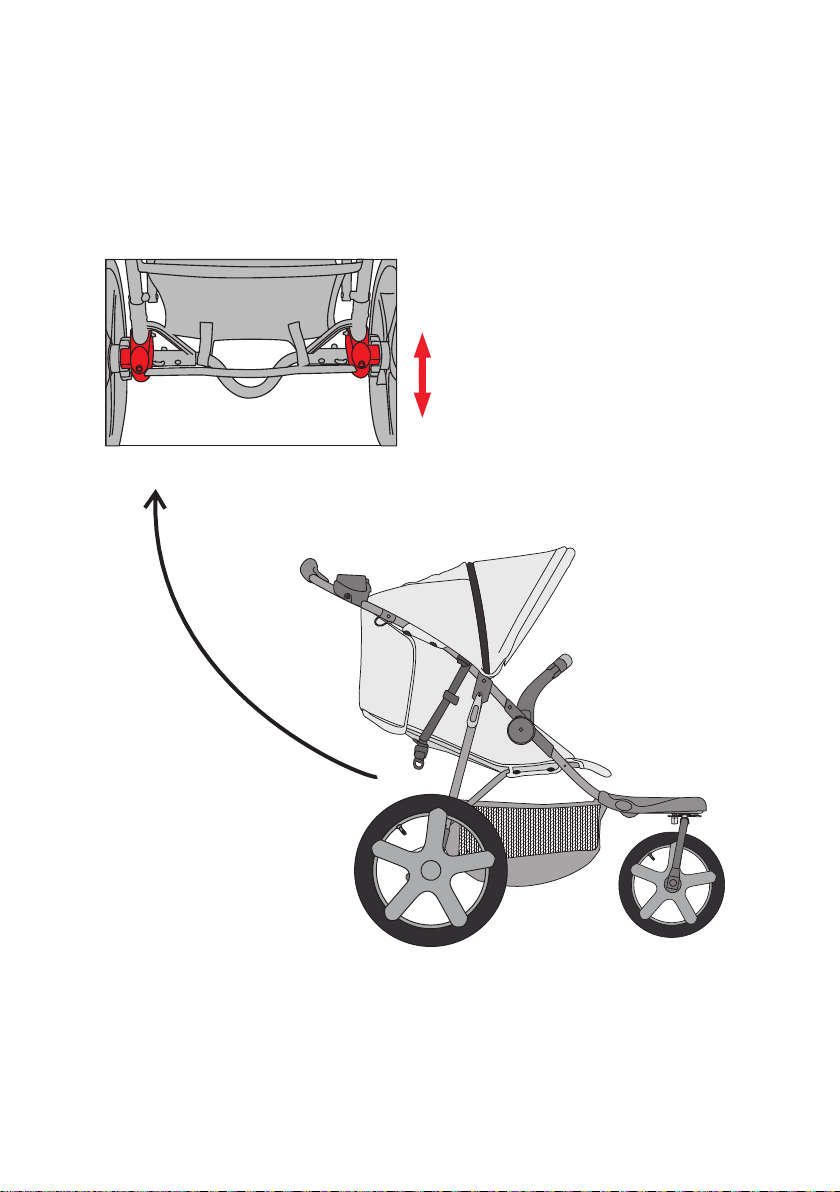
0$.(685(&+,/'5(1$5(&/($52)$1<029,1*3$576
,)<28$'-8677+(6752//(527+(5:,6(7+(<&28/'
*(7,1-85('
5HDGDOOLQVWUXFWLRQVEHIRUHXVH.HHSWKLVPDQXDOIRUIXWXUH
UHIHUHQFH
)DLOXUHWRIROORZLQVWUXFWLRQVPD\UHVXOWLQSURSHUW\GDPDJHRU
LQMXU\'RQRWOHDYHFKLOGUHQXQDWWHQGHG
Ɣ1RWWREHXVHGE\FKLOGUHQRYHUWKUHH\HDUV0D[LPXPORDGLV
NJ
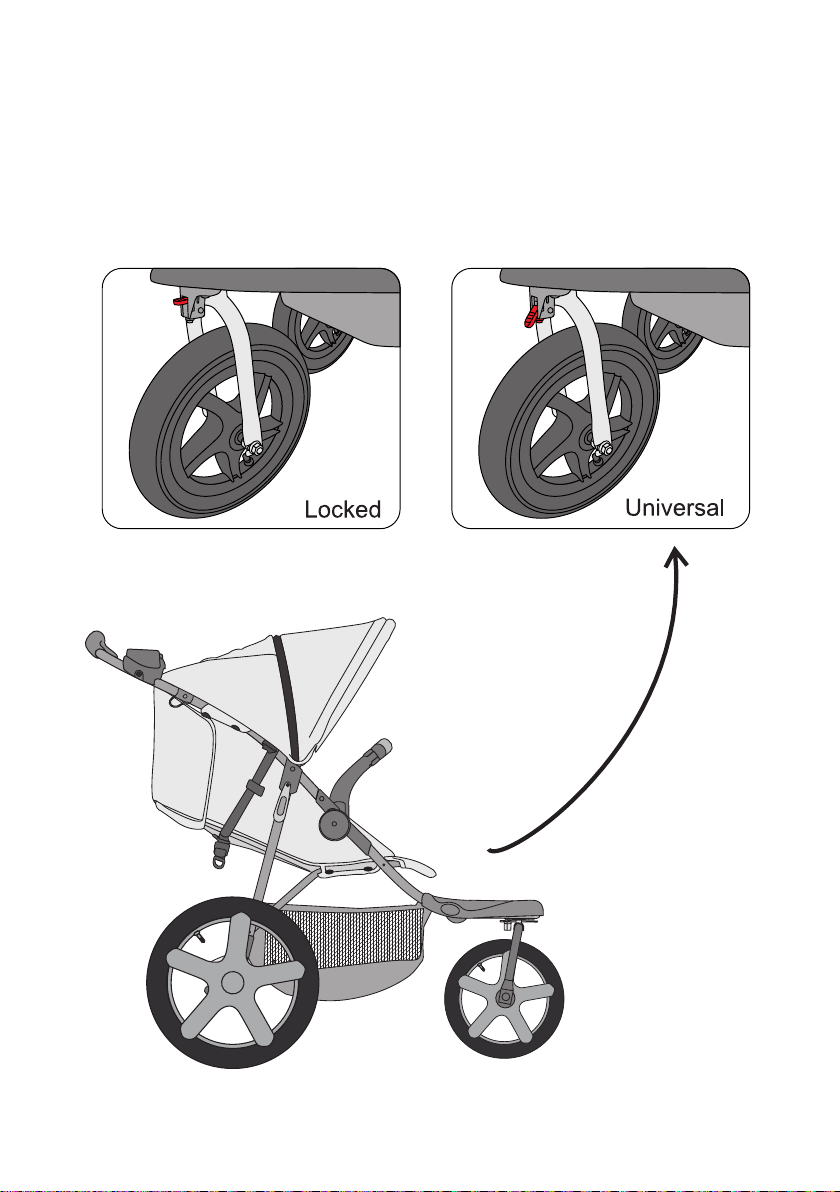
Ɣ%HIRUHXVLQJFDUHIXOO\FKHFNDOOORFNLQJGHYLFHVWRPDNHVXUH
WKH\DUHSURSHUO\ORFNHG
Ɣ'RQRWIROGWKHSXVKFKDLUZKLOVWDFKLOGLVLQVLGH
Ɣ$VHDWEHOWPXVWDOZD\VEHZRUQ
Ɣ'RQRWOLIWWKHSXVKFKDLUE\WKHIURQWKDQGUDLOLWFRXOGIDOORႇDQG
FDXVHDQLQMXU\'RQRWOHDYHWKHSXVKFKDLURQDVORSH
Ɣ7KHPD[LPXPORDGRIWKHVWRUDJHEDVNHWLVNJ
Ɣ'RQRWKDQJLWHPVRQWKHKDQGOHEDUVLQFDVHWKHVWUROOHUWLSV
RYHU
Ɣ'RQRWGLVDVVHPEOHRUDGMXVWDQ\SDUWVRIWKHVWUROOHUZKLOHD
FKLOGLVLQLW
Ɣ.HHSSODVWLFEDJVDQGRWKHUPDWHULDOVDZD\IURPWKHVLGHRIWKH
VWUROOHUFKLOGUHQFRXOGVXႇRFDWH

86(7+(%5$.(7267237+(386+&+$,552//,1*$:$<
Ɣ3OHDVHFOHDQZLWKDQRQWR[LFDQGQRQFRUURVLYHFOHDQHU0L[
ZDWHUDQGDVPDOODPRXQWRIPLOGQRQWR[LFGHWHUJHQWLQWRD
VROXWLRQDQGZLSHWKHIUDPHZLWKDGDPSFORWK'RQRWXVH
FRUURVLYHFOHDQHUVRUVROXWLRQV
Ɣ'RQRWVWRUHLQKXPLGRUKLJKWHPSHUDWXUHSODFHVUXVWDQG
GDPDJHVWRSDUWVFRXOGRFFXU.HHSLQDSURSHUO\YHQWLODWHGDQG
GXVWIUHHDUHD
Ɣ5HJXODUO\FKHFNIRUORRVHVFUHZVDQGGDPDJHVWRSDUWV,IDQ\
GDPDJHVDUHIRXQGGRQRWXVHWKLVSURGXFW
Ɣ)ROORZDOOLQVWUXFWLRQVZKHQDVVHPEOLQJDQGGLVDVVHPEOLQJWR
DYRLGGDPDJH

6
Unfolding the pushchair
1. Remove the product from its packaging, put the wheels and other parts of the
pushchair to the side, and prepare the stroller for installation (see the picture
below).
2. As shown in the picture, pull the folding clasp outward (1)- at the same time, hold
the handlebar with your hand and lift up slightly (2). The clasp will disengage
from the fixing bolt, then fully expand the pushchair in the direction shown in the
figure (3).

7
Assembly and disassembly of Rear Wheel
1. Assembly of Rear Wheel: Insert the axle of the rear wheel set into the hole of the
centre sleeve of the rear wheel. When you hear them 'clicking' together, pull the
wheel in the opposite direction to ensure it is properly in place. Follow the same
steps for the other wheel.
2. Quick Disassembly of Rear Wheel: Press and hold the button as shown, then
pull the rear wheel out of the centre sleeve.


10
Use of Rear Wheels Brake
Use of rear wheels brake: Press the brake pedal of the rear wheel to brake. Lift
the pedal to unlock.

11
Locked and Universal Front Wheel
When the dial button in front of the front wheel is pushed upward, the front wheel
moves in a straight line. When pushing down the button, the pushchair can rotate
and turn.

12
Backrest Adjustment
1. Hold the clip at the on the back of the belt, which is on the back of the pushchair,
then push the adjusting plastic part of the back up and tighten the belt until the
backrest is vertical.
2. Hold the clip at the end of the belt and hold down the two buttons on the back to
adjust the plastic part. Then, pull down the plastic part and loosen the belt until
the backrest becomes horizontal.

13
Folding the pushchair
1. Fold the top canopy.
2. Pull up folding locks on both sides of the handlebar.
3. At the same time, press down on the handlebar and fold the pushchair (see
picture below).
4. Finally, buckle and fasten the folding clasp.

14
PARTI
1. Sbirciatina
2. Cappottina
3. Portaoggetti per genitori
4. Pulsante Piegatura
5. Bracciolo
6. Chiusura per piegare passeggino
7. Gruppo regolazione cinghie schienale
8. Cesto per stoccaggio
9. Ruota posteriore
10. Pedale del freno della Ruota posteriore
11. Pedale del freno della Ruota anteriore
12. Ruota anteriore
IT

15
1. Telaio del passeggino
2. Bracciolo
3. Ruota posteriore
group
4.Portaoggetti per
genitori

6(*8,5(/(,6758=,21,'(/352'87725(
87,/,==$5(,)5(1,48$1'26,3$5&+(**,$,/
3$66(**,12
121/$6&,$5(,%$0%,1,,1&8672',7,
1213257$5(%$0%,1,2%256($**,817,9,6848(672
3$66(**,12
$66,&85$56,&+(,%$0%,1,6,$12/217$1,'$48$/6,$6,
3$57(02%,/(48$1'26,5(*2/$,/3$66(**,12
$/75,0(17,3275(%%(52&$86$5(/(6,21,),6,&+(
/HJJHUHWXWWHOHLVWUX]LRQLSULPDGHOOXVR&RQVHUYDUHTXHVWR
PDQXDOHSHUULIHULPHQWLIXWXUL
/DPDQFDWDRVVHUYDQ]DGHOOHLVWUX]LRQLSXzFDXVDUHGDQQLDOOD
SURSULHWjROHVLRQL1RQODVFLDUHLEDPELQLVHQ]DVRUYHJOLDQ]D
Ɣ1RQGHYHHVVHUHXWLOL]]DWRGDEDPELQLGLHWjVXSHULRUHDLWUH
DQQL,OFDULFRPDVVLPRqGLNJ
Ɣ3ULPDGHOOXWLOL]]RFRQWUROODUHDWWHQWDPHQWHWXWWLLGLVSRVLWLYLGL
EORFFDJJLRSHUDVVLFXUDUVLFKHVLDQRFRUUHWWDPHQWHEORFFDWL
Ɣ1RQSLHJDUHLOSDVVHJJLQRPHQWUHFqXQEDPELQRDOOLQWHUQR
Ɣ,QGRVVDUHVHPSUHODFLQWXUDGLVLFXUH]]D
Ɣ1RQVROOHYDUHLOSDVVHJJLQRGDOFRUULPDQRDQWHULRUHSRWUHEEH
IDUHFDGHUHHFDXVDUHOHVLRQL1RQODVFLDUHLOSDVVHJJLQRLQ
SHQGHQ]D
Ɣ,OFDULFRPDVVLPRGHOFHVWRSHUVWRFFDJJLRqGLNJ
Ɣ1RQDSSHQGHUHRJJHWWLDOPDQXEULRSHUQRQIDUHULEDUWLUHLO
SDVVHJJLQR
Ɣ1RQVPRQWDUHRUHJRODUHQHVVXQDSDUWHGHOSDVVHJJLQRPHQWUH
FqXQEDPELQRGHQWUR
Ɣ7HQHUHLVDFFKHWWLGLSODVWLFDHDOWULPDWHULDOLORQWDQLGDOODWRGHO
SDVVHJJLQRLEDPELQLSRWUHEEHURHVVHUHVRႇRFDWL
$99(57,0(172
$99(57,0(172

87,/,==$5(,/)5(123(5)(50$5(,/3$66(**,12
'$/029,0(172
Ɣ6LSUHJDGLSXOLUHFRQXQGHWHUJHQWHQRQWRVVLFRHQRQFRUURVLYR
0HVFRODUHDFTXDHXQDSLFFRODTXDQWLWjGLGHWHUJHQWHGHOLFDWRHQRQ
WRVVLFRLQXQDVROX]LRQHHSXOLUHLOWHODLRFRQXQSDQQRXPLGR1RQ
XWLOL]]DUHGHWHUJHQWLRVROX]LRQLFRUURVLYH
Ɣ1RQFRQVHUYDUHLQOXRJKLXPLGLRDGDOWDWHPSHUDWXUDSRWUHEEHUR
YHUL¿FDUVLUXJJLQHHGDQQLDOOHSDUWL&RQVHUYDUHLQXQOXRJR
DGHJXDWDPHQWHYHQWLODWRHSULYRGLSROYHUH
Ɣ&RQWUROODUHUHJRODUPHQWHODSUHVHQ]DGLYLWLDOOHQWDWHHGDQQLDOOH
SDUWL6HVLWURYDQRLGDQQLQRQXWLOL]]DUHTXHVWRSURGRWWR
Ɣ6HJXLUHWXWWHOHLVWUX]LRQLGXUDQWHLOPRQWDJJLRHORVPRQWDJJLRSHU
HYLWDUHGDQQL
$99(57,0(172
$99(57,0(172
87,/,==$5(6(035(48(67$&,1785$',6,&85(==$
&85$(0$187(1=,21(

18
Aprire il passeggino
1. Estrarre il prodotto dalla confezione, mettere da parte le ruote e le altre parti del
passeggino e preparare il passeggino per l'assemblaggio (vedi figura sotto).
2. Come mostrato in figura, tirare la chiusura per piegatura verso l'esterno (1) - allo
stesso tempo, tenere il manubrio con la mano e sollevarlo leggermente (2). La
chiusura si disimpegnerà dal bullone di fissaggio, quindi espanderà
completamente il passeggino nella direzione mostrata nella figura (3).
Chiusura per piegatura
Istruzioni

19
Montaggio e smontaggio delle Ruote posteriori
1. Montaggio della Ruota Posteriore: Inserire l'asse del gruppo della ruota
posteriore nel foro del manicotto centrale della Ruota Posteriore. Quando li
senti "clic" insieme, tirare la ruota nella direzione opposta per assicurarti che
sia correttamente in posizione. Seguire gli stessi passaggi per l'altra ruota.
2. Smontaggio rapido della Ruota posteriore: premere e tenere premuto il
pulsante come mostrato, e poi estrarre la Ruota posteriore dal manicotto
centrale.
Montaggio della
ruota posteriore
Smontaggio rapido
della ruota posteriore
Pulsante di
smontaggio rapido
della ruota posteriore

1. Fissare la fibbia con la piastra di chiusura, quindi posizionare la piastra di
chiusura combinata al centro della fibbia. Utilizzare questi passaggi per l'altro lato.
2. Per rimuovere la fibbia, premere il pulsante ovale al centro.

22
Utilizzo del Freno della Ruota Posteriores
Utilizzo del freno della ruota posteriores: Premere il pedale del freno della ruota
posteriore per frenare. Sollevare il pedale per sbloccare.
This manual suits for next models
1
Table of contents
Languages:
Other HOMCOM Stroller manuals