When using this charger, basic precautions should always be followed, including the following:
READ ALL INSTRUCTIONS BEFORE USING THIS CHARGER
WARNING:To reduce the risk of re, electric shock, damage or injury:
• Dry location use only.
• For use only with Hoover ONEPWR™ batteries. Charge only battery packs listed in the Compatible Battery Packs Section
of this User Manual. Charging any other battery packs may create a risk of injury or re.
• Do not use with damaged cord or plug. If charger is not working as it should, has been dropped, damaged, left outdoors,
or dropped into water, contact Customer Service by calling (AUS) 1300 698 130 / (NZ) 0800 126 688.
• Do not pull or carry by cord, use cord as a handle, or pull cord around sharp edges or corners. Keep cord away from
heated surfaces.
• Do not unplug by pulling on cord. To unplug, grasp the plug, not the cord.
• Do not handle plug or charger with wet hands.
• Follow all charging instructions and do not charge the battery pack outside of the temperature range specied in the
charging instructions. Charging improperly or at temperatures outside of the specied range may damage the battery
and increase the risk of re.
• Do not disassemble charger. Do not modify or attempt to repair the charger. This charger has no serviceable parts.
• Follow all mounting instructions. Failure to do so could result in personal injury or property damage. Manufacturer is
not responsible for damage or injury caused by incorrect installation.
• This charger is not intended to be used or cleaned by persons (including children) with reduced physical, sensory or
mental capabilities, or lack of experience and knowledge, unless they have been given supervision or instruction con-
cerning the safe use of the charger by a person legally responsible for their safety. They should be supervised whilst
using the charger. Children shall not use, clean, or play with this charger, which, when not in use should be secured
out or their reach.
• The power cord cannot be replaced. If the cord is damaged the charger should be scrapped.
• Do not use this charger to charge non-rechargeable batteries.
• Do not use the product if it has suffered any heavy shock or jolting, or is damaged in any other way.
• Never charge a damaged battery pack. If damaged, replace immediately.
• Do not conduct charging in a position which may become exposed to sunlight or other heat source.
• Due to the heat generated during charging, the product should not be operated on a combustible surface.
• Do not conduct charging operations in the vicinity of ammable materials. Example: Cloth, packaging materials, paint,
spray paint or aerosols, lubricant, thinners, petrol
• Protect battery contacts to avoid a short circuit caused by metallic objects which could cause a re or explosion!
TRANSPORTING LITHIUM BATTERIES
• Transport the battery in accordance with local and national provisions and regulations.
• Follow all special requirements on packaging and labelling when transporting batteries by a third party.
• Ensure that no batteries can come in contact with other batteries or conductive materials while in transport by
protecting exposed connectors with insulating, non-conductive caps or tape. Do not transport batteries that are cracked
or leaking. Check with the forwarding company for further advice.
IMPORTANT SAFETY INSTRUCTIONS
SAVE THESE INSTRUCTIONS
HOOVER ONEPWRTM
DUAL BAY CHARGER
USER GUIDE
MODEL NUMBER: F18CHOP21K
MAINTENANCE
OPERATION
APPLICATIONS
You may use this product for the following purpose:
• Charging ONEPWR™ Lithium Ion Batteries.
CHARGING (Figure 2)
• Charge the battery fully before rst use. This will take up to 3.5 hours per
battery. The battery does not come fully charged.
• Make sure the power supply is normal household voltage, 220-240 volts,
AC only, 50 Hz.
• Do not place the charger in an area of extreme heat or cold. It will work
best at normal room temperature.
• Plug the charger into a power outlet.
• Attach the battery pack to the charger by aligning the ribs on the battery
pack to the grooves in the charger. Slide the battery pack into the charger.
• The battery pack will become slightly warm to the touch while charging. This
is normal and does not indicate a problem.
• When charging, the lights on the battery will illuminate to show the state
of charge. The light on the charger will ash.
• If the light on the charger ashes red, there is an error with the battery or the charger. Try again or call customer
service for support.
• When the charge is complete the lights on the battery will turn off. The lights on the charger will remain on.
• To remove the battery pack from the charger, press the latches and pull up on the battery pack.
• During charging, the pack and ambient temperature should be between 5 and 30°C.
• The charger will sense if the pack, or ambient temperature, is too cold or too hot, and will return an error code (red
light will remain on) and not charge the pack until ambient temperature is reached.
• Do not disassemble charger. Do not modify or attempt to repair the charger. This charger has no serviceable parts.
Contact Customer Service by calling (AUS) 1300 698 130 / (NZ) 0800 126 688.
MODE BATTERY PACK RED LED ON CHARGER WHITE LED ON
CHARGER ACTION NEEDED
POWER Without Battery Pack On for 3 seconds On for 3 seconds Ready to charge battery pack
TESTING
HOT Battery Pack ON OFF
When battery pack reaches
normal temperature, charger
begins charge mode
COLD Battery Pack ON OFF
When battery pack reaches
normal temperature, charger
begins charge mode
DEFECTIVE Defective Flashing OFF Battery pack or charger is
defective
• If defective, try to repeat the conditions a second time by removing and reinstalling the battery pack. If LED status repeats a second time, try
charging a different battery.
• If a different battery charges normally, dispose of the defective pack
• If a different battery also indicates “Defective”, the charger may be defective.
CHARGING Charging – LED lights will ash
depending on charge level OFF Flashing Battery is being charged
FULLY CHARGED Charged – lights will go off OFF ON Charging is complete; charger
maintains charge mode
NOTE: It is recommended that the charger is always supplied via a residual current device (RCD) with a rated residual current
of 30 mA or less.
Regulatory
Compliance
Mark
For Indoor
Use Only
Read User
Manual
Class II
Equipment
T3.15A
Time-lag
F u s e 3 . 1 5 A
V
Efciency
Rating
WARNING! :RISK OF FIRE, PROPERTY DAMAGE, AND INJURY. NEVER EXPOSE YOUR BATTERY PACK
OR CHARGER TO WATER, MOISTURE, OR FLUIDS, INCLUDING BUT NOT LIMITED TO CORROSIVE OR CONDUCTIVE FLUIDS,
OR ALLOW FLUIDS TO FLOW INSIDE THESE ITEMS. Corrosive or conductive uids, such as salt water, chlorine, certain
industrial chemicals, and bleach or bleach containing products, etc., can cause a short circuit in the battery pack.
If your battery pack is exposed to a corrosive or conductive uid, do not attempt to use or charge the battery pack
and immediately cease using the battery. Please contact Customer Service immediately by calling
(AUS) 1300 698 130 / (NZ) 0800 126 688.
MAINTENANCE
• Do not disassemble charger. Do not modify or attempt to repair the charger. This charger has no serviceable parts.
Contact Customer Service by calling (AUS) 1300 698 130 / (NZ) 0800 126 688.
• Do not allow the charger or batteries to become contaminated with any material which could be conductive.
Example: Metal particles from grinding, cutting or machining processes.
• Remove the plug of the product from the power socket when it is not in use or when cleaning it.
• If the battery is not going to be used for a while, remove the charger plug from the power socket and take the battery
off the product.
STORAGE
• Store your charger in a cool dry place between 10 and 25°C.
• It is not recommended to leave it in a vehicle during hot or cold conditions. Ensure no metal lings or swarf can fall into
the vents during storage, as this may cause serious injury when it is next used.
ENVIRONMENTAL PROTECTION
• Recycle raw materials instead of disposing of as waste. The machine, accessories and packaging should be
sorted for environment friendly recycling.
COMPATIBLE BATTERY PACKS
MODEL TYPE RATED VOLTAGE RATED CAPACITY CELL NUMBER
F18BTOP21J4 Li-Ion 18V 4.0Ah 5
BH29040ANZ Li-Ion 18V 4.0Ah 5
BH29040ANZV Li-Ion 18V 4.0Ah 5
MODEL CHARGER INPUT OUTPUT
F18CHOP21K 220-240V~50Hz 45W 18V 1.5A
PRODUCT SPECIFICATIONS
ASSEMBLY
1.
Locate a wall stud with a stud nder to mount charger
where, when mounted, it can be plugged into an outlet
that is easily accessible and out of the reach of children.
2.
Use only the power cord supplied with the kit. Wrap excess
cord length around cord wrap found on the back of charger.
3.
Remove the charging indicator plate, as shown in Figure 1,
and align the mounting holes with the centre of the stud.
4. Hold charger to wall, t and tighten the top screw, then
the bottom screw (2).
5. Place the reversible charging indicator plate back on the charger.
IMPORTANT: Always ensure the batteries are secured into place. Hold the battery pack
rmly to ensure it does not drop. Dropping can cause damage or result in personal injury.
To prevent risk of strangulation, re, or shock, route cord
properly, avoiding loops, is out of the reach of children,
and where they cannot get snagged or pulled.
If you hit metal, stop immediately and contact an electrician.
WARNING! WARNING!
HOOVER.COM.AU
HOOVER.CO.NZ
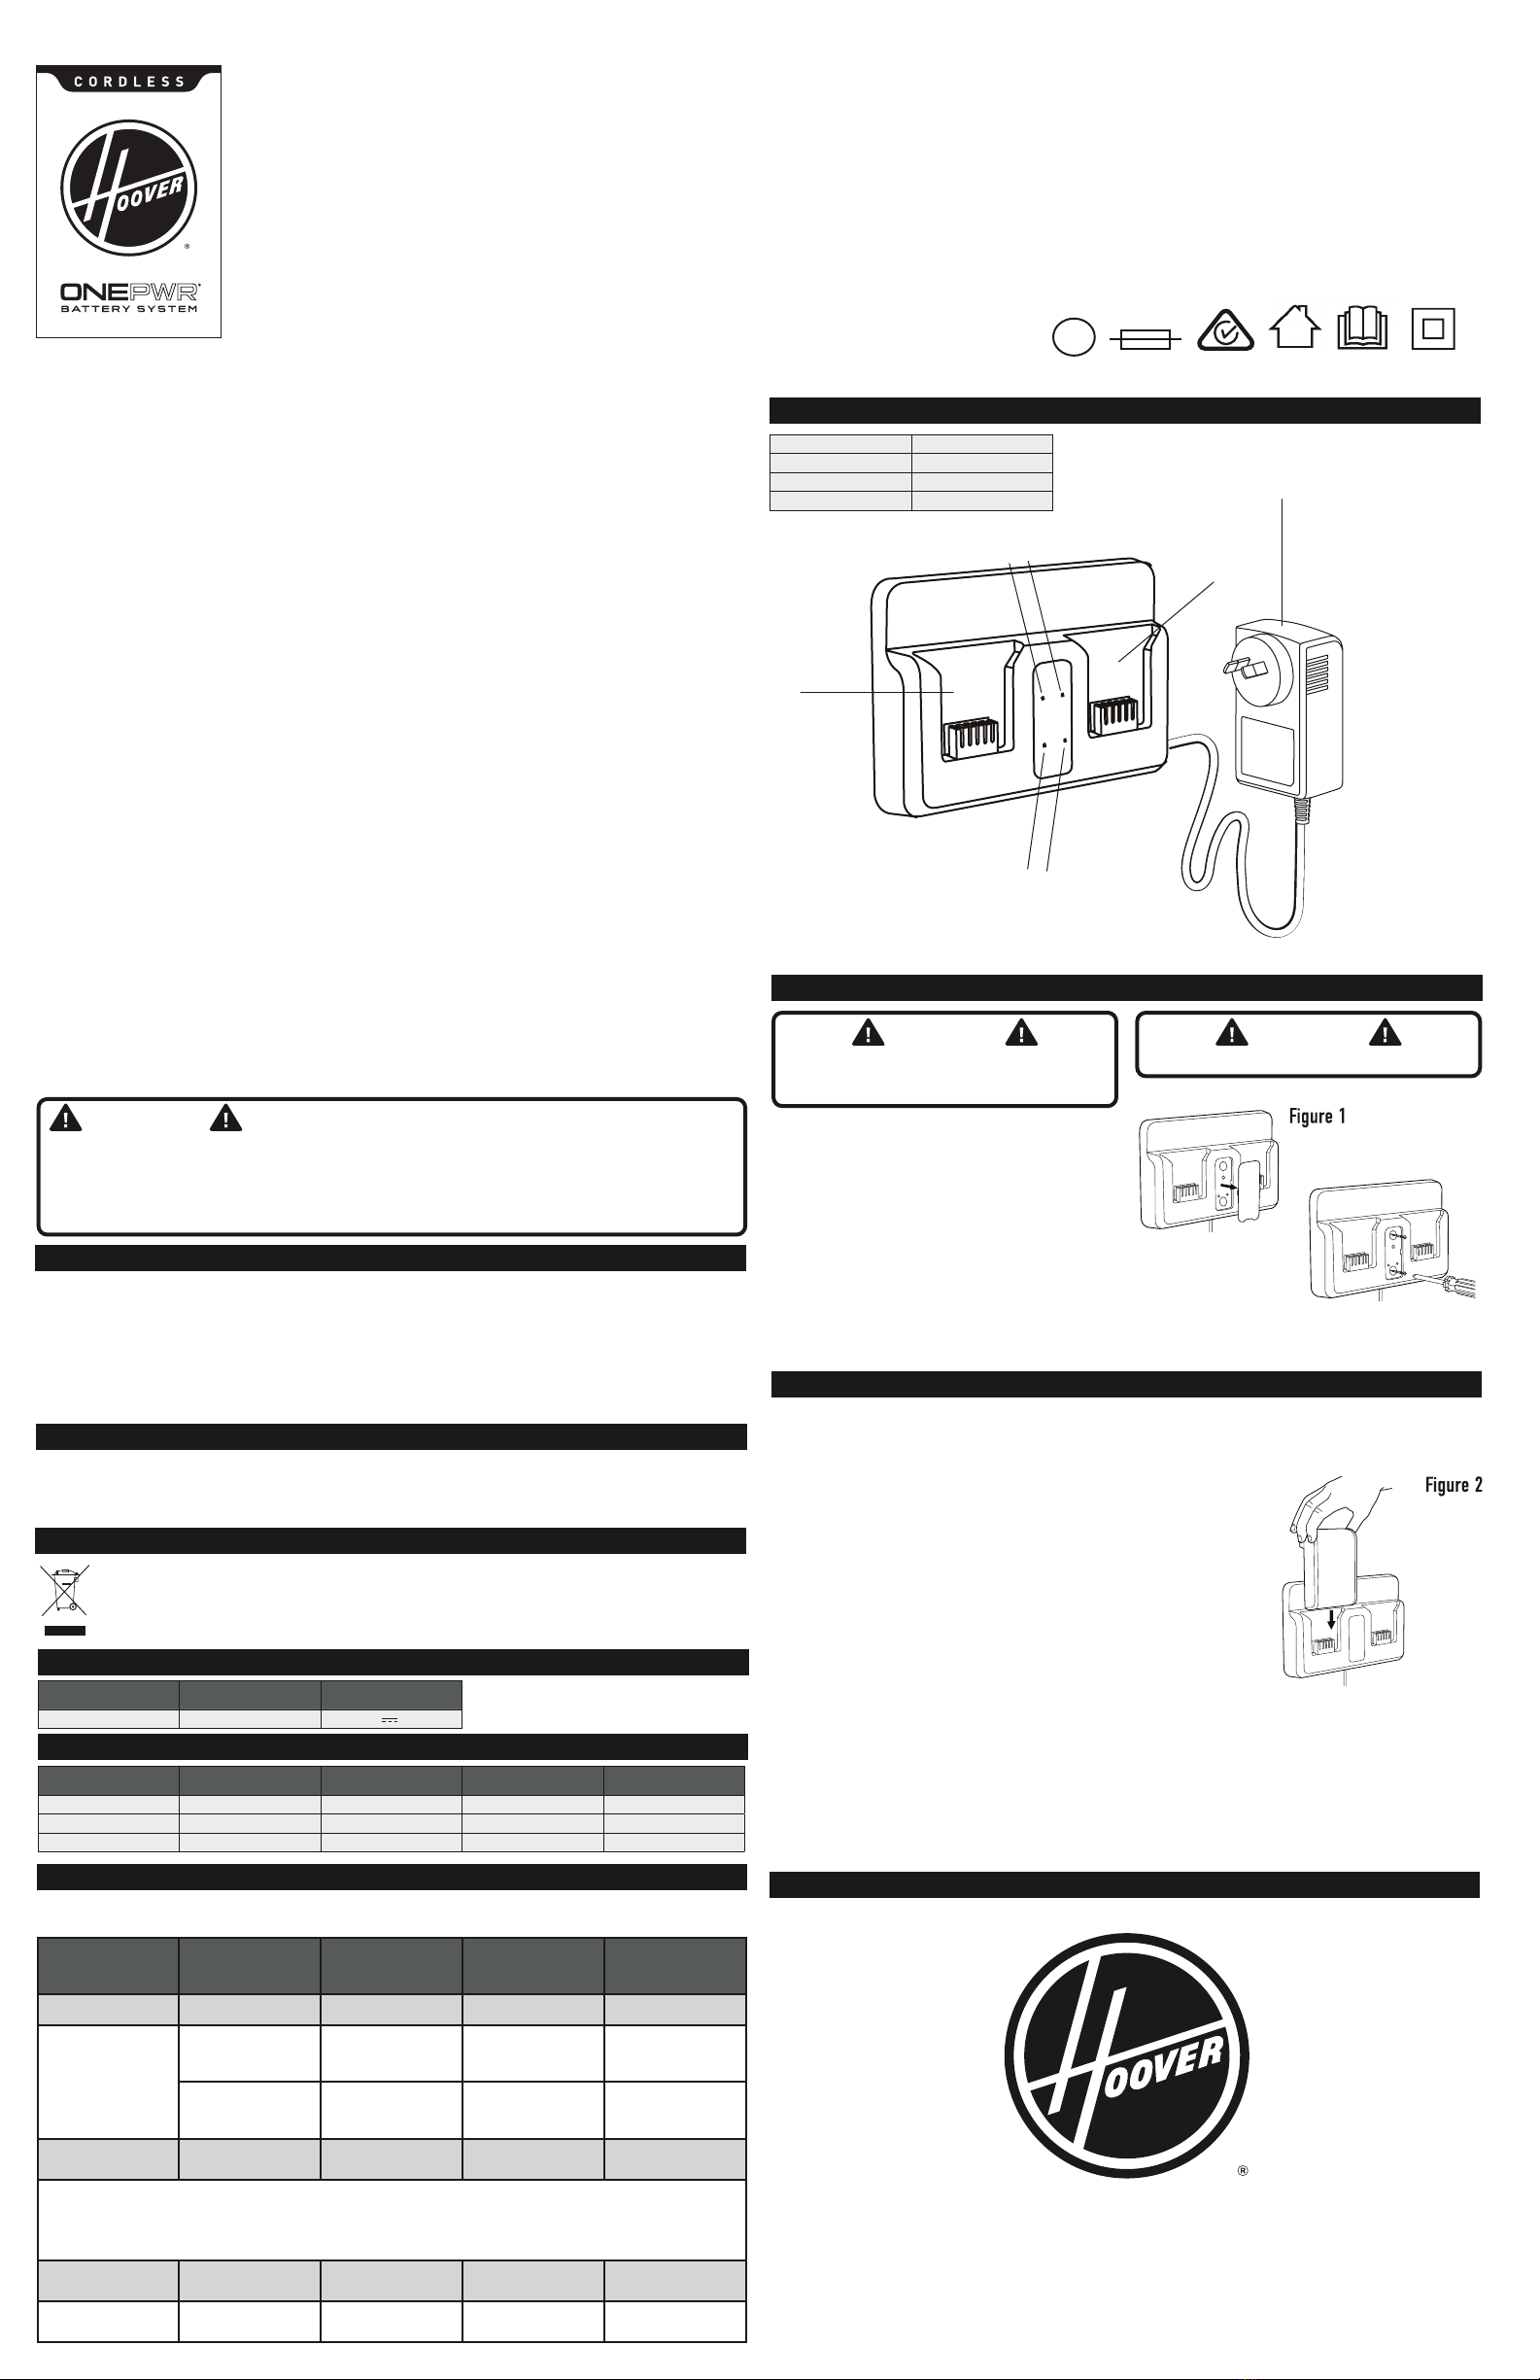
KNOW YOUR PRODUCT
1 Battery Port
2 Red Light
3 White Light
4 Adaptor
1
1
4
DISTRIBUTED BY:
Techtronic Industries Australia Pty Ltd
31 Gilby Road, Mount Waverley, VIC 3149, Australia
Customer Careline: 1300 698 130
Techtronic Industries N.Z. Limited
Unit C, 70 Business Parade South, East Tamaki, Auckland, 2013,
New Zealand
Customer Careline: 0800 126 688
2 2
3
3


