Hoshizaki DL-1HTF User manual

DL-1HTF
L1W031102 (070116)
LIQUID DISPENSER
INSTRUCTION MANUAL
3-16 Minamiyakata, Sakae, Toyoake, Aichi 470-1194 Japan
FOR END USER

i
NOTES TO USERS
* Thank you for purchasing HOSHIZAKI’s dispenser.
* Before operating this dispenser, you should rst thoroughly read this manual.
* Please keep this manual for later reference.
CONTENTS PAGE
1. CONSTRUCTION ------------------------------------------------------------------------------------------ 1
[a] GENERAL----------------------------------------------------------------------------------------------- 1
[b] DISPENSE BUTTON--------------------------------------------------------------------------------- 2
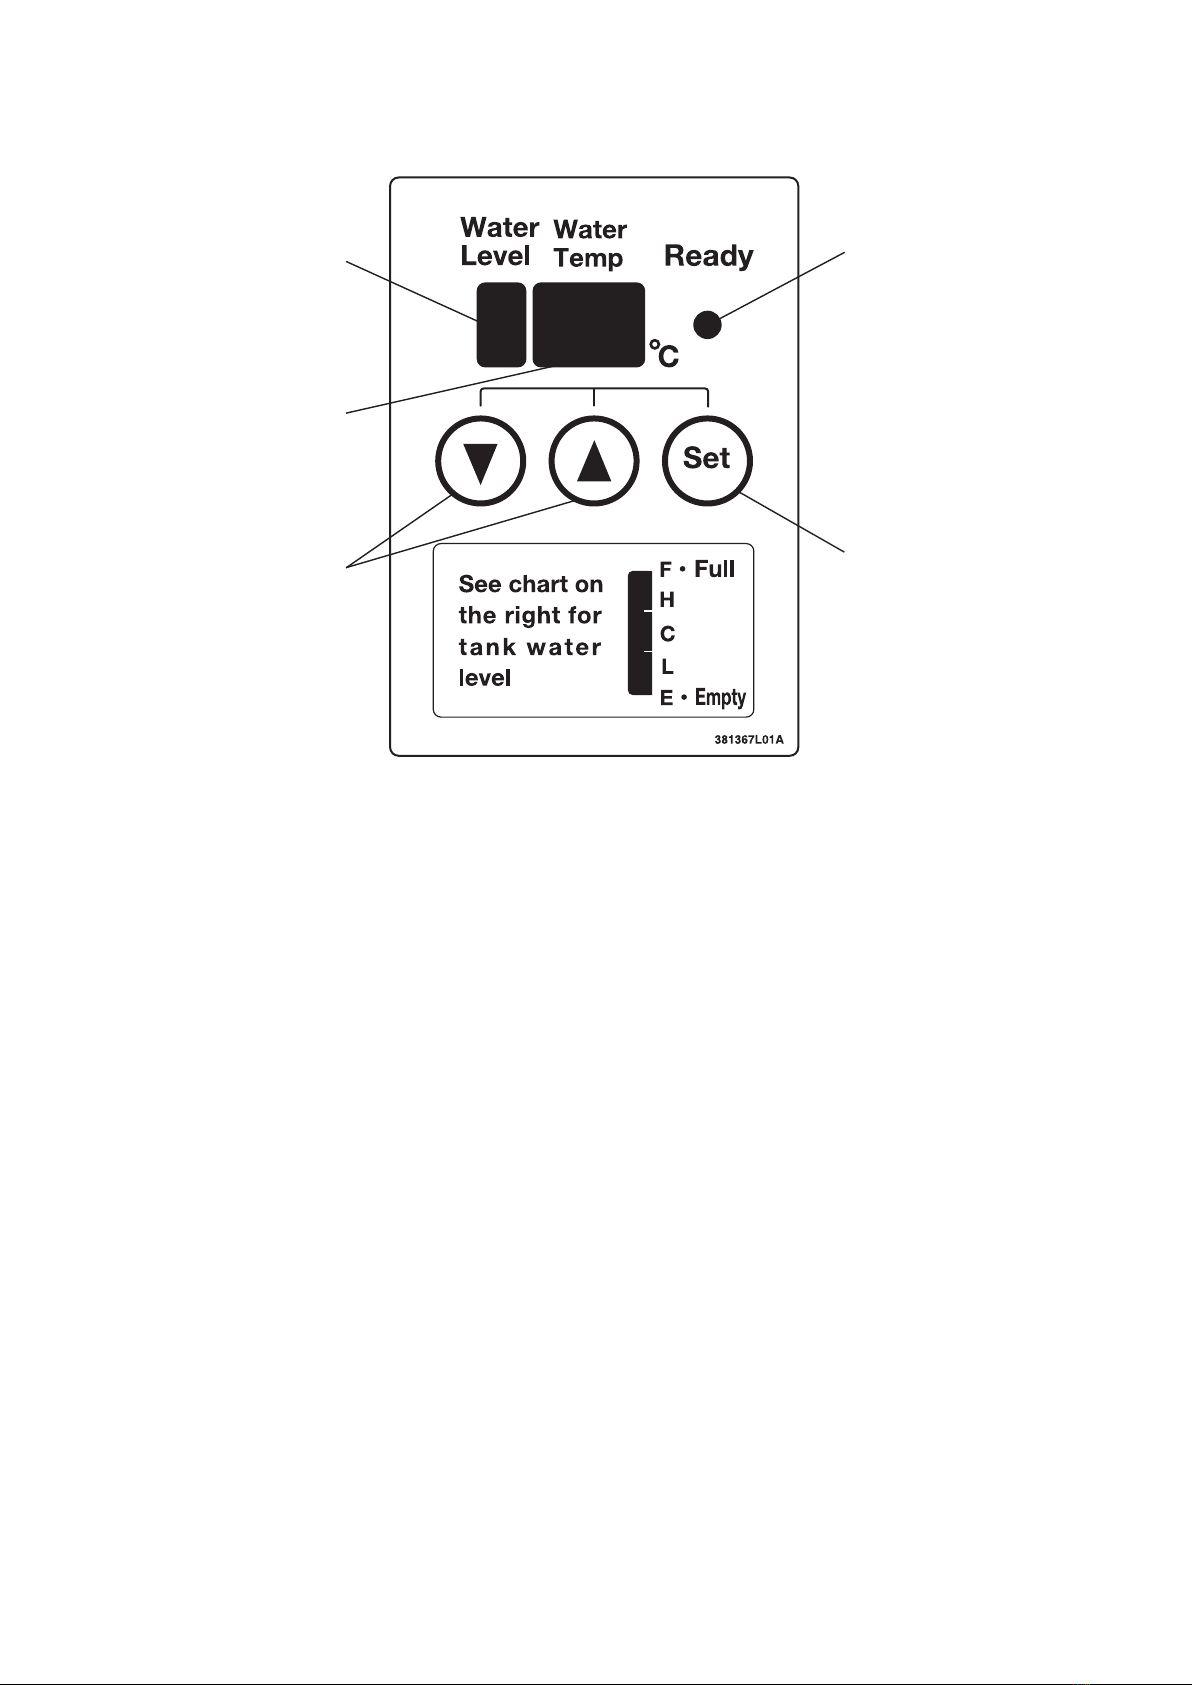
[c] TEMPERATURE DISPLAY/SETTING PANEL ------------------------------------------------- 3
[d] ACCESSORIES---------------------------------------------------------------------------------------- 3
2. INSTALLATION --------------------------------------------------------------------------------------------- 4
[a] CHECKS AFTER INSTALLATION ---------------------------------------------------------------- 4
[b] AMBIENT TEMPERATURE------------------------------------------------------------------------- 4
[c] WATER PRESSURE --------------------------------------------------------------------------------- 4
[d] POWER SUPPLY ------------------------------------------------------------------------------------- 4
[e] CLEANING AND INSPECTION-------------------------------------------------------------------- 4
3. CHECKS BEFORE OPERATION ---------------------------------------------------------------------- 5
[a] DISPENSER-------------------------------------------------------------------------------------------- 5
[b] PREMIX PACKAGE ---------------------------------------------------------------------------------- 5
4. OPERATION------------------------------------------------------------------------------------------------- 5
[a] START UP----------------------------------------------------------------------------------------------- 7
[b] DISPENSING------------------------------------------------------------------------------------------- 7
[c] REPLACING PREMIX PACKAGE ---------------------------------------------------------------- 7
[d] SHUT DOWN------------------------------------------------------------------------------------------- 7
5. MAINTENANCE AND INSPECTION ------------------------------------------------------------------ 8
[a] DISPENSING NOZZLE ------------------------------------------------------------------------------ 9
[b] FRONT PANEL ---------------------------------------------------------------------------------------- 9
[c] DRIP PAN, GRILLE ----------------------------------------------------------------------------------- 9
[d] SUCTION PUMP -------------------------------------------------------------------------------------10
[e] LABEL, FRONT COVER, SIDE PANEL --------------------------------------------------------12
[f] EARTH LEAKAGE CIRCUIT BREAKER--------------------------------------------------------12
[g] WIRES --------------------------------------------------------------------------------------------------12
[h] WATER SUPPLY AND DRAIN CONNECTIONS ---------------------------------------------12
[i] ATTACHMENT PLUG --------------------------------------------------------------------------------13
[j] SUBFREEZING TEMPERATURES --------------------------------------------------------------13

ii
6. CHECKS AND ADJUSTMENTS-----------------------------------------------------------------------14
[a] JOINT TAP ---------------------------------------------------------------------------------------------14
[b] HANGER -----------------------------------------------------------------------------------------------14
[c] PREMIX PACKAGE----------------------------------------------------------------------------------15
[d] ADJUSTMENTS --------------------------------------------------------------------------------------16
7. TROUBLE SHOOTING ----------------------------------------------------------------------------------18
[a] TROUBLES WITH ERROR CODE INDICATION --------------------------------------------18
[b] TROUBLES WITHOUT ERROR CODE INDICATION --------------------------------------19
[c] PERIODIC REPLACEMENT ----------------------------------------------------------------------20
8. LONG STORAGE, RELOCATION, DISPOSAL, TRANSFER----------------------------------20

1
1. CONSTRUCTION
[a] GENERAL
[1] Screen
The remaining premix level can be checked.
[2] Dispense Button
See “[b] DISPENSE BUTTON”.
[3] Dispensing Nozzle
Dilutes premix with hot water and dispenses product.
[1]
[2]
[3]
[4]
[5]
[6]
[7]
[8]
[9]
[10]
[11]
[12]
[13]
[14]
[15]

2
[4] Drip Pan
Receives spilled product.
* Clean up spills as soon as possible.
[5] Exhaust Opening
Exhausts hot air to control interior temperature.
[6] Front Cover
[7] Front Panel
[8] Power Cord
[9] Accessories
Include impellers, multi tube, reducer, joint and extra O-rings.
[10] Temperature Display/Setting Panel
See “[c] TEMPERATURE DISPLAY/SETTING PANEL”.
[11] Suction Pump
Draws premix from its package into the dispensing nozzle.
[12] Hanger
Hangs a premix package.
[13] Hot Water Tank (inside)
Heats water and keeps it hot.
[14] Power Switch (Earth Leakage Circuit Breaker)
See “5. [f] EARTH LEAKAGE CIRCUIT BREAKER”.
[15] Drain Valve
Drains water from the hot water tank.
[b] DISPENSE BUTTON
Press the dispense button once to dispense one cup
of product. The dispense lamp ashes while product
is being dispensed and stays on when product is
available in the optimum temperature range.

3
[c] TEMPERATURE DISPLAY/SETTING PANEL
[1] Water Level Display
Indicates the hot water tank level in ve scales F (full) > H > C > L > E (empty).
[2] Temperature Display
Indicates the hot water tank temperature.
[3] Up/Down Button
Increases or decreases the set point.
[4] Ready Lamp
Lights up to indicate that product can be dispensed.
[5] Set Button
Use to change the settings.
[d] ACCESSORIES
Instruction Manual x 1 Installation Manual x 1 Maintenance Sheet x 1
Extra O-ring (S38) x 2 Extra O-ring (P10) x 3 Brush x 1
Elbow x 1 Joint Tap x 1 Nut (H) x 1
Screw x 3 Multi Tube x 2 Impeller x 2
Scale Guard x 1 Gasket x 1 Reducer x 1
Joint x 1 POP Rail x 2 POP Cover x 1
[1]
[2]
[3]
[4]
[5]

4
2. INSTALLATION
WARNING
To prevent possible water leak, electric shock or re, the installation must be
carried out by qualied personnel.
[a] CHECKS AFTER INSTALLATION
* In the presence of the installer, check for proper installation according to the installation
manual provided.
* Receive the installation manual from the installer, and keep it for later reference.
[b] AMBIENT TEMPERATURE
Ambient temperature should be within 5 to 35°C. Operation of the unit for extended periods
outside of this normal temperature range may affect performance.
CAUTION
To avoid the risk of corrosion, clogging and health problems, be sure to use tap
water with a turbidity level of not more than 2.
[c] WATER PRESSURE
CAUTION
To prevent water leaks resulting in damage to the surrounding property, keep
the water supply pressure within 0.05 to 0.78 MPa.
[d] POWER SUPPLY
Power supply voltage: 220V AC Voltage variation: 207 - 233V
Power supply capacity: 1.2 kVA
[e] CLEANING AND INSPECTION
* The product circuit has been cleaned before shipping. But clean it again before starting
up the unit, and check for proper installation of each part. See “5. MAINTENANCE AND
INSPECTION”.
* Check the wiring and piping before starting up the unit. See “5. MAINTENANCE AND
INSPECTION”.

5
3. CHECKS BEFORE OPERATION (DAILY)
CAUTION
1. To prevent possible health problems, wash your hands before operation or
maintenance of the unit.
2. Always use a food grade neutral detergent for cleaning.
3. To keep the oor clean, do not leave water or product in the drip pan until it
overows.
4. Always use a food grade ethyl alcohol (70 - 75%) for disinfection. Do not use
it for any other purposes. Keep it away from children.
[a] DISPENSER
* Check that the product circuit has been cleaned after closing time and that each part is
properly installed in place. See “5. MAINTENANCE AND INSPECTION”.
* Check that the water supply line shut-off valve is open.
[b] PREMIX PACKAGE
CAUTION
To prevent possible food poisoning, do not use expired premix.
* Check the remaining premix level by the screen on the front cover.
* If necessary, replace the premix package according to “6. [c] PREMIX PACKAGE”.
* Check that the joint tap connected to the premix package is open (lever is vertical).
4. OPERATION
WARNING
1. To prevent electric shock, do not touch the attachment plug, power switch, or
other electrical parts with damp hands.
2. If the earth leakage circuit breaker turns off, contact an authorized Hoshizaki
service company. To prevent electric shock or re, do not turn it back on.

6
3. In case of trouble, turn off the power switch and unplug the unit or disconnect
the main power supply, and immediately contact an authorized Hoshizaki
service company. To prevent possible electric shock or re, do not keep the
unit in operation.
4. In case of a gas leak, turn off the gas and ventilate the room. To avoid the risk
of ignition and explosion, do not unplug the unit.
5. Do not put your hand or face under the dispensing nozzle while product
is being dispensed. Hot water exceeding 80°C comes out and may cause
burns.
6. This unit is not suitable for use by unsupervised children or within reach of
young children, which may result in burns, electric shock or injuries.
7. Do not tilt, shake, or carry the unit with hot water inside. Hot water may ow
out and cause burns.
CAUTION
1. Do not put heavy things or water containing vessels on the unit. They could
fall off and cause injury, or spilled water may degrade the electrical insulation
and increase the risk of electric leak.
2. Do not block the air outlet on the top of the unit. This may cause poor heat
radiation and result in failure.
3. Do not place a cooking stove or other thermal appliances on or around the
unit. Heat may melt the plastic parts.
4. This unit is intended for use with potable products only. Any other use may
result in failure or health problems.
5. Do not use combustible spray or place volatile and ammable substances
near the unit. They could catch re from a spark of a switch or the like.
6. In case of low water, turn off the power switch and close the water supply line
shut-off valve, or rusty water may come out when water supply is resumed.
IMPORTANT
1. Do not operate the unit with the power cord or attachment plug damaged or
loosely connected.
2. Do not push the attachment plug with the rear of the unit.

7
[a] START UP
1) Open the front cover, and turn on the power switch on the front panel. Water starts to be
supplied into the hot water tank.
2) When the hot water tank lls up and water boils, the ready lamp and dispense lamp light
up to indicate that product can be dispensed.
IMPORTANT
Product cannot be dispensed while the ready lamp is off, because hot water has
not reached the proper level or temperature.
[b] DISPENSING
1) Check that the dispense lamp stays on.
2) Place a cup on the grille under the dispensing nozzle.
3) Press the dispense button.
4) The dispense lamp ashes, and the dispensing nozzle dispenses product.
5) When the dispensing nozzle stops dispensing, the dispense lamp stays on. Then,
remove the cup.
[c] REPLACING PREMIX PACKAGE
When the premix package gets empty, replace it with a new package. See “6. [c] PREMIX
PACKAGE” for details.
[d] SHUT DOWN
1) Open the front cover, and turn off the power switch on the front panel.
2) Remove the drip pan and grille. See “5. MAINTENANCE AND INSPECTION” for details.
3) Move the drain lever to the open position to drain the hot water
tank.
4) Drain the hot water tank for 10 seconds every day to keep the
tank interior clean. To completely drain out the tank, keep the
drain lever open for 10 minutes.
5) Move the drain lever to the closed position. Fit the drip pan and grille.
Open
Closed

8
6) Close the water supply line shut-off valve.
7) Follow the instructions in “5. MAINTENANCE AND INSPECTION”.
5. MAINTENANCE AND INSPECTION
WARNING
1. To prevent fire, electric shock, injury or water leak, this unit should be
disassembled, repaired or modied only by qualied service personnel.
2. To prevent electric shock, do not touch the attachment plug, power switch, or
other electrical parts with damp hands.
3. In case of trouble, turn off the power switch and unplug the unit or disconnect
the main power supply, and immediately contact an authorized Hoshizaki
service company. To prevent possible electric shock or re, do not keep the
unit in operation.
4. Do not splash water directly onto the unit. It may cause a short circuit, electric
shock, corrosion or failure.
5. An alcohol disinfectant is ammable. Do not use it near re.
6. Assemble the dispensing nozzle and other parts properly. Otherwise, hot
water exceeding 80°C may leak and cause burns.
CAUTION
1. To prevent possible health problems, wash your hands before operation or
maintenance of the unit.
2. Always use a food grade neutral detergent for cleaning.
3. Always use a food grade ethyl alcohol (70 - 75%) for disinfection. Do not use
it for any other purposes. Keep it away from children.
4. Before using invert soap or other disinfectants, thoroughly read and
understand the manufacturer’s instructions for use to prevent possible health
problems.
5. Before starting cleaning or inspection, turn off the power switch and unplug
the unit to avoid possible electric shock or burn.
6. To unplug the unit, be sure to pull the attachment plug and do not jerk the
power cord. It could be damaged and cause re or electric shock.

9
IMPORTANT
1. After closing time, be sure to carry out maintenance and inspection.
2. Follow the instructions in “5. MAINTENANCE AND INSPECTION” whenever
required.
3. In cleaning operations, be careful not to lose any parts. The unit will leak
water or fail to dispense properly.
4. To prevent damage to the stainless steel or plastic surfaces, do not use
sodium hypochlorite, thinner, benzine, alcohol, cleanser, petroleum, soap
powder, polishing powder, alkaline detergent, acid, synthetic detergent
and scrub brush. When using a disposable cleaning cloth, follow the
manufacturer’s instructions.
[a] DISPENSING NOZZLE (DAILY)
1) Open the front cover. Turn the dispensing nozzle and multi tube in
the direction of arrow 1 and pull them off in the direction of arrow 2.
2) Disassemble the dispensing nozzle and multi tube. Use a food grade
neutral cleaner, sponge, and cleaning brush (accessory) to clean
them.
3) Rinse thoroughly with clean water.
4) Use a spray bottle to spray an alcohol disinfectant on the dispensing
nozzle and multi tube and leave them to dry.
5) Push up the dispensing nozzle and multi tube in the direction of
arrow 1 and turn them in the direction of arrow 2 until they lock with
the nozzle stopper.
[b] FRONT PANEL (DAILY)
Use a soft damp cloth containing a diluted food grade neutral cleaner to wipe off dirt. Then
wipe away the residue.
[c] DRIP PAN, GRILLE (DAILY)
1) Remove the drip pan and grille. The drip pan can be
pulled off by pressing down the push levers on both
sides of the grille. Use a sponge and food grade neutral
cleaner to remove dirt.
Push Lever
Grille ①
②
①
Drip Pan

10
2) Rinse thoroughly with clean water and wipe dry with a soft cloth.
3) Attach the grille back on the drip pan and t them into the unit.
[d] SUCTION PUMP (WEEKLY)
IMPORTANT
1. The impeller must be replaced once a year. But the life cycle depends on
the running rate. Inspect the impeller well before the end of expected life
cycle. Operation with a defective impeller may result in dripping or improper
dispensing action.
2. The impeller must be sprayed with an alcohol disinfectant and assembled
into the casing immediately before restarting the unit. The impeller is made
of rubber. Do not leave it inside the casing for a long time without product or
with an alcohol disinfectant. The impeller may stick to the casing and fail to
turn or get damaged.
3. When the premix package becomes almost empty, the unit cannot operate
properly. Replace the premix package immediately. Operation with an empty
package will drastically reduce the impeller’s life cycle.
Cleaning
1) Open the front cover and remove the premix package. See “6. [c] PREMIX PACKAGE”
for details. The removed package must be stored in a refrigerator.
2) Place a container under the dispensing nozzle.
3) Press the dispense button to drain any premix remaining in the suction pump.
4) Repeat step 3) until no premix comes out.
5) Turn the nut securing the suction pump in the arrow direction and pull the suction pump
towards you.
6) If the shaft is dirty, wipe with a damp cloth, then a dry cloth.
Nut Shaft Casing

11
7) Remove the inner casing and reducer from the
casing. The reducer can be removed by turning
and pulling down.
8) Remove the impeller from the casing by putting
a nger between the blades, turning in the arrow
direction and pulling towards you.
9) Use a food grade neutral cleaner, sponge, and cleaning brush (accessory) to clean the
suction pump parts.
10) Rinse thoroughly with clean water and store in a clean place when not in use.
Reassembly
1) Check for the parts shown on the right.
2) Fit the impeller to the casing in the rotating
direction.
3) Attach the casing to the unit by fitting the center of the
impeller to the shaft.
4) Turn the casing in the arrow direction until it reaches the normal
position.
5) Remove the casing from the unit and spray alcohol disinfectant on
the parts.
6) Attach the inner casing and ret the casing back to the unit.
7) Pull the nut towards you and turn it in the arrow direction
to t the suction pump. Be careful not to tilt the nut.
Note: The inner casing must be t all the way inside to
allow the nut.
Impeller
Inner Casing
(O-ring)
Casing (O-ring)
Reducer (O-ring)
Impeller
Reducer
Casing
Inner Casing
Good No good
Shaft
Center of Impeller
Casing
Suction Pump
Nut

12
8) Fit the dispensing nozzle and multi tube. See “[a] DISPENSING NOZZLE” for details.
9) Fit the premix package. See “6. [c] PREMIX PACKAGE” for details.
IMPORTANT
Check the impeller for broken, cracked
or swollen blades. Operation under
inappropriate conditions may cause
varied dispensing amounts or dripping
premix.
[e] LABEL, FRONT COVER, SIDE PANEL
Wipe with a soft cloth as required. Use a soft damp cloth containing a diluted food grade
neutral cleaner to wipe off dirt. Then wipe away the residue.
[f] EARTH LEAKAGE CIRCUIT BREAKER
CAUTION
Check the earth leakage circuit breaker for proper operation once a month. If it
is left inoperable, it could increase the risk of electric shock in case of electric
leak.
1) Press the test button.
2) Check if the power switch turns off.
3) If the power switch does not turn off, unplug the unit and
contact an authorized Hoshizaki service company.
[g] WIRES
Check the wires for damage or deformation once or twice a year. In case of any problem,
contact an authorized Hoshizaki service company.
Also, check that the wires are not weighed down, strained, or in contact with edges or
heated parts. In case of any problem, remove its cause.
[h] WATER SUPPLY AND DRAIN CONNECTIONS
Once or twice a year, check that the water supply and drain connections are free of
damage, deformation or water leaks. In case of any problem, contact an authorized
Hoshizaki service company.
Broken Cracked Swollen
Test Button
ON
OFF

13
[i] ATTACHMENT PLUG
WARNING
1. Check periodically that the attachment plug blades and their vicinity are free
of dust and that the attachment plug is securely plugged into the receptacle.
Dusty blades or loose connection may cause electric shock or re.
2. Do not damage the power cord. It should not be additionally processed,
jerked, bundled, weighed down or caught in. It could cause electric shock or
re.
3. The unit must have a separate power supply. Branching off the power
cord, using an extension cord, or sharing a single power supply with other
appliances may result in electric shock, heat generation or re.
Check the attachment plug and power cord once or twice a year to see if:
* The attachment plug is plugged into a separate receptacle.
* The attachment plug and power cord are not overheated, damaged, weighed down or
caught in. In case of any trouble, immediately contact an authorized Hoshizaki service
company and ask for a repair.
* The attachment plug blades and their vicinity and the receptacle are free of dust. Clean
them if necessary.
[j] SUBFREEZING TEMPERATURES
CAUTION
If there is a possibility that the ambient temperature may fall below 0°C and
freeze the unit, be sure to drain the unit. The water supply line could be
damaged and leak water, resulting in damage to the surrounding property.
IMPORTANT
Do not dispense product while draining the unit.
1) Turn off the power switch. Drain the hot water tank to the level “C” or “L”. See “4. [d]
SHUT DOWN” for details.
2) Close the water supply line shut-off valve.
3) Turn on the power switch.
4) Open the drain valve to drain the water circuit.
Shut-off Valve
Drain Valve
Elbow
Water
Inlet
Water Supply Line

14
5) After completely draining the circuit, turn off the power switch.
6) When the unit will not be in use for more than a week, shut down the unit according to “4.
[d] SHUT DOWN” and unplug the unit.
IMPORTANT
If the warranty period is expired, ask an authorized Hoshizaki service company
for the following inspections to ensure safety and prevent troubles caused by
electric leak or overheating (charged).
* Dust buildup, water leak or dirt inside the unit
* Scale, silica, limestone or other foreign matter in the water circuit
* Aging conditions of the unit and its components
6. CHECKS AND ADJUSTMENTS
[a] JOINT TAP
There are two different sizes of the joint tap connections on premix packages. For the
smaller size of connection, x the joint tap and nut (H) as follows:
1) Tightly screw the nut (H) into the joint tap nut.
2) Insert a screw into the two holes in the joint tap nut to prevent the
nut (H) from turning.
3) Connect a premix package and check.
[b] HANGER
Move the location of the hanger according to the premix package.
1) Loosen the screw securing the hanger. Connect the joint tap to a
premix package. See “[c] PREMIX PACKAGE” for details.
2) Hook the premix package. Move the hanger until the suction
pump joint aligns with the joint tap and x the hanger there.
Nut (H)
Screw Hole
Joint Tap Nut
Securing Screw
Joint Tap
Suction Pump
Joint
IMPORTANT
If the hanger is not located in place, premix may not be
dispensed properly.

15
[c] PREMIX PACKAGE
* The remaining level of premix may be slightly different for each manufacturer or setting.
Check the product concentration or package condition to assume the remaining level.
* If air comes in when installing a premix package, more premix will remain inside, the
product concentration will change, or product will not be dispensed. Be sure to release
air from the package.
* Set the joint tap correctly, or premix cannot be dispensed properly. Correct the joint tap if
necessary.
IMPORTANT
1. Always use the premix specied by Hoshizaki.
2. To prevent changes in color or smell to reduce marketability, do not use a
premix package for more than three consecutive days.
3. When releasing air from the premix package, keep your face away from the
joint tap. Premix may splash into your eyes.
4. Store premix packages with their connection side upward. Air will go up and
can be removed easily.
5. After replacing the premix package, press the dispense button two or three
times to dispense product. Do not leave the casing empty, or the impeller
may be damaged.
Check
1) Check the remaining premix level from the screen on the front cover.
2) Replace the premix package if necessary.
Replacement
1) Open the front cover. Turn the tap handle in the arrow
direction to unlock the joint tap.
2) Pull the joint tap in the arrow direction to remove it from the
suction pump. Unhook the premix package from the hanger.
Casing
Suction Pump
Joint
Tap Handle
(closed)

16
3) Open the joint tap.
4) Turn the joint tap nut and remove it from the empty premix
package. Wash the joint tap if necessary.
5) Attach the joint tap to a new premix package so that the tap
handle is in a proper position when the package is hooked with
the joint tap open.
6) Place the premix package with the joint tap up, move up the air
inside, and slowly push both sides of the package to release air.
7) When premix comes up to the outlet, close the joint tap.
8) Hook the holes on the premix package on the hanger.
9) Attach the joint tap to the suction pump.
10) Turn the tap handle in the arrow direction to lock the joint tap
with the suction pump.
11) Check for proper installation of the joint tap.
12) Slowly close the front cover. If it is half open, the unit may not
dispense product properly.
13) Place a container under the dispensing nozzle and press the dispense button to
dispense two or three cups. The product concentration may vary just after the premix
package is replaced.
[d] ADJUSTMENTS
The hot water amount, premix amount and hot water temperature are separately
adjustable.
IMPORTANT
1. Adjust with the hot water tank full, or the dispensing amount may vary.
2. After adjusting the set amounts, always use a graduated cylinder to check for
accurate dispensing.
3. To check the dispensed amount, place a container under the dispensing
nozzle.
Tap Handle
(open)
Hanger
Tap Handle
(closed)
Suction Pump

17
4. Check the dispensing time settings by dispensing product more than five
times.
5. After a long interval, the initial dispensed amount may be less than the set
amount. The unit will dispense the proper amount from the second dispensing
action.
Setting Mode
1) With the power switch on, press the set, up and down buttons together for 5 seconds.
2) The display will change from a temperature indication to “T-1” and start ashing in the
setting mode.
Changing Settings
1) While “T-1” is ashing, press the set button once. “T-1” will change to “T-2”. Every press
of the set button will change the code on the display.
T-1 > T-2 > T-3 > T-1 > T-2 ......
2) Each code means the following. Adjust the settings according to the type of premix
used.
Code Item Factory Adjustment Adjustable Range
T-1 Hot Water 3.5 sec 0.5 - 7 sec
T-2 Premix 2.0 sec 0 - 6.5 sec
T-3 Max Hot Water Temp 92°C 82 - 92°C
3) While the display is ashing “T-1”, press the up/down button to indicate the T-1 setting.
4) With the setting on the display, press the up/down button to increase/decrease the set
value. Keep the button pressed for rapid change.
5) When the desired value appears on the display, press the set button once. The display
will start flashing “T-2”. With the setting on the display, press the up/down button to
adjust the set value. See step 4) above.
6) After adjusting the set values, keep the set button pressed for 5 seconds.
7) The setting is complete when the display shows a temperature.
Set Values and Dispensed Amounts
1) The dispensed amount of hot water “T-1” is adjustable as follows. The dispensed
amount of hot water will increase by about 50 mL per second.
Table of contents
Other Hoshizaki Dispenser manuals