Howdens TOWER UNIT 3 DRAWERS User manual

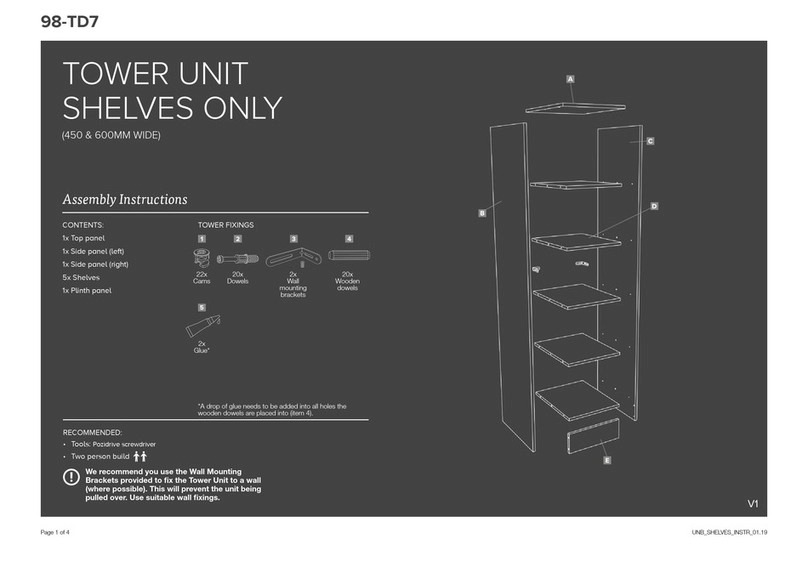
CONTENTS:
1x Top panel
1x Side panel (left)
1x Side panel (right)
4x Shelves
1x Plinth panel
6x Soft close drawer runners
(3x left, 3x right)
2x Drawer inll panels
2x Metal inll strips
3x Drawer sides (left)
3x Drawer sides (right)
3x Drawer bases
3x Drawer fronts
3x Drawer backs
We recommend you use the Wall Mounting
Brackets provided to fix the Tower Unit to a wall
(where possible). This will prevent the unit being
pulled over. Use suitable wall fixings.
2x
Wall
mounting
brackets
20x
Wooden
dowels
20x
Dowels
22x
Cams
TOWER UNIT PACK
DRAWER PACK
• Tools: Pozidrive screwdriver
• Two person build
RECOMMENDED:
TOWER UNIT
3 DRAWERS
(450 & 600MM WIDE)
Assembly Instructions
18x
Euro Screws
6x
Cams
24x
Wooden dowels
6x
Dowels
9
2x
Glue*
*A drop of glue needs to be added into all holes the
wooden dowels are placed into (items 4 & 9).
UNB_TUDRAWER_INSTR_01.19Page 1 of 5
V1

UNB_TUDRAWER_INSTR_01.19
PRELIMINARY DRAWING
ISSUED BY: A.SIMMONS
ISSUE DATE:18/06/12
QUOTATION PURPOSES ONLY
ISSUED DRAWING
ISSUED BY: A.SIMMONS
ISSUE DATE:18/06/12
ISSUED TO: SUPPLIER
4
PRELIMINARY DRAWING
ISSUED BY: A.SIMMONS
ISSUE DATE:18/06/12
QUOTATION PURPOSES ONLY
ISSUED DRAWING
ISSUED BY: A.SIMMONS
ISSUE DATE:18/06/12
ISSUED TO: SUPPLIER
1 2
34
Place the cams in the holes. (Apply to all shelves).Lay panels (B&C) on a at surface. Fit cams & dowels to both panels.
Note: B panel shown
Page 2 of 5
Insert the screws into the holes shown on both sides (B & C). 5
PRELIMINARY DRAWING
ISSUED BY: A.SIMMONS
ISSUE DATE:18/06/12
QUOTATION PURPOSES ONLY
ISSUED DRAWING
ISSUED BY: A.SIMMONS
ISSUE DATE:18/06/12
ISSUED TO: SUPPLIER
x10 x11
x4
x2
x9
1 2
Fix through these holes highlighted
3
x10
x2
x2

UNB_TUDRAWER_INSTR_01.19
7
Page 3 of 5
Attach shelves (D) onto side panel (C). Attach the other side panel (B).
8
PRELIMINARY DRAWING
ISSUED BY: A.SIMMONS
ISSUE DATE:18/06/12
QUOTATION PURPOSES ONLY
ISSUED DRAWING
ISSUED BY: A.SIMMONS
ISSUE DATE:18/06/12
ISSUED TO: SUPPLIER
1 2
1- Insert the cams into both inll panels (G). On the metal strip (H)
remove the plastic backing from the double-sided tape then stick the
metal strip to the drawer inll (G). 2 - Attach drawer inll panels onto the side panel (C) and tighten
the cams.
6
x2
Slot infill (G) onto the
sticky side of the tape on
the drawer infill strip (H).
x2

9
UNB_TUDRAWER_INSTR_01.19Page 4 of 5
9
910 (Repeat on all drawer sides). (Repeat on all drawer fronts).
10 11
1 2 3
1 – Lay drawer side (I) on a at surface, insert the base (K) into the
groove then hold the back panel (M) in place. 2 – Place the other drawer side (J) over the base and fasten the
back panel (M). 3 – Turn the drawer around and add the drawer front (L) .
(Repeat on all drawers).
12
x1
x4 x2
Drawer base
Drawer base
Drawer front
Drawer side
Drawer side
Drawer back
Drawer back
Making the drawers
Insert a drop of glue into all x6 holes in item A.
x6
x6
x2
x4 x4

UNB_TUDRAWER_INSTR_01.19Page 5 of 5
PRELIMINARY DRAWING
ISSUED BY: A.SIMMONS
ISSUE DATE:18/06/12
QUOTATION PURPOSES ONLY
ISSUED DRAWING
ISSUED BY: A.SIMMONS
ISSUE DATE:18/06/12
ISSUED TO: SUPPLIER
Use two people to stand up right.
14
PRELIMINARY DRAWING
ISSUED BY: A.SIMMONS
ISSUE DATE:18/06/12
QUOTATION PURPOSES ONLY
ISSUED DRAWING
ISSUED BY: A.SIMMONS
ISSUE DATE:18/06/12
ISSUED TO: SUPPLIER
15 Fix the wall mounting bracket to both sides of the Tower Unit.
(Use suitable xings when attaching to the wall).
13
1 2
1 - Pull the sliding part of the lower drawer runners out (F) and sit
the drawer on top. Whilst holding the runners in place, slide the
drawer back until the drawer clicks into place. 2 - Use the locking button to secure the drawer. Repeat for all
drawers. To remove a drawer, reverse the operation.
We recommend you use
the Wall Mounting Brackets
provided to x the Tower Unit to
a wall (where possible). This will
prevent the unit being pulled over.
Use suitable xings.
WALL MOUNTING
BRACKETS x2
Pull the sliding part of the
lower drawers out first and
hold in place.
Drawer shown
from underneath. Locking button
Turn to
adjust height
Use suitable
wall fixings

UNB_TUDRAWER_INSTR_01.19
Assembly Instructions
1 e· 1200 - 6mm = 1194mm
Assembly Instructions
1 e· 1200 - 6mm = 1194mm
HOW TO FIT
TOWER UNIT
Assembly Instructions
V1
Please check your opening for any
hidden electrical wires and water
pipes before / screwing.
Screws not supplied. Use
suitable screws and plugs.
TOOLS REQUIRED: Place your tower unit into position (This can be left, centre
or right aligned).
Once in position, measure side A. (Tip: Measure approximately
where the hanger will be placed). Measure and cut.
Cutting around skirting boards (optional). Mark using a
compass then cut using a coping saw.
Width (A) - 6mm
A
i.e 1200 - 6mm = 1194mm
Page 1 of 2

UNB_TUDRAWER_INSTR_01.19
1 2 3
Mark the position of the hanger bar. By measuring in 225mm to
the centre of the tower unit.
Fitting the second hanger bar. 1- Place hanger bar into rst bracket and level up.
2- Make sure to mark position on the side wall 225mm from the back wall. 3- Then x into position. Repeat 3-7 for remaining hanger bars.
Fix rst bracket through both holes. (We recommend
16mm screws).
225mm
225mm
Back wall
Page 2 of 2

UNB_MULTI_FIXINGS2_INSTR_04.191/2
A GUIDE TO FIXINGS
DE: EIN LEITFADEN FÜR DIE BEFESTIGUNG / FR: GUIDE DES FIXATIONS /
RO: UN GHID PRIVIND ELEMENTELE DE FIXARE / IT: GUIDA AI DISPOSITIVI DI FISSAGGIO
EN: Wall & Ceiling Fixings: You must first identify the type of wall or ceiling you intend to fix product onto and then contact your local hardware store if the fixings supplied are not suited to your wall or ceiling type.
Care and Maintenance: Safety: Always check the fitting and location to ensure your safety in and around the home. Fitting: From time to time check the fitting to ensure the wall plugs or screws do not become loose.
DE: Wand- und Deckenbefestigungen: Sie müssen, bevor Sie beginnen, zuerst die Art der Wand oder Decke kennen, an der Sie das Produkt befestigen möchten. Im Falle, dass die mitgelieferten Befestigungen nicht für Ihren Wand- oder
Deckentyp geeignet sind, wenden Sie sich bitte an Ihren örtlichen Baumarkt. Pflege und Wartung: Sicherheit: Überprüfen Sie immer die Befestigung und den Ort, um die Sicherheit in und um Ihrem Haus sicherzustellen. Befestigung:
Überprüfen Sie die Dübel oder Schrauben regelmäßig, um sicherzustellen, dass sich nicht lösen.
FR: Fixations pour murs et plafonds : Vous devez commencer par identifier le type de paroi ou de plafond sur lequel vous souhaitez installer le produit. Contactez ensuite votre fournisseur local si les fixations fournies ne conviennent
pas à votre type de support. Entretien: Sécurité : Toujours vérifier les fixations et les sites d’installation pour garantir votre sécurité. Fixation : Vérifiez périodiquement que les vis ou les mèches restent stables.
RO: Elementele de fixate pentru perete și tavan: Mai întâi trebuie să identificați tipul de perete sau tavan pe care intenționați să fixați produsul, apoi contactați magazinul de fierărie, dacă elementele de fixare din dotare nu se potrivesc cu
tipul dvs. de perete sau tavan. Îngrijire și întreținere: Siguranță: Verificați întotdeauna montajul și locul pentru a vă asigura siguranța în casă și în jurul casei. Montajul: Din când în când verificați montajul pentru a vă asigura că diblurile sau
șuruburile nu se slăbesc.
IT: Fissaggi per muri e sotti: Si dovrà innanzi tutto definire il tipo di muro o sotto a cui si intende fissare il prodotto, contattando quindi il negozio di ferramenta locale qualora i dispositivi di fissaggio forniti non fossero idonei per il
tipo di muro o sotto. Cura e manutenzione: Sicurezza: Verificare sempre la tenuta e il posizionamento per garantire la sicurezza in tutti gli ambienti della casa. Tenuta: Ispezionare regolarmente la tenuta per assicurare che i tasselli o le
viti non si allentino.
EN: IMPORTANT NOTE: When drilling into walls always check that there are no hidden wires or pipes etc. Make sure that the screws and plugs being used are suitable for supporting your unit. Always consult a qualified tradesperson if you
are unsure.
Tips: 1. Ensure you use the recommended drill bit to match the wall plug and hole size. 2: Ensure you drill the hole straight, do not force the drill or enlarge the hole. 3: Take extra care when drilling high walls, ceilings and ceramic tiles. Ensure wall
plugs are inserted beyond the thickness of the ceramic tiles to avoid the tiles splitting or cracking. 4: Ensure wall plugs are well fitted and are a tight fit in the drilled hole.
IT: NOTA IMPORTANTE: Importante: Prima di perforare i muri, verificare sempre che non vi siano fili o tubi nascosti e quant’altro. Assicurarsi che le viti e i tasselli utilizzati siano idonei per sostenere l’unità. In caso di dubbi, consultare sempre un
addetto qualificato.
Consigli: 1: Assicurarsi di utilizzare la punta di trapano consigliata per le dimensioni del tassello e del foro. 2: Assicurarsi di praticare un foro dritto, non forzare il trapano o allargare il foro stesso. 3: Prestare particolare attenzione nel forare pareti
di altezza elevata, sotti e piastrelle in ceramica. Assicurarsi che i tasselli vengano inseriti oltrepassando lo spessore delle piastrelle in ceramica, per evitarne la rottura o fessurazione. 4: Assicurarsi che i tasselli siano ben inseriti e perfettamente
aderenti nel foro praticato.
RO: NOTĂ IMPORTANTĂ: Important: Când executați găuri în pereți, verificați întotdeauna să nu existe cabluri sau conducte ascunse etc. Asigurați-vă că șuruburile și dublurile utilizate se potrivesc pentru susținerii unității dvs. Consultați
întotdeauna un comerciant calificat, dacă nu sunteți sigur.
Sfaturi: 1: Asigurați-vă că utilizați burghiul recomandat care să se potrivească dimensiunii diblului și orificiului. 2: Asigurați-vă că executați un orificiu drept. Nu forțați burghiul și nu lărgiți orificiul creat. 3: Fiți foarte atenți atunci când executați
orificii în pereți înalți, tavane și plăci ceramice. Asigurați-vă că diblurile sunt introduse dincolo de grosimea plăcilor de ceramică, pentru a evita crăparea sau fisurarea plăcilor. 4: Asigurați-vă că diblurile sunt bine potrivite și sunt bine fixate în
orificiul executat.
FR: REMARQUE IMPORTANTE : Information importante : Avant de percer dans une paroi, toujours vérifier qu’elle ne contient pas une canalisation ou un câblage électrique. Vérifiez que les vis et les mèches utilisées sont compatibles avec votre
unité. En cas de doute, toujours consulter un professionnel.
Astuce: 1 : Toujours utiliser le foret recommandé pour la mèche et le diamètre de l’orifice. 2 : Le perçage doit être droit, sans forcer sur le foret ni élargir le trou. 3 : Prenez les précautions nécessaires lorsque vous devez percer dans des zones en
hauteur, un plafond ou des carreaux en céramique. Les mèches doivent être insérées sous l’épaisseur du carreau de céramique pour éviter qu’il craque ou se fende. 4 : Vérifiez que les mèches sont fermement fixées et tiennent bien dans
l’orifice percé.
DE: IMPORTANT: Wichtiger Hinweis: Wichtig: Überprüfen Sie beim Bohren in Wände immer, dass keine unsichtbaren Kabel oder Rohre usw. vorhanden sind. Achten Sie darauf, dass die verwendeten Schrauben und Dübel für die Befestigung
Ihres Geräts geeignet sind. Fragen Sie, im Falle, dass Sie sich nicht sicher sind, immer einen Fachmann.
Tipps: 1. Benutzen Sie den für die Größe des Wanddübels des Lochs empfohlenen Bohrer. 2: Bohren Sie das Loch gerade in die Wand. Drücken Sie nicht mit Gewalt auf die Bohrmaschine oder vergrößern Sie das Loch mit dem Bohrer. 3: Seien Sie
besonders vorsichtig, wenn Sie Löcher oben an hohen Wänden, in Decken und Keramikfliesen bohren. Stellen Sie bei Keramikfliesen sicher, dass die Dübel bis hinter die Keramikfliesen hineingesetzt werden, um ein Zerbrechen oder Einreißen
der Fliesen zu vermeiden. 4: Achten Sie darauf, dass die Dübel gut ins Bohrloch passen und fest sitzen.

UNB_MULTI_FIXINGS2_INSTR_04.192/2
Important note:
Types of structures
Provided in pack
No.2 “Plasterboard” wall plug
For use when attaching light loads on to
plasterboard partitions.
Care &
Maintenance
Safety: Always check the fitting and
location to ensure your safety
in and around the home.
Fitting: From time to time check the fitting
to ensure the wall plugs or screws
do not become loose.
You can use one of the following types of wall plug if your walls are made
of brick, breeze block, concrete, stone or wood.
Important: When drilling into walls always
check that there are no hidden wires or pipes etc.
Tips:
1:
2:
Ensure you use the recommended drill bit to match the wall
plug and hole size.
3:
Ensure you drill the hole straight , do not force the drill or
Provided in pack
No.1 “General Purpose / Concrete or Block
Work” wall plug
Generally aerated blocks should not be used to
support heavy loads, use a specialist fitting in this
case. For light loads, general purpose wall plugs
can be used.
enlarge the hole.
4:
Take extra care when drilling high walls, ceilings and ceramic tiles.
Ensure wall plugs are inserted beyond the thickness of the
ceramic tiles to avoid the tiles splitting or cracking.
Ensure wall plugs are well fitted and are a tight fit in the
NOT supplied
No.3 “Cavity Fixing” wall plug
For use with plasterboard partitions or hollow
wooden doors.
HD_Wall fixings-inst_Ex_03.19
Screws provided
No.4 “Wooden Structure”
If you know you are fixing directly into a wooden
batten, the screws provided do not require a “plug”.
drilled hole.
Wall & Ceiling Fixings:
Make sure that the screws and plugs being used are suitable
for supporting your unit. Always consult a qualified tradesperson
if you are unsure.
You must first identify the type of wall or ceiling you intend to fix
product onto and then contact your local hardware store if the
fixings supplied are not suited to your wall or ceiling type.
AGuide Fixingsto
No.1 / Nr.1 / N. 1
No.3 / Nr.3 / N. 3
No.2 / Nr.2 / N. 2
No.4 / Nr.4 / N. 4
EN: “General Purpose / Concrete or Block Work” wall plug.
DE: Mehrzweck/Beton- oder Ziegelmauerwerk-Dübel.
FR: Mèches tous usages/béton ou parpaing.
RO: Diblul nr. 1 „Uz universal/beton sau bolțari”.
IT: Tassello per “uso generico / opere in cemento o blocchi.
FR: Mèches pour fixation en creux.
DE: Hohlraum-Dübel.
EN: “Cavity Fixing” wall plug.
RO: Diblul nr. 3 „Fixarea în orificii”.
IT: Tassello “con alette”.
RO: „Structură de lemn”.
FR: Structure en bois.
DE: Holzdübel.
EN: “Wooden Structure”.
IT: “Struttura in legno”.
DE: Gipskartonplatten-Dübel.
EN: “Plasterboard” wall plug.
FR: Mèches pour plaques au plâtre.
RO: Diblul nr. 2 „Placă de gips-carton”.
IT: Tassello per “cartongesso”.
EN: For use with plasterboard partitions or hollow wooden doors.
DE: Für Gipskartonplatten oder hohle Wabentüren.
FR: À utiliser sur des cloisons en plaque de plâtre ou des portes en bois creuses.
RO: Pentru utilizare pe pereții despărțitori din gips-carton sau în ușile din lemn goale pe dinăuntru.
IT: Per l’uso su pareti divisorie in cartongesso o porte in legno tamburato.
EN: If you know you are xing directly into a wooden batten, the screws provided do not require a “plug”.
IT: Se si prevede di eettuare il ssaggio direttamente su un listello in legno, le viti fornite non necessitano di “tassello”.
DE: Wenn Sie etwas direkt an einer Holzleiste/Dachlatte befestigen, können Sie die gelieferten Schrauben ohne Dübel verwenden.
FR: Si vous préparez une installation dans un support en bois massif, vous n’avez pas besoin de mèche.
RO: Dacă știți că xați direct într-o scândură groasă de lemn, șuruburile din dotare nu necesită „diblu”.
EN: For use when attaching light loads on to plasterboard partitions.
DE: Zur Befestigung leichter Lasten an Gipskartonwänden.
FR: À utiliser pour xer des charges légères sur des cloisons en plaques de plâtre.
RO: Pentru utilizare la xarea greutăților mici pe pereții despărțitori din gips-carton.
IT: Per l’assione di carichi leggeri su pareti divisorie in cartongesso.
EN: Generally aerated blocks should not be used to support heavy loads, use a specialist tting in this case. For light loads,
general purpose wall plugs can be used.
DE: Gasbetonblöcke sollten nicht zur Aufnahme schwerer Lasten verwendet werden. Verwenden Sie in diesem Fall eine
spezielle Halterung. Für leichte Lasten können Universaldübel verwendet werden.
FR: En général, les blocs en ciment à air occlus ne doivent pas être utilisés pour supporter des charges lourdes. Dans ce cas,
utilisez une xation spécialisée. Pour les charges légères, les mèches murales tous usages sont recommandées.
RO: Bolțarii aerați în general nu trebuie să e utilizați pentru a susține greutăți mari. Utilizați un specialist în montaje în
acest caz. Pentru greutăți mici, pot utilizate diblurile de uz universal.
IT: In generale, non utilizzare blocchi aerati per sostenere carichi pesanti, ma usare invece dei ssaggi speciali. I tasselli per
uso generico possono essere utilizzati in presenza di carichi leggeri.
EN: Types of structures:
You can use one of the following types of
wall plug if your walls are made of brick,
breeze block, concrete, stone or wood.
FR: Types de structures:
Vous pouvez utiliser un des types de mèches
suivants lorsque le mur est en briques, en
parpaings, en béton, en pierre ou en bois.
RO: Tipuri de structuri
Puteți utiliza unul dintre următoarele tipuri
de dibluri, dacă pereții sunt din cărămidă,
bolțari, beton, piatră sau lemn.
IT: Tipi di strutture:
Se le pareti sono di mattoni, calcestruzzo,
cemento, pietra o legno, è possibile usare
uno dei tipi di tasselli di seguito indicati.
DE: Baumaterialien
Für Wände aus Ziegelsteinen, Gasbetonblöcken,
Kalksandstein, Beton, Stein oder Holz können Sie
einen der folgenden Wanddübeltypen verwenden.
Table of contents
Other Howdens Indoor Furnishing manuals
Popular Indoor Furnishing manuals by other brands

Bunkers
Bunkers LOLINE LONGWALL Series Assembly instructions

Muckle Mannequins
Muckle Mannequins ANT-ATWP-1 instruction manual

Germania
Germania Regal 2251 Assembly instructions

Bouclair
Bouclair 9399422 Assembly instructions

Classic Exhibits
Classic Exhibits visionary design MOD-1524 Assembly instructions

Robern
Robern CRAFT Series installation instructions