Hozelock 1352 User manual
1352
1353
1354
Bioforce revolution
6/9/14000
?
www.hozelock.com
2
Year
guarantee
Hozelock Ltd.
Midpoint Park, Birmingham,
B76 1AB. England
Tel: +44 (0) 121 313 1122
www.hozelock.com
33852-000

Contents
Assembly
x1
x1
x1
2 3
a
f
i
l
g
h
n
b
j
k
g
m
q
d
e
p
o
c
aElectrical Housing.
bLid assembly.
cUV lamp indicator lens.
dCleaning Handle Knob.
eCleaning Handle.
fDiverter Valve.
gCleaning Fingers (Yellow).
hUV Shroud.
iFoam Bucket.
jCypricube Foam.
kBio-media.
lVessel o-ring seal.
mFilter Vessel.
nLid Clamp.
oBio-trumpet.
pHosetail & Nut.
qLever.

GB
Thank you for choosing a Hozelock quality product, you can
be assured of many years of reliable service from this product.
INSTALLATION &
OPERATING INSTRUCTIONS
READ THESE INSTRUCTIONS CAREFULLY
BEFORE AT TEMPTING INSTALLATION.
FAILURE TO OBSERVE THE FOLLOWING
NOTICES MAY RESULT IN INJURY, PRODUCT DAMAGE OR
LOSS OF FISH.
KEEP THESE INSTRUCTIONS FOR FUTURE REFERENCE.
This Hozelock Cyprio Bioforce Revolution is a new concept in
easy maintenance water filtration for garden ponds.
It is:
Used with the appropriate pond pump, it will improve water
clarity, remove unwanted solid matter from the pond and
convert dissolved organic and chemical fish waste into
harmless compounds.
Attention: UV Caution
This appliance contains a UV-C emitter. Unintended use of
the appliance or damage to the housing may result in the
escape of dangerous UV-C radiation. UV-C radiation may,
even in little doses, cause harm to the eyes and skin. The lamp
is fitted with an interlock that will turn the lamp off in the
event that the electrical housing is opened.
When switched on, the lamp can be checked for operation by
looking for a bluish glow from UV indicator lens. Do not run
the product dry.
Warning: Do not attempt to operate the UV-C emitter
when it is removed from the appliance housing.
Important
The appliance is not intended for use by persons
(including children) with reduced physical, sensory or mental
capabilities, or lack of experience and knowledge, unless
they have been given supervision or instruction concerning
use of the appliance by a person responsible for their safety.
Children should be supervised to ensure that they do not play
with the appliance. If this appliance is obviously damaged it
must not be operated.
(Australia & NZ only). This appliance is not intended for use
by young children or infirm persons unless they have been
adequately supervised by a responsible person to ensure that
they can use the appliance safely. Young children should be
supervised to ensure that they do not play with the appliance.
Warning:
Safety & Electrical Connections
1.1 WARNING: ALWAYS UNPLUG OR DISCONNECT ALL
APPLIANCES IN THE POND FROM THE ELECTRICITY
SUPPLY BEFORE PUTTING YOUR HANDS IN THE
WATER WHILST EQUIPMENT IS BEING INSTALLED,
REPAIRED, MAINTAINED OR HANDLED.
1.2 This filter has been designed for the use with garden
ponds only. Do not use this filter for any other use
(i.e. do not use this filter in swimming pools, etc). Using
the product for any other application may result in
injury or product damage.
1.3 Appliances that are obviously damaged must not be
operated.
1.4 The clear tube inside the unit is made from quartz
glass and care should be taken during installation and
maintenance. We recommend the use of eye protection
and suitable gloves.
1.5 Your Bioforce Revolution filter is weatherproof but not
submersible. Position the unit upright near the pond
but not where it can fall into the water or where the
ground can become waterlogged (See the section,
“Installation”).
1.6 Important: This product is supplied with 5m of 3-core
electric cable . It is designed to be permanently wired
to the mains supply. For connection to the mains
supply use only 3-core cable (ref HO5 RN-F). This has
a minimum copper cross-section of 0.75mm2 with
Polycloroprene-Rubber insulation.
The termination to the mains supply should be:
1.7 WARNING: This appliance MUST be earthed and it
is essential that the connections are made using the
following code:
1.8 Exposed cable runs should be sensibly positioned and
protected by armoured conduit, especially if there is a
risk of contact with gardening equipment such as forks
and lawnmowers, or children and domestic animals.
1.9 A 30mA maximum Residual Current Device (RCD)
MUST be fitted to the mains supply.
1.10 Permanent installations to the mains supply (hard
wiring), must conform to the national and local wiring
regulations. If in any doubt about wiring to the mains
supply, consult a qualified electrician or local electricity
authority.
1.11 Never use the mains supply cable or cleaning handle
to lift or move the filter, as this may cause damage.
If the filter needs to be moved, the product should be
switched off and drained of water first. Then lift the
product by gripping the area where the lid is clamped
to the main vessel.
1.12 Never sit or lean on the cleaning handle! (Fig. 4).
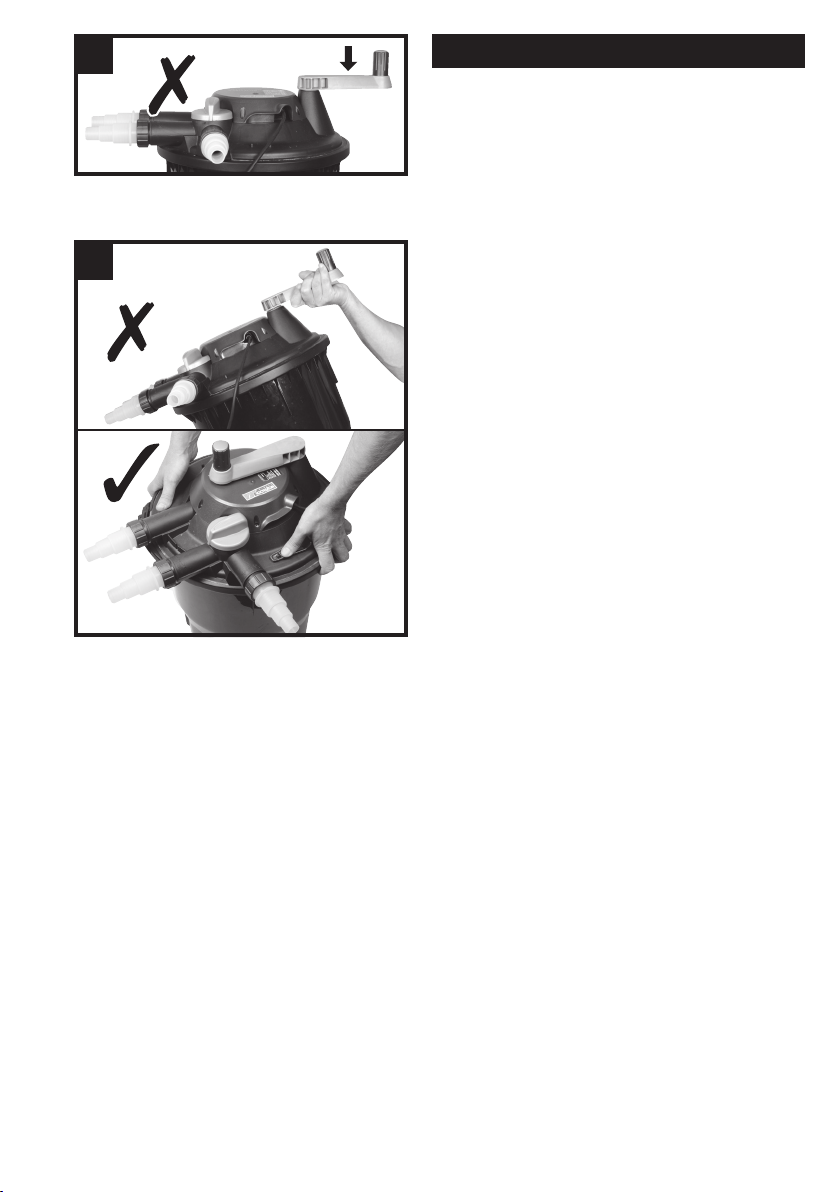
4
1.13 Never lift the filter using the cleaning handle. Always
carry the unit using two hands by firmly gripping the
rim of the lid (Fig. 5).
5
1.14 Do not operate your filter dry.
1.15 Do not block outlets whilst filter is in use.
1.16 Do not operate this product if the mains supply cable
has become damaged in any way. The supply cable
cannot be replaced. If the cable is damaged, the
electrical housing should be disposed of according to
local regulations.
1.17 Protect from frost if the unit is not to be run year-round.
(See the section, “Winter Care”).
1.18 Protect the filter from direct sunlight.
1.19 This product is not suitable for water temperatures
above 35ºC or below 0ºC.
1.20 Only use accessories which have been designed for use
with this product. The use of any other accessories or
spares may invalidate your guarantee.
Installing this product in the garden is classed as
‘notifiable’ in the Regulations for England and Wales. The
Regulations require you to tell your local authority building
control department that you intend to install this product
before installation. Your local authority will let you know
how you can get your installation approved.
General Guidance
2.1 The Technical Information Chart overleaf gives
general guidance on the specifications of the filter
& recommended pump. However, for best results
several other condition factors should be taken into
consideration, as these reduce the capabilities of the
filter.
Pond depth: Hozelock Cyprio recommends a minimum
depth of 1.2m (4’) for Koi ponds. For a pond with an
average depth of less than 0.75m (2’ 6”) the Condition
Factor is + 25%. Shallow ponds are subject to full
penetration of sunlight, and warm up quickly. This
encourages algae growth.
Location: Pond location determines the daily amount
of sunlight or shade a pond receives. Ponds exposed
to full sunshine throughout the day have a Condition
Factor of +25%.
Climate: Climate affects water temperatures and fish
the fish, the greater the demands on the filtration
system. In hot climates (ie South Africa), the Condition
Factor is +35% In temperate climates (ie Southern
Europe), the Condition Factor is +15% In a Northern
European climate (ie most areas of Great Britain), the
Condition Factor is +0%.
•EXAMPLE: You have a 2200 litre goldfish pond 0.75m
deep (Condition Factor +25%). You live in London - a
Northern European climate (Condition Factor +0%).
The pond is exposed to full sunlight (+25%). The
effective volume of your pond is therefore increased
by 50% (25% + 25%), and you would need to size your
equipment as though your pond held 3300 litres.
2.2 Flow Rate: For best results the pond volume should
pass through the Bioforce Revolution every 1½ - 2½
hours, the fastest flow rate being recommended for
Koi ponds. Do not exceed the maximum flow rate, as
stated in the Technical Information Chart overleaf.
Correct flow rate is essential if you are to obtain clear
water. If your installation does not suffer from high
losses (ie long hose runs) it may be necessary to adjust
the flow to achieve the 1½ - 2½ hours turnover rate
using a flow control hose tap.
Small-diameter hose, unnecessarily long hose runs and
a high pumping lift (‘head’) can all considerably reduce
a pump’s output. We recommend choosing a pump
that will deliver the required flow against full static lift
(= vertical distance between pond surface and filter
inlet), plus 0.6m (2ft) to allow for friction losses in
hoses.
The object of filtration is to transfer waste material
from the pond into the filter, and so any pump used
as part of the package should be capable of handling
solids such as Hozelock Cyprio’s range of Aquaforce
pumps which have been specifically designed for ponds
in the size range covered by Bioforce Revolution. The
pump should be positioned in the deepest part of the
pond to ensure the best circulation of water in the
pond and maximise its solids handling capability. The
pump should be installed on a flat level platform which
is raised 300mm off the bottom of the pond. This will
prevent the pump sucking dirt directly from the bottom
of the pond and will also ensure that sufficient water
remains in the pond in the event of accidental leakage
of pond water.

How to check your flow rate: Take a container of a
known volume and time how long it takes to fill (in
seconds). Then divide 3600 by the number of seconds
it takes to fill the container, and multiply by the volume
(litres or gallons) of the container. The result will be the
flow rate in litres or gallons per hour (lph or gph).
2.3 Fish Stocking Density: Under normal conditions and
feeding regime, the Bioforce Revolution range will
support up to 50cm per 1000 litres (10” of fish per
100 gallons) of pond capacity. Introduce fish slowly
over the first few weeks, up to 20% of maximum
recommended level, increasing this if you wish to 50%
after six months. The balance will allow for fish growth.
2.4 Pond Treatments
can degrade very quickly by UVC radiation. Consider
switching off the filter during disease treatment. The
mechanical and biological filtration will continue to
work.
If treating your pond for blanketweed, turn off your
pump and filter for the duration of treatment until the
treated blanketweed has been removed from the pond
2.5 Extra care should be taken with any hose connections
as leaks will result in loss of water from the pond.
Installation
3.1 Important: Do not use a pump with a flow rate greater
than 8000lph or a maximum head greater than than
5m with the Bioforce Revolution range of filters.
3.2 Important: Bioforce Revolution filters must only be
installed in an upright vertical position (Fig. 6).
6
3.3 Bioforce Revolution filters are pump-fed, pressurised
external filter and UVC units, suited to either above
ground (Fig. 7) or in-ground (Fig. 8) installation
adjacent to your pond or concealed at the top of a
waterfall.
7 8
i
i = MIN 50mm
If you choose to install your filter above ground, place
the filter on flat level ground.
If you choose to part-bury your filter, the excavation
should be firmly back-filled with compacted sand to
support the unit. If you choose this type of installation,
you should leave a minimum of a 50mm gap between
the clamp and ground level ensuring it is easily
removable for annual maintenance.
3.4 Using small bore hoses leads to excessive restriction
of the water flow. The larger the diameter of hose
that you use the better the performance of the filter
will be, especially over long hose runs. The hosetails
supplied with this unit will accommodate 25mm (1”),
32mm (1¼”) and 40mm (1¾”) Cypriflex hose. We would
always recommend that on the Bioforce Revolution
filters, that the 40mm diameter hose should be used to
avoid water flow restriction.
9
25mm
32mm
40mm
Once you have selected
the hose diameter you
wish to use, cut the
steps off the hosetail
which are smaller than
the hose diameter to
eliminate restriction
(Fig. 9).
The pump which
supplies the filter and
the outlet of the pond
return hose should be
as far apart as possible
for optimal water circulation, so bear this in mind when
purchasing, measuring and cutting the Cypriflex hose.
Attach a suitable length hose between the supply
pump and the filter inlet (Fig. 10 (i)) securing the
hose to the hosetails using Hozelock Cyprio hoseclips,
available separately. Then connect a suitable length
of hose to the filter outlet (Fig. 10 (ii)) in the same way.
For details on the waste outlet (Fig. 10 (iii)), refer to the
section “Cleaning”.
10
i
ii
iii
43.5 x 20mm
43.5 x 20mm
Place the pump in the pond in a suitable location and
position the end of the outlet hose so that filtered
water returns to the pond.
Avoid kinks and sharp bends when positioning the
hoses. Keep the hose runs as short as possible to
minimise the restriction of flow.
3.5 Ensure the winding handle is positioned over the
electrical housing. Take the winding handle knob &
cover supplied and connect it to the cleaning handle by
locating it on the handle and clicking it in in place
(Fig. 11).
11
Your filter is now ready for use.
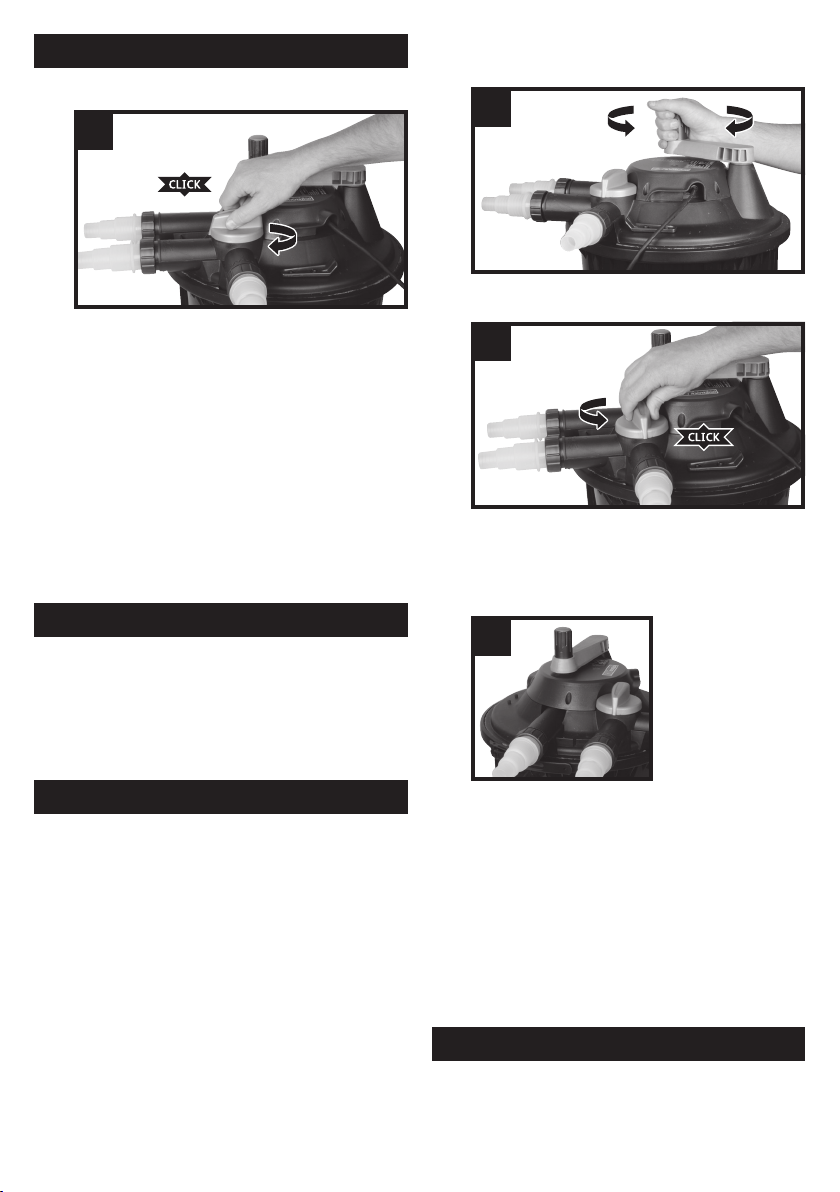
Operation
4.1 Ensure the Diverter Valve is turned to the pond
outlet (Fig. 12).
12
4.2 Connect the filter’s supply cord (See section 1 – Safety
& Electrical Connections). This switches on the UVC
lamp. You can check that the lamp is working by
looking for the blue glow in the UV lamp indicator lens
in the top housing (Fig. 3 (c)).
4.3 Switch on the pump.
4.4 Periods of Operation: Keep the filter working 24
hours a day. Ideally it should run all year round but at
least throughout the feeding season (ie until water
temperature falls below 10ºC). In winter, operating the
pump and filter will maintain a basic level of useful
bacteria in the Bioforce and will help prevent the pond
icing over. If you switch off the pump for winter, wash
the filter thoroughly before resuming filtration in the
spring (see “Winter Storage”, 11.0). Never feed your fish
when the filter is not in use.
Maturation
5.1 Biological maturation means that the filter has built
up enough nitrifying bacteria to convert harmful fish
and other organic waste (ie ammonia, nitrite) into
relatively harmless nitrate. The process normally takes
6-8 weeks, but depends on many factors such as water
temperature, feeding rate and stocking density. Speed
up maturation by adding a maturing agent such as
Hozelock Cyprio Filter Start.
Cleaning
When to clean your Bioforce Revolution.
Bioforce Revolution filters deliver maximum performance with
minimum maintenance. If the pond is very dirty, the filter may
need cleaning every few days at first, as it takes up waste
matter very quickly. Once the pond becomes clearer, there
will be less waste to remove, so the filter will need cleaning
less often. Pressurised filters are at their most efficient when
the foam becomes partly blocked. However, as blockage
increases, the flow rate drops as less water can flow through
the foam and cleaning becomes necessary.
6.1 Switch off the pump at the mains.
6.2 Connect a suitable length of hose to the waste outlet
(Fig. 10(iii)) using the hosetail provided and a hoseclip.
The end of the waste hose can positioned above a
drain or over a flowerbed. The waste water makes
excellent fertiliser.
6.3 Wind the handle several times. We recommend
several revolutions in both clockwise and anticlockwise
directions (Fig. 13). As the handle is rotated, the yellow
cleaning blades (Fig. 2 (g)) will rotate breaking apart
and squeezing each foam cube releasing debris which
they have collected.
13
6.4 Turn the diverter valve to the waste position (Fig. 14).
You will hear a “click”.
14
6.5 Switch on the pump.
6.6 Continue winding the handle (complete revolutions
in both directions). Initially the waste water will be
an intense green or brown colour depending on your
pond’s set up.
15 After a short period of
time the intensity of
the colour of the waste
water fades and the
water will start to clear.
At this point, stop
winding and return the
handle to the stowage
position above the
main housing (Fig. 15).
Wait 5 seconds for the last bits of waste to be flushed
through and turn the diverter valve back to pond.
WARNING: Leaving the valve in the waste position
will empty the pond. Make sure it is switched back to
pond outlet.
6.7 The time required to clean your filter depends on
several factors, but the more regularly you clean your
filter, the shorter the cleaning time required. Typically
the cleaning will take a few minutes.
From time to time, you will need to top up your pond
to replace the waste water removed during cleaning.
Partial water changes are an important aspect of
maintaining a healthy pond water system.
Maintenance
Warning: Read these maintenance instructions before
opening the appliance.
Warning: do not attempt to remove the lid or electrical
housing when the pump and filter are in use. A slot for a
padlock is provided in the lid clamp to prevent accidental
opening and we recommend this is used where children are
likely to be present.
7.1 Replacing the UV lamp:
Warning: The appliance must be disconnected from
the power supply before disconnecting the UV-C
emitter.
A UV lamp’s effectiveness reduces significantly over
time so you should replace your lamp every 12 months
even if the lamp is still functioning.
7.1.1 Switch off the power to the supply pump and filter.
7.1.2 Turn the diverter valve to waste. This allows the
internal pressure to equalise with atmospheric pressure
and allows easy removal of the electrical housing
without water being drawn up onto the top surface of
the lid.
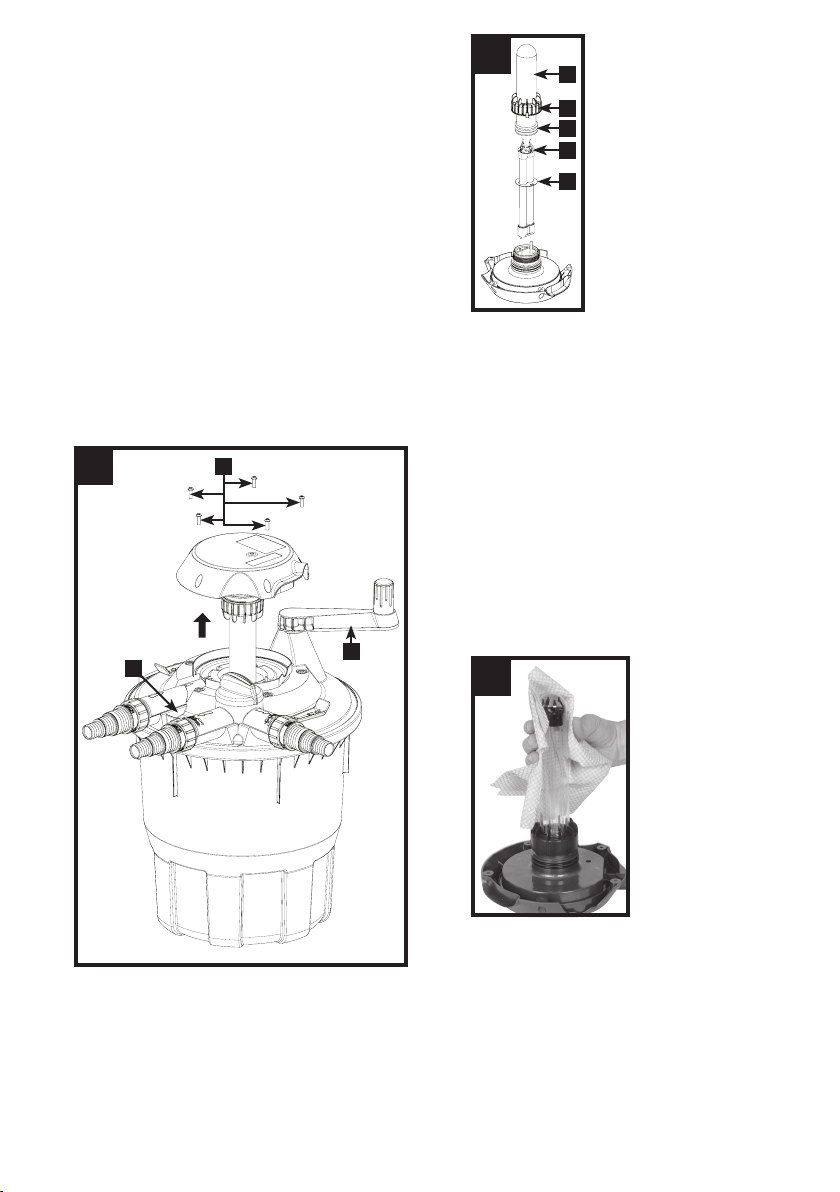
7.1.3 Wind the cleaning handle by half a turn so that it is out
of the way of the electrical housing (Fig. 16 (i)).
7.1.4 Use a screwdriver to remove the 5 screws which secure
the electrical housing to the lid. (Fig 16 (ii)). There is a
pocket provided between the filter’s inlet and outlet
to store the screws while you change the lamp (Fig. 16
(iii)).
16
i
iii
ii
7.1.5 Grip the electrical housing and gently pull up to remove
the electrical housing. Turn the housing upside down
and place on a dry level surface.
7.1.6 17 ii
i
iii
iv
v
(Fig. 17) Unscrew the quartz tube
locking collar (i). Gently hold the
quartz tube (ii), lift up and remove
together with its o-rings (iii) and
locking collar.
7.1.7 Remove the old lamp by gently
pulling it from its holder and
remove the black protection cap
from the end of the lamp (Fig.
17 (iv)) and remove the reflector
plate (Fig. 17 (v)). Dispose of
the old lamp according to local
regulations and fit the new lamp.
7.1.8 Refit the reflector plate and push
the black cap on to the end of the
lamp.
7.1.9 Slide the quartz tube down over the lamp. Ensure that
the two o-rings at the base of the quartz tube are clean
and free from debris.
7.1.10 Slide the locking collar down over the quartz tube and
screw down. You should screw down until the stop of
the locking collar hits the stop of the housing so that
the collar cannot be screwed down any more.
7.1.11 Refit the electrical housing. The housing can only be
fitted in one position so do not try to force it down.
Once in position, replace the 5 screws. The screws must
be fully screwed down to ensure that the interlock
switch is activated.
7.1.12 Turn the diverter valve back to pond and position the
cleaning handle in the stowage position.
7.1.13 Re-start the pump first checking for leaks, then switch
on the UV lamp. Check for the bluish glow from UV
indicator lens.
7.2 Care of UV quartz tube:
18 Especially in hard water
areas the quartz tube
sheathing the UVC lamp
may become covered in
limescale. This will reduce
the efficiency of the unit if
it is allowed to build up. To
clean, switch off the pump
and the power supply to
the UV, remove the
electrical housing, as
described in 7.1, and wipe
the quartz tube with a soft
cloth moistened with a
gentle cleaning agent such
as vinegar (See fig 18). You
should wear protective clothing when cleaning the
quartz tube such as safety glasses and gloves.
7.3 Cypricube foam replacement:
Inspect your foam annually. The frequency of foam
replacement will depend on your pond’s set up. We
recommend that foams are replaced during winter
and before you start feeding the fish again at the
start of the spring*. Changing the foam at other
times of the year may cause the pond chemistry to
alter and this may harm your fish.

*As pond water cools in the autumn, fish start slowing
down in preparation for a period of semi-dormancy.
Their digestive and immune systems slow down, and
they are not capable of digesting the same types of
foods that they can during the warmer months. If they
are hungry they will feed off more simple foods which
naturally occur in the pond environment. Therefore,
once the pond water temperature falls below 10°C for a
prolonged period of time, you should stop feeding your
fish. Once the weather begins to warm at the start of
the spring, as the fish start to become more active you
can gradually start to feed your fish again.
7.3.1 Switch off the power to the supply pump and filter.
7.3. 2 Turn the diverter valve to waste. This allows the
internal pressure to equalise with atmospheric pressure
and allows easy removal of the lid.
7.3.3 19 Unlatch the lid clamp
(Fig. 2(n)). Gently release
and remove the lid by
using the 2 levers in
opposite slots (Fig. 19). It
may help if you remove
the attached hoses.
7.3.4 Lift and remove the foam bucket (Fig. 2(i)) and discard
the old foam. Empty the water from inside the filter
vessel collecting the bio-media in a net. The bio-media
does not require any maintenance.
7.3.5 If the bottom of the vessel is coated in a layer of
sludge, rinse out the bottom of the vessel with some
pond water.
7.3.6 Replace the bio-media ensuring it is located around
the bio-trumpet (Fig. 2(o)) at the bottom of the vessel.
There must be no bio-media inside the bio-trumpet
(Fig. 20).
20
7.3.7 Place the foam bucket into the vessel. Rotate the foam
bucket until the small triangles at the top of the foam
bucket align with one of the vertical lines on the inside
of the filter vessel (Fig. 21). The foam bucket will drop
into place. Ensure that the foam bucket is correctly
positioned to allow easy location of the lid.
21
7.3.8 Fill the foam bucket with the recommended amount of
replacement Cypricube foam. Don’t worry if the new
dry foam cubes take up a little more space when they
are new. Ensure no foam falls down the central hole
into the bio-trumpet area.
Never squash down your foam to fit more in. The
dry foam should be loosely added and should not
fill higher than the filter vessel (Fig. 22). Adding too
much foam will make it harder to clean the filter.
22
MAX MAX
7.3.9 Ensure that the seal (Fig. 2(l)) at the top of the filter
vessel is in position and free from dirt and debris. Add a
light coating of silicone grease to the seal if required to
help assembly. Refit the lid. Slide the central black tube
which covers the UV lamp down through the central
hole.
7.3.10 Re-fit the lid clamp. Ensure that there is no build up of
water beneath the band clamp and keep the hinged
lever lubricated using an oil based lubricant.
7.3.11 Turn the diverter valve back to pond and position the
cleaning handle in the stowage position.
7.3.12 Re-start the pump first checking for leaks. Then switch
on the UV lamp. Check for the bluish glow from UV
indicator lens.
Winter Storage
8.1 In cold winter weather (when fish are inactive and
algae growth ceases) the unit may be switched off.
It should then be removed, thoroughly washed,
cleaned and dried and stored in a dry frost protected
area. Always store the unit with the lid off to ensure
adequate ventilation and drying.
Problem Possible cause Remedy
No water
flow through
filter to
pond.
Supply pump not
switched on or not
working.
Check that the pump is
working and switched
on.
Supply hose
blocked.
Check supply hose and
pond return hose for
blockages.
Diverter valve set
to “Waste”
Turn diverter valve to
“Pond”.
Reduced
flow through
filter
Foams are
blocked.
Clean filter
(See “Cleaning”).
Supply hose
blocked.
Check supply hose and
pond return hose for
blockages.

Problem Possible cause Remedy
Water does
not clear
New Filter has not
matured yet.
The pond water clarity
should start to improve
within 2-3 weeks,
but full biological
maturation can take 6-8
weeks before the filter is
fully effective.
Wrong sized filter
for your pond.
Check you are using the
appropriate filter for
your pond set up.
Wrong size supply
pump.
Check your flow rate.
See 2.2.
Blown UV lamp. Check UV indicator lens.
Replace UV lamp.
Old UV lamp. Replace UV lamp every
12 months.
Foams need
cleaning.
Clean filter
(See “Cleaning”).
The outlet of the
pond return hose
is positioned
above the supply
pump
Move the pump or
the outlet of the pond
return hose so that
they are as far apart as
possible.
Pond is
overstocked with
fish.
Reduce the quantity of
fish in your pond.
Overfeeding. Only feed your fish with
as much food as can
be consumed in a few
minutes. Only feed once
per day.
Cleaning
handle does
not rotate.
Pump is running
at the start of
cleaning.
Switch off pump. Wind
the handle in both
directions several times.
Switch on your pump
(See “Cleaning”).
Hozelock Cyprio Clearwater Guarantee
WE GUARANTEE YOU CLEAR WATER OR YOUR MONEY BACK
for a Hozelock Cyprio Bioforce Revolution when used with the
appropriate pump. This guarantee runs for 12 months after
purchase, provided that
instructions.
Hozelock Cyprio’s sizing information.
any problems to be put right.
A refund can only be authorised by Hozelock Cyprio and
is made only at the place of purchase to the value of the
purchase price of the filter only. Please note that the
Clearwater Guarantee does not cover loss of water clarity
when blanketweed, as opposed to greenwater algae, is the
cause.
Hozelock Cyprio 2 Year Guarantee
If this Bioforce Revolution (excluding Lamp) becomes
unserviceable within 2 years of the date of purchase it will
be repaired or replaced at our option free of charge, unless in
our opinion it has been damaged. Liability is not accepted for
damage due to accident, improper installation or use. Liability
is limited to replacement of the faulty unit. This guarantee is
not transferable. It does not affect your statutory rights. To
obtain the benefits of this guarantee, firstly contact Hozelock
Cyprio Consumer Services (0121 313 1122) who may request
that the unit is sent along with proof of purchase directly to
the address below.
For product advice and spares please contact
Hozelock Cyprio Consumer Services on 0121 313 1122 or visit
www.hozelock.com
Technical Information
Part Number 1352 1353 1354
Range Bioforce Revolution
Volts (V) 230V 50Hz
UVC Power (W) 18 24 36
Maximum Pond
size with Fish
6000 ltr
(1320 gal)
9000 ltr
(1980 gal)
14000 ltr
(3080 gal)
Maximum Pond
size without Fish
12000 ltr
(2640 gal)
18000 ltr
(3960 gal)
28000 ltr
(6160 gal)
Max Hozelock
Cyprio Aquaforce
Pump Size (lph)
4000 6000 8000
Max Flow,
3000 4500 7000
IP Rating IP57 IP57 IP57
Max Water
Temperature
T,, (°C)
35°C 35°C 35°C
Bioforce
Revolution
Cleaning System
333
* Measured under controlled conditions
Do not dispose of electrical appliances as
unsorted municipal waste, use separate
collection facilities. Contact your local
government for information regarding the
collection systems available. If electrical
appliances are disposed of in landfills or
dumps, hazardous substances can leak into
the groundwater and get into the food chain,
damaging your health and well-being. In the
EU, when replacing old appliances with new
ones, the retailer is legally obligated to take
back your old appliance for disposal at least
free of charge.


Hozelock Ltd.
Midpoint Park, Birmingham,
B76 1AB. England
Tel: +44 (0) 121 313 1122
www.hozelock.com
33852-000
This manual suits for next models
2
Table of contents
Other Hozelock Pond Pump manuals

Popular Pond Pump manuals by other brands

Bermuda
Bermuda BER0364-P019C instruction manual

fish mate
fish mate 9000 instructions

1A Profi Handels
1A Profi Handels OASIS 501R-1 operating instructions

Biotop Garden
Biotop Garden D0060 User instructions

TeichTip
TeichTip Sunsun Bio Pond Filter Set user manual

Pontec
Pontec PondoMax Eco 5000 Translation of the original operating instructions


