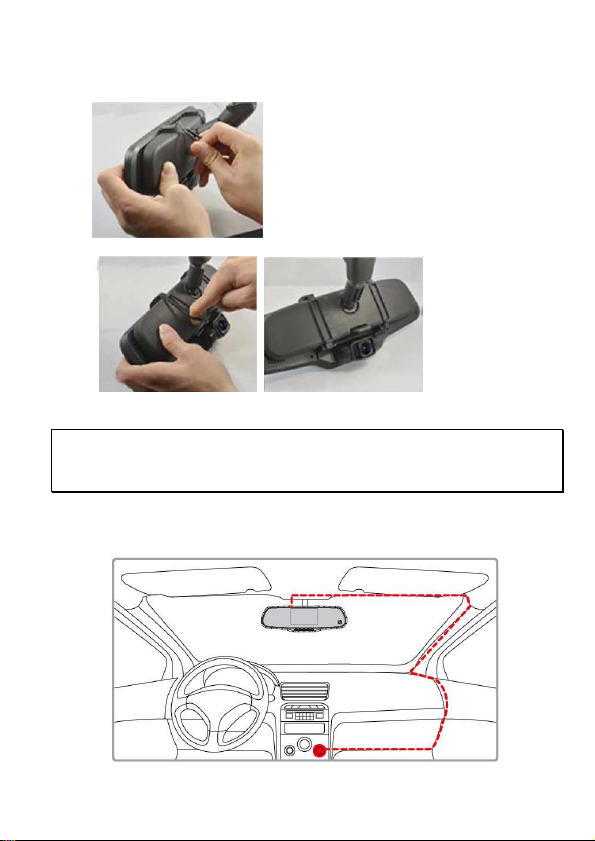
manuals.online logo
Brands
  1. Home
  2. •
  3. Brands
  4. •
  5. HP
  6. •
  7. Dashcam
  8. •
  9. HP Compaq Presario,Presario F760 User manual

HP Compaq Presario,Presario F760 User manual

f760
f760
f760
f760
完整版產品使用者手冊請至
完整版產品用戶手冊請至
1
About this Guide
The content in this document is for information purpose and is subject to
change without prior notice. We made every effort to ensure that this User
Guide is accurate and complete.
However no liability is assumed for any errors and omissions that may
have occurred.
The manufacturer reserves the right to change the technical specifications
and accessories without prior notice.
Caution

Never disassemble or attempt repair of this product. Doing so may
damage the camcorder cause electric shock and void your product
warranty.

Set up time and date accurately before you use this camcorder.

Exposing the camcorder to open flames can cause explosion.

Due to local laws and vehicles safety considerations do not manually
operate the camcorder while driving.

The values displayed in this system such as speed position and the
distance warning to the speed camera set points may be inaccurate
due to the influence of surrounding environment. They are for your
reference only.

HP Inc. Company is NOT responsible for the loss of any
data/content during operation.
For more operation details, please refer to CD-ROM.
2
1Introduction
Thank you for purchasing this advanced camcorder. This camcorder is
specifically designed for real time video and audio recording when driving.
1.1 ackage Contents
The package contains the following items. If there are any missing or
damaged items contact your dealer immediately.
Car camcorder Rubber Band CD-ROM
Quick start guide Car adapter Rear Camera
3
1.2 roduct Overview
4
No. Item
1 Rearview mirror clip
2 Rubber Band
3 LCD Display
4 Menu and Return ( )
5 Playback and Up/Previous option ( )
6 Power on/off and LCD on/off ( )
7 Confirm and Emergency record ( )
8 Photo and Down/Next option Audio on/off ( )
9 MicroSD memory card slot
10 Rear Camera connection
11 Car power adapter connection
12 Reset
13 Lens
5
2Getting Started
2.1 Inserting the Memory Card
Insert the memory card with the gold contacts facing the back of the
camcorder. Push the memory card until it clicks into place. (Use class 10 or
greater speed micro SD cards for this camcorder; It is recommended to
format the micro SD cards before the initial use.)
To remove the memory card
Push the edge of the memory card inward until you hear/feel it click then
allow it to push out until you can remove it from the slot.
Note:
1. Do not remove or insert the memory card when the camcorder is powered on. This
may damage the memory card.
2. It is recommended to use a 32 GB Class 10 speed or above micro SD card.
3. It is recommended to format the micro SD cards before the initial use.
6
2.2 Installing in Vehicles
1. Clip on to your original car mirror.
2. Circle the clip with the band.
3. Adjust the camcorder lens.
Note:
Image shown here is for installation illustration. The outlook may differ from what you
purchased.
2.3 Connecting to ower
Use only the supplied car adapter to power up the camcorder and charge
the built-in battery.
7
1. Connect one end of the car adapter to the USB connector of the
camcorder. USB port input: DC 5V / 1A.
2. Plug the other end of the car charger to the cigarette lighter socket of
your vehicle. Once the vehicle engine is started the camcorder
automatically powers on. Car charger input: DC 12 / 24V.
Note:
Please take note if the environment temperature reaches 45°C or above the car
adapter still can supply power to camcorder but it may not charge the battery. This is
characteristic of Lithium polymer battery and is not a malfunction.
2.4 Initial Settings
2.4.1 Set the Date and Time
To set the correct date and time do
the following:
1. Press the button
to
enter the OSD menu.
2. Press the
or
button to select Date / Time and
press the button.
3. Press the
or button to adjust the value and press
the button to move to another field.
4. Repeat step 3 until the date and time setting is complete.
5. Press the button to exit the Date/Time settings. Press the
button again to exit the settings menu and return to the live
view mode.
Note:
When the battery is depleted you must reset the date/time before the function
-automatic record is started.
8
3Using the Camcorder
3.1 Recording Videos
3.1.1 Record videos while driving
When the vehicle engine starts up and the Automatic Record function is
enabled the camcorder automatically turns on and starts recording.
Recording will automatically stop when the engine is switched off.
Note:
1. On some cars the recording will continue when the engine is switched off. If this happens
please manually turn off the cigarette lighter or remove the car adapter from the cigarette
lighter.
2. The camcorder saves the recording in the memory card. If the memory card capacity is full
the oldest file in the memory card will be overwritten.
3.1.2 Emergency Recording
This Car Camcorder is equipped with a sensor that is designed to detect
collisions and automatically trigger the Emergency Recording feature. The
“ Emergency” icon will be displayed if this feature is initiated as illustrated.
The Emergency Recording video will not be overwritten via the normal loop
recording function of this product.
To manually initiate the Emergency
Recording feature press the
button during the normal recording
function.
To stop the emergency recording
press the button.
Note:
1. If the Collision Detection function is enabled and a collision is detected the camcorder will
automatically trigger the emergency recording feature.
2. The emergency file is created as a new file and save in Event folder which will be protected to
avoid being overwritten by normal loop recording. The emergency video folder will occupy 40%
of available memory card capacity. For example if you use 8GB memory card about 3.2GB
memory space will be saved for emergency files. When the emergency video folder is full the
oldest emergency file will be automatically deleted by the newest emergency file.
9
3.1.3 The Recording Screen
No.
Item
Description
1 Duration Indicates the current recording duration
2 Microphone
Indicates sound will be recorded with the video.
Indicates sound will NOT be recorded with the video.
Long Press to disable/ enable
3 Resolution
Resolution can be changed in the Settings menu. If the
camcorder is in Video mode available resolutions are:
1080P: Full HD 1920 x 1080 pixels @30fps
720P: HD 1280 x 720 pixels @30fps
4 TF Card
When a compatible micro SD memory card is inserted the LCD
displays .
If no memory card is inserted or if the memory card is damaged
/ incompatible the LCD displays
5 Battery Indicates the estimated remaining battery power. See Battery
Status Indicator 2.3
6 Date / Time Current date and time.
10
3.1.4 Taking hotographs
You can also use this camcorder to
take snapshots of the current
scene.
1. In recording status press
to capture recording
screen shots from the front lens.
2. When the icon shows in the central of screen it means the
screenshots is completed.
Note:
The picture resolution is limited by the speed of the target object and changes in ambient
lighting. The photograph function is better used for taking still pictures in accident
scenes or when the car is stopped to wait for a traffic light.
3.2 layback Videos and hotos
1. If recording is in progress press the button to stop recording
and enter the playback menu.
2. Press the
or
button to select the file
category that you want to
browse and press the
button to display thumbnail
images of the recorded video
or photo files.
3. Use the
or to
select the video or photo you want to playback and press
button to confirm your selection.
11
3.3 Deleting Files
To delete file(s) perform the following steps:
1. Press the button to
stop recording and enter the
main Menu.
2. Press the
or
button to select File Deletion
and press the button
to confirm.
3. Press the
or
button to select folder and
press the button to
confirm.
4. Use the or
to select the video or photo
you want to delete and press button to confirm your
selection.
Item Description
Delete One Delete the current selected file.
Delete All Deletes all files in this folder.
5. Press the button to confirm deletion.
Note:
Deleted files CANNOT be recovered. Ensure the files you wish to preserve are backup
before deletion.
12
3.4 Driving Safety
The following driving safety function is for reference only. Drivers are
advised to exercise discretion based on actual road conditions.
Menu option Description
Collision
Detection
If Collision Detection is activated this camcorder starts
emergency recording once it detects any collision.
Parking Mode To monitor the vehicle when it is parked you can activate
Vibration Detection, or Motion Detection.
LDWS
Once LDWS triggers this camcorder produces audible alert
and screen message when you drive off of or change
lanes.
FCWS
Once FCWS triggers this camcorder produces audible alert
and screen message when you are less than 20m away
front the car in front of you.
1
關於本手冊
本文件內容僅供參考,且可隨時變更不事先通知。本公司已盡力確保此
使用者手冊內容準確完整。
然而,對於可能發生的任何錯誤或疏漏,本公司概不負責。
製造商保留變更技術規格與配件的權利不事先通知。
注意
千萬不要拆解或試圖修理本產品。此舉可能損壞行車記錄器,造成
觸電並使產品保固失效。
使用此行車記錄器之前請準確設定時間與日期。
此行車記錄器暴露於明火中可能爆炸。
由於當地的法律及車輛安全考量,行駛當中請勿手動操作行車記錄
器。
此系統顯示的數值,例如速度、位置,以及警告測速照相機設置點
的距離,都可能因為周遭環境的影響而不準確。這些數值僅供參考。
惠普公司對於操作當中的任何數據/內容流失概不負責。
欲瞭解更多的操作訊息,請參閱 CD-ROM。
2
1簡介
本公司在此先感謝您購買此行車記錄器。此行車記錄器經過特別設計,
可於駕駛時錄下即時的影像與聲音。
1.1
包裝內容
包裝內包含下列項目。如有任何項目遺漏或毀損,請立刻聯絡經銷商。
行車記錄器 鬆緊帶 CD-ROM
快速使用說明 電源供應器 後置鏡頭
3
1.2
產品概觀
4
號碼
項目
1 後視鏡夾
2 鬆緊帶
3 螢幕
4 設定選單及返回( )
5 撥放及向上/前一個選項( )
6 電源及螢幕開關( )
7 確認及緊急錄影( )
8 拍照及向下/後一個選項( )
9 MicroSD 記憶卡埠
10 連接後置鏡頭
11 連接電源供應器
12 重置
13 鏡頭
5
2開始
2.1
插入記憶卡
記憶卡金色接觸面朝向行車記錄器背面插入。將記憶卡推到底直到扣
住。(此記錄器請使用 class 10 或速度更快的 micro SD 記憶卡;建議在初
次使用前先將 micro SD 卡格式化。)
移除記憶卡
將記憶卡邊緣往內推到你聽到/感覺到喀噠聲,然後讓它從卡槽推出直到
你可以移除。
備註:
1. 行車記錄器電源打開時不要移除或插入記憶卡。此舉可能損壞記憶卡。
2. 建議使用 32 G ,速度 Class 10 以上的 micro SD 記憶卡。
3. 初次使用前建議先將 micro SD 記憶卡格式化。
6
2.2
安裝於車內
1. 夾在原本的汽車後視鏡上。
2. 用鬆緊帶圈住夾子。
3. 調整記錄器鏡頭。
備註: 以上圖示為安裝說明。實際外觀請以您購買機種為主。
2.3
連接電源
限使用本產品包裝內附的電源供應器供電給行車記錄器並讓內建的電池
充電。
7
1. 電源供應器的一端連接到記錄器的 US 埠。電源連接孔輸入直流電
壓5V/1A。
2. 將電源供應器的另一端插到車內的點煙器插孔內。車輛的引擎一旦
發動,記錄器電源自動打開。車充輸入直流電壓 12/24V。
備註:
請注意如果環境溫度達 45°C 以上,電源供應器仍可供電給記錄器,但可能無法讓電
池充電。這是鋰電池的特性而非故障。
2.4
首次使用設定
2.4.1 設定日期及時間
進行下列動作設定正確的日期及時間:
1. 按 按鍵進入 OSD 選單。
2. 按
或
按鍵選擇
時間設定並按下
按鍵。
3. 按
或 按鍵調整
數值並按 按鍵移至另一欄。
4. 重複步驟 3 直到日期與時間設定完畢。
5. 按 鈕退出時間設定。再按一次 按鍵退出設定選單
並回到現場取景模式。
備註:
電池電力耗盡時,必須在啟動自動錄影前重設時間設定。

Other manuals for Compaq Presario,Presario F760

1

Other HP Dashcam manuals

HP F510 User manual

HP

HP F510 User manual

HP f490w User manual

HP

HP f490w User manual

HP f520 User manual

HP

HP f520 User manual

HP f330 User manual

HP

HP f330 User manual

HP Deskjet F310 User manual

HP

HP Deskjet F310 User manual

HP CD-ROM User manual

HP

HP CD-ROM User manual

HP f790 User manual

HP

HP f790 User manual

HP U818 Series User manual

HP

HP U818 Series User manual

HP F650g User manual

HP

HP F650g User manual

HP s970 User manual

HP

HP s970 User manual

HP f500c User manual

HP

HP f500c User manual

HP f799w User manual

HP

HP f799w User manual

HP F885 User manual

HP

HP F885 User manual

HP F300 User manual

HP

HP F300 User manual

HP f530 User manual

HP

HP f530 User manual

HP f270 User manual

HP

HP f270 User manual

HP f770 User manual

HP

HP f770 User manual

HP Deskjet F335 User manual

HP

HP Deskjet F335 User manual

HP f550g User manual

HP

HP f550g User manual

HP f890g User manual

HP

HP f890g User manual

HP f550g User manual

HP

HP f550g User manual

HP f530g User manual

HP

HP f530g User manual

HP f870g User manual

HP

HP f870g User manual

HP f910g User manual

HP

HP f910g User manual

Popular Dashcam manuals by other brands

Rac RAC 107 instruction manual

Rac

Rac RAC 107 instruction manual

Thinkware X1000 quick start guide

Thinkware

Thinkware X1000 quick start guide

Somogyi SAL DVR WF1 instruction manual

Somogyi

Somogyi SAL DVR WF1 instruction manual

AX2V DV-880WM user manual

AX2V

AX2V DV-880WM user manual

VSYSTO M2F manual

VSYSTO

VSYSTO M2F manual

Teltonica MVC300 quick start guide

Teltonica

Teltonica MVC300 quick start guide

Azdome GS63H owner's manual

Azdome

Azdome GS63H owner's manual

Luturadar DVR-A83 quick start guide

Luturadar

Luturadar DVR-A83 quick start guide

Transcend 620 user manual

Transcend

Transcend 620 user manual

AITZ ALPHA user manual

AITZ

AITZ ALPHA user manual

Telefunken TF-DVR24HD instructions

Telefunken

Telefunken TF-DVR24HD instructions

Outlook 56226 Owner's manual and safety instructions

Outlook

Outlook 56226 Owner's manual and safety instructions

Apeman C560 instruction manual

Apeman

Apeman C560 instruction manual

Lotim Cloud LCD02 User manual book

Lotim Cloud

Lotim Cloud LCD02 User manual book

Osram ROADsight 30 manual

Osram

Osram ROADsight 30 manual

Prestigio RoadRunner quick start guide

Prestigio

Prestigio RoadRunner quick start guide

KALEAS 43010 Operating	 instruction

KALEAS

KALEAS 43010 Operating instruction

ring RBGDC50 instructions

ring

ring RBGDC50 instructions

manuals.online logo
manuals.online logoBrands
  • About & Mission
  • Contact us
  • Privacy Policy
  • Terms and Conditions

Copyright 2025 Manuals.Online. All Rights Reserved.